I promised in my new year’s resolutions to complete the Nightmare Heirs of Numenor cycle this year, and with 2 months having already passed without an article on that, I thought I might as well get started on fulfilling this promise. So today, we kick-off the cycle with Peril in Pelargir. It is a quest that is often forgotten when discussing this cycle, but it has some fun mechanics. You battle with brigands in this port-city for control over a scroll that you have to deliver to Faramir. The normal version of the quest was the first time people were introduced to the Battle-keyword, and people struggled a little with balancing questing and combat because of it. With the new Nightmare version, the designers removed the training wheels and gave us tougher enemies and more pressure to keep the scroll under our control. This makes it a more thematic take on this quest, which is great fun with a deck tuned for Battle-questing.
Nightmare Peril in Pelargir
- Found in: Heirs of Numenor Nightmare pack, quest 1
- Size: 19 cards and 1 Nightmare rules card
- Quest cards: 3, this is unchanged from the normal version of the quest
- Increase in Difficulty: Yes, this will be a feature for all NM Heirs of Numenor quests, but some more than others. The original version of this quest was relatively easy, though Battle questing made it difficult. This revised version adds tougher enemies and drops the desire to threat you out, focusing more on combat and stealing the Scroll from your heroes.
- Fixed Loopholes: Players can no longer drop Alcaron’s Scroll without repercussions. The players will now lose if the enemy who has the Scroll attached survives for 3 rounds. The players will also no longer have to worry about Collateral Damage surging into more copies, the entire mechanic of discarding locations from the encounter deck has been removed for this Nightmare version.
- New mechanics introduced: A heavier focus on combat and on Alcaron’s Scroll. Players who lose the Scroll have a limited time to retrieve it before it gets stolen by the enemy. This can cause a game-over through a new mechanic, which shifts the focus of the quest more on the combat phase.
- Play this scenario if: You want to dive into the NM Heirs of Numenor cycle. You want to play Peril in Pelargir, but hated the location discard mechanic.
- Solo or multiplayer?: That’s a tough question, but I would suggest going into this quest with a lower player count. There are new treacheries in this quest that will accelerate the enemy stealing the Scroll, which can lead to an unfortunate series of encounter cards that will lose you the game. However, more players will mean that you are able to prevent many enemies from engaging the player controlling the Scroll. As a balance, I would suggest a 2 player game for this quest.
- What to look out for: Extra lose condition now that enemies can run away with Alcaron’s Scroll. Players can get swarmed by enemies. Non-optional engagements will hurt a lot. Stage 3 moves away from Battle questing to regular questing, requiring that the players have both a lot of attack and willpower.
New Rules
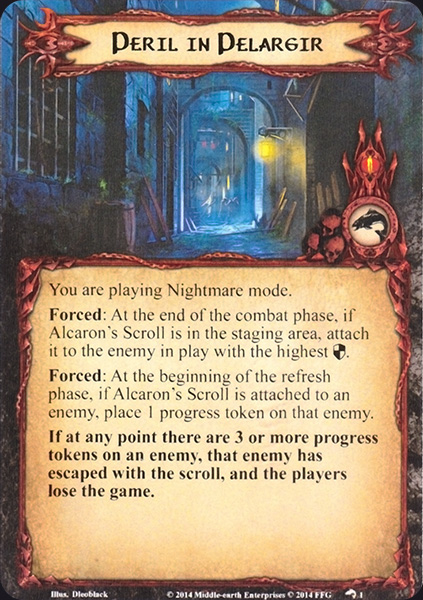
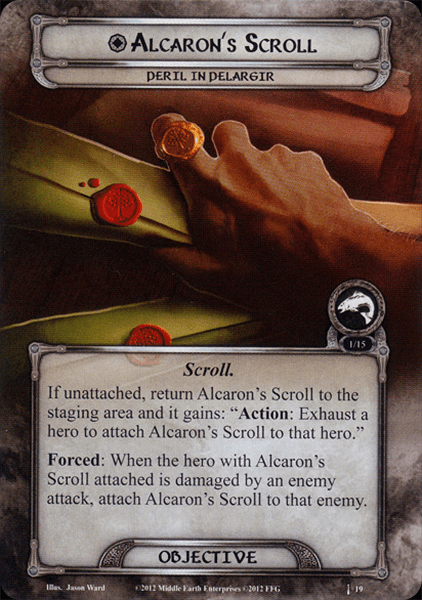
The rules card included with this Nightmare quest comes with 2 new Forced abilities and a new lose-condition related to those effects. The first Forced effect is important, as it will check at the end of each combat phase whether or not Alcaron’s Scroll is unattached in the staging area. If it is, the Scroll is then attached to the enemy with the highest defense in play. This can be either engaged with a player or in the staging area. If there are no enemies in play, then this effect does not do anything. Since this now means that players are unable to keep the Scroll in the staging area until they need it to progress the quest, it is important to have a hero available to exhaust in order to claim the Scroll. That way, you avoid enemies running off with the Scroll, though this does leave you open to nasty effects like Cunning Informant getting extra attack power.
If the Scroll does end up being guarded by an enemy for whatever reason, then the second Forced effect will trigger at the beginning of the refresh phase (immediately after the previous effect). The enemy gains 1 progress token, which symbolizes them trying to run off with the Scroll. Progress tokens can also be placed on enemies guarding the Scroll through other means, such as treacheries or enemy effects. These progress tokens are important because if an enemy gets 3 of them at any point, then that enemy has escaped with the Scroll, and the players lose. This means that the players should prioritize killing the enemy with the Scroll at all costs. The quest does have several effects that move enemies back to the staging area, so you would do well to have a backup plan in case you cannot directly attack the enemy. Direct damage should do a lot in order to kill the enemy, thus allowing the players to claim the Scroll again.
New Setup
The setup for this quest remains mostly unchanged. After the players have removed the cards listed on the Nightmare Rules card and have shuffled in the Nightmare cards, they begin the setup of stage 1A. This instructs the players to make the Leaping Fish the active location and attach Alcaron’s Scroll to a hero in play. Make sure that this hero has ways to avoid taking damage by enemy attacks, so defenders are probably not the best targets here. The player who ends up with the Scroll should be able to take on a lot of enemies, though, as the Harbor Thugs that will be placed in the staging area during stage 1B will be engaging that player and making attacks. With the Leaping Fish as the active location as well, it is likely that the players will be overwhelmed by enemies in the early game, which is no different from the regular version of this quest.
Cards Removed
The following cards are removed from the encounter deck to make way for new Nightmare cards. They are a lot fewer than usual, meaning that the encounter deck will increase in size by 9 cards compared to the normal version of the quest.
- 4x Collateral Damage (Quest moves away from location discard mechanic)
- 2x Harbor Storehouse (Quest moves away from location discard mechanic)
- 3x Pickpocket (Weak enemy)
- 1x Harbor Thug (Weak enemy, though more copies remain in the deck)
The Quest
The quest plays out in much the same way as the original, but this time without the safety net of keeping the Scroll in the staging area until you can advance. Stage 1 will be a swarm of enemies thanks to the Harbor Thugs in the staging area, on top of the Leaping Fish‘s ability and the high percentage of enemies in the encounter deck. With most enemies having a low engagement cost, you can find yourself getting swarmed pretty fast. You will need an early solution to this, either canceling the attacks or making sure you have enough defenders to handle these enemies. Attacking back is also a problem since you are spending most of your attack strength on questing during the quest phase. I have had decent success against this early stage with direct damage effects taking care of weaker enemies like the Zealot and using Grimbeorn’s ability to kill enemies when they attack me. I suppose you can also use other methods, like traps and heroes that have high attack and readying abilities (Boromir, Gwaihir).
Your goal initially will be to at least clear the Leaping Fish quickly. That takes some pressure off, allowing you to clean up the board a little before you advance to stage 2. For this quest, it is advised to quickly kill as many enemies as possible so that none survive to steal the Scroll at the end of the combat phase if it is in the staging area. This is easier in low player counts, and once you have a clean board state, it will be relatively easy to keep it that way, though the many surge effects in play can bring out more enemies than you’d like. Scrying the top of the encounter deck will be useful here, as you can more easily check how much attack power you need to commit to clear stage 2.
For stage 2, you will lose control of the Scroll, but likely not for very long if you kept a clear staging area. If there are no enemies in play, you can easily keep the Scroll in the staging area for a turn and only retrieve it if there are too many enemies or cards like Pelargir Alley will prevent you from making progress. During stage 2, it is important to get your solution for stage 3 in place, as you will suddenly need willpower, where that wasn’t important before.

Stage 3 is nasty, thanks to that passive ability that does not allow you to optionally engage enemies. This isn’t as bad in Nightmare mode since perhaps Dockside Street has been preventing optional engagements for a little while longer. The extra attacks at this stage are also scary, especially if you get some hard-hitting enemies like the Assassin or Informant. Make sure you keep the Scroll attached to your heroes for the majority of the round, as the optional engagements will prevent you from engaging an enemy with a higher engagement cost, even if they are guarding the Scroll. If you need a panic-button to engage the enemies with a higher engagement cost, then Doomed cards or Pillars of the Kings will boost your threat. Pillars of the Kings will even allow you to engage the Harbor Brutes unless someone is bringing Hobbit/Ranger cards that increase engagement costs for some reason…
The quest is won by making 15 progress on the final stage and owning Alcaron’s Scroll. You can fulfill either requirement first, but since you should never lose the Scroll for very long, I think you’ll win as soon as that 15th point of progress has been made.
The Encounter deck
- The new encounter deck is made up of 40 cards at the start of a single-player game. This is a lot thicker than for the regular version of the quest.
- Only 18 cards have a shadow effect, which translates to a 45% chance of hitting a shadow effect. This is going to be one of the lower chances for this cycle. Most shadow effects give the attacker +2 attack or direct damage to the hero guarding the Scroll.
- The average threat per card is quite high, at 1.8 threat per card. This value is increased to 1.975 if the players do not control the Scroll, as the Pelargir Alley gains 3 threat.
- There is a lot of surge in the deck, thanks in most part to the new treacheries of the Nightmare version. 7 cards surge anyways, but the two copies of Lurking in Shadows will surge if they return no Brigands to the staging area.
- The Doomed keyword is absent from this quest. With the additional removal of the Collateral Damage treachery and the Harbor Storehouse location, the quest is a bit lighter on threat-raising abilities. All copies of Local Trouble are still in the deck though, and should be taken into account for this quest!
- Archery 2 on the Umbar Assassin is the only Archery damage dealt in this quest. Enemies like the Zealous Traitor will still deal direct damage though.
- Immunity
- During stage 3, enemies cannot be optionally engaged.
- While Dockside Street is in the staging area, enemies in the staging area cannot be damaged or optionally engaged.
- Market Square is immune to player card effects.
- Lost in the City cannot be cancelled.
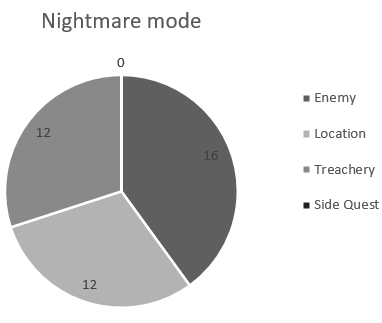
Note that I did not count the Leaping Fish, Alcaron’s Scroll, and 1 copy of Harbor Thug for these statistics since those won’t start in the encounter deck. The quest is focusing more on enemies than any other card type, but the distribution is not skewed heavily in one way or another.
Enemies
The brigands have called in some reinforcements to the nightmare version of this quest. Most enemies from the normal version remain in the deck, along with their nasty “when engaged” effects. The new enemies do not have these effects but instead try their best to get their hands on Alcaron’s Scroll. This can be done by handing the Scroll between enemies, gaining buffs when the Scroll is under their control, or organizing more enemies to try and steal the Scroll from the players.

- Pelargir Ringleader: This first enemy is more in line with what enemies in later quests look like. It has beefy stats and medium engagement cost but is still tough to take down if you are also using your attackers to quest. The Ringleader’s main threat comes in the form of his ability, which triggers when you engage him. It does not matter if this is an optional engagement or not; the effect remains the same. When the Ringleader engages you, the top-most Brigand enemy from the discard pile will be revived and also engage you. This means that this extra enemy also triggers whatever ability they might have (and since this was again not optional, you have to trigger the worst version of the ability). Timing is important with this enemy, as you could make him whiff if there are no other enemies in the discard pile. Furthermore, if you get the option, try to make sure that something like a Harbor Thug or Cunning Informant is on the top of the encounter discard pile, as those will be easier to deal with as they have no ability when they engage. The Ringleader itself is tough, with 3 attack and defence. But if you happen to lose Alcaron’s Scroll to this guy, a simple Sneak Attack+Gandalf can kill the Ringleader right away. Otherwise, it is an idea to keep this enemy engaged with you for a while and focus your attention on more important enemies if possible.
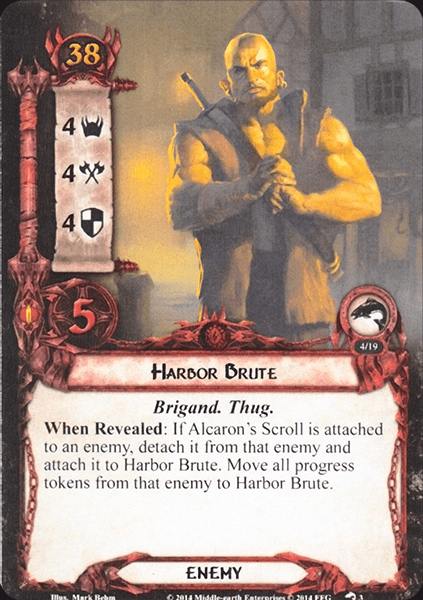
- Harbor Brute: Now we get a pretty tough enemy who also interacts with Alcaron’s Scroll. This Brute should be feared, and not just because he has the same stats as Gandalf (now we finally know how the encounter deck feels…). The Harbor Brute clocks in at 4 threat, 4 attack, 4 defence, and 5 hitpoints. With an engagement cost of 38, it is one of the enemies in the encounter deck who will stay in the staging area for a long time, contributing that 4 threat to the total. The Brute should be engaged quickly though, as there is a high chance he has Alcaron’s Scroll and will try to run away with it. This is all due to the When Revealed effect on the enemy. This states that if the Scroll is currently attached to an enemy, it is detached from that enemy and moved to this copy of Harbor Brute, along with any progress tokens that the previous enemy had. This makes it a lot more difficult to take back the Scroll, as it is now guarded by a tougher enemy who may not even engage players for a while. If you happen to be at stage 3 or have a Dockside Street in the staging area, then this Brute can just accumulate progress over the next few turns before he escapes. There are still some effects that can reach him, like Son of Arnor, Mablung, and even Bedlam in the Streets. But once engaged with a player, the Brute will take a lot of effort to bring down. 4 defence is tough to pierce, and whilst direct damage works well against other enemies, now you have to chew through 5 hitpoints before defeating the Brute. There isn’t really an easy way around this enemy that doesn’t involve cards like The Great Hunt or Poisoned Stakes. You could use Tactics Eowyn’s ability to get this enemy out of the way, but I would only do that if there is no other way to avoid him escaping with the Scroll. Note that there are two copies in the encounter deck, and one can steal the Scroll from the other when it is revealed. The When Revealed will fail if the Scroll is attached to a hero or in the staging area. But players will have to retrieve the Scroll from the staging area quickly, as it will otherwise attach to this enemy at the end of the combat phase.
- Cunning Informant: The final new enemy for this scenario is the Cunning Informant, who is not as difficult to kill as the other two new enemies. Instead, this enemy is difficult to avoid thanks to its low engagement cost of 21, and its ability. During the encounter phase, the player who owns the hero with Alcaron’s Scroll attached is considered to have +10 threat for making engagement checks. If this value pushes you beyond the threat elimination level, don’t worry, you are not eliminated. Enemies just act as if you have +10 threat when making checks against you. What this means is that you are likely to engage more enemies when you have the Scroll, forcing you to trigger more abilities by Brigand enemies, and you will have to defend more attacks. To make matters worse, this effect will stack with more Informants in play and is only removed once the enemies leave play. So even when they are engaged with you, they will invite more enemies to engage you as well. The Cunning Informant has one more trick up his sleeve, where he gets +3 attack if the Scroll is attached to a hero. This makes him hit for 5, which is going to be harder to defend without taking damage. Should players have lost control of the Scroll, then this enemy is a lot easier to deal with, as he only takes 4 attack to kill. With just 1 defence, you will not have a hard time dealing damage to this foe, which is a good thing if he gets control of the Scroll from you.

Locations
Only the Harbor Storehouse was removed from the encounter deck in this version of the quest, and 2 new locations will take its place. Because of this, the fear of location lock that the original version of the quest had is still in effect since cards, like Lost in the City, are also still in the game. Location control will be important to bring to this quest if you are playing with multiple people.
- Dockside Street: The first new location clocks in at 2 threat and 6 quest points. It also comes with a passive ability that is very nasty and seeks to improve the chances that enemies escape with the Scroll. While Dockside Street is in the staging area, enemies in the staging area cannot be damaged or optionally engaged. The damage prevention means that players cannot kill enemies in the staging area anymore, which was a solid strategy up to this point. This is now no longer an option, though players can still discard enemies from the staging area with Eagle of the North and The Great Hunt. The protection against optional engagements also hurts. Not only will most Brigands now use their upgraded ability (2 damage to allies, discard a hero, lose 2 resources from each hero, etc.), but if a high engagement cost enemy now has the Scroll, the players are unable to drag that enemy down and kill it. The only way would be to have a high-enough threat or get Dockside Street out of the staging area.
Traveling to Dockside Street does come at a cost. The players must exhaust the hero with Alcaron’s Scroll attached to travel here. This will be difficult if the players do not control the Scroll, but thankfully there are player card effects that allow you to bypass the travel cost like West Road Traveller and Ghan-buri-Ghan. These effects will be important if you happen to find the Scroll on an enemy in the staging area that you can no longer optionally engage. Clearing the location in the staging area is more difficult, thanks to the 6 progress required. Travel here when you have the option, else it will come back to bite you later in the game. - Pelargir Alley: This location is much simpler than Dockside Street, as it doesn’t really do much, aside from sitting in the staging area contributing its threat. While the heroes have the Scroll attached, the 2 threat is hardly enough reason to travel to the Alley, but that all changes when the enemy gets control of the Scroll. If Alcaron’s Scroll is not attached to a hero (either sitting in the staging area or attached to an enemy), then the Alley gets +3 threat. This boosts the location up to 5 threat, which is going to hinder the amount of progress you make on the quest that turn. If the Scroll is in the staging area and this location is revealed during the quest phase, the players may still exhaust a hero to claim the Scroll, thus lowering the threat in the staging area from this location. With multiple copies of the Alley in play, it will be worth keeping the Scroll under your control. The location itself is a relatively low priority destination over other locations (not that City Street cares about priority anyway), but if you are still at stage 1, I would suggest going here, as you are going to lose control of the Scroll when you transition to stage 2. 5 progress is required to clear the location, which is a lot, so a Woodmen’s Path can be used to save 4 progress if you’d like. You can also leave this location in the staging area and try to blow it up with progress-placing cards, but that may take some time.
The shadow effect on this location also deserves some attention. If the enemy is attacking the player who has a hero with Alcaron’s Scroll attached, then the Scroll is placed on the attacking enemy instead. This can be a nasty way to lose the Scroll, but if the enemy is engaged with a player, that player should be able to regain the Scroll quickly. If the attack came from stage 3B’s effect or Bedlam in the Streets, then it may prove a bit more difficult to regain the Scroll, though the players will have some time to claim it. Cancelling this shadow effect will save a lot of headaches, though.

Treacheries
Gone are the Collateral Damage treacheries that the quest was infamous for, and three different new treacheries will now take their place. These treacheries try to make the enemies steal the Scroll faster or hinder the players during the quest phase. These treacheries are dangerous and should be canceled if you want to avoid a quick loss.
- Bedlam in the Streets: Something about the art makes me think this is some sort of medieval painting; it looks out of place with the rest of the artwork in the game. This is one of the more generic treacheries in the scenario, but it will always hit, unlike the other two treacheries, which are covered later in the article. When Bedlam in the Streets is revealed, each player must choose to either remove a hero from the quest (without readying that hero) or engage an enemy in the staging area. This is not an optional engagement, so the more powerful effects on Brigand enemies will come into play when this option is selected. Furthermore, if you engaged an enemy by this effect, they will make an immediate attack against you. This can be troublesome with some of the stronger enemies like the Umbar Assassin and the Cunning Informant, as they will also be making attacks again during the combat phase. In an ideal world, this treachery is just cancelled, preventing a loss of progress on the main quest. If this is not possible, try to engage some enemies in the staging area who have a high threat but who’s attack you are able to defend. Removing their threat from the staging area will actually help you to make more progress this round. You can also select to engage any enemy with Alcaron’s Scroll attached to them, allowing you to engage them if stage 3 or Dockside Street prevented this. You can also remove a hero like Boromir and not suffer as much consequence as with other heroes. Cards like Windfola can also help, though since it grants a willpower-boost, you are not getting the card’s worth until the final stage. Still, it protects you from this treachery, allowing you to remain committed to the quest.
- The Thieves’ Ploy: While players can lose the Scroll by accidentally dropping it when their hero takes damage, it can also be stolen through other means. This treachery is one such method that the enemy can use to snatch victory from under your nose. The treachery will surge, which is added to this card in case it completely whiffs. That is because the When Revealed part of the treachery is situational. There will be cases where this does not trigger, and the players simply replace this treachery with the next card on the pile. However, if this treachery is revealed while Alcaron’s Scroll is attached to a hero and there is an enemy engaged with the player who owns the Scroll, then the Scroll is stolen by that enemy. It gets attached to the enemy, and the treachery immediately places one progress on the enemy. Usually, this isn’t terrible, as the players will have likely already dealt with the enemy engaged with the player and might have even damaged them already. So there is a high chance of the players simply killing the enemy during the next combat phase and reclaiming the Scroll afterwards. However, that pesky surge keyword can ruin your plans here. If the players should get a card like They’re Getting Away or Lurking in the Shadows, then the enemy engaged with the player becomes a threat of getting away. Returning them to the staging area is a bad thing, as you might not be able to optionally engage that enemy again, which can potentially lose you the game. This treachery can also cost you an additional phase or round at the same stage, as you are unable to advance the quest without owning the Scroll. If you have enough progress on the quest, but this treachery loses you the Scroll, then you will have to take a little longer to clear the quest. This can be reason enough for some people to cancel the treachery, though I would suggest keeping the cancellation for Lurking in the Shadows or Bedlam in the Streets.
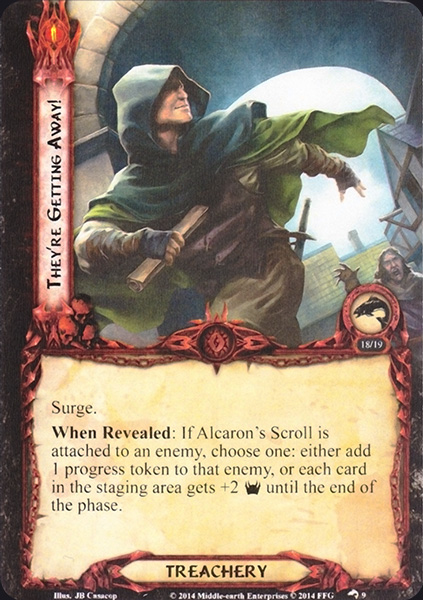
- They’re Getting Away!: I really like it when we get art in the game that is done by the same artist. This one features the same brigand as from the Thieves’ Ploy, essentially telling a story if you get the two treacheries back-to-back. It’s not a fun story, however, as this treachery will accelerate the way that enemies earn progress tokens to escape with the Scroll. First of all, this treachery surges, which means that it could, in theory, start a surge-train with the other treacheries in this expansion, which can be a game-ender. Beyond the surge keyword, the treachery also comes with a When Revealed effect. The players only trigger this if Alcaron’s Scroll is attached to an enemy. The treachery just surges and does nothing else if it is attached to a hero or in the staging area. This is weird for a Nightmare card, but I suppose the added surge will at least replace the effect. Should the Scroll be attached to an enemy, then the players are given a choice. The players either have to add a progress token to the enemy, or each card in the staging area gets +2 threat until the end of the phase. The progress token is usually the more appealing option here, but only if you are certain that you can kill the enemy with the Scroll soon. If the enemy already has 2 progress on them, then this effect would cause you to immediately lose, as they get a third progress token. So you would have to go for the higher threat in the staging area. +2 threat on every card in the staging area is tough though. If you are in a game with more than 2 players, there is a real risk of several locations sitting in the staging area. If each of those get +2 threat, then you are almost guaranteed not to make progress that turn. But if you have managed to keep a relatively empty staging area, then this effect won’t hurt as much. It is a very situational treachery, but generally not one to save cancellation for unless you are with your back against the wall and would lose to either location lock or the enemy escaping with the Scroll.
Tips and Tricks
- The swap to regular willpower questing at stage 3 often surprises people, but you should really prepare for it. If you are unable to focus on playing high willpower allies during the first two stages, then cards like Trained for War and Grappling Hook can still help to use your attack strength to quest with.
- Action advantage is always useful in Battle quests, so if you have characters like Gwaihir and Boromir, who have high attack and built-in readying, then you can use them to both quest and attack enemies! Other readying abilities are also super useful to make sure you still make progress whilst killing enemies engaged with you.
- Be ready for the swap back to willpower questing at stage 3. With all the unwanted extra attack and non-optional engagements, it is a dangerous stage to linger at. Get some characters with good willpower into play during stage 2, so that you can quickly make the 15 progress during stage 3.
- With most of the threat-raising abilities gone from the original, threat is less of an issue for this quest. However, if you are caught with Local Trouble on a hero, it can be a quick game over. Bring some Condition removal for this card especially!
- If you are really worried about an enemy escaping with the Scroll because you can’t get to it, use some direct damage! Dropping Gandalf on most enemies will immediately kill them, and even other direct damage effects can help to kill enemies in the staging area slowly. That way, you do not have to engage any brigand enemies, triggering their effects.
- Be careful with shadow effects. While they may not be as frequent or as terrible as others in the cycle, +2 attack can still cause your hero to take damage. There is also the shadow effect that deals damage to the hero with the Scroll, so making sure that you match the attacking enemy’s strength is vital. Round Shield and Tides of Fate can help here.
- If you are faced with an enemy with a higher engagement cost than your threat in the staging area and they are guarding Alcaron’s Scroll, then you could use effects like Pillars of the Kings or Doomed cards to boost your threat to their level. This allows you to engage these enemies even during stage 3 or with Dockside Street in play. It’s a bit of a bold move, but as long as you don’t have Local Trouble on a hero, you should survive for a few more rounds.
Playthroughs
With this quest being a relatively old Nightmare scenario, there are various playthroughs to be found online. Here is a selection of them to ease you into the experience of playing this quest in Nightmare mode:
- True solo: https://www.youtube.com/watch?v=uYOtgef1ZCs
- Two handed, progression style: https://www.youtube.com/watch?v=OvGeAnrFEHw
- 2 player: https://www.youtube.com/watch?v=AcB_KuilJ3g
So ends this first venture into the Against the Shadow cycle in Nightmare mode. Plenty of horrors still await us with the remaining 8 scenarios, but I will attempt to complete them in order of release. This means that the infamous Into Ithilien will be up next! This will feature more tears and more Mumaks than the original! Stay tuned.
