This quest is one of the community’s favorites thanks to its high replayability with the different Plots and Villains. The quest was so popular that the designers tried their hand again with Danger in Dorwinion, which is a spiritual successor. But this quest also comes with a Nightmare mode, building on the original version with new plots, stronger enemies, and new loss conditions. This version really scales up the difficulty in higher player counts and will set the tone for the difficulty from now on with the rest of the Against the Shadow cycle.
Nightmare The Steward’s Fear
- Found in: The Steward’s Fear Nightmare pack
- Size: 1 rules card, 2 plots, 3 Underworld cards, 14 encounter deck cards
- Increase in Difficulty: Yes, the original was a bit of a push-over with enough players, but this one adds tougher enemies that you have to kill quickly. The treacheries in this scenario are also brutal, though that was mostly from the original quest.
- Fixed Loopholes?: Yes, in the original, the Underworld deck would not get reshuffled. I suppose that was an oversight by the developers since you would usually run out of cards in that deck fast (especially in higher player counts). By reshuffling the Underworld cards into their deck, you give the Underworld keyword meaning later in the game. The game also fixed the loophole by which players could easily advance through stage 2 by keeping all Clue objectives in the staging area. That way, they could prevent the Plot from ticking up quickly.
- New mechanics introduced: Two new plots with the chance to get multiple in play at the same time. The final Villain enemy can receive buffs.
- Play this scenario if: You enjoy the original quest and want to make it a bit more difficult. You like scenarios that can be replayed several times with wildly different loss conditions.
- Solo or multiplayer?: This quest has never been one to play in solo, there are just too many locations for you to handle, and the extra enemies from the Underworld deck add to the difficulty in solo. Higher player counts will mean that there are more cards revealed each round, but players will be able to specialize their decks more, allowing you to deal with locations and enemies more easily than if you did in solo. Once you reach stage 3, only 1 player will have to deal with the final Villain, allowing the other players to clear the board in order to make a final push.
- What to look out for: Many different loss conditions, stronger final boss, tougher enemies that make more attacks, and location lock is still a threat.
New Rules
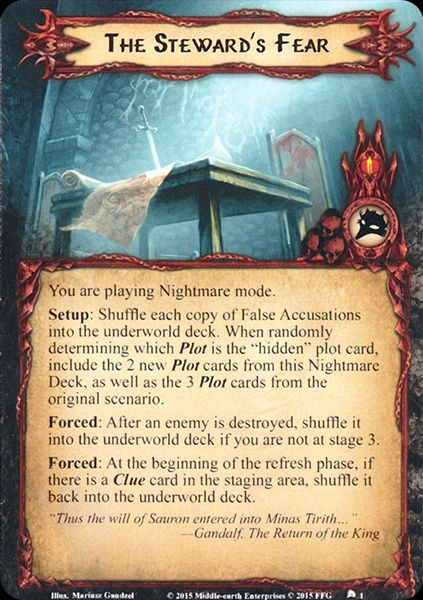
There are two extra rules on this card; both are meant to fix the original version a bit and make it more difficult for the players. The two Forced effects can be found on the additional rules card and will be in play during the entire game.
The first rule instructs the players to shuffle any destroyed enemy into the Underworld deck. This ensures that the deck remains filled and that there will be enough cards to trigger the Underworld keyword if a new location is revealed. Because this rule does not specify any particular enemy, I would interpret this as any enemy killed originating from either the encounter deck (Underworld Dissident, Faithless Conspirator) or all enemies that start the game in the Underworld deck. So if you have gone through the regular encounter deck and reshuffle it, there will be a lot fewer enemies in there while the Underworld deck keeps growing. This all comes to a halt during stage 3 when the rule is ignored, and all enemies just go to the regular encounter discard pile. There is no Underworld deck anymore at this stage, so it wouldn’t make sense to remove more enemies from the encounter deck.
The second rule is an additional check at the beginning of the refresh phase (before characters are actually ready). The players will have to see if there is any Clue objective in the staging area at that point. If there is, it is shuffled back into the Underworld deck. This incentivizes the players to claim the Clue cards as soon as they are revealed, placing extra tokens on the active location and the main quest. This is still beneficial to the players, but they are no longer able to choose when to trigger these effects, as the clues will be shuffled back into the deck if the players take too long to trigger them. On the other hand, this can be a good thing. Shuffling these back into the deck will mean that an Underworld card down the line might not be an enemy or treachery, which means that exploring the active location with a bunch of Underworld cards under it is not as big a punishment as anticipated. Still, since there is no telling which cards are under what location, it is not much comfort.
New Setup
Some extra setup is needed for the Nightmare version on top of the extended setup of stage 1A. The Underworld deck will see the removal of the Pickpocket, and he is replaced by the Murderous Turncoat. The two copies of False Accusations are also added to the Underworld deck. These will not be reshuffled into the Underworld deck when they are revealed but will go to the regular discard pile after resolving the effects. The Villain is selected at random as well at this point. The new Plot cards are shuffled with the original three as well, and one of the five is randomly selected. This is the one that will be revealed during stage 2. Keep the other four close at hand, as there will be a way for more Plots to enter play during this version of the game.
Cards removed
The following cards were removed from the original encounter deck and Underworld deck, to make place for the new Nightmare cards.
- 3x Pickpocket: Weak enemy, replaced by the Faithless Conspirator in the Underworld deck
- 3x Underworld Dissident: Relatively weak enemy, though 2 copies remain in the deck
- 2x Storehouse: Generic Underworld location, replaced by the NM locations
- 2x Market Square: Was always a low priority location that didn’t interact with anything
The Quest

While the setup of this Nightmare quest is pretty long, it does not leave you with any encounter cards in the staging area, which helps the players to clear The Fourth Star if they want to quickly. Make sure that you do send enough characters to the quest, though, as there is a lot of surge in the deck, and cards, like Lost in the City, will add a ton of threat to the staging area. After the first few rounds, you will start to get a rhythm with the encounter deck, where you just try to clear the active location each turn and move on to the next location. In lower player counts, this will usually balance itself out. In higher player counts, you will likely get more than one location per round, which means that the number of locations in the staging area will steadily increase. Use cards that place progress on those locations in order to clear them. This will not place resources on the main quest but will prevent you from getting too much threat in the staging area and effects like Traitor’s Den and Rath Celerdain from triggering more often. There is nothing stopping you from clearing locations this way. You do have to be careful that some locations will have Underworld cards beneath them. These are usually enemies, though you can get lucky with a Clue objective from time to time. Make sure you claim these before the end of the round, or they get reshuffled.
During stage 1, your goal will be to clear 4 active locations. This can take more than 4 rounds thanks to some effects that remove resource tokens from the main quest and treacheries like False Lead that stop the entire quest phase. You can still clear locations if this happens, as long as you are running Steed of Imladris, Lorien Guide, or Map of Rhovanion. This ensures that the players can continue to travel and add resources to the main quest. Any extra progress from questing successfully can be placed on player side-quests if you bring them. You can also repurpose those progress tokens to clear more locations in the staging area if they become a problem. Use Backtrack or Explorer’s Almanac for this.
The enemies in this scenario can come out unexpectedly, and not all tricks work anymore now that they aren’t coming out of the staging area. Still, you will be better off if you can kill these Brigand enemies before they engage players. Direct damage and additional attacks into the staging area will be a good way to avoid unnecessary damage on your allies or losing resources. Remember that all enemies (even those coming out of the encounter deck) will be shuffled back into the Underworld deck upon defeat.
Once the players have cleared four active locations, the quest will move on to stage 2, and the players will reveal the Plot that they set aside during setup. Remember that this is selected from a pool of 5 Plots, adding in the new Nightmare ones. Now the players are on a timer to complete the quest as fast as possible since the Plot will likely get worse over time and cause a game-over if you stall too long. This is also not the only Plot that you can reveal, but I am assuming that you did not trigger a Traitor’s Den up to this point. Else it will be very difficult to defeat this quest before either Plot kills you first.
Stage 2 is the same as stage 1 in terms of clearing it. Players can still play side-quests without repercussions, and you just have to clear 4 active locations. This is usually the stage where all the Clue objectives are triggered, but since they do not stick around in the staging area anymore for the Nightmare version of this quest, you either have to get lucky to come across one or just clear 4 active locations.
Stage 3 is where a bunch of things happen. The Underworld deck is now shuffled into the main encounter deck, and a few triggers that interact with the Underworld deck no longer work. This is usually beneficial to the players, though the newly revealed Villain will compensate for that benefit. The players will have likely come across some if not all copies of The Cabal’s Champion, which will all attach to the Villain at this point, boosting their stats. For stage 3, the players have to make 15 progress on the quest and defeat the Villain before any of the plots kill the players. This is a pretty climactic fight at the end of a long quest, but if you can kill the Villain within a turn or two, then the rest of the quest will be easy. As tough as the Villains will be with their stats boosted, they are still not immune to player card effects, making them a good target for events and hero abilities. Once the quest has 15 progress, and the Villain is defeated, the players have won the game.
The Encounter deck
Global
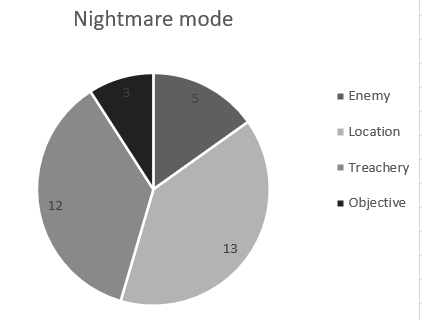
- After removing a lot of cards for the setup of this quest, we are left with 33 cards in the encounter deck and 14 in the Underworld deck. These values will change during the game as some cards change decks during the quest.
- Shadow chances from the encounter deck are actually pretty low. Just 39% of cards have a shadow effect. These effects usually return the attacker to the staging area or remove tokens from the main quest card.
- The average threat on cards revealed is 1.67 threat per card. This can range from 0 to 4 threat and does not count the fact that some cards can surge.
- Surge is a common keyword in this quest, 8 cards will surge at all times, but 5 treacheries will also surge if their effect cannot be triggered.
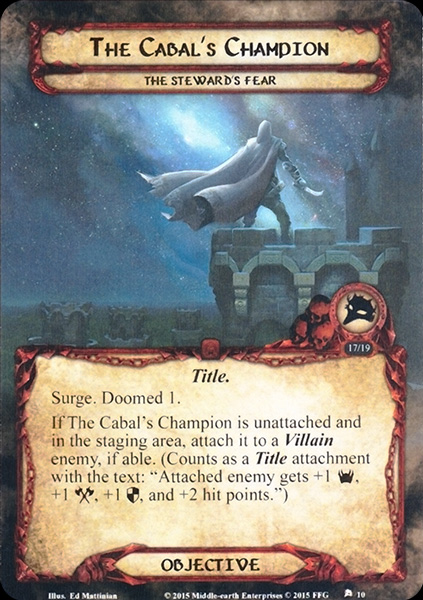
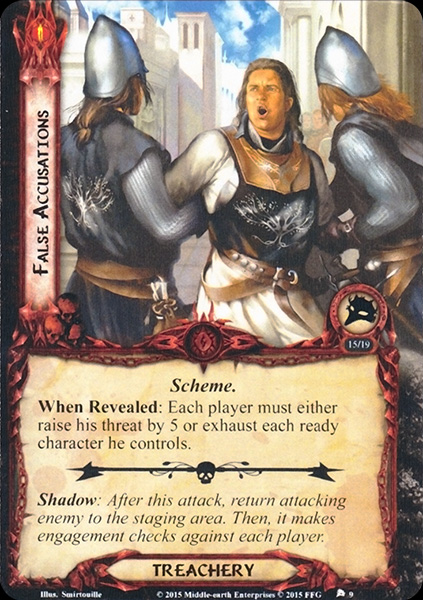
- Doomed is a far less common keyword, with only The Cabal’s Champion having the keyword. But there are a lot of other effects that will raise your threat, like Local Trouble, False Accusations, or the Poisoned Counsels plot.
- Archery is still exclusive to the one copy of Umbar Assassin in the Underworld deck.
- Immunity
- Lost in the City cannot be canceled
- While City Street is in the staging area, players cannot travel to other locations
- While the active location has at least 1 facedown card underneath it, Faithless Conspirator cannot take damage.
- Daughter of Beruthiel cannot be optionally engaged
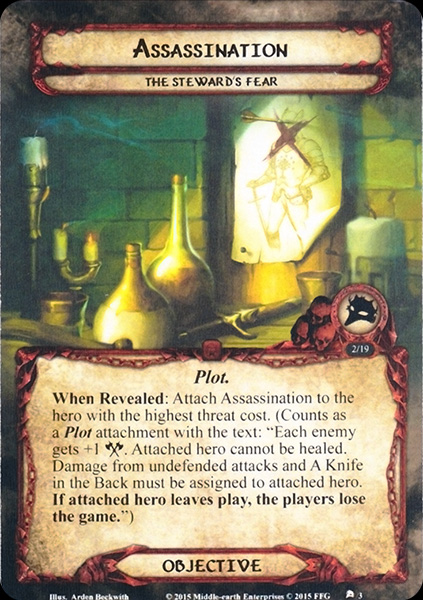
- The hero with Assassination attached cannot be healed
The encounter deck chart is skewed a lot towards the treacheries and locations since most of the enemies are in the underworld deck. This will change during stage 3, which in turn will reduce the risk of The Hand of Castamir making additional attacks. These stats do not count in any added threat from Plot or Villain cards, so in reality, the threat in the staging area can appear to be a bit higher than these numbers might suggest.
Objectives
A new title objective is introduced in this version of the quest. This is not so much an objective for the players to claim but for the final boss of the scenario.
- The Cabal’s Champion: This is an odd card since, usually, enemies do not receive objectives meant only for them. And yet, here we are. This objective is added to the main encounter deck during setup and can be revealed during staging. When done so, it simply surges and raises the threat of each player by 1. It will remain in the staging area without the players being able to interact with it. Once the players arrive at stage 3 and the Villain is added to the staging area, all copies of The Cabal’s Champion are attached to the Villain. Once attached, it serves as a Title attachment that will boost the Villains stats by 1, and hitpoints by 2. This stacks with all three copies, potentially increasing the stats of the final boss by 3/3/3/6. This makes them much more of a challenge. But you may not see all copies during your game, as this card can be a shadow card without an effect earlier in the game. It can also appear during the final stage, in which case it immediately attaches to the Villain (if they’re still alive) and boosts their stats. This can cause them to survive a little longer, thanks to the extra hitpoints. Luckily, this objective does not grant the Villain immunity to player card effects, so you can use any combat tricks to kill them; it will just take a little longer. There isn’t much that you can do against this objective, as there is nothing to cancel or target an objective with.
Plots
To bring a more replayable scenario to the table, the Nightmare version of this quest features two new Plots that can be uncovered during stage 2 or through the Traitor’s Den location.
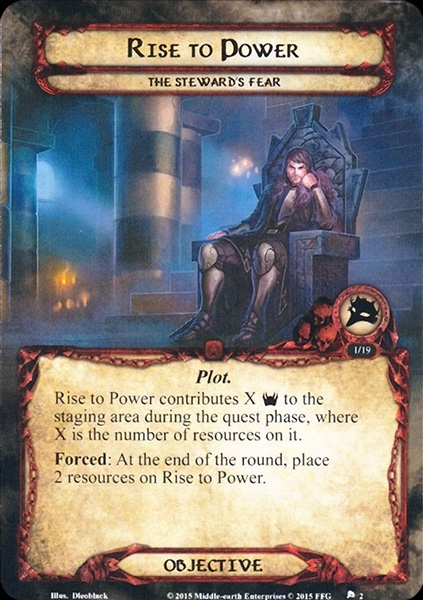
- Rise to Power: The first new Plot is aimed at increasing the threat in the staging area, preventing progress by the players and thus stalling them out. Eventually, the threat will be too high to no longer allow them to clear locations and perhaps even have to raise their threat. When Rise to Power is added to the staging area, it will receive 2 resource tokens at the end of the round. Then, during the quest phase, it will add threat to the staging area equal to the number of resources on the card. This counts up quickly, especially now that the new rules do not allow you to advance through stage 2 that fast anymore. Initially, 2 or 4 added threat is not a big deal, but considering that stage 2 will take at least 4 rounds without the use of Clues and that the Plot will remain in play for stage 3, you are likely looking at a 10-20 threat in the staging area that you cannot do anything about. If it were an enemy or location card, you could still use Radagast’s Cunning or Secret Paths, but that’s not an option now. You just have to bring more and more willpower to equal the threat that this card presents. If the players play at least a 2 willpower ally each round, then they should be able to match this Plot before it gets out of hand. If it gets to a point where you are making insufficient progress on the active location, try using cards like the Map of Rhovanion, Steed of Imladris, or Lorien Guide to still make progress on the main quest. Just remember to keep adding willpower to your board state to equal this Plot. This one hits a lot harder in solo than in multiplayer, where all players can more easily counter the increased threat by playing some allies.
- Assassination: The second Plot does what you expect it to do by the title. It attempts to kill a specific hero in order to win the game. Once the Plot is revealed, it is attached to the hero with the highest threat cost in the game. If there is a tie, the players can decide which hero it goes on. That hero now cannot be healed and will be the recipient of all damage dealt by undefended attacks and by A Knife in the Back. This can quickly cause the hero to die, in which case the players lose the game. To make it even worse, each enemy in the game now also gets a passive +1 attack from the Plot. This will make them more difficult to defend and makes undefended attacks hit a lot harder. Luckily, a high threat cost hero will likely have 4-5 hitpoints to begin with, and if you bring some effects to boost their hitpoints, you do not need the healing. Spare Pipe is a universal hitpoint booster, but specific decks can also run Ent Draught, Boots from Erebor, Ringmail, and other attachments. You can also use damage cancelation like Raven-winged Helm and Honour Guard to reduce the hero’s damage. The +1 attack to each enemy is annoying, though players could use the Keep Watch side-quest to balance this boost. If you explore it fast enough, you even get to enjoy reduced attack strength on your enemies!
Enemies
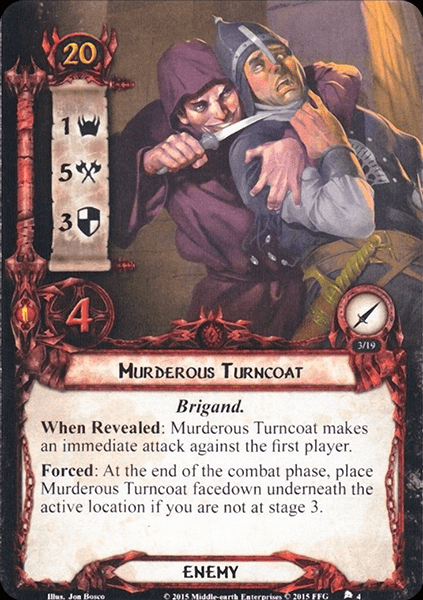
Some tougher enemies are introduced to this scenario, as the Brigand enemies were pretty easy to defeat, having no more than 3 hitpoints most of the time. Two new enemies are introduced, one which will go into the main encounter deck and one who replaces the Pickpocket in the Underworld deck.
- Murderous Turncoat: With the Nightmare version of a quest, you can expect some increased stats and the encounter deck trying to make the most out of those stats. Well, with this Brigand enemy, the developers sure wanted you to know that this guy hits for 5! The Murderous Turncoat will start the game as a part of the Underworld deck, so you may end up revealing him whenever a location is explored with Underworld cards beneath it. When he is revealed, the Turncoat will make an immediate attack against the first player. This can be a problem thanks to the aforementioned 5 points of attack. If the first player is unprepared for this, and there is no way to cancel or use a Sentinel defender, then you are going to have a rough time dealing with this attack, and you may end up losing a character. The point of this guy is that players start chumping so that some of the shadow effects can trigger, like the one on False Lead (removing all tokens from the main quest). Taking the attack undefended is also a bad decision here since 5 damage is difficult to survive for most heroes, not even mentioning the fact that the Assassination Plot will likely cause the selected hero to die. However, if you can cancel the initial attack of the Turncoat, you might only have to lose 1 character to this guy instead of 2. With an engagement cost of just 20 and with so many effects increasing threat for everyone, the Turncoat will likely engage a player. If the players have cards that can prevent them from engaging enemies (Advance Warning, Grey Cloak, Rohirrim Scout), then this is the enemy to use it on. There’s no attack made during engagement, only during the combat phase. Once that is finished, the players get one chance to kill this enemy. That’s because the Turncoat will be placed facedown underneath the active location at the end of the combat phase if he is not dead yet (and the players aren’t at stage 3). With 3 defence and 4 hitpoints, he is a tough enemy to defeat, though a Sneak Attack Gandalf can help you out. If you do not defeat this enemy before the end of the combat phase, then you will be dealing with extra attacks once you clear the next active location. If you are getting multiple copies of this enemy underneath the same location, it will be very difficult for the first player to deal with the attacks. Make sure to help your team out by defending for them with Sentinel.
- Faithless Conspirator: This next enemy starts play in the encounter deck, not the Underworld deck. However, once the Conspirator is defeated, he is shuffled into the Underworld deck, so you may end up seeing him pop up from underneath a location if you are unlucky. There is no real punishment for revealing this enemy, though the 4 threat is quite a lot for a single card. The problem comes from the fact that this enemy will remain in the staging area for a long time without the players being able to do much about it. With 40 engagement cost, the players will likely be busy enough with the other Brigand enemies to really care about this guy, but that threat is going to prevent a lot of progress from being made on locations. Worse, while the active location has at least 1 facedown card underneath it, the Conspirator cannot take any damage. That means you are not allowed to damage the Conspirator through direct damage or effects like Leadership Eomer, Haldir, Dunhere, or Hands Upon the Bow. But that does not mean that the Conspirator is immune to everything. During my games, I have found that the Put Off Pursuit location attachment has been very useful in discarding this enemy. Yes, you get a location for it in return, but at least you can place progress on that (which is likely, since you are probably running some sort of location control if you are running this attachment). Another option would be to engage this enemy when you have the chance and stick a Forest Snare onto him. He now cannot attack anymore, but you do not have to worry about damaging this enemy. Even better, Emyn Arnen Rangers will get +4 willpower because this enemy fell into a Trap. If you do decide to try and damage this enemy, do it while either a location without Underworld cards is active, or in the window between exploring the active location and traveling to a new one. This will take some setup with certain attachments or events, though.
Locations
The original quest had plenty of locations, though some were perhaps a bit easier to clear than others, especially if you brought a location control deck. These three new locations interact with the Underworld deck and will add more misery to the staging area while they are up there.

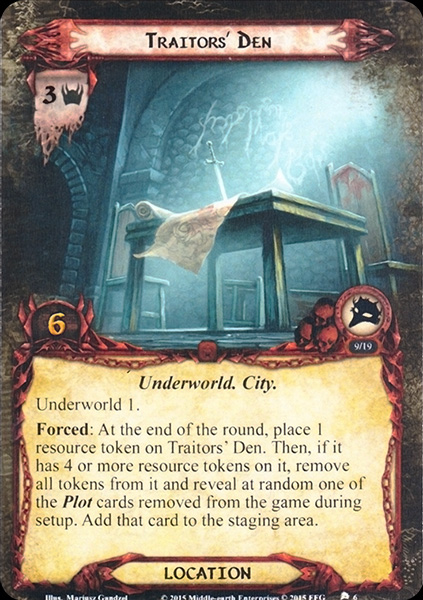
- Traitor’s Den: The developers really borrowed the Time keyword from the next cycle with this card, even if it isn’t mentioned by name yet. The Traitor’s Den is probably the most dangerous location in the game since it will continue to add loss conditions to your game as time goes on. With 3 threat and 6 quest points, it has certainly got some of the highest stats in the scenario, which will prevent the players from easily clearing it in the staging area. It also comes with 1 Underworld card underneath it once it is revealed. The time mechanic comes into play with the Forced effect on this location. At the end of each round, the players must place 1 resource token on the Den. This triggers while the location is in the staging area, as well as the active location slot. Once 4 resources are on the Den, all tokens are discarded, and a random Plot card from the stack set aside during setup is added to the staging area. That means that if the players are not on stage 1, 2 plots are now in play at the same time, both adding their way to kill the players. This isn’t even limited to 2 plots, as there are several copies of this location, and with the tokens removed, a location will start counting again. You are really under pressure to clear this location quickly because those plot cards are permanent until the end of the game. The more there are, the harder it will get to win. You can turn this into a challenge where you try to get all 5 Plots in the game and still win, but that is going to take a while, I think. You would be wise to make this a priority destination and try chipping away at the 6 quest points in the meantime. I do appreciate the Sindarin graffiti in the artwork, though!
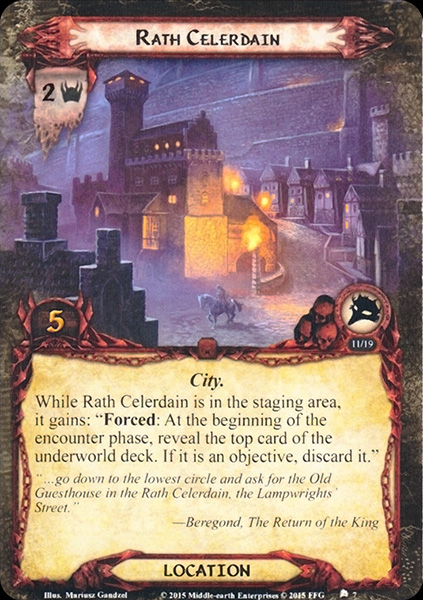
- Rath Celerdain: You know this is an evil place if you consider that the most powerful ally in the game actually lives on this street: The Minas Tirith Lampwright!
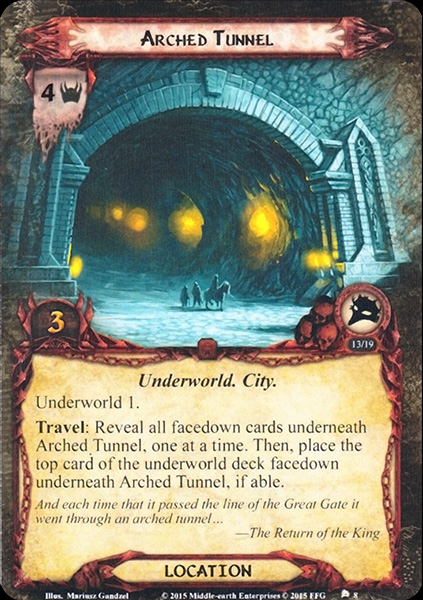
The actual card is pretty bad, as it will force more Underworld cards into play, even if the players aren’t busy exploring locations or decided to travel to a place without the Underworld keyword. While Rath Celerdain is in the staging area, the players will need to reveal the top card of the Underworld deck at the beginning of the encounter phase. That means that any When Revealed effects will go off, and any potential enemies will be making engagement checks that round. If you luck into a Clue objective, it is instead discarded into the encounter discard pile (remember that only enemies are shuffled back into the Underworld deck). If you hit False Accusations, resolve the treachery as normal, though you likely have a better idea of whether or not you need your characters ready for the rest of the round. This effect does not stack with itself since there is just a general check at the beginning of the encounter phase whether or not there is a Rath Celerdain in the staging area. Because of this, the location is easier to handle in higher player counts since you get one additional card divided among several players. Still, this is a decent destination to travel to, considering that it does not have the Underworld keyword itself and removes the extra card during the encounter phase. Removing 2 threat from the staging area isn’t much, but at least you can quest a little more next turn. You’ll need it because the 5 quest points on this location is a bit much. But considering that the main quest does not require progress until stage 3, you are probably fine without resorting to player cards to clear this location. - Arched Tunnel: With 4 threat, this location ranks as one of the higher threat cards in the encounter deck. It also comes with Underworld 1 and a Travel cost if you want to get rid of the threat from the staging area. In order to travel here, the players must first reveal each facedown card underneath Arched Tunnel as if the location had already been explored. These cards from the Underworld deck are added to the staging area, and their When Revealed effects will trigger. Then, you place one card from the Underworld deck underneath the Arched Tunnel. This is a pretty nasty effect if you just cleared an active location this turn that also revealed cards from the Underworld deck. Now you have to deal with even more enemies. And it doesn’t even take away the facedown card underneath the active location, which matters if a Faithless Conspirator is in play. A much easier way to deal with this location is to clear it in the staging area. Only 3 progress is required, and if that means removing 4 threat out of the staging area, then there are probably not many better targets for cards like Asfaloth or Mirkwood Explorer. Yes, you get the Underworld card underneath the Arched Tunnel in exchange for clearing the location, but you’d get it for travelling, too, so that is unavoidable. Alternatively, you can also use a card like South Away, Thror’s Map or Ghan-buri-Ghan to cancel the Travel cost of this location. That saves you the extra Underworld card, but I feel that those cards are not really that important in this scenario. And Ghan is better to have in play when the Tunnel is active, as that gets him 4 willpower! Chip away at the quest points for this location while it is in the staging area and travel to some other locations instead.
Treacheries
Only one new treachery is introduced in this scenario, which will be added to the Underworld deck. All original treacheries remain in the encounter deck, so get ready to be stabbed in the back!
- False Accusations: This is a weird little treachery, considering that you are instructed during setup to add it to the Underworld deck. That way, you can end up revealing this card through the Underworld keyword on a location or through effects like Unwelcome Discovery. When this happens, the When Revealed effect of this treachery is triggered, and each player is given a choice. Either they raise their threat by 5, or they exhaust each ready character they control. Both effects are tricky, depending on the situation. 5 threat is a lot, especially if the Poisoned Counsels Plot, which raises your threat much faster than you are used to. But exhausting every character you control will leave you defenseless against any enemy that is engaged or will engage you for the remainder of the round. This is bad if the Assassination Plot is in play since you won’t be able to take attacks undefended without risking losing the selected hero. Luckily, you are allowed to cancel this treachery, and if you choose either option, you can always run readying effects or threat reduction to reduce the pain this treachery causes you. If anyone at the table has a copy of Grim Resolve in their hand and the resources to afford it, everyone can choose to exhaust it with minimal impact. Once this treachery has been resolved, it is discarded in the regular encounter discard pile. It is not shuffled back into the Underworld deck like the enemies will be.
Tips and Tricks
- Most of my advice from the original version of this quest still applies. Read that article for some more tips.
- Canceling treacheries is still important, especially since False Accusations can cost you the game.
- Location control is not prohibited in this quest, and I advise you to bring at least a way to get rid of City Street. This allows you to travel where you want and to get some more threatening locations out of play. The new locations are also not immune to player card effects, so Northern Trackers can swiftly explore the majority of the locations in this deck.
- Since defeated enemies will go back to the Underworld deck, it won’t be long before they show up again. Because of this, you might want to bring some cards that put the nastiest enemies into the Victory Display. This can also help you to avoid treacheries if you manage to clear Scout Ahead.
- With quite a lot of surge in the encounter deck, it can be worth bringing the Minas Tirith Lampwright to this quest. It’s a thematic choice, too, since the Lampwright’s Street is in the encounter deck! And with so few enemies in the encounter deck, you have a better chance of guessing what card type the next card will be.
Playthroughs
With the quest being pretty popular, it makes sense that there are a fair few videos to be found of people playing the Nightmare version. Here are some playthroughs for you to watch to see how each Plot and Villain can change the difficulty of this quest.
- Solo, Dale deck: https://www.youtube.com/watch?v=tKA2HdmUY9M
- Two handed, progression style: https://www.youtube.com/watch?v=iQKTWarQGBs
- Solo, Normal and Nightmare: https://www.youtube.com/watch?v=tWKd7SFvr3A
- Two players: https://www.youtube.com/watch?v=T9ccm1evXRg
That’s another Nightmare quest completed! The next one will be Druadan Forest, but that will take a while to complete, as the mechanics in that quest are changed a lot in the Nightmare version. I may take a break and focus on some other articles before then.

One thought on “Nightmare The Steward’s Fear”