‘Yes, yes,’ said Gollum. ‘All dead, all rotten…. The Dead Marshes. There was a great battle long ago, yes, so they told him when Sméagol was young, when I was young before the Precious came. It was a great battle. Tall Men with long swords, and terrible Elves, and Orcses shrieking. They fought on the plain for days and months at the Black Gates. But the Marshes have grown since then, swallowed up the graves; always creeping, creeping.’
-The Two Towers, The Passage of the Marshes
Coming off the defeat of Saruman and the neutralization of Isengard, we turn our gaze eastward towards Frodo and Sam and the events of the second half of The Two Towers. I really like this chapter, particularly the sense of foreboding dread that is presented as our heroes make their way through a dead land, where something sinister lurks just beneath the surface of the water. Hearing that the chapter in part was inspired by Tolkien’s own experiences at the Battle of the Somme with the mud and the corpses in the water made this part stand out for me in the book. However, the design team must have scratched their heads when they had to decide how to take on this material. Because while the first half of the book is about heroic feats like chasing the Uruk-hai across the plains of Rohan and the great battles of Helm’s Deep and Isengard, the second half is a much more personal story about hardships, resilience, mercy, and doing the right thing when it seems impossibly hard to do so. It is a story about camaraderie, about Frodo and Sam trying to navigate a land that seems to shun life itself. And it is about Gollum, about redemption and second chances. There is only one great battle involving Frodo and Sam, and we save that for the very end. How do you translate that into the mechanics of a card game? The second thing that must have given the designers gray hair about this particular quest was that the Dead Marshes had already featured in a scenario during the game’s infancy. The first two cycles contained several quests that were practically reskinning book events, including the battles against the trolls in Conflict at the Carrock, the Watcher in the Water, and the Balrog in Shadow and Flame. Dead Marshes focused on tracking down Gollum through the marshes, and the designers tried to distance themselves from this by placing the focus somewhat differently in this one. You can almost argue that this scenario represents a what-if scenario. What if Frodo and Sam had awakened the dead on their way through? The result is a fun quest with dangerous enemies that threaten to strike if you do not keep your pace through. Don’t follow the lights….
The Passage of the Marshes
- Found in The Land of Shadow Saga Expansion
- Official Difficulty: –
- Community Difficulty: 6.2
- Encounter sets: The Passage of the Marshes, Gollum, and Morgul Nazgûl.
- Quest cards: 3
- Play if: You like the Dead Marshes as a setting. You like Gollum as a character. You want to fight undead. You want to play a quest focusing on locations and location management.
- What is different about this quest?: Mire tokens being placed on locations, discarding them, and triggering bad stuff if you cannot clear them fast enough. Gollum/Smeagol as a guide and potential danger.
- Solo or Multiplayer?: The quest is often much easier at lower player counts because you can more easily clear locations, preventing the Mire effects from triggering. At higher player counts, these effects will likely trigger unless you bring good location control. And even then, you have one stage blocking direct progress placement.
- Can I bring Side Quests for this scenario?: Yes, several stages are dependent on you meeting specific conditions in addition to placing progress. You might therefore have time to clear side quests without affecting the pace of your questing.
The Quest
Setup

If you are playing Saga mode, each player shuffles a copy of The Searching Eye treachery into their deck and removes any cards from the Helm’s Deep and Road to Isengard sets from player decks and the encounter deck (those stick to Aragorn and co., not Frodo and Sam). This is also a good time to check that you have remembered to shuffle any obtained burdens into the encounter deck and added boons where applicable.

Regardless of whether you play Saga, you must pick a hero from the fellowship sphere that has the ring-bearer trait and attach the One Ring to it. In reality, this means that you have to make up your mind on which version of fellowship Frodo Baggins you want to use. You then put the double-sided Gollum enemy into play, engaged with the first player. Then, each player searches the encounter deck for one location, reveals it, and adds it to the staging area. Keep in mind that this does not need to be different locations, so you can grab multiple copies of the same location at higher player counts. Locations in this quest are special since they all have Victory X (meaning that once you clear them, they go to the victory display instead of the encounter discard pile) and because all locations have the Mire X keyword.

When a location with Mire is in the staging area, at the end of the refresh phase, it will get one resource token added, which is a Mire token. Then, if a location has Mire tokens equal to its Mire value, it is discarded, and the Mire effect will trigger. While this is nice since it protects you from severe location lock, it is not something you want happening because Mire effects are bad. They reveal encounter cards, bring out enemies, raise your threat or cause damage. In solo, I like Soft Mires, but since it has Mire 1, it is not worth it to grab more than a single copy. Evil-Smelling Fens is my second recommendation since it has a low traveling cost and a high Mire value, and if one of them ends up firing, it is usually not the end of the world. Shifting Quagmire might be a tempting candidate, but remember that it is revealed, and since it has Surge, you can put yourself in a quite vulnerable situation by picking it. Stagnant Pools can be a candidate if your group is bringing a lot of quest power. It requires a lot of progress to clear, and its threat value will grow over time. However, it has a high Mire value, so you can potentially leave it for some time. I would not recommend picking Haunted Mere because it has Mire 2 and requires Smeagol to travel there. As you will see in a bit, it can be difficult to get Smeagol right out of the gate unless you have a lot of available combat strength. Consider what decks you are bringing when you decide what your locations will be and in what order you plan to travel to them. After all, locations are added, you give the encounter deck a good ol’ shuffle and proceed to 1B.
Quest Card 1B: The Taming of Smeagol (6 progress)
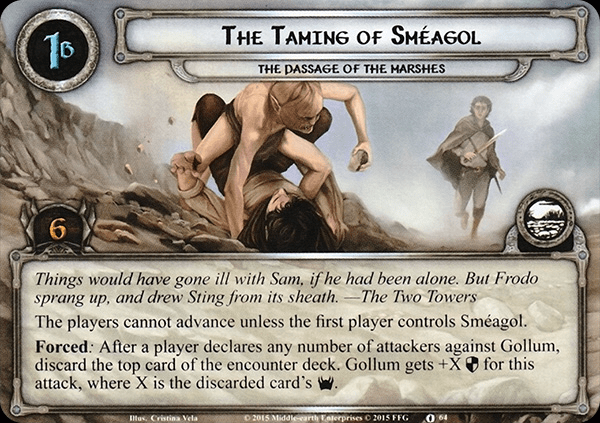
In this first stage, the players have to give Gollum a wack over the snout and show him who’s in charge. While the stage requires little progress to clear, keep in mind that you potentially start with a bunch of locations in the staging area and that these will require progress to clear as well. Furthermore, the players cannot advance unless they control Smeagol. So let’s take a closer look at how that is done.

To get Smeagol, you have to subdue the Gollum side of him. Gollum is a double-sided enemy with 2 threat, 2 attack, and 2 defense. Gollum has an engagement cost of 30, 5 hit points and is immune to non-fellowship player card effects. Gollum engages the first player, which means that he will follow Frodo around when he is passed from player to player during the refresh phase. Gollum is not too pleased with Frodo moving around and will therefore make an attack when he engages the first player during the refresh phase. It is clarified in the rules insert that this effect will not trigger when you play true solo since the first player token never moves, so you get one fewer Gollum attack by being on your own.
If Gollum is defeated, instead of discarding him, you flip him to his other side – his Smeagol side – exhausted. In this version, Smeagol is an objective ally with 2 willpower, 2 attack, 2 defense, and 5 hit points. Smeagol is immune to player card effects and is given to the first player, following his master around. He has a Forced effect stating that if the players quest unsuccessfully, he flips back to his Gollum form. If Smeagol is destroyed, the players lose the game. Smeagol is a nice, versatile ally, and once you get control of him, you don’t ever want to quest unsuccessfully again. It is a good idea to include willpower boosts in your deck, so you have a few options to get on the right side of questing successfully if the need arises.

In the first stage of the quest, you will have to subdue Gollum first. Gollum gets some extra help from the quest card, as it grants him a Forced effect saying that after a player declares any number of attackers against Gollum, you must discard the top card of the encounter deck. Gollum gets +X defense for this attack, where X is the discarded card’s threat value. This means that you cannot be sure how much damage you will actually get to deal, and it might take a few rounds to deal sufficient damage to flip him. You could include tactics Eowyn and fire her ability, which should carry you a long way towards taming Smeagol. But otherwise, you might have to deal with him over multiple rounds while you are also trying to clear the starting locations. Gollum can be particularly troublesome for decks that need a few rounds to setup or decks with low attack power right out of the gate, such as hobbit decks or Noldor decks. You should have some sort of strategy for how you will deal with Gollum. At higher player counts, you are taking two attacks per round from him, which can be problematic over time and potentially cost you a hero. The encounter deck contains few attack boosts, so usually, it’s safe to take an undefended attack or to let Frodo block, but keep in mind that We hates them is in the encounter deck and that this can kill Frodo if you are unlucky, costing you the game. If you include scrying such as Far-sighted, you can know what is coming and how much defense boost Gollum will get. This can be a good idea to make sure that you attack at the right time and don’t put all your resources into an attack that disappears because you discarded a 4 threat enemy. Once you bring down Gollum and place 6 progress on the quest, you can advance.
Quest Card 2: Across the Dead Marshes (12 progress)

When you reveal stage 2A, if the number of locations in the staging area is less than the number of players in the game, you must discard cards from the top of the encounter deck until a location is discarded and add that location to the staging area. Now it’s time to cross those marshes. Stage 2B nullifies location control by stating that progress cannot be placed on locations in the staging area. You have to clear them the old-fashioned way, like your father’s father, did. You cannot advance from here unless the first player controls Smeagol, and there are four locations in the victory display. Unless the first part of the quest went horribly wrong and all the Mire effects triggered, you should have made some progress on the number of locations when you get here. Unless your deck is super efficient, it might take a few rounds to deal with Gollum and clear the locations that begin in play. If you can linger a bit at stage 1, it might be worth it to do so. Though be sure not to fail questing; otherwise, you have to deal with Gollum all over again! This stage has an obnoxious Forced effect that reveals an additional encounter card at the end of the staging step if the number of locations in the staging area is less than the number of players in the game. This can make it quite tricky to generate sufficient quest power to place progress, especially if enemies start to accumulate. Keep the staging area as clear from enemies as you can, and of course, remember to watch out for Mire effects. You might be able to leave the Mire locations with higher values for a while, but remember that certain treacheries can pop them quite suddenly. Tread with caution, and try not to fail questing if you can. Build up a strong board state so you can clear locations and enemies as they appear, and work your way towards having 4 locations in the victory display.
Quest Card 3: Don’t Look at the Lights! (24 progress)

You have arrived at the final stage! Well done, you! When revealed, each player searches the encounter deck and discard pile for an undead enemy and puts it into play, engaged with them. All locations in the victory display are shuffled back into the encounter deck. I usually go for the Groping Dead, and if you are playing four-player or one of them is already in play, the remaining players should take Dead Things. Prepare for battle and clear them fast! If you made it this far, your board state is probably in a pretty good place. Focus on clearing the undead, and be ready to blast through the final stage. While ANY player is engaged with an undead enemy, progress cannot be placed on this stage. You could play a side quest here as an alternative if you still need a turn or two to clear out the undead and have the available quest power. Clear locations if required, but at this stage, your main priority should be blasting through the whooping 24 quest points required to beat it. If you make it this far, and the first player controls Smeagol, the players win the game. Congratulations! If you play Saga, Each player must choose: either take a permanent +2 starting threat penalty or earn 1 copy of The Searching Eye. I would almost always go for the +2 threat nudge.
The Encounter Deck
Global
- The encounter deck consists of 36 cards (26 on easy)
- 21 cards have shadow effects on standard, bringing the risk of shadow effects to 58%. In easy mode, the risk of shadow effects is 53%
- The average threat on cards revealed is relatively high, at 1.9 threat in Normal mode, and 2 threat per card in Easy mode. This ranges from 0 to 4, not counting any buffs.
- Surge is present on six cards (the Shifting Quagmire, We Hates Them! and Creeping Marshes)
- Doomed is present on two cards (Creeping Marshes)
- Peril is present on four cards
- Immunity
- Gollum is immune to non-fellowship player card effects and the Nazgul cannot have non-Morgul attachments
- Morgul Wraith cannot have non-Morgul attachments and gains immunity to player card effects when the One Ring is exhausted.
- While any Undead enemies are engaged with a player, that player cannot reduce their threat
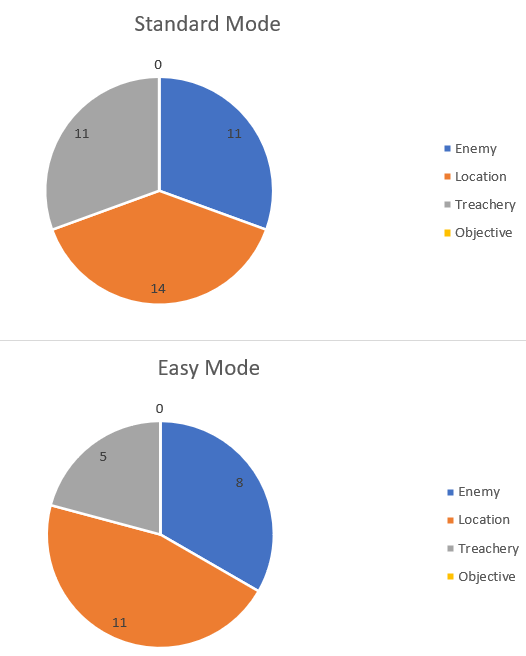
It’s clear that the encounter deck is skewed somewhat towards locations in this quest, but in normal mode, the split is a lot more even. These statistics do not take into account what happens once Mire tokens are placed, since that can result in the players having to raise their threat more, or locations adding more threat to the staging area.
Enemies
- The first enemy in the encounter set is also the most heavy-hitting one – the Candle-bearer. This enemy contributes 3 threat, hits for 5, has 2 defense, and 6 hit points. Candle-bearer is buff! It has an engagement cost of 36, meaning that you probably won’t have to engage it if you are unlucky enough to pull it during the beginning of the game. However, this quest has several ways to nudge up your threat, and before you know it, you will hit 36 and will be in for a world of trouble if you are not ready for it. 36 is, therefore, a good threshold to keep in mind when you consider whether you should use Gandalf for threat decrease or card draw. While you are engaged with the candle-bearer, you cannot reduce your threat, which makes it inconvenient to neutralize it with a Forest Snare. It also has a Forced ability stating that after it destroys a character, it cannot take damage until the end of the round, meaning that if you chump block it, you cannot kill it. For this reason, you need to devise a strategy on how to survive it. You need a defender that can take a 5 attack and live to tell the tale. Alternatively, you can keep a Feint in hand or Sneak Attack Gandalf in for the combat phase. Or, if your threat is low, play the sneaky game and never engage it, discarding through The Great Hunt or repeated Gandalf-slaps. You might also be able to quest over it, though 3 threat is not trivial. For this reason, I recommend you include a defender that can block it without dying. Dain or Beregond can get there with an attachment to boost their defense, as can Sam with a Rosie Cotton buff. There are few encounter cards that will increase attack strength, so usually, it is safe to take the 5 attack if it will not outright kill your hero. Once you’ve survived, you better be ready to hand out 8 damage and kill it! As a shadow card, it grants the ability that until the end of the round, the attacking enemy cannot take damage. This is always inconvenient, but it is particularly annoying when it targets Gollum, keeping you from flipping him back. The encounter deck contains three copies (1 on easy).
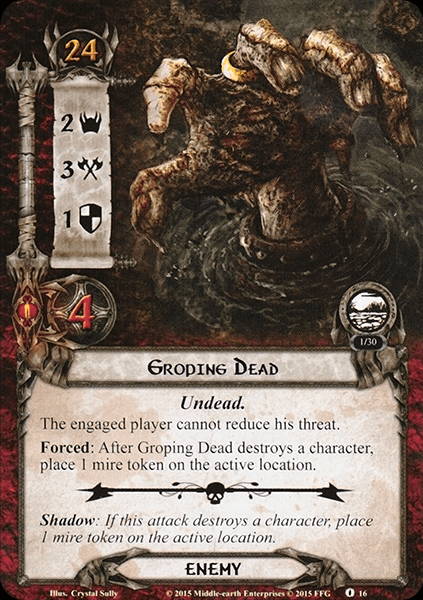
- Groping Dead is an enemy I do not mind seeing as much. 2 threat, 3 attack, 1 defense, and 4 hit points put this enemy into a category where I would not have been surprised if it had Surge. It doesn’t, though. Instead, it says that while engaged with it, you cannot reduce your threat (and the Keen-eyed Tooks amongst you might start to sense a theme here!). With an engagement cost of 24, you will likely have to engage this one on the turn it appears, unless you are running secrecy. After the Groping Dead attacks and destroys a character, you place a Mire Token on the active location. This can be pretty bad if you have an active location that is about to pop because of Mire or if you have traveled to one of the Mire 1 locations. For this reason, I recommend just blocking the attack. 3 attack strength might cause a point or two of damage, but it is hopefully not the end of the world. This quest is not archery-heavy, so damage shouldn’t accumulate too much. Most damage will accumulate due to Evil-smelling Fens, so keep in mind that you might lose the ability to take an undefended attack from this guy if you let the fen pop. Otherwise, most average defenders will be able to take an attack here and live to tell the tale. It takes 5 damage to kill it, which you should be able to muster if you haven’t yolo quested. As a shadow card, it also places a mire token on the active location if the attack destroys a character. Chump block with caution. The encounter card contains three copies.
- Finally, in the undead category, we have Dead Things, which is a bit misleading, as it seems quite feisty to me. Placing itself in the middle of the road between the other two undead, this one has 3 threat, 4 attack, 2 defense, and 5 hit points. It has an engagement cost of 32, placing it above the famous Hill Troll threshold where you have to engage it from the beginning of the game. Like the other undead enemies, engaging it prevents you from using threat reduction. If it destroys a character, defending player raises their threat by 3. A threat increase is usually not the end of the world, and if I play a deck with good threat management, I might just chump this one if my dedicated defender is needed for another attack or if I need to conserve attack power to dispose of it. As a shadow card, you will get 1 threat for each undead enemy engaged with you, which will be at least one. However, this shadow effect is usually not bad enough to require cancellation unless it’s the end of the game and you are reaching 49 threat. The encounter deck contains 3 copies.
- Morgul Wraith is a beefy mini-boss that is provided by the Nazgul encounter set. 4 threat, 5 attack, 4 defense, and 9 hit points are the stuff of nightmares. It cannot have non-morgul attachments, so no trap shenanigans. It has an engagement cost of 45, meaning that you likely won’t have to engage it until you want to, except if you use the One Ring. For a while, the One Ring is exhausted; it gains -30 engagement cost and gains “immune to player card effects.” Forget about feint. Forget about trying to cheese it. It will come for you. This is a brilliant piece of design, in my opinion, because you will always think twice about using the Ring if these guys are still in the encounter set. It really feels like they are chasing you. And if they come out and linger in the staging area… Valar, have mercy on you if you try to cancel an encounter card with Black Riders Frodo! If I can, I usually try to snipe them with The Great Hunt because it simply requires too many Gandalfs to clear 9 hit points. Otherwise, I will engage it when I have enough attack power on the board to take it down in one go. I’m usually not keen on leaving them in the staging area because 4 threat is a lot to quest over. But if I’m not ready for them, I will not engage them. It doesn’t punish you for chump blocking, but keep in mind that several other shadow effects will punish you for that. It has no shadow effect, meaning that I am very pleased to see it as a shadow card. The encounter deck contains 2 copies.

Locations
- Stagnant Pools is a 3 threat location that requires 7 quest points to clear. It gains +1 threat pr. Mire token it has, making it a threat that grows over time. It has Mire 5, and when it is discarded due to Mire, you raise each player’s threat by 5. This is a location that you will have to deal with as soon as possible because the threat will continue to rise, making location lock a real threat. Also, remember that failing to quest is a major setback because it will make Smeagol flip. 7 quest points is no easy feat, though, and it might take you a few rounds to clear it. Depending on the build and board state, the threat might be inconvenient or dangerous. It will make undead enemies much more likely to engage you, which can be tough if you are not ready to take them on. It also has Victory 3, so once you clear it, you won’t see it again. The encounter deck contains two copies, and it has no shadow effect.
- Soft Mires is a 2 threat location that requires 4 progress to clear. It has Mire 1, meaning that it will trigger unless you can travel to it in the round that it appears. The low threat makes it a good candidate for one of the locations added during setup, especially at lower player counts. If it is discarded by Mire, the first player reveals an encounter card. Again, this can be quite inconvenient as extra encounter cards can lead to all sorts of nastiness, such as location lock, enemy accumulation, or trigger Smeagol flipping. However, if you are doing well, it might be a welcome addition, as it doesn’t contribute much threat and requires little progress to clear. It has a travel cost, raising each player’s threat by one, which usually shouldn’t be the end of the world. The encounter deck contains four copies (three on easy), and it has victory 2, meaning you will only see each of them revealed once. It has no shadow effect.
- Shifting Quagmire is a 1 threat location, requiring 3 progress to clear. It has Surge, which means that it will often be accompanied by more locations or enemies. It has Mire 1, and when it is discarded by the Mire keyword, the players either return a random location from the victory display to the staging area or raise their threat by 1 for each location in the victory display. Which option you go for depends on the state of both the staging area and the victory display. Early in the game, I will likely go for the threat raise, though later in the game, I will take a location, as I am hopefully in a state to clear it rapidly. This is obviously harder at higher player counts, but the threat cost can be quite substantial because you will likely clear quite a few locations. It has a victory point value of 1, so it is removed from the encounter deck once you explore it. Travel cost is 1 fellowship resource, which can get tricky if you have spent them all on encounter card re-draws using Black Rider Frodo, or to counter the We Hates Them! treachery. This location is a good reason to keep a Fellowship resource in the bank. It can be quite a setback if you need to go back and explore locations that you had already cleared. The card has no shadow effects, and the encounter deck contains two copies.
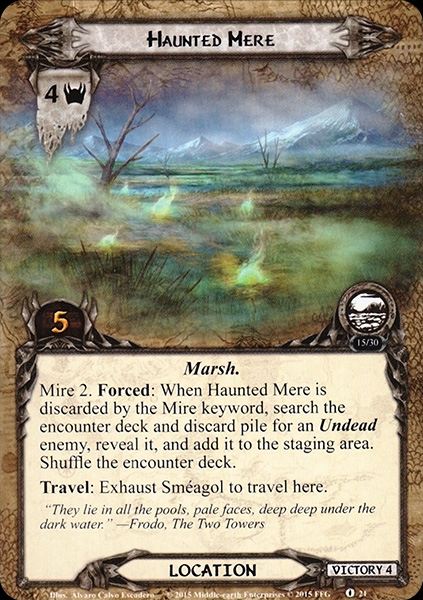
- Haunted Mere is a 4 threat location that requires 5 progress to clear. It has Mire 2, giving you a chance to leave it out for a round if need be (though beware the treacheries…). You need to exhaust Smeagol to travel there, which makes it very likely that you need to leave it out for a round if you relied on Smeagol for questing. If the Mire effect is allowed to trigger, you must search the encounter deck and discard pile for an undead enemy, reveal it and add it to the staging area. Which enemy you pick, of course, depends on how ready you are to fight, and if you have a Great Hunt lined up, you might pick an enemy with a higher engagement cost. I will usually go for the handsy Groping Dead, as their low threat/attack power makes them a manageable threat. Of course, it increases the risk of being overrun if you reveal multiple enemies during the next questing phase, so make a contingency plan for dealing with multiple enemies. The encounter deck contains three copies, and as for most of the other Mire locations, it has no shadow effects and a victory point value, meaning it will go to the victory display once you explore it.
- Evil-smelling Fens looks like a place that really stinks. 3 threat and 4 progress to clear it is not too bad, though, and with Mire 3, you can leave it out for a bit before dealing with it. When the Mire effect triggers, you deal 1 damage to each character, which can be a big deal depending on what decks are in play. Usually, this is one you want to clear, though, in true solo, this might be one you let go off if it doesn’t wipe your board to take a bit of damage. To travel there, each player increases their threat by one, which is a pretty minor cost, though it can be inconvenient. This one is special since it has a shadow effect: the dreaded “deal one damage to defending character,” which has killed many a Defender of Rammas. Keep this location in mind when you chump block – the undead enemies are hard hitters and can easily cost you a hero. The encounter deck contains 3 copies (2 on easy), and it goes to the victory display once it is cleared.
Treacheries
- The Searching Eye is a special treachery that is only used if you play in saga mode. It is additionally special because it is shuffled into the player’s deck rather than the encounter deck. This is an interesting design because it will make card draw riskier. After you draw it, you must either exhaust each hero you control or reveal an encounter card. This can be a minor setback if you have readying or if you are commanding an ally swarm. But at the wrong time, this can cascade, causing you to fail questing, flipping Smeagol, or reveal an untimely enemy. Furthermore, it robs you of a card draw, which might kill your momentum. It can be REALLY inconvenient. Since this is never drawn from the encounter deck, it does not have a shadow effect. The card tells you to treat it like a player card, meaning it will go into the player discard pile.
- A Fell Light is a fell treachery. It is the kind of treachery that you save your cancellations AND shadow cancellations for, and it can cause an instant scoop. When A Fell Light has peril, and when it is revealed, you put the top undead enemy in the discard pile into play, engaged with you. Then, each undead enemy engaged with you makes an immediate attack. Given the high potential damage output of the enemies and the shadow tricks the encounter deck can pull where you cannot damage enemies for a round, this can be backbreaking. There isn’t really any good way to counter it, except for having cancellations in hand. Or by holding back a defender, because many enemies in the encounter set punish chump blocking. This card is a good reason to clear undead enemies after you engage them because things can escalate very quickly if you pull it while being engaged with an undead enemy already. You can hope that you will keep undead enemies out of the discard pile for as long as possible, so the effect will whiff. However, the nature of the quest with Gollum, starting in play, also means that shadow cards will be discarded, as Gollum will make attacks until you tame him. Therefore, it is highly likely that you will get an undead enemy in the discard pile sooner rather than later. As a shadow card, you still put the top undead enemy in the discard pile into play, engaged with you, but it does not make an immediate attack (though it will still make an attack from the combat phase). The encounter deck contains two copies, and it is the kind of treachery you save cancellation for unless you are already set up and cruising towards victory. The encounter deck contains two copies (one on easy).
- While A Fell Light outright tries to murder you, Bitter Reek tries to threat you out. It has Peril, and when revealed, you must either raise your threat by 1 pr character committed to the quest or deal 1 damage to each character committed to the quest. If you play a swarm deck, you might not have a choice unless your threat level is exceptionally well managed, like playing a Dwarf deck with Nori where you keep hanging on your starting threat. The second effect is no picnic, though. 1 damage can clear a board of Gondor allies or Silvans, so if I can take the threat, I will go for it. I will rarely save cancellation for this one unless it is a game-winning moment. I will save that for A Fell Light. If you play a deck with few dedicated questers, you can usually either take damage or threat on the chin, as questers tend to be less in harm’s way than combat-focused characters. Just make sure that you don’t accidentally kill off Eowyn with a Mire triggering Evil-smelling Fens because you took too many Bitter Reeks. As a shadow card, it raises your threat equal to attacking the enemy’s threat, which is a recurring theme of the scenario, where it tries to bump up your threat. Usually, this is not too bad. The encounter deck contains two copies (one on easy).
- Call of the Ring is a treachery from the Nazgul encounter set. When revealed, the first player must choose to either search the encounter deck, discard pile, or victory display (!) for a Nazgul enemy and add it to the staging area, or exhaust the One Ring and reveal the top card of the encounter deck. Which option you go for obviously depends on how many Nazgul enemies are in the discard pile/victory display already and your general board state. Accidentally revealing a Nazgul after going for option 2 is a recipe for disaster and will place a Morgul Blade in your tender little rump before you can yell “Strider!”. Exhausting the One Ring also removes the option of using Frodo‘s ability, which can be inconvenient if you tend to rely on it. If you have already seen all the Nazguls, or you have a fat encounter deck and feel lucky, I would go for option 2. If I feel like it is too risky, or I feel confident leaving a Nazgul in the staging area for a while, I’ll go for option 1. This is not often, though. As a shadow card, this is also a rather unpleasant encounter, as the card has the dreaded “attacking enemy makes an additional attack after this one” effect, which is never nice. This might force you to chump block, which in turn can stall you when undead enemy effects trigger. This might be worth cancelling. The encounter deck contains two copies (one on easy).
- Creeping Marshes has Surge and Doomed 1, and when revealed, it attaches to the current quest as a condition attachment and grants “at the end of the refresh phase, place 1 mire token on each location in the staging area. Then discard Creeping Marshes”. If you are lucky and draw this as you are about to advance, or while the current quest is a side quest, this might basically whiff, but at higher player counts, this can escalate things rather dramatically, causing a bunch of Mire locations to fire at once. If you are capable of clearing locations as they appear, this is mostly a minor inconvenience. It would have been much worse if it also had targeted the active location. If you are really worried about this one, you could keep some location management in backup, but I would say it usually is not worth it. The card does not have a shadow effect which is always nice. The encounter deck contains three copies (two on easy).
- Lastly, we have We Hates them!. This treachery has Surge, and when revealed, you must either flip Smeagol to Gollum or let Gollum make an immediate attack. This effect can be canceled by spending one Fellowship resource and exhausting the One Ring, which is a devilish piece of design. As the card has Surge, you will reveal another card. And if that card is a Nazgul… You are in for a world of pain! If there is a Nazgul in the staging area, you might also hesitate (rightfully) about triggering this effect, as Gollum is easier to deal with than one of the nine. As a shadow card, this card grants + 1 attack, or +3 if the attacking enemy is Gollum. This is the only shadow card in the encounter deck that grants attack bonuses, and for that reason, you can usually math out how much defense is needed if you want to keep your defender alive. It is, therefore, a good idea to keep count on how many of those you have in the encounter discard pile. The encounter deck contains two copies (one on easy).

Tips and Tricks
- The encounter deck contains a few shadow cards that boost attack strength, and you can therefore be pretty sure about how much damage you are about to take whenever you defend an attack. You can therefore do more risky blocks than usual, where your defender will take a point of damage or two without risking them getting more damage and dying as a result. Take advantage of that to avoid chump blocking when dealing with undead enemies.
- Keep a clean staging area whenever you can. You should ideally clear a location each round so the Mire effects won’t fire and so you have the option to travel to the Mire 1 locations, should the need arise.
- Bring location control. If you get into a situation where you cannot make meaningful progress, Mire effects will start firing, and this can bring out an untimely enemy or wipe your board. Having some tech to remove a pesky location from the staging area can therefore be invaluable.
- When picking a traveling destination, remember to keep an eye on Mire values and Mire tokens. It might be worth it to leave a high threat location in the staging area; if a lower threat one would pop because of Mire at the end of the round. However, you should also try to assess the situation realistically and ensure that you can actually clear the location you travel to. No point in traveling to a low threat location if that decision location locks you.
- Remember that you cannot use any other version of Frodo Baggins than the Fellowship version, and you cannot use Aragorn or the One Ring + master cards from the Mordor cycle.
- It is not a good idea to bring trap decks to this scenario, as the final stage keeps you from placing progress when you are engaged with an undead enemy. It would be a shame to find out when you are almost there…
Playthroughs
- One stop Co-op shop made a stop at the Marshes in this video (and part 2 is here).
- LotRLCGSolo posted this playthrough very recently in progression style
- Mr Underhill himself posted this playthrough where he played a Boromir deck and this one where he played a thematic saga playthrough
- Brandon and Sean of Cardboard of the Rings fame posted this playthrough. Brandon is playing his usual Boromir Galadriel lineup, whereas Sean is piloting a mono leadership deck
- Chad from Cardboard of the Rings’ Second age also posted multiple playthroughs. Here is one and here is the other. In both of them he is playing his Ring around the Rosie hobbit deck.
- Warden of Arnor posted two videos, a line unbroken video and a solo campaign video
This is it for the marshes! Tune in next time for a cultural exchange with the Southrons at the Crossroads. Spoiler alert: it will not end well for them…


A Fell Light has an error with the shadow part:
As a shadow card, you still put the top undead enemy in the discard pile into play, engaged with you, but it does not make an immediate attack (though it will still make an attack from the combat phase.
In fact, the enemy goes to the Staging Area, not engaged with the player.
LikeLike