The game’s creators seem to have a fondness for alliterations in quest’s names, also seen in Peril in Pelargir. This one more resembles The Steward‘s Fear in its mechanics, though, essentially being its successor. Story-wise, you have now arrived in Dorwinion, a great city at the shores of the Sea of Rhûn, where you met up with Rutland’s friend Niena, who tells you about a cult of evil that abducts people. As you are heroes, you of course offer to help the people and begin your investigation about the cult in the streets of Dorwinion…
Danger in Dorwinion
- Found in: A Shadow in the East deluxe box, quest #2
- Official difficulty: 5
- Community difficulty: 5.1
- Encounter sets: Danger in Dorwinion, Servants of Sauron, City of Rhûn, Under Guard
- Quest cards: 3
- Play if: You want a fun, recent quest that is of manageable difficulty. You want to have some of the Against the Shadow cycle’s enemy design and overall feeling, but without nasty design problems. You didn’t get a chance to buy The Steward’s Fear.
- What is different about this quest?: High replayability due to some of the quest’s components changing from game to game; progress mostly being made by exploring locations
- Solo or multiplayer?: As in The Steward’s Fear, 2-3 players are probably going to be the sweet spot, with solo maybe needing too long to find enough locations to progress and four players easily getting location-locked
- Can I bring side-quests for this scenario?: You definitely can, as stage 2 and 3 require no progress and stage 1 not needing a lot, too. Good side-quests might include Double Back (due to the quest often taking a lot of time) and Keep Watch (due to some enemies doing bonus-attacks quite easily)
- What to look out for: Quick and unexpected bonus attacks; consistent threat-raise; Allies being stolen from your hand or even from play; A new loss-condition from stage 2 on
The Quest
Setup
Upon revealing stage 1A, you have to set aside all Cultist enemies and all Plot objectives aside, out of play (they will come in later). Then, every player searches the encounter deck for a different location, adding it to the staging area. One of these locations has to be Side Street, so in solo, the choice has already been made for you.

- In two-player, the other location should probably be Hillside Manor, due to its moderate stats and not too harsh textbox.
- With three players, Side Street and Hillside Manor should be chosen, too, adding (as I would recommend) Seedy Tavern.
- In a Four-Player game, use all the above cards and City Forum, as it won’t be too threatening in the beginning and you can quite easily get rid of it without too dire consequences.
After doing all that, you are ready to begin your investigation among the inhabitants of the cities underworld.
Stage 1B – A City in Turmoil

Let’s just all appreciate the artwork on this stage, showing the city of Dorwinion on the shores of the Sea of Rhûn with dark, fiery mountains in the background. The artwork isn’t really shown in all its glory on this card, but check out the thumbnail of this article for the full image.
This stage has a meager five quest points, but comes with a catch: after the active location has been explored, you place one resource here and you can only advance if there are at least two resources here. Solo players will have no disadvantage here as the Side Street will add another location to the staging area when it is traveled to, ensuring that you don’t have to wait for more locations to show up. In multiplayer, you should just try to get rid of the most threatening locations quickly, but save up some for the next stage. This is also going to be the best stage to stall, as stage 2 can get quite harsh due to the Plot being revealed then. As soon as you are prepared well, you can just explore the last location or put the last points of progress to advance to stage 2.
Stage 2 – The Shadow of Mordor
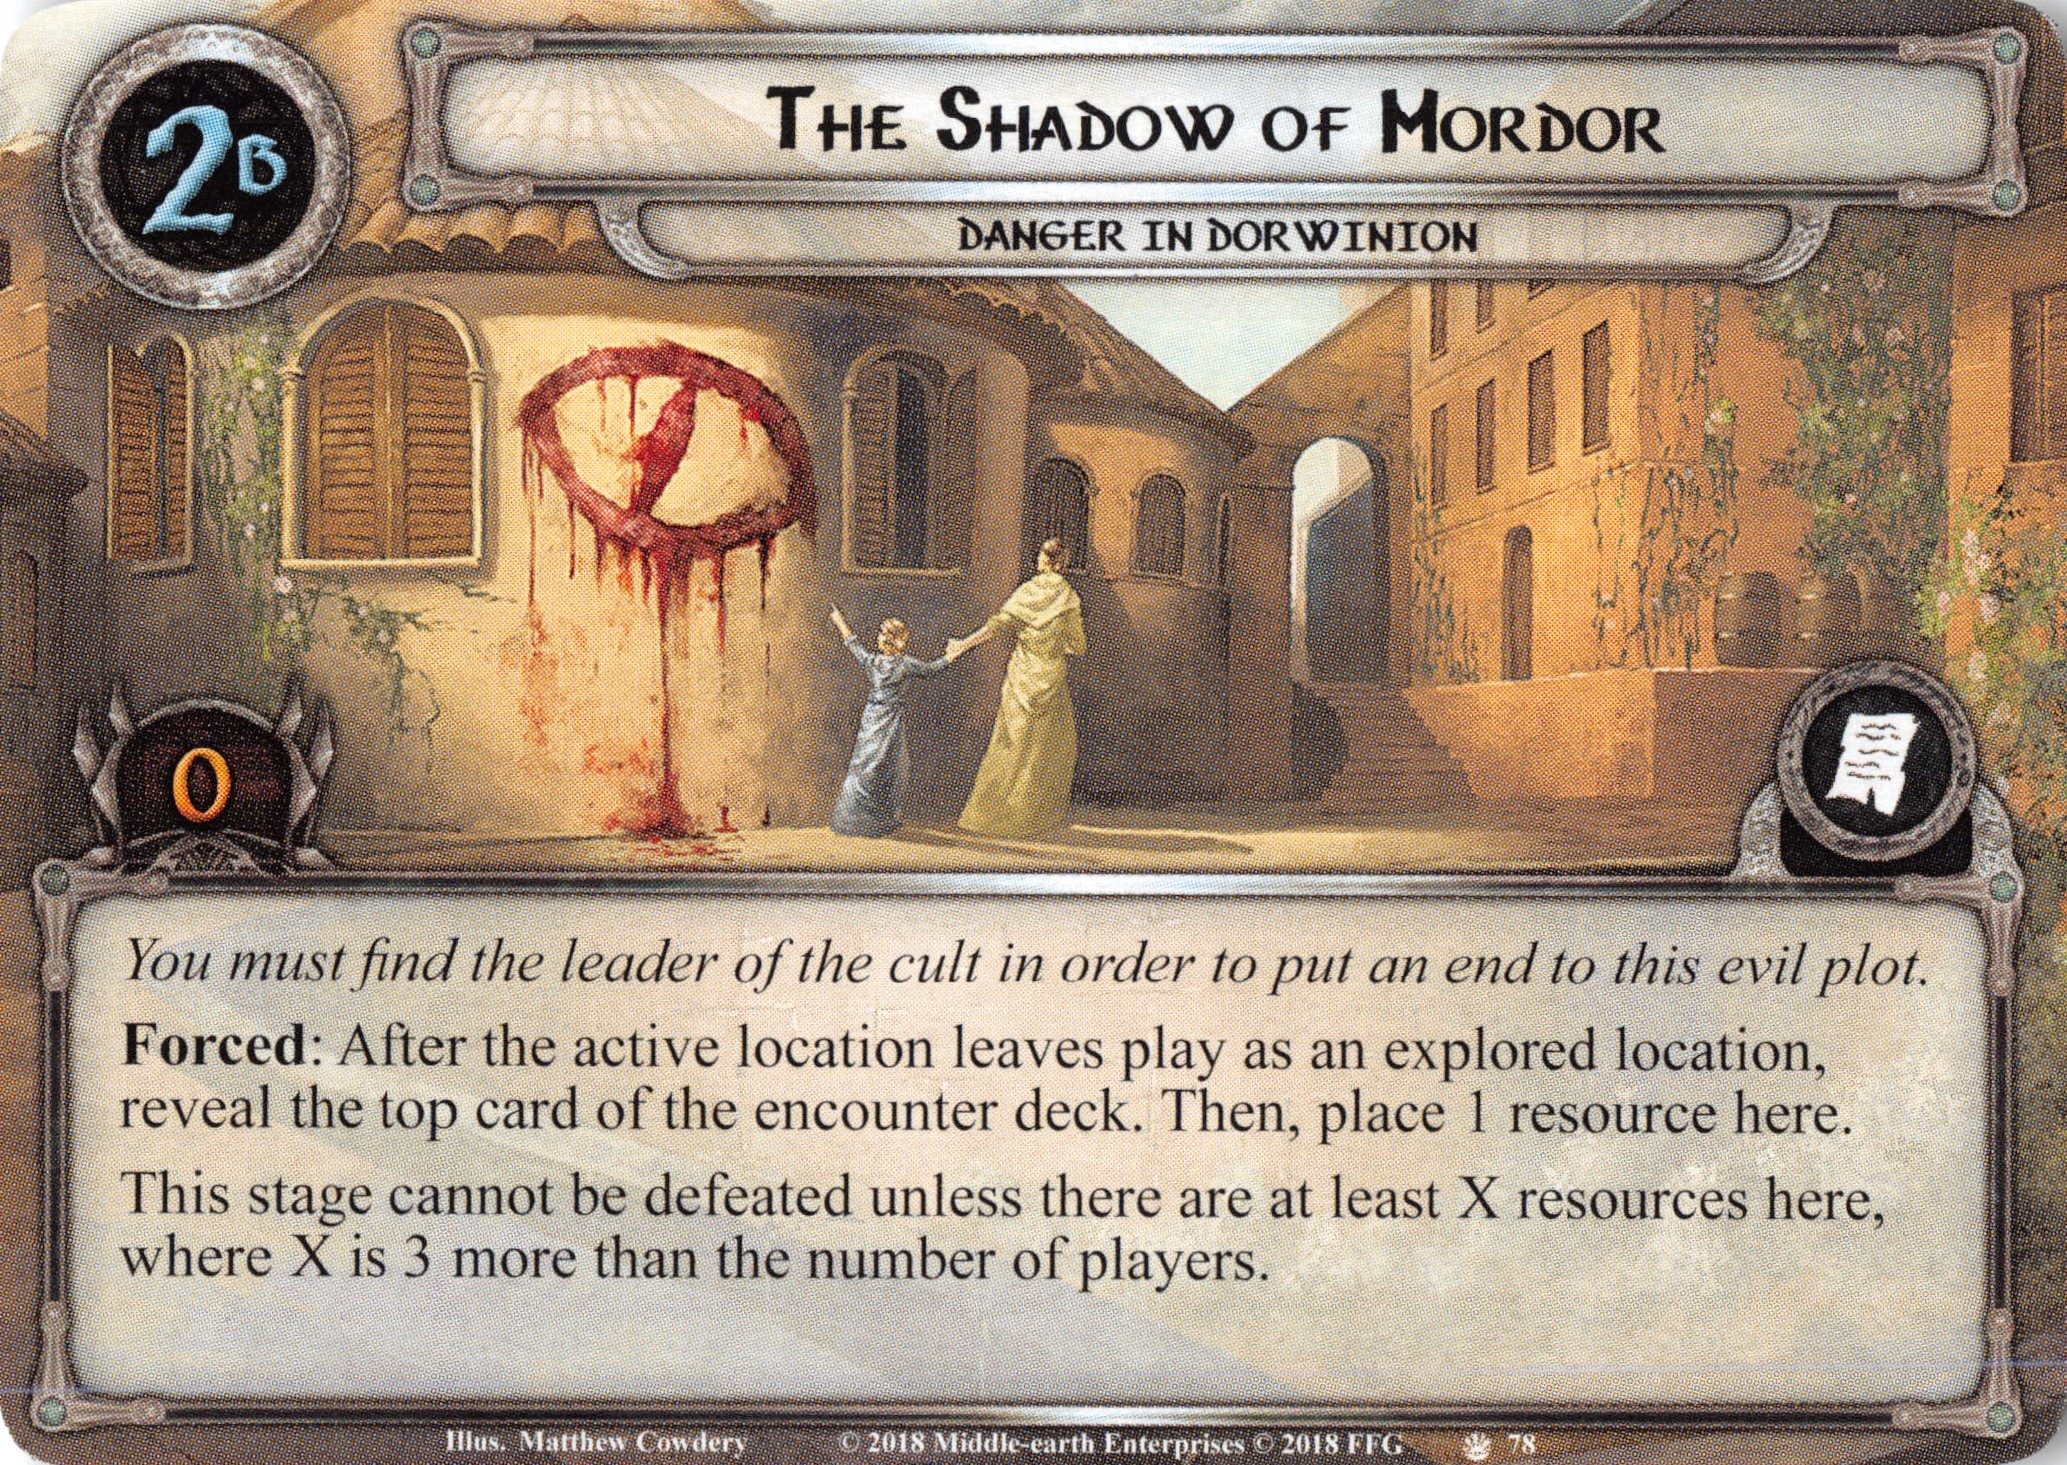
Upon arrival at stage 2, players add a random plot objective to the staging area and reveal 1 encounter card for each player. I will talk about the plots a little further down, but let’s just say that they all add a “ticking clock” to the game, meaning that you’ll want to get through the scenario as quickly as possible from now on. Combined with the new encounter cards, this means you’ll want to time your advancement to this stage so you don’t arrive too early.
Again, after exploring the active location you’ll add a resource to this card, but you will also have to reveal an extra encounter card, just for good measure. You can only advance once there are three plus the amount of players in resource tokens there, which means you’ll have to do some exploring (investigating?). Once the final resource is placed, you advance to stage 3, but pay attention to the fact that the forced effect on this stage first reveals an encounter card and then places the resource.
Stage 3 – Leader of the Cult
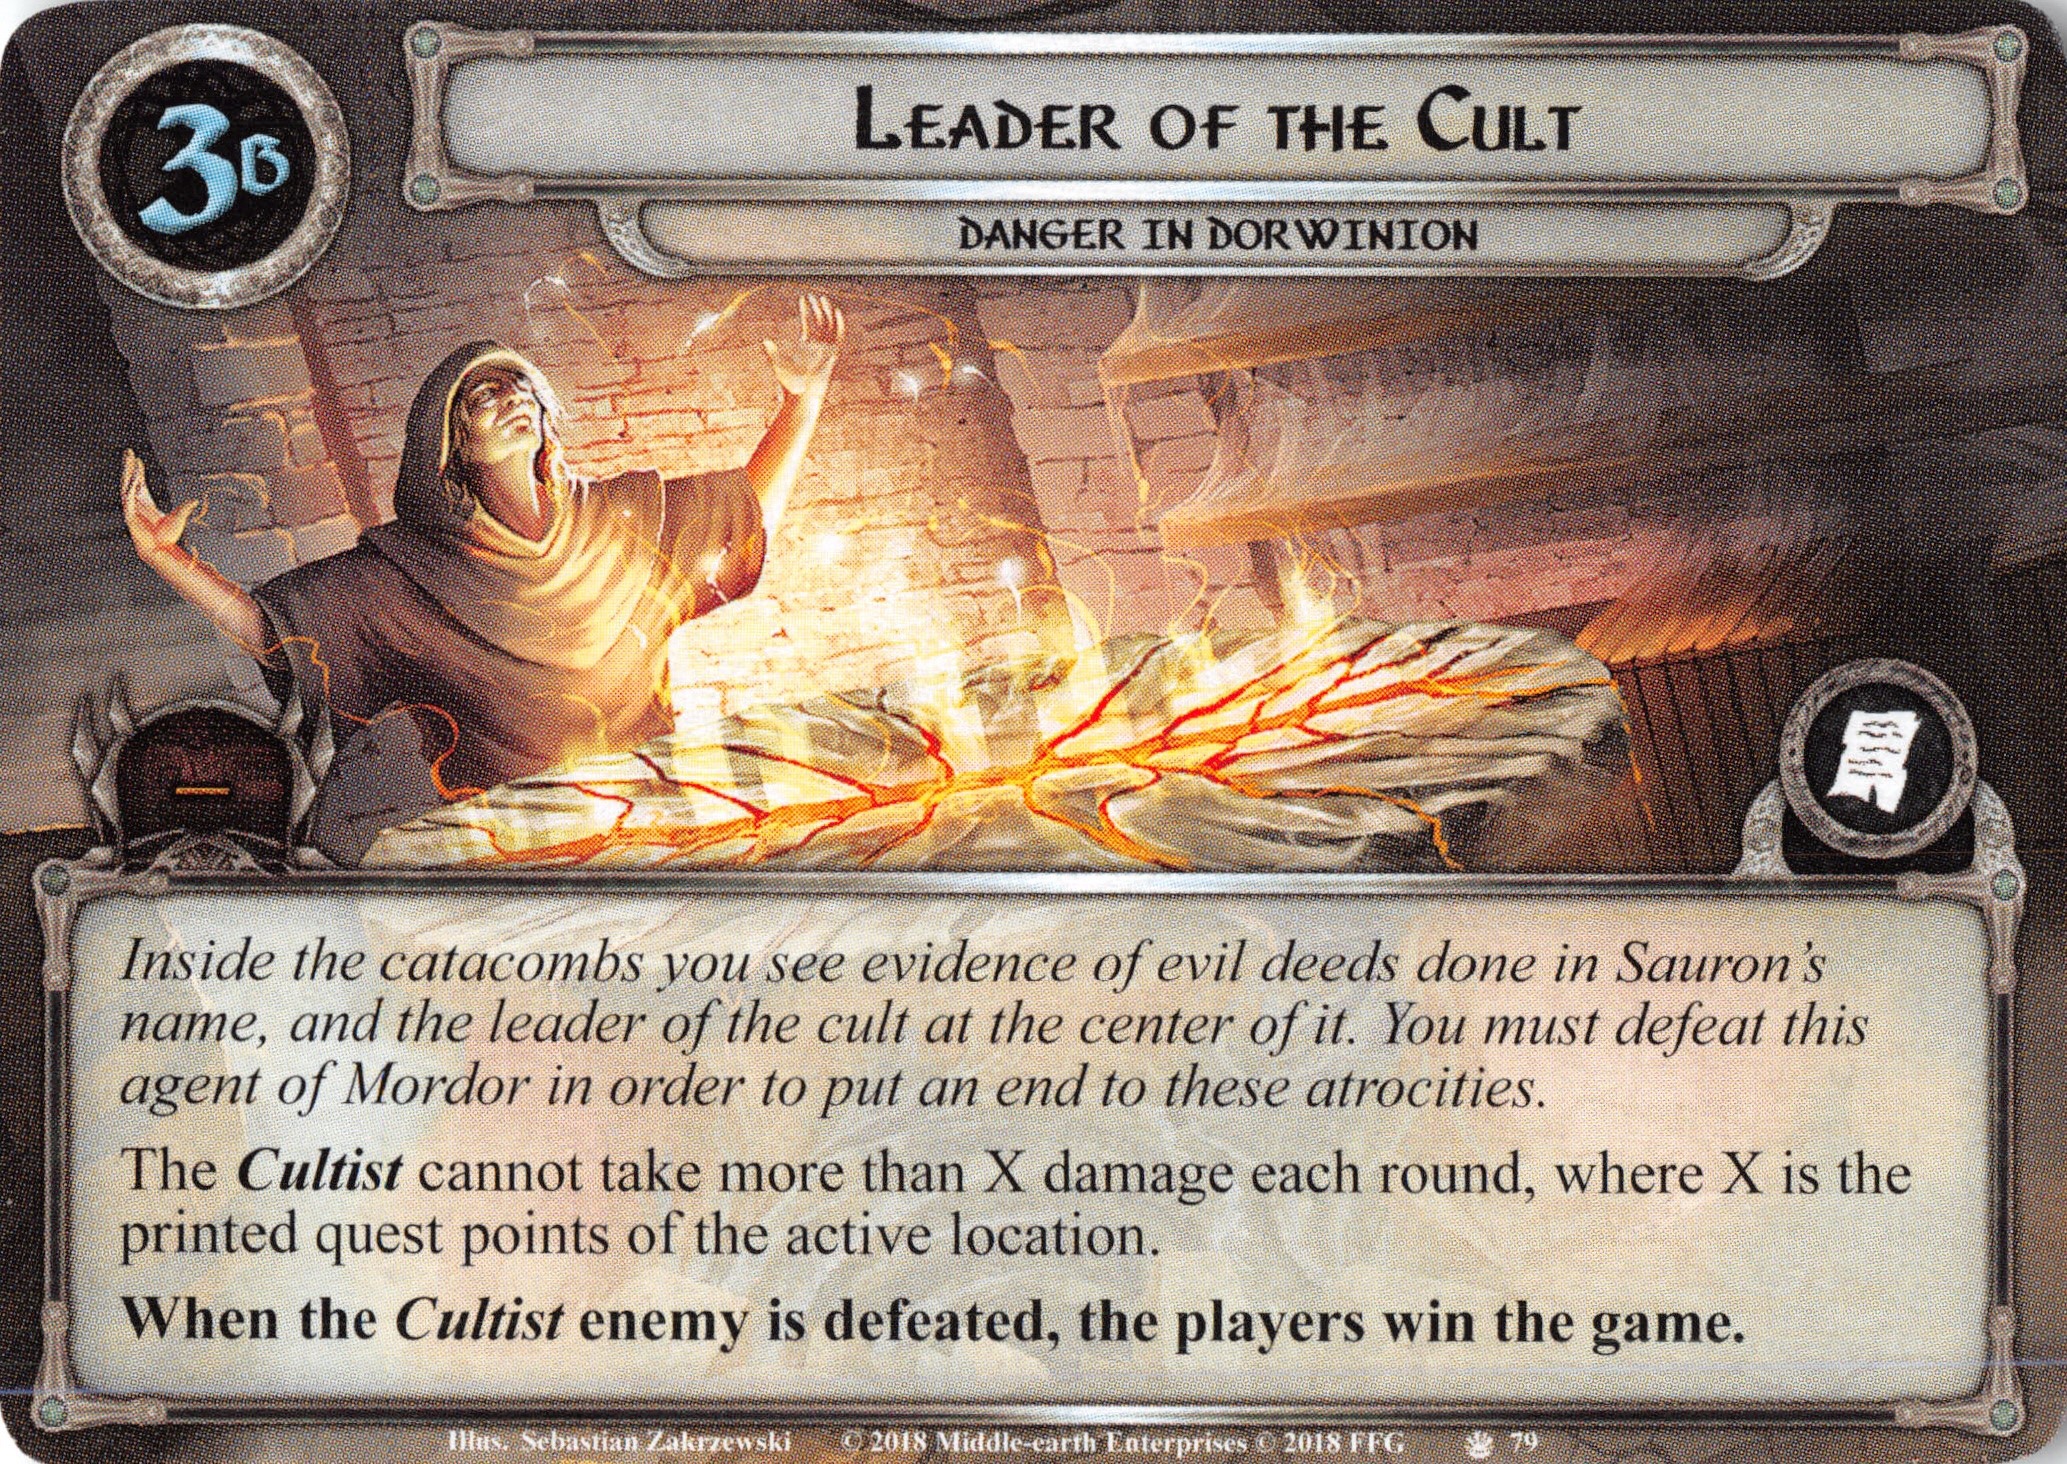
Congratulations, you have found the cult leader! Now you just have to kill him, and you’ll have finished your task in the east (no, just kidding. There’s a whole journey of pain into Mordor you’ll have to take). When you reveal this quest stage, you add a random set aside cultist enemy to the staging area, shuffle the encounter discard pile into its deck, discard cards… you know how it is. That means you’ll now end up with a number of enemies equal to the player count in the staging area, and one of these is a straight-up boss (though a quite weak one).
You win the game once the cultist has been killed, but this stage comes with a catch: the boss can only take damage equal to the active location’s quest points each round, meaning it will take you at least two rounds, potentially much longer if you don’t reveal any locations. That means you’ll want to be able to weather the cultist‘s attacks for some rounds while questing well without accidentally exploring the active location! I’ll talk about the different cultists and plots a little further down.

Cultists and Plots
Bribes
The first plot adds a ticking clock which adds a growing amount of threat to the staging area through an effect that can bump said threat up by up to 16 (depending on the location, player decks and luck)! This is the main reason you want to bring lots of willpower to this quest, even in solo. Thematically speaking, I’d say the threat addition to the staging area represents the inhabitants of Dorwinion getting less and less friendly to our heroes.
Submit or Die
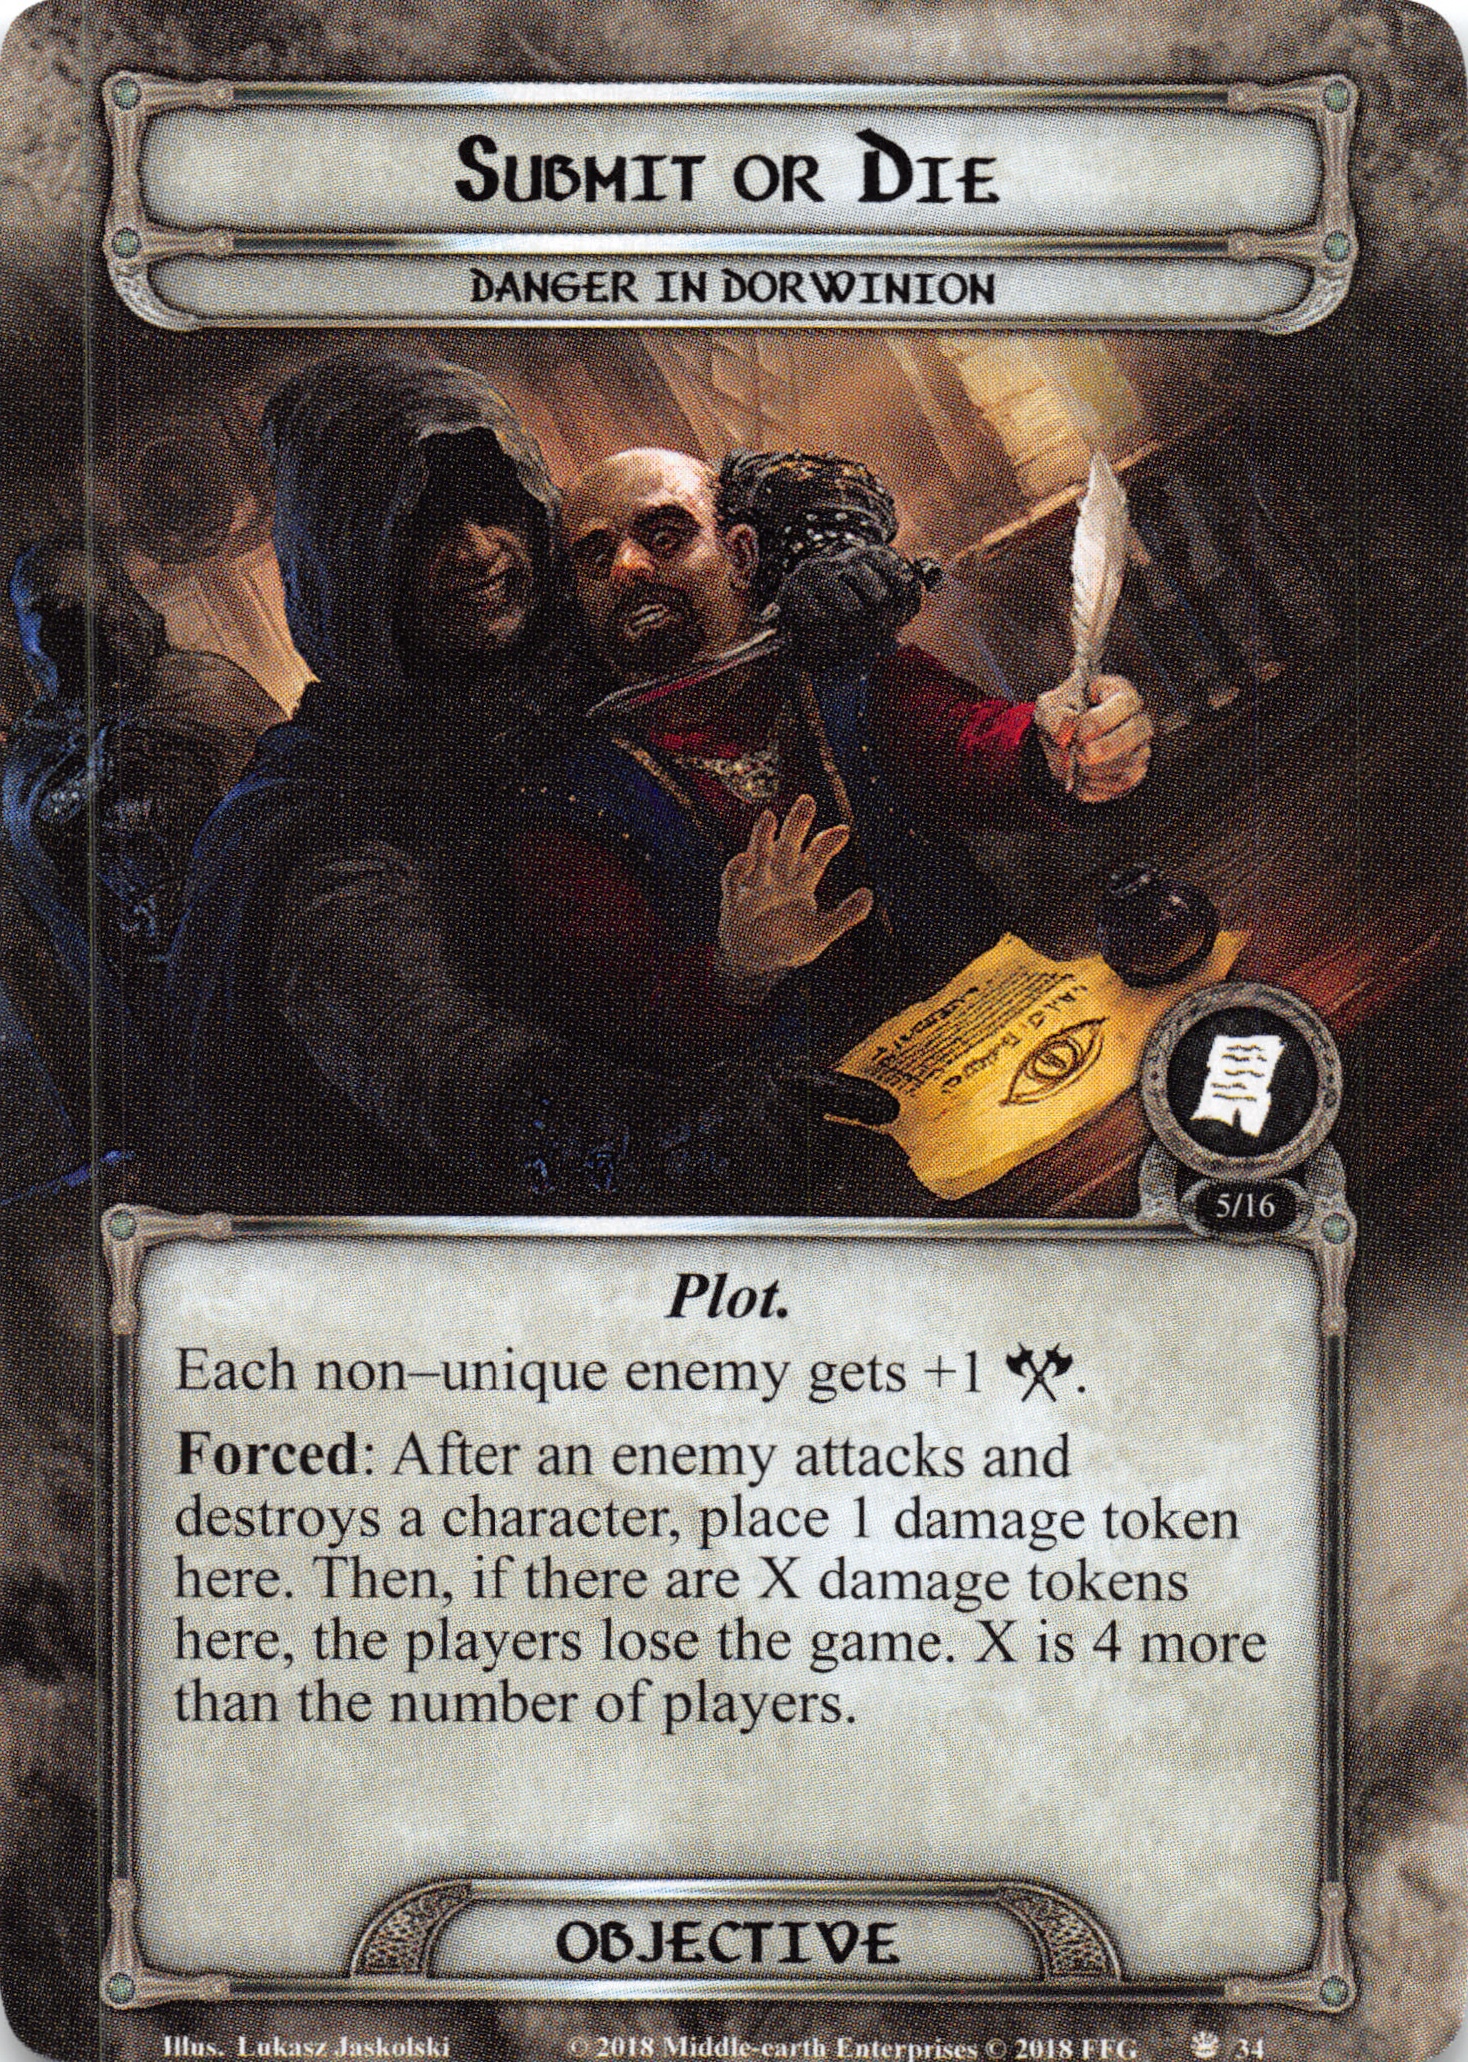
This plot is focused on combat, buffing the attack strength of all enemies (except for the cultists and, possibly, Gollum) by one, which is already quite threatening, but gets even deadlier with the second effect, which punishes chump blocking (or bad shadow effects) to an extent where it can make you lose the game! Chumping as a defense solution would be a very bad idea in this quest because of this, so build up one or two good defenders!
Sauron Worship

The last plot messes with your threat elimination level, lowering it by one when it enters play and every round from then on, giving you only so much time until your quest fails. Because you will need quite a few rounds for the quest, Valour decks are more risky to use here, as you’ll either need some very serious threat reduction or the ability to quickly deal with everything. The card’s theme fits the general “Mordor magic” theme from this cycle, which often seems to reduce your threat elimination level, as also seen in The Temple of Doom. As a last note, I feel like I should add that the three plot‘s artworks each feature the same person, an inhabitant of the city, and sometimes two hooded cultists, which is a nice touch.
Priest of Sauron
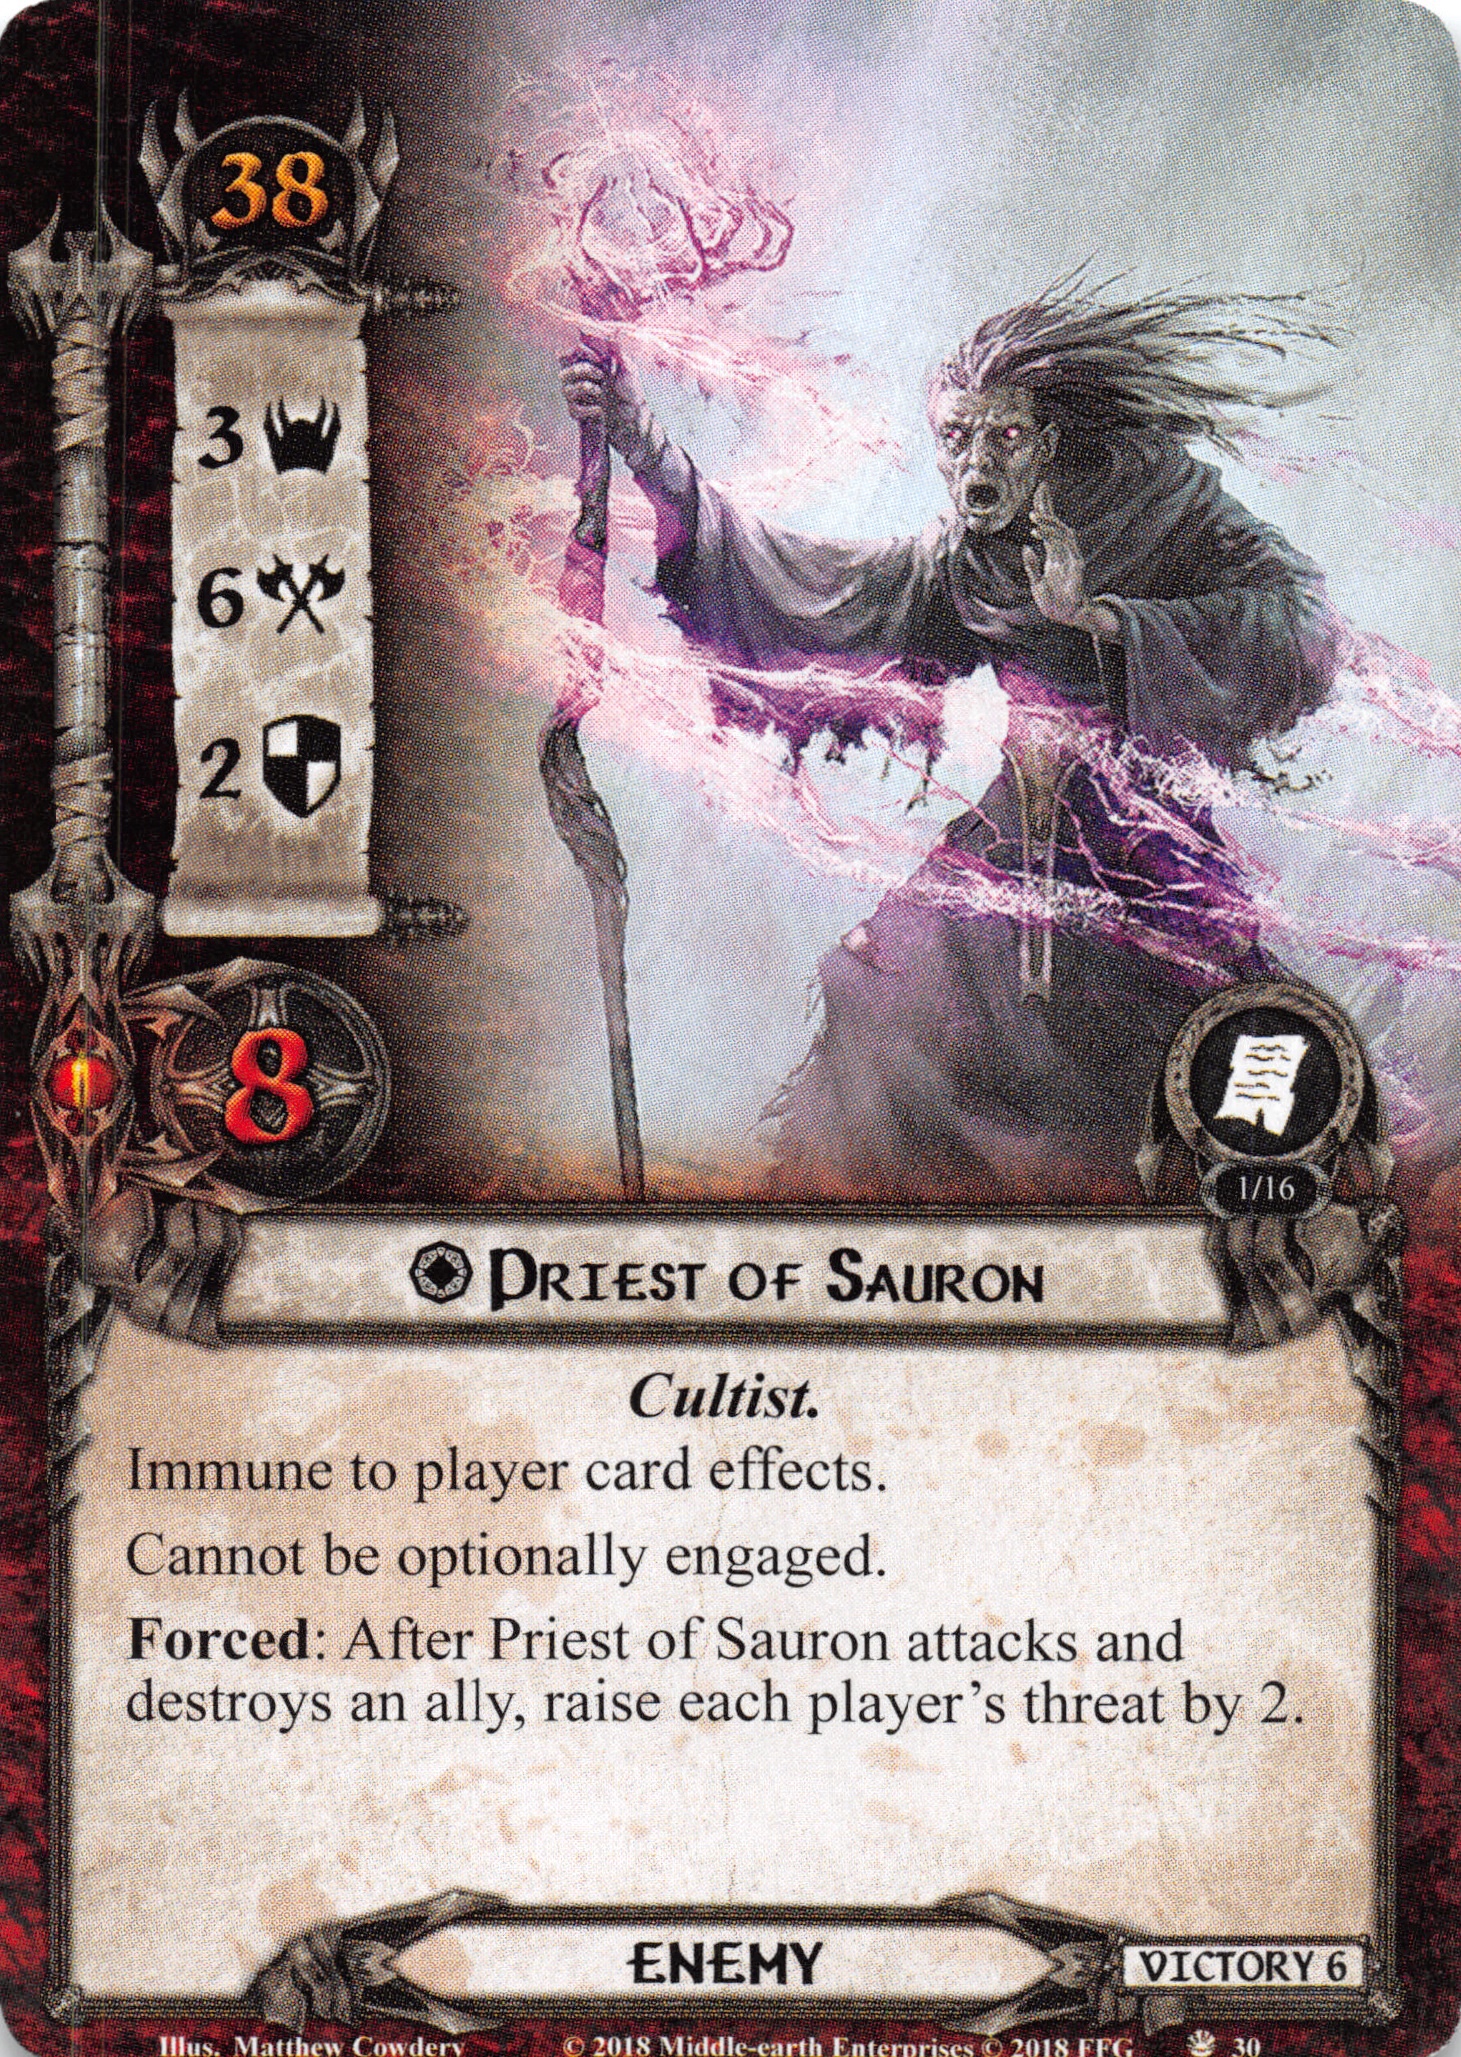
First and foremost, this guy, as all cultists, this guy is immune to player card effects. He has minor boss level stats with an emphasis on threat and attack strength but would be rather easy to kill if there wasn’t that wrinkle of him being impossible to optionally engage. As this quest does have a few effects that raise your threat and usually takes quite long, that shouldn’t be much trouble, except if you are running some very serious threat reduction (Galadriel). He also has a Forced effect which raises everyone’s threat by two every time he kills an ally. Paired, these two abilities will (pretty thematically) probably do you the most harm if the active plot is Sauron Worship, as they all toy with your threat and make threatting out quite a possibility.
The Governor

The second cultist has rather low stats compared to the other two, but he again has a pretty nasty ability: after a location has been revealed, he engages the first player and makes an immediate attack! Of course, this ability gets stronger the more players there are in the game, as that also means more locations revealed. The Governor seems to thematically tie in with the Bribes plot, but there is no real mechanical synergy other than making you dread locations more than before.
Black Númenorean
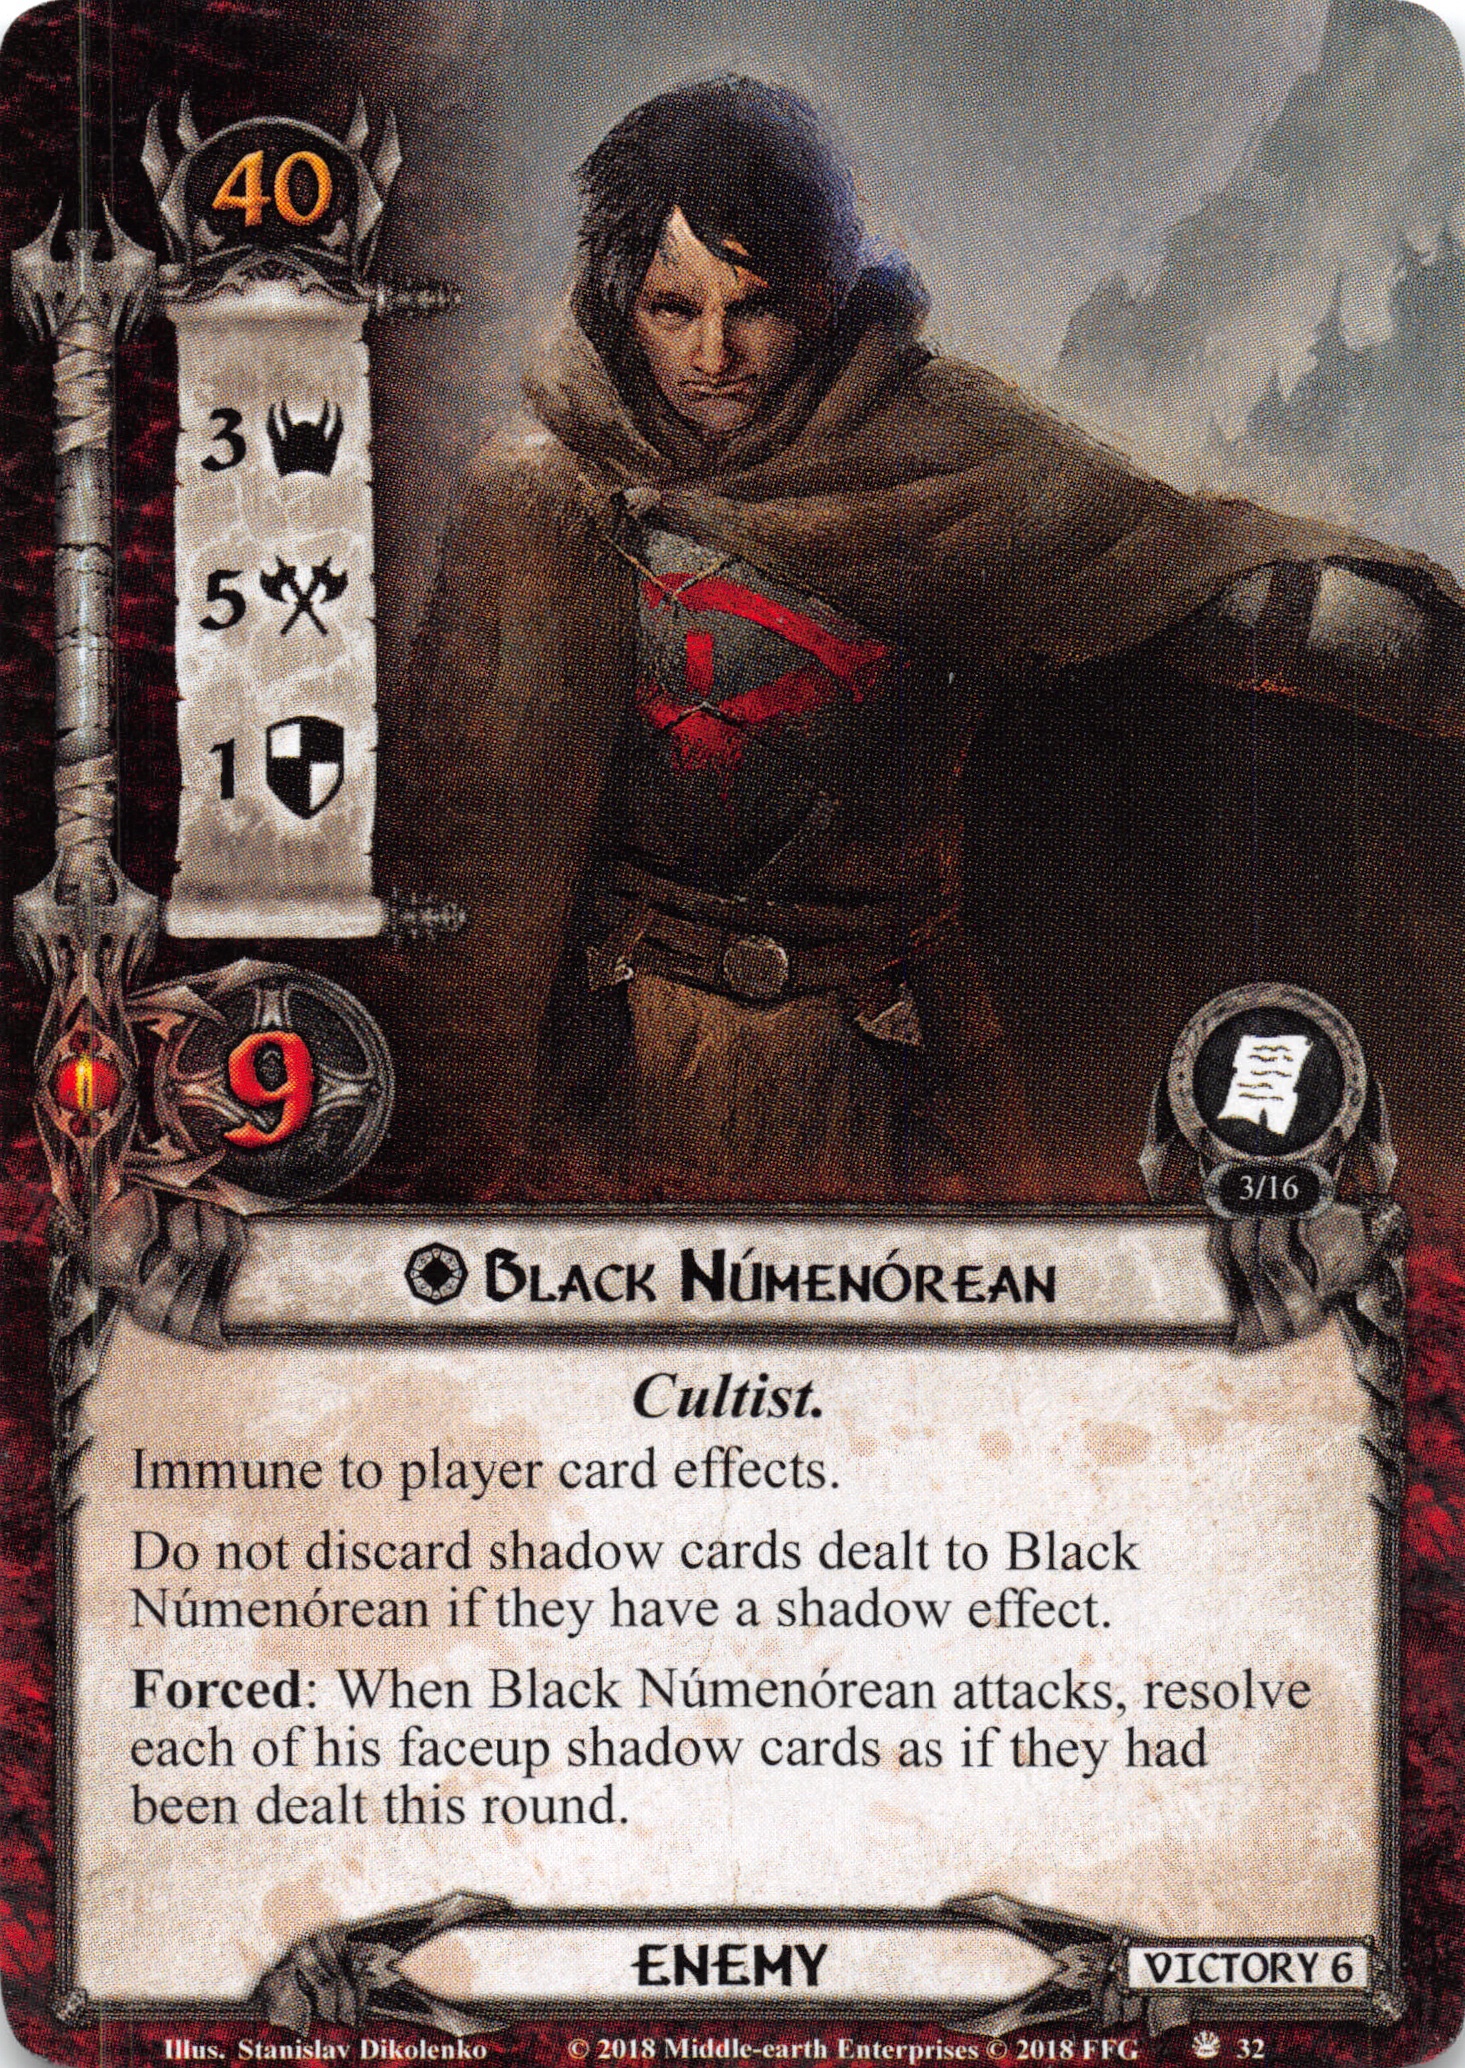
The last cultist, this guy has a rather strong combat focus that shows both in his stats as well as the abilities. First, shadow cards dealt to him that have a shadow effect cannot be discarded (by any effect, I guess, so leave Dawn Take You All in your binder). That also means you’ll have to deal with his shadow cards from the rounds before, which is made clearer by his forced effect, making him grow in strength rather quickly. So, especially for this cultist, bring in lots of combat power! Lastly, he works pretty well when paired with the Submit or Die plot as his attack power will probably grow to quite high levels of you let him live for too long.
The Encounter deck
Global
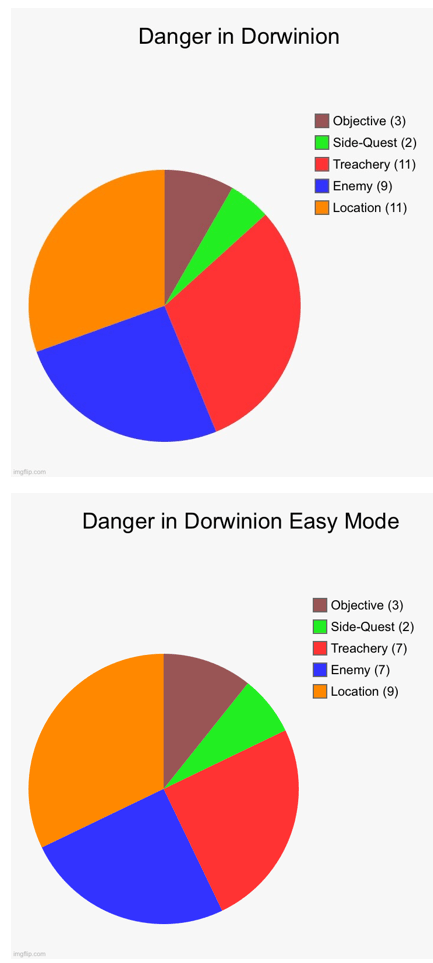
- There are 36 cards to reveal from the encounter deck (28 in easy mode), not counting the plots and cultists, but counting all locations as the number put into the staging area can vary.
- The chances for shadow effects are low, at only 38% in normal mode and 39% in easy mode. They focus on damage boosts, threat increase and a number of other effects.
- Average threat revealed is 1.2 in normal mode and 1.18 in easy mode, but can very a lot, as some cards surge and others reveal encounter cards if another effect cannot trigger.
- 3 cards (2 in easy mode) will surge, but many others can reveal more cards based on different conditions. Also, 3 cards in both modes are guarded.
- No cards will inherently have Doomed, but many effects will raise your threat based on some conditions. That makes Doomed player cards rather dangerous to use and based on the effectiveness of your deck you might need some threat reduction.
- Immunity:
- All cultist enemies are immune to player card effects
- Priest of Sauron cannot be optionally engaged
- Seedy Tavern is immune to player card effects
Objective
The three plots are analyzed further at the top, but there are still three other objectives shuffled into the encounter deck:
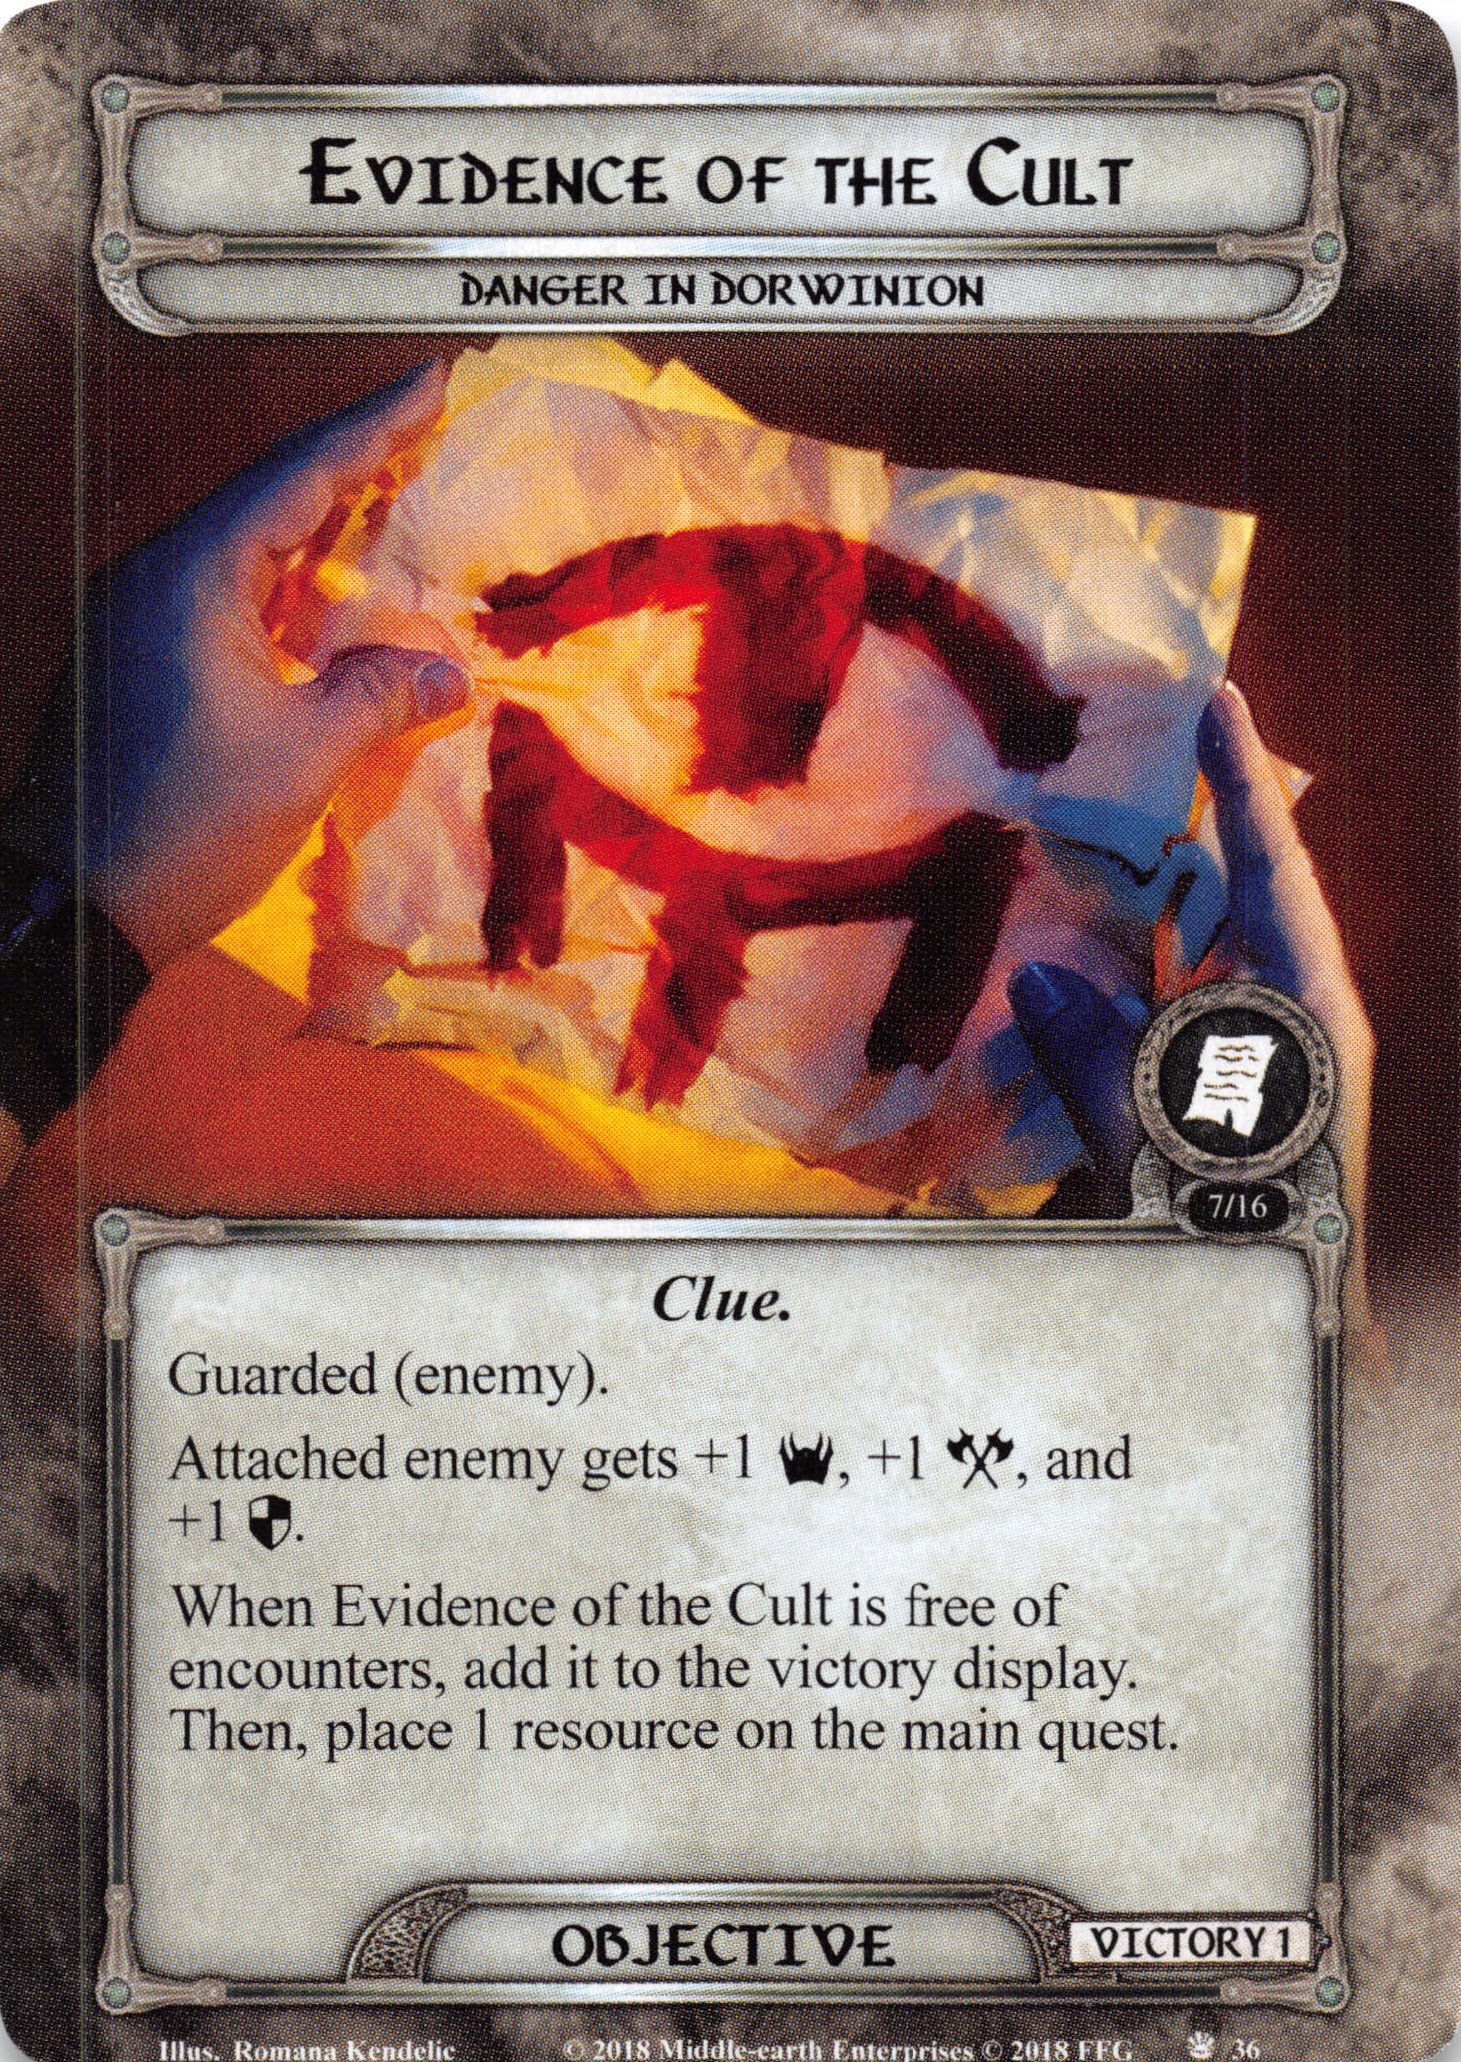
Evidence of the Cult
As an additional way of “investigating”, you get a guarded objective that strengthens attached enemies stats but also lets you put one resource on the active quest upon defeating said enemy, possibly saving you some time in the progress. You also only get to find a maximum of three clues, as each one is added to the VD after resolving its resource-placing effect.
Enemies
Enemies come from the City of Rhûn and Servants of Sauron encounter sets only (except for the cultists which I already covered). They inherit the Against the Shadow cycle’s brigand enemy effects of nasty effects that trigger upon engaging them and add some threat raise and effects that play around it, making them synergies with some of the other encounter cards, but they pay for that by having rather moderate or low stats.
Rhûn Backstabber

A rather weak foe (with a nasty-sounding name, though). The problem isn’t in his low stats, though, but rather in the nasty forced effect triggering when you engage him: after you have engaged him, you either have to raise your threat by two, which is quite bad in a quest that really tends to punish you for raising your threat, or discard an ally of cost two or higher you control, which may or may not be even worse an option, depending on the allies you have. A rather low engagement cost makes the choice rather hard to avoid, but cards like Hands Upon the Bow can take the enemy out before it has a chance to trigger.
Treacherous Easterling
Speaking of threat raise synergy, this is an enemy that begins at average stats, but grows its attack and defense strength every time the engaged player raises their threat, which means it’ll do so at least at the end of every round and possibly more often if some of the encounter deck’s evil tricks trigger. All in all, you should try to take out this guy as quickly as possible, maybe even trying to not engage it until you are sure you can immediately defeat it upon engaging it.
Messenger from Mordor
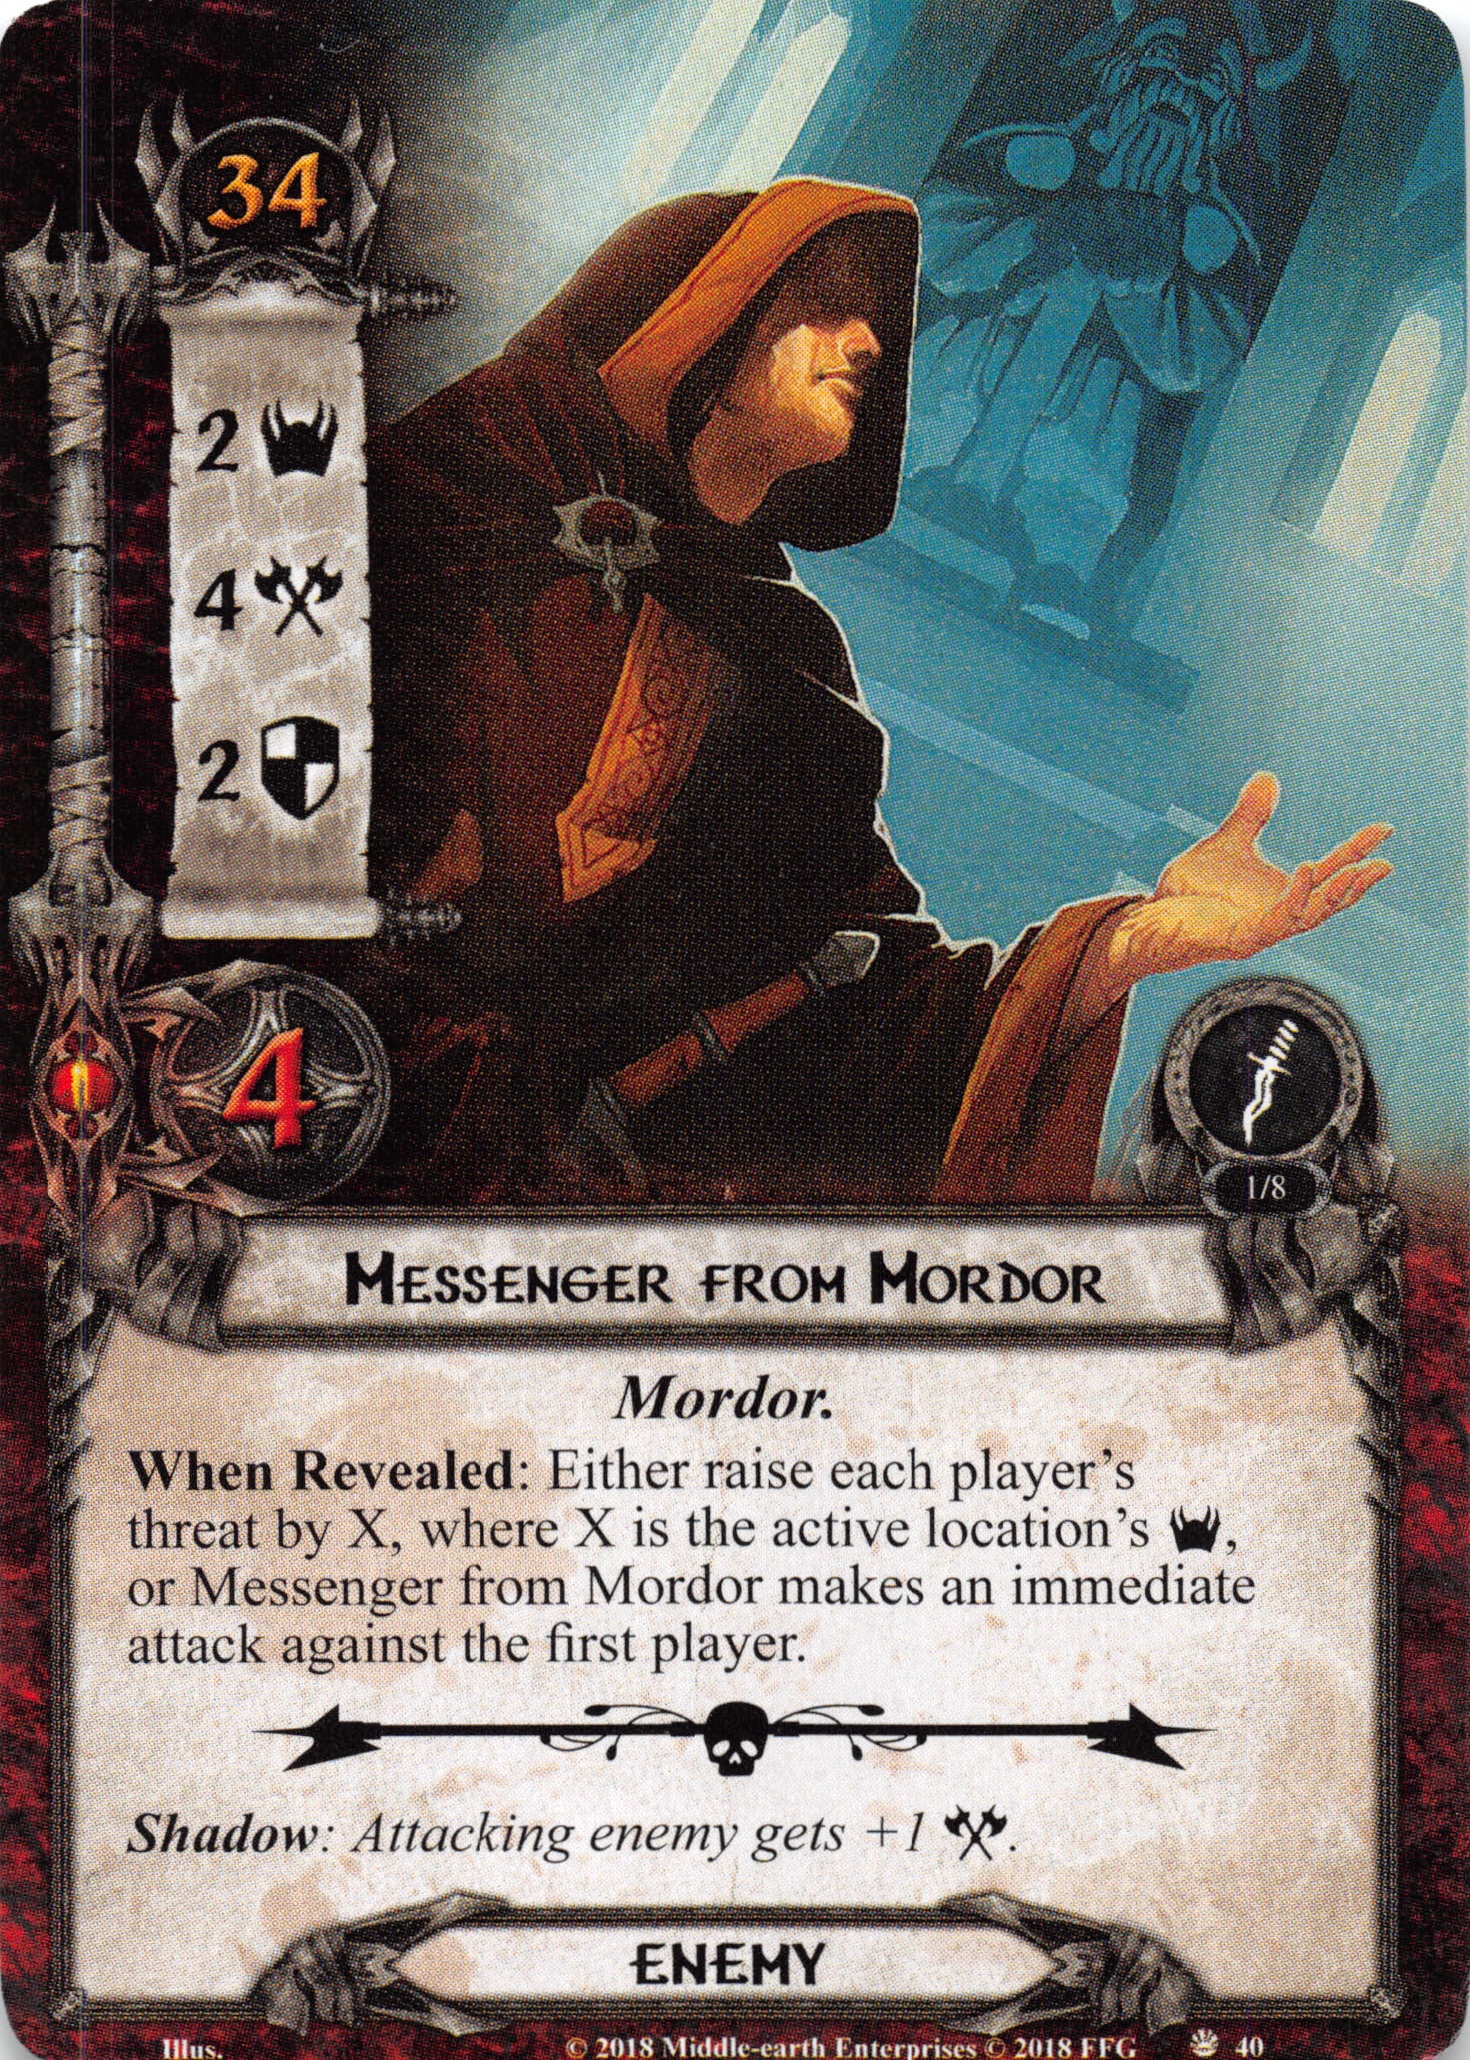
Bringing in more threat raise, you probably won’t be too happy to see this guy. When revealed, he either raises every player’s threat by X (X is the active location’s threat) or he’s gonna make an immediate attack against the starting player. As he has an attack strength of four, you probably won’t want to take the attack, but if there is no active location or you really don’t want to raise your threat, you might have no other choice. Once you have dealt with that, though, he is just another moderately strong enemy.
Servant of Sauron
The last enemy is very weak in stats, but makes up for it by having surge and two pretty annoying little abilities: first off, he always engages the first player and thus changes engaged players in every refresh phase. Also, after engaged player has raised their threat, he is going to make an immediate attack. As his attack stat is only two, it doesn’t seem like much, but as the effect is going to trigger at least once every round (though not more than once per phase), everything adds up and makes killing this enemy another priority to keep other players safe.
Locations
The quest’s locations try to build a picture of the city of Dorwinion, showing you both the rich hills of wine and the shabby underworld, where you’ll spend most of your time. Mechanically, there is no real “theme” among them, but some of the locations tend to reveal additional cards or add them to the staging area.
Hillside Manor
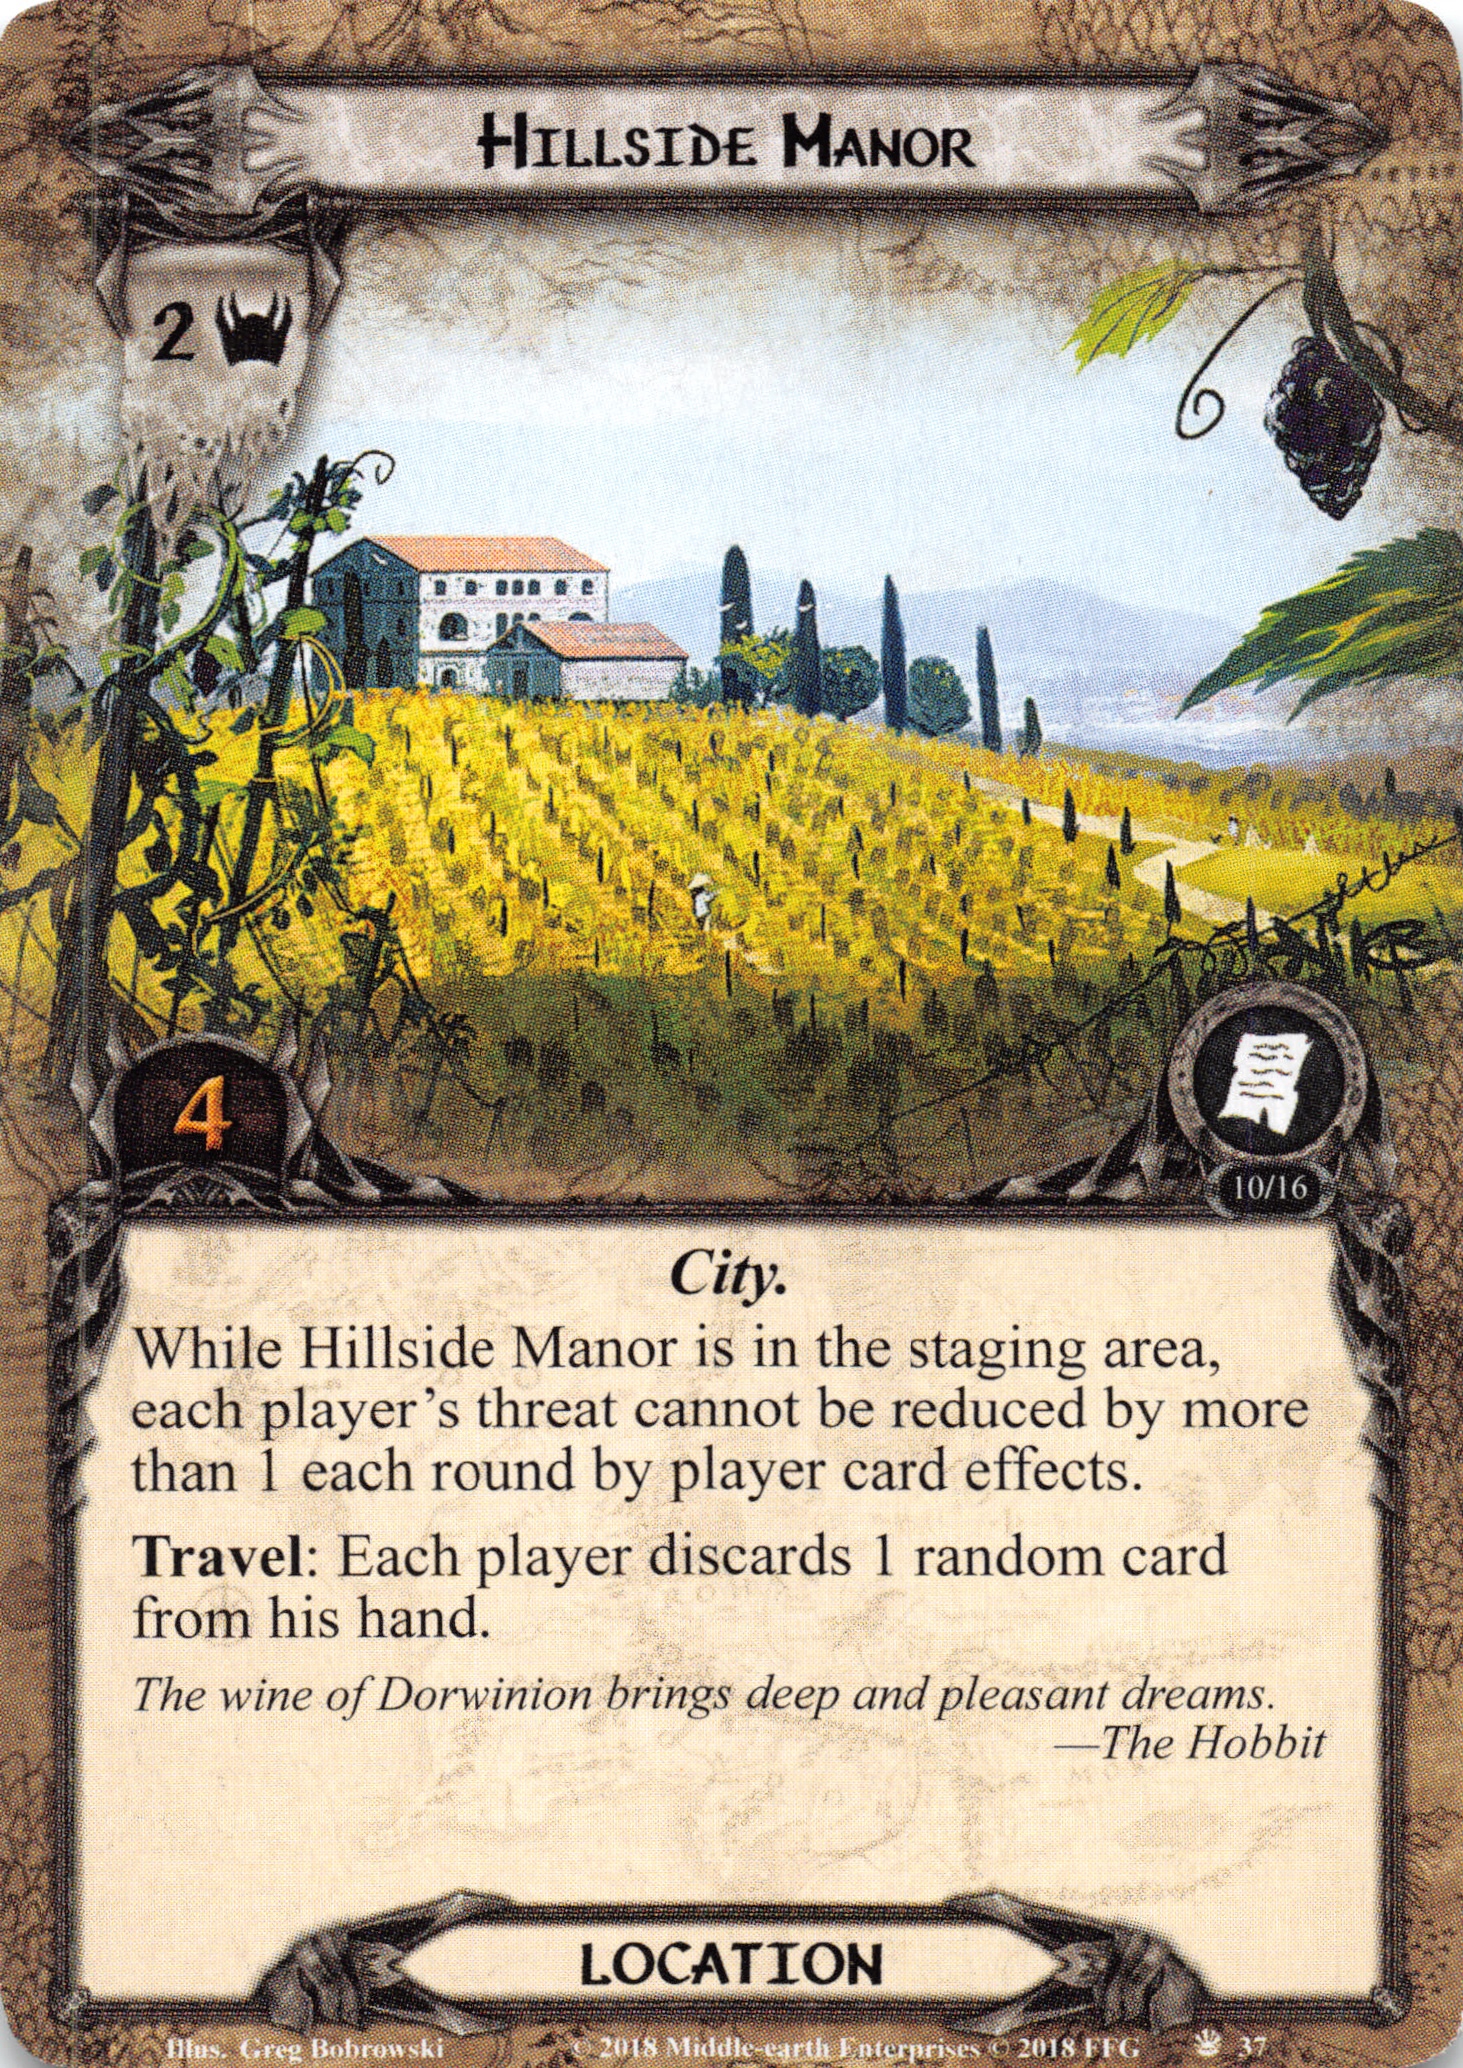
A The Hobbit reference, and a really niche one at that. Hooray! Anyway, with a pretty average to low stats, the hills of wine aren’t too bad. There is an annoying thing, though, as it it lowers threat reduction to one per player per round while it is in the staging area. That can hit hard or not, depending on whether you are running Galadriel or not. To get the effect away, though, you just need to travel to the location. The travel effect is quite harmless, so nothing really stops you.
Side Street
As this is the location that starts out in play in any case, you are definitely going to see it. Side Street has quite average stats of 3/3, but while it is in the staging area, progress cannot be placed on other locations in the staging area, which might be annoying in a 4-player-game if you are trying to use location control to solve problems. Also, Note that if you allow the second copy of this to get in the staging area, too, you won’t be able to place progress on either of them! Traveling here probably isn’t going to make you happy, too, though, as its travel effect always brings in an additional location that might be even worse! Overall, this one is annoying, but doesn’t have a lot of bite in low player counts, as it might even help you in your investigation (which is pretty thematic).
Catacombs
Catacombs is to enemies what Side Street is to locations. While it is in the staging area, enemies in the staging area cannot be dealt damage, which shouldn’t be too bad, except if you are running a direct damage or trap deck, or if you are using Haldir. Usually, though, the location’s four threat are going to be what makes you travel here. If you choose to, you have to resolve the travel effect, discarding the top card of the encounter deck and putting it into play engaged with you if it is an enemy! Overall, this location is one of the more dangerous ones you’ll be seeing, at a pretty high threat and the chance to bring in an additional encounter card!
City Forum

Featuring some artwork that really reminds me of Escape from Umbar, City Forum is one of those locations that grow stronger the longer you leave them unexplored. It begins at one threat, but whenever a location is explored, you put a resource on it, adding one point of threat to it. That means after a few rounds it might have four or five threat, making it pretty daunting! Even traveling there can be dangerous, though, as every player has to raise their threat level by the number of resource tokens here. All that means you’ll want to travel here as quickly as possible, although it might be better to get somewhere more immediately threatening first.
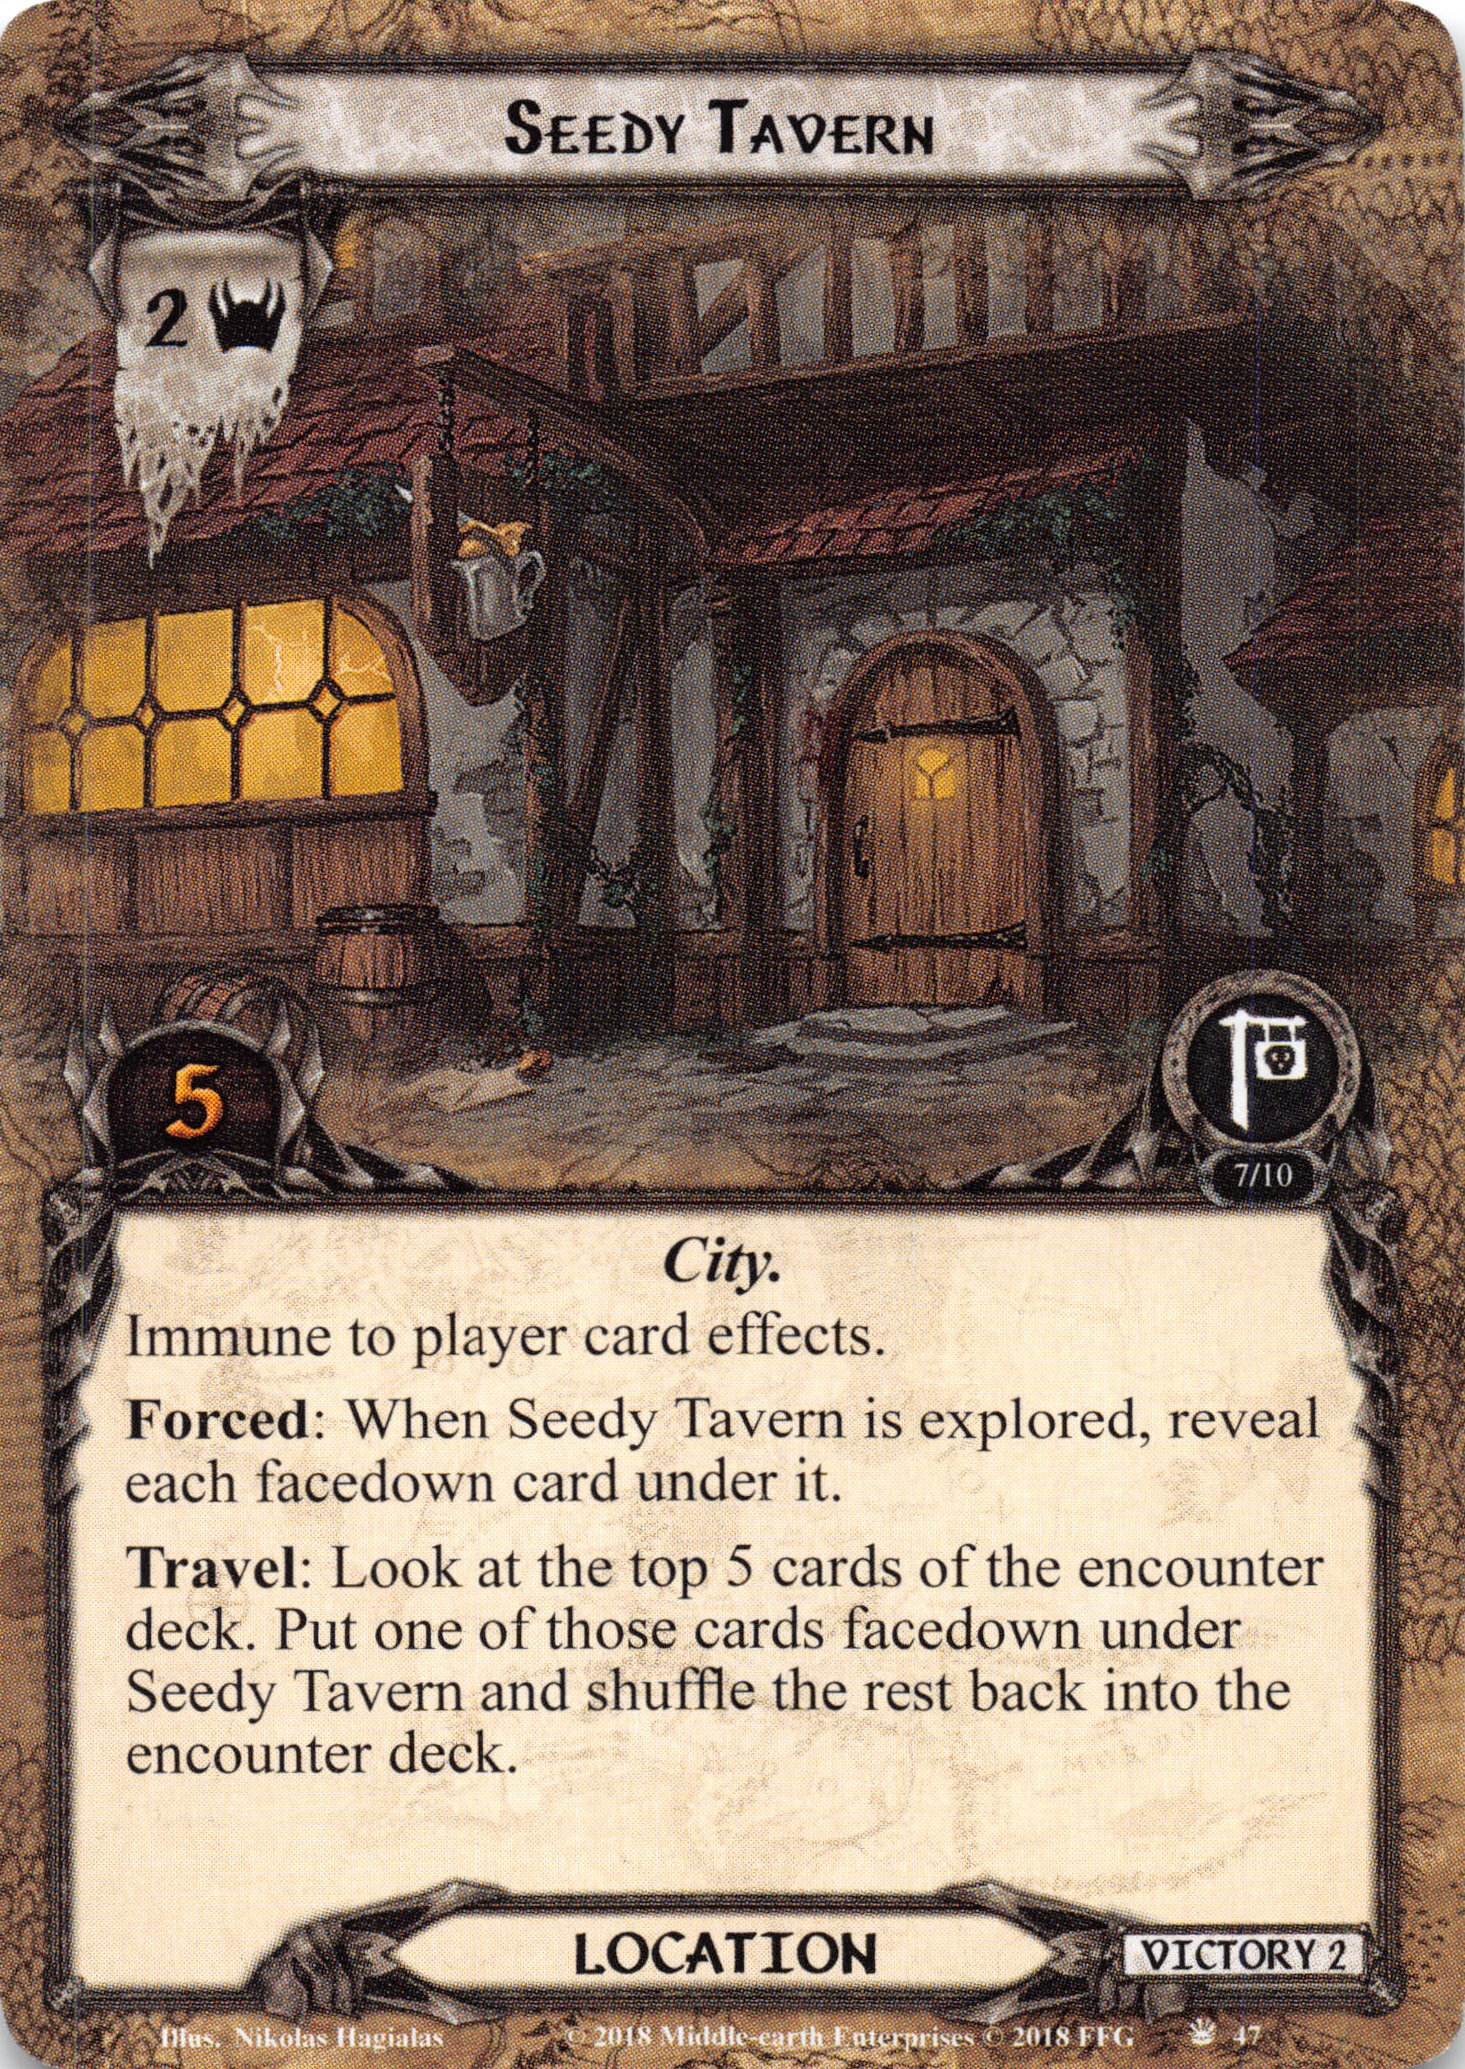
Seedy Tavern
Our last location is not too bad by itself and can even be useful in some cases, although it might also cause you some serious trouble! It has a pretty low threat of two, making it rather less immediate a threat, and is immune to player card effects. Upon traveling there, you have to look at the top five cards of the encounter deck, choosing one to put under Seedy Tavern and shuffling the others back. When it is explored, you have to reveal the card under it. Depending on your situation, you might want to add a location or clue to make your investigation a bit easier, a weak treachery or an enemy if you can immediately deal with it.
Treacheries
As for the treacheries in this quest, there are some that deal with the active location, some that do fun stuff with allies and a few others without an obvious connection.
Disappearances

This nasty and incredibly thematic card makes every player discard all ally cards from their hand! This might hit extremely hard in a deck that depends on its allies a lot or less in others. If it fails to discard any cards, it just gains doomed 2.
Secret Cultist
Being an evolved version of A Knife in the Back, this is another really fun treachery. When you reveal it, you attach it to the ally with the highest attack strength in play, making it an enemy that engages its owner! This not only steals a potentially strong and defense expensive ally from you, but also poses a new combat threat. There is no way to save somebody from being a cultist, so if you defeat attached enemy/ally or discard this card, both are discarded. Be careful with timing your Gandalf allies, as you wouldn’t want him to be a secret cultist.
Under Guard
This is the most common treachery seen in the encounter deck, and it is quite unique (though also quite weak). It’s when revealed effect makes you resolve the active location’s travel effect again. That can pretty much whiff, as some of the locations’ travel effects are based on chance, or it can raise your threat by quite a bit of City Forum is active, but if there is no active location, it gains surge. Overall, this is a pretty weak card.
Darkness in the East

Our second treachery that deals with the active location isn’t too bad, either. When it is revealed, each player has to raise their threat by the active location’s threat, which can again be close to nothing or a pretty whopping four. Just as Under Guard, if there is no active location, this surges. On a side note, the art here was done by the same guy who did the great Dorwinion artwork I talked about above.
Overwhelmed
Here, we have the last treachery, which deals with enemies. It has doomed 1, adding to the abundance of threat raise in the quest, and when it is revealed, enemies engaged with the first player cannot take damage until the end of the round. That also affects enemies that would only engage the first player this round and can even protect the cultist, potentially buying them some time to defeat you. The only saving grace is that if you somehow reveal both copies of Overwhelmed in one round, the second copy pretty much whiffs.
Side-Quests
Lastly, there are the two side-quests. Those are usually pretty bad to reveal, as their negative effects will dominate the board in each round you cannot clear them. You do have an advantage against them, though, as only one main quest stage needs progress, meaning that there is no cost in time you might have to suffer if you choose to clear a side-quest.
Unwelcome Travelers
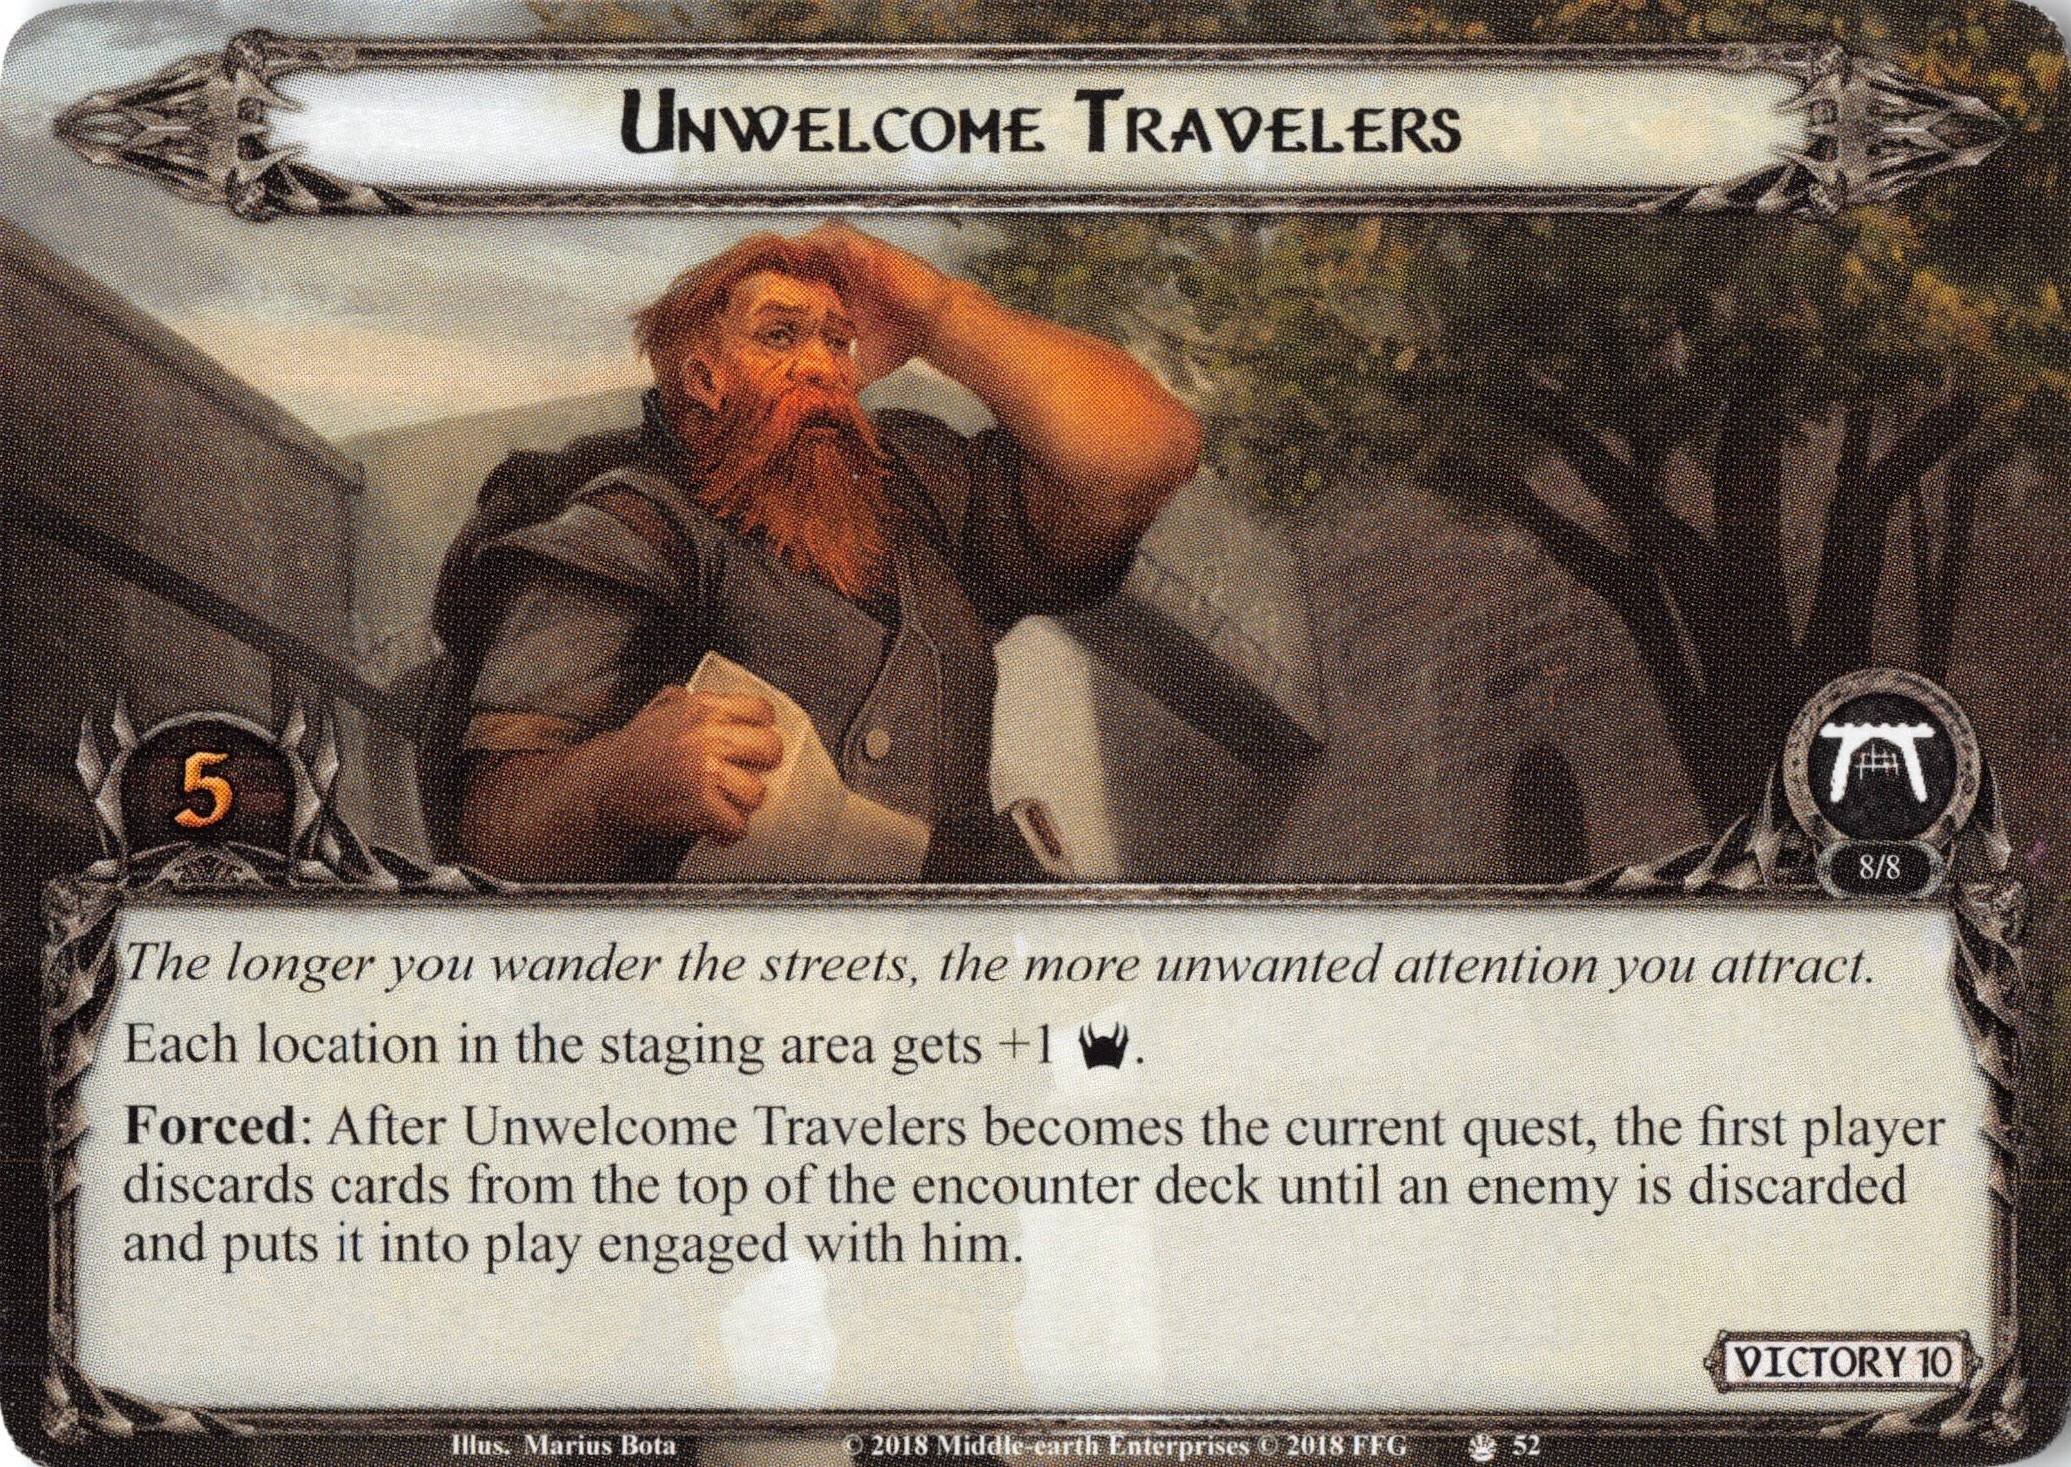
The first side-quest adds one point of threat to each location in the staging area, which is probably going to be worse the more players there are, and it can certainly support location lock. Even worse, when you try to clear it by making it the active quest quest, the first player gets to deal with an additional enemy, although you at least won’t have to reveal that enemy, making Servant of Sauron the optimal one to get here. So, in solo you might be able to just ignore this, but in multiplayer you should prepare to deal with an additional enemy and clear Unwelcome Travelers as quickly as possible.
Shadow of Fear
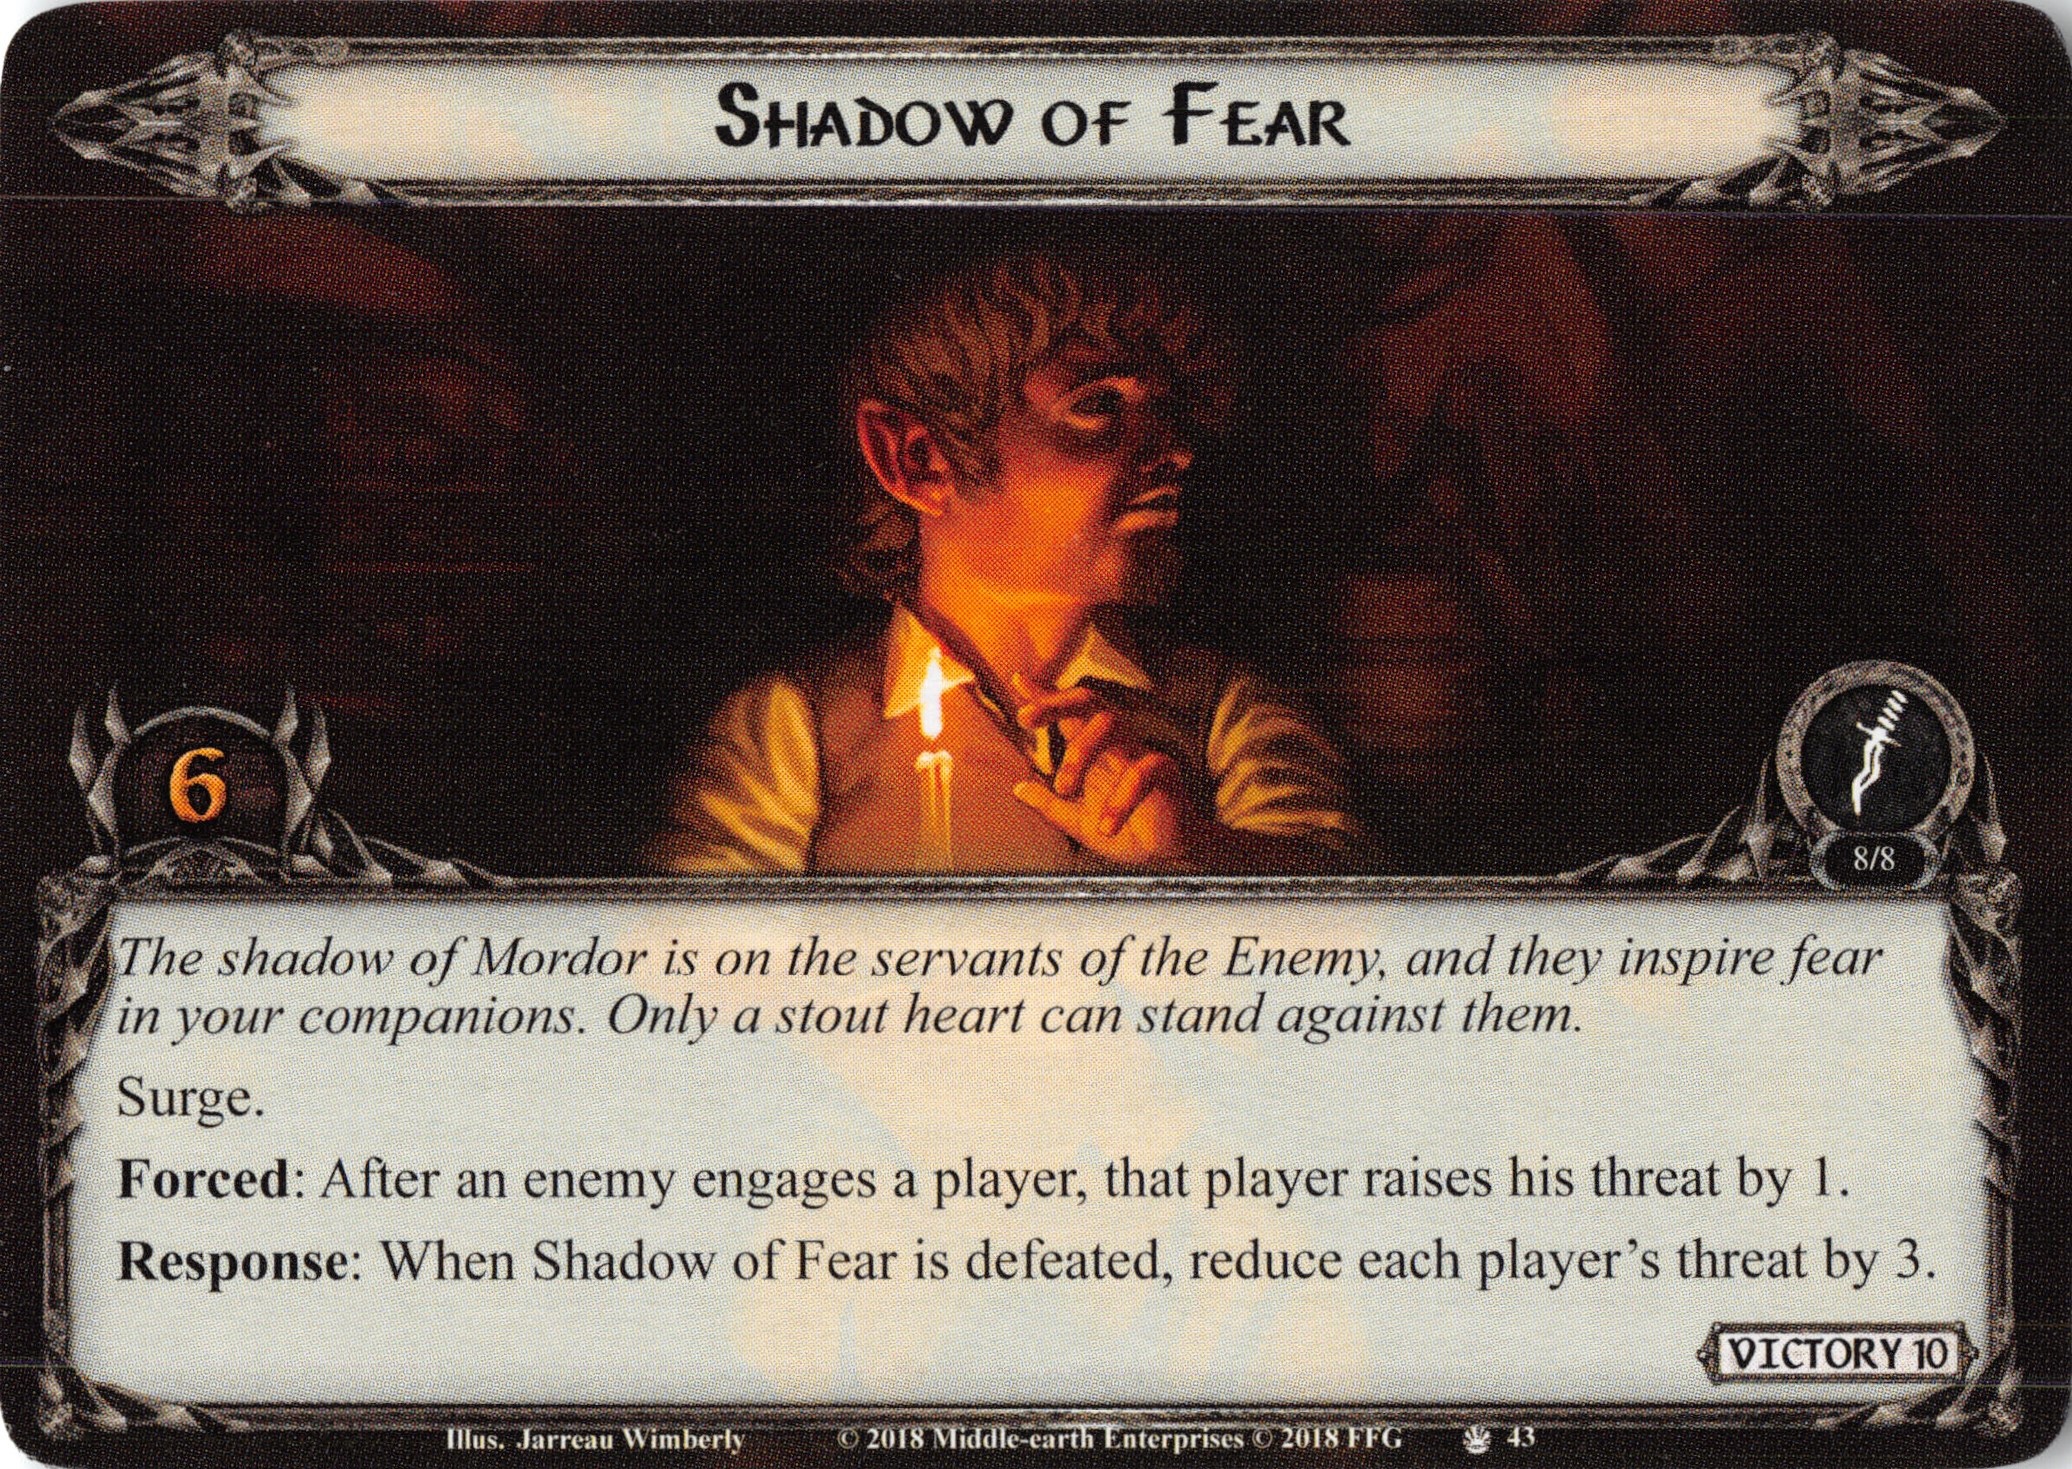
Our last card to analyze, this side-quest first surges and then adds even more threat raise, which is triggered by engaging enemies. You’ll want to defeat this card as quickly as possible to not only avoid more threat raise but also get a decrease by three, meaning that you can maybe even have an overall decrease in threat. Overall, if you can deal with Shadow of Fear quickly it is not going to be bad.
Tips and Tricks
- You are probably going to need some threat reduction to work against all the threat raise here
- Good combat capabilities are a must if you want to be able to deal with the cultist in the end
- Location control might be useful here, as the whole quest is pretty focused on them
- Be sure to know who your highest attack ally is, so you can anticipate who will become the secret cultist. This can be quite dangerous with tough allies like Gandalf, who isn’t easy to kill if he turns against you. He also doesn’t leave play at the end of the round, so you must find a way around him, which will be tough, as you just lost your highest attack ally.
- Other than that, the usual rules apply, this quest can be played with many types of decks
Playthroughs and Final Thoughts
With this being a relatively new quest, there aren’t many playthroughs that can be found. We will continue to add playthroughs as they are uploaded.
- True solo, Hobbit deck: https://www.youtube.com/watch?v=vZUCpGoV3Eg
Concluding, this is a new, fresh, fun quest that is also a bit challenging. You can play it with any deck and have quite some fun, so it is a pretty good quest to just relax or play with friends.
Now, though, your thoughts are turned east where, as one of the cultists told you, there is a temple in the Hills of Rhûn to which the bad guys brought their prisoners.

Drawing Thane Ulchor in Stage 3B is best avoided if possible. Hope that you can catch him early and put him in the victory display. When he is in staging beside the selected cultist, it’s trouble.
LikeLike
I’m not sure what you mean. Thane Ulchor is not in this scenario, he only appears in the Temple of Doom for the first time. You might have made the quest a little harder for yourself if you have been including him for Danger in Dorwinion.
LikeLike
Thank you for mentioning this. My 79-year old eyes made a mistake on the icons for Under Guard and the Power of Mordor, but only on two cards: Thane Ulchor and Tribute to Mordor. So these made perfect sense when played in the same encounter deck, but they make the quest Nightmare++. They have been removed and maybe my deck will beat it now.
LikeLiked by 1 person