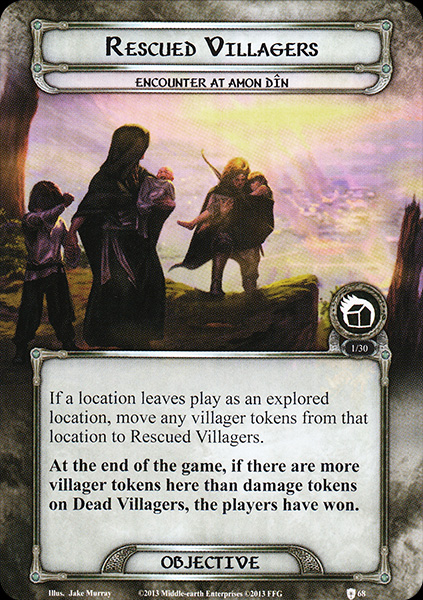
When the Against the Shadow cycle was first released, many players were stomped by the great difficulty of the scenarios compared to previous cycles. But then, along came Encounter at Amon Din: an easy scenario that most players are able to beat in under 5 turns without too much trouble. It still ranks as one of the easiest scenarios in the game to this day. But the quest wasn’t without its teeth. The shadow effects on enemies could pile up and take down unprepared players. And there was also still the check at the end of the game to see if the players managed to rescue more Villagers than having dead ones left behind.
This brings us to the Nightmare version of the quest. It is arguably the biggest jump in difficulty that any scenario has received with their Nightmare mode compared to the Normal version of the quest. This way, the quest falls more in line with the rest of the Nightmare Against the Shadow cycle. For this Nightmare version, the focus is put completely on the Villager mechanic, making sure it will be a lot more difficult to beat the quest while having more alive villagers than dead ones. This adds to the brutality of the quest since rushing it might now just cause you to lose the game at the end of stage 2.
Nightmare Encounter at Amon Din
- Found in: Encounter at Amon Din Nightmare deck.
- Size: 19 new encounter cards and one added rules card.
- Increase in Difficulty: Oh yes, this is probably the most extreme case of difficulty increase for a Nightmare deck. A good thing, too, since many players found the regular version too easy compared to the rest of the cycle. However, if you are a new player looking to buy Nightmare packs and think this one won’t be so bad, I would suggest skipping this one and going for something like NM Druadan or NM Steward’s Fear instead.
- Fixed Loopholes: Players are no longer able to kill Ghulat as soon as they arrive at stage 2 of the quest. Having him make more attacks until the players place all the required progress on the stage means that you will be discarding a bunch more villager tokens from his effect. Players are also on a bit of a timer this time, so the strategy of just waiting for more locations to pop up is also not really feasible anymore. There is now also a penalty for placing progress on locations in the staging area, hindering clearing locations there for some bonus villagers.
- New mechanics introduced: Nothing really new is added to the quest, but the nightmare cards focus a lot more on placing tokens on Dead Villagers, making it harder to beat this quest at the end of stage 2.
- Play this scenario if: You are up for a real challenge! You wanted the regular version of Encounter at Amon Din to be a little more difficult and focus more on the villager mechanic. You want a break from all the Archery that you might have gotten sick of after going through Druadan Forest!
- Solo or multiplayer?: I would argue that this quest is better with as few people as possible, preferably going solo. While this means that you do have fewer locations with Villagers, you also reveal fewer effects that will discard villager tokens than in a 4 player game. And with the starting location and first quest card giving you plenty of villagers, solo players aren’t punished that much. In higher player counts, you should really focus on cancelling encounter effects and invest in location control.
- What to look out for: You can now more easily lose the game if there are more dead villagers than rescued ones by the end of the game. Ghulat is much more of a threat with multiple attacks that hit harder. If Alcaron dies, you also lose the game (unlikely, but with the new enemies, he really shouldn’t be defending).
New Rules

There are two new rules introduced on the Nightmare card that are worth taking a look at. The first one is a passive ability that will protect Ghulat from an early grave. This “boss”-type enemy was usually dealt with in one or two turns and never really had an impact on the game. This now changes with him getting immunity to all damage until there is at least 15 progress on the second stage of the quest. This also serves to make Ghulat a stronger foe, as you likely won’t make the 15 progress in a single turn. That means he attacks more often and will discard villagers each time he does so. And waiting for more turns before you can kill him will also mean that the total number of Dead Villagers will be increased, causing Ghulat to have a much higher attack stat than his 2-3 attack he usually gets in a normal game before he is killed. Luckily, you can prevent him from attacking through player card effects, and while he is unique, he can still be a target for traps and events that lower his stats. You can also attempt to keep a low enough threat so that Ghulat remains in the staging area, not making attacks against any player. Once the players have achieved 15 progress on the main quest, they can take care of Ghulat in about a turn or two. He will be the key to your victory, as the game cannot end while he is in play. Ensure that you have enough villagers rescued when you eventually deal the killing blow, as the comparison between the objectives will begin immediately afterwards.
The other rule that is added to the game is a Forced effect at the beginning of every quest phase. Players must either discard 1 villager token from Rescued Villagers (and place it on Dead Villagers), or they must reveal 1 encounter card. This is a difficult choice each round, but especially during the first round. You already got a card per player during setup, will get another during staging, and now you might end up with one extra. That puts the encounter deck at a huge advantage. When playing the game with a low player count, that extra card each turn will hurt a lot. It would be better to discard the villager token instead, and the game even allows you to do that during your first round, as it gives you a free token on the objective during setup. But the decision really depends on your current boardstate and the number of alive/dead villagers at the moment. You can still rescue the villager from this effect with Lord Alcaron, so I would suggest you use him for this effect, as it saves you an extra encounter card. Players also have a tendency to forget this rule exists, so maybe set some sort of reminder for yourself. Or just keep Lord Alcaron exhausted at all times to compensate and move the villager to a location instead.
New Setup

There isn’t a lot of new setup to be discussed here. The players still start with Lord Alcaron under control of the first player and a Burning Farmhouse in the active location slot. Clearing that initial location quickly will provide players with a good head-start against the encounter deck. Ghulat is set aside, out of play until the players progress to stage 2. The two Villager objectives are also added to the staging area, though I prefer to set them aside somewhere else to be able to place tokens on them. You do still reveal 1 encounter card per player at the start of the game, for which a lot of the Nightmare cards will be horrible to get this early on. Luckily, the players start the game with one token on Rescued Villagers, which will allow them to pay for some of the new treacheries or enemies when they are revealed during setup. If you get lucky and nothing demands you discard a Villager token, you simply start the game with a score of 1-0 in your favor. It won’t last too long, but hopefully, you can claim some other villagers before the nasty effects appear that discard them.
Cards removed
The following cards were removed from the regular encounter deck to make space for the new Nightmare cards:
- 2x Burning Farmhouse (Easy location, though 2 copies remain)
- 2x Gondorian Hamlet (Thinning the encounter deck for more locations)
- 1x Marauding Orc (Making space for the new enemies, 3 copies remain)
- 1x Orc Rabble (Relatively easy enemy to defeat, 2 copies remain, mostly for their shadow effect)
- 3x Orc Ravager (Easy enemy)
- 2x Craven Eagle (This was always an odd enemy to see, glad to see this When Revealed effect removed in favor of enemies that interact with Villagers).
- 2x Trapped Inside (In solo, this was just a free encounter card, all copies are removed)
- 2x Panicked! (Removed to make way for the new treacheries)
- 2x Scourge of Mordor (Treachery doesn’t work well with the Villager mechanic)
The Quest
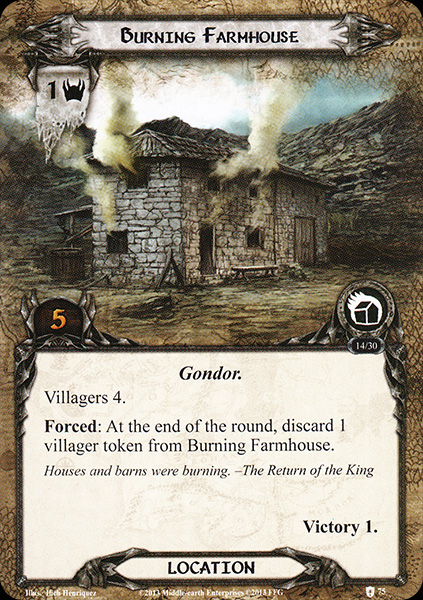
With the setup being mostly unchanged from the original version of the quest, you will find that the beginning of the game in Nightmare mode feels a lot the same as the regular version. However, keep in mind that at the beginning of the quest phase, you either have to discard a Villager token from Rescued Villagers or reveal an encounter card. On the first round, you can spend the Villager token that was added to the objective during setup, and I would advise sending that Villager to the Burning Farmhouse, which is now the active location. This will require that you exhaust Alcaron, so you can only do that if you didn’t use him during setup. Clearing that location now gets you 5 Villagers, which is a fantastic start to the game. The downside with removing the villager token is that there are now 0 tokens on Rescued Villagers. This means that cards like the new enemies or Save Us! no longer give you the option to discard tokens, and you must instead deal with additional attacks, enemies, and encounter cards. But hopefully only for one turn.

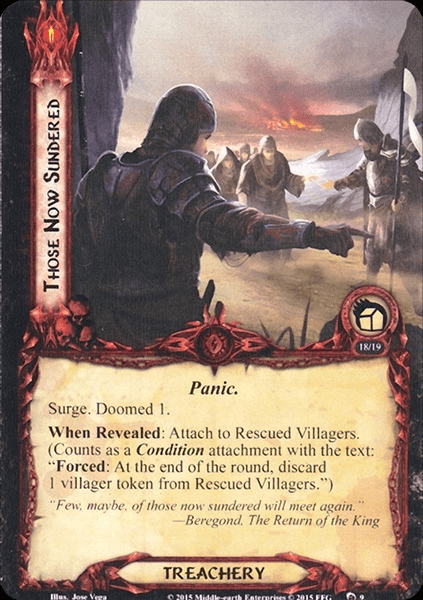
Your goal early on is to make as much progress as you can. Making 10 progress on round 1 will mean you start with 10 tokens on Rescued Villagers (in an ideal world, of course). This sets you up nicely to perhaps lose a few of the tokens in exchange for not triggering certain effects. Stage 1 should not take very long, as the longer, you wait, the more villagers will be discarded from encounter card effects and the new effect at the beginning of the quest phase. Getting (several copies of) Those Now Sundered on Rescued Villagers will be bad as well, adding to the timer ticking down before you are lost without a chance to save enough villagers. Ideally, you should clear stage 1 within 2 turns, which allows you to still have a good supply of villagers for later.
During stage 1, you should put a focus on willpower. Not at the cost of everything else, but if you have enough willpower, you are able to clear the active location each round and travel to a new location. That helps with rescuing more villagers without having to resort to location control. The extra willpower will also help during stage 2 to make the 15 required progress a lot faster. This prevents Ghulat from building up a strong attack, and the sooner you win, the less time the encounter deck has to discard villagers. This is also where playing the quest in lower player counts comes in useful since you might be able to avoid the worst cards in the deck if you move fast enough, revealing just 1-2 cards per round.
At stage 2, Ghulat will join the game and might already start to engage players. With an engagement cost of just 30, he can be a nuisance pretty soon. Luckily, he has no immunity to player card effects, which the players should definitely use to their advantage. Ghulat will add Dead Villagers to the objective each time he attacks, so your goal will be to not let him make attacks! This can be done by lowering your threat below 30, raising his engagement cost above your threat, or using attack cancellation effects like Feint, Feigned Voices, and Forest Snare. If you prevent the attacks, you also won’t have to deal with Ghulat’s high attack stat towards the end of the game, which is another reason to move through this quest quickly. Remember that Ghulat cannot take damage until there is 15 progress on quest stage 2B. This means that you can use your attackers to deal with the many other enemies in the quest.
Depending on the number of Rescued Villagers vs. dead ones, you will want to time exactly when to beat the quest. If you make the 15th point of progress on the quest, then you can start damaging Ghulat. At the moment you kill him, the game ends. If you see that there are currently too many Dead Villagers, but you have tools to rescue more of them next turn, then it is advised just to wait another round and make sure you keep as clean a boardstate as possible. This is to prevent any other encounter cards from killing more of the precious villagers. Only once you know for sure that there are more Rescued Villagers than dead ones should you kill Ghulat and end the game.

At the end of the game, if there are more Rescued Villagers than Dead Villagers, the players win the game. If there is a tie or there are more Dead Villagers than rescued ones, the players will have lost the game. This split between dead and alive villagers can be very luck dependent with this quest since you can get very different results during different games. If you were unlucky, try again until you manage to beat it. You might get a few more locations this turn, or maybe the Nightmare cards will just be discarded as shadow cards or something. This version of the quest is difficult and might take a few tries, but it is not impossible. Best of luck to you!
The Encounter Deck
Global

- The new encounter deck is made up of 35 encounter cards. 2 more than the regular version of this quest.
- As is custom for this cycle, shadow chances are high, at 63%. A lot of these shadow effects can also cause you to take more shadow cards on the attacking enemy.
- Average threat on cards coming out of the encounter deck is 1.86 threat/card. This has a pretty narrow range, up to 4 threat on some enemies and locations.
- 4 treacheries have the Surge keyword, but there will be a lot of other effects that reveal additional encounter cards. Examples are the new rules card, and the Pillaging Orc.
- Doomed is not actually a very common keyword, with only Those Now Sundered having Doomed 1. There are some threat levels you might not want to cross, but there isn’t a lot stopping you from bringing your own Doomed cards.
- There is no Archery in this quest, which is a welcome relief after Druadan Forest. There will still be a little bit of damage being dealt to characters through Run for your Lives!
- Immunity
- Ghulat cannot take damage until there is at least 15 progress on stage 2.
The following statistics did not count any of the objectives, Ghulat, or the initial Burning Farmhouse that is all removed from the encounter deck at the start of the game. There is a pretty even split between the types of encounter cards in this quest, though this will skew over time, since all locations will end up in the Victory Display once they are explored. Once you’ve gone through the encounter deck once, you’ve seen them all, and the new deck will only contain locations that happened to have been shadow cards.
Enemies
Two new enemies are introduced, both having a When Revealed effect that can cause you to discard villagers. They are a lot stronger than the Orc enemies that were in the normal game, adding an extra challenge on the combat front for this scenario.
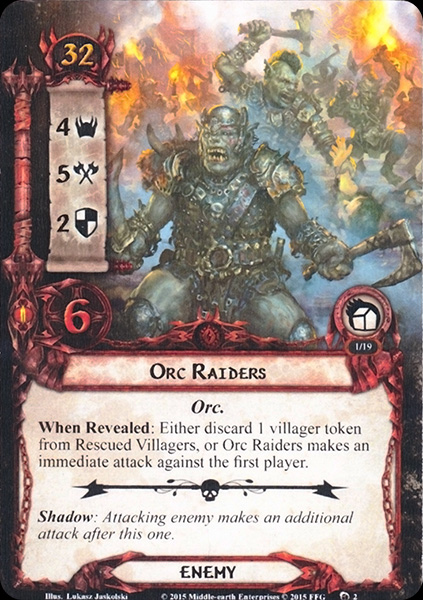
- Orc Raiders: These enemies are pretty strong compared to what got removed from the encounter deck to make this Nightmare version. I know this is common, but it’s always a bit of a shock when you see such strong enemies with horrible effects in the encounter deck. Such is the case with the Orc Raiders. They have a very powerful stat line at 4 threat, 5 attack, 2 defence, and 6 hitpoints. With an engagement cost of 32, the threat won’t stay around very long, but that initial hit of 4 threat can still cost you enough progress to not clear the active location. But the initial attack value of 5 hurts a lot more, especially because the Raiders have a when revealed effect that can cause them to attack when they are revealed! Players can prevent this initial attack by discarding a villager token from Rescued Villagers, but if you have enough defenders, then the extra attack isn’t impossible to defend. If your threat is also low enough, you can avoid engaging this enemy this round, so he only makes a single attack this round. Ideally, you would retaliate immediately with Grimbeorn the Old or an attack into the staging area with Hands Upon the Bow. Not only would this get rid of the 4 threat, but you also do not have to deal with this enemy during the combat phase. But with 2 defence and 6 hitpoints, it will be tough to kill this enemy, especially in the early game. If players are not prepared for the extra attack this turn (perhaps because you already revealed a copy of this enemy earlier), then losing a single Villager isn’t the end of the world. Since this enemy has such a high base attack value, many of the shadow effects (and especially when they start stacking), can cause a hero to die. This enemy will require shadow cancellation, or you can chump the attack. Killing the Raiders won’t be easy, but having a way to reduce their defence by 2 with Rivendell Blade can help you to deal more damage to their 6 hitpoints.
- Pillaging Orc: The other new enemy in this encounter deck acts a lot like the Raiders. Many of the stats are almost the same, and it even has a When Revealed effect as well. The Pillaging Orc’s effect has the players choose to either discard a villager token or reveal an additional encounter card. This is different from the extra attack that the Raiders would make. But this decision does make it difficult to decide between an additional card or the villager token, especially since players are given the exact same choice at the beginning of every quest phase. The same advice goes for this effect. Check to see how you are doing in terms of board state and the number of villager tokens on the two objectives. The good thing about this particular effect is that you will be able to cancel it with a Dunedain Lookout. The enemy itself is less threatening than the Raiders but will still add 2 threat to the staging area until the players engage it. Once engaged, the 4 attack from this enemy will still need to be defended, but a decent defender can take care of it. Attacking back is a little bit more difficult, as the Pillaging Orc has 3 defence, making it harder to get to the 5 hitpoints. That number also protects it from dying immediately from a Gandalf-bomb. The shadow effect on this enemy also deserves a special mention since it will give the attacking enemy a shadow card equal to the number of villager tokens on the active location. If you have been placing a lot of villagers on the active location with Lord Alcaron, then you may be facing a bunch of shadow effects all at once. This one also has a chance to whiff, but you are likely not travelling to a location that does not give you villagers. It’s worth canceling if you would otherwise get more than 1 shadow card or if the attacking enemy is the Orc Rabble.

Locations
Since locations are the only real way to gain Villager tokens, they are extremely important. Two new locations are added, each with different ways to lose Villager tokens. They also don’t reward the players with a lot of Rescued Villagers when explored, but it’s better than nothing.
- Besieged Homestead: This is definitely the more annoying one of the two new locations. And I’m not just saying that because this location shuts down a strategy that worked well against the regular version of this quest. You could usually bring some location control to clear any locations in the staging area to claim their villagers without having to travel to each location. The Besieged Homestead comes with the wonderful ability that discards a Villager token from each location in the staging area where progress gets placed. That means that a single Northern Tracker could kill quite a lot of Villagers, making travelling to locations next to pointless since there is nobody to rescue anymore. Luckily, you only discard 1 villager for any amount of progress placed on a location in one go. So you could build up some big progress-placing cards like Mirkwood Explorer and nuke a location by the end of the game for a few more villagers, even if the Homestead is in play. That only costs 1 Dead Villager, but Lord Alcaron could also save them.
The Homestead also has some other dangerous features, like a relatively high threat of 4, 6 quest points, which makes it difficult to place a lot of progress on the main quest if this is the active location, and a travel cost. This travel cost forces the first player to search the encounter deck and discard pile for an enemy, reveal it, and put it into play, engaged with them. There are some good enemies to get for this effect, especially the Orc Arsonist, who won’t deal extra shadow cards to any new enemies you will engage this round. You can also go for the Marauder or the Rabble since they don’t have a When Revealed effect either. It depends a little on what your situation is like. The travel cost isn’t insane since you get to choose the enemy. If you drew no enemies this round, then the Homestead can be a nice destination, and you might rescue the two villagers on it as well. This location is also a great target for Thror’s Key, allowing you to still place progress on locations in the staging area without punishment. This can help you to rescue a lot more villagers in a single round than you normally would with just the active location (and quest 1B). - Overrun Village: The next location is one that is likely best to ignore. The Overrun Village has just 2 Villagers when it is added to the staging area and will have a Forced effect that will discard villagers from it whenever an enemy engages a player. This can happen pretty quickly, causing you to lose both villagers quickly. You can still use Lord Alcaron‘s ability to move those villagers to the active location, allowing you to rescue them. The Overrun Village will quickly have no incentive to travel there if all its villagers are gone, and the 3 threat does not make it a super high-priority destination. It also has 5 quest points, which makes a Burning Farmhouse a much more appealing destination at the same amount of progress required to clear it. What’s more, is that the Overrun Village has a Travel cost where 1 damage token has to be placed on Dead Villagers in order to go here. This damage cannot be prevented unless players find a way to ignore the Travel cost of this location. If you have no other destination, or this location appears for an effect like The Hidden Way, it can still get you some villagers, so it is not completely useless. Remember that the effect on Overrun Village is only active if it is in the staging area. A nice combo you could also use is to get a Woodmen’s Path on the location and use South Away! to ignore the Travel cost while also reducing everyone’s threat. The path will allow you to quickly clear the village before treacheries can kill off the villagers on it.

Treacheries
Four new treacheries are introduced in this version of the quest, all focusing on discarding even more Villager tokens. With 9 cards in total, you likely won’t be able to avoid these treacheries during your playthroughs.
- Trapped Villagers: This first treachery is one where the encounter deck really gets to catch up to the players. First of all, it adds three tokens to Dead Villagers out of nowhere, so there is no way to save them with Lord Alcaron. The treachery will then add threat to the staging area equal to the number of tokens placed on Dead Villagers. This just got boosted by three, so you can imagine it adds quite a lot of threat to the total. And considering there are three copies of this card in the deck, you could run into several copies in the same round. If you have a way to cancel this card, then I would advise doing so. The three dead villagers can never be resurrected again, so the encounter deck just closed the gap with your objective a lot (or even raced ahead of you). The added threat to the staging area can also delay the progress that the players would make as well. This potentially prevents them from clearing the active location and adding those much-needed villagers to Rescued Villagers. If you can set it up, then The Door Is Closed would be excellent for this treachery. It would require you to find one copy to place into the victory display, which can be done through Out of the Wild and Scout Ahead. AleP’s Weep No More can also help with this, provided you have access to that card.
- Run for your Lives!: When I said that there was no Archery in this game, I was technically correct. However, this treachery does act a lot like Archery and can really cause problems if you do not have the hitpoints to spare for a lot of direct damage. When revealed, this treachery forces you to discard a villager from Rescued Villagers. You could still save this Villager with Lord Alcaron if he hasn’t done his ability yet this turn. After the Villager is discarded, the players as a group must deal damage to their characters equal to the number of tokens on the Dead Villagers objective. Luckily, this is not done per player but shared as a group. This makes the treachery a lot more tolerable compared to some others in this quest. I would not deem this worth canceling since the damage can likely be healed with relative ease. It’s especially easy in the early game, allowing a reasonable “free” encounter card when there are less than 4 Dead Villagers. Towards the end of the game, you will be faced with more damage and might end up losing an ally or two. Constant healing and damage cancellation are your friend here. Honour Guards are especially useful since they can soak up 2 damage themselves and use their ability to cancel another point of damage. With 2 copies of this treachery in the game, you aren’t likely to get them back-to-back, which gives you enough time to heal any damage.
- Save Us!: This is a pretty horrible treachery that can cost you 8 villagers if you aren’t careful. The treachery offers a choice to each player: either you discard 2 villagers from Rescued Villagers and place them on Dead Villagers, or you have to find an enemy. That enemy must then be revealed and added to the staging area. The “reveal” part of that second option is very tough, as it would trigger the new enemies in the deck, as well as some other ones. Luckily, there are some enemies still in the deck, like the Orc Rabble and Marauding Orc, that do not have “When Revealed” effects and could be killed relatively easily. But putting this choice in front of every player is a problem, as it means you either kill a lot of villagers or end up with several enemies in the staging area, all adding their threat to the total and triggering effects. In lower player counts, the enemy option is better since you might not even get another enemy this turn, and this way, you get to pick who you are going up against. But in higher player counts, this one is worth cancelling, and otherwise, you may need to split the difference between enemies and villagers.
- Those Now Sundered: Finally, we have treachery that will attach itself to the Rescued Villagers objective. The card will have a condition attachment that will discard 1 villager token from Rescued Villagers at the end of each round. This constant outflow of villager tokens makes it very hard to keep increasing the number of tokens on the objective, especially if more than one copy of Those Now Sundered attaches itself to the card. You really have to bring condition removal for this card alone, as otherwise, you will find yourself with next to no villagers left by the end of the game. The treachery also doesn’t attach to the quest card, which would have allowed for some more tricks. So you are pretty much forced to bring some form of Condition removal. My suggestion would be Power of Orthanc, as the quest doesn’t punish a high threat too much. Other cards like Miner of the Iron Hills or ally Elrond also work. The treachery itself will also raise each player’s threat by 1 and surges. This is really one worth canceling if you want to avoid adding the condition removal to your deck. But with so many treacheries in this game, it will be easier to discard this as an attachment and leave the Test of Wills for the other treacheries instead.
Tips and Tricks
- Since Ghulat will be making a lot more attacks in this mode than in the normal version of the game, he will be placing more and more tokens on Dead Villagers. Combine this with the increased attack value on him, and the urge to cancel his attacks becomes very powerful. He is a perfect target for a Forest Snare, which is a permanent solution for him, allowing you to dedicate your defenders elsewhere. Temporary solutions like Feint and Feigned Voices are also possible, but you will likely need multiple copies.
- Lord Alcaron should really only be used to rescue villagers during this quest. It’s nice that he has stats, but you really need to save a villager each round. There are a lot of constant discarding effects, like Burning Farmhouse, the new rules card, and Those Now Sundered. Rescuing these villagers will help you to reduce the number of Dead Villagers and will help in the final calculation to see whether or not you have won.
- While Besieged Homestead somewhat counters location control, it can still help you to gain more villagers each round than just from the active location. The trick is to have some abilities place a lot of progress at once so that the Homestead doesn’t trigger every time. Mirkwood Explorer is an excellent ally for this, though it can take a while to get him to a point where he can take care of a single location. Other effects like Evening Star and Asfaloth are also great tools to clear more locations from the staging area.
- Don’t ignore location attachments, either. Since you will likely be travelling each round, it would be good to get some extra boons through Ranger Provisions/Ancient Mathom/Woodmen’s Clearing. You can also get great use out of Thror’s Key to blank travel costs (or active abilities). With high quest point locations, the Woodmen’s Path attachment can also save you a lot of progress so that you can make more on the main quest (or on other locations with Explorer’s Almanac).
- Get some readying on Lord Alcaron! You’ll need it to make use of his ability more than once per round. It is often thought that his ability has a limit, but it hasn’t. You can still ready him through cards like Narya, To Arms (if he has an attachment), Ever Vigilant, Strength of Arms, or Spare Hood and Cloak. This helps to rescue more villagers each round, including those from constant effects like Those Now Sundered.
- Since this is still a quest in the Against the Shadow cycle, shadow cancellation will be important. Not only to stop an enemy from getting a ton of shadow cards (especially the Orc Rabble) but also because a lot of shadow effects will discard Villagers. Erkenbrand, Balin, and Hasty Stroke are great to bring to this quest.
Playthroughs
If I scared you a little too much with this article, and you don’t want to play this quest but are still interested in seeing how the quest plays out, I have linked a few videos down below.
- 2 player: https://www.youtube.com/watch?v=LC5Q-mLU6GI
- 2 handed, progression style: https://www.youtube.com/watch?v=CtBsHznSKZY
- 2 player, normal and nightmare: https://www.youtube.com/watch?v=apkxfJOyeb0
Just three scenarios left for the NM Against the Shadow cycle! Looks like we will be finishing this cycle ahead of schedule. That leaves me with plenty of time to focus on some of the other projects, including the yearly swag that still needs some work. Since we will be playing this cycle during Con of the Rings, I hope to finish before that time, just in case people are crazy enough actually to try the Nightmare versions during the convention. We are also going to be playing through the Ringmaker cycle, but that’s too much work to finish before October since none of the quests have been covered in Nightmare mode at all!

