There has been a pattern in this card game stretching right back to the Core Set. Well, perhaps I should be more specific, there are in fact several of these patterns. But the one in particular I am referring to is the removal of heroes from the player’s control before the game ever begins. It began with the third quest we ever got, Escape from Dol Guldur, and so certainly has pedigree on its side, unlike these modern inventions like splitting upthe party or BossBattles. With this first incarnation, one hero was randomly captured at the beginning of the game so you had to save them and survive the effort. And to this day, whenever someone in the community fancies getting their teeth kicked in, they try a game of EfDG solo. If they have a masochistic streak, they can even try it on NightmareMode…
So seeing the universal declaration of difficulty, the game decided to wait a year or two (or four) before trying that tack a second time. And so we were given Escape from Mount Gram. Anybody else notice a theme with the names? Except this time we had two heroes taken from us! Well how on earth could they top that?
By taking away all of them. This, my friends, is the culmination of the ‘Captive Hero’ trilogy. This is the inciting incident of the Harad Cycle and one of the most unusual scenarios in the entire roster of this game. This is:
The Long Arm of Mordor
Found in: Sands of Harad Deluxe Expansion
Official Difficulty: 7
Community Difficulty: 6.5
Encounter Sets: The Long Arm of Mordor; Mordor Orcs; Jungle Forest.
Quest Cards: 4
Play if: You fancy trying a quest that starts slow and quiet, before building to an explosive crescendo. You want to try out the new Harad allies without paying for them. Using your heroes is too mainstream for you.
What is different about this quest?: Objective Heroes, Guarded Heroes
Solo or Multiplayer?: Either really. Each player gets to pick a Harad Objective Hero to start the game with, so in that sense the more players there are, the better off your starting position will be. But you will have to move fast or get outpaced by the encounter deck.
Can I bring Side-quests?: Yes, but these are really not advised for the first few Quest Stages. The only possible exceptions might be Send for Aid, which will allow you to get your more expensive allies out faster, and so compensate for your lack of heroes, or Gather Information, again allowing you to set up your board state faster by giving you the tools you need.
The Quest
Setup
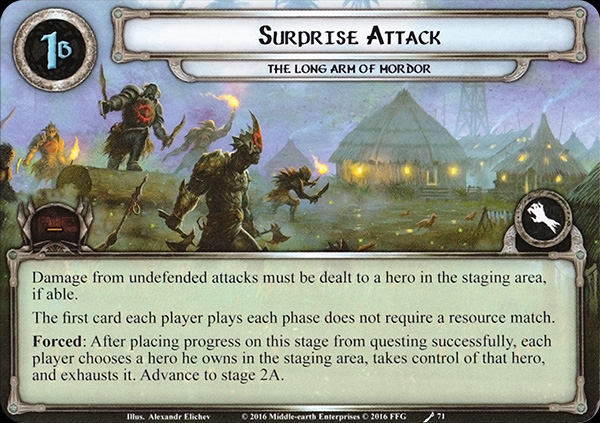
First we set Uruk Chieftain aside, out of play. Don’t worry, we’ll come back to him later. Then each player adds 1 copy of Sauron’s Enforcers to the staging area. This is a fantastically designed enemy whose difficulty scales with your progression of the quest, so here at the beginning each of these only produce a paltry 1 threat. Move each hero you control to the staging area. Each player takes control of one of the four objective-heroes and adds 2 resources to its resource pool. We’ll get to a close examination of these heroes later on and weigh up the pros and cons of each. For the remainder of the game, all the player’s original heroes now in the staging area are in play but under no player’s control, immune to player card effects, and their text boxes are considered to be blank.
One thing to point out here pertains to heroes with set-up text, such as Galdor and Denethor, though there are others. Setting up your heroes comes before resolving the set-up text on Stage 1A, and so your heroes get to trigger those abilities before the quest blanks their text boxes and neuters them. Thurindir gets to dig out Gather Information and Eowyn is allowed to lower your initial threat by 3. I’m afraid this also means we cannot avoid Gollum‘s stipulation to shuffle in 2 copies of Stinker, but you take the good with the bad.
This stage represents the first Orcs breaking into the camp’s perimeter. You have no heroes out, no allies or attachments either. Also bear in mind that each of Sauron’s Enforcers will assign you damage each turn equal to the stage number. At first this will only be 1 each round, but this will escalate quickly as the quest goes on. The quest phase of this stage is the single most important phase of this entire scenario. You could pull back a win after failing the first quest phase and trying again on the second, but you would need some extremely lucky card draws. Fail the second one and you’re most likely doomed. So what you purchase during the first planning phase will set the tone for the rest of the game.
Fortunately the first card each player plays each round doesn’t need a resource match, so you don’t have to worry too much about spheres of influence for your first purchase. You will have 3 resources to start with, but as you are only guaranteed 1 resource next turn you need to be very careful about what you buy. Cheap allies with decent willpower will have to be a priority as you need to place progress on this quest stage to advance. So for 3 resources the most a single player could possibly get out would be an extra 6 in the form of a Dunedain Pathfinder and 2 copies of Envoy from Pelargir followed by Strider.
The Dunedain Pathfinder could be ill-advised at this point as, while you could get a 1-threat location out in the form of Southron Boma, you could also pull a Jungle Trail and be landed with an extra 4 threat instead, only netting you one. And of course this extra 1 willpower would be cancelled out by Sauron’s Enforcers‘s threat leaving just the base willpower of the Objective Hero to contend with whatever the encounter deck has to throw at us. Leave the Pathfinder at home during the first few rounds and avoid the extra threat in the staging area until you are sure you can handle it. Instead try an Escort from Edoras and a copy of Strider. This will also give you 6 willpower, but without the extra location coming your way. The worst the encounter deck can throw at you is Uruks of the Eye followed by an Uruk Warg-rider for a total of 6 threat if we add in the Enforcer already there in the staging area. Now remember we haven’t yet counted the willpower of your Objective Hero so there is no way you’d be able to fail to make your progress and regain your first hero. And remember that Strider will allow the attached hero to quest without exhausting, meaning they’ll be ready in order to defend against an attack from the Enforcer should your threat by 25 or higher.
An alternative could be found in the likes of Quickbeam, netting you 2 willpower with the possibility of readying him a second time if combat forces itself upon you. The only way this would happen however if your threat was under 30 would be for Uruks of the Eye to show up, allowing Sauron’s Enforcers to engage anyone with a threat above 25. This could actually be countered by Mablung, who conveniently only costs 2 as well. In a worst case scenario Mordor Warg would show up after Uruks of the Eye, bringing the Enforcer up to a meaty 3 attack. Note that this is assuming you fail to quest successfully and remain at Stage 1 for the combat phase, which you might do with the Enforcer also having it’s threat gone up to 3 as well. Hopefully it won’t come to that, because every turn you spend on this stage is another turn the encounter deck can outpace you until you are threat-locked and you have to tap out.
On average, you will reveal about 2 or 3 threat per player on the first turn, unless you happen to draw a treachery in which case you’ll have different problems. Assuming you can quest successfully you will get back one of your heroes. The question then becomes a simple one: which hero does one save?
The trite answer would be ‘the best one’, which is certainly not wrong but does need unpacking. Have a look at what your deck is doing and see which hero is most important in fulfilling that design, be it by ability or resource sphere. For instance, in an Outland deck there is no question that Hirluin the Fair should be your first hero. Similarly Radagast in an Eagle deck, Leadership Dain in a Dwarf Swarm deck or Arwen Undomiel in a Noldor deck.
But what about a deck less focused on a specialised archetype? In that case you should have a look at how fast you are able to accelerate your questing capabilities and recover a second hero. If it will take probably take an extra turn or two you will want a hero that will either allow you to survive those two or three turns or help make it just the one. So let’s look at some examples. Beorn doesn’t need a great deal of support to do well, so he won’t miss the resources from your other heroes. He can absorb a good deal of damage and hit back hard. This bruiser will almost certainly keep you afloat until help arrives. Erkenbrand also fit into that mould of heroes that doesn’t require support from other cards to do some work for you. Tactics Beregond and Spirit Dain similarly can allow you to weather several rounds of combat while you sort out your questing power, providing you don’t get overwhelmed.
As for heroes that would accelerate your questing abilities and allow you to recover that second hero, again there are a few really good options here. Cirdan the Shipwright is almost certainly at the forefront of this list. While Spirit Eowyn can muster more willpower, Cirdan will allow you to filter your card draw so you are more likely to see what you need, when you need it. Eitherincarnation of Glorfindel also fills this role, although the lower costed Spirit version will mean your threat is lower and so you can ignore enemies in the staging area for longer. Tactics Eowyn would also work well, with her Nuclear Option on standby if ever you get in over your head.
The third niche of recommended heroes to recover would be board-state acceleration. By this we mean card draw, resource acceleration, cost reducers and stat boosters. Of the four, I’d probably suggest card draw is the most important. It doesn’t matter how many resources you have if you have no cards to play from your hand. In a solo game, Beravor can triple your card draw for the cost of an action, and even in multiplayer the extra cards she can provide across the board make the ranger a prime target for readying attachments. Lore Bilbo can provide the first player an extra card every turn without the need to exhaust him, leaving him ready to either quest or be used for an effect such as Spare Hood and Cloak or Peace and Thought. Lore Pippin and Ori are a bit too situational to be useful at this point, thought Gildor Inglorion would be an excellent choice, especially coupled with his high willpower.
Resource accelerating heroes might include Leadership Denethor, whose extra resource will be invaluable in this cash-poor stage of the game, Gloin and Mablung. Gloin and Denethor can also both absorb an attack or two, not as well as the dedicated defenders but competently enough to see you through. Their utility speaks for themselves, more resources means more cards can be played. Just be sure to secure card draw sooner rather than later or you will empty your hand rather quickly.
Cost reducers fill a slightly different role to resource accelerators. While the latter allows resources to be saved and stored up for a big play of several cards, the former can usually only be used on the one occasion, making it much more restrictive. Spirit Theoden will be vital if you are using a Rohan deck, similarly Damrod for a Trap deck. The most ubiquitous choice would be Grima, allowing any card to have its cost reduced for the trade-off of 1 threat to every player. This does allow cards to be reduced to a cost of 0, but bear in mind if you want to use him in anything outside of a solo game you will need to be able to offer the other players additional threat reduction, so as to smooth over any (justifiably) hurt feelings triggered by the Doomed mechanic.
I’ll just briefly touch on the stat-boosters here before we move on to the next quest stage, but they shouldn’t really require much explanation. If your resources are limited, then you can always try and improve your value for money. Heroes like Leadership Boromir and Farmer Maggot will help your allies to hit as hard as they can, providing certain conditions are met. Celeborn gives a boost to every stat of all your Silvan allies, but only on the turn they enter play, while Leadership Brand son of Bain gives every Dale ally an extra willpower, but only if they have a player attachment on them. Again, everything here depends on which deck you are running and what your opening hand looks like. But don’t get too hung up on which hero you go for (says the author who just spent nearly 900 words on the matter), because their most important contribution just now will be their resources and sphere match. If all other reasoning fails, just go for Tactics Boromir as he can chip in and help with every phase. Just be sure to make it to Stage 2 in as little time as possible.
There is only one difference between the text on Quest Stage 1B and 2B: you need 5 progress to complete this one. The absence of text here is as significant as its presence. There are no locations to fetch, no enemies to summon and no treacheries to reveal. Knowing your weakened state, the encounter deck has mercy on you, for now. But now you have to make 5 progress on the main quest before you can progress, just placing any amount of progress is no longer sufficient. So now the question becomes one of timing, because the next stage will fetch out enemies that will be made more difficult by the quest. How long before you are ready to face them, and can you build enough momentum with only one hero and your objective-hero before the encounter deck outruns you? You will need to increase the strength of your board state, and sooner would be better than later.
There are plenty of ways to increase your card draw these days, and resource acceleration isn’t terribly scarce either. So we’re going to quickly look at ways to speed things up even further. We could mention here a varietyofcost-reducers but instead we are looking at ways to get allies into play for free, however temporarily, collectively labeled by Beorn (of ‘Hall of Beorn’ fame) as ‘mustering‘. And of course we’ll have to start by looking at the biggest player in this game: Elrond.
Now of course when we’re talking about Elrond, we are also taking into account his Ring of Power. Vilya is one of the single most powerful cards in the entire game, and deservedly so for it was the mightiest of all the Rings of Power save Sauron’s alone, which is borne out by the fact of it being the cornerstone of Seastan’s legendary One Deck. With his Ring, Elrond can summon the mightiestofalliesfreeofcost, equipthemostlegendaryweapons or triggerthegrandestevents. And it doesn’t even matter which sphere the allies belong to, because Elrond can summon them all. As for the events and attachments, if you want to go off-sphere you’ll be dependent on the quest-card’s effect keeping your options open. But if you are able to get out an Imladris Stargazer out then the whole thing just becomes bonkers. Of course this is a high-risk strategy because if you are unable to find Vilya, and even with a Master of the Forge on the table it can take time, then you are left with 2 resources coming in a turn and a whole heap of expensive allies sitting in your hand. So we’ll now briefly turn to some alternatives before we move on.
If your deck is set up to clear locations quickly, throw in a copy or two of Elf-stone to get an expensive ally out quicker. Hobbit and other low-threat decks may want to take a look at Timely Aid, while Silvans will need three copies of The Tree People to shine. To temporary trigger their ‘5 or more Dwarves’ mechanic, as used by Gloin, Oin and Bifur, then play To Me! O My Kinsfolk! to scrape over the edge and then cement it with Dwalin. Beorning Skinchanger can help you summon a Giant Bear, or indeed the man himself, and there isn’t a faction that won’t benefit from a copy or two of A Very Good Tale.
This quest stage also presents the question of which hero will you take as your second. Typically we’d be talking about a support hero, one that greases wheels without being so vital that your deck would suffer for its absence. Thorin Oakenshield is an excellent example of such, he is by no means vital to a decent Dwarf deck, but once you pass the ‘5 Dwarves’ threshold he really gives it legs. The extra resource he provides would effectively bring you back up to full power before you even recover the last hero. And to cap it off, he has very respectable stats that will certainly be put to good use. Other examples might include Rossiel, Leadership Faramir, Tactics Bilbo or Bard son of Brand. In any case, you must recover a second hero before the encounter deck can outstrip you, you will get more of a chance to breath during the next quest phase.
Now you have your second hero back, together with the objective hero given to you at the start of the game you should be back to your usual resource production. Bear in mind that you will no longer be able to ignore resource matches for the first card you play each phase, unless you have been able to complete a copy of The Storm Comes. Fortunately you are able to play the resource–smoothingSongattachments on your objective heroes so their resources will not go to waste. Alternatively you could just get Bifur to siphon them all off to him, which would be a much cleaner solution.
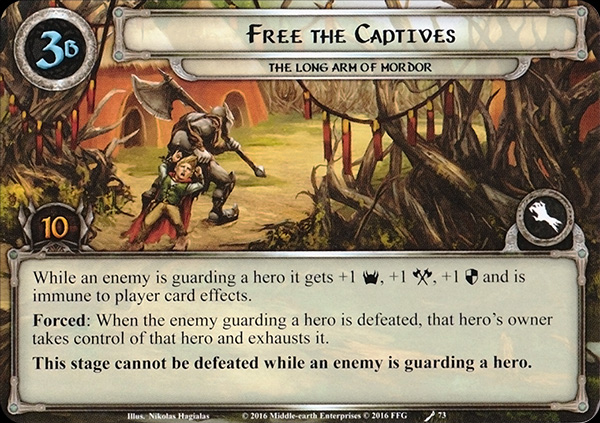
Now for the quest stage itself. First of all each player searches the encounter deck and discard pile for an Orc enemy and adds it to the staging area. After the encounter deck is shuffled, attach each hero in the staging area to a different Orc enemy in the staging area. Each hero attached to an enemy is guarded by that enemy and are under no player’s control, immune to player card effects, and their text boxes are considered to be blank. On top of this, while an enemy is guarding a hero it gets +1 Threat, +1 Attack, +1 Defense and is immune to player card effects. All the fun stuff. Now just a quick point before anyone’s hopes get raised, like mine unfortunately did, these Orcs are immune to player card effects. That means Tactics Bilbo can’t damage them in the staging area. Nor, for that matter, can Haldir, Argalad or Dunhere. Grimbeorn and Tactics Aragorn cannot reduce their defense and Gaffer Gamgee cannot stop them from attacking. No, I’m afraid you shall need to get up close and personal with these Orcs and deal with them face to face.
So now we must ask, which Orc enemy would be best to choose? Well there are no right answers, they all seem pretty bad. The contenders are: Sauron’s Enforcers; Uruk of Mordor; or Uruk Warg-rider. But what the Orcs lack in variety, they make up in nastiness. Let’s go through them one at a time together.
At this point Sauron’s Enforcers are at 3’s across the board and will be doing you 3 damage at the end of every round. If you have more than one on the table then that damage escalated very quickly. Having them guard the prisoner brings them up to 4’s, definitely not insurmountable but hardly a walk in the Shire either. This enemy would be the most uniformly bad, with no real upsides to choosing it except that the other two are worse in certain circumstances.
Like the Uruk of Mordor for instance. Sporting 2 threat and defense, but hitting for a meaty 4, this enemy will hurt you given half a chance. With 4 hitpoints it will be slightly tougher to take out than the Enforcer, who can at least go to direct damage, but right now the Uruk is just one Marksman of Lorien away from being taken out with a Straight Shot. However once he guards a hero, his defense goes up to 3 and he is immune to player card effects so that option goes out the window. What’s more, his attack would become 5, which is enough to put a serious dent in most heroes. I say hero because the Uruk’s willpower will be 3, and given his special ability you are not left with an awful lot of allies who are allowed to defend against that. Outside of GandalfandSaruman, only the ally versions of Elrond and Gildor would survive the Uruk, and Elrond would be going away at the end of that round in any case. And there are dozens of heroes who would be cutdown in a single swing from that beast of an axe he’s carrying. If you opt for the Uruk of Mordor, you will need a dedicated defender for when the time comes to deal with him or someone will get the chop.
The Uruk Warg-rider is the most lopsided of the Orcs in terms of their stats. 3 threat and attack are bad enough, and the 1 defense is offset by the impressive 5 hitpoints, but it is the Warg-rider’s special ability that will really dish out the pain. For every point the Orc’s threat is higher than the willpower of the defender, increase the Orc’s attack by 1. This means a naked Warg-rider can knock out a Defender of Rammas, as it is often the case that dedicated defenders have the lowest willpower. Once the Warg-rider is guarding a hero however, now he can take down Beregond in a single bite. Should the gaze of Melkor be upon you, it has been known for the Mordor Warg to deign to appear at this time and if you’ve been keeping your board-state clear of enemies then the Guarding Orc may be the only one on the board. In such cases the Warg-rider now can hit for 12, outstripping the current highest printed attack of 9, as found on Host of Angmar. Throw in Uruks of the Eye and we now have an Warg-rider potentially hitting for 13, 4 more than a card that is meant to represent an entire war-band.
Of course you could always chump–block the Warg-rider. If you have been able to accelerate your board-state to a decent enough position, this is probably the best option to deal with this enemy, and then with a comparatively low defense it shouldn’t be too hard to get everyone stuck in and finish off the Warg-rider before it comes in for a second bite. And with an engagement cost of 40, it shouldn’t be coming down until you are ready for him to do so.
Once your hero is free, you will only need 10 progress to complete this stage and move on to the last one. But before we do that, there is one further means of dealing with these Orc enemies guarding your heroes that I haven’t yet addressed. One that requires a bit of unorthodoxy from the players, and it is thus.
Only take two heroes. Or utilize the ability for one of your heroes to soak up undefended attacks and kill off your third in Stage 2B. Admittedly the latter option is even more radical, only to be utilized if you are falling behind so much that while you need to get through to Stage 3 and reclaim a hero, you cannot handle the extra enemy that has been boosted. In this analogy then, having a hero killed off before you progress to Stage 3 would be like amputating a limb to save the rest of the body. This contingency can be planned for by making your third hero one with relatively low threat, to keep down your party’s starting threat, that you would not mind terribly if you weren’t able to utilize their ability. Mirlonde would be an excellent example of such a hero, her ability activates before everyone gets captured, so she’s already served her chief purpose. Smeagol could be another, while his ability would be useful, the paltry threat he contributes at the start means that were he to accidentally be killed off it shouldn’t be a devastating loss to your efforts.
But if at least one player uses only two heroes left at this stage in total, the encounter deck is robbed of one of its more powerful enemies. In a solo game this is especially potent, as with no Guarded hero to free the only remaining stipulation on advancement is acquiring a comparatively straightforward 10 progress. Given the contributions of whichever objective-hero you have alongside you, the player will effectively already have their third hero and so the remaining hero is strictly speaking a bonus. As an objective-hero counts as a normal hero to practically all intents and purposes, I’m afraid neither Strider nor Vanish from Sight will help you as soon as your second recovered hero will be counted as your third hero in the eyes of the rules. But to reiterate, none of the Orc enemies examined about would be boosted by guarding a hero, none of them will need to be slain in combat and none of them will be immune to player cards effects. The last one of those points is probably the most important. Now these enemies can be blocked with Feint, discarded with Delay the Enemy and even have have their shadow cards discarded with A Burning Brand.
By taking this tack, this quest stage can then be considered much more of a rest point than previously, a breath you can take before plunging into the final quest stage. You will have more opportunity to complete side-quests, such as Uruks of the Eye or Keep Watch to de-buff the Orcs, Scout Ahead to fish out a nasty enemy or treachery ahead of time, or even Rally the West so you can not only quest faster but the attacking power of the Uruk Warg-rider won’t be as ferocious.
But even setting aside the side-quests and the two-hero theory, now is the time to build your forces and kit out your heroes. You will be facing the Uruk Chieftain and under normal circumstances you will need to weather at least two attacks from him before you can kill him and progress. So make sure your defender(s) have at least 4 defense, 5 if you have little-to-no healing, and some readying would be helpful. Beregond with an Armored Destrier would be ideal, so too would Elrohir with Hauberk of Mail, or even Ancestral Armour if you have the spare funds. This is admittedly less likely if you are running Elrohir as his ability depends on resources to ready him, though at this point there are plenty of optionsforresourceacceleration to remedy this. Bear in mind there are no penalties for chump-blocking in this scenario so don’t be afraid to build that army of redshirts to send into the proverbial meat grinder. And be sure to kill off as many Orcs as possible before advancing, your survival may depend upon it.
Here it is, your bid for freedom. Having rescued all your heroes, the friendly local Haradrim lead you toward the safety of the jungle. But before you can reach the tree line, a large Uruk chieftain blocks your path. You’ll need to kill him to get past, but he won’t go down easily. For a start he cannot take non-combat damage so that rules out direct damage. Furthermore, while the engaged player is engaged with another Orc enemy, Uruk Chieftain cannot take damage. So you need to get him by himself before you can even touch him. That would be easier if he didn’t jump around and engage whichever player has already got the most Orc enemies engaged with them. Now the other Orc enemies will have -10 engagement cost so it is much more likely you’ll be getting engaged by them, especially Sauron’s Enforcers and Uruks of Mordor. You’ll need to have enough combat power then to defend against 3 attacks, two from the Uruk Chieftain and one from his friend, and then counterattack successfully. To do so you’ll need to muster up 9 attack at the very least to scratch the Chieftain, 15 if you want to knock him out at the same turn. That’s 6 to kill either the Uruk of Mordor or the Uruk Warg-rider, and then enough to get past the Chieftain’s defense of 3.
Let’s assume then that you have your defense taken care of, as discussed above. Now is the time to attack. Again, no direct damage is allowed so you’ll need to get out the high-attack allies and gird your heroes loins for combat. The first thing to note is that the engagement cost of the Uruk Chieftain is 50. This means that unless Uruks of the Eye appears and your threat is dangerously high, you are always going to be below his engagement threshold. What this means is extremely good news for Hobbits and their mechanic of engaging enemies with an engagement cost higher than their threat. Sam Gamgee will trigger upon engagement, which would allow him to defend for 4 with no shadow card if he’s given a Hobbit Cloak and Staff of Lebethron. Play Taste it Again! and let him wield a Dagger of Westernesse and all of a sudden he’s hitting back for 6 and you’re halfway to defeating the final boss. Throw in Ally Boromir to tank that first attack on engagement from the Chieftain so the Heir of Mardil can ready and be on stand-by for the kill.
Now instead of the counterattack strategy, you could go for the hammer and anvil. The one of the best defenders the hobbits have is Tom Cotton, coming in just under Spirit Frodo. With 3 natural defense, he is easily boosted to 5 with Hobbit Cloak, 6 with Hauberk of Mail, and then 7 with Ring Mail. In this instance though, the best thing about Tom Cotton is his ability that grants Hobbit allies an extra 2 attack on entering play. Remember that this is a flat ability, it is not dependent on any conditions. Best paired with Raise the Shire, we can see Farmer Maggot hitting for 4 in addition to his direct damage (not able to be placed on the Chieftain remember), as can the Bywater Shirrif and Ally Pippin. And don’t forget the hardest hitting Hobbit of them all, Tactics Merry. In an tri-hobbit-hero lineup and two Daggers, Merry will be hitting for 7 all by himself.
There are plenty of ways to boost your attack, Dagger of Westernesse really being the best example for this scenario. One weapon I’d normally be in love with is sub-par for this situation and that’s Warrior Sword. As you are trying to get the Chieftain on his own, the Sword will only be only be giving you an extra 1, when we really need to be looking at more than that. Now is the time for your Haradrim Spears, for the Black Arrow and Fair and Perilous. You would need high willpower from your characters anyway, especially to negate the Uruks’ abilities detailed above, so this should be a natural fit. Unseen Strike couples with the Hobbit’s ability, Boomed and Trumpeted allows your Ents to counterattack and Swift and Strong will let you keep up your momentum as you cut down all before you. And once you have, after the Uruk Chieftain goes down all you need to worry about is the final 15 progress needed to complete the stage, and thus the scenario.
The Encounter Deck
The Mordor Orcs encounter set is used in this scenario, but that has already been covered in the Race Across Harad article, so we’ll not retread the same steps here. The numbers below do reflect that encounter set taken into account. The other two encunter sets used are The Long Arm of Mordor (appropriately enough) and Jungle Forest.
Global
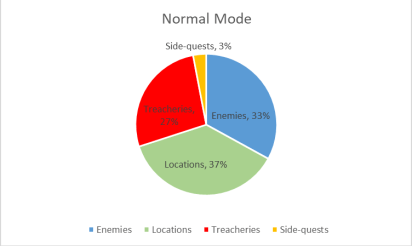
There are 33 cards for the encounter deck to reveal in normal mode, 26 in easy mode, so we are talking about a relatively thin encounter here. I have discounted The Uruk Chieftain as he does not enter the encounter deck throughout the course of the game, so too with the Objective-Heroes.
61% (20) of the encounter cards have shadow effects, and in easy mode this becomes 62% (16). The effects themselves tend more towards increasing attack strength, but there is one that is beneficial to you. If the defending character is an Objective-Hero, Southron Boma will ready that hero and cancel all damage from that attack.
There are 3 cards with Surge on it; one copy of Uruks of the Eye and two copies of Overgrown. The developers have been very restrained with this quest, most draws will not result in hordes of extra cards.
The only enemies that are immune to player card effects are the ones guarding your heroes in Stage 3. As for locations, if one gets Overgrown attached to it then it will become immune. Other than that, you’re free to do whatever you need to the encounter deck.
Objective-Heroes
Kahliel: If you are playing that two-hero strategy, this is the hero you want. If you are playing with two players or decks, one of them should really take Kahliel. With an even spread of stats, the Harad leader can help out wherever you need him the most. Don’t leave him with just 2s across the board however, be sure to boost his stats to fill whatever role you need. If you want to quest with him perhaps put Song of Kings on him so that Celebrian’s Stone is in sphere for him, as would be Song of Hope. An Elf-friend and Protector of Lorien could allow you to quest or defend, although this will be dependent on you having the card draw to sustain this. And of course it would be remiss of me not to discuss Guarded player cards, such is their potential for boosting a hero’s capabilities and specializations. But I won’t be doing it here, instead it’ll be under the Tips and Tricks section.Now, the extra resources Kahliel provides will be pivotal in getting your board state established. Be sure to take some card draw as well or you may find yourself with an empty hand and a growing pile of surplus resources. He is a Noble, so is eligible for Ancestral Armour, Captains of the West and Terrible to Behold. He can have resources given to him by the Envoy of Pelargir, or can hand them off to someone else to smooth out the spheres of influence. You can even put Kahliel’s Headdress on him, though this plays in to me next point which is why you might not want to take him as your objective hero. Because taking Kahliel as one of your standard heroes is by no means a bad idea. He may use his resources to get out your other big-name Harad allies, but more importantly by discarding a Harad ally Card from your hand, Kahliel allows you to ready any Harad character in play, including your objective heroes. Want Yazan to finish off that Warg-rider lurking in the staging area? Or need Jubayr to defend just one more attack? With Kahliel you can really accelerate your action advantage and make sure you’ll rarely be caught flat-footed be an enemy. Make sure you get Kahliel’s Headdress so you can keep cycling these discarded allies back into your deck.
Firyal:This is the hero for all you solo-players out there. The 3 willpower is exactly what you’ll need to get started, especially with that ability filtering the encounter deck so you can always be aware of exactly what you’ll be up against. Take Henamarth Riversong, Risk Some Light and Interrogation and there won’t be a card coming at you that you can’t prepare for. Firyal will also make it easier to plan for Out of the Wild, if you see a nasty card on top you just do not want to deal with, like a Mordor Warg about to attach to the Uruk Chieftain, you now have the means to reliably get it out of the encounter deck for good. Note that Firyal is a Scout, so be sure to take Warden of Arnor and Map of Rhovanion. The former puts a progress on the first location that is revealed each turn, and the latter puts a progress on the active location every time the attached character commits to the quest. Get them both out and Firyal have 2 progress on each active location before questing is even resolved. With her ability to filter the encounter deck, she can bring out more locations and make the most of those attachments to such a degree that Leather Boots may even look attractive some of its detractors. And I would be remiss if I did not talk about how brilliant Firyal is in a Trap Deck. Seeing what is coming means that you can prepare the ideal trap at just the right time, whether it’s a Poisoned Stakes able to bypass the defense of an Uruk of Mordor or an Entangling Nets reducing the potentially sizeable stats an Enforcer can muster.
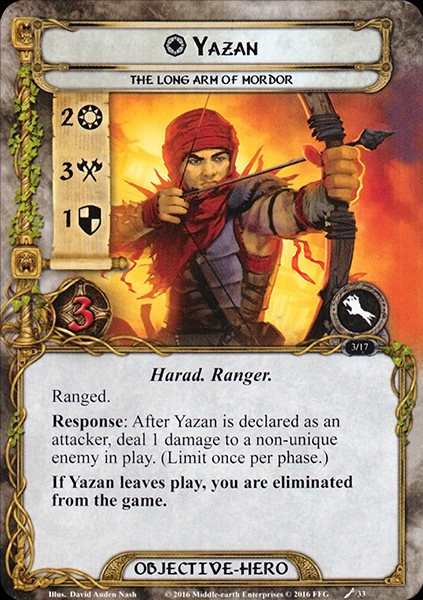
Yazan: The only reason to take Yazan in anything less than 3 players is if you can guarantee strong willpower coming from other quarters. He won’t be able to get you past Stage 1 in a hurry, not by himself anyway, so solo pretty much rules out this archer I’m afraid. 2 players could see him put to use, but only if your team-mate can carry the weight of questing. But 3 or 4 players is where Yazan will fit the most comfortably. His 3 attack is weighty enough to punch though the defense of any unboosted Orc during the first 2 stages. Once we get onto Stage 3, Sauron’s Enforcers will have 3 defense and then after there is the Uruk Chieftain in Stage 4. Hopefully by then he’ll have his attack boosted, whether by Warrior Sword, Dagger of Westernesse or even a Dunedain Mark or two. One possibility that would play to his strengths is Firefoot, increasing his hitting power and facilitating extra damage spilling over onto other enemies, bypassing their defense. Bear in mind that other than the enemy guarding your heroes no-one is immune to player card effects. So feel free to make the most of as many direct damage effects as you’d like to whittle down the Orcs. Just one point about Firefoot is Yazan will need to be a Tactics Hero before he can get that mount so take a few copies of Song of Battle with you. This will also allow you to take Mighty Prowess, something that you should always be able to trigger given all the enemies are Orcs. Except for two Mordor Wargs of course, but once they’re unattached from their Orc Riders they shouldn’t be too hard to take down. Also remember that as a Ranger, Yazan can take the Leather Boots mentioned above, or indeed Wingfoot, which when coupled with Firyal would allow you to make the most of both his willpower and attacking capabilities. Steed of the North can accomplish much the same thing and Ranger Spear can give you that boost you’ll need to take down whichever Orc gets the Mordor Warg attached to it. And let’s not forget about Haradrim Spear, offering either a constant increase of 1 or discarded for a one-time boost of 3, why is by no means insignificant. Yazan will also allow you to reduce the cost of Take No Notice and In the Shadows, making the most of the stealth elements of the early game.
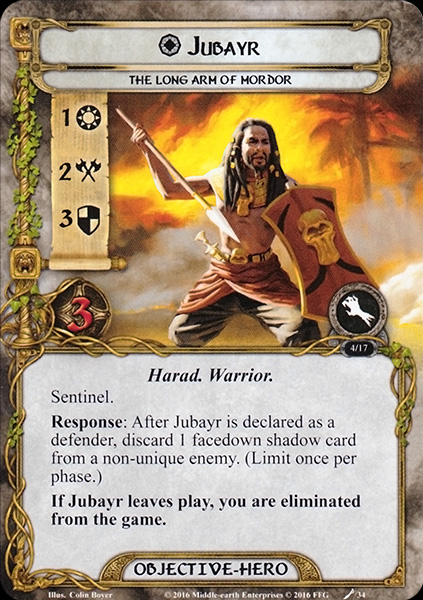
Jubayr: Much of what was said about Yazan with regard to player count applieshere as well, if not more so. Yazan has 2 willpower he could offer in a pinch, but Jubayr only has the 1 to contribute. With 3 defense and 3 hitpoints he certainly isn’t the world’s strongest defender, but there are no enemies that can kill him in one shot in this scenario without a Warg helping out. You see, the strength of Jubayr is his ability to discard a facedown Shadow Card from an enemy when he is declared as a defender. Now I know what you’re thinking, I was thinking it too, but Silver Lamp will not work with this guy. The Shadow Card needs to be facedown before Jubayr can discard it, so you’ll have to do it blind. Now if there is only one enemy you’ll be defending against then that blindness isn’t an issue, just take away the Shadow of the enemy in question. If there is more than one however, that’s when things become interesting. Use Needful to Know or Rumour from the Earth to peek ahead and see what one of the Shadows will be so at least you’ll have a bit more of an informed choice, or better yet use Risk Some Light and see the top 3 cards have have the chance to get rid of one preemptively. Then depending on how the Shadows fell and how Jubayr’s defense is compared to the attackers, you could discard the Shadow from Jubayr’s attacker or from where it would be most advantageous. You can even discard a Shadow from an enemy controlled by another player. The only thing is to err on the side of caution, if Jubayr dies the players loose the game. This is true of any of the Objective-Heroes, but as a defender Jubayr is especially at risk. So how would you boost his survivability? Well as a Warrior Jubayr is eligible for Captain of Gondor, boosting his defense upon engagement with an enemy. Alternatively, Raiment of War will increase his attack, defense and hitpoints, allowing you much greater flexibility in how you use him. And although this takes up both your restricted slots there is always Hauberk of Mail, which incredibly is not restricted, and then puts Jubayr at 3 attack, 5 defense and 5 hitpoints. Throw on a Dunedain Warning or two for seasoning and coupled with his ability to discard a Shadow we have a wall that will not easily be moved. With more than one enemy attaching, Armoured Destrier would be good to get rid of 2 Shadow Cards in one combat, especially if you have Elfhelm as one of your heroes and you can give Song of Kings to Jubayr, or alternatively Round Shield could increase Jubayr’s defense yet further as a contingency plan. Alternatively you can reduce the damage that he might take with Raven-winged Helm or Mithril Shirt. The latter will require an extra location to be added to the staging area, but it can really help neuter the Enforcer’s direct damage. If you give him the Gondor trait, either with In Service of the Steward or Steward of Gondor, then why not go for Gondorian Shield and Livery of the Tower.
Enemies
Sauron’s Enforcers: This is the first enemy you’ll be facing this game. One will start in play for every player in the game and then his stats will increase for every quest stage you surpass. By the time the scenario will have wrapped up, these guys will have turned from weak enemies that collapse at a sneeze to monsters that have 4s across the board. With an engagement cost of 30, you should have a turn or two to get yourself prepared before having to tackle him. But of course the other aspect of the Enforcer is his ability to passively dish out direct damage equal to the Stage number, so be sure to either bring healing or damage cancellation along. The moral to the story then to take them out before they turn into the monsters that they can become, or gang up on them quickly if they appear during the later period of the game. Failing the ability to take them n in combat, remember they only have 3 hitpoints so they will be particularly susceptible to direct damage. You could always take Yazan and have him start picking away at things, supplemented by Hail of Stones or a Galadhon Archer. Dwarrowdelf Axe allows you to bypass defense, and if you’re able to get him to down to his last hitpoint then a Gondorian Spearman or a Spear of the Citadel will be in prime position to finish off the Enforcer.
Locations
Southron Boma: Like the Enforcer, the threat of this location is concurrent with the stage of the quest, which thematically is brilliant. As more of your heroes are rescued and the conflict escalates, the Village becomes more and more dangerous. It does cost a resource from every player to travel here, which will especially sting in the early game, but the threat it contributes will only get higher as the quest goes on. There are of course things you can do to mitigate either the threat or the travel effect, with Thror’s Key rendering the entire location meaningless. Absent that, Power in the Earth will ensure it will never rise above 3 threat, something that isn’t ideal but by no means back-breaking. West Road Traveller would allow you to swap this with the active location without paying the travel cost, as would South Away if you had an attachment on the Boma. One idea for that might be a Ranger Provisions so that you might recoup your losses, or Woodmen’s Path so that you can guarantee completing it in one shot. The last thing to remember is the Shadow effect, this being one of the very few in the entirety of the game that actually help the player. Now remember that Jubayr’s effect only works on face-down shadow cards, so there is a small risk you may pick the Boma. Using Dark Knowledge to flip over 1 shadow card, you can at least reduce the amount of uncertainty in your choices.
Village Hut: This location also has both a beneficial and detrimental side to it. After you have traveled to a Village Hut there is the chance to get an ally into play for free, although exhausted. But as you sneak from Hut to Hut trying to find your allies, you may stumble upon an enemy as you carry out your investigations. Scrying of one description or another is your best way to deal with this location’s effects if you wish to travel here. The ally version of Gildor Inglorion or Imladris Stargazer would help you set up a more expensive ally so you can accelerate your board state as much as you can which is especially important with your reduced number of heroes. But the other side of the travel cost is the possibility of pulling an extra enemy from the encounter deck. Now of course you may just take that on the chin, indeed if you are running a Dunedain deck that may be exactly what you are after. But if not, use Lore Denethor to shift anything troubling out the way, or Interrogation to set up that both your revealed card and some Shadow Cards for the coming combat. Once you have travelled here, the location itself only has two quest points and so should not prove to be too much of a hindrance to your progression. This makes the Village Hut a prime target for location attachments. Slap down Elf-stone and get out another decent ally, Ancient Mathom to draw 3 cards or Woodmen’s Clearing to knock your threat down a few pegs. For a couple extra quest points you could even use the new Put Off Pursuit to shuffle your newly-acquired enemy back into the encounter deck. You’ll pick up a new location in doing so, but if you are avoiding combat you should be set up to quest reasonably well instead, or something is going wrong. Of course you could always use a wide variety of tools to explore this location while it is in the staging area. All it takes is two turns of Northern Tracker, one use of a fully-charged Asfaloth or even a copy of The Evening Star and Village Hut is taken care of.
Jungle Trail: Yet another location that can give some small benefit to the player, this quest seems to be full of them. Here we’re looking at an impressive 4 threat and 4 quest points so you will be wanting to get it out of the staging area sooner rather than later.If you draw this on your first turn this can potentially scupper your entire first few turns. Southron Boma will be up at 4 threat on the last stage, but this comes out swinging at you from the beginning. There’s no real tricks here though, it takes 4 quest points to complete it so you will get slowed down, but the passive effect on Jungle Trail should help counteract that. Every location in the staging area will have a reduced threat, so as long as there is at least one other location in the staging area when you travel here, you will be reducing the threat in the staging area by at least five. That really is the only piece of advice I’d offer for this location, be sure to make the most of this ability while you can. There are only 2 copies in the encounter deck so it is likely you’ll see at least one in a solo game, but we have a relatively thin encounter deck so the times this will come into the staging area will increase as more players get added.
Forest Clearing: Here is one that has an effect that can’t be dodged unless you use Thror’s Key to just blank the text box altogether, which would be a bit of a waste to be honest. The Forest Clearing continues the trend of filtering the encounter deck looking for enemies, though this time it is dependent on the location being explored, not merely travelled to. Upon its exploration, you’ll have a roughly 30% chance of discarding an enemy. I know the graph says 33% above us, but remember at least 1 Enforcer is already in play from the beginning. So what can you do about this extra enemy? Well if the location is in the staging area, Henamarth could at least scout out the Clearing before you put down that final progress from that Rhovanion Outider or Northern Tracker, then is it is an enemy you don’t like the look of you can refrain from said placement. I’ve already mentioned Interrogation and Risk Some Light above with regards to avoiding an enemy, but the other side of that coin would be to lean into the curve, taking either the Dunedain or the Trapping approach. The former uses enemies as fuel for their engine, so it is a case of the more the merrier, while the latter hampers and cripples your enemies before they can really get going. Just like the Village Hut there are only 2 quest points, so all that was said about attachments for that location can be applied here as well.
Dense Jungle: And now we come to the Forest Clearing’s brother. With the threat and quest point values flipped, and the Forced effect focusing on locations instead of enemies, this is a much more passive location than the one we’ve just looked at. That’s not to say it isn’t dangerous, but this one delivers death by slow suffocation rather than stabbing you then and there. This location provides only 2 threat to the staging area so there isn’t too much pressure to travel there immediately. However, with 3 quest points that makes things slightly awkward for remote location control that at the most are able to put down 2 quest points at one time, such as Woodland Courier, Meneldor or Ranger of the North. As a result, often the fastest way to get rid of it is to actually travel there. But, and this is the dangerous part here, Dense Jungle has the lowest threat of any location in the encounter deck, except for Southron Boma during Stage 1. What this translates to is that whenever you do travel here, you risk the threat in the staging area going up instead of down. As you can see from the graphs above, you will have over a 33% chance of pulling a replacement location and thus finding yourself in an even worse situation. On the other hand, there’s a 66% chance of discarding something else that now you won’t have to face, like Uruk Warg-rider or Overrun by Orcs coming up as Shadow Cards, or a late-game Sauron’s Enforcers popping in in the next questing phase.
Treacheries
Savage Attack:This treachery can have some serious bite to it. While at first the choice can seem simple, discard an ally or this card effectively gains Surge, the consequences of it are a bit more nuanced. Remember that in this game the encounter deck is outpacing you at the beginning, and it is up to you to increase your speed of deployment and outstrip it if you are to have any hope of beating this scenario. So this treachery offers you a choice: either you are slowed down or the encounter deck is sped up. Well those are two sides of the same coin, you may say, and you wouldn’t be wrong. But each side has its differences to consider. If you choose to discard an ally, you must get rid of the most expensive one. If you have two that cost more than the others you may pick between them. Depending on how much you paid for said ally this could put you back a turn or two, especially if we’re talking a more expensive ally like Gwaihir or Beorn. So how might this be mitigated? Well you have two options, either leave off the more expensive allies and get out as many cheap-moderate costed allies as you can, or continue to purchase the more expensive ones, trusting in their higher quality and utility to survive the extra encounter card you would take instead. So for the former, we’re talking about strategies liketheGondorSwarm where Leadership Boromir with Visionary Leadership boosts up ahordeofcheapallies who overcome the encounter deck through weight of numbers. Alternatively the Dwarven Army led by Leadership Dain, or even the Wheeling Rohirrim where Spirit Theoden allows cheap Rohan allies to enter play at a reduced cost only to be discarded for variouseffects and recovered with Guthwine or Gamling. The latter option would involve getting in more allies than you otherwise would have done with cards like Send for Aid, Elf-stone or A Very Good Tale. The more allies you have on the table, the less this treachery will hurt you with either effect. If you have more allies you can absorb the loss of one better and you can handle the reveal of an extra card with greater ease. Or if all else fails, there’s always A Test of Will.
Overrun by Orcs: We’ve had an enemy and a location that scales in severity in accordance with the stage number you find yourself at, so now we’ll have a look at the treachery that follows this pattern. When revealed, this card adds threat to the staging area equal to twice the stage number you are at. So while you’ll be looking at 2 extra threat in the first stage, lower than most of the other encounter cards you could see, the final stage would see an extra 8 threat being added, twice the threat of the next highest encounter card that could appear. Other than cancelling this treachery altogether, or usescrying the encounter deck to see whether or not this is coming up, the only way to effectively deal with this is to make sure you overquest and make sure you can make your progress on the quest. You’ll be wanting to get through the first two quest stages as quickly as possible anyway, and the latter two depend upon another condition being reached before you can advance so there is nothing really to be lost by committing too many folk to the quest. The obvious exception would be if you were then left vulnerable to enemy attacks because you don’t have enough folk left to defend them, but that’s an area you should always endeavor to keep covered. This is one card that does theoretically get easier to deal with when there are more players as there should be more spare willpower kicking about.
Overgrown: This is one of only two ways that an encounter card might becomeimmune to player card effects, the other being Stage 3B’s Guarded heroes. There are only two copies in the encounter deck, but it does have Surge so it will always bring along something else with it. This treachery increases the threat of the location that already had the highest in the staging area and makes it immune. As a result, the only way to deal with it is to get up close and personal and actually travel to it. Fortunately none of the locations in this quest have ongoing passive effects for being in the staging area. This means you can pick your moment for travelling to the attached location when it best suits you, because each location has a travel cost or forced reaction. Only travel when you are able to shoulder the cost, be it paying the resources for Southron Boma or revealing an extra encounter card to travel to Jungle Trail. This applies to all the locations in this scenario, but as none of the alternate methods of placing progress will work on whichever location gets assigned this treachery the only recourse is to ignore it and quest appropriately unless you are able to travel to it. Now I’m afraid that Miner of the Iron Hills and Power of Orthanc are unable to help you, the fact that the location is made immune to player card effects means that you cannot get rid of Overgrown by any methods other than the conventional ones.
Tips and Tricks
Guarded Cards have the potential to seriously augment your board state should you get them attached to your heroes in decent time. There are two that are particularly suited for this scenario however: The Arkenstone and Necklace of Girion. Bear in mind you will have an extra enemy or location to deal with if you play these cards, but let’s assume you won’t risk playing these cards until you are comfortable you can handle the extra encounter card. The Arkenstone gives a willpower boost to each of your unique characters, particularly strong in a ‘5 or more’ Dwarf deck which is littered with unique characters, or in one of the new Fellowship Contract decks where now every unique character gets an extra 2 willpower. If you are running a few of the uniqueHaradallies, add Kahliel’s Headdress into the mix for extra craziness. As for the Necklace of Girion, this has the power to supercharge one of your heroes, giving them 2 extra willpower and an additional resource every single turn. This can push several characters into a level of power that is remarkable. Leadership Aragorn could quest every turn for 4 and pay for his readying with a resource to spare, for instance. Under the right circumstances, Thorin Oakenshield could quest for 5 and collect up to 3 resources a turn, or Eowyn could reach a massive 6 willpower, 7 with her horse. Amarthiul would see 3s in all his stats and could collect 3 resources that could be spent in either Leadership or Tactics. There are a fair number of heroes with sphere or resource manipulation that would really benefit from an extra resource a turn, especially when their primary role it to quest as well.
There is one hero who would be particularly suited for this scenario. Somewhat of adark horse in the running, but Rossiel is nearly ideal here. Every location in this scenario has the Forest trait, and every enemy has the Orc trait, bar the Mordor Warg of which there are 2. Once you can get a single location in the victory display, Rossiel is suddenly questing for 4. And she can shore up your defenses when an Orc is put into the victory display with enemies having to beat 4 with their attack to even make a dent. Throw in a Protector of Lorien, A Burning Brand and a Silvan Tracker, and this elf-maid will carry some serious weight for you. Remember that both the Uruk of Mordor and the Uruk Warg-rider have abilities dependent on the defender’s willpower, so having a high value of each is a real steal in this quest. If you do take her, I’d suggest making Rossiel your second hero to recover, it may take some time to get the necessary cards into the victory display and until then there are other heroes that may be more useful.
Again all the locations have the Forest trait. Remember what we said about Rossiel above? Make her even more bonkers with a Cloak of Lorien, boosting her defence up to 6 easily. Feel free to splash in a Woodland Courier or two as well to give your progression a little helping hand here and there.
As we’ve said above, all the enemies have the Orc trait, except for 2 Mordor Wargs. Fortunately this allows you to tap into the wealth of tools and weaponry specifically tailored to fight Orcs. For instance, a Longbeard Orc Slayer, though too expensive for most conventional decks doing this scenario, would be perfect for a Sneak Attack to strip all the Orcs on the board a hitpoint. Throw him in during the CombatPhase and make the most of his 2 attack before he returns to your hand. If you are needing help with your progression, a Blade of Gondolin can help you place additional progress for every kill you make. Goblin-cleaver is able to literally remove the Enforcers and the Mordor Wargs off the board right off the bat, dealing extra damage to the former because they are Orcs. The twin sons of Elrond, Elladan and Elrohir, both ready upon engaging an Orc, but you really need the pair of them on the table at the same time to be able to make best use out of them. And at 3 cost each, they aren’t exactly cheap. You’ll need to include 3 copies of each to ensure that you draw them both as soon as possible, which means the duplicates of whichever you get first can be discarded with To the Sea, to the Sea! and reduce the cost of the other brother. If you need a bit extra threat reduction, throw a Dwarrowdelf Axe on Dwalin and your threat will start falling in no time. And finally, Skinbark is often overlooked as an ally in Ent decks and to be fair to him he is rather a situational character. But this is his moment to shine, as with 4 attack ignoring the defense of any Orc when he attacks alone, both the Enforcers and the Uruks of Mordor will go down in one hit. Allow Skinbark to take the direct damage from the Enforcer and then play Boomed and Trumpeted, and now after attacking for 7 only the Uruk Chieftain boosted by the Mordor Warg will still be standing, and even then he’ll only be clinging to life with one solitary hitpoint.
Ally Prince Imrahil opens the door to a very interesting way of playing this scenario. Recall the text on Stages 1 and 2 of this quest for me. They said that undefended attacks must be assigned to your captured heroes. Remember all the benefits I mentioned of only having two heroes in Stage 3, dodging the enemy that will be made immune to player card effects. Well now look to your right, and behold the answer to this quest. Get Prince Imrahil onto the board as an ally, whether by Send for Aid, Elf-stone or good old-fashioned resources. Once there, allow that third superfluous hero to be killed off and allow Prince Imrahil to automatically become your third hero without having to worry about recapturing him. You will start off Stage 3 with all three of your heroes, as well as your Objective Hero, and will be in a much better position to face the Uruk Chieftain than before, not needing to worry about having to the upgraded enemy but able to muster your full might much sooner and break out of the village into the jungle beyond.
Playthroughs
With this quest being relatively new and not as popular with the community as other quests in the cycle (or even in the same box), there aren’t as many playthrough videos to be found of this quest. The list will be updated as more videos are published.
And there you have it. You have survived being shipwrecked on the shores of Umbar, navigated a harrowing chase through its treacherous streets, crossed the great desert of Harad and slipped through the nets of Sauron’s servants yet once again. But next you will have to face a different danger, for the untamable jungle knows no master, not even Sauron. And you are uninvited guests; best not outstay your welcome in The Mumakil.
Share this:
LikeLoading...
Related
Published
9 thoughts on “The Long Arm Of Mordor”
The article talks about spending the initial two resources wisely. But setup gives two resources, and since these are objective heroes instead of objective allies, they should get a third resource at the beginning of round one. Are you making this quest harder than it really is?
This is such an interesting scenario. I enjoy the concepts of being short a hero or two (with no further comment on solo Escape From Dol Guldur) to start the game, but this one was a wild shock to me when I first tried it.
As someone who rarely deckbuilds for a particular scenario (I like to make a deck for a cycle, generally), this is often a tough one. Doable, but tough. Having said that, it’s great to see some specific tips here!


The article talks about spending the initial two resources wisely. But setup gives two resources, and since these are objective heroes instead of objective allies, they should get a third resource at the beginning of round one. Are you making this quest harder than it really is?
LikeLike
Hi Dale, that was something I had missed but thank you very much for pointing it out. The article has now been amended appropriately.
LikeLike
This is such an interesting scenario. I enjoy the concepts of being short a hero or two (with no further comment on solo Escape From Dol Guldur) to start the game, but this one was a wild shock to me when I first tried it.
As someone who rarely deckbuilds for a particular scenario (I like to make a deck for a cycle, generally), this is often a tough one. Doable, but tough. Having said that, it’s great to see some specific tips here!
LikeLike