Your hunt for Gollum has brought you to one of the more boring quests in the game, according to many. The Hills of Emyn Muil focuses a lot on locations and exploration rather than combat. As such, it is not unheard of to clear this scenario without ever seeing a single enemy. This greatly reduces the time it takes to complete a round and allows players to quest a little harder with their characters. There are some arbitrary timers set for this quest, where you have to have 20 victory points and no Emyn Muil locations in order to win. That’s it. No extra quest cards, no new unique enemies, and the most interesting locations are added to the game during setup. Still, for players who enjoy a lighter quest to try their Lore/Spirit decks against, this quest can serve as good training. It also allows for an easy win if you have been getting stomped by other quests that night. So there is still merit in playing this quest, and you might still face some situations where victory isn’t that easy to achieve!
The Hills of Emyn Muil

- Found in: The Hills of Emyn Muil Adventure Pack, Shadows of Mirkwood cycle, pack 4
- Official difficulty: 4
- Community difficulty: 2.7
- Encounter sets: The Hills of Emyn Muil, Sauron’s Reach, Orcs of Dol Guldur
- Quest cards: 1
- Play if: You are looking to test a side-quest deck, a deck with guarded cards, or a deck that explores a lot of locations. If you are not a huge fan of combat in this game, this quest will be ideal, as it is mostly focused on locations.
- What is different about this quest?: Heavy focus on locations. 20 victory points required to win the game. Several forced effects on active locations to make the travel phase a little more interesting.
- Solo or multiplayer?: You usually can’t get a large group together for this quest, so I suggest going at it solo. This will set you back a little in the early game, but as long as you can get enough locations revealed each turn, you should have no problem with this quest. In higher player counts, the problem might become that after you reach 20 points, you have to continue to play the game until all locations are explored.
- Can I run side-quests for this scenario?: Yes, you can, and you really should! This quest only requires a single progress token, meaning that all other progress would go to waste. You could, in theory, use it for Back-track on locations in the staging area, but it’s better spent exploring side-quests for the players. There are plenty of good side-quests for this scenario, so really bring whatever you’d like. The combat-focused ones might not be the best to go to, but other than those, go nuts!
- Can I bring Guarded (X) cards?: Again, yes. This quest requires that you find a certain number of locations, and in lower player counts, you might not come across any for a while. Guarded attachments can dig through the encounter deck for them. You are not as likely to find an enemy with them and will even get rid of some of the nasty treacheries while you’re at it. This quest is also suitable for Burglar’s Turn decks since you’ll be traveling a lot.
- Player cards to avoid: None. All cards are legal to bring for this quest. Rohan decks will have a bit of an easier time with certain locations, and you might want to avoid bringing a combat-focused deck. But there’s nothing preventing you outright.
- Optimal starting threat: With very few enemies in the deck, threat isn’t much of a concern. There is a little bit of Doomed in the deck, but nothing you can’t handle. However, with Evil Storm and Treacherous Fog in the deck, I would suggest staying under 35 threat for a while. This is also the engagement cost of Chieftain Ufthak, who is the most troublesome enemy in the deck as well.
- Traits to add to the Victory Display: Dol Guldur, Orc, Stronghold, Creature, Emyn Muil, Hazard, Mordor
- What to look out for: Location lock, boredom, surprise direct damage effects from treacheries, location’s forced effects, enemies returning to the staging area.
- Any changes from the original cards?: None.
The Quest
Setup
The setup for this quest is pretty easy. Find the two unique locations, Amon Hen and Amon Lhaw, and add them to the staging area. You can then immediately flip over the quest card to side B. This starts the game with 2X threat in the staging area, where X is the number of players in the game. This can be a tall order for some decks that lack early willpower, so be sure to have a way to overcome at least the threat from these two locations on top of an additional encounter card during the first round. These two locations will provide you with half of the required victory points for this quest, so it is nice that you do not have to find them yourself during the game.
Quest card 1: The Hills of Emyn Muil – 1 quest point

This is the only quest card in the game and requires but 1 quest point. However, to beat this scenario, you have also to have 20 victory points. These can be obtained by clearing a lot of Emyn Muil locations. Alternatively, you can also attempt to explore a couple of Player Side Quests to put them into the victory display. An even crazier idea is to use cards like Black Arrow, Red Arrow, or Justice Shall Be Done to bump those points up even more. Be careful with the last one, though, as you can only win if you have 20 points and there are no more Emyn Muil locations in play. You can also kill Chieftain Ufthak for his 4 victory points, which is 20% of what you will need.
The rest of the quest card instructs you not to clear every location in the staging area because if there are no location cards there, every first treachery card revealed gains Surge. Be reminded that Surge is a keyword and can therefore stack. So if the first treachery already has Surge, it surges into 2 additional cards. This can be the case with Driven by Shadow.
The name of the game here is location control. You have to be able to clear more than 1 location each turn in order to get to your 20 victory points quickly and to be able to clear Emyn Muil locations after you reach that number. Travelling to the locations is an obvious solution, but beyond a 2-player game, you will likely reveal more than 1 location per turn, trapping you into a location lock. Invest early in ways to place progress on locations in the staging area, and find ways to redirect progress made on the main quest to locations in the staging area. Explorer’s Almanac and Back-track can quickly get you extra locations out of play if you are questing hard enough.
The Encounter deck
Global

- The deck is made up of 53 encounter cards in Normal mode, but only 32 in Easy mode.
- The chances of hitting a shadow effect are lower than average, at only 36% in Normal mode, and 40% in Easy mode. Many of these effects return enemies to the staging area.
- The average threat on cards from the staging area is 1.1 threat/card in Normal mode, and 1.2 in Easy mode.
- On top of the surge that the quest card can give any treachery, there are also 3 copies of Eastern Crows that will surge. You can also have Impassable Chasm surging if there is no active location.
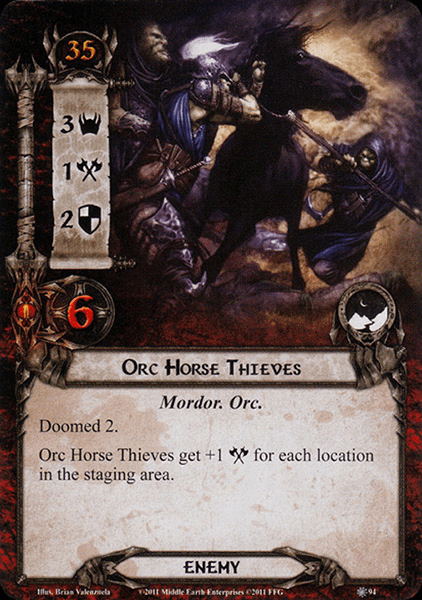
- Doomed 2 is the only instance of the keyword you will find, which is on the three copies of Orc Horse Thieves.
- There is no immunity on any of the encounter cards, so you are free to use any tricks you want.
The encounter deck is dominated by the many locations in there. This should allow you to get 20 Victory points with relative ease, but it might be some time before there are no more Emyn Muil locations in play. There are also a lot of treacheries in the deck, so cancellation will be wise to include in your decks. Enemies are less of a concern, especially when many of them are relatively easy to kill.
Enemies
The enemies really are not the focus of this quest, hence why there is only a single new enemy introduced in the quest. All enemies should be relatively easy to deal with since you can have a lot of characters ready for combat. Do be careful of shadow effects returning them to the staging area.
- Dol Guldur Orcs: These are some of the weakest Orc enemies in this scenario, but they can still pack a punch if you are not careful. The Orcs have a very low threat, meaning that if you are unlucky, you can get swarmed pretty early by these enemies. They also have a When Revealed effect that is quite annoying, as it will deal 2 damage to a character committed to the quest. The first player gets to select this character, but if that character dies because of the direct damage, their willpower is removed from the total. This makes it quite annoying to reveal this enemy multiple times in quick succession, especially in lower player counts where there aren’t as many characters committed to the quest. With an engagement cost of 10, these enemies will engage nearly all decks right away, except for the early game Grey Wanderer decks. While engaged, the Orcs aren’t that big of a problem, but due to their low engagement cost, you do not get the option to leave them in the staging area. This can cause you to be overwhelmed by lower engagement cost enemies early on, requiring you to dedicate more characters to defense. Killing the Orcs is no problem, though. They do not have any defence, meaning that every point of attack you can spare will result in them taking damage. It also means that Straight Shot can discard them immediately. Shadow: The shadow effect on the Orcs is a pretty basic one. The attacking enemy gets +1 attack for this attack. Should players have taken the attack undefended, then the enemy gets +3 attack, which can be deadly for an undefended attack. It even turns enemies like the orc Guard into a 4-attack enemy that you took undefended. The best way to deal with that case is to have Dori, White Tower Watchman, or Barliman in play, so you can redirect the damage you would otherwise take on your hero.
- Chieftain Ufthak: This is the only enemy with a Victory score. This allows you to beat the quest faster since you’ll end up at 20 Victory points a little quicker. Chieftain Ufthak is an enemy that you don’t want to leave around for too long, and you should prioritize him whenever he is engaged with a player. At 35 engagement cost, you have some time to prepare for him, though higher starting threat decks might need to prepare quickly. Ufthak has a well-rounded stat line of 2/3/3/6, and he has a special ability that allows him to collect tokens. He gets one resource token from the bank each time he attacks. He then gets +2 attack for each token on him at that moment. This happens after the damage is calculated during the attack, meaning that he will attack for 3 during his first attack, 5 for his next attack, and so on. Save your Feints for this enemy since he doesn’t get a resource token if he doesn’t attack. Killing him should be a priority before he becomes too big. Use some one-time abilities like Black Arrow and Tactics Eowyn to defeat Ufthak quickly. He will be added to the Victory Display upon his defeat. You should exploit his lack of immunity to player card effects so that you can maximize damage dealt to him while avoiding his attacks.
- Dol Guldur Beastmaster: The biggest threat of this enemy is that it has quite a lot of hitpoints, making it tough to defeat in the early game. At 5 hitpoints, the Beastmaster can even survive a direct hit from Gandalf’s damage ability. This means it will be very likely that you are going to have to suffer through at least one of the Beastmaster’s attacks. This can be quite dangerous. Not because the Beastmaster has so much attack, 3 attack is quite standard, but because of the ability on the Beastmaster. When he attacks, he is dealt an additional shadow card. This can be a problem, as you can potentially get 2 shadow effects buffing his attack or doing other nasty things like discarding attachments or raising your threat. To circumvent these shadow cards, you can either focus all your direct damage on the Beastmaster to kill him before he makes an attack. Events like Quick Strike are also a good solution if you can manage to attack for 6 with a single character. Alternatively, you can also make sure that the Beastmaster won’t attack, thereby not triggering either shadow effect. Feint is a great tool for this, but you can also get creative with a Reforged Forest Snare. With 35 engagement cost, you will have some time to prepare for this enemy before it comes down. You are also helped by the fact that the chances of seeing a shadow card on this enemy is relatively low, let alone getting both cards with an effect. But if you are not willing to try your luck, there are several options mentioned earlier that will help you to get around this enemy.
- Eastern Crows: These are about as weak as enemies are ever going to get, but that is not without cause. The Eastern Crows only have 1 threat, 1 attack, and 1 hitpoint, but they do Surge into another card and have a nasty recursion effect that keeps putting them back into the encounter deck. If you get this enemy to guard your Guarded X attachment, that’s great! You cannot have a more ideal target. But in most cases, you will end up revealing this enemy and having its Surge grab the next card on the pile. An interesting combo with these enemies is that if Thalin is committed to the quest, his 1 point of damage is dealt before the Surge on the Crows can trigger. This causes the Crows to die, which makes it a free encounter card to reveal. As the game text on the Crows isn’t in play at that point, they also don’t get shuffled into the encounter deck. This is a combo that should be exploited by Core Set players as much as possible, as it can save you from some nasty encounter cards that might be harmless as shadow cards. With an engagement cost of 30, it can take a little while in this scenario before the Crows come down, but players can always optionally engage them if they want a quick and easy kill. The Crows aren’t a threat during combat but note that if you take them undefended, some shadow effects become worse, so you are running that risk. The Crows are best defended by heroes like Beorn, who don’t have to exhaust to defend. When the Eastern Crows are defeated, they get shuffled back into the encounter deck. This means that their Surge will be added back to the deck, which can be troublesome down the line. In higher player counts, it can be a good strategy just to keep the Crows alive, as they won’t be a big deal to defend but can be dangerous in the encounter deck. Killing them with Legolas or other cards that benefit players from killing enemies (Blade of Gondolin, Foe-Hammer, Proud Hunters) is still beneficial, especially if you have Thalin committed to the quest in the future. Shadow: The shadow effect raises the attack of the enemy by 1 in the early game. Once your threat reaches 35 and higher, the attack raise will be doubled. This can be quite dangerous as the Crows are common in the encounter deck, especially when killed. So make sure you have a little space between your character’s defence and the attack strength of the enemy to make sure this doesn’t accidentally kill your character.
- Orc Horse Thieves: The only new enemy in the encounter deck is not one you’ll see a lot of but will require some attention if they are revealed. At 3 threat and with Doomed 2, the Horse Thieves make quite the entrance. The threat increase usually isn’t a big deal, as the quest does not have a lot of threat-raising abilities outside of this one and Pursued by Shadow. However, if this effect puts you above 35 threat, you might want to consider reducing it soon before you fall prey to Evil Storm or certain enemies. The Horse Thieves are one of the enemies with an engagement cost of 35, but you usually want to engage them a bit earlier. This removes their 3 threat from the staging area, plus you likely have enough characters ready for combat anyways. The Horse Thieves have an ability that increases their attack stat for each location in the staging area. If you have been travelling constantly and clearing locations in the staging area, then they will likely not get past 3-4 attack. However, for higher player counts, you might face these enemies with a lot higher attack stat if the players are currently in location lock. That can get pretty dangerous, at which point I would suggest you cancel their attack with a Feint. In most cases, though, their attack should be easy to deal with. Attacking back is sometimes more difficult than you might think at first. With 2 defence and 6 hitpoints, you will need a lot of attack to get rid of these enemies. And if your deck is not particularly focused on attacking, this might take a long time. Don’t worry, though. If you are questing well and clearing locations, you can definitely afford to have this enemy engaged with you for a few turns. Hobbit decks might even get a nice boost out of it since they will be engaged with an enemy that has a decently high engagement cost.
Locations
With 8 new locations and the quest revolving around exploring them, you’d better familiarize yourself with the new locations of this deck. Some will start in the staging area already, but to make up for 10 more Victory Points, you will have to explore some of the others as well. Not all of them are that bad though.
- Necromancer’s Pass: Since this quest requires you to obtain victory points, it makes little sense to travel to a location that doesn’t have any. This is one of the locations you can better leave in the staging area to prevent the main quest from adding surge to the first treachery each round. The Pass can be cleared in the staging area by just placing 2 points of progress on it. Traveling is also an option, but I would not recommend it unless there is perhaps an Enchanted Stream in the staging area as well. Traveling will demand that the first player discards 2 cards at random from their hand. If they have 1 or no cards in their hand, the players cannot travel here. I tend to clear the location in the staging area unless I feel that I have a high enough chance to discard some cards from my hand that I don’t mind losing. The location isn’t too much to worry about, and you can generally get away with traveling somewhere else. However, if you are in a situation where location lock is becoming a threat, then travel to the Pass, as it lowers the threat in the staging area by a lot.
- Enchanted Stream: This is another location best left in the staging area because clearing it will not get you any closer to completing the quest. Aside from this, the location is quite easy to clear in the staging area, requiring just 2 progress, and it also has a passive rule that affects you negatively. While it is the active location, players cannot draw cards. This means that players not only lose the card they get every resource phase, but they also cannot draw from other effects. Card draw events like Deep Knowledge become useless, but even utility allies like Master of the Forge and Bofur cannot draw you specific cards anymore. This stalls your deck’s development unless you have plenty to play from the cards in your hand. Decks that run Erestor (and usually Noldor decks in general) will struggle as they lose most of their hand and cannot draw extra cards. Since this only happens when the Enchanted Stream is the active location, I would suggest leaving it in the staging area, even if it is the only location in the staging area during the travel phase. It is not worth losing your ability to draw cards unless you can be sure to quest through it before you can draw a card again. With it only having 2 quest points, cards like Legolas and Strength of Will can clear it without costing you too many cards. Blanking the textbox of this card with Thror’s Key can also solve the issue, but only if you really want to. Usually, there are enough other options to travel to during the travel phase.
- Amon Hen: The first of two unique locations in the encounter deck is the famous Amon Hen, where Frodo saw much of what was happening in Middle Earth during his visit there. The location is nearly identical to Amon Lhaw, except for its passive ability once it is active. It starts the game in the staging area and will have a threat equal to twice the number of players in the game. This can be quite a lot in a 4 player game, hence why this is a good target for cards like Secret Paths, Thror’s Key, or other ways to get it out of the staging area quickly. Travelling to this location is free, but once Amon Hen is the active location, players are not allowed to play events. This is usually not a big deal (unless you are playing a Council of the Wise deck), but it can still screw over some of your plans. You will have to wait to draw cards from Daeron’s Runes or Elven-light, and you are also not able to cancel a treachery with A Test of Will. The 5 quest points on Amon Hen can be a bit of a roadblock in lower player counts, but considering you just got rid of a lot of threat in the staging area, you can probably clear this in a single turn. You can also use a Woodmen’s Path for this location to make it even easier to clear. Exploring Amon Hen will grant you 5 victory points, which is 25% of the total that you’ll need. So there is reason enough to travel here when there’s a lull in the action. Since this location also has the Emyn Muil trait, you will have to get rid of it anyways in order to win the quest.
- Amon Lhaw: The other unique location that starts the game in the staging area is the Hill of Hearing. It has the exact same stats as Amon Hen and also has 5 victory points. That means that if you clear both locations, you’re already halfway towards your goal of clearing the 20 required points for this quest. The only thing that is different about this location is that you will be allowed to play events while this is active, but all attachments are blank. This can screw over many decks that get their use out of having attachments on their characters, like a Three Hunters deck or the Dale archetype. Still, this is probably the easiest location out of the two unique ones since it won’t do much in the early game when not many attachments are yet in play. It’s pretty common to travel here on turn 1. Do note that location attachments will be blank as well, so you are unable to use effects like Woodmen’s Path to reduce the quest points on this location while it is active. Thror’s Key will work if you place it on the location while it is in the staging area, allowing you to blank the blanking card… If your strategy really depends on getting attachments into play early, then you can still consider slowly placing progress on this location in the staging area.
- The East Wall of Rohan: At 4 threat, this location can put quite a damper on your progress for this turn. This makes it a good target for cards that can reduce the threat of a location, like Guarded Ceaselessly and Secret Paths. The high threat makes this also a popular destination during the travel phase, but do keep the passive effect on the East Wall in mind. While it is active, each non-Rohan character will cost 2 additional matching resources to play. This will greatly hinder any ally swarm (aside from the Rohan deck). If you are not too worried about playing allies for a turn, then this can be a good travel option. Otherwise, you can better leave it in the staging area and try to explore it there. With just 2 quest points, it can be easy for a location control deck to make short work of this location, adding it to the victory display and earning you 3 points. Asfaloth can be a good card against this location, but also Strength of Will if you don’t want to travel anywhere else. This event can clear the location as soon as it becomes active so that you do not have to suffer the increased cost to play non-Rohan allies.
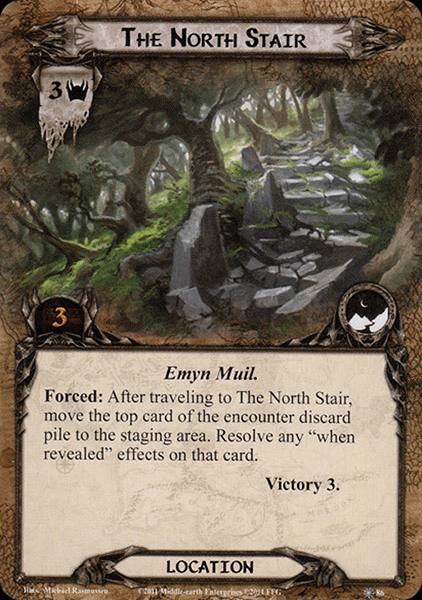
- The North Stair: Another 3 victory point location, though this one only has 3 threat, but does require 3 progress to clear. This makes it a little more resistant against location control cards, but any dedicated deck can make short work of this location. Still, this is a location I do find myself travelling to more often than others. This does depend on the situation since you can see which card is on the top of the encounter discard pile. Once The North Stair becomes the active location, that card is moved back to the staging area, and any When Revealed effects are triggered. Locations are rare to get on the top of the deck since most are sent to the victory display once cleared. But you can still get some locations worth Victory Points if any were dealt as shadow cards. Treacheries are usually fine, with some exceptions. Most treacheries can often do next to nothing, like Rockslide (no longer the quest phase), Slick Footing (if there’s no progress on any cards), Evil Storm/Treacherous Fog (if no player is above 35 threat), and Driven by Shadow (increased threat on cards doesn’t matter). The other treacheries in the deck will do something, but since you can see which card is on top of the discard pile, you can time when you want to travel here. Enemies on top of the discard pile will also usually be a fine card to return to the staging area. They are not that difficult in this scenario, and in lower player counts, you might actually like to see an enemy for once. The North Stair itself is not that interesting after this Forced effect is triggered. Clear it for 3 points, and try to avoid having to return it to the staging area from Impassable Chasm, lest you have to trigger the Forced effect again next turn.
- Rauros Falls: The great falls of Rauros are a 2 threat, 4 quest point location that will force all characters in play to commit to the quest during the quest phase while it is active. This is bad since players will be able to make a lot of progress, but at the cost of having almost no ready characters for combat. Alternatively, players can also get hit by a Rockslide during the quest phase, having to deal 2 damage to each character they have, even the ones that are not meant to be questing. This is pretty dangerous, and that is why I do not advise players to travel here. This location is best left in the staging area to be cleared by player card effects and prevent treacheries from gaining Surge. If you are going here, try to get a readying effect like Grim Resolve or The Free Peoples before the staging step so that at least Necromancer’s Reach does not kill anyone, and you will have characters left standing for combat. The good news is that Pursued by Shadow won’t do anything, and you will likely be making a lot of progress on the active location, certainly clearing its 4 quest points and earning you the 3 victory points. Shadow: This shadow effect is shared with the next two locations as well, resulting in 8 cards having the same effect. After the enemy attack resolves, you have to return the enemy to the staging area. There it will continue to add its threat to the total, likely forcing you to engage it again next turn. You are also prevented from counterattacking unless you have defended with Grimbeorn or have invested in ways to attack into the staging area. Traps and the Dunedain archetype will also still have ways to interact with that enemy.
- The Shores of Nen Hithoel: With 2 threat and 2 quest points, this location is not really a big deal. The only thing worth noting is that this location has a pretty long title. It does not have a passive ability like many other locations but instead comes with a travel cost. The first player must discard one of their event cards to travel to this location. If the first player does not have an event in their hand, they won’t be able to travel here. That is not a huge deal if you are running cards that can place progress on locations in the staging area, but if you don’t have those, you will have to wait a while before someone can discard an event as the first player. Alternatively, you can use effects like Ghan-buri-Ghan to bypass the Travel cost. The shores won’t do much as the active location and will reward players with 2 victory points upon completion. Shadow: See Rauros Falls.
- The Outer Ridge: To buff the potential location lock that this scenario tries to set up, the Outer Ridge will provide all locations with an additional point of threat when it is the active location. This is only while it is active, though, meaning that you have a pretty good reason never to travel here. The location itself is just 2 threat, so travelling can often add more threat to the staging area than you removed by going there. With 2 quest points, you can likely expect what I am about to say: clear it in the staging area. There is no point in travelling here, even if there is no other location in the staging area to buff. You might reveal 2 locations next turn, for which the Outer Ridge will boost the threat. However, if you are able to clear this location during the combat phase (Legolas, Blade of Gondolin) or before questing (Map of Rhovanion, Lorien Guide), then I suppose there is nothing wrong with going here since the threat will be gone by the time it is relevant again. Shadow: See Rauros Falls.
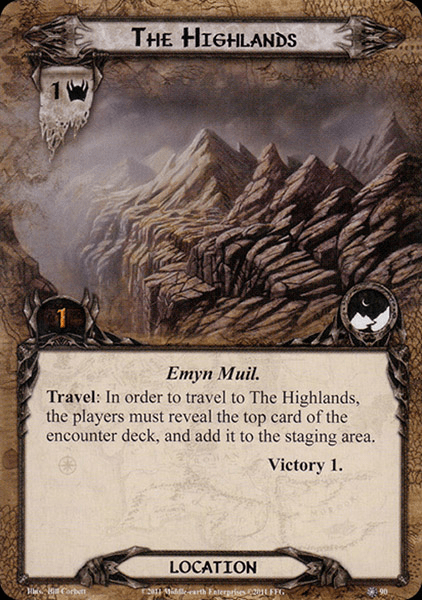
- The Highlands: This is by far the weakest location in the encounter deck, at just 1 threat and 1 quest point required to defeat it. You are, in turn, only rewarded with a single victory point, but that’s still 5% of your required total. The single point of progress required to clear this location makes it very easy to clear in the staging area or even before that! Warden of Arnor is not a common card used in decks, but it could clear this location as soon as it is revealed. There is also a host of other effects that can be used to clear this location without traveling to it, so you really do not have to worry too much about this one. However, if you do decide to travel here because the other destinations aren’t worth it, you do have a travel cost. You have to reveal the top card of the encounter deck to travel here. This can reveal another location or get you an enemy to face in the combat phase. Treacheries like Rockslide are also good to get here since characters are no longer considered to be questing. But in most cases, you do not have to worry about any of that if you just leave this location in the staging area for a Northern Tracker to pick up the next round.
Treacheries
There’s a surprising number of treacheries in this quest, and some are brutal enough to wipe your board if you are not careful. Cancellation will be required in some circumstances, and keeping a low threat will help to avoid the worst of it.
- Driven by Shadow: There are two scenarios for this treachery. Either it does next to nothing, or it is the worst card you could have revealed, making your location lock a lot worse. When this treachery is revealed, each enemy and location currently in the staging area gets +1 threat. This does affect any encounter cards that were revealed before this treachery but not those that are added after this treachery. Should there be no locations or enemies in the staging area at the time this treachery is revealed, then it surges into the next encounter card (which also doesn’t get +1 threat). The impact of this card scales with the number of cards in the staging area, and it will be less terrible if you manage to keep it clean. However, in higher player counts, this is not always possible, and Driven by Shadow can easily add 5+ threat to the staging area. But in higher player counts, you will have sent more willpower to the quest, so it usually balances out. It is often not worth canceling the treachery, but it often depends on the situation. There is only one copy of this treachery, so you do not have to worry about it triggering more than once. Shadow: The shadow effect on the treachery can be annoying, as it will discard an attachment from the defending character. If this character has no attachments, the shadow effect does nothing. But you will otherwise lose an attachment, which can cause you to take more damage if you have to discard something that boosts your defence. Should the attack be undefended, then the shadow effect discards all attachments you control. This can be devastating for some decks late in the game and should serve as a reminder not to take undefended attacks.
- The Necromancer’s Reach: This next treachery is probably the most remembered treachery from the Core Set and has been remade in many different formats over the years. But this classic card still invokes an audible grown across the table when it is revealed, followed by: “Can anyone cancel this?” The When Revealed effect on the Reach is brutal in its simplicity. Each exhausted character gets dealt one damage. They do not have to be committed to the quest but can also be exhausted from triggering their effects before the staging step (Gleowine, Master of the Forge, Bofur) or be exhausted from other effects (Ents that were just played, for example). Each exhausted character is dealt one damage, which can destroy lower-cost characters with just one (remaining) hitpoint. If these characters were committed to the quest, they no longer contribute their willpower to the quest, and you have to recalculate after the staging step. This effect can lay waste on some decks like Silvans and Hobbits, so it should be cancelled if possible. Getting this card multiple times in the same quest phase is not impossible, as there are 3 copies in the encounter deck in Normal mode. Multiple triggers of this treachery in short succession can often lead to dead heroes and to a reset of the game. Cancellation is important for this one, but another way to avoid having to take so much damage is to ready all your characters before the staging step. Cards like Grim Resolve, Need Drives Them, Free Peoples, and Strength of Arms can ready a lot of characters while keeping them committed to the quest. Healing can also help, provided there is enough time between copies of this treachery to heal everyone.
- Evil Storm:If you want another reason to keep a low threat during this scenario, then check out this lovely treachery. While players have a threat of 34 or lower, this does nothing; it doesn’t even surge. However, once any player reaches 35 threat or higher, and this treachery triggers, then they will have to deal 1 damage to each character that they control. While this sounds a lot like Necromancer’s Reach, it also does damage to ready characters, meaning that there is no escape for the weaker utility allies or characters that got damaged earlier and are just clinging on to life with 1 hitpoint remaining. The Evil Storm will deal 1 damage to all, causing potential board wipes in the later stages of the game. With 3 copies and with Necromancer’s Reach and Rockslide in the deck as well, you can expect a ton of direct damage from this if you are not careful. Keeping a low threat is the best remedy against this treachery, allowing you to save your cancellation for other treacheries that aren’t as forgiving. If you reveal this at a low enough threat, you will actually like seeing this treachery, as it does nothing at all.
- Pursued by Shadow: In a quest all about keeping a low enough threat, the last thing you would want is to suddenly have to raise your threat by quite a large amount. That is what this treachery can potentially do to you. When it is revealed, Pursued by Shadow raises each player’s threat by 1 for each character not currently committed to the quest. Don’t mind cards like Late Adventurer or Hobbit Pony; you can’t trigger those right now. This treachery looks at the number of characters you have left and forces you to raise your threat for each one of them. A higher threat can put you within the engagement costs of certain enemies and can mark you as a target for Evil Storm and Treacherous Fog. Cancellation is possible, but there are also other options to minimize the damage of this treachery. Free to Choose is not a popular event, but it can neutralize this treachery on the spot for you. The only problem is that you should have it in your hand early. It also only lowers your threat and not that of your fellow players. To ensure players reduce their threat again, Galadhrim’s Greeting can provide you with -2 threat after staging at the cost of 3 resources. If this puts everyone below 35 again, then it is a good card to play. Double Back is also a great counter to this treachery, as long as you manage to clear it quickly. Cancellation is also an option, but save it for other treacheries if you can. Shadow: The shadow effect on this card is quite unique, as it requires the defending player to return an exhausted ally to their hand. This can be quite bad if your only exhausted ally is the one defending this attack, as that will cause the attack to become undefended. Make sure you always have an ally to return who is not defending, just to avoid a nasty undefended attack if you are unlucky. Certain decks like the Silvan, Rohan, and Eagle archetype will love returning an ally to your hand, as that can trigger some interesting synergy in your deck. But if you have the option, return the character you either don’t need or who is easy to bring back into play. Should you have no (unexhausted) allies, the defending player must instead raise their threat by 3. The ally is usually the better of these two, so if you see this shadow coming, exhaust an ally before it triggers to avoid unnecessary threat increases.
- Treacherous Fog: This final treachery is a kind of combination of Evil Storm and Driven By Shadow. When it is revealed, it raises the threat of each location in the staging area by 1. This can be bad if you are already in the early stages of location lock, but if you managed to keep a lid on the locations you keep in play, this treachery shouldn’t add more than 3 threat on its own. The stinger comes in the second part of the treachery, where players with a threat of 35 or higher must choose and discard 1 card from their hand. The fact that players get to choose the card they discard makes this treachery hit a little softer, as players can discard copies of unique cards that are already in play if they want to. It would have been worse if the discard was random. The fact that this also only targets players at a threat of 35 or higher makes it quite a tame treachery that doesn’t do a lot compared to the rest. Only if you are really struggling with locations would this be worth cancelling, just because it saves you from a ton of threat. But even that threat is temporary, making this a better reveal than yet another location.
- Impassable Chasm: This treachery is a bit of a nuisance if you hit it over and over again, which can happen thanks to the 4 copies there are in the encounter deck. When it is revealed, the players must return the active location to the staging area and remove all progress from it. If you have been working on Amon Hen/Lhaw for a while and were finally going to quest through, then this treachery just put you back a few turns. This one can also prevent a victory at the end of the game, preventing the players from clearing their last location and having to wait another turn. Out of frustration, it is usually cancelled in these situations. Should this treachery be revealed at a time when there is no active location, it will surge into a new encounter card. However, if there’s also no location in the staging area at this point, it will reveal an extra encounter card if this was the first treachery revealed this round (as per the quest card). So it can potentially reveal 2 additional encounter cards, hopefully getting you another location to travel to.
- Rockslide: Out of all the new encounter cards for this quest, I think this is the one that catches most players off-guard. The quest is supposed to be easy, with nothing to worry about. And suddenly, you find yourself dealing 2 damage to every questing character in play! This effect can even deal damage to characters who are still questing without being exhausted, unlike Necromancer’s Reach. So instead of a readying effect preventing this treachery from dealing any damage, you might need to invest either in cancellation or in ways to commit characters to the quest after the staging step. This can only really be done with Hobbit Pony and Late Adventurer, but it will help to keep some heroes still alive. This treachery is just brutal and will discard nearly all allies committed to the quest. If you somehow know this treachery is coming, I do not blame you for sending fewer characters to the quest, perhaps even underquesting on purpose to prevent getting your board wiped. Shadow: The shadow effect can also be pretty brutal. The defending character is removed from combat (meaning they are still in play but are no longer considered to be defending). The attack is now handled undefended, meaning that your heroes will be taking some direct damage from this attack. The good news is that the enemies in this quest do not hit very hard unless Orc Horse Thieves or Chieftain Ufthak got some setup behind them. You can get away with taking just 1 or 2 damage on a hero, but it is still a dangerous shadow effect.
- Slick Footing: This is the game’s counter to players who bring Northern Tracker to this scenario. When the treachery is revealed, 1 progress is removed from every location in play, including the active location. Then, each player must discard the top X cards from their deck, where X is the number of progress tokens just removed. This is a lot milder than it could have been since the treachery only removes a single point of progress from all locations, not all tokens. So if you have been chipping away at a large location in the staging area, you aren’t reset to zero tokens; you just lose one. The threat of discarding cards from the top of your deck is also not really a big deal in most cases. Unless you have been setting up your deck for a while, you usually don’t care too much about having to discard a few cards from your deck. Some decks like Dwarf and Noldor decks could even benefit from this! Also, if the players have no progress tokens on any location in play, this treachery just whiffs. It does not surge (unless there are no locations in the staging area at all). A pretty tame treachery, though it can set back your progress a little bit.

Worst cards in the encounter deck

- Enemies
- Chieftain Ufthak
- Orc Horse Thieves with a lot of locations in the staging area
- Locations
- The Outer Ridge
- Amon Hen
- Amon Lhaw
- Treacheries
- Necromancer’s Reach
- Evil Storm with a threat higher than 35
- Rockslide
- Shadow effects
- Rockslide
Tips and Tricks
- Try and keep your threat below 35. This is the engagement cost of most enemies, which will allow you to choose your own battles. It also makes treacheries like Evil Storm and Treacherous Fog less of an issue.
- Bring Northern Trackers; these rangers will allow you to place progress on all locations in the staging area and will allow you to explore locations without the need to travel to them. The more you get, the faster this quest will be over.
- Dunedain Pathfinder is a good ally to get out. He is sure to hit with nearly half of the encounter deck being locations. He also lets you find a way around the surge trigger on the quest card. Other scrying effects like Scout Ahead and Risk Some Light can also be useful to put locations on the top of the encounter deck. That way, the first treachery revealed won’t surge, and you will get those victory points faster.
- This should go without saying, but be sure to pack enough location control. Warden of Arnor lets you discard The Highlands if they are the first location revealed. Asfaloth can allow you to pop a location with a lot more quest points than usual, like Rauros Falls.
- There are quite a few direct damage effects to questing characters. Be sure to bring some healing to prevent your entire questing board from being wiped. Effects like Rockslide can be very dangerous as it targets every questing character, not just every character that is exhausted to commit to the quest. Sailor of Lune is a good counter against it, provided you can have an event on the top of your discard pile.
- With a lot of treacheries, cards like Eleanor and A Test of Will are also very useful. They will prevent you from getting destroyed with an untimely Rockslide or Necromancer’s Reach. Alternatively, you can experiment with the Door is Closed if you manage to put a treachery into the victory display.
- Victory Display decks can work against this quest. Not all cards are viable targets, though; Leave no Trace is practically useless against Emyn Muil locations. Out of the Wild can only work on cards without victory points, so try and fish out some treacheries. Rossiel will almost immediately quest for 4 willpower since the victory display will be stuffed with locations.
- With many shadow effects returning enemies to the staging area, it might be a good idea to have a way to damage enemies in the staging area. Dunhere, Leadership Eomer, Hands Upon the Bow, etc. can help you to still kill enemies that fled back up there.
- Not all victory points have to come from the locations in this quest. Players are also allowed to get the points from enemies like Chieftain Ufthak, from player cards like Black Arrow, or from side-quests. This helps you to get to 20 a lot faster without having to get lucky in hitting some locations.
Playthroughs
- True solo, progression mode: https://www.youtube.com/watch?v=v81puUqGcdQ
- Two player, progression mode: https://www.youtube.com/watch?v=7VejBJcRwJ0
- Two player, progression mode: https://www.youtube.com/watch?v=_P07jfT8rVE
- True solo, progression mode: https://www.youtube.com/watch?v=89Nim6gYbrw
With Emyn Muil now completed, I will try and go for the Dead Marshes and Return to Mirkwood next. With those quests needing to be revised, I can probably fill out the rest of the year. This will allow me enough time for the yearly recap, as well as perhaps some time to focus on Nightmare articles or other topics should I be inspired enough. These revised articles, luckily, don’t take that much time anymore, as much of the content can be shared between articles.