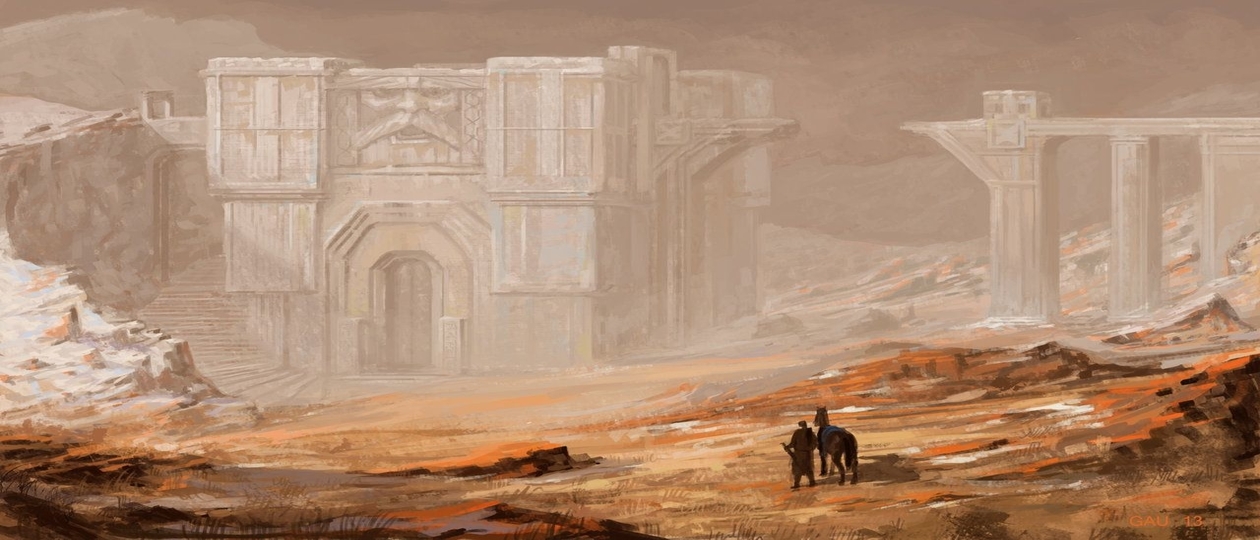
… the ancient cities of Nogrod and Belegost in the Blue Mountains were ruined at the breaking of Thangorodrim.
The Return of the King
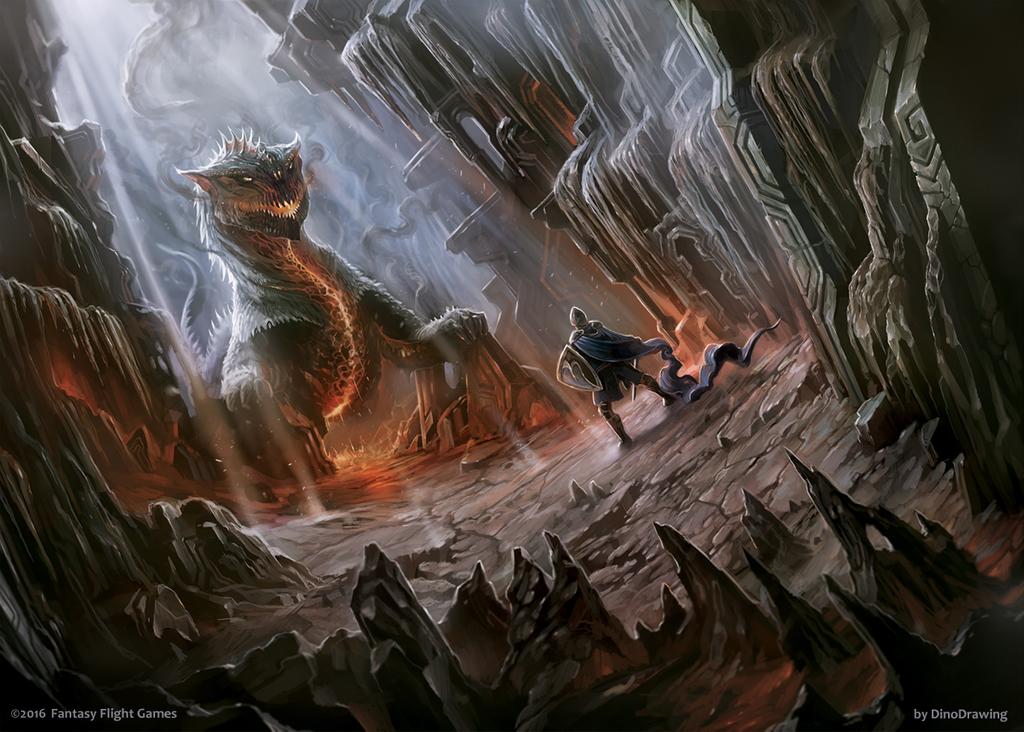
The Ruins of Belegost print-on-demand scenario is another unique POD quest where the players have to go “treasure hunting” or, better yet, “loot hunting” to the destroyed city and the underground caves of Belegost. On top of the loot that the players should claim, there is a terrifying dragon. The notorious Naurlhûg who can haunt your dreams of winning this scenario! As the dragon wasn’t enough, there is a bonus mini-boss that you won’t like to encounter. This “mini” boss is an ancient creature that resembles The Watcher.
The main objective of the quest is to loot as many objective cards as possible and reach the final stage where you can (and must) slay the Naurlhûg. This is definitely not a quest for new players because, despite its really high difficulty, it has a lot of things going at the same time and a lot of effects that players must keep in mind and apply when needed. Imagine playing this complicated quest with a “complicated” deck, namely a deck with a bunch of trigger effects and combos of cards. That will be extremely hard to keep track of everything. Although in this review, I’ll try to explain to you every bit of this quest, and I’m sure the moment you understand the mechanics and the effects, it won’t be too hard to handle.
The Ruins of Belegost
- Found in: The Ruins of Belegost – Print on Demand (POD) Scenario. Part of the 2015 GenCon event.
- Official Difficulty: N/A
- Community Difficulty: 8.1 (from Hall of Beorn) and 8.4 (from LOTR LCG Quest Companion)
So averaging at 8.3 because Quest Companion has more votes. - Encounter Sets: The Ruins of Belegost.
- Quest Cards: 4, although there are 2 separate copies of Stage 2 and 3 separate copies of stage 3. That makes a total of 7 cards; thankfully, you won’t have to pass from all of them. Best case scenario, you see 4 of them, and in the worst case, 6, which is a really unfortunate situation.
- Play if: You love to slay orcs and creatures underground, want to have a Boss dragon and a bonus mini-boss, and enjoy looting items and artifacts which can help you within the quest.
- Solo or Multiplayer?: I find this quest very tough in solo play that I wouldn’t recommend it. On the other side 4 player game can get your staging area overcrowded and might lead to a potential location lock. So I lean more on a 2 or 3 player game.
- Can I bring Side-Quests?: You can definitely bring Side-Quests with you. In order to progress on the first 3 stages, you need to have the Objectives, and few progress is required. So while waiting for the Objectives to reveal from the loot keyword you can always commit to side-Quests.
- What to watch out for: Of course, Naurlhûg, who can get in and out of the game and always he can assign more damage than his attack can do! Furthermore, you should watch out for a lot of nasty enemies whose stats might depend on the active location.
The Quest
Before proceeding to the quest cards we, have to introduce a new keyword from this quest. Almost every Objective card of this scenario has the loot keyword, but what does it mean?
When an encounter card is revealed from the encounter deck and has the loot keyword, it cannot go to the staging area. Instead, the players have to discard it and reveal a new encounter card from the encounter deck. The loot keyword is printed on almost every Objective of the quest and indicates that the Objective (which is always an Item/Artifact) is a valuable treasure that can only be discovered by traveling to a location. Now we come to another keyword introduced by this scenario, the Discover X keyword. Thankfully, all locations of this scenario have the Discover X keyword. When a location with that keyword becomes the active location, the first player has to do a series of actions in a specific order.
- Look at the top X cards of the encounter deck, where X is the active location’s Discover value.
- Choose 1 looked at objective with the Loot keyword and attach it to the active location as a guarded objective.
- Randomly select 1 looked at card with the Hazard trait, reveal it and add it to the staging area.
- Place any remaining looked at cards in the encounter discard pile.
If there are fewer cards in the encounter deck than the X value of the discover keyword of the active location, then the players shuffle the encounter discard pile into the encounter deck and continue resolving the Discover keyword. The Discover X keyword represents the Heroes’ search for the treasures (Objectives) and the dangers (Hazards) that might come up in the various locations of this scenario. To claim the Loot, the players have to explore the active location that guards it or defeat the enemy that guards it, and then the first player immediately takes control of the Objective and attaches it to one of their Heroes. That means the players can claim the Objective of the active location before proceeding to the next stage (of course, if they have enough progress), and then they can advance.
Setup
Beginning with setup, quest card 1A instructs the players to add Stalking the Ruins Objective card into the staging area and add 1 copy of Abandoned Mine per player to the staging area. Then, you have to set Lurker of the Depths, Naurlhûg, Naurlhûg’s Lair, and Sword of Belegost aside, out of play. When you finish preparing all that, you need to randomly select 1 of the 5 remaining Loot Objectives and place it facedown underneath Stalking the Ruins without looking at it. Then shuffle the remaining Loot Objectives back into the encounter deck without looking at them.
That was a prolonged Setup with a lot of instructions comparing it with other quest setups. Some things worth mentioning here are that every game begins without knowing in advance which Objectives are in the encounter deck, which kind of makes each game unique, giving high replayability to the scenario. Moreover, the Objective that goes underneath Stalking the Ruins is practically out of play until you explore Naurlhûg’s Lair. This “out-of-play” Loot Objective plays a major role in how the game will evolve and which quest cards the players will meet.
Another thing we notice while setting up the game is the Sword of Belegost, which stays out of the encounter deck from the beginning of the game. It comes in handy only in the late game when you need to slay the dragon. Only then will it go to the encounter deck, and if you are lucky enough, you will claim it, and it can boost your attack by a lot to finally kill the beast! Of course, Naurlhûg himself stays out of the game until Stalking the Ruins calls him into play, and Lurker of the Depths also stays out of play until the 2A or 2C stage.
Quest card 1: Ruins of the First Age – 6 quest points.

Beginning the quest and flipping quest card 1A, you get the 1st stage of the scenario which requires 6 progress and at least 1 Loot Objective in order the players are illegible to advance to the next stage. Generally, the easy part of the quest cards is to obtain the required amount of progress, and the hard part is to discover the Loot Objectives needed to pass them. This quest card comes with a Forced effect which coerces the players to return the topmost location from the encounter discard pile to the staging area only if (during the Travel phase) there isn’t any location in play. In that way, you will always have a location to travel, which means you can search the encounter deck for Loot Objectives faster. The last Forced effect of this quest card is when this stage is defeated; if the Keys of Belegost are attached to a Hero, the players can advance to stage 2C. Otherwise, they must advance to 2A.
Now is a good time to play your side-quests as you can easily collect the 6 progress, and you’ll probably have a couple of rounds until you acquire a loot objective. So you shouldn’t throw your questing progress into the “trash.” The only thing you need to do in this quest card is to search as much as you can for a Loot Objective and hopefully get the Keys of Belegost. If you do so, you will be able to advance to 2C directly, bypassing 2A and the mighty Lurker of the Depths.
Quest card 2A: Ancient Evils Disturbed – 9 quest points.

If you didn’t find Keyes of Belegost, you are doomed to proceed to stage 2A and put the Lurker of the Depths in the staging area. Now 3 conditions should be satisfied in order to advance to stage 3.
- You need 9 progress tokens on this quest card.
- You must control at least 2 Loot Objectives
- The Lurker of the Depths must be in the victory display.
That’s quite a demanding quest card in the case of progression. You will find out that defeating the Lurker of the depths isn’t trivial and will be challenging even for combat dedicated decks. Although, if you manage to succeed, then you can proceed to stage 3. Furthermore, if you have discovered the Book of Aulë’s Children, you can directly advance to stage 3C; otherwise, you must advance to stage 3A.
Quest card 2C: Deeper into the Past – 9 quest points.

When Stage 2C is revealed, you must shuffle Lurker of the Depths and encounter discard pile back into the encounter deck. Then you should start discarding cards from the top of the encounter deck until a location is discarded. On top of that, you must add that location to the staging area.
After executing the when revealed effect of 2C, you flip the quest card. The first Forced effect of this card allows the players to place resource tokens on this card every time they explore the active location. So, similarly to the 2A, there are 3 conditions that must meet to advance to stage 3:
- There must be 9 progress tokens on stage 2D.
- The players must control at least 2 Loot Objectives.
- There should be at least 3 resource tokens on stage 2D (Which practically mean that the players must explore at least 3 active locations before they can advance to the next stage).
If you manage to fulfil the above requirements, you can advance to stage 3C or stage 3E if you control the Book of Aulë’s Children.
Quest card 3A: The Servants of Morgoth – 6 quest points.

When this stage is revealed, the players must shuffle the encounter discard pile back into the encounter deck and reveal 1 encounter card per player. When you flip to 3B, you get the following permanent effect: “The first Hazard card revealed each round gains Surge.” That effect can be really nasty, especially if half the encounter deck consists of Hazard cards. In addition to that effect, if it’s the Travel phase, the players must travel to a location, if able. That’s a slightly negative effect as it restricts your options of traveling or not; moreover, if there is always an active location, Nameless Cave Dweller enemies are possible to pile up on the staging area, and it might be impossible to clear them all. Thankfully the 6 progress required by this quest card isn’t much trouble.
On the bright side, a 3rd Loot Objective isn’t necessary in order to advance from this stage. Although to advance in stage 4 and not on another different stage 3, a specific Loot is required. When this stage is defeated, if Dwarven Torch is in players’ control, then you can advance to stage 4A. Otherwise, you must advance to stage 3C.
Quest card 3C: The Roots of Ered Luin – 6 quest points.

When 3C is revealed, the players have to shuffle the encounter discard pile to the encounter deck and then reveal 1 encounter card per player. Next, you flip to 3D. Stage 3D obligates the players to travel to a location (during the travel phase) if able. Moreover, the discover value of the active location is increased by 1. This might be helpful for the players. You will be able to search the encounter deck faster for the proper Objective, which will assure the players’ advancement to stage 4. Specifically, when this stage is defeated, if Map of Ered Luin is attached to a Hero, you should advance to stage 4. Otherwise, advance to 3E.
Quest card 3E: The Mines of Belegost – 6 quest points.

There are two possible ways to be on this quest card. The first one is that you were really unlucky, and you didn’t find the Loot Objectives that the quest cards 3B and 3D require. In that case, you are playing this scenario for quite a while, and you probably are almost out of threat. The second possibility is you got the Book of Aulë’s Children on stage 2D. In that case, you have skipped a lot of trouble, and you are close to an ending (if you have acquired the Blue Mountain Gem Objective) or to recycling the quest cards of stage 3. Anyway, when you reveal stage 3E, you have to shuffle (again) the encounter discard pile into the encounter deck and reveal 1 encounter card per player. The same effect applies here. If it’s the travel phase, the players must travel to a location, if able. The first Forced effect of the Mines of Belegost is, after resolving the Discover keyword, if no Hazard card was revealed by that effect, you have to reveal the top card of the encounter deck. That might be a really harsh effect. Combined with the “Forced” effect to travel every time you have the chance, there are always extra cards revealed from the encounter deck each round. Eventually, if you have acquired the Blue Mountain Gem and it’s attached to one of your Heroes, you must advance to stage 4; otherwise, you recycle the stage 3 quest cards and advance to stage 3A.
Quest card 4: The Beast of Belegost – 6 quest points.

When you finally reveal Stage 4 of this scenario, you can finally have the chance to kill the Naurlhûg and win the game. First of all, when you reveal stage 4A, you must add Naurlhûg and Naurlhûg’s Lair to the staging area. Then you must shuffle the Sword of Belegost and the encounter discard pile in the encounter deck. After you flip to stage 4B, you are informed that if Naurlhûg’s Lair is in the victory display, then Naurlhûg loses the text: “Cannot take damage.” And that’s the way Naurlhûg loses his invulnerability, and you can finally defeat him. Furthermore, this quest card has a Force effect that says: “After Naurlhûg attacks, if it was dealt a shadow card with no shadow effect, it engages the next player. Then, it makes an immediate attack. Do not deal it a shadow card for this attack.“. Now that’s a pretty unfortunate effect, but “thankfully,” the percentage of the shadow effect on the encounter cards is pretty high, so hopefully, this Forced effect won’t trigger that much. Finally, if you manage to slay the dragon, you have won the game!
To better understand the quest card sequence of this scenario, I made a flowchart that starts (of course) from quest card 1 and, depending on the Loot Objectives you find during the game, can tell you to which stage you’ll go next.

So, from the above chart, we can clearly see that the Keys of Belegost is the Loot Objective you seek during stage 1, and it’s the most important Loot because it can delay Lurker of the Depths from entering the staging area. Now, independently of the quest card 2 copy you advanced, you are seeking the Book of Aulë’s Children. Here things become more tactical. In my opinion, the effect of stage 3C/3D is the most friendly compared with the effect of 3A/3B or 3E/3F. In other words, to have an extra +1 Discover value added to the Discover value of the active location isn’t that much comparing it to the Surge that the first Hazard card will get (from 3B effect) or the extra card that you’ll reveal if you didn’t get any Hazard from the Discover keyword (from 3F effect). So in most cases, traveling to 3C or even 3E is preferred. You should also take into account that if you already have, for example, the Dwarven Torch Loot Objective, it benefits you more to aim for quest card 3A because the moment you make the 6 progress, you can advance to stage 4 without waiting for any other Loot Objective.
It’s great for the players to have all those tips in mind, but the scenario itself doesn’t always let you make decisions about the quest cards because the Loot Objectives reveal randomly. Moreover, you should remember that one Objective remains out of play under the Stalking the Ruins Objective, so you should keep track of the Loots that appear in order to get clues about which quest card will come next.
Finally, the best combinations of Loot Objectives that you can acquire are:
Keys of Belegost –> Book of Aulë’s Children –> Map of Ered Luin or
Keys of Belegost –> Book of Aulë’s Children –> Blue Mountain Gem
The Encounter Deck
Global
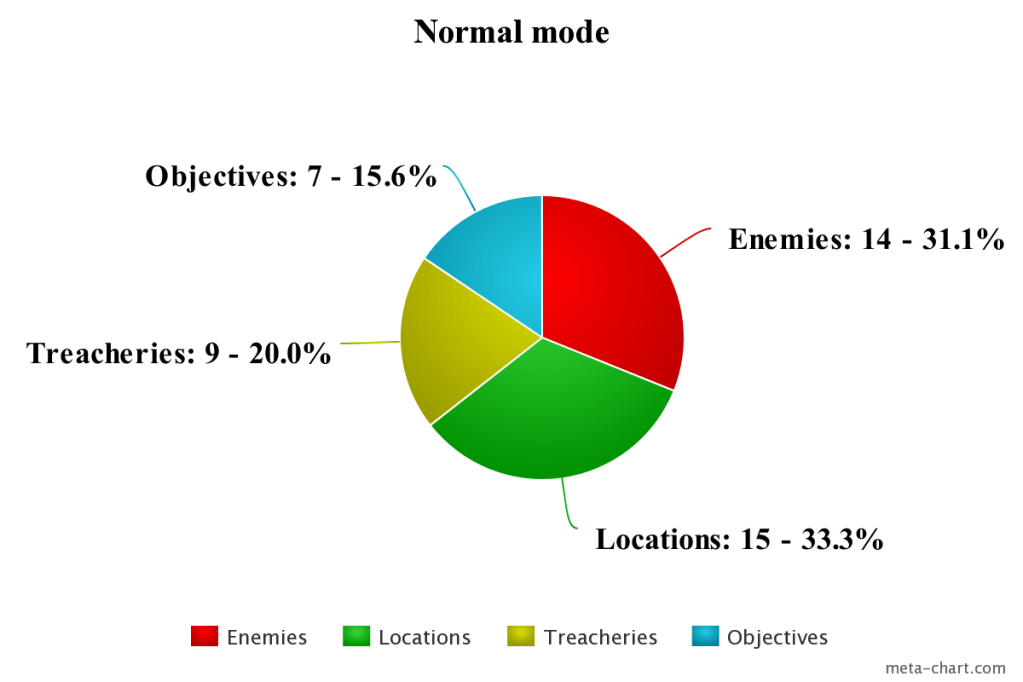
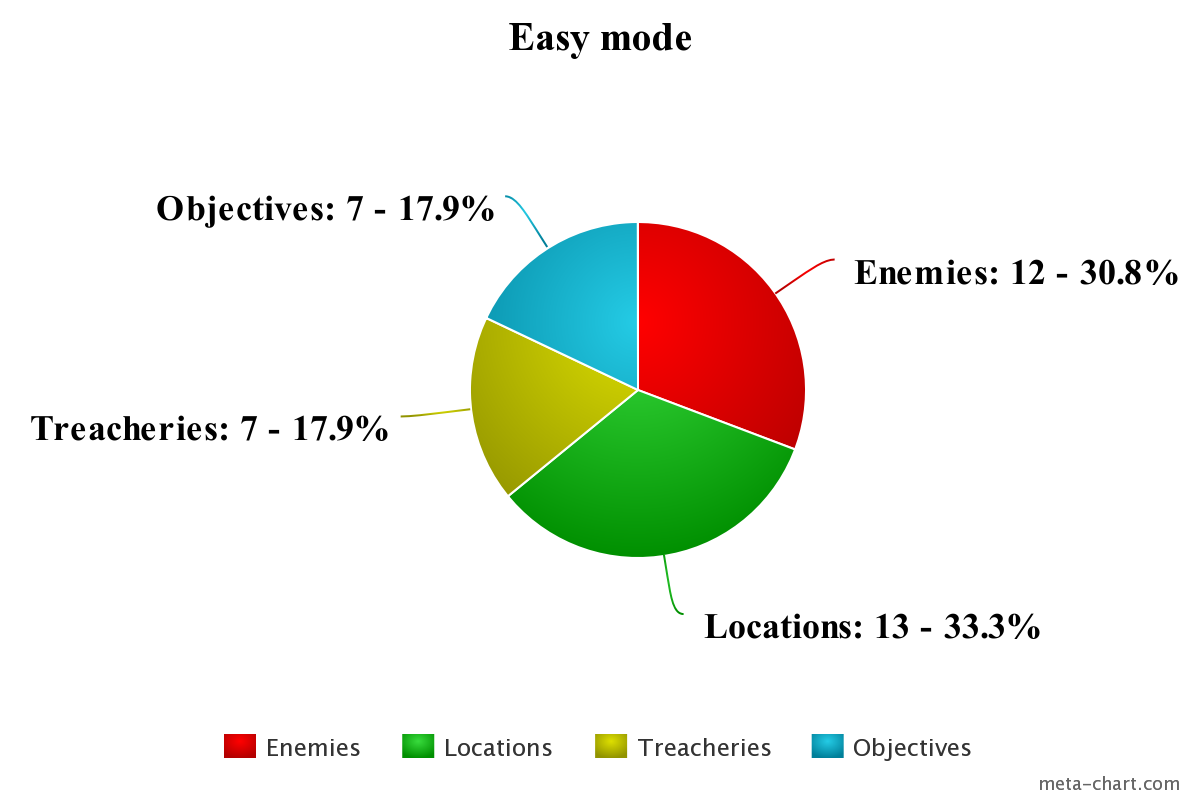
- The encounter deck of this scenario consists of 45 cards in Normal mode and 39 cards in Easy mode. From those cards, 39 are possible to be in the encounter deck in Normal mode and 33 in Easy mode.
- The chance of a Shadow effect in Normal mode is around 56% and in Easy mode 61%. The above percentages are calculated without taking into account the encounter cards that will never end up in the encounter deck. Most of the Shadow effects focus on enemy additional attacks, buff the enemy attack, dealing damage or exhausting your characters, even stealing your loot. There are plenty of different and harsh Shadow effects that players won’t like to face in this scenario. Thankfully, there are a lot of options for Shadow effect cancellation, but that’s a topic for the Tips and Tricks section at the end of this review.
- The average threat revealed from the encounter deck from a single card is around 1.3 in Normal mode and 1.1 in Easy mode. However, there is a special enemy who can raise staging’s threat dramatically. Don’t forget that Naurlhûg can go to the staging area at any time giving at least 3 threat to the total. Moreover, in most cases, you are going to face Lurker of the Depths, which can contribute a whole 4 threat. From all the above and considering the Discover keyword, you should always expect more threat in the staging area. In addition, there is always a chance to reveal Echoes in the Dark, which can raise the total threat.
- There isn’t any card with the printed surge keyword. Although, there are 3 cards (the 3 copies of Blue Mountain Goblin) that can gain the Surge keyword while a Loot Objective is attached to a Hero in play. So, after stage 1 almost always that Goblin gains Surge. Additionally, if it happens to be at stage 3B: The Servants of Morgoth, then the first encounter card with the Hazard trait that is revealed each round from the encounter deck also gains the Surge keyword.
- There are 3 cards in the encounter deck which have the Doomed keyword. Those are the 3 copies of Echoes in the Dark Treachery, which has Doomed 1. This card is dedicated to raising threat, so a Doomed keyword seems to fit its theme. I found that threat isn’t much of a problem in this quest, except if you were unfortunate with the Loot Objectives or if you want to keep your threat really low to avoid some enemies.
- Immunity: Of course, Naurlhûg is Immune to player card effects, so forget avoiding his attacks with Feint or Feint-like cards. In addition to that, Naurlhûg cannot take damage unless a special condition on stage 4 is met. Moreover, his little nest, a.k.a. Naurlhûg’s Lair, is also Immune to player card effects.
A lot of enemies have the “Cannot have attachments” text. Lurker of the Depths has it, and also, he cannot be engaged by the players or/and take more than 4 damage each round. Nameless Cave Dweller and Old Stone Troll both have the text: “Cannot have player card attachments,” which actually tells you to leave your traps at home.
Objectives:
As you already know, Loot Objectives are the main theme of this scenario. All treasures have a positive effect that can help the players defeat this harsh quest. The same rule applies to all Loots; when they are free of encounters, the first player can claim and attach the Loot to a Hero he controls. These Artifacts give a touch of treasure hunting to the players, and the addition of the caves and the dragon to the quest, makes the scenario resemble a D&D story.

- Stalking the Ruins: Stalking the Ruins Objective card is one of those cards which adjust the game and setup the rules (like Rescued Villagers and Dead Villagers Objectives from the Encounter at Amon Din). This card does a couple of things. First of all, it works as a timer on whether Naurlhûg will be in or out of play. To be more specific, at the beginning of each quest phase (before committing characters to the quest), you have to place a resource token on it. While Stalking the Ruins has at least 3 resources on it, the Naurlhûg is added or returned to the staging area. On the other hand, if you manage to advance to the next quest card, you have to discard all tokens from Stalking the Ruins and set Naurlhûg aside, out of play. Then, you repeat these steps until the game comes to an end. It’s always nice to advance to the next stage before Naurlhûg comes into play, but those occasions are pretty rare. You have to be pretty lucky and find a Loot Objective in the first 2 rounds. As said before, Stalking the Ruins is Guarding an Objective that the players choose randomly while setting up the quest. That Objective (which you don’t know what it is beforehand) will be yours at the final stage of the quest (stage 4) when you explore the Naurlhûg’s Lair, and the Dragon can, at last, be killed.
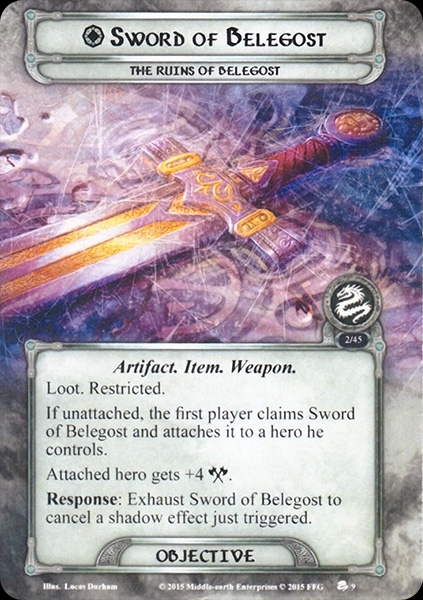
- Sword of Belegost: This amazing Blade is probably the last Loot Objective you are going to claim in this scenario. It becomes available only when you reach stage 4A, where you are instructed to shuffle it along with the encounter discard pile back into the encounter deck. If you last long enough to Loot this Sword and attach it to a Hero you control, it is capable of boosting your Hero’s attack by an amazing +4 attack! This Sword doesn’t stop there. You can exhaust it to cancel a shadow effect just triggered from an enemy attack. This Blade must seem amazing, but it’s harder than it looks to acquire it. After it is shuffled in the encounter deck, the Naurlhûg would already be in the staging area and probably attack you every round along with various enemies. So it wouldn’t be so easy to focus on exploring locations and progress. Although, if you manage to claim Sword of Belegost, the +4 will almost cancel out the 5 defence of Naurlhûg. Sword of Belegost is probably the most powerful attachment in the game, in terms of attack boosting, of course. I can only think of one other attachment that can give you more attack than the Sword, and that’s the Black Arrow which can give +5 attack, but only for one attack, and can be equipped only on ranged Heroes. Moreover, you can only have one Black Arrow per deck, and when you use it, it goes to the victory display. So it is literally once per player per game one use attachment. Anyway, with this attachment and a great attacker, you should be able to one-shot all other enemies in the scenario, which might help you clear the field before slaying Naurlhûg. Furthermore, the once per round shadow cancellation of the Sword is really useful, especially if you remember the 56% chance of dealing a shadow with a shadow effect on an enemy (61% on easy mode). Although I highly recommend bringing A Burning Brand along, extra shadow cancellation is always welcome. A final comment about Sword of Belegost, you might have noticed the restricted keyword, which might prevent you from equipping it to a strong attacker who might have other restricted weapon attachments equipped. In that case, it’s still possible to make your attacker a “beast” with this Sword just by equipping a Golden Belt to your attacker, allowing him to carry an extra, third, restricted attachment.

- Keys of Belegost: These Keys are the first Loot Objective that you’ll want to claim. By acquiring Keys of Belegost during stage 1B, you will be able to bypass stage 2A and go directly to 2C, avoiding the Lurker of the Depths who can ruin your life. By acquiring this treasure, you will be able to exhaust it and choose any Hero you want to get a resource to his/her resource pool. That’s a pleasant effect that can give you a minor resource acceleration in order to bring more characters to the game to help you with the remaining of the quest. In contrast with the Sword of Belegost, Keys of Belegost doesn’t have the restricted keywords (actually, neither of the following Loot Objectives have the restricted Keyword), so you don’t have to worry about stacking a lot of Loot Objectives to one Hero, or worry about the number of restricted attachments your Heroes have. Looking at the card, the first thing you see it’s its gorgeous artwork. I really like when the illustrators “play” with the light and the shadows on the cards’ illustrations. Moreover, the stains of blood and the spiders’ web give it a really creepy and thematic aspect to the card and as an extension to the quest.

- Book of Aulë’s Children: The next Loot Objective you might want to claim is the Book of Aulë’s Children. When you are on either stage 2B or 2D, having that Book will determine which stage 3 you will advance to next. In my opinion, it’s better to try for a couple more rounds to find the Book if you are at stage 2B. If you advance to stage 3 without having it, you are going to advance to stage 3A/3B, and then the first Hazard encounter card revealed each round going to get Surge, and that will complicate and make your game really hard. On the other hand, if your current quest card is 2D, advancing without the Book won’t cause you much trouble. You would go to stage 3C/3D, and an extra point would be added to the Discover value of each active location. As said before, that isn’t so bad if you want to search harder for Loot Objectives. Now, if it happens to be on stage 2D and you claim Book of Aulë’s Children, it’s fine too. That means you’ll advance to stage 3E, and then only when you don’t reveal a Hazard card during the Discover keyword execution, you are going to reveal a card from the top of the encounter deck. In conclusion, If you are at stage 2B try to find the Book, and if you are at stage 2D, you can always advance as soon as you place the 9 progress (and, of course, while acquiring a second loot Objective and there are 3 resources on 2D).
As all Loot Objectives help the players, Book of Aulë’s Children can be handy when you want to draw cards. When the player controlling the book exhaust it, he/she can draw 1 card. Practically, the player who has the Book can draw at least 2 cards in total per round. That effect renders the Book quite a powerful Artifact. Someone might see a connection here between Aulë’s Children (Dwarves) and the Dwarf archetype synergy of card drawing and deck mining, but maybe that’s rather obscure.

- Dwarven Torch: Next on the list is Dwarven Torch. This Loot Objective is the one stage 3B requires in order for the players to advance to stage 4A. If you defeat stage 3B without having Dwarven Torch attached to a Hero, then you continue your journey to stage 3C. Of course, you don’t want to defeat a stage without having the Loot Objective it requires, so an obvious thing someone could do is to commit characters to side quests in order to avoid an unintentional stage advancement. Having that covered, we can talk about Dwarven Torch’s Action effect. While you control the Torch, you can exhaust it and choose a non-unique enemy; that enemy gets -1 attack and -1 defence until the end of the phase. That’s another great Loot Objective effect that I really want to have in my armoury. This card opens up the road for some nice combos with Tactics Aragorn and Straight Shot to clear most of the enemies before combat. Of course, there are much more combos you can activate with the Torch. Another is to get a copy of Rivendell Blade on a Noldor or Silvan character and a straight shot. While attacking, for example, an Old Stone Troll, it will get -1 (from the Torch) – 2 (from the Blade) = -3 defence, and with the straight shot is down. More tips and tricks will follow in the “Tips and Tricks” section of the review.

- Map of Ered Luin: This Loot Objective is the one required from stage 3D in order to advance to stage 4A. In other words, if you don’t get the Map of Ered Luin, you won’t be able to get to the final chapter of the scenario, and you are obligated to advance to stage 3E. Once again, being in stage 3 is always a great time to play your side-quests while you are waiting for the right Loot Objective to come up from the encounter deck via the Discover keyword. While you have claimed the Map, you get the following Action effect: “Exhaust Map of Ered Luin to choose a non-unique location. That location gets -2 threat until the end of the phase.” Effects that reduce the amount of threat in the staging area are always welcomed by the players. Although this effect might not seem as good as the previous ones, with the right timing, it will save you from a couple of threat. I usually don’t use Map’s effect before the staging step, as I need to see how much progress I’ll make. Sometimes, you don’t want to make huge amounts of progress because you wait for the right Loot Objective to appear before you advance to the next stage. So always be careful when you use Map of Ered Luin’s effect.

- Blue Mountain Gem: Last but not least, we have the Blue Mountain Gem Loot Objective. This final Objective is required from stage 3F in order to advance to stage 4. Otherwise, you make the stage 3 cycle and advance to stage 3A. The Action effect of the Gem is to exhaust it and reduce the player’s (controlling the Gem) threat by 1. That’s another powerful effect that might be essential for finishing the quest without treating out. Moreover, it could really give a huge boost to Secrecy decks. It’s quite common to try beating this scenario with a secrecy deck because if you are and stay with under 20 threat, then Naurlhûg won’t make any attacks against you, and he will remain at the staging area for the whole game.
In a more thematic aspect, what’s uncommon with this Gem is that instead of raising the player’s threat, it is reducing it. I mean, in the Lord of the Rings universe, the Treasures, Gems, Jewels, etc., tend to corrupt the person who possesses them, and that corresponds to the game as threat increase. Maybe that Blue Mountain Gem has a deeper meaning and lore as it appears to have? Despite its enigmatic nature, Blue Mountain Gem has my favourite artwork from the entire card pool of this scenario. Again, we notice the webs of the spiders from the abandoned ruins of Belegost, and we understand how old and dirty this kingdom is today. On the other hand, besides the webs and the dust, there is the Blue Mountain Gem, which has (of course) a deep blue clear colour that shines in the Underground caves of Belegost. With that said, it is obvious that Belegost has a lot of secrets and treasures waiting for the players to Discover.
Enemies
We continue our encounter card analysis with the enemies of the scenario. I noticed there isn’t a wide variety of enemies in the quest. Although, most of the enemies are really tough to defeat and may lead to failing the quest if you aren’t well prepared. As said before, at the end of the quest, during the final stage, you are going to face the mighty Naurlhûg, who is the boss enemy of the quest. Moreover, you will probably encounter a special “mini” boss that requires multiple attacks to be killed. Let’s see what the Ruins of Belegost has in store for our Heroes without further ado.
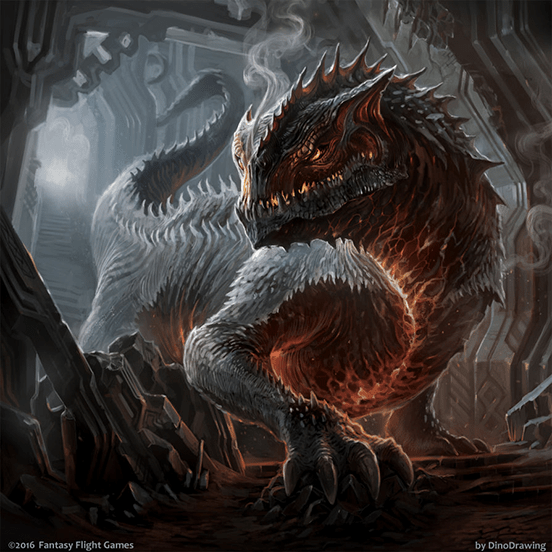
- Naurlhûg: Let’s begin with the main attraction of the scenario. It’s an ancient beast, breathing fire and crushing bones, lying underground on its golden bed, hiding from the light of the sun. Naurlhûg is his name. He is particularly a tough enemy, as he has a special text indicating that Naurlhûg cannot take damage and is also Immune to player card effects. Practically you can’t do much against that beast except push it out of play by advancing quest cards as Stalking the Ruins indicates you can do. When Naurlhûg joins you into the game, he contributes 3 threat to the staging area. As rounds pass and more resources pile up on Stalking the Ruins, his threat will rise accordingly. To be more precise, he has a threat of X, where X is the number of resources on Stalking the Ruins. When Naurlhûg attacks, the defending player has to assign X damage among his characters, where X is the number of resource tokens on Stalking the Ruins. For that particular effect, I highly recommend bringing your healers along. Speaking of Naurlhûg’s attack, he attacks with an impressive 7 attack! Most of the time, chump blocking is a one-way solution. There are only a few defenders that can actually stand the attacks of Naurlhûg. The most common example is Tactics or Spirit Beregond with the help of his favorite Gondorian Shield and maybe a copy of Raven-Winged Helm. The total defense of Beregond with the Gondorian Shield is 6, and by canceling any extra damage with Raven-Winged Helm, you can withstand Naurlhûg’s attacks (hopefully) without damage. To make Naurlhûg’s attacks completely safe, you can bring A Burning Brand with you or other Shadow effect cancellation player cards. Remember, the majority of the encounter cards in the encounter deck come with a shadow effect. When you finally manage to advance to quest card 4A, you are instructed to put Naurlhûg’s Lair in the staging area. Exploring that location will allow you to kill Naurlhûg as he is going to lose his “Cannot take damage” text. To defeat the worm, you need to deal him 20 (!) damage and penetrate his 5 defense. Killing the dragon won’t be an easy task. You probably need teamwork and a bunch of strong attackers to give him a fatal strike. If you manage to acquire the Sword of Belegost, you will receive a huge attack boost to pierce the dragon’s hard scales (his defense). Some good attackers for the dragon are, of course, tactics Eowyn who can attack with 1+9=10 attack for a single attack. She is also an excellent quester that you will need for this quest. Furthermore, with some readying card (e.g., Unexpected Courage) and a Golden Shield, you can make her a great defender and have all the necessary attributes in one Hero. Another great attacker for the Naurlhûg is Tactics Gimli, with a copy of Citadel Plate and a lot of damage on him. Then, he can attack, maximum, with 10 attack. Generally, I prefer to play this quest with swarm dwarf decks. You just need to play a bunch of dwarf allies and a couple of Erebor Battle Masters to maximize your attack power. Although you have to remember that Naurlhûg loses his “Cannot take damage” text, he doesn’t lose his “Immune to player card effects” text, so still, you cannot Feint him or damage him with other means rather than classic attacks. Another effect that Naurlhûg gains when you pass Naurlhûg’s Lair is an additional attack to the next player. If he attacks and you deal him a shadow card with a shadow effect, then Naurlhûg engages the next player and makes an immediate attack against him/her without dealing him another shadow card. Thankfully, you don’t have to defend against Naurlhûg a second time in solo play as there isn’t a next player. Taking this effect into account, the next player from the one defending the dragon should always be ready to defend against a potential attack from Naurlhûg because a single, unexpected attack could easily kill almost all Heroes (maybe except Beorn, who can stand a single undefended attack from Naurlhûg). Finally, in multiplayer games, I highly recommend bringing ranged characters to contribute to all attacks but especially in attacks against Naurlhûg.

- Lurker of the Depths: Finishing the prolonged review of the Boss of this quest, we continue with the review of the mini Boss of the quest. If you aren’t so lucky with the Loot Objectives, you probably advance to stage 2A, and the Lurker of the Depths is going to be added to the staging area. We talk about a strange creature enemy, similar to The Watcher from The Watcher in the Water scenario. Although Lurker has an engagement cost of 50, it is considered to be engaged with each player, and as a result, it makes an attack on every player in each combat phase. Combining the multi-attack of this creature with his attack of 5, makes Lurker of the Depths a really tough enemy who can kill most of your Allies with a single attack. If you try to one-shot him, you will be disappointed. Lurker of the Depths doesn’t take more than 4 damage each round. So, because of his 12 hp, you gonna need at least 3 rounds in order to take it down. The fact that Lurker cannot be engaged leaves the staging area with a permanent 4 threat (at least until it is defeated). The only positive thing is its low defense of 2. So if you can keep a character who can attack with 6 for 3 turns, you will be able to get rid of Lurker as soon as possible. Because 6 attack from a single character is hard to achieve, you can take advantage of the absence of the “immune to player card effects” text and deal Lurker some quick and easy damage. Some great examples are Swift Strike, Spear of the Citadel on your tank defender (most of the times Beregond), and for sure Gandalf ally, who can deal exact 4 damage to an enemy. Besides, Lurker is immune to attachments, so you won’t be able to trap it and beat it easier. Finally, if you manage to defeat the creature, it will go to the victory display, so you don’t have to deal with it again for the remainder of the game.

- Nameless Cave Dweller: This enemy is one of the nastiest creatures in this scenario. It’s a Nameless enemy (Vietnam flashbacks from Foundation of Stone scenario strike back) who also has the Hazard keyword. So the probability of revealing that enemy is increased as the Discover keyword is triggered. Although, dealing with the Nameless Cave Dweller without having any active location isn’t that hard. Having an active location with a high Discover value might give you some trouble. The statistics of this enemy (Willpower, Attack, Defend) are all X, where X is 1 more than the Discover value on the active location. On top of that, Cave Dweller has a tidy sum of hp. All the above contribute in order to make it an enemy you won’t be happy to see in the staging area. Best case scenario, if you don’t have any active location, this creature is going to have 1/1/1/5 stats, so it’s better to deal with it then. This scenario almost always wants you to be on a location, so you should take advantage of the times you aren’t on any in order to defeat this harsh enemy. In addition, if you deal Nameless Cave Dweller as a shadow card, it is going to give +1 attack to the attacking enemy or +2 attack if you control a loot objective. Now, the +1 isn’t so much trouble in most cases, although if you control a Loot Objective, you probably want to have a shadow cancelation card ready for use. I almost forgot to mention the “Cannot have player card attachments” text on Dweller’s card. Generally, the majority of the enemies in this scenario have this annoying text. So, in my opinion, you should leave your traps back at home.

- Old Stone Troll: Next on our list is Old Stone Troll. We have learned so far from the game that when a Troll exists in the encounter deck, we are going to have some trouble. And here, we don’t have an exception! Although Old Stone Troll has an engagement cost of 50, it gets a -10 engagement cost for each Loot Objective currently attached to a Hero. That means, just with 2 or 3 Loot Objectives in the game, the Troll will engage almost everyone. Although there are some options of player cards that can raise Trolls’ engagement cost again, that’s a discussion for the Tips and Tricks section. On the other hand, if Old Stone Troll doesn’t engage you right away, it is going to add 3 threat to the total threat in the staging area. Once again, we see the “Cannot have player card attachments” text and also a special text which includes an extra restriction regarding combat against the Troll. This special text says that only the engaged player can declare attackers against Old Stone Troll. That’s a somewhat strange restriction, but I imagine it represents the Troll’s “Immunity” from Bow and arrows attacks. One can say that Troll’s skin is pretty hard to get damage from arrows, but again this is a theory of mine. Anyway, in case you engage the Old Stone Troll, you have to deal with its astounding attack of 6. Probably Beregond with Gondorian Shield would be the best defender against the Troll, although you should watch out for shadow cards that raise the enemy’s attack. Another way to deal with the Troll is that you can always chump block the Troll’s attacks. Thankfully, you won’t have any extra negative effects from excess combat damage, as other Toll enemies have. When you survive Troll’s attack, you have to fight back. In order to defeat the Troll, you’ll need 3+8 = 11 attack power! That’s a lot, especially with the restriction that Ranged characters can’t help you with the attack. In most cases, Old Stone Troll won’t be defeated in one strike unless you have a swarm of characters in play or/and great attackers as Heroes buffed with attack boosting attachments. The good news is, the Troll doesn’t have a shadow effect, so you have to care about other things more.
- Blue Mountain Goblin: Finally, an enemy with normal stats! But no, Blue Mountain Goblin is going to Surge while a Loot Objective is attached to a Hero. This practically means that this enemy is going to surge most of the time after the early game. Except for the Surge possibility, this Goblin doesn’t have any extreme stats; it has a common 1/3/2/3 stat bar which is normal for a Goblin enemy. It won’t contribute a lot of threat in the staging area, except if it surges. Its attack of 3 can be easily blocked by a medium-high defender and can be killed pretty easily. You need to strike it with 5 attack power, so a Hero with an attachment or a combined attack from 2-3 characters will be fatal for our fellow Goblin. Furthermore, Blue Mountain Goblin has a shadow effect that instructs the defending player, if they have a Loot Objective should put the Goblin into play, engaged with him/her, and deal it a shadow card for an attack. That’s a pretty nasty effect, especially if you don’t have so many characters for defense. That’s another really common effect of Goblin enemies, which we saw really often in the Khazad-Dûm quests.

- Orc of Ered Luin: The last enemy on our list is the Orc of Ered Luin. This is another normal-ish Orc enemy. It has 2 threat and 2 defense. Despite being an Orc, its 4 attack is above average. Moreover, it has above average hp for an Orc. So, in order to defeat it, you will need to deal 2+4=6 points of damage which is doable, but if there are other enemies engaged with you, you might have a problem. To make matters worse, when you reveal Orc of Ered Luin, it makes an immediate attack against EACH player that controls at least 1 Loot Objective. Every attack has to be in turn order, so the first to have to defend is the first player, then the next, and so on. In the early game, Orc of Ered Luin isn’t going to engage you (unless you’ve got over 29 threat), so I usually choose to leave it in the staging area (it contributes only 2 threat) and only if I’m sure that I can defeat it the same round, I optionally engage it. If it happens to get the Orc of Ered Luin as a shadow card, its shadow effect might get you nervous. After this attack, the attacking enemy engages the next player and then makes an immediate attack. So this effect reminds me a bit of the “when revealed” effect of the Orc and results in more nasty attacks. This is definitely a shadow card you don’t want to see on Naurlhûg or Lurker of the Depths. Although in a solo game, this effect can’t apply (of course, because there isn’t a next player). On the other hand, in solo play, you have to worry about a ton of other things, so that balances things out. Some final thought about the card is that it has really funny artwork. The illustrator “Sam Lamont” chose to give an aspect of a (female?) Orc with weird clothes that leaves just under the Ered Luin.
Locations
I believe that locations are the most important encounter cards for this scenario. Travelling to locations will allow you to discover the Loot Objectives via the Discover X keyword, but also, one specific location can allow you to defeat the Naurlhûg worm and win the game. A lot of effects during the game will force you always to have an active location or a location to the staging area waiting for you to explore it. Without further ado, let’s see the list of the locations.
- Naurlhug’s Lair: Maybe the most important Location in the game. While you follow the Setup instructions, you have to put Naurlhûg’s Lair out of play, and when you reach the 4th and final quest card, you are instructed to put it in the staging area along with the Naurlhûg itself. The first thing we notice is the immunity in player card effects. The only way to clear this Location is by the traditional successful questing way. Of course, you have to travel to it first. To do so, you have to place X progress on Stalking the Ruins Objective, where X is the number of players in the game. With 4 threat from Naurlhûg’s Lair and the threat from Naurlhûg, I would probably Travel to the Lair as soon as possible and explore it also as fast as possible. This Location has an amazing Discover 5 keyword which, with a thinned down encounter deck, will give you a great chance of revealing The Sword of Beregost and have a huge attack boost. On the other hand, the chance of getting a Hazard encounter card is really high. Moreover, when you explore the Lair, the single Objective that you put under the Stalking the Ruins Objective at the beginning of the game is going to get revealed and go to the staging area. As said in the “Quest Cards” section, when Naurlhûg’s Lair is in the victory display (Victory 4), Naurlhûg loses his “Cannot take damage” text and finally can be killed. Thankfully, the players will need only 6 progress to explore the Lair, which I think is pretty doable in a single round.

- Abandoned Mine: This is one of my favourite locations in this scenario. You start the game having one Abandoned Mine per player in the staging area. This will give you a small early boost on finding the Loot Objectives sooner. This is a low threat (of 2) location with relatively few quest points. The only negative effect of this location is that while it is in the staging area, the players cannot place progress on locations in the staging area that are not named Abandoned Mine. This effect doesn’t counter location control decks but prioritizes the progress to be placed on Abandoned Mine first and then to other locations. To help you search more encounter cards for Loot Objectives in the early game, there is a Forced effect that says that when the players resolve the Discover keyword on Abandoned Mine, they must look at X additional cards where X is the number of players in the game. So when you travel to abandoned Mine, you are able to look at 3 to 6 encounter cards for a Loot Objective and, of course, a Hazard Trait encounter card. This way, in a 4 player game, the Treasures are going to get into play much faster than in a solo or 2 player game.
- Flooded hall: This is a location that you won’t see if you are playing in Easy mode. There are only 2 copies in Normal mode, and for a good reason. This is a pretty harsh location. While it is in the staging area, the players have to increase the cost to play an ally by 1! And the negative effects don’t stop here. When the players resolve the Discover 4 keyword of the Flooded Hall, the first player must reveal an additional hazard trait encounter card for every other player in the game. I don’t want to imagine what is going to happen if you reveal 4 Hazards in 4 player game. Thankfully, Flooded Hall isn’t immune to player card effects, and maybe the players can deal with it before becoming an active location. Additionally, you don’t want to have Flooded Hall in the staging area for a lot of rounds. It contributes an amazing 4 threat which is a lot for a location. So if you can’t clear it really fast with player card effects, you have to consider traveling there to avoid the 4 threat. A quick tip: Flooded Hall is an amazing target for Ancestral Knowledge, but we are going to discuss more about it in the Tips and Tricks section.

- Sunken Treasury: Don’t let this Location fool you with its low threat. It will get an extra point of threat for every loot Objective attached to a Hero. So theoretically, it can end up with 7 threat (maximum). You always have to be ready for this Location as it can potentially contribute a ton of threat to the staging area. In order to travel to Sunken Treasury, each player has to discard 1 card from his/her hand at random. Moreover, if you travel there, you get a Discover 3 keyword. In most cases (and especially in the early game), I choose to leave this Location in the staging area, and if I get the chance, I clear it with Ancestral Knowledge or Asfaloth on Glorfindel (in 2 rounds). In the late game, though, it’s the first Location I consider to travel. Finally, if it happens to see Sunken Treasury as a Shadow card, you have to exhaust a character you control. That’s a short effect but pretty strong. Sometimes it might get you into trouble, mostly when you want to defend against other attacks too. That’s why you should always bring shadow card cancellation with you.
- Darkened Tunnel: This Location has only 2 copies (just as Flooded Hall) but with the difference that there are 2 copies of Darkened Tunnel in Easy mode too. This is a 3 threat location with a Discover 2 keyword. When Darkened Tunnel is in the staging area, it gains a Forced effect which says that every time a “When Revealed” effect is cancelled, the players have to discard the top card of the encounter deck. Then, if the discarded card has a Hazard trait, they have to resolve its staging as if it was just revealed from the encounter deck. This effect might seem a little complex and hard to understand, but it isn’t. Just consider that every time Darkened Tunnel is in the staging area and you cancel a “when revealed” effect, that card is going to “surge” but surges only to a Hazard trait card. I hope I simplified things down! Anyway, in order to travel to Darkened Tunnel, you have to place 1 resource on Stalking the Ruins Objective. That’s a really nasty effect, so once again, I prefer to clear this Location by other means. Besides, it only requires only 3 quest points to get cleared.

- Secret Chamber: This is the final Location on our list. The Secret Chamber (or the chamber of secrets ?) is another great location to boost your search for the Loot Objectives. Besides its Discover 3 keyword, after the players travel to Secret Chamber and if no Loot Objective is attached to Secret Chamber, the players can search the encounter discard pile for a Loot Objective and attach it to Secret Chamber as a guarded Objective. So, in other words, if you didn’t find any Loot Objectives via the Discover 3 keyword, this Location gives you another chance to get one that was discarded (for any reason) during the game. That’s always a great location to see while seeking Loot Objectives (literally all the time). Of course, its 3 threat isn’t so pleasant to see, but if you manage to travel there as soon as possible, you’ll be just fine. There is a cost every player should pay to do so. Each player must raise his/her threat by 2. That’s a fine price for a Loot Objective (especially if you know that there is one in the encounter discard pile). Finally, this Location is a great target for Legolas while it is the active Location. Although if you want to explore it that way and you are at quest card 1, you have to consider what benefits you most depending on the topmost Location in the encounter discard pile. Don’t forget that while you are at quest card 1, if it is the Travel phase and there isn’t any active location, the topmost Location in the encounter discard pile is going to get added to the staging area.
Treacheries
Although the number of different treachery cards in this scenario isn’t huge (we have just 4 different treacheries), most of them are pretty nasty, and half of them can reveal during the Discover X keyword. So the chances of revealing a Treachery are increased, despite their relatively small number. Another point I would like to mention here is how thematic and well-designed those Treacheries are. They are all made to give you a really heavy dungeon-ish feeling and entrain you to always look for traps inside the mountain. You should watch your steps!
- Spawn of Thangorodrim: The first Treachery we are going to discuss focuses on the main antagonist of the scenario, the mighty Naurlhûg. When you reveal Spawn of Thangorodrim, if Naurlhûg is in play, it makes an immediate attack against the first player. On the other hand, if the worm isn’t in play, you should place a resource token on Stalking the Ruins Objective, and if the 3 resource boundary has been exceeded, you should put Naurlhûg in the staging area. Thankfully there are only 2 copies of this Treachery in the encounter deck, so you probably will be able to cancel its effect the moment it reveals. Moreover, Spawn of Thangorodrim has a shadow effect that seems to follow the pattern of the “when revealed” effect. That shadow effect allows the enemy to make an additional attack against the same player after the first one. So we notice this card can be a huge problem both as a “when revealed” card and as a shadow card. For that reason, we follow the golden rule: “Always bring when revealed and shadow cancellation.” The good news is that if you play this scenario in Easy mode, you won’t encounter this card.

- Covered Pit: When you reveal this card, it’s too late. One of your allies has fallen into a pit. Each player has to discard an ally they control. If a non-unique enemy is dealt this card as a shadow card, then you have to attach a Loot Objective you control (if able) to that enemy. To make matters worse, if this attack destroys a character of yours, then the attacking enemy returns to the staging area. That’s definitely a Treachery you don’t want to see on Old Stone Troll or Nameless Cave Dweller when the active location has a high Discover X value! If the enemy “steals” your Loot, then you have to defeat it to get it back attached to a Hero. Although this is an unfortunate encounter card, I would advise you to keep your “when revealed” cancellation for a copy of Spawn of Thangorodrim. In my opinion, losing an ally isn’t that much compared with having the Naurlhûg make an extra attack or reveal itself a round earlier. Of course, depending on the circumstances, you make the decision. In conclusion, if you execute the Discover keyword steps from the active location and you don’t want to reveal another enemy or location, you can always think of revealing this card (as it has the Hazard trait) and maybe cancel it instantly with A Test of Will.

- Echoes in the Dark: This is the only encounter card in this Print on Demand quest with the Doomed Keyword. When you reveal Echoes in the Dark, you must add 1 to the total threat in the staging area for each character controlled by the first player until the end of the phase. Then you raise your threat by 1 for the Doomed 1 keyword. That’s a really nasty treachery. In general, this quest wants you to have a bunch of characters in play for defense, attacks, committing to the quest, healing, etc. So this Treachery comes and punishes the players for having a lot of characters! The worst part is that there are 3 copies of Echoes in the Dark in the encounter deck! Thankfully it hasn’t the Hazard keyword, so you can discard it during the Discover keyword steps. A way to counter this card’s effect is to try committing characters to the quest who have over 1 (and sometimes, maybe 2) willpower. In that way, you will still make progress and probably won’t raise your threat by a lot. The shadow effect of Echoes in the Dark seems softer, but only if it doesn’t trigger. The shadow effect instructs the defending player to discard a card from their hand at random, and if the discarded card is an event, then the attacking enemy gets +2 attack for this attack. The +2 attack might give you some trouble but not much, as there are more, worse effects in this scenario.

- Concealed Spikes: This is the final encounter card we are going to discuss in this review. It is a Hazard trait Treachery with a “when revealed” effect that says: “Each player assigns X damage among characters he controls. X is 1 more than the Discover value on the active location.” So the damage every player has to assign to among his/her characters is from 1 to 6, depending on the active location. In the extreme case, you are at Naurlhûg’s Lair, and this Treachery is revealed, you are really unlucky because you have to assign 6 damage among your characters, plus a potential X damage from Naurlhûg’s attack (where X is the number on resources on Stalking the Ruins Objective). That’s a huge amount of damage! For that cause, a player probably has to bring a healer deck along. If you are playing solo or 2-player and you don’t have the luxury to bring a healing deck with you, a nice combination for fast healing is Elrond with a couple of Warden of Healing allies and, for best results, maybe some resource acceleration card such as Steward of Gondor on a Lore Hero, in order to use Warden’s ability at maximum. The shadow effect of Concealed Spikes is similar to its “when revealed” effect. Instead of dealing damage among each player’s characters for the Discover value of the active location, you have to deal damage among characters you control. The amount of damage is X, where X is the number of attachments you control. This shadow effect gives you a way out by letting you discard your highest-cost attachment to cancel this effect. That’s some good news, especially if you don’t have enough healing power in play. Finally, you can take advantage of the Hazard trait and reveal Concealed Spikes during the execution of Discover steps, and hopefully, you’ll get away with just some damage (which potentially you can heal immediately).
Tips and Tricks
As said before, this is a really complicated quest with lots of rules to keep track of and some very nasty effects you wish you could counter. In this section, I’ll present some Tips & Tricks on how to make your game much easier and prepare yourself for this hard quest. Without further ado, let’s see some tips.
- Always bring along your Test of Will with you! There are some nasty Treacheries you would love to cancel as soon as they appear in the game. Some excellent targets for Test of Will are: Echoes in the Dark, Spawn of Thangorodrim, and Covered Pit. Echoes in the Dark can be a pain in the ass if the first player plays with a swarm deck, although if this Treachery is revealed in the early game, you can skip cancelling it and keep your precious Test of Wills for worse situations. Spawn of Thangorodrim is always a nice target for cancellation. You never want to see or get attacked by Naurlhûg sooner than normal. A third potential target for cancellation is Covered Pit which has a pretty straightforward effect. Every player has to discard an ally they control; again, seeing this Treachery in the early game when you haven’t played any allies yet is always welcome. Although, if you play with a deck where every one ally is essential for the well-being of your play (e.g., Outlands decks), it is really useful to cancel the Covered Pit’s When Revealed effect.
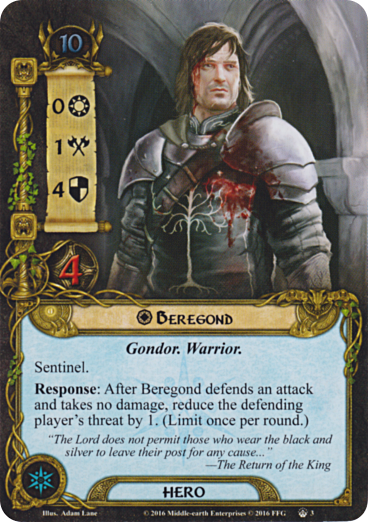
- Another great tip for this quest is to have a strong defender always ready to defend against the multiple attacks that you are going to face in this harsh scenario. Some of the enemies have really high attack stats that reach up to 6 or 7 attack points. Of course, a really suitable defender for this task is Spirit Beregond, who (in my opinion) fit better to this quest than the Tactics Beregond because his threat reduction effect comes really handy against the Ruins of Belegost scenario. I’ll dedicate the next 3 bullets on building a strong tanky defender who can save you from all the enemy attacks! I always tend to focus my deck around Beregond for this scenario. I find 3 main points you should focus: 1) Enhancing defense, 2) Multiple Readying, and 3) Shadow Cancellation.
- As you already know, Beregond has only 4 defense points, so the first thing we have to do is to enhance his defense. For doing so, I find it essential to have access to Tactics Sphere (probably with Tactics Éowyn in your deck or using Tactics Beregond, which I prefer not to use for this quest (I’ll explain later why). Then you can equip Gondorian Shield, a Round Shield, and a Raven-Winged Helm, so Beregond can reach up to 8 defense points with the potential of cancelling an extra point of damage. This should be enough to defend against every enemy in this quest. Moreover, using Spirit Beregond, you might find Desperate Defense a really practical event for a couple of extra defense points. Furthermore, Arwen Undomiel is a great ally to have. When you commit her to the quest, you can always contribute another defense point! All these should be enough for making Beregond a strong tanky Hero.
- Of course, you will need some readying for your defender to allow him to defend multiple times. Again you will need to have access to Tactics Sphere. Outmatched is a great Trap for the enemies of this scenario. However, keep in mind that not all enemies can have player card attachments. Behind strong Walls seems the perfect event for Beregond. Not only gives an extra defense point to Beregond but also does ready him after defending against an enemy attack. Another event you might find useful (I don’t use it much often), especially if you play with a deck with multiple Sentinel characters, is Hold your Ground!. For 1 cost, you ready a sentinel character, and if you have 40 or more threat, you ready every sentinel character. I couldn’t forget to include Unexpected Courage. I’ll suggest bringing multiple copies of it for readying Beregond multiple times. Another card that might come in handy is Tides of Fate. There are quite a few shadow cards that can increase enemy attack, so this free event can give you up to 3 extra defense points, and with the help of your group, if you spend 2 Tactics resources, you can ready your defender and give him an extra of 3 attack points in order to help in a potential attack. If it happens to have access to the Leadership sphere Armored Destrier is an excellent mount attachment that can ready the defending Hero after defending an enemy attack. After readying, you can discard a shadow card from another enemy engaged with the defending player.
- To complete your “perfect” defender for this scenario, you’ll need to bring with you some shadow cancellation cards. The most used card is the all-time classic, Hasty Stroke. Although, my personal favorite player card, which provides you excellent shadow card control, is Burning Brand. The problem here is that you can equip Burning Brand only to a Lore Character. You can always overcome this complication by attaching Song of Wisdom to Beregond. In that way, you provide the Lore Sphere of influence to him, and then you’ll be able to attach Burning Brand to him, which can cancel a shadow card effect just triggered during an attack that the attached character (Beregond) is defending. The downside of using Burning Brand is that you’ll need the Song of Wisdom in order to play it, so this makes it a difficult combo to achieve. A final suggestion here is Silver Lamp. I know it isn’t a shadow card cancellation, but it can provide you a great oversight over the shadow cards that are dealt to the enemies which are engaged with you, as long as Beregond is ready. In that way, you can decide if you can defend the attacking enemy with another character and keep Beregond for the tougher dudes!
I hope the above suggestions will lead you to make a really powerful defender for this quest. All in all, there are a lot of strong enemies there, and they are looking to attack you multiple times!
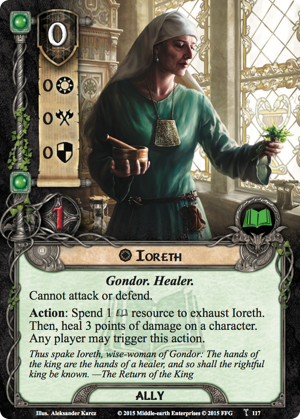
- Next on my list is the Healing cards. Healing in this scenario is essential, not only to heal the wounds of your characters after the battle but also to heal them from the damage they’ll take from a bunch of Treacheries and effects. Without any further ado, let’s see which cards will save your Heroes and Allies from certain death. You must have multiple copies of Warden of Healing in your deck as he can heal up to 2 characters plus another 2 characters for every 2 Lore resources you pay. Another great healer for the quest is Ioreth. She’s a free-cost Ally, but in order to activate her effect, you must spend a Lore resource and exhaust her. Then you can heal 3 points of damage on a character. The negative side of this card is that you have to exhaust her in order to use it, and that prevents you from using her multiple times unless you have some readying player cards on her. On the other hand, it isn’t necessary for the player controlling Ioreth to spend the Lore resource; any player can trigger this effect which is a really nice thing to happen if you are out of Lore resources and you desperately need some healing. Moreover, someone could ask why you haven’t suggested Elrond already? The answer is in his really high threat cost. In this quest, I find it essential to start with the minimum threat possible. That’s why Secrecy decks are always welcome here.
- I find some Location Control cards really helpful in this POD Scenario. Rhovanion Outrider is an excellent choice for every Location control deck or any deck that wants to include Location control cards. His effect is similar to Lorien Guide, but instead of placing 1 progress to the active location after you commit him to the quest, you place 1 progress on a location on the staging area. Additionally, if this effect doesn’t explore that location, Rhovanion Outrider gets +1 willpower until the end of the phase. Meneldor is my favourite location control Tactics card. It is a 3-cost Eagle ally with really nice stats (2/2/1/2). Especially he has a great 2 willpower which is really nice to see on Tactics allies. On top of its stats, our Eagle friend has an impressive effect that instructs the players to place 2 progress tokens on a location after Meneldor enters or leaves play. Finally, a really powerful location control card is (of course) Asfaloth. You can exhaust Asfaloth to place 1 progress on a location or 2 progress if Asfaloth is attached to Glorfindel. When thinking about the healing, the obvious is to include Lore Glorfindel as one of your Heroes and potentially use Asfaloth on him. Although, in my opinion, because of Lore Glorfindel’s high threat cost of 12, it is preferable to take Spirit Glorfindel with you, who has only 5 threat cost, and with a Light of Valinor, he won’t increase your threat any further. Now we have to think about how to play Asfaloth on Spirit Glorfindel. If you remember my previous tip on how to equip A Burning Brand to Spirit Beregond, you’ll find the answer. The key card here is Song of Wisdom. Having multiple copies of Song of Wisdom, you can get access to Lore resources from both Spirit Beregond and spirit Glorfindel. A final problem I would like to discuss here is the case where there are multiple locations in the staging area; some of them are Abandoned Mines, and others are some locations that you want to clear immediately. As you remember, if Abandoned Mine is in the staging area, progress cannot be placed on any location in the staging area that is not named Abandoned Mines. A quick solution to this problem is Thror’s key. After playing the key to one of your Heroes, if it happens to reveal Abandoned Mines (or generally any other location that you don’t like its effect, e.g., Flooded Hall), you immediately attach Thror’s key on it, and you don’t have to bother about it’s printed text box anymore.
- One more great tip I want to share with you is that this quest is thematic friendly. By thematic friendly, I mean that you can build a really powerful dwarf deck (as dwarfs used to leave in Belegost mines) which has a high win chance against Ruins of Belegost. You’ve probably noticed that all locations in this scenario share the Underground Trait. That trait boosts up a lot of Dwarf effects. Ever my Heart Rises is an amazing example. This non-unique free cost attachment can ready the attached dwarf character every time the players travel to a Mountain or Underground Location. On top of that, you can lower your threat by 1 every time your travel to a Mountain or Underground Location. Another example is Untroubled by Darkness. When you play this event, every dwarf character gets +1 willpower until the end of the phase, but if the active location has the Underground or the Dark trait, all dwarf characters get +2 instead of +1. I think you’ve got the point. Here I’ll leave you a small “project.” Try to make a cool dwarf thematic deck for this scenario, and then send it to me as a comment on this article! I’m really curious to see your results!
Playthroughs
Unfortunately, I couldn’t find any solo playthrough (for obvious reasons). Additionally, it seems there isn’t any 3-Player Playthrough either. If you find anything interesting, feel free to comment below!
- 4-Player playthrough from Wandering Took (ft. Card Talk crew): https://www.youtube.com/watch?v=3RkcruBINhc
- 2-Player playthrough from Mr Underhill (attempt two): https://www.youtube.com/watch?v=LzX_wTItaGg
- 4-Player playthrough from Cardboard of the Rings Podcast: https://www.youtube.com/watch?v=GITPWXiph0E
- 2-Handed playthrough from Warden of Arnor (Line Unbroken) : https://www.youtube.com/watch?v=6on97G5zkRY
At this point, this extensive article about The Ruins of Belegost Print on Demand Scenario comes to an end. Reviewing this scenario was one of the hardest projects I have taken on so far in Vision of the Palantir! It is indeed a really tough quest that requires a lot of experience in order to defeat it. I wouldn’t recommend it to new players as they are going to feel disappointed if they play for around an hour and a half and then lose by threating out or Naurlhug’s attacks. Anyway, as I said before, I find this quest pretty complicated but also really fun to play if you have some time to kill. Although, I find it vital to go well prepared with a fine-tuned deck specially designed for this scenario. Finally, I hope you find my article pleasant and helpful. I’m waiting for your feedback and the comments on your own dwarf decks ;). As always, I want to thank Durin’s_Father for his help with this article and generally for giving me the opportunity to write about my favourite card game via his amazing blog!

3 thoughts on “The Ruins of Belegost”