This cycle is keen to revisit past quests and fix what was broken with them. In today’s episode, we get Assault on Osgiliath 2.0. Not only the mechanics are the same, but even in the announcement for this pack, FFG mentioned that you are defending “the ancient capital of Gondor”. Last I checked, Dorwinion wasn’t in Gondor, but ok. The mechanics of the two quests are the interesting part here, where you are fighting the Rhûnnic forces under command of Thane Ulchor for control of the city. However, the difficulty is increased significantly compared to Assault on Osgiliath. Sure, there are no Mumaks in this quest, but it does feature a boss-level enemy and 2 stages instead of 1. This means that you are no longer able to blitz through this quest and win on the first round, which is a real possibility for Assault on Osgiliath. The quest cards now also require you to make progress there, and progress can no longer be placed on locations in the staging area by player card effects. So a location control/side-quest strategy won’t get you very far in this defence of the city.
Wrath and Ruin
- Found in: Wrath and Ruin Adventure Pack, Vengeance of Mordor cycle, pack 1
- Official Difficulty: 7
- Community Difficulty: 6.9
- Encounter Sets: Wrath and Ruin, City of Rhûn, Easterling Raiders
- Quest cards: 2
- Play if: You want a tougher version of Assault on Osgiliath, you are playing the Vengeance of Mordor cycle in order, you want a tug-of-war with the encounter deck over the control of a city.
- What is different about this quest?: Players collect locations after they are explored. These locations can return to the staging area through various means. Untouchable boss-level enemy that continues to make attacks against you as you progress, heavy focus on combat with Easterlings.
- Solo or multiplayer?: It is a difficult quest in any player count, as in true solo, you will need to balance everything yourself, which is very difficult with the extra attacks that are being made. However, higher player counts mean more locations in play, and players having to reveal more encounter cards constantly. With the amount of surging cards in this scenario, that can be a swift end to you. I would recommend a 3-player game, with the focus of having 1 player control all the locations.
- Can I bring side-quests to the game?: The quest comes with one side-quest, but also requires you to make progress on the main quest in order to advance. However, there will be situations where you have all the progress on the main quest that you need, but cannot advance yet due to a lack of controlled locations. In positions like that, I could see player side-quests being a viable option. There are many suitable side-quests for this scenario, but I recommend Keep Watch to lower the attack value on enemies, and Explore Hidden Ways to reduce the location lock problem in higher player counts. This is one of the quests where that side-quest can actually make a difference.
- What to look out for: Archery chipping away at your hitpoints, a lot of enemies surging into each other, potential location lock, steep increases in threat, a lot of triggers when you explore locations, Easterlings getting attachments and growing stronger.
The Quest
Setup

You begin the quest by taking the two unique cards out of the encounter deck and placing them in the staging area. These are the Thane Ulchor enemy card, and the Gate of Dorwinion location. These only add 2 threat in total to the staging area, but the Gate of Dorwinion will grow in threat as you keep collecting locations. You also make a copy of Makeshift Fortification the active location. This location will take 3 progress to clear, but also has Archery 3 while it is the active location. That means that if you cannot clear it in the first quest phase, you will have to take 3 extra points of Archery in the first combat phase. On top of that, each player must also search the encounter deck for a different location and add it to the staging area. There are some decent options here, and some that you might want to avoid.
If you are playing solo, the first option should always be the Contested Square. This removes a copy from the encounter deck and allows you to avoid the Surge keyword on the card. Second best is the Ransacked House. If you get a round with no enemies, you can use the Encounter Action on this location to get an enemy in exchange for taking control of this location. A second Makeshift Fortification isn’t ideal, unless you plan to play an Eryn Galen Settler on turn one, so you can eliminate both the active location and this one on the first turn. City Forum is also interesting if you can make sure to travel there quickly. The other locations aren’t great, but have a read of them in case your deck could handle their effects well. It is unlikely, but you never know.
With the extra locations added to the staging area, the game can now begin. Be sure to have read the text on all cards in the staging area, since many of them will have effects that can trigger throughout the coming rounds.
Quest card 1: Inside the Walls – 4 quest points
With so many locations in the staging area at the start of the game, it is important to bring a lot of willpower early on to avoid a quick loss to location lock. Of course, this can still happen if you get unlucky and draw more locations in the first 2 rounds. But luckily the encounter deck does come with a few ways to explore locations in the staging area, even if the quest card specifies that players cannot place progress on locations in the staging area by player card effects. This line of text blocks all attempts at location control in this scenario, though players can still use a few tricks to place progress on active locations. But since you will most likely be too busy to worry about location control (thanks to all the combat that this scenario throws at you), it is often best to ignore location control completely, and just explore locations as usual.

Contested Square and Ransacked House locations can help you in this way. These two can be explored without having to travel there. Contested Square will clear itself after the players kill 3 enemies, and the Ransacked House can be explored in the encounter phase through its action, which drags out an enemy from the discard pile into play in exchange. Combine exploring those two locations with exploring a location each round from the active location slot, and you will soon be in control of a lot of locations.
And that’s a good thing! This quest is all about comparing the number of locations that Ulchor controls (in the staging area) and the locations that the players control by exploring them and setting them aside next to their deck. If you haven’t played Assault on Osgiliath before (I don’t blame you), read through the rules before you begin, so you know how to interact with controlled locations. These locations retain their gametext and stats, with which the encounter deck will interact a lot.
Another way to gain control of locations, outside of exploiting their game text, is by exploring the active location as usual. The quest card informs you that when any location is explored, the first player gains control of it (with the exception of Ransacked House). However, if the location that was explored happened to be the active location, a second Forced effect is triggered. This one can be found on Thane Ulchor, and is easy to forget sometimes, as the debate on where to travel next is much more interesting. Thane Ulchor gives the players a decision each time that they explore the active location. Either they discard from the encounter deck until a location is discarded and adding it to the staging area (leveling the score between Ulchor and the players), or Thane Ulchor makes an attack against the first player who just took control of the active location. In the beginning of the game, you will want to take the location option, as you probably won’t be ready for a 6 attack on top of all the enemies that this encounter deck can spit out. But down the line, go for the attack more often.

During this quest stage, you will become familiar with the many enemies that this scenario throws at you. Not only are enemies added during the quest stage as per usual, but treacheries and locations can also force enemies out of the encounter deck, or return them from the discard pile. There are a lot of heavy hitting enemies in this deck, so you should be prepared for a lot of combat. And I’m not talking about having 1 or 2 combat decks on the table and use the other players as support. Each player will get enemies engaged with them, and some will hit very hard. This is all on top of Ulchor’s continuous attacks. Each player should ideally get a defender with at least 5 defence on the table, or one hero should get all the readying effects that you can fit on them. Characters like hero Beorn or the Vigilant Dunedan who do not exhaust to defend are really strong in this scenario, provided you can keep them alive.
The quest card only has 4 quest points, but it gains 4 for every player in the game. This is not a real problem though, since there is another pre-requisite to advancing to stage 2. Players will also have to control more locations between them all than there are locations in the staging area. Eventually you will have all locations in play, but with the encounter deck being desperate to return locations to the staging area, you might have to put in some effort to meet this requirement. In the meantime, you can chip away at the 8-20 quest points of this main quest. Should you already have all required progress on this quest card but don’t have all locations yet, then exploring side-quests can be a good use of your time.
One solid strategy during this stage is to have one player control all the locations. While this will be tricky to pull off in a higher player count game, it does make certain cards like Ulchor’s Revenge a lot easier. With one player controlling the majority of locations, you can also ensure that they lose fewer locations to effects like Easterling Skirmisher (assuming other players can engage and take care of this enemy). The real time-save will come once the players advance to stage 2. This can only happen if they have enough progress on the main quest, and control more locations than there are locations in the staging area.
Quest card 2: Drive them Out – 12 quest points

The reason why it is a good idea to have 1 player control all the locations is revealed right as the players advance to stage 2A. To start with, each player must return the highest threat location that they control to the staging area. This puts Ulchor back in the lead by a lot, considering that if you happen to control a Ransacked House, but it is not the highest threat location you control, you have to return both locations to the staging area. This can cause a massive spike in threat at the start of this second stage. However, you cannot dedicate all your time and effort to questing, as the When Revealed of this stage transition isn’t done just yet. The players shuffle the encounter discard pile into the encounter deck and start to discard until each player discards 1 enemy. They put those enemies engaged with them, triggering any effects like the Rhûn Backstabber or the Champion of Rhûn. This places the players in quite a tough position that they have to find a way to stabilize.
The first step to stabilization is to start killing the enemies engaged with you. Not only does this free up some of your characters to commit to the quest, you can also recover some of the Contested Squares back from the staging area. Players then have to repeat the same process as during stage 1, where they slowly build up again to a point where they control more locations than there are locations in the staging area. Only after they make 12 progress on the main quest and control more locations than there are in the staging area, are they allowed to enter the end-game of this quest.

The rules on this stage are mostly the same as stage 1, and the core mechanics don’t change either. I believe this stage was just added to make sure players couldn’t blitz through this quest like they did with Osgiliath back in the day. Players still cannot place progress on locations in the staging area by player card effects, and after any location is explored (with the exception of Ransacked House) the first player gains control over it. The only difference with the first quest stage is that the main quest no longer has a variable quest point limit, but is now simply 12 progress in any player count. However, placing the final point of progress isn’t the end of this game. You may have pushed Ulchor’s forces out of the city, but you still have to claim the Gate of Dorwinion to win the game.
Upon placing the final point of progress on the main quest, or after taking control over one more location than there are locations left in the staging area (depending on which thing is easier for you to accomplish), you are allowed to travel to the Gate of Dorwinion. Travelling here comes with an attack by Ulchor, so make sure that you have sufficient defenders, as he will be making an attack against everybody. This is much like the Ulchor’s Revenge treachery, but this attack also targets players who have no locations under their control.
Once active, the Gate of Dorwinion does nothing except remove a large block of threat from the staging area that the players have faced during their quest. The removal of this location from the staging area makes it easy to quest succesfully, and clear the 5 quest points on the Gate itself. After clearing the Gate, you will get Ulchor’s ability to trigger again, but you are free to select the location option for him. You are close to the finish now, and an extra location now won’t hurt you.

The players will have taken control of the Gate now, but they need to hold it until the end of the round in order to win the quest. That means that there is one more round of combat that you must survive to be victorious. During this round, it can occur that enemies will return the Gate of Dorwinion back to the staging area. For instance, when the Easterling Skirmisher defeats a character by its attack, then the highest threat location you control must be returned to the staging area. This will be the Gate of Dorwinion in almost all cases. In order to avoid having to repeat this, it is advised that the player who receives the Gate of Dorwinion after exploring it, engages as few enemies as possible, to negate the risk. Have other players engage more foes, perhaps even too many so that heroes might die. As long as the Gate is controlled by the players, you will have victory at the end of the round. This can cause some heroic sacrifices against the armies of Rhûn, which always make for good stories after the game.
If by the end of the round, the players still control the Gate of Dorwinion, they have won the game. The players can now assess the damage that has been done to the city, and seek out Ulchor in his retreat to the city of Ulfast. There, the players will have to sneak around the city, trying to find Ulchor and confront him with his crimes.
The Encounter Deck
Global
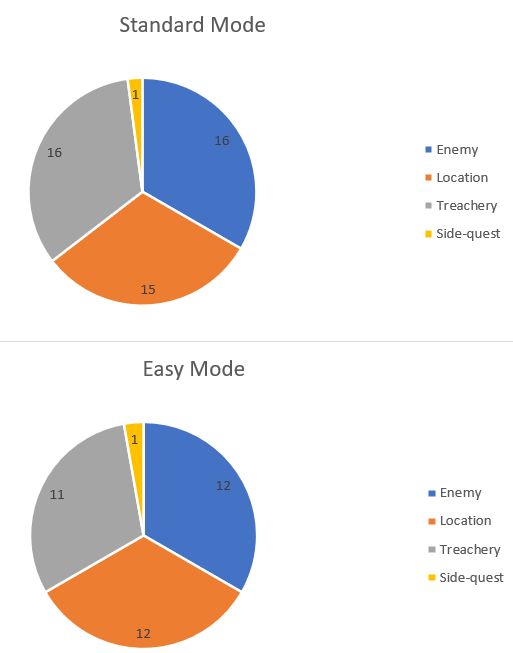
- The encounter deck is quite large, with 48 cards in normal mode, and 36 in easy mode.
- The chances of getting hit by a shadow effect are quite small though, at only 42% in Normal mode, and 47% in Easy mode
- Average threat per card is quite low, at only 1.3 threat per card revealed. This ranges from 0 threat treacheries to a 4 threat location.
- Surge is a serious issue in this quest, forcing you often to reveal more cards from the encounter deck. 16(!) encounter cards have the potential to surge from the regular encounter deck. Make sure to bring Lanwyn and the Minas Tirith Lampwright for this quest, you’ll get great use out of them.
- The Doomed keyword only appears on 2 cards, but a lot of other cards raise the threat of players. Threating out is a serious concern in this quest.
- Archery will also be quite common. Easterling Skirmisher and Easterling Raider have Archery 1, the Recurve Bow adds Archery 2 to enemies, and the Makeshift Fortification gets Archery 3 when it is the active location. There are 3 copies, but only one can be active at the same time.
- Immunity
- Thane Ulchor is immune to player card effects and cannot leave the staging area
- All locations are immune to progress placing player cards while they are in the staging area
- Gate of Dorwinion is immune to player card effects and players cannot travel there unless stage 2B has 12+ progress on it.
- While Captured Tower is the active location, encounter card effects cannot be cancelled
- Seedy Tavern is immune to player card effects.
The following statistics do not take Gate of Dorwinion or Thane Ulchor into account. These two cards are placed in the staging area at the start of the game and never enter the encounter deck. The encounter deck itself is thicker and has lower average threat than usual, but the inclusion of 16 cards that can surge, makes it a really easy deck to go through quickly. You will often reveal more than one card per round and will occasionally go on a surge-train with cards surging into each other. The size of the encounter deck will also decrease as players get more and more locations under their control. This means that the percentage of enemy and treachery cards is increased as time goes on. This makes it easier to predict the next card with Minas Tirith Lampwright whenever you hit another surging card.
Locations
Locations really are the focus of this scenario, so it makes sense that there are 5 new ones to explore in this scenario. These locations will be controlled by the players as soon as they are explored, and 4 of them have special Forced effects that must be remembered when players have control over the locations. This can be an easy thing to miss. The other locations from the City of Rhûn encounter set don’t have this extra text. Players gain control of these locations but can still lose them through treacheries or quest card effects. Those locations have been covered in Danger in Dorwinion already.
- Gate of Dorwinion: The first location on this list is the one that is the most important in the game. If you manage to control the Gate of Dorwinion at the end of the round, you win the quest. But there are a lot of hurdles that stand in your way before you can travel to this location. But let’s start with what the Gate does at the beginning of the game. The Gate has a variable threat value that scales with the number of locations that the players control, plus 1. This means that the threat constantly updates depending on how well the players are doing. In the early game, the Gate is pretty tame, but it can grow to as big as a 16 threat location. This added threat balances out the threat that would otherwise be in the staging area if players didn’t control locations, so you often still reduce the threat in the staging area by exploring and controlling the active location. The Gate is also immune to player card effects, so there is no way to lower the threat on this location through ways like Familiar Lands, Thror’s Key, or Guarded Ceaselessly. The players are also unable to travel to this location until they make 12 progress on the second quest card, and control more locations than there are locations in the staging area. These two pre-requisites are joined by an unavoidable travel cost where Thane Ulchor will attack each player in turn order after the players travel to the Gate. This is regardless of whether or not the players control locations. Once the Gate is the active location, all you have to do is place 5 progress in order to control it. Note that this does again trigger Ulchor’s ability to pull out a location or make an attack. If there are any locations left in the deck, go ahead and take one out. All you need to do now is to survive the combat phase. This is tricky, as the Easterling Skirmisher will return the Gate of Dorwinion to the staging area if they destroy a character with their attack. The shadow effect of Under Siege will as well, so be sure to keep combat to a minimum and prevent characters from dying to these attacks. If the Gate gets returned during this combat phase, you will have to travel there again next round, adding 2 more rounds to this game at the very least. However, if you can survive with the Gate of Dorwinion under your control until the end of the round, you win the game!
- Contested Square: This location is almost a straight-up copy of the Ruined Square from Assault on Osgiliath, with the only difference being the extra quest point on this one (and the progress placing no longer being optional). The Contested Square will likely be one of the locations that will constantly bounce back and forth between your control and the staging area. When the location first appears, it will only add 1 threat to the staging area, but it does surge. This can lead to you quickly revealing all 3 copies of the card within a few turns, but once the three copies are in play, they shouldn’t trigger their surge keyword anymore as they will never be revealed again. Their Forced effect is the most interesting thing here, as it allows you to place a progress on each copy of Contested Square whenever you defeat an enemy. Kill 3 enemies, and you get to control the Contested Square without having to trigger Ulchor. The only caviat with this is that the Square must be in the staging area to be able to receive progress this way. It is because of this that I do not advise travelling to this location, even if there is no other option. Clearing this location in the staging area through its effect is better than questing over it thanks to you avoiding Ulchor’s effect. You will probably have a different location that is better to travel to. Once the final point of progress is placed on this location, the first player gains control of the Square. It is now important that the controlling player does not lose any character to an enemy attack, because the Square is returned to the staging area whenever the controlling player has a character destroyed. Losing just the Square is fine, as it’s single point of threat is balanced with the threat of Gate of Dorwinion. But if you lose a Ransaked House as well (since you lost another location), then the loss of the character will cost you dearly. The Square can be won back easily, as players will quickly defeat 3 enemies in this quest thanks to the heavy combat focus.

- Ransacked House: Much like the Contested Square, this House is another location that can be explored in the staging area by completing its effect. This is balanced by quite an annoying Forced effect that puts the House into the staging area quite easily though, so it is often better to wait with taking control of this location so that you don’t lose it immediately after you take control of it. But let’s start with the stats on this location first. The 2 threat is not really a problem compared to the other locations in the encounter deck, though if you have all copies of the House in play, it can be a serious block of threat in the staging area. The 4 quest points on the location are not really that important, as the House does not always have to be explored by placing 4 progress on it. The Encounter Action on this card is the other way to get rid of this location as opposed to travelling here and exploring it as the active location. The encounter action requires the players to put the topmost enemy in the encounter discard pile into play engaged with you to take control of the House. Any player may trigger this effect, so the enemy doesn’t always go to the first player through this effect. If a player has no enemy engaged with them during the encounter phase, they can select this action to get an enemy from the discard pile and be rewarded with a location to guard. There is also no restriction on this effect, so players can trigger all 3 copies of the House during the encounter phase to get a nice lead over Ulchor and his attempt to control more locations. Gaining control over the House through this action also doesn’t trigger Ulchor’s ability, so this is a good location to leave in the staging area, and use when you need an extra location under your control. The downside to the Ransacked House is that it can leave your control pretty easily. That is because its Forced effect requires players to return the location to the staging area if the controlling player loses control over another location. There will be many cases where players are forced to return locations to the staging area, but this one always follows after you have returned another location. If you control multiple copies of the House, then you must return all copies as well. So if you have the option to select what location you return to the staging area (for example, transitioning to stage 2), always select the Ransacked House first. Solo players will want to avoid getting control of the House in the early game, and focus on getting other locations first. This is because they will always be getting all the locations, making it very likely that they must return the House sooner or later.
- Makeshift Fortification: You start with this location as the active location, and that is where it is the most annoying. Sure, the 3 threat on this location can be considered a lot when it is in the staging area, but I’d rather quest a little harder than having to take Archery 3 when this location is the active location. Archery 3 is quite a lot for lower player counts, but I suppose that is the price you pay for wanting to travel to this location. Notice that the Archery only occurs when Makeshift Fortification is the active location, meaning that if you can clear it within the travel phase, you don’t have to worry about the Archery. You do have to trigger Ulchor again, so that is a compromise you’d have to make. The 3 quest points on this location allow it to be explored pretty easily, but if you want to clear it during the travel phase, you are going to need location control cards, which are difficult to justify bringing to this scenario to be honest. Once you clear the Makeshift Fortification, the players take control of it, and have to trigger the Forced effect on it (on top of triggering Ulchor). This Forced effect requires the players to return the topmost enemy in the encounter discard pile to the staging area. During your first round, you will have this location active, and will likely not have any enemy in the discard pile yet, so that will be a free location. Any future Fortifications you take control of, will come with an enemy that pops back into the staging area. This means that if you have a Fortification as the active location and you intend to clear it next round, that you have to take care in what order you defeat enemies that combat phase. The Easterling Skirmisher is a solid target, as you can avoid the surge this way, and you can kill it with ease, potentially making more progress on Contested Squares. Unlike previous locations mentioned on this list, the Fortification does not come with an effect on the location itself that pushes it back to the staging area. But with 3 threat, you run the risk of having to return the location if it has the most threat of locations you control when you progress to stage 2. The best advice I can give is to prioritize other locations over this one, as it is relatively harmless if you keep this location in the staging area. You only have to quest over it. You can still travel here, perhaps during a round where you don’t have a lot of combat or have enough hitpoints to take the extra Archery.
- Captured Tower: At 4 threat, this is the highest base-level threat card in the encounter deck, and one of the highest threat locations in the scenario that you can control. It comes with an effect which is only active while it is the active location, much like the Makeshift Fortification. This passive ability on the Captured Tower prevents players from cancelling encounter card effects. If no players are bringing cancellation to the game, this effect does basically nothing, but you would be playing the game with quite a ballsy approach. There are some effects in this encounter set that are really worth cancelling, so it will hurt when you cannot do that with this location active. I do advise to travel to this location when you can though, because it frees up quite some threat in the staging area once you do. 4 threat is a decent chunk, and you’ll have an easier time making progress with this location active. Once the players explore the Captured Tower, they must trigger the Forced effect on this location as well as Ulchor’s ability. The Captured Tower requires the players to shuffle the encounter discard pile into the encounter deck (good for getting rid of Easterling attachments out of the discard pile), and discard cards from the top of the encounter deck until an enemy is discarded. That enemy engages the player that took control of the Captured Tower. The enemy added to the game this way does not trigger surge keywords, but if you get the Champion of Rhûn or the Rhûn Backstabber this way, you do have to trigger their Forced effect. The Captured Tower itself does not come with any effect that pushes it back to the staging area, but with 4 threat, it will be returned by transitioning to the second stage of the quest. You also need to make sure that you have other locations under your control that can be sent back through effects like Caught Off Guard or Champion of Rhûn. It would be a shame to quickly lose this big location after you just captured it.

Enemies
With the focus of this scenario being on locations, not many new enemies are introduced to the deck. However, the two other encounter sets add plenty of enemies that can be quite fearsome. These enemies have already been discussed in previous articles, so we will only go over the enemies that only appear in this quest.
- Thane Ulchor: Ulchor is quite a unique enemy in this scenario, and I don’t just mean that he has the unique symbol in front of his title. No, he is actually a menacing force that will continue to make attacks against you during the game, but you cannot do anything about him. He is immune to player card effects, unique, and has a victory score. Put all these lines of defence on top of his ability that prevents him from leaving the staging area, and the players have no way to counter-attack Ulchor. This reminds me a little of the Nameless Fear from Flight from Moria. However, despite not being able to engage players to attack, Ulchor does still make attacks against players at regular intervals. His Forced effect requires the players to make a decision after they explore the active location. Either Ulchor makes an attack against the first player, or the players must discard cards from the top of the encounter deck until a location is discarded, and add that location to the staging area. While the location option might be tempting, I only advise to do this in the early game. Selecting this option will not only add threat to the staging area, but also prevents you from advancing stage 1 or travelling to Gate of Dorwinion at the end of stage 2. You will also reach a point in higher player counts where all locations are already in play, so you have to take the extra attack at some point. Players with control over locations can also be expecting attacks from Ulchor in case a copy of Ulchor’s Revenge pops up during the quest phase. So while you don’t have to worry about killing him, nor be afraid of his single point of threat, the 6 attack can still be something to plan for in advance. With no way to influence the attack, your best bet is to have a solid defender to block this attack. Chump blocking is not a good solution for this quest, as you can lose locations like Contested Square through this. Ulchor’s shadow cards are not immune to anything, so having Inner Strength or Burning Brand on your defender can add an extra layer of protection. There is no way to counter-attack Ulchor in this quest, but don’t worry, you’ll get your chance later in this quest.
- Champion of Rhûn: We all know from the Haradrim cycle that enemies with Champion in their title should be avoided if possible, and prioritized as soon as they engage you. With 36 engagement cost, this enemy won’t be staying in the staging area for too long, especially if effects like Ransacked House, Caught Off Guard, and Captured Tower can bring him engaged with you even sooner. Whenever the Champion of Rhûn engages you (from these effects or regular engagements), you have a choice before you. Either the Champion makes an immediate attack against you, or you must return a location you control to the staging area. Returning the location will put you on the backfoot in the tug-of-war between locations under your control and locations in the staging area. However, if you have a Contested Square under your control but no Ransacked House, you can easily sacrifice that with the knowledge that killing a few enemies will return it to you. The extra attack is quite tough, with the Champion hitting for 5 without any boosts. Considering that this is an Easterling enemy, he can end up with a Sword of Rhûn, which will boost him to 7 attack. Cancelling his attack will be important, after which swift action must be taken to get rid of this enemy. Direct damage will be tough, as the Champion has 5 hitpoints and can also get Fury to survive his first death. Instead, a proper attack of 7 will kill this enemy. The 2 defence on the Champion isn’t huge, so you can bring it down to 0 with Rivendell Blades, making it much easier to deal enough damage to the Champion. The shadow effect on him also deserves some special attention, as this effect will deal 1 damage to the defending character. This can wipe out specialized defenders like Winged Guardian and Defender of Rammas, leaving the attack to be undefeneded. Avoid using these defenders if possible, as you will be risking your heroes that way.
- Easterling Skirmisher: With 4 copies of this enemy, it is hard to ignore the weird mustache-beard combo on this enemy. This is a more swarm-based enemy and is quite annoying for several reasons. The first is the surge keyword, which means that this guy can occasionally surge into another copy. With so much surge in one encounter deck, you’ll be seeing this guy a lot in each playthrough. The next thing is the archery 1, which isn’t much by itself, but with 4 copies of this enemy and various other cards dealing out Archery damage, you must be prepared for a lot of direct damage. The worst thing is the 4 attack on this guy. That is quite an extreme value and players won’t be able to comfortably take this attack undefended. On top of that, the Forced ability on the Skirmisher will trigger each time one of these enemies destroys a character you control. When that happens, you must return the highest threat location to the staging area. This can be annoying, as it can return difficult locations like the Captured Tower. The 30 engagement cost might seem like you stand a chance at turtling and building up for this enemy, but in reality, it is usually better to engage this enemy and get him out of the way quickly. This encounter deck throws a lot of enemies at you, and you don’t want 3 of these Skirmishers engaging you at the same time. Killing the Skirmishers isn’t that difficult (provided they don’t have Fury attached to them). 1 defence and 3 hitpoints make them good targets for attacking heroes, and make for easy progress on Contested Squares in the staging area. The best way to deal with this enemy is probably by lowering their attack value through cards like Keep Watch, Beorn’s Rage, and Entangling Nets. That makes this Skirmisher a whimp that can easily be killed if you don’t need your attackers elsewhere.

Treacheries
On top of the Easterling attachment treacheries and the threat-increasing treacheries of the encounter sets, Wrath and Ruin has 5 other treacheries that are unique to this scenario. They deal with the number of locations that the players control, and can be quite nasty if the players are doing well.
- Fury: I think this card takes the crown for shortest title in the game, especially for encounter cards. Fury is the only new Easterling attachment in this scenario, but it is a really annoying one. When it is revealed, the treachery will automatically surge into the next encounter card. It then attaches to the lowest engagement cost Easterling enemy in play. While attached, Fury acts as a Condition attachment that gives the attached enemy a second life when it is defeated. If the attached enemy would be defeated, all damage is healed and Fury is discarded instead. Other tokens, like on the Treacherous Easterling remain on the enemy. This treachery will then go to the discard pile, where you will probably see it go back onto an enemy soon after, through effects like Warriors of the East or Warrior of Rhûn. The treachery should be removed from the encounter deck if you have the means. It will only prolong the life of your enemies, making you have to deal with them over and over again. Out of the Wild and Scout Ahead are the best ways you can ensure that this treachery won’t bother you too much. Cancelling the When Revealed will only delay the inevitable, so don’t waste a cancellation effect on this treachery.
- Caught Off Guard: This next treachery is worth cancelling though, as it will make sure to bring a lot more encounter cards to the staging area. When it is revealed, each player must choose to either return a location they control to the staging area, or discard cards from the top of the encounter deck until an enemy is revealed, and put it into play engaged with them. The best enemy you can get for this is probably the Easterling Skirmisher, as you avoid their surge keyword. The Rhûn Backstabber and Champion of Rhûn will trigger their Forced effects, so you will be unlucky if you get them. You have no say over what enemy you get though, so cross your fingers and hope for the best. The other option is to return a location to the staging area. Always send the Ransacked House to the staging area first, as you will lose that one anyways if you send a different location out. If you don’t have a House, go for the Contested Square, as you will be able to win that one back through combat. It also doesn’t add a lot of threat to the staging area. The best option, especially in higher player counts, is to cancel this treachery, because it is a brutal one that adds 1 encounter card in play per player. The shadow effect on the treachery isn’t much better. In an already combat-heavy quest, this shadow effect forces you to take another attack from the enemy.

- Street Fighting: I haven’t actually played Street Fighter in my life, so I suppose that this is as close as I’ll get to it. The treachery is quite simple. It forces each player to deal damage to their characters equal to the number of locations they control, plus 1. If you have a player holding most of the locations, then they will have to take a lot of direct damage, but you as a team-player can take the archery damage in the next combat phase to balance things out. If you listened to my advice on bringing some healing effects to this game, then the extra direct damage shouldn’t matter too much, as long as you don’t get this treachery multiple times per phase. Players with no locations under their control get off easy, only having to deal 1 damage to a character they control. The shadow effect is the same effect as the treachery, only this time the defending player has to take the damage.
- Under Siege: This can actually be quite a tame treachery, as it scales with how well the players are doing. If you are not doing too well and have no locations under your control, this treachery only adds 1 threat to the staging area which goes away after the quest phase. If you are doing very well, then this treachery makes up for the threat on locations that would be in the staging area. However, with this treachery adding 1 threat per location the players control plus 1, it is not as bad as having a ton of locations in play. This is a pretty softball-treachery that you don’t have to cancel, though it can mess with your math during the late game.
- Ulchor’s Revenge: If you thought that Ulchor wasn’t attacking you enough after exploring locations and travelling to the Gate of Dorwinion, then this treachery is for you! The treachery has Doomed 1, causing players to raise their threat just a little bit more. This comes on top of the many other threat-raising abilities in the encounter deck and can trigger effects like Treacherous Easterling and the shadow effect of Darkness in the East. The real effect is the When Revealed on this treachery, which forces Thane Ulchor to make an attack against each player who controls at least 1 location. If you are playing this scenario smart and managed to push all locations to a single player, then only one attack is made this way, and the treachery isn’t so bad. But in a worst-case scenario, the treachery will cause 4 attacks to be made, each hitting for a base value of 6, but with shadow effects potentially boosting this, or even causing Ulchor to make an additional attack. And if you are going to be exploring the active location this round, he will make his regular attack on top of this all. The extra attacks are quite punishing, so you are forgiven for cancelling this treachery if you can. The lack of cancelling or influencing the individual attacks from Ulchor thanks to his immunity add an extra layer of pain on this treachery. However, if the players aren’t doing so well, this treachery can even whiff in the early game without it surging. So that’s a nice gift from the encounter deck.

Side-quests
There is one side-quest in this scenario, from the Easterling Raiders encounter set: Warriors of the East. I have already covered this side-quest in depth during the review of The River Running. The card will pull back the top most Easterling attachment from the discard pile into the game whenever a new Easterling enemy enters play. There are 3 attachments for the Easterlings in this scenario, but with the amount of enemies in this scenario, it will be common to find the encounter discard pile without any attachments in it. However, exploring the side-quest can still be a good thing as you can prevent having to bring back Fury over and over again. It is quite an annoying attachment for enemies to have, and even worse if it keeps coming back. Since the main quest can only be beaten as long as the players have enough progress and more locations under their control than in the staging area, you can end up with a situation where you have enough progress on the main quest. You can then put some progress on this side-quest to be rid of it, without it costing you an extra round or two. Try to beat it in one go though, as the quest card will force the highest attack Easterling in the staging area to make an attack against you. There can be situations where this effect whiffs, and since Ulchor isn’t an Easterling enemy, you can avoid the extra attack with proper timing.

Tips and Tricks
- Leave behind your player card effects that put progress on locations in the staging area. They have no use in this quest thanks to the quest cards preventing you placing progress on them. You can still include cards that put progress on the active location, like Map of Rhovanion and Lorien Guide to ensure you clear the active location when questing.
- If you are facing location lock in higher player counts, I will advise running the Eryn Galen Settler. This Woodmen ally allows you to discard a location from the staging area that matches the title of the just explored active location. This second location is not explored, but discarded. This means that you do not get control of it, and don’t have to trigger any other effects because of it. This will lower the number of locations in the staging area though, perhaps allowing you to advance the quest stage.
- Make sure you bring reliable sources of healing and threat reduction. There is a lot of archery damage in this game, as well as several effects that raise your threat faster. Your deck needs to be well-rounded to be able to counter these threats. Wardens of Healing will suffice for healing, and threat reduction can be handled in whatever way works best for your deck.
- Because of the sharp increases in threat all the time, a Secrecy deck is not recommended. Players will be better off with a Valour deck as long as you have reliable ways to lower your threat by means of the Perilous Voyage contract or Pillars of the Kings.
- Be prepared for a lot of surge in this deck. I will recommend running Lanwyn for this quest, as you will be able to often get to use both her abilities in this game, especially in higher player counts.
- Keep a close eye on the Forced effects on locations that you control. You can run into a situation where you chump an attack, and have to return a location to the staging area. Ransacked House is also a very easy trigger to miss, where you have to return it as well in case you lose a different location.
- With enemies getting Easterling attachments, Ranger cards will have some benefit in this quest. Valour of the North, Lore ally Faramir, and Ranger Spear all are well worth including in the deck to play against any enemy with attachments on them. Be sure to not have the Warriors of the East side-quest in play though, which would recycle the attachments.
- Invest in a big defender and get some readying attachment on them. Beregond, Dain, Grimbeorn and other heroes are good defenders against the high damage attacks that this encounter deck can throw at you. Having a hero like this with Sentinel and a bunch of readying effects can also help to constantly defend against Ulchor when exploring locations.
- While location control is countered pretty hard in this scenario, it is not completely wasted in your deck. The Woodmen archetype especially has some useful effects that you can use to free up some threat from the staging area. Locations can still receive attachments (excluding the Gate of Dorwinion), and that means that you can lower the threat of these locations by using cards like Power in the Earth, Guarded Ceaselessly, and most of all: Familiar Lands. Spread out your attachments on locations in the staging area, and you will be able to clear the quest phase more easily. This leaves characters ready to deal with combat. If you need even more characters, Woodman Lore combines quite well with this playstyle. Just remember that attachments are discarded after the location is explored, even if you gain control of the location.
Playthroughs
As this is a relatively new quest, not a ton of recordings can be found of this quest. It is also not the most popular one of the cycle, but I will extend this list as more playthroughs are recorded.
- 2 players: https://www.youtube.com/watch?v=Xd2jbEwgfp8
And that’s another scenario covered! Not many now remain, but I will return to the NM Dwarrowdelf cycle before I continue with this cycle of scenario analyses. There is still a lot to cover, and these articles are taking quite some time thanks to the complexity and difficulty of the quests. But I have a good feeling that we will be able to finish this cycle soon, completing all of the regular cycle content. After that, the AleP quests, Saga quests, and NM modes of scenarios will continue, and I will be looking to improve certain older articles as well. A lot to do, but fortunately the game isn’t going anywhere.

Ghan-buri-Ghan creates an interesting situation when playing Gate of Dorwinion. His threat is solely determined by the threat of the active location, which is immune to player card effects. But he must be able to quest, so one would
presume since the quest threat is “x” and his willpower is also “x”, that he gets the equivalent WP to the quest threat. If that is the case, he’s a star here. Either, he did well for the scenario in dealing with those 3 & 4-threat quests.
LikeLike