Out of all 50 Nightmare packs, I think this is one that you should save for last. Not because it is worth the wait but because it is going to take some time to defeat the quest, and you’ll be pretty burned out by the time you achieve that feat. The base scenario is already not one of the community’s favorites, so making the quest even more difficult does it no favors. The worst case scenario has you go through all of the encounter cards in the deck, having all of them in play or as hidden cards at the same time, meaning that you get nothing but the same horrible treacheries over and over again.
Some slight improvements for the mechanics were made, but it does not save this quest from being one of the more forgettable quests of the cycle, and one I would argue you should buy last of all Nightmare packs. Not even the artwork on the new cards can save this quest. Still, if you are playing progression style through the Against the Shadow cycle, this is an obstacle you have to overcome, so I’ll do my best to get you through this in one piece.
Nightmare The Blood of Gondor
- Found in: Blood of Gondor Nightmare deck, Against the Shadow cycle, pack 5.
- Size: 19 cards, and one new rules card
- Increase in Difficulty: A larger focus on the hidden card mechanic makes the quest even more brutal. Add to that the fact that you now have to clear the Black Numenorean, and you’ll be facing a major uphill battle. It’s one of the more brutal quests in the game in this mode, on par with the likes of Carn Dum and Dol Guldur.
- Fixed Loopholes: The players are now forced to both explore the Cross-roads location and defeat the new and improved Black Numenorean. This means they can no longer rush the quest and ignore those two cards. This was a pretty common strategy in Normal mode, as it meant you could just build for a Siege quest and ignore willpower.
- New mechanics introduced: None, the encounter deck just focuses more on the mechanics that were already in place.
- Play this scenario if: Honestly, I don’t see a reason to put yourself through this. I would only attempt this if you want to have a laugh and a quick reset. Or if you are as mad as me and are playing through this entire cycle in Nightmare mode. Otherwise, there are better Nightmare quests for you to play.
- Solo or multiplayer: I think you won’t be invited to many more game nights with friends if you propose to play this in higher player counts. It’s honestly for the best, as a solo deck might end up doing better, thanks to the smaller number of Hidden Cards in play at one time. Play this quest with 3 or 4 players, and you might end up drawing through the entire deck every other turn.
- What to look out for: Surprise attacks from hidden cards, Boss enemy starting in play from round 1, objective allies that disappear halfway through the game and whose death causes an automatic Game Over, and high threat in the staging area (especially with more players).
New Rules
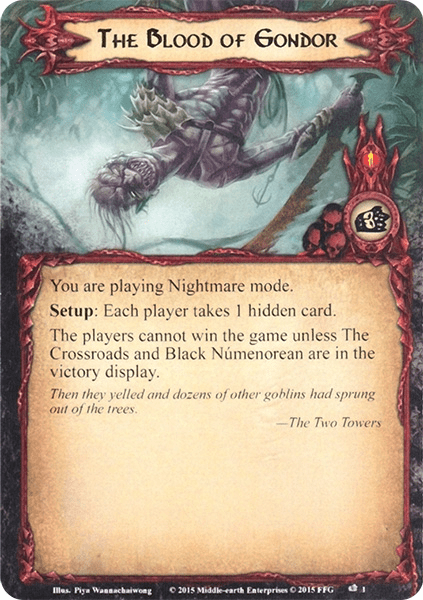
Apart from informing you and any unfortunate fellow players that you are playing this quest in Nightmare mode, the rules card comes with an additional requirement for beating this quest. Where in the base version, you were able to ignore the Black Numenorean and quest over him, you are no longer able to do that. Both the Black Numenorean and The Cross-Roads locations have to be in the Victory Display before you can claim your victory. Luckily, it does not matter when you clear both these cards, so you can wait until there is a lull in battle and you have found your footing before making the quest a Siege quest and engaging the Black Numenorean.
The new and improved Black Numenorean will take a lot more effort to kill than his base version, but it is important that you engage him early on. He will have a high threat thanks to all the Hidden Cards in play, but he will also raise the threat of each player at the end of the round. This even happens when he is in the staging area, so you must either keep flipping your Hidden Cards or engage this enemy early and kill him as soon as you are able.
The Cross-Roads location is less menacing, though it can still cause you problems if you are forced to make the quest a Siege quest. Losing defenders to make up for the threat in the staging area is a problem since you will likely be engaging more enemies, thanks to your hidden cards. The key to this location is its lack of any immunity and the low number of quest points. This means that it will be very easy for any location control to clear this location and send it to the victory display. You should do it while it is in the staging area since you can avoid the Travel cost this way. Asfaloth is the obvious solution to this location.
New Setup
There’s a very brief extra bit of setup to the quest. To start the game, each player takes one hidden card. This already can set you up for more combat on turn one, even if you just get locations during staging. This also increases the starting threat of the Black Numenorean, who starts the game in the staging area. This puts him at 4 threat in a 4-player game before even resolving the rest of the setup of 1A, which can quickly escalate if you draw the wrong encounter cards. This sets the players up to have even more Hidden Cards before they get the chance to play cards themselves. That means they have to overcome a high-threat enemy on their very first turn. Once you have passed the first turn and have gotten a grip on the situation, you will not really notice this extra setup anymore, which is fortunate.
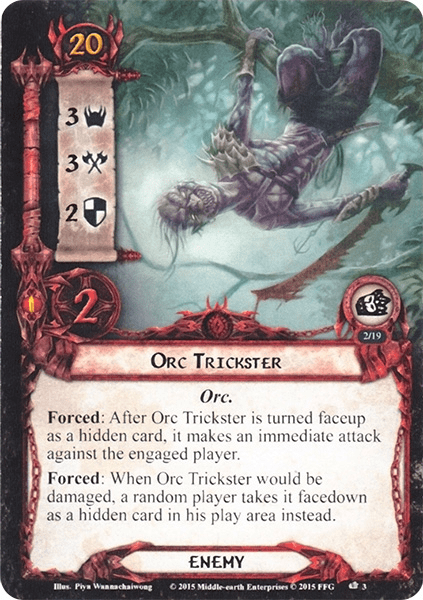
The rest of setup remains the same. The new Black Numenorean enemy is placed in the staging area, as well as the Cross-roads location, which now has to be explored in order to win the game. Each player gets one card from the encounter deck to reveal during setup, which is always more brutal in Nightmare than in the base version of the quest. Surrounded by Shadow is a good treachery to hit this way since no heroes are committed to the quest just yet. Orc Trickster is also a card you would rather see this way than as a Hidden Card. Once all cards have been dealt, the players may flip over to side 1B and start the game.
Cards removed

The following cards were removed from the regular encounter deck to make space for the new Nightmare cards:
- 1x Black Numenorean (Replaced with a NM version)
- 2x Evil Crow (Weak enemy that has no place in such a brutal quest)
- 2x Lying in Wait (Got cut to 2 copies, since it could sometimes reveal itself, which was a free Hidden Card)
- 4x The Dark Woods (Replaced by new locations)
- 1x Orc Rabble (Weak enemy replaced by newer ones that hurt when flipped over as Hidden Cards)
- 1x Orc Arsonist (Weak enemy replaced by newer ones that hurt when flipped over as Hidden Cards)
- 1x Scourge of Mordor (Treachery that didn’t hurt very much, replaced by ones that interact with the quest’s mechanic)
The Quest
The start of the quest will be the most brutal time since you will be going into the first staging step with at least 2 Hidden Cards per player, two cards in the staging area with variable threat, and one card per player added to the staging area for setup. It will not be uncommon to fail the quest on turn one, but that luckily doesn’t mean that the game ends then and there. If you can afford to take the increase in threat on turn one, you can start to lower the threat in the staging area that turn by traveling to a high-threat location (Mountains of Shadow, North/East Road). You can also engage some enemies that were revealed, but keep in mind that you should have enough defenders out early in case you are also deciding to flip over your Hidden Cards at the beginning of the combat phase. I personally recommend that you flip over these cards whenever you can since it will lower the threat of the Black Numenorean and will also save you from having to raise your threat from his effect at the end of the round. You might even avoid some shadow effects if you go into the combat phase without Hidden Cards.
A few turns into the game; you should start to find your footing and get some control over the encounter deck. If nobody has allowed their Hidden Cards to pile up, your threat should be manageable, and I would look at the opportune moment to travel to the Cross-Roads if you aren’t clearing it in the staging area. Make sure to kill most enemies engaged with you during the round you travel there so that you can safely send defenders to the quest next round. This is also the time to deal with the Black Numenorean, as the sooner you can kill him, the fewer times you have to raise your threat at the end of the round. Once he is dead, you notice that having Hidden Cards isn’t so bad anymore.
Before you advance to stage 2, make sure to send both Faramir and Lord Alcaron to the quest, even if you are Siege-questing through The Cross-Roads. They will be useless once you advance to the next stage, so you might as well use their stats while you have them. Advancing to stage 2 will also force every player to flip their Hidden Cards, so be ready to fight off a few enemies during the transition. Once you do advance, use that turn to kill as many enemies as you can since this will free up your attackers for the second stage, which is a Battle quest.
During stage 2, you should really throw everything you have at the quest in order to beat it as quickly as possible. Because of this, it is important to have cleared The Cross-Roads and defeated the Black Numenorean before you advance to stage 2. Else you will find yourself in a situation where you cannot win until those two cards have been cleared, but you are still forced to Battle-quest in order to overcome the threat in the staging area. This hurts the attack strength total that you can muster against the Black Numenorean, so that could trap you at the end of the quest. Pushing hard through the second stage can allow you to escape as soon as possible. This is, therefore, also the time to just take any Hidden Cards that the encounter deck throws at you since you don’t have to flip them unless an encounter card says so or you have 5+ Hidden Cards at once.
Once the Cross-Roads location has been cleared, the Black Numenorean is defeated, and you have 15 progress on the second stage; you have defeated the quest and can proudly proclaim you have completed one of the hardest Nightmare mode scenarios out there.
The Encounter Deck
Global

- The deck starts at 41 cards thick, but in higher player counts, this won’t last long since you have to deal cards from this deck as hidden cards as well as reveal them during the regular staging step.
- The chances of hitting a shadow effect are mediocre at 53%. Most of these effects deal additional hidden cards or more shadow cards.
- The threat per card revealed is relatively high, at 2.05 threat/card. This is mostly due to the high volume of 4 threat locations and enemies.
- 3 cards surge outright, but if Conflict at the Cross-roads fails, it also triggers surge, increasing the number to 5 cards in the encounter deck.
- Doomed 2 on Surrounded by Shadow is the only instance of the Doomed keyword, but the Black Numenorean will ensure players keep increasing their threat!
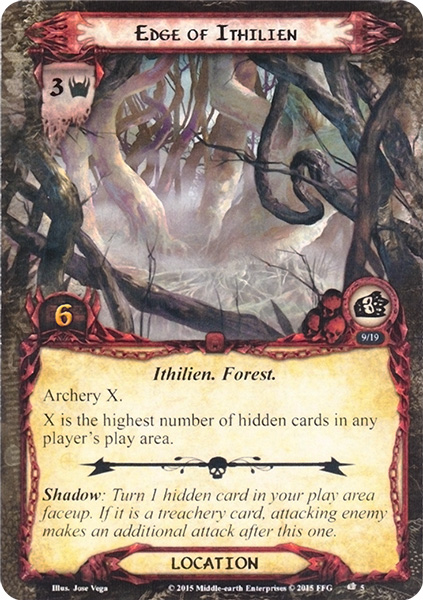
- Uruk Marksman and Edge of Ithilien both have the Archery keyword, ensuring that there will be enough direct damage heading your way!
- No cards are immune to anything, so make sure that you bring all the tricks you have!
These statistics do not count the Black Numenorean, the objective allies, or the Cross-roads location. It also does not account for the first Hidden card that players must take as a part of setup. The most worrying thing about the encounter deck is the focus on enemy cards, which increases the odds of you getting an enemy as a Hidden card. Those odds are nearly 50% if you also have a few locations already in the staging area. Keep track of what cards are in the discard pile as well so that you can better anticipate whether or not it is safe to flip your hidden cards.
Enemies
The following enemies are added in the Nightmare version of this quest. Note that these can now pop up from your Hidden Cards, so take extra care when these enter play.
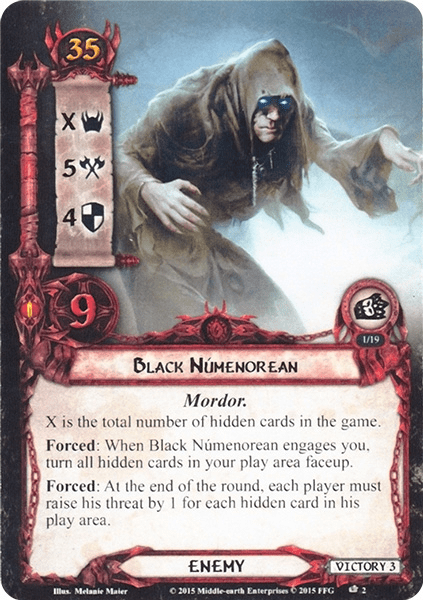
- Black Numenorean: The boss enemy from the regular version has received a big update in the Nightmare mode for Blood of Gondor. No longer can you simply muster 8 attack and kill him; now, you need 9 damage in total and get through 4 points of defence. The 5 attack remains the same, but that is hardly the worst thing about this enemy. The Black Numenorean is infamous for being an enemy that can get up to insane levels of threat really early in the game. This is thanks to the variable threat stat, which scales with the total number of Hidden Cards in the game. And with the new setup for this version of the quest, you get 2 Hidden cards before the first staging step per player, so this can escalate really fast. This high threat makes the Black Numenorean a perfect target for cards like Radagast’s Cunning and Revealed in Wrath. This helps to make a ton more progress, especially in multiplayer games. Aside from the high threat, the Black Numenorean has 2 Forced effects. The second one deserves a bit more attention, as it will raise the threat of each player at the end of the turn by the number of Hidden Cards they have. This is luckily done per player, and not counting the total number of Hidden Cards, but it can still force your threat beyond the engagement cost of some enemies. Since this triggers at the end of each round, you will be forced to deal with this enemy a lot sooner than you might be comfortable with, or you have to flip over your Hidden Cards each round to lower the threat gain. This does also invite more enemies to engage you, so neither option is perfect. To make matters worse, the first Forced effect from the Black Numenorean will cause the engaged player to have to flip all of their Hidden Cards when they engage this enemy. This can make for a pretty difficult combat phase, and you might need the help of other players with Ranged and Sentinel. However, the good news is that the Black Numenorean is not unique and is not immune to player card effects. This allows you to use all sorts of tricks, like dealing damage to him (even in the staging area), canceling attacks, or lowering his stats. You can even trap this enemy, wearing him down over time with things like Poisoned Stakes. It is now mandatory to kill this enemy in order to beat the quest, so go into the game with a plan in mind for how to deal with this high-threat, difficult-to-kill enemy.
- Orc Trickster: An annoying little enemy that I luckily didn’t have to deal with too often, thanks to Firyal in my playthroughs. But this enemy is very hard to get rid of and will work better if you can trap it than when you try to kill it. The Trickster is a pretty basic enemy when it is revealed normally, having no noteworthy stats other than perhaps his 3 points of threat. But with an engagement cost of 20, he won’t stay in the staging area for very long. There is also no “when engaged” effect like with other enemies from the base encounter deck, so it’s easier to engage this enemy by a player who doesn’t have a lot of enemies yet. The problems start to appear when you try and kill the Trickster. You will find that whenever you try to deal damage to him, he will disappear as a Hidden Card for a random player. If you are at stage 2 and this is now your fifth Hidden Card, you will have to flip them all over, which can be a very bad time for all players involved. On top of that, if you flip over the Trickster as a Hidden Card, he will make an immediate attack against the engaged player. Yes, the attack is only 3, but you will have to deal with 2 of them, plus any additional enemies you might have engaged with you. If you are given the option to put this guy in the victory display through cards like Out of the Wild, do so! There are 4 copies, but they can shuffle around and continue to poke you, and there isn’t really any way to get rid of them. Well, that’s not entirely true. The Trickster cannot take damage, or they’ll scurry away as a Hidden Card, but there are ways to straight-up discard them with events like Helm! Helm!, Fierce Defense (in Valour), and even Delay the Enemy if you somehow brought that side-quest. You can also put this enemy in a trap like Forest Snare or Outmatched and just ignore it until the end of the game. If you are tired of the constant attacks and would rather have the extra Hidden Card, defend with a Gondorian Spearman since the damage will cancel his attack and have him flee to someone’s Hidden Cards right away.
- Uruk Marksman: If you thought the Orc Trickster was slippery, then the Uruk Marksman might surprise you with how it moves between your play area and the staging area. If it is revealed regularly, it doesn’t do much except sit in the staging area, adding 4 threat and Archery 3 to the game. This will force you to engage him at some point, as the 40 engagement cost will keep him out of forced engagements for a while. You can safely engage him, though, since he has no ability to trigger that way, and his actual combat stats are quite poor. An attack of 2 is pretty weak for a Nightmare card, and 2 defence and 4 hitpoints are not enough to survive most attackers. However, the 4 hitpoints are notably one more than Faramir‘s damage, meaning that if you flip him over with Faramir’s effect, he won’t die. You’d need a Gandalf to kill him in the staging area. If you get the Marksman as a Hidden card and flip him over, you get dealt 3 damage to a single character you control and have to send him back to the staging area. There he can sit and add his threat and Archery, proving to be quite a nuisance for the players. Either has a way to kill him in the staging area or find a way to engage him before the next quest phase (Tactics Aragorn loves enemies like this).

Locations
Locations were never really the focus of this quest, but two more are added to add to the Archery total and the number of Hidden Cards in play.
- Edge of Ithilien: The first location replaces the Dark Woods in favor of a location with higher stats. It still adds a lot of Archery to the total, but now it also has 3 threat, will take 6 progress to clear, and loses the beneficial effect of getting to discard a Hidden Card when you explore it. The Archery value on this location varies and will be equal to the highest number of Hidden Cards in any player’s area. This can get out of hand in the early game if players are too afraid to flip over their cards, but during stage two, it will never exceed Archery 4. This is good news since there are three copies in the encounter deck, meaning that this location can really add a ton of damage to your characters if you keep a lot of Hidden Cards in your play area. This location also punishes solo players with more Archery than the original location, and it will also be more difficult to explore this location. It is free to travel here, though you will need 6 progress to clear it as the active location. Making this the active location also does not remove the Archery from the total; it just removes 3 threat from the staging area. Woodmen’s Path can be a useful tool to get rid of this location faster, saving you five progress to be placed on the quest cards. The shadow effect on this location is also annoying. The defending player has to flip over one of their Hidden Cards. If that card is an enemy, normal rules apply, and it engages that player. If it is a treachery, the attacking enemy makes an additional attack. Only if the flipped-over card is a location will this shadow effect do nothing, but those odds are not in your favor considering the shadow card itself was a location already.
- Mountains of Shadow: With even more threat, you might just be tempted to go to the Mountains of Shadow over most other locations in this scenario. And while that would remove 4 threat in total, you would also have to face its Forced effect while it is the active location. During this time, whenever you flip over any number of Hidden Cards, you have to take one new one. This combos with effects like Sudden Onslaught, where you will end up with more Hidden Cards than you started with. It also means that you will always have at least 1 Hidden Card in your play area, raising the values for the Black Numenorean and the Edge of Ithilien. Luckily, the Mountains of Shadow aren’t that bad while they are in the staging area, only contributing their threat. You can get around that with some passive debuffs like Guarded Ceaselessly and Power in the Earth. Though with three copies in the encounter deck, you might also want to consider exploring this in the staging area or getting it as the active location when you are sure that you can clear it in one turn. The 4 quest points on here make it quite resilient to location control effects, but you could use different cards to slowly chip away at this one before clearing it. This is a very bad location to get stuck at, so make sure you are questing hard enough.

Treacheries
The following two treacheries are new but, luckily, won’t have to be resolved if they are dealt as a Hidden Card. They do still add Hidden Cards to your play area or waylay you in other ways.
- Surrounded by Shadow: The first new treachery is the easier one of the two, but it can still cause you to either increase threat in the staging area or reduce your willpower, making it more difficult to make progress on the main quest. The first thing you have to do is to raise your threat by 2 thanks to its Doomed keyword. Add this to the other threat-raising effects in the quest, and you’ll find yourself engaging more enemies on top of the ones that might be lurking in your Hidden Cards. It also pushes you closer to your elimination level. The second effect, its When Revealed, gives each player a choice. They either have to take one hidden card for each hero they control that is committed to the quest or remove a hero they control from the quest for each hidden card they own. Either way, you will have wished that you didn’t quest with heroes, which would make this card do nothing at all. If you happen to have just a single Hidden Card and a hero with Windfola, then the second option will be more appealing. Taking more Hidden Cards is usually not the best idea since it can give you more to do in the combat phase and will raise the values on Black Numenorean (threat) and Edge of Ithilien (Archery). In the early game, this treachery will hurt more since you will likely be questing with your heroes and have more threat to overcome in the staging area. Removing them from the quest can cause you to raise your threat even more than the two points you just took from the Doomed keyword. Personally, I feel that there are worse encounter cards that you should save your cancellation events for, but it really depends on your situation. If you can manage not to have to quest with your heroes in the late game, then the three copies of this treachery will be a very easy encounter card to reveal.
- Sudden Onslaught: This next treachery does not actually change the number of Hidden Cards that each player owns, but it does flip them all over before it replaces each of them. Flipping them all over can cause you to have to engage more enemies and can trigger effects like the Orc Trickster. But what is worse is that you don’t actually benefit at all from having flipped these hidden cards since the treachery deals the same number back to you. In the best-case scenario, none of the initial cards were enemies, but that still robs you of having an easier combat phase than you otherwise would have had. This alone is reason enough to cancel this treachery. You can even get unlucky and reveal both copies back-to-back, getting you a ton more encounter cards to have to deal with. The best remedy for this treachery is to have as few hidden cards in your play area as possible since that neuters this card a little bit. This is also one of the main culprits of drawing through the encounter deck super fast, as in a multiplayer game, this card can easily deal 10+ new cards from the encounter deck. The shadow effect seems to make another trade of taking 1 Hidden Card and flipping one over. But during stage 2, this can put you past the 5 Hidden Cards limit, forcing you to flip everything over. And since you are still in the combat phase, you might have to deal with a lot more enemies all of a sudden.

Tips and Tricks
- Make no mistake; this is one of the hardest NM quests out there, so don’t beat yourself up so that you can’t get past the first two rounds of this thing. You need a bit of luck with the Hidden Cards, and it will require a few resets before you get a grip on the quest.
- Since you are likely to draw through so many encounter cards, it might be a good idea to bring some encounter cards of your own. Tom Bombadil, Ranger of the North, and Eagle of the North can be great allies to get, and they might just end up being a free hidden card. Wind from the Sea is my preferred encounter card for this quest, allowing you to ready your questers, who you will likely need for combat, especially during a Siege quest.
- Radagast’s Cunning is an amazing event to bring to this quest, as you can ignore the threat of the Black Numenorean that way for a turn. It won’t prevent you from engaging this guy at some point, but at least you can get some more progress on the quest.
- Bring ways to cancel treacheries. A Test of Will should always be available before you start the staging step or have Eleanor ready to go. The more Hidden Cards you can prevent this way, the easier your time will be throughout this quest.
- You will have to pick up the pace for this quest. It is not one that you can build up for. The quest hits you hard right out of the gate, and most players may struggle to get through the first two rounds. It will get a little easier after that, but with your threat climbing each round, you are going to have to get to the end before you hit your elimination level.
- If you want an easier time flipping over hidden cards, try to get as many enemies in play at the same time. This strategy is only advised for higher player counts, but if you can survive dealing with all enemies in play, you can flip over each of your hidden cards without a problem. This will require traps and a Dunedain deck to handle things with less risk, but it can be a bold strategy to get through the quest.
- In the same spirit, you can try and use Victory Display cards to put as many enemies into the victory display as possible. This reduces the long-term risk of revealing enemies through Hidden Cards. Out of the Wild, None Return, and Scout Ahead can allow you to send the enemies to a place where they will be even more hidden!
- Remember that you will have to deal with both Siege and Battle questing during this scenario, so invest in cheap allies with plenty of attack and defence before it is too late. Not only will characters like Defender of Rammas and Winged Guardian help during a Siege quest, but they will also be great ways to defend the smaller enemies coming out of the staging area or your hidden cards.
- Direct damage can help a lot against enemies that are in the staging area. Especially Gandalf will be a useful tool at taking out the Uruk Marksman that go back to the staging area after they have been flipped. Also, keep in mind that all your damaging effects can target the Black Numenorean while it is in the staging area, so you might not even have to engage him at all!
- With so many enemies engaging you, you might also want to look at ways to deal damage to enemies before they attack. Direct damage in the form of Goblin-cleaver, Durin’s Axe, Rain of Arrows, and Pursuing the Enemy can clear the weaker enemies engaged with you and even send the Orc Trickster back as a Hidden Card. You can also use Gondorian Spearmen and Spears of the Citadel on your defenders to hopefully kill some enemies before they attack.
- Remember that you have two objective allies during stage 1 that can help out during combat. While Faramir’s attack stat might seem useful, his ability is a lot better, allowing you to flip a Hidden Card and deal damage if it was an enemy. The 3 damage he deals is quite significant. Lord Alcaron can send enemies to the staging area, where the Rohan archetype can kill the enemies, or they fall into traps.
Playthroughs
Since this is not a very popular quest, let alone in Nightmare mode, it should come as no surprise that there aren’t that many playthroughs to be found online. Still, here are two videos of people attempting the quest.
- 2 handed, progression style: https://www.youtube.com/watch?v=kvcVf5XVVrA
- True solo: https://www.youtube.com/watch?v=_Vyepy_AsYg
With this horrible quest now behind us, I get to continue on my journey through the Nightmare Against the Shadow cycle. The final quest now lays before me: The Morgul Vale. With its three required boss-enemies and constant ticking timer, it is not going to be an easy finale to the cycle, but at least we will never have to look back at this cycle after that!
