When you read the flavor text before and after this scenario in the rule sheets, you learn that our heroes actually do get nightmares from the base scenario of that quest. It is not often that they are disturbed by things, but the memory of Minas Morgul under the full moon haunts them a bit longer than other quests do. And rightfully so! The base quest is quite brutal, and they uncover a conspiracy against them. Add to this an encounter with a Nazgul and a ticking timer before Faramir is lost forever, and you understand the stress the heroes (and, by extension, the players) are under.
Now imagine this quest being far more brutal, with tougher enemies, a timer ticking down faster, and punishments for not keeping up with the quest. This conclusion to the Against the Shadow cycle pulls out all the stops, and it won’t be easy to clear the Nightmare version of this quest. But there are some quirks to this quest that you can exploit, which prevent it from being impossible. Let’s take a look at the quest and the new cards introduced in this mode.
Nightmare The Morgul Vale
- Found in: The Morgul Vale Nightmare pack, Against the Shadow pack 6
- Size: 19 new encounter cards, 1 rules card
- Increase in Difficulty: Yes, the timer is a lot more strict than in Normal mode, and with the new encounter cards, you can find yourself getting 10 progress on the objective within a handful of turns. The new buffs also make it harder to fight each Captain. But this was always a difficult quest, and the core mechanics have not changed. So a deck that works well against the normal version of this quest will find itself coming a long way against the Nightmare version. Just kill the bosses faster to not get Faramir caught in Minas Morgul.
- Fixed Loopholes: They removed all copies of Power of Mordor from the encounter deck, which helps you not to lose any cards in the staging area. This was a broken mechanic in the base game, hence why this treachery was removed in every quest that originally had it. There aren’t many other loopholes for this quest, so not much else needed fixing.
- New mechanics introduced: None, between the To The Tower objective and the three different boss-enemies, you will have enough mechanics to worry about. No need to spice up this quest even more.
- Play this scenario if: You enjoy a fast-paced quest where you have to get going right away. You love fighting tough enemies, which in this version receive various buffs. You have a mono-Tactics deck that doesn’t quest hard but can fight really well. You have a deck that wants to explore as many side-quests as possible.
- Solo or multiplayer: I feel that you will struggle against this quest in solo because of the sheer amount of combat that is required. Usually, it is better to play this quest in 2-3 player games. That allows one player to deal with the Captain at each stage while the others clear the regular enemies and ensure that enough progress is made to clear locations. 4 players will be too difficult because of the many effects that place progress on To the Tower. You can lose on turn 2 because of this, especially if you get some of the new encounter cards.
- What to look out for: Losing to To the Tower, boss enemies fighting you during the entire quest, high-threat locations and enemies in the late game scaling with the number of progress tokens on the objective, a lot of combat, and punishment for playing multi-sphere decks.
New Rules

There are actually no additional rules for this version of the quest. Just play the quest as normal. After setup, you can ignore the additional rules card.
New Setup
There is one bit of additional setup for this quest. You have to start with one progress on To the Tower. This puts you 10% towards a game-over but is meant to make the early game a bit more difficult. Too many cards now interact with the number of tokens on the objective, and in order to make some of them not whiff, a token is added at the start of the game. This also means that the Sentry of the White Bridge will have a threat and attack stat of 1, which it otherwise would not have if you reveal one during setup. I would also have appreciated this extra token on the objective from the start of the game if any copy of Morgul Road was still in the encounter deck since that would allow you to take it off once you clear the location, but sadly all copies of that location were removed to make way for the Nightmare cards.
The rest of the setup remains the same. Players have to set aside Lord Alcaron, the Nazgul, and the White Bridge for later stages. Players then add To the Tower, Murzag, and one copy of Morgul Vale to the staging area. This makes the setup indistinguishable from Normal mode, except for that one progress token on the objective. Players then flip over quest card 1A and start the first round.
Cards removed
The following cards were removed from the regular encounter deck because they were either too easy or they had to make way for the new Nightmare cards.
- 3x Forest Bat (Weak enemy that was essentially a free encounter card if Thalin was in play)
- 1x Watcher in the Wood (The quest does not have Battle or Siege, so this would not surge, still one copy remains)
- 3x Orc Arbalesters (Low attack enemies that just added Archery 4 in most games. Replaced by other enemies)
- 1x The Power of Mordor (Broke the scenario by removing the objective)
- 2x Morgul Sorcerer (Weak enemy)
- 2x Morgul Tracker (High threat enemy, but would fall easily to traps or direct damage)
- 3x Morgul Road (Beneficial location that could remove progress from the objective)
The Quest

The scenario plays a lot like the regular version of the quest, just at a higher pace and with more enemies. You really have to be ready for combat on turn 1 so that you can take on Murzag and any enemy that he brings with him. The enemies in this scenario are a lot stronger than you might be familiar with, so having extra players to engage other enemies and provide Ranged and Sentinel support to whoever is defending Murzag will be key. During the first few stages, it is all about getting a foothold against the enemies of the encounter deck. There are various approaches to this, depending on what cards you are revealing. The first approach is to slowly build up and dispatch enemies as they come out. The benefit of this is that you have a more reliable boardstate going into the next two stages. You can also take your time to explore side-quests and enjoy their benefits. The downside to this is that you are on a timer during this quest, and the longer you wait, the more progress is placed on To the Tower. Because of that, I would advise going for option 2, but only if you are lucky enough to avoid Morgul Bodyguard for a while.
Option 2 is to go all-out against Murzag and kill him on turn 1 or 2. If you are getting a Warrior of Nurn in play, this might be more difficult since you have to deal all the damage in one turn, but there are heroes that are capable of doing this. If you are bringing Tactics Eowyn, this is the time to use her since she won’t do much against the Nazgul at the end (guess he’s not the Witch-King). Killing Murzag early advances you to stage 2, where you can take a bit more time with Lord Alcaron. He hits for less attack, and with 80%+ chance of a shadow effect, you don’t have to worry about his second forced effect. Arriving at this stage early also allows you to accept a few tokens on the objective from his effect, but if you are able to cancel his attacks, you obviously should. This strategy of putting all your eggs into the Murzag-basket is risky, as you need to make sure to have enough attack to kill him, but if it works, you will be facing fewer enemies in the early game.

Eventually, you will arrive at stage 2, and I advise you to stay here for a little while to build up for the final stage. Remember that during stage 3, the White Bridge will be added to the staging area, adding a lot of threat. So you need to be ready and have enough willpower to overcome it during the round you advance to the next stage. This also means that you should have an empty active location slot since you will want to travel to the White Bridge as soon as you can. Alcaron is not as scary as the other Captain enemies in the quest, but with the buffs from Ephel Duath, Warrior of Nurn, and Banks of Morgulduin, he can still pose a problem. And you have likely spent most of your attacking prowess on Murzag and other enemies that have appeared since the start of the game. You will need to keep the pressure up and use this time to kill whatever enemies you can. Special attention should be given to Warrior of Nurn and Morgul Bodyguard since they will stop you from damaging the Nazgul at stage 3 and dragging out the game for longer. Once you feel that you are ready to face the final challenge, kill Alcaron and advance to stage 3.
At the final stage, you will be adding a few extra cards to the staging area. The White Bridge will be there to act as a big buffer to your progress, so travelling there as soon as you are able is important. There is no punishment for travelling there or having the location active. The only issue is that the Bridge does not come with victory points, meaning that if you happen to explore it and have to reshuffle the encounter deck afterwards, you run the risk of revealing it again. The Nazgul of Minas Morgul is also added to the staging area and will have to be defeated in order for you to win the game. His 7 attack is already pretty brutal, but with any copy of Ephel Duath in the staging area, it will be nearly undefendable. If you have any way to cancel his attacks, you should, just so that you can use your defenders elsewhere.
Another thing that is worth pointing out at this final stage is that one card per player is added to the staging area when you transition between stages 2 and 3. This extra card (or cards in multiplayer) can really define your strategy for stage 3. If it somehow provides a buff to the Nazgul, it will be worth taking out first before handling the Nazgul. This is especially true for the Warrior of Nurn, which is Kill On Sight at this stage because the Nazgul doesn’t take damage easily. If you get a regular treachery for this effect, then you should be ok, especially if you have plenty of tokens to spare on To the Tower. If it is a close battle between winning the quest in time or losing to the objective, then all effort should be put towards finding ways to cancel putting progress on the objective, even if it would mean killing off a few heroes.
Your goal for this stage remains to kill the Nazgul, who has the nasty restriction that any damage dealt to him is automatically reduced to 1. With 5 hitpoints, it means that you need to deal 5 separate instances of damage to him, which is not impossible if you bring the right cards. Direct damage effects, especially certain weapons (Sting, Dwarrowdelf Axe, Bow of Yew), are useful here during the combat phase to at least deal 2 instances of damage when attacking. You can also use Spear of the Citadel, Gondorian Spearman, or Defender of Cair Andros in Valour to deal damage when defending. During most action windows, there will also be an opportunity to deal damage with events like Hail of Stones, Rain of Arrows, and Pursuing the Enemy. If you manage to deal 5 damage this way, you will have won the game and saved Faramir. Since this is so important, I personally advise everyone to save their direct damage effects until the very end of the game, even if they draw it on turn 1. Have enough resources left over by the end to make a quick end to the Nazgul, and you should be fine.
Congrats on making it through the Nightmare Against the Shadow cycle. It was a hard-fought battle to the end, but you are now a master of these quests and never have to play them again unless you actually enjoyed the more powerful Mumaks, the shifting enemies from Blood of Gondor, and being turned into a pin-cushion in the Druadan Forest. We now turn our attention to the next cycle, where card draw is your biggest enemy after the Time keyword.
The Encounter deck
Global

- The encounter deck is made up of 46 cards, which is slightly more than the Normal version of the quest.
- Shadow effects are very common, at 82.6%. This ensures that Lord Alcaron will likely not make an additional attack. Shadow effects generally place more progress on To the Tower.
- Average threat on cards revealed is quite high at 1.8. There are a lot of 4 threat cards in the deck and even two 5-threat ones.
- The surge keyword appears on the Terror Drives Them treachery (3x). Additional cards can be revealed through Impenetrable Fog.
- The Doomed keyword does not appear as frequently as you might think for this quest, as only the two copies of Sleepless Malice has this keyword, raising your threat by 2.
- Archery has been removed from the scenario. Instead, you will be taking damage from Noxious Fumes.
- Immunity
- If Orc War Camp is in the staging area, and an Orc enemy is in play, progress tokens cannot be placed on Orc War Camp.
- While Orc Vanguard is in the staging area, resources cannot be spent by non-Tactics heroes.
- While Morgul Body Guard is in play, damage dealt to Captain enemies is redirected to one copy of the Bodyguard instead.
These statistics do not count all the cards set aside during setup, including the one copy of Morgul Vale. The Tower Beckons is counted as having 2 threat, and the Sentry of the White Bridge is counted as having 1 threat. These are the most ideal circumstances for these cards at the start of the game, but they will quickly gain more threat as the game goes on. The encounter deck is decently balanced but has a preference for enemies. This can matter for Murzag’s ability.
Enemies
No new Captain enemies; those remain the same. But new generic enemies are included in the encounter deck to waylay your fellowship and help the captains survive for longer while more and more tokens are stacked on To The Tower.
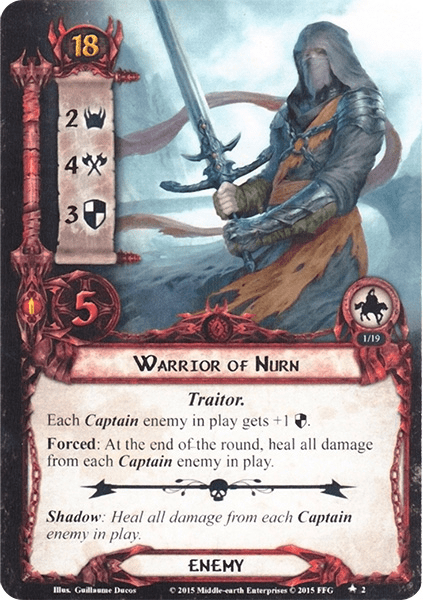
- Warrior of Nurn: Looks like Alcaron got some support from Nurn in this Nightmare version of the game. This enemy serves as a buff to each Captain enemy by providing them with +1 defence and a heal at the end of each round. The defence will stack with all copies of this Traitor enemy, so you can potentially get +3 defence on enemies. The more annoying part is that at the end of each round, all damage gets healed from each Captain enemy in play. For Alcaron and Murzag, this is not a huge issue since you can try to hit them hard in one attack, hopefully killing them in one go. But the Nazgul is protected from this by its textbox, reducing all damage to 1. And if the Warrior of Nurn is removing all damage at the end of each turn, then you will need to find a way to deal 5 different instances of damage to the Nazgul in a single turn while also dealing with an increased defence. So it is usually better at that point to turn your attention on the Warrior of Nurn and kill him before dealing with the Captain enemy at your stage. Though that is easier said than done. The Warrior will engage early, at 18 engagement cost. It attacks for 4, putting pressure on players early on to be able to defend him as well as Murzag. Killing the Warrior is going to take some effort, as you will need to penetrate 3 defence and deal 5 damage. This is also too much for direct damage to deal with, though it can help to soften him up a little.
- Orc Captor: The next enemy on this list does not interact with the Captain enemies but instead with the To the Tower objective. At the end of each turn, if the Orc Captor is in the staging area, you have to deal 1 progress to the objective. This triggers for each copy of this enemy, which can lead you to deal 3 additional progress to the objective at the end of each turn. The solution to this is to engage the Orc Captor, which is also ideal because of his 4 threat. While engaged, you will have to deal with an attack of 3, which is not too bad. But this enemy will also be difficult to kill, requiring 7 attack in total to deal with. Though thanks to his high engagement cost and relatively low attack, players might want to keep this enemy engaged with them if they are running Hobbit or Dunedain decks. This enemy does nothing while engaged with you, making it the perfect target for those decks. This enemy is worse in lower player counts since you won’t be able to deal with every enemy coming out in the early game. At those moments, it will be more tempting to leave this enemy in the staging area and just suffer the 1 additional progress each turn. Alternatively, this enemy makes for a good target for Sneak Attack + Gandalf, saving you the progress and reducing the threat in the staging area by 4. If you are engaging this enemy, please keep in mind that the shadow effect on White-flowered Fields can push this enemy back to the staging area, as well as the effect on Morgul Vale. The second effect won’t trigger the additional progress since that would happen at the same time, but having to re-engage this enemy over and over again can be annoying.
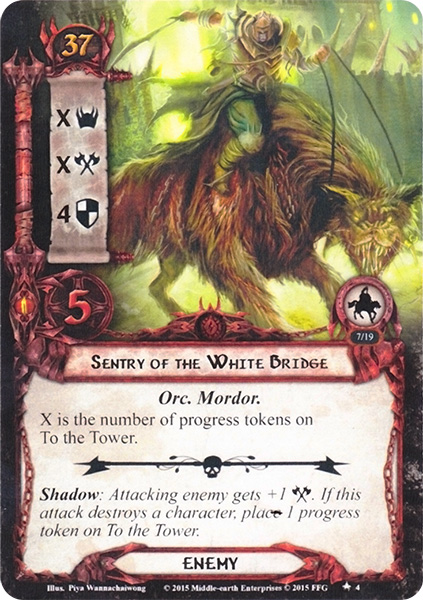
- Sentry of the White Bridge: The final new enemy in this Nightmare scenario is the Sentry of the White Bridge. It gets its name from the unique location at the end of this scenario because it too scales with the number of progress tokens on the To the Tower objective. Its threat and attack strength will steadily increase during the game, making this a relatively harmless enemy at the start of the game but potentially an 8-9 attack/threat enemy by the end. Blanking his textbox is a great counter to this scaling, though, as Revealed in Wrath can make this enemy attack for 0 or contribute 0 threat to the total in the staging area. Radagast’s Cunning can also do this. While engaged, the Sentry will be difficult to defeat thanks to the 4 defence and 5 hitpoints. It’s not the only sturdy enemy in the encounter deck, so if you are playing multiplayer, this enemy is better to be engaged by a player who does not have to deal with the Captain at your stage. Another good trick against this enemy is to use a Forest Snare on it. If you do that, then his inflated stats do not matter for the rest of the game. There are also only 2 copies of this enemy out there, so if you can trap both this way, they will do nothing from that point on to harm you.
Locations
There are three new locations that you can explore during the Nightmare version of this quest. All three are horrible, but with no progress required on the main quest, there is no point in not travelling, so you may as well take a close look at these cards and see which one is the more suitable destination for you and your team.
- Banks of Morgulduin: This first location is quite interesting, as you are almost guaranteed to have to deal with the entire card, both as a location and as a shadow card. As a location, the card is bad enough, with 4 threat and 4 progress required to clear it. But there are no effects active on it while it is in play as a location; you just have to stomach the 4 threat. The real problem appears when you clear this location. Its Forced effect will deal the Banks of Morgulduin as a facedown shadow card to the Captain in play at the time. This will give that Captain an additional 3 shadow cards during their next attack, on top of the additional shadow card that they get in the combat phase. For Lord Alcaron, this is nice since you are ensured a shadow card with an effect, so he won’t make an additional attack, but having to tank an attack with at least 4 shadow cards, you are likely going to lose your defender, especially since some shadows will give the attacking enemy +X attack equal to the progress on the objective. If you are able to, you should either clear this location after enemy attacks have been resolved or keep the Banks in play and find a way to lower their threat. You can also use effects like Gandalf’s Staff, Armored Destrier, and Rider of the Mark to discard the shadow card that this location turns into. There are enough tricks to ensure this location doesn’t trigger its shadow effect, but you will have to invest some effort into them and avoid the 3 additional shadow cards.
- Ephel Dúath: In contrast to the Banks, the Ephel Dúath are a nuisance while they are in the staging area. With just 2 threat, they aren’t hindering your progress too much, but the passive buff they provide to Captain enemies is concerning. For each copy of Ephel Duath in the staging area, Captain enemies get +2 attack. This can provide them with up to +6 attack if you keep all copies in the staging area, at which point you either have to chump or find a way to cancel enemy attacks. So travelling to these locations is your best bet. There’s, fortunately, no travel cost; the only problem is that there is 5 progress required to clear the location while it is active. Since none of the quests require progress, it’s not a bad thing to have such a big location in the active slot, but you should try and clear it in one go. There are quite a lot of locations in this quest, and if you are able to clear one per turn, you should be ok. Keep one copy of this location in the active slot for too long, and you might be stuck in a location lock. Woodmen’s Path and cards like Map of Rhovanion/Lorien Guide can help you to explore this location faster. I would also suggest Explorer’s Almanac on copies of this location in the staging area if you are able to make a lot of progress each turn.
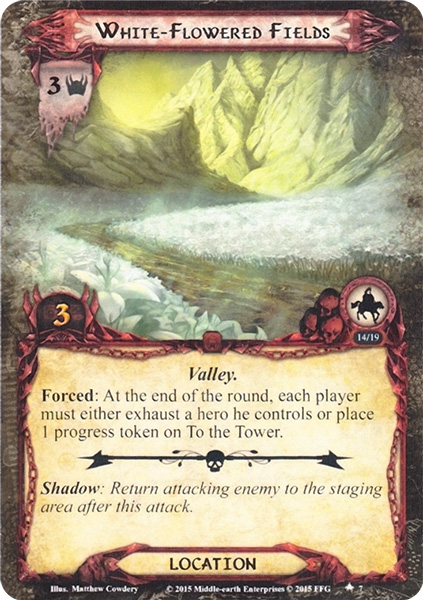
- White-flowered Fields: This is another location that you do not want to have in play for a very long time. The title of the card might sound wonderful compared to the others, but for those of you who have read the chapter on the Morgul Vale, you’ll know that these flowers aren’t all that great. While this location is in play (in the staging area or as the active location), each player must either exhaust a hero they control or place a progress token on To The Tower at the end of each round. This is done for each copy of the location, though there are only 2 in the deck. But the fact that you cannot avoid this Forced effect when the location is active makes it quite tricky, and you will likely have to deal with the effect at least once during your playthrough. In nearly all cases, I would advise exhausting a hero. If each player were to place a progress on To the Tower, it would be game-over in a few turns. Instead, you can equip your heroes with some readying attachments and be fine. This also triggers after the Refresh Phase, so all heroes will be ready for this effect (except perhaps Gwaihir). In order to avoid having to trigger this Forced effect, I would suggest finding a way to clear the location from the staging area. You can also use Thror’s Key to blank one of the copies so that you just have a generic location in the staging area with 3 threat that you do not have to travel to unless you have no other option.
Treacheries
The two new treacheries for this quest are quite similar, both adding tokens to To the Tower and scaling their abilities to the number of tokens on the objective. If you are keen on keeping as few tokens on the objective as possible, canceling these treacheries will help you out.
- The Tower Beckons: When you reveal this treachery, you will have to place one progress token on To the Tower. If this is the tenth token, you automatically lose the game right then and there. But if not, then you will at least be a step closer to losing the game that way. The additional token also means that the White Bridge and its Sentry will have a higher threat. The additional token also interacts with the treachery itself, as it will add X threat to the staging area, where X is the number of progress tokens on the objective. This is counted at the end of the staging step, so if you hit both copies of this card, they will each contribute the same threat to the staging area total. You would also have added 2 progress to the objective in a single turn, so that’s not ideal. Because this treachery can add up to 9 threat to the staging area, it is probably best to cancel it. Not only do you ignore the added threat that way, but you also do not have to add a progress token to To the Tower. The shadow effect will just straight-up add a token to the objective, so if you are able to cancel that somehow, it would help a lot.
- Noxious Fumes: The second new treachery feels a lot like The Tower Beckons since it also starts its When Revealed effect by adding a progress token to To the Tower. However, the second part of the treachery works different. Instead of adding threat to the staging area, it forces each player to deal damage to their heroes equal to the number of progress tokens on the objective. Note that you are not able to place this progress on allies and that each player has to deal the damage; it is not spread amongst players like Archery would be. This makes the treachery especially brutal in decks that run one or two heroes since you will need to start healing immediately before the second copy of this treachery pops up. Hobbit heroes are also going to struggle here since they don’t have as many hitpoints as some other heroes. Cancelling this treachery will save everyone from having to deal with a lot of damage, especially later on in the game when this treachery can start to kill heroes because of accumulated damage on them and more progress tokens being on To the Tower. The shadow effect is at least a bit nicer, where it will only put a progress token on To the Tower if the attack destroys a character. If you are not chumping and you aren’t facing a shadow train, you should be ok.

Tips and Tricks
- As per the text on To the Tower, you are not allowed to include any version of Faramir in your deck. Check this before you begin, especially since his Leadership ally version is quite popular to splash into decks.
- This is not a quest to chump in. A lot of shadow effects will trigger off of enemies killing characters, usually adding additional progress tokens to To the Tower. Instead, invest in damage cancellation and attack cancellation. This will also prove useful against the Captain enemies.
- Side-quests are wonderful for this scenario since none of the main quests require progress. Additional willpower on your heroes would be useful, but also consider running Keep Watch to lower the attack stat of most enemies by 1. You can really explore a lot of side-quests in this scenario, making Thurindir and Legacy Blade great tools here.
- Traps are also quite useful, especially Forest Snare. If you can manage to put these on the first two Captain enemies, you reduce the number of attacks they make and, with it, the number of enemies they add or progress they make on To the Tower. Other attack cancellation works too, but since these are permanent, they are a bit more reliable
- For the final boss enemy, the Nazgul of Minas Morgul, run some direct damage. Hail of Stones, Bow of Yew, and Dwarrowdelf Axe can deal additional damage to it, reducing the number of rounds you have to waste against him. This reduces the time spent at the final stage, thereby reducing the chance of losing to the objective. This also cuts through any additional defence that the Nazgul might get by encounter card effects.
- Cancellation of treacheries and shadow effects is not punished by the encounter deck and will save you some progress on the objective. This, in turn, gives you more time to clear the quest and reduces the threat of the White Bridge and its Sentry.
- Try to keep your decks monosphere. This reduces the damage that Master’s Malice can do. Mono-Tactics has an advantage in this quest since it also ignores the text box on Orc Vanguard.
- With none of the quests requiring progress, you can either relax a bit in the willpower department, explore side-quests, or bring cards like Back-track and Explorer’s Almanac to clear locations in the staging area. This lowers the threat in there, making it easier to make more progress in future turns. It can also get rid of annoying passive effects like on Ephel Duath and White-flowered Fields.
Playthroughs
Since this quest is quite a challenge but without tricky mechanics aside from the boss-fights, it is pretty popular for players to bring a powerful deck up against this quest. There are various playthroughs to be found online of people trying this quest with different decks.
- 2 player: https://www.youtube.com/watch?v=Ep1MD4NNJgU
- True solo: https://www.youtube.com/watch?v=6d1V5mISQtc
- 2 Handed, progression style: https://www.youtube.com/watch?v=u9-r2ls5qWU
And there we are, the complete Against the Shadow cycle finished! I will personally skip the Ringmaker cycle in Nightmare mode since I have other people who would like to write the articles for that cycle, so I will plug the gaps in the Angmar Awakened cycle and the Dream-chaser cycle next. Once those are all completed, I will have to turn my attention to the Saga quests in Nightmare mode. Those will be very difficult to do, and I am not looking forward to them, but if I can survive the Against the Shadow cycle, the Sagas should not be impossible. Thank you to everyone who has followed my struggles through this quest, and I hope that it may have inspired you to try these quests out yourself. I, at least, am glad to have seen all these new cards and their amazing artwork.
