This is the final custom scenario kit that was ever released for the game and one that players will likely own. This is because the set was handed out during the somewhat controversial Fellowship 2020 event, which never actually took place in many physical stores due to the virus. The kit had 4 sets of this kit but only 1 copy of the Balrog playmat, which meant that the Fellowship kits were bought up by scalpers after it was released and was only sold in pieces at a higher price. The quests were still sold relatively cheap, hence why many players will at least have seen a copy of this being offered for sale. It was also the second-to-last scenario pack ever released, with only the Hunt for the Dreadnaught being released before the hiatus.
The quest itself is actually rather cool, combining elements from Flight from Moria, Foundations of Stone, Shadow and Flame, and the last part of Journey in the Dark. A lot of the art will have been sourced from those quests, including some amazing Balrog artwork. The quest is rather punishing in the late game but allows the players to set up before they take on the Balrog. If you are bringing this to an event, you will have the players quaking in their boots when they are about to flip to that final quest card. This kit is compatible with The Mines of Moria, in case you want to mix some enemies and locations between those two sets. Remember that the quest cards cannot be mixed so you will be restricted to just the three different stage 2Bs and 3Bs, for this scenario.
Escape from Khazad-Dum
- Found in: The Escape from Khazad-Dum Scenario Kit (Fellowship kit 2019/2020)
- Compatible with: Mines of Moria
- Encounter decks: 70 cards divided in 14 packs of 5 (sets 15-28 in this kit).
- Quest cards: 7. Stage 1 is mandatory, but stages 2 and 3 can be selected from 3 different cards.
Synergies
For the second half of the Moria set, the focus shifts away from the Spider and Goblin synergy and swaps it for Creatures and Uruks. More formidable enemies that will have synergies of their own for you to play with. Aside from that, the fourteen encounter sets focus on a bunch of different synergies. Several have already been discussed in previous articles, but those that are explored the most in this set will get their time in the spotlight now. The synergies are split between the sets roughly like this:

- 15: Creature, threat raise, willpower reduction
- 16: Spider, Quest card scaling
- 17: Troll, location lock, counter (cancelling)
- 18: Troll, swarm punishment
- 19: Creature, location lock, willpower reduction
- 20: Threat increase, counter (abilities)
- 21: Creature, location lock
- 22: Creature, location lock, counter (readying)
- 23: Creature, counter (threat reduction), threat increase
- 24: Uruk, swarm punishment, willpower reduction
- 25: Uruk, location lock
- 26: Uruk, swarm punishment, location lock
- 27: Uruk, counter (shadow cancellation), threat increase
- 28: Creature, counter (attachment)
With quite a lot of different synergies to choose from, I will go over the major ones that have not already been discussed in the Mines of Moria set. Note that many of these synergies can be enhanced by owning both sets, but it is not required. The sets included in this kit alone can ensure a pretty tough scenario!
Creature synergy

With this second part of the Moria set focusing on the second half of the Dwarrowdelf cycle, the Nameless Things from Foundations of Stone have to be included! They are very iconic enemies that are not seen very often. But since the Nameless trait would exclude some other enemies, the scope is broadened to include some other creatures like bats and snakes as well. If you include the enemies from Mines of Moria as well, you can also have werewolves and the Watcher under the creature trait, filling up a significant portion of your enemy cards.
The synergy for the creature trait is pretty weak due to the variety of enemies that are included. The Nameless Things do share a common interest in discarding cards from the top of players’ decks in order to get additional stats. The one card supporting all the creatures is Nest of Vermin, which will boost the threat of all creatures by 1. If you have a bunch of bats with the surge keyword, and they are all getting buffed, this can be quite nasty. In reality, you will likely just use some of these creatures to flesh out the rest of your encounter deck alongside a larger enemy trait.
Counters: Since the creature trait does not have a coherent synergy, there isn’t much to really counter. The weaker creatures can be easily dealt with, and the Nameless Things are diverse enough that there isn’t a single strategy around all of them. However, since the Nameless Things will scale with the cost of discarded cards from your deck, it will help you a lot if you build a relatively cheap deck without too many 4/5 cost cards. This helps to prevent unwanted surprises, such as a +5 attack, before a shadow card is dealt. Cheaper decks, such as Hobbits and Silvan, will have a better time against these enemies.
Troll synergy

We’ve had the Great Cave-troll in the Mines of Moria, but he really stood alone. Not anymore, since two new trolls and a supporting location are introduced in this pack that will really make the Troll synergy work. These enemies focus on being single, hard-hitting enemies that are immune to player card attachments and can take a serious beating before dying. To make matters worse, the Frightful Den location will lower their engagement cost so that players have to engage these trolls even earlier. This can be brutal in the early game since excess damage usually has to be taken as threat. Including Trolls in your deck is pretty fun, though, there aren’t enough to fill the entire encounter deck with. But since the synergy only requires 4 cards, you can still include them in most other encounter decks that can afford the high cost of these cards.
Counters: Trolls can be a pain in the behind when they come out early. And your traps will be of no use here. Instead, try and use attack cancellation cards like Feint to prevent the Troll from attacking you after it has been engaged. You can then focus the majority of your attack power on the Troll to hopefully kill it. Prioritize dealing damage to the Troll above other enemies since you might be able to kill it in one turn or have it leave play with direct damage in the next turn. The good news is that the Trolls aren’t as strong as you remember them from their original quests for the sake of balance.
Uruk synergy
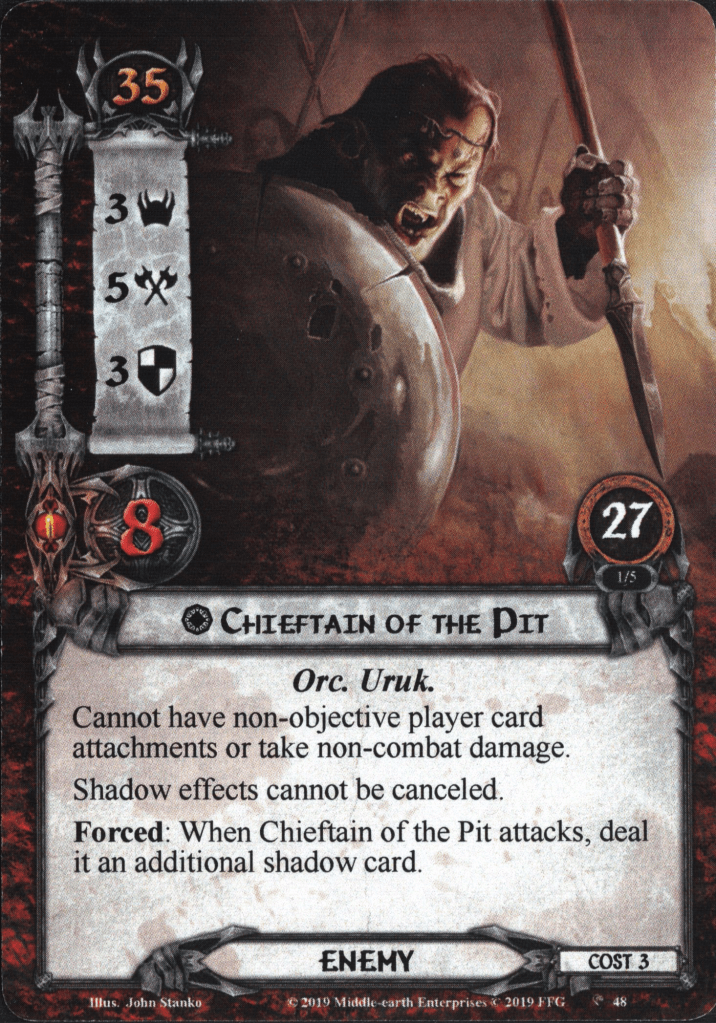
While there are only 4 different Uruks that you can possibly include in the deck, they will bolster your ranks of Goblins, Creatures, or Trolls pretty well. These Orcs are a lot stronger than your average Goblin, meaning that the players will have to put some effort into killing these enemies. They do not swarm as much as Goblins, though you can include treacheries that fetch more enemies. Instead of having strength in numbers, the Uruks focus on shadow effects. The Orc Horn Blower will give all enemies additional shadow cards, Black Uruks get +1 attack for each shadow card dealt to them, Orc Raiders get a shadow card when it engages a player, and Chieftain of the Pit gets an additional shadow card when it attacks, on top of preventing shadow effects from being cancelled. Combine this strong synergy with other effects that will grant shadow cards, additional attacks, and stat buffs, and your opponents will have a hard time getting through the combat phase.
Aside from the shadow synergy, the Uruks also have a few other tricks, such as Orcish Howls exhausting characters equal to the number of Uruk enemies in play. This can be a very nasty treachery in low player counts and if the players did not kill a lot of the enemies yet. When building a deck around this synergy, also pay attention to what shadow effects you are including. There are some that will allow you to search the deck for a particular shadow effect, so that will greatly help the chances of getting that ultra-nasty shadow effect to go off.
Counters: When facing the Uruk synergy, you will have to power through the host of shadow cards coming your way. But any lessons you learned from the Against the Shadow cycle will work here. Canceling enemy attacks, playing traps, and discarding shadow cards before they are revealed will be useful tools to get through the combat phase in one piece. Chieftain of the Pit prevents canceling revealed shadow cards, so prioritize killing him if you are relying on your Hasty Strokes or Balin. Killing the enemies before they can attack through Quick Strike or direct damage will also work. You can also run into situations where no more shadow cards can be dealt because the deck is empty, which sets you up for a slightly easier combat phase.
Counters

We continue the trend of refusing the players to use half their deck by shutting down different aspects of the game’s mechanics. This synergy also has some cards in the Mines of Moria set, allowing you to fill the deck with these ways to counter your opponents’ decks. Examples in this set are Undisturbed Bones which prevents a When Revealed effect from being cancelled, which is great when you are facing a mono-Spirit deck with 3 copies of A Test of Will and Eleanor. New Devilry will blank all text boxes on characters, shutting down any synergy that those characters might have. To further shut down the usefulness of characters, Fatigue will exhaust characters and prevent them from readying until the end of the round, which is a great tool against Three Hunters contracts. I can go on and on about the different ways to shut down decks, but you will probably understand that including these cards to fill out your deck will help prevent your opponents from steam-rolling through the quest.
Counters: We again get to the segment “counters against counters,” but the advice of last time remains the same. Be prepared to have a part of your deck shut down for a portion of the game. Diversify your focus, and don’t put everything into just allies or just attachments. Having ways to cancel treacheries is still important, even if Undisturbed Bones can prevent this from happening. It is unlikely that there are many copies of these cards in the deck, so you probably will not face all the effects at once.
Willpower reduction

Where the Mines of Moria focused on raising the threat in the staging area, the Escape from Khazad-Dum set looks to lower the willpower sent to the quest in various ways. I am not counting direct damage effects here, as those could, in theory, kill off a quester, reducing your willpower. Instead, these cards either remove characters from the quest or lower the willpower of characters. Examples of this are Swarm of Bats (-1 willpower to all characters), Lost and Alone (remove a questing character), and Deep Fissure (1 damage to a character and remove it from the quest). Losing willpower this way will hurt the overall progress made that turn, but it is only a temporary setback. Reducing willpower by 1 for a round does not have the lasting effects that a 5-threat location in the staging area might have. Still, it can prevent the players from advancing the quest that turn, delaying them and giving the other team more time to get ahead on their quest. This is a pretty good set of cards if you combine them with the threat-increasing ones from Mines of Moria, though you will end up with a treachery-heavy encounter deck.
Counters: Getting characters removed from the quest isn’t great, especially if you are not allowed to choose which character gets removed. Windfola is the only real card that can help you here, though you can also try and cancel whatever treachery just removed your progress. Alternatively, you can also invest in ways to boost your willpower, negating the treacheries. Faramir, Nenya, and faction-specific willpower boosts will be very valuable in these quests, allowing you to overcome the high threat in the staging area and ignore potential willpower losses.
Swarm punishment

One way to try and beat this game is to just spam big allies and win by strength in numbers. It’s so popular that the Goblin synergy has also adopted the same strategy. However, the encounter sets in this kit offer some ways to punish these swarms of allies. This can come in the form of treacheries that force you to either discard a character or raise your threat or scale certain cards by the number of characters you control. Some allies can also be trapped in the Goblin Dungeon, forcing you to rely on fewer characters. This synergy isn’t too strong, but combine it with ways to discard or exhaust characters, and players might just find themselves short on action advantage during the final fight.
Counters: There are two ways around these encounter cards. Either you have no allies and rely on your heroes (which does mean you have to constantly raise your threat for Deep Deep Dark), or you spam even MORE allies to make up for the difference. Either way works decently, but know that your hordes of allies could get punished during the game.
Quest cards
Where Mines of Moria started with a boss fight and ended with a location, this time, you have to get through a location and end the game with a climactic boss fight against a Balrog.
Setup
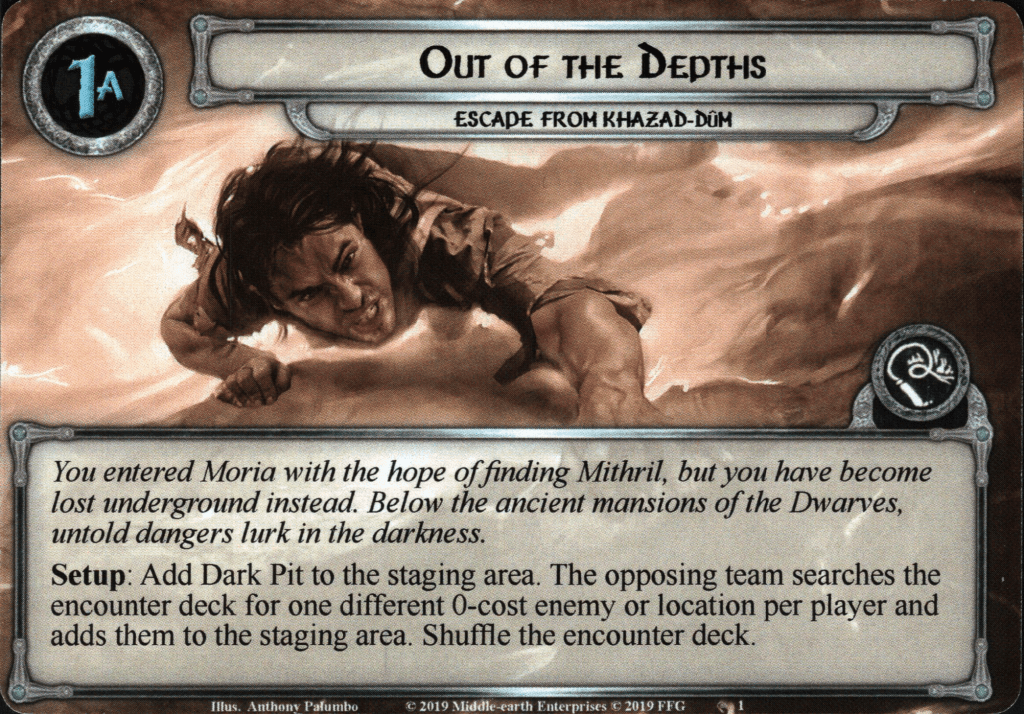
I suppose we all know the drill by now. We add a card to the staging area that has to be beaten in order to be flipped and allow the players to advance. That then comes back in stage 3 for the final confrontation. In this scenario, that unique card is the Dark Pit, which will be added to the staging area at the start of the game. To further fill the staging area, the opposing team gets to find a different 0-cost enemy or location per player and add it to the staging area. Note that these have to be different cards for each player and cannot include treacheries. But it allows the opposing team to set up their combo early. This is especially true since they get to search the entire deck for any 0-cost card they like.
My suggestion is to go all in on one card type. For instance, if you pick only locations, you set up a pretty early location lock that will be tough to get out of this early in the game (especially with Dark Pit starting in the staging area as well). Alternatively, going in on enemies early on will force an intense combat phase (as long as the engagement costs are low enough). This prevents the players from putting everything they have towards questing through the first stage. Note that these cards are not revealed; they are just added to the staging area. Some good options at this early stage are:
- Rock Adder: low engagement cost and cannot be defended
- Lightless Grotto: shuts down any direct damage early on, and forces players to engage an enemy
- Branching Paths: sets up a location lock early on with quite high threat to begin with
- Silent Caverns: Prevents players from reducing their threat by more than 1 per round and raises their threat when traveling
- Dreadful Gap: Prevents progress from being placed on locations in the staging area
- Forked Passage: Has players raise their threat a lot faster from the start of the game
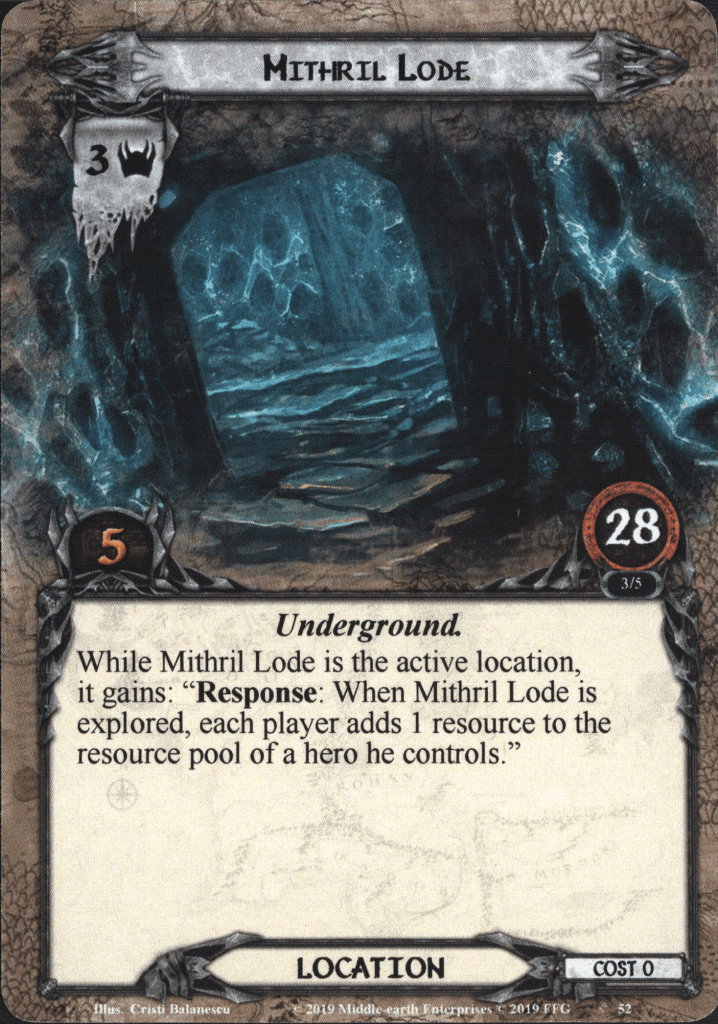
- Mithril Lode: A big location that will distract the players from going to the Dark Pit, though they do get resources when it is explored.
Once one card per player has been added to the staging area, the quest card is flipped over and the players can begin their first round.
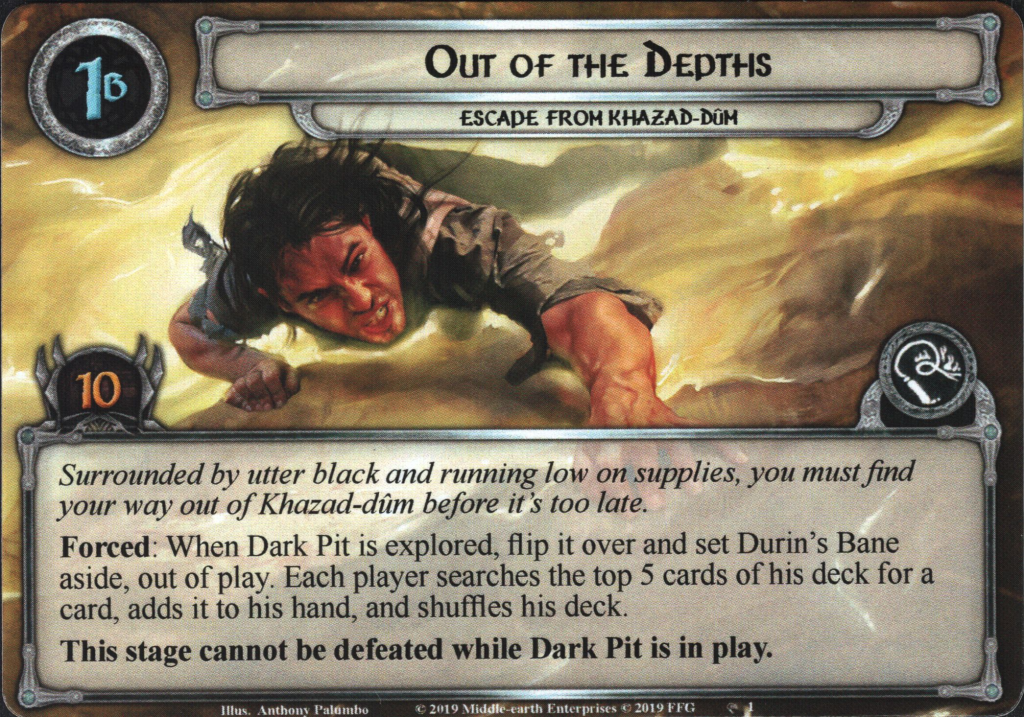
Quest card 1: Out of the Depths – 10 quest points
The goal at this stage is simple: clear the Dark Pit and make 10 progress to advance to the next stage. But the trick is to do this quickly if you are going up against another team at the same time. On top of that, you will have to deal with whatever is in the staging area at the moment whilst also starting to build up a boardstate. But comparing this to The Mines of Moria, which had a fight with the Watcher at the start of the game, this scenario starts off a lot milder. You just have to travel to the Dark Pit, explore it, and make sure to have enough progress to clear the quest card.
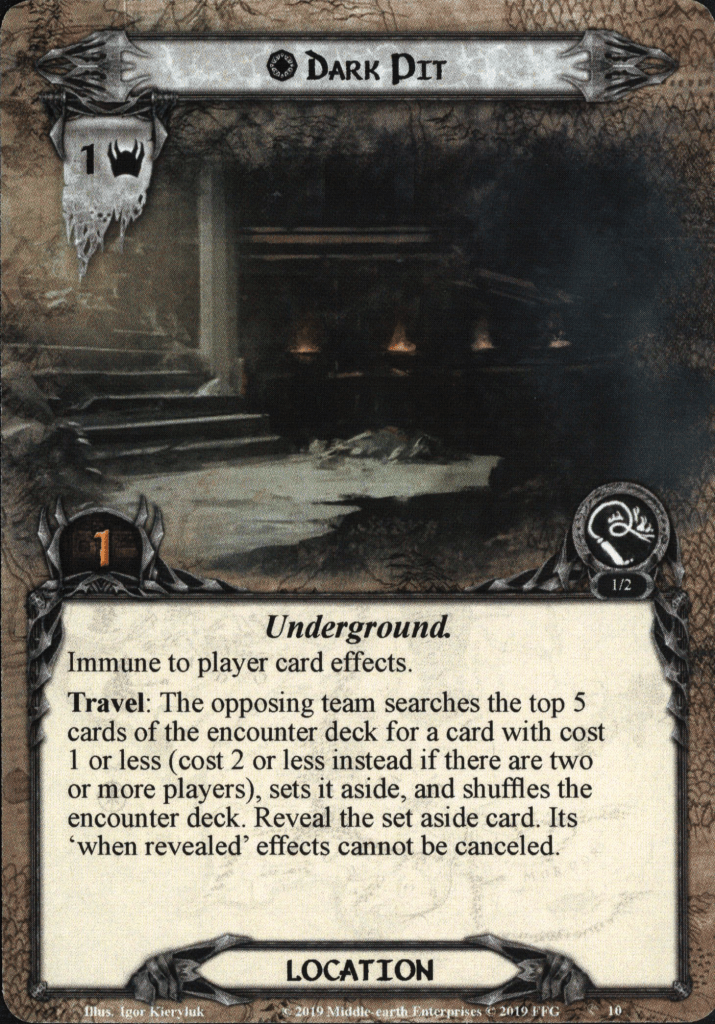
The question then becomes: when do you travel to the Dark Pit? After all, it will have to be explored at some point, but it only adds 1 threat to the staging area total and has a pretty nasty travel cost that you would like to delay until you are properly set up. My advice is to deal with whatever got put in the staging area during setup, perhaps even traveling to one of the other locations, before thinking of going here. During that time, you can also build up your boardstate and make some progress on the main quest. Once you have cleared the table a bit (turn 2-3), travel to the Dark Pit. This will come at the cost of a 1-cost card that cannot be canceled (2-cost if there are 2 or more players). However, the card can only be taken from the top 5 cards of the encounter deck, so if there aren’t any great options there, you will be spared a little. You could use Far-sighted ahead of time to see what the possible options are when you would travel here. If there are some horrible things there that you’d rather not face right now and would rather see as a shadow card, stall a little bit and travel elsewhere.
Clearing the Dark Pit is easy, as it just requires 1 progress. That means that a serious willpower push can get you through the location and towards the 10 progress required to beat the quest card. Upon clearing the Dark Pit, flip it over and put Durin’s Bane aside, out of play. Don’t worry about him for now; he’ll come into play for the final stage. If you find yourself at 10 progress before having traveled to the Dark Pit, you could use the extra time for a side-quest, though that is generally not advised. There are cards in this set that can steal progress from the main quest, causing you to not have enough when you finally clear the Dark Pit. Instead, build up more progress on the main quest, but maybe don’t quest as hard as you used to. Leftover progress could be used with Backtrack to clear locations in the staging area if you are allowed to place progress there.
Quest card 2A: Search for an Exit

Once the Dark Pit has been cleared, the Balrog set aside, and quest card 1B has 10 progress on it; the players advance to stage 2A. This is the same for each of the three stages 2B, so you won’t know what is coming ahead of time. When you arrive at this stage, the opposing team gets to search the top 5 cards of the encounter deck for a card with cost 1 or less (cost 2 or less in multiplayer) and reveal that card. If there are When Revealed effects, they cannot be canceled. This makes it the ideal place to play a nasty treachery since there won’t be anything the players can do about it. The opposing team is limited to just the top 5 cards, though, so if there is nothing flashy on top, you might have an easier time transitioning to this stage. Some good options at this point are:

- Nest of Vermin: boosting Creatures in play and setting up the synergy
- Watchful Eyes: you can guarantee this hits and shuts down a hero for the majority of the game still
- Either Troll enemy: both are solid options to give the players a big enemy to have to deal with
- Undisturbed Bones: will shut down the first cancelation effect used during stage 2B, and surges into another card.
- Frightful Den: If Trolls are already in play, this ensures that they will engage a lot sooner
- Bottomless Chasm: Shuts down any travel plans that the players might have had, and will slow them down as they have to clear 6 quest points in order to travel again.
- New Devilry: shuts down all text boxes for the rest of the turn, which can make for an interesting combat phase
- Many Roads: Further increases location lock
- Fatigue: forces exhaustion of a character per player and prevents them from readying until the end of the round, which can make for an interesting combat phase
- Orc Horn Blower: additional shadow cards for all engaged enemies, great for the Uruk synergy
- Goblin Dungeon: Imprisons an ally, forcing the players to go to the location in order to rescue it
- Orcish Howls: good if there are a lot of Uruk enemies in play and not many ready characters for the players
- A Foe Beyond: discards an attachment from a character, good if the players are relying on that attachment a lot.
As you can tell, there are a lot of good options for cards to reveal at this point. The list is not even complete, as some combos could be pretty good if the situation is ideal for it. Once the card has been resolved, the players may advance to stage 2B and find out which of the three it is!
Quest card 2B: Old One Lair – 10 quest points

As usual, there are some quest cards that focus on locations and some that focus on combat. This is certainly the combat one, as the opposing team gets to find any enemy worth 2 cost or less from the encounter deck or discard pile and put it into the staging area with a resource on it. This resource grants that enemy immunity to player card effects and prevents the players from making any progress on this stage while this enemy is in play.
The idea behind this quest is simple, put a big enemy in front of the players that they will have to defeat in order to be able to make the 10 progress required to beat this stage. If this effect is combined with another big enemy for the 2A side, then the combat phase is going to be really interesting the next few turns.
Looking at the options for enemies (taken just from the Escape from Khazad-Dum set), the following enemies would make a good fit for this quest card:

- Cave-Troll: Of course a troll is going to be good here, as it cannot be defended or attacked by allies, forcing the heroes to take on this enemy and his 5 attack strength.
- Old Stone-Troll: A tougher troll, though allies will be able to chump and attack this one. It could last a bit longer than the Cave-Troll thanks to its increased stats, but will do poorly against a swarm deck.
- Hobgoblin: Not only will this enemy hit like a truck, it will also stick around for at least a turn, as it cannot take damage when it engaged a player. Combine this with effects from Mine of Moria that return him to the staging area, and you can stall the players here for a long time.
- Unspeakable Thing: Not as bad as its Nightmare version, but it can hit pretty hard against the right deck. It does only take 7 attack to bring down, but the big attacks that cannot be canceled could swing it. A decent option if other enemies are already in play.
- Shadow Dweller: The immunity to player card effects won’t matter too much for this enemy, though it will take the players a few turns to kill this one, during which time it will damage characters constantly. A pretty decent pick!
- Orc Horn Blower: Remarkably tanky for an Orc, and the 4 attack can be annoying if you combine it with his added shadow card. This is a good pick if you have several other enemies in play as well, since the shadow cards will be dealt to them as well.
- Nameless Thing: A wild-card, but if you hit a Gandalf with his effect, it’s going to take a long time to deal with this one. The immunity to player card effects will help a lot, since its textbox cannot be blanked with Revealed in Wrath.
Of course, there will be more good targets in The Mines of Moria set, but even these enemies can make it pretty difficult to get through this stage quickly. Remember that no progress can be placed on the main quest while the enemy with the resource is in play, though players could still make progress on the active location and side-quests. Explorer’s Almanac could also be put to good use here while the enemy is in play. Once the enemy is defeated, you have to switch gears again and quest hard in order to make it to stage 3 without too much delay. Try and use this time to get as clear a boardstate as you can get, though that might not be easy if you are facing a lot of other encounter cards that were put on hold while you dealt with the big enemy.
Quest card 2B: A Wrong Turn – 15 quest points
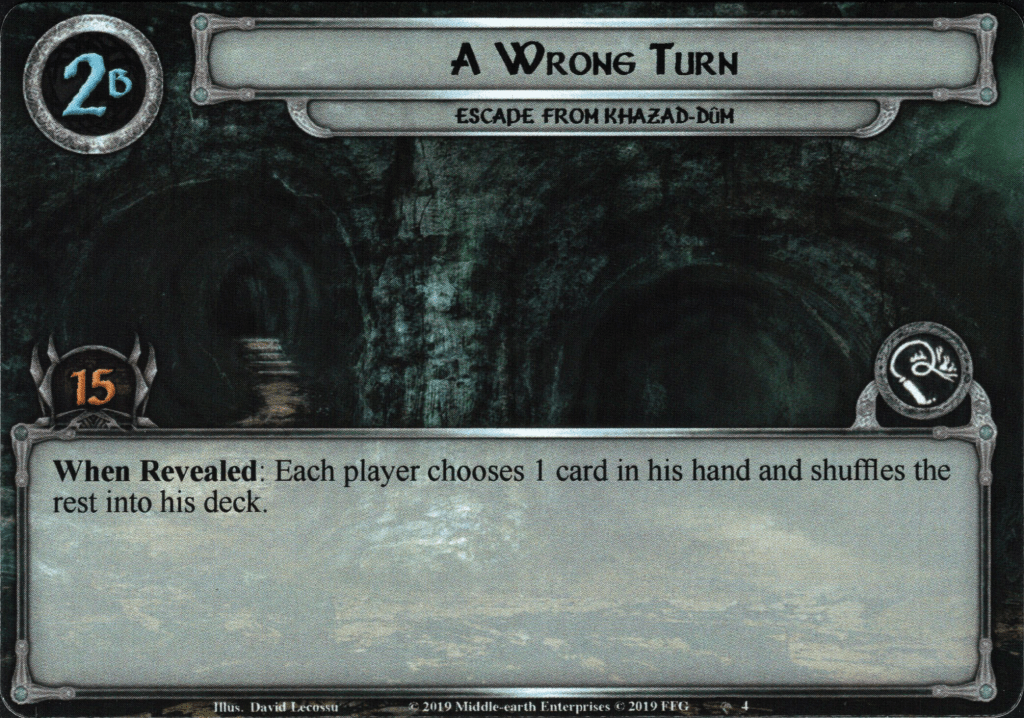
This is the generic second stage, which is a good pick if you do not know the decks the players are bringing beforehand. This stage just has a When Revealed at the start of the stage, and further just requires 15 progress to be made without any passive effects. The When Revealed is pretty nasty, though, as players will have to choose one card from their hand to keep and shuffle all others into their deck. This hurts decks that require a lot of cards, and if players were saving up for their combo, they can only keep 1 of those cards. To further hinder the players, if they do not have any card draw in place by now, they will be top-decking for the rest of the game, which can have big consequences for the rest of the game. It is likely because of this that the rest of the stage is pretty tame.
If you are facing this stage, consider whether or not you have a good card draw engine in play already. If you do, just keep the card that is most useful to you. If you do not, consider hanging on to that Gleowine or Gandalf in your hand over a more useful combo piece. The cards are shuffled back into your deck, so there is a fair chance you’ll see them again if you focus on card draw for a while. Decks that already have all their pieces on the table and/or have only 1 or no cards in their hand when this stage is revealed will be impacted less by the effect. That just makes this a vanilla stage to cruise through within a few turns while you try and clear the board. 15 progress shouldn’t take more than 3 turns to obtain.
Quest card 2B: A Way Up – 20 quest points

This is the longest of the stage 2 quest cards and will hurt the most for decks that prioritize combat over questing. At this stage, the threat of the active location is added to the staging area total, meaning that traveling to high-threat locations might not be the last you see from it. To make matters worse, the players are forced to travel during the travel phase, meaning that they are going to have to pay any travel cost on a location, even if they’d rather not travel here. Having to quest over several active locations during this stage will also mean that the number of quest points to overcome at this stage will be more than 20, which is already the highest of all three stages. Players will have to have plenty of willpower and even some location attachments if they want to advance through this stage as fast as possible.
The good news for the players is that they are forced to clear locations, meaning that once they are explored as the active location, it won’t hurt them anymore. This can alleviate a location lock eventually, though it might not feel like it early on. If the players have prepared for locations with ways to reduce the quest points on the active location and clear locations in the staging area, they will have an easier time getting through this stage. Ignoring travel costs can also be very useful here, as well as big willpower boosts like Untroubled by Darkness. The risk at this stage is that you eventually get slowed down so much by the mounting threat in the staging area that you cannot beat the active location each turn anymore, at which point you are stuck and will either threat out or fall behind the other team too much to catch up. Use any trick you have in order to prevent this and make it through the 20 quest points of this stage!
Quest card 3A: Nearing the Gate

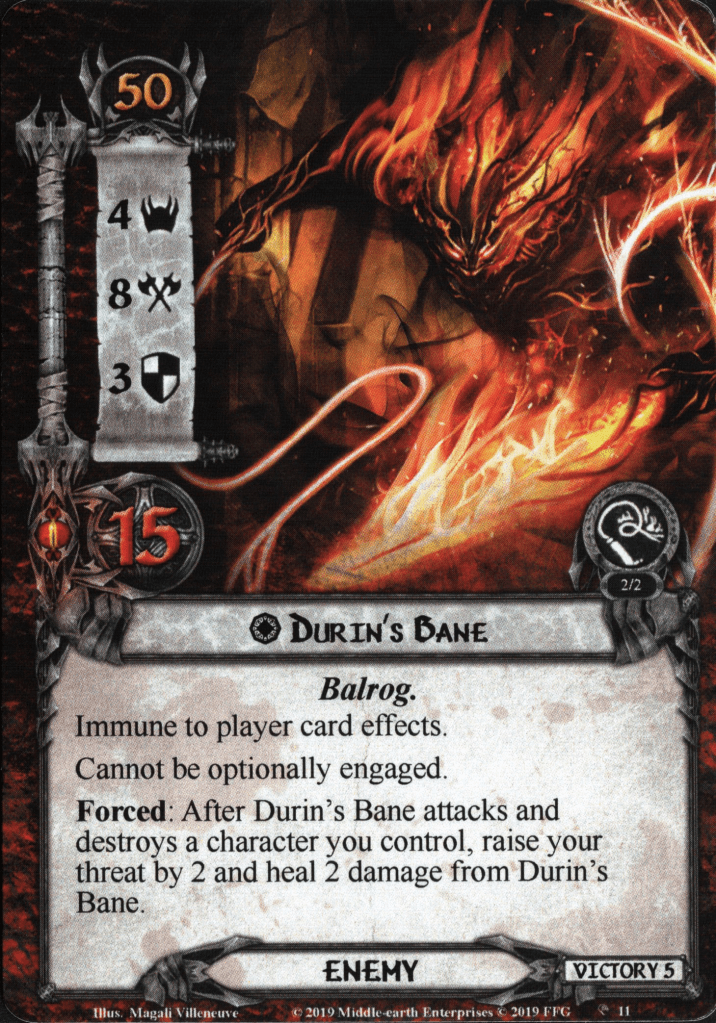
Having made it past the second stage all roads converge for stage 3A where you are instructed to add Durin’s Bane to the staging area. This is the Balrog that was on the flip side of the Dark Pit location you explored during stage 1. The Balrog has some impressive stats, though it is not as big as when you fight him during Journey in the Dark or Shadow and Flame. Still, it is a big enemy that you will have to overcome in one of three ways, depending on what side 3B you end up at. To add to its impressive stats, the Balrog has immunity to player card effects, cannot be optionally engaged (adding its 4 threat to the staging area constantly), and during the round it enters play, it cannot take any damage. It can deal damage to you, though, since its 8 attack strength will cut through all but the toughest defenders out there. If you decide to go the other direction and chump his attacks with an ally, you will have to trigger the Forced effect whenever he kills a character. This will raise your threat by 2 and heal 2 damage from Durin’s Bane, which is extremely annoying at a particular quest stage where you have to overcome his 15 hitpoints.
Because the Balrog is so massive, there are no other cards added to the staging area when transitioning to this stage. This makes it worthwhile to arrive here with a clean staging area so that you can focus on the Balrog for this final fight. It also means that players that this transition is easier in higher player counts since only 1 card is added for any number of players. However, if there is more than one player, Durin’s Bane will make an immediate attack against the first player at this stage. This is troublesome since there will be more attacks to come, and defending this enemy will find you short of defenders really soon. After the attack has resolved (or as soon as the Balrog is added to the staging area in solo), the quest card is flipped over to see how you are to overcome this threat.
Quest card 3B: The Bridge of Khazad-Dum – 10 quest points

This is a really interesting option for a quest card, as you offer the players an additional way to lose the game. They do not have to battle the Balrog too much but will have to race the Balrog toward the end of the game. It is usually the shortest quest card of the three, but the additional loss condition can catch players unawares. To start with, this quest card only requires 10 progress to clear, which makes it ideal for the players that were struggling up to this point to make enough progress to clear the quest. However, willpower-heavy decks cannot just power through this stage since there is a cap of 5 progress per turn. This means that the players will have to take at least 2 turns at this stage, but potentially more if this is combined with the Spider synergy from The Mines of Moria, which steal progress. If you are unable to meet that 5 progress quota each turn, then you will be forced to spend more time at this stage, which is something you really do not want to do. This quest card also makes any card that adds threat to the staging area or takes away willpower from the players much more threatening.
The reason why you do not want to stay at this stage for very long is that, at the beginning of the quest phase, the Balrog will make an attack against the first player. Other players can block this attack, but that is going to be a tall order since not many defenders live past an 8 attack enemy plus a shadow card. The shadows can be pretty nasty here, as anything that forces an undefended or additional attack is going to be brutal and will guarantee damage gets through the defence of your character. This is bad since damage from undefended attacks or excess damage dealt by the Balrog to your characters will instead be dealt to the quest card itself. See it as the Balrog trying to break the bridge, preventing your escape. If the quest card has 10+ damage on it before it gets all progress required to clear it, then the players automatically lose the game.

Instead, the players will have to endure the constant attacks in the staging area during the quest phase (and from cards like Chance Encounter) whilst making enough progress to clear the final stage before the bridge is broken. The good news is that the Balrog does not have to be killed at all in order to win. You can deal damage to it or even kill the Balrog if you want, but it is not a requirement. I would suggest you focus your attention on any other enemies that might be a nuisance during the combat phase. Speaking of that phase, the Balrog won’t be making attacks during the combat phase since it is not engaged with a player. It will only add its 4 threat to the staging area and make an attack in the quest phase. This makes the stage so tricky since it will also mean that Combat Actions cannot be used during this attack. If you do manage to defeat the Balrog somehow before you win the game, the attacks no longer take place, and you are able to complete the scenario with a little less stress.
Once you have managed to survive the continuous attacks and have made 10 progress on the main quest, you have beaten the scenario! If you were not up against another team, you automatically win. Otherwise, compare timings and consult the rules sheet for tie-breakers.
Quest card 3B: Last Lord of Moria – 15 quest points

Where you didn’t have to defeat the Balrog in the previous quest stage, you do have to do it here. And let me tell you, if you are bringing a deck that just quests, this stage is not going to be for you. To start with, the Balrog will engage the first player, constantly shifting if there is more than one player. The good news is that he doesn’t add his 4 threat to the staging area. The bad news is… well, everything else. You now have a big enemy engaged with the first player, who will be making attacks every round. Perhaps even more attacks if Massing in the Deep is included in the encounter deck…
But let’s not focus on the problems at hand; what do you actually need to do to beat this stage? Well, overcome those problems. The Balrog needs to be defeated in order to win the game. But this is not as straightforward as dealing 15 damage to him in one go and calling it a day. Instead, the Balrog can only take as much damage as the quest card has progress on it. This means that the players will have to make progress each turn and be able to hit the Balrog whilst also preventing him from healing due to characters dying to his attacks or progress getting removed from the quest card. It demands a lot from the players, but if you play the cards right, you could beat this stage in a single turn (though I have not seen it happen yet).
In order to improve your chances of beating this stage, invest in a big Sentinel defender who can tank an attack from the Balrog no matter with which player he is engaged. Try to prevent him from healing or make enough progress to be able to go all out on one big attack. Remember that Ranged will work against the Balrog, though player cards that target him will not work. Once the Balrog has 15 damage on him (from having 15 progress on the quest card), the game is over.
Quest card 3B: The Rear Guard – 20 quest points

The final option for stage 3 doubles down on raising the threat of the players. This tries to focus on the Forced effect on the Balrog, where you have to raise your threat by 2 whenever you chump an attack. And chumping is one of the things you will be very likely to do at this stage, as the Balrog is considered to be engaged with every player (though still adding its threat to the staging area) and will be making attacks in player order during the combat phase. As if this wasn’t enough, the Balrog will also get a shadow card for each attack, so perhaps you get unlucky, and he makes an additional attack. With so many attacks being made, it will be next to impossible to keep all your characters alive, which makes this a pretty dangerous stage for higher player counts. Upon killing a character, that character’s controller will be forced to raise their threat by 2, putting them closer to their threat elimination level.
To make matters worse for the players, their threat can no longer be reduced by player card effects, which can be troublesome if they rely on heroes like Spirit Merry and Galadriel for threat stabilization. Instead, they will have to think twice about using any effect in their deck that would raise their threat, like Tactics Boromir or Spirit Glorfindel. Doomed cards or using The One Ring will also be riskier at this point. The One Ring especially, since it also lowers your threat elimination level and will cause a game over for all players when the controlling player is defeated.
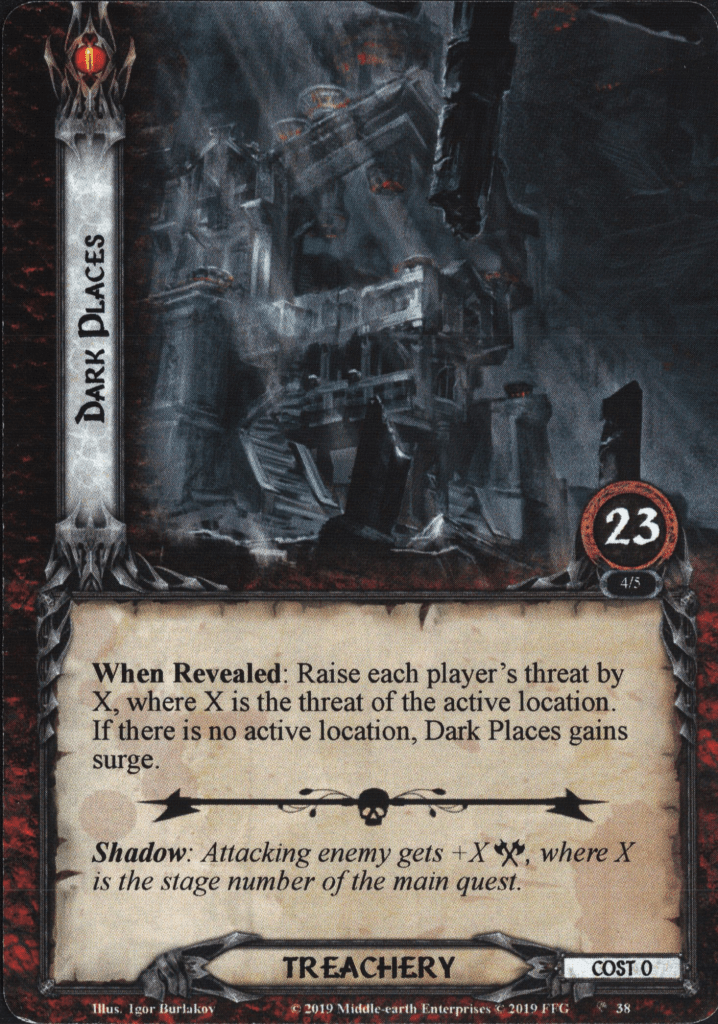
Besides the lack of threat reduction and the constant harassment by Durin’s Bane, the quest card also has the most progress required. 20 quest points stand between you and the end of the quest, but you are not restricted to a certain amount of progress. There is also no additional requirement for completing this stage, making it the best option for willpower-focused decks. They can just blast past this quest in a few turns, taking some losses by the Balrog along the way. If you have been keeping a low threat and are able to cancel cards like Dark Places, then threat won’t be too much of a concern. Knowing that this quest card can end up being your final stage, consider using all your threat reduction before advancing to stage 3, after which you might no longer be able to use any of it.
After the 20th point of progress has been placed, the players have beaten the scenario. There is no requirement to defeat the Balrog, though this is the stage where that will be the easiest since it is considered to be engaged by each player. If you manage to focus on the Balrog and kill him before the quest is over, you no longer have to take the attacks every combat phase. It’s cool to pull off, but there’s also an argument to be made for focusing on other enemies at this stage.
I never actually thought I would get around to completing the custom scenario kits, but here we are. With all four of them now complete, I hope to see many more people bringing their decks to conventions and challenging each other to beat the quests faster than their opponents. As for me, I will return to regular Nightmare content, filling in the gaps between the articles that have already been written in the past. I will start with the Angmar Awakened cycle and see how far I get. I am not looking forward to having to play some of those NM scenarios, but perhaps we will discover a few fun quicks about the quests. I might also do the final POD quest during the summer, though Attack on Dol Guldur is not a quest that I regularly play.

2 thoughts on “Escape from Khazad-Dum”