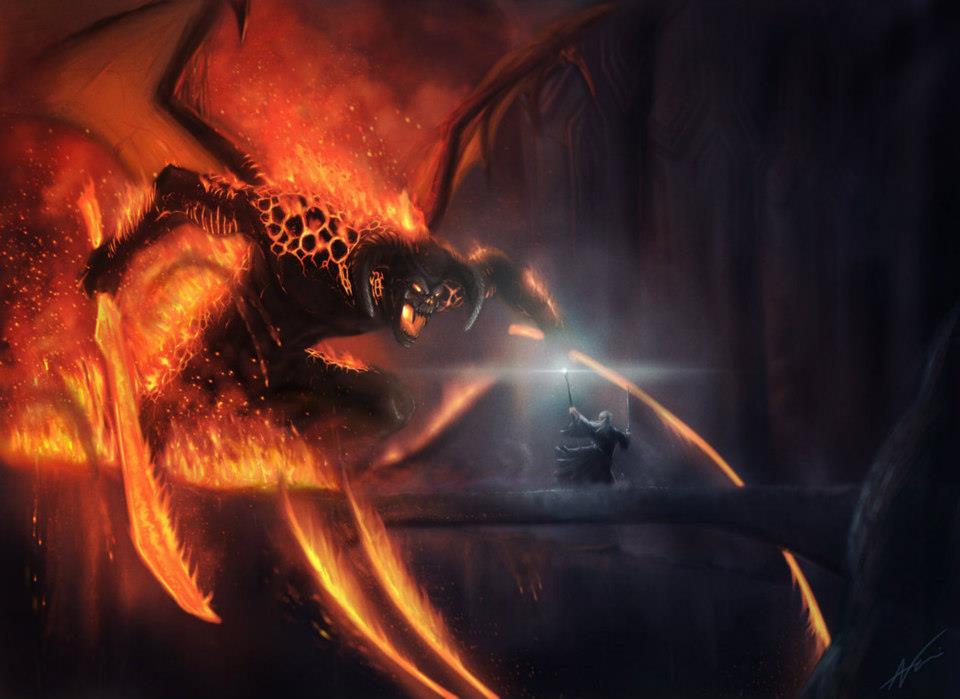
This cycle goes out with a bang as you are faced with your toughest opponent yet: The Balrog of Moria, Durin’s Bane. This absolute beast of an enemy will be the centre point of this scenario. This scenario features many treacheries that will boost Durin’s Bane to absolutely crazy stats, making the task of killing him quite the challenge. And while the early card pool featured a Feint-lock ability with Hama, since the recent patch this option is no longer available. This will make killing the Balrog even more of a challenge since you won’t be able to cheat this way for long. In fact, you will not be able to kill this Balrog, as that task is for when you return to Moria during the Saga campaign. This time, it will be your task to reach the East-Gate of Moria and being able to tell the tale. But a huge demon stands before you made of:
Shadow and Flame
- Found in: Shadow and Flame Adventure Pack, Dwarrowdelf cycle pack 6
- Official Difficulty: 8
- Community Difficulty: 7.9
- Encounter sets: Shadow and Flame, Deeps of Moria, Goblins of the Deep
- Quest cards: 3
- Play if: You want one of the fiercest boss-fights in the game to date, you want to finish your Dwarrowdelf cycle, you have beaten the Balrog in saga mode but want to do it again, you want to test Secrecy cards in your deck, but don’t want to run 2 heroes.
- What is different about this quest?: Balrog enemy attacking all players, threat starts at 0, unique location to discard the Balrog.
- Solo or Multiplayer?: Having more players will help in many ways. Having a few people extra will give you more Ranged and Sentinel abilities to attack the Balrog and some of the other enemies in the scenario. Having other players bring some willpower will get you through the stages, as that may be less of a priority when faced with a Balrog in the staging area.
- Can I run Side-Quests for this scenario?: I don’t think you will want to go to these side-quests, as the main stages will require enough willpower to clear, and questing shouldn’t be a priority in this scenario. Better leave that deck space for some extra copies of Feint or other events/attachments/allies to help in combat. The only time you will have time and willpower to spend on side-quests is in the final stage, and that is usually too late.
The Quest
Setup
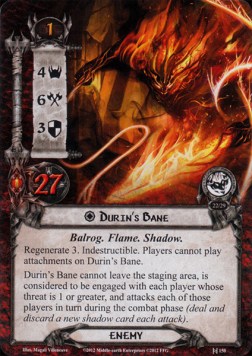
We begin this quest by searching the encounter deck for the unique Balrog enemy and adding it to the staging area. Then, players will remove Dark Pit from the deck and put it aside, out of play. This location will get added during the final stage of the scenario and will be your ticket out of the mines.
Quest card 1: Nearing the Gate – 9 quest points
Now we come to one of the most important steps in the game: reducing every player’s threat to 0. Not only does this open up the Secrecy mechanic, it will also allow players to skip questing during the first few rounds. An increase in threat won’t be terrible in the early game. With the threat of each player at 0, all other enemies will not have to engage if you can keep your threat low enough. Even Durin’s Bane won’t attack you this round, as he has an effect that causes him to be engaged with each player who is at 1 threat or higher. Note that Hobbit/Ranger synergy of increasing engagement cost doesn’t raise this limit. Having a very low threat will also allow you to engage Goblin Scout, removing his 3 threat from the staging area before you pass the 25 threat threshold.
Besides dropping your threat to 0, the stage will also require players to reveal an additional card for each player other than the first player. There are a couple of good cards to reveal at this point like Whip Lash, Inner Shadow, and Fires in the Deep (to some extent). There will also be a lot of nasty effects that might go off, such as an immediate attack from the Balrog, a Great Cave-Troll added to the staging area or a weapon attachment for Durin’s Bane right of the bat. After all the cards have been revealed, your total threat in the staging area should be about 4+ 0.9 threat per player.
The first round of the game is very important, as it will give you just this round to avoid attacks from Durin’s Bane. At the end of the round, you will raise your threat to 1 so Durin’s Bane will attack all player the next round unless they manage to lower their threat during round 2. It is also vital that players do not play any Doomed cards at this point, for obvious reasons. Getting 2 cards isn’t worth an additional round of attacks from a Balrog. You should also try to quest successfully during the first round. This should be easy, as you don’t have to deal with combat this round (if everything goes to plan).
Try to get a couple of allies out during these first 2 rounds. These allies will provide emergency chump blockers to the Balrog. While you are sacrificing allies to the Balrog, try to get your main defence strategy online. This can either be a very beefy Hero/Ally or getting enough attack cancellation on the board. Also, try to get some threat reduction for at least one player. This player can focus solely on questing while managing to avoid the Balrog that way. Elrond’s Counsel and Galadriel’s Handmaiden will be important. If players happen to have to raise their threat because of failing the quest, one player can be saved by playing Ever Onward. If encounter cards would raise your threat, Free to Choose will save that player as well.
During the second turn, most players will have to deal with attacks from the Balrog, but this also allows them to attack the Balrog back. While the Balrog is immune to attachments, it isn’t immune to player card effects. And since it only has 3 defence, putting damage on him will be easy. He does, however, regenerate 3 of that damage at the end of each round, plus his healing ability with Inner Shadow can heal 5 damage off of him. During these first rounds, it is not vital to keep attackers around to deal with Durin’s Bane. Since he is indestructible, he will still keep attacking you if he has no hitpoints left. This stage requires you to get your defence online and set up your board state for later.
The 9 progress tokens required to clear the stage shouldn’t take more than 3 turns for most decks. In solo, it may be a bit difficult, as you might also want some characters to act as chump blockers. But with very little locations in the encounter deck, it shouldn’t be too much of a task to clear the stage.
Quest card 2: The Rear Guard – 16 quest points
While transitioning between quest stages has no trigger, this next quest stage does have some interesting ways to progress through this stage. If a hero has committed to the quest during the previous round (when you transitioned from 1B to 2A) you get to place 4 progress tokens on the quest immediately, not counting any active location. This will make it less important for players to commit characters to the quest, as all they have to do is commit a hero in order to place 4 progress tokens. Now, you are not limited to this effect alone, you can still make progress the traditional way. This would allow you to clear locations, and clear the stage in less than 4 rounds. A good tool to use for this stage is Light of Valinor on a hero. That hero will still be committed to the quest, but not be exhausted. This leaves the hero ready during the combat phase. A word of warning though, try to commit a couple of heroes to the quest, this will protect you from effects like Inner Flame or Inner Shadow, where you could opt to remove a hero from the quest, and still make the progress. Windfola is also another great card to use with those two treacheries.
At this stage, players should start to chip away at the Balrog’s massive pool of hitpoints. By now, they should have a sizeable army of allies to be able to chump. The rest of the characters can easily pierce the 3 defence and start putting the hurt on Durin’s Bane. Since Durin’s Bane is not immune to player card effects, direct damage is another good way to reduce his hitpoints fast. One of my personal strategies involves a Dwarf Swarm with an Erebor Battle Master. When the Battle Master attacks, Heavy Stroke can double his damage, which can get out of hand real quick. The Balrog will try and protect itself with Counter Spells, so beware playing event cards during this time.
Another way to beat this stage is to get the Balrogs hitpoints down to 0. In a 4 player game, this should be manageable if at least 3 players can damage Durin’s Bane consistently. This might save players a round or two worth of attacks.
Quest card 3: Last Lord of Moria – 1 quest point
Now we come to the thrilling finale of the cycle, you have to find a way to distract the fire demon so that you can slip by him. Once this stage is revealed, players add Dark Pit to the staging area. During the next travel phase, you should definitely travel here (unless you progressed with an active location still in play). Durin’s Bane will also make an immediate attack against the first player during this time. Either time your progression right, so that he attacks the player who can deal with 2 attacks this round or have a sentinel character ready to defend it.
The players will be unable to defeat this quest while the Balrog is in play. The only way to defeat him is to use the Refresh Action on Dark Pit. Now, you will only get a couple of attempts at this, as you can only trigger it while it is the active location during the refresh phase. This will mean that it will prevent you from travelling anywhere else during the rest of the game unless you keep switching the location out with another one during planning. Recycling a West Road Traveller will let you quest like normal if you can keep switching Dark Pit with another location in the staging area, clearing that location, and travel to Dark Pit during the Travel Phase. This will give you the most options to use its ability. DO NOT CLEAR DARK PIT IF THE BALROG IS STILL IN PLAY!! This is the only way to discard him, and if you discard the location first, you will have to stall until it pops up again from the encounter deck. Cards like A Watchful Peace and Shadow of the Past can put it back on top, which makes it the perfect reveal in a solo game.
The effect on Dark Pit will require players to exhaust up to 3 characters during the refresh phase. All characters will be ready at this time, but be careful who you exhaust. Those characters won’t be able to attack, quest or chump during the next round (unless you ready them, Greenwood Archer is perfect for this). Then, you discard as many cards from your deck as characters you exhausted (up to 3). If the combined cost of those cards is higher (not equal) than the remaining hitpoints on Durin’s Bane, you discard him from play. There are a couple of ways you can do this action more efficiently: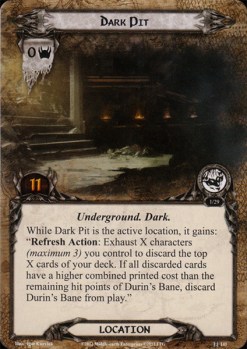
- Have Durin’s Bane at 0 hitpoints, this will make him very likely to be discarded. Even a single 1 cost card will do the trick. The Regenerate keyword will have healed the Balrog though, so you will either have to reveal up to 4 cost of cards for this effect or find some way to damage the Balrog in the Refresh Phase (like Ranger Bow).
- Include a lot of high-cost card in your deck. This does not only include Beorn and Gandalf but perhaps also a couple of Secrecy cards that you didn’t get to play. Resourceful and Timely Aid have a very high printed cost.
- Stack your deck for maximum chances. Imladris Stargazer, Wizard Pipe, and Gildor Inglorion will allow you to put the highest costed cards on top of your deck. This is very useful as you know for certain how much printed cost you will reveal. This will help if the Balrog still has a couple of hitpoints remaining.
As soon as the Balrog leaves play, you win the game. You do not need to clear the Dark Pit location or make that 1 progress on the quest card. Most of the danger will have passed after the Balrog is gone, so you win then and there!
Encounter deck
Global
- This encounter deck can reveal 54 cards in Normal mode, 40 in Easy mode. This does not count Durin’s Bane and Dark Pit.
- Shadow Effects will trigger 52% of the time in Normal mode and 55% in Easy mode

- Average threat on cards revealed is quite low due to the high number of treacheries in the deck: 0.9 threat/card in Normal mode, 1.0 threat/card in Easy mode. X-cost is not counted.
- Surge is quite a common theme on cards in this scenario in order to compensate the low threat on an individual card. 15% of the cards have the ability to surge. Most of the time this can happen because a treachery didn’t go off.
- Doomed 1 is only present during Normal mode. Massing in the Deep will raise your threat 1 point. On turn 1 this is horrible, as it will force players to deal with Durin’s Bane on the first round.
- Immunity:
- Durin’s Bane: Only to attachments, player card effects can still go off.
- Great Cave-Troll: Immune to Ranged attacks and attachments.
- Second Deep: Immune to progress if Durin’s Bane is at full health.
This scenario features a lot of treacheries, so cancellation will be nice to include in your decks. While Durin’s Bane is the chief antagonist in the scenario, he is far from the only enemy in the game. Be careful not to spend all of your defences on the Balrog, as Goblins may overwhelm you if you don’t handle them quickly.
Enemies
Besides the pretty obvious Balrog that will be the main challenge of this scenario, the quest has a couple of other enemies in the encounter deck that will try to make your life miserable. The Great Cave-Troll is a very strong enemy to have engaged with you if you also have to deal with the Balrog that turn. Note that your threat will be very low at the start of the game so it will be a while before you have to engage some of these enemies. This will mean that many enemies will be left in the staging area, adding their threat to the total of the quest. I personally found that traps like Poisoned Stakes and Ranger Spikes are great cards to deal with some of the enemies. Arrows from the Trees is also a very effective tool to discard a lot of the smaller Goblin enemies.
- Durin’s Bane: I have covered Durin’s Bane a lot already in this scenario review as he is the main antagonist of this scenario. The 4 threat will always be in the staging area, as Durin’s Bane can’t leave the staging area. It is also impossible to play Secret Vigil on him, as the Balrog is immune to attachments. The 6 attack stat on him will be a handful to most defenders until you can get someone like Beregond+Gondorian Shield online. Chumping this 6 attack will be the best way to deal with this attack during the early stages of the game. You can also try to load up a hero like Dain with Dunedain Warnings and Ring Mail for all you progression players out there. The 3 defence stat is a bit low to my liking, but this makes the Balrog more susceptible to your attacks. Remember that each player declares their own attacks in turn against the Balrog, unless they have Ranged characters. At the end of the round, 3 of the damage tokens on the Balrog get removed, so be sure to place a little more than that on him each round. Try damaging him during stage 2, so that you will have him near 5 hitpoints during the final stage. The lack of immunity to player card effects is really useful to players, as they will be able to use Feint or Thicket of Spears to counter any attacks the Balrog would make. Having Direct Damage will also allow you to place more damage on him outside of combat if you can’t pierce the 3 defence.
- Ranging Goblin: This is the only other enemy that gets introduced during this scenario. When it gets revealed, each player has to deal 1 point of damage to a hero they control. This is to soften up the heroes in order for the Balrog to finish them off. When a character would leave play, the Ranging Goblin gets shuffled back into the deck to be revealed later. This makes him a very bouncy enemy, and one that you will have to deal with before combat. If you tend to chump a lot of allies, this enemy will continuously assail your heroes and ping them for 1 point of damage. Direct damage is a good way to deal with the goblin. Engaging it is also fine, but it might leave play if you have to chump again. Thalin+Gondorian Spearmen is a good tactic to kill him outright. Having him back in the encounter deck might also be a good thing, as he doesn’t have a shadow effect, so that might be beneficial during your other attacks.

Locations
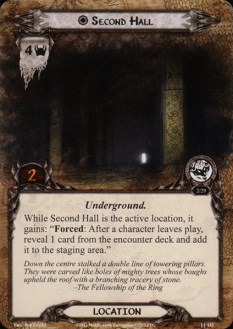
While the encounter deck is quite location light, these new locations will be vital in defeating the Balrog. The two Second locations will be really good cards to get rid off in the staging area, as they will mostly add a lot of threat to the staging area.
- Second Hall: The Second Hall of Moria is a rather annoying location. It will contribute its 4 threat to the staging area, which is quite a lot for a single encounter card. This might put a dent in the progress you were about to make on the quest. On top of this, the Second Hall has a horrible forced effect once it is active. Players will have to reveal a card from the top of the encounter deck the moment that one of their characters leaves play. This makes chumping a rather poor defence strategy. I wouldn’t make Second Hall the active location if you were planning to chump this round. Instead, Asfaloth on Glorfindel will be good tech against this location, as it only has 2 quest points. Do this during staging will save you 4 progress (or increase in threat). Other location control cards are also decent options, but not as effective as Asfaloth.
- Second Deep: This is a bad card to get out early. You are not able to make any progress on this location while Durin’s Bane has no damage on it. This counters not only location control, but also regular progress from travelling. Once you start beating back at the Balrog, this location will be a good location to have active, as it will remove 3 threat from the staging area and only requires 3 progress tokens to clear.
- Dark Pit: As mentioned before, Dark Pit will be encountered during the final stage of the scenario. Try to make it active asap and subdue the Balrog with its effect. More detailed strategy tips are given in the scenario overview.
Treacheries
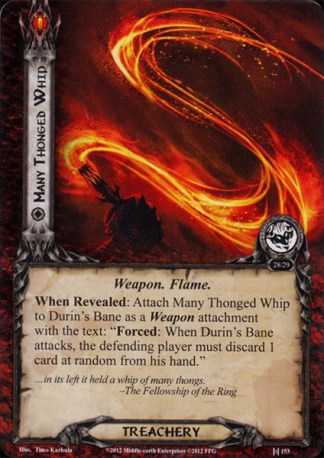
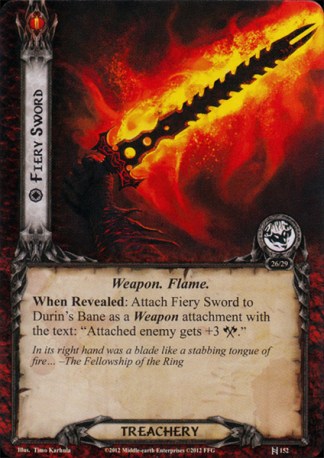
The scenario adds a host of new treacheries to the encounter deck. Most are designed to increase the stats and abilities of the Balrog. This is most notable in the two unique weapon treacheries that can be revealed from the encounter deck. Since these treacheries are unique, there can be no two copies of the same treachery on the table. Any second copy of Fiery Sword or Many Thonged Whip are discarded immediately if the Balrog already has one of those attached to him. These treacheries will not surge into new cards.
- Counter-Spell: Now here is a rather unique treachery, even though it hasn’t got a unique symbol on it. Counter-Spell will attach to the Balrog as a Condition when it gets revealed. Then, if any player plays an event, that player must first discard the top card of the encounter deck. If that card is a treachery that player cancels the effects of the event, and is forced to discard his entire hand. Only then will Counter-Spell be discarded from the Balrog. The chances of getting a treachery revealed are 50% in Normal mode, and 40% in easy mode (counting the fact that Counter-Spell is on the table and cannot be discarded from the top of the deck). This percentage can vary depending on what cards you have seen already. If the discarded card is a location or an enemy, the event goes off, but Counter-Spell will remain attached to the Balrog. With multiple copies of Counter-Spell in the encounter deck, players will have to make checks against each copy of Counter-Spell for each event they play. This will thin the encounter deck a little, but this card is very much worth cancelling when it gets revealed. You can also discard the Condition with Miner of the Iron Hills or Elrond. Bulwark of the West and Power of Orthanc will require players to make the Counter-Spell check first.
- Fiery Sword: This the first of the two unique attachment you can attach to Durin’s Bane. Since there are two copies of this attachment, you will have to discard the second copy if the first one is out already. When attached to the Balrog, Fiery Sword grant him a +3 to his attack stat. This boosts his reasonable 6 attack to an outrageous 9. While the 6 attack is pretty easy to defend with just a Gondorian Shield on Beregond, a 9 attack will be a lot more difficult. Getting Blood of Numenor or a Shield, Citadel Plate and a Raven-winged Helm might do the trick. This attachment is permanent and will boost the attack of the Balrog during each attack he makes.
- Many Thonged Whip: This second unique attachment will start to reduce your hand each time the Balrog attacks you. Since you don’t get to pick the cards you would like to discard, you find yourself discarding vital cards you were planning to play next round. Getting a Silver Harp on the table will negate this effect for you, as you can return the card to your hand after it gets discarded.
- Fires in the Deep: Basically Fires in the Deep will discard your chumping options for this round if you have only 1 ally. This is why Swarm decks are so important in this quest, as they will not be bothered if you discard just 1 ally. During the first few rounds, this treachery is worth cancelling, as you may have to discard an important ally from play. If players don’t discard any allies, because they have none, this effect will surge.
- Inner Flame: Charging his Inner Flame, the Balrog will get a boost to his attack stat of 3. This could boost him up to 12 attack until the end of the round if Fiery Sword is in play. This treachery will also stack on top of any other copies you may have revealed this round. This could potentially boost the Balrog to an incredible 18 attack until the end of the round if you reveal all 3 copies and the Sword is attached to him (not counting shadow effects). Better bring a chump blocker this round to deal with this. The first player will get the option to remove a questing hero from the quest in order to cancel this effect. This will not ready the hero, and might put a dent in your progress this round. It will also prevent you from placing 4 progress tokens on stage 2 if you remove your only hero from the quest. Use Windfola and commit at least 2 heroes in order to cancel this effect (twice) and still make some progress.
- Inner Shadow: This card will surge, along with healing 5 damage off of the Balrog immediately. This will make the final stages more difficult, and will force players to deal 5 more damage this round to get the Balrog down to 0 hitpoints if that was their goal. The first player may remove a questing hero he controls in order to cancel the healing ability. This would be adviced for only the last stage, as that player might want to keep a hero in reserve to cancel the effect of Inner Flame. Removing a questing hero won’t cancel the Surge though. Use Windfola to recommit that hero to the quest.
- Leaping Flame: This is nothing special, but the Balrog will make an additional attack against the first player. This might screw that player over during the first few rounds, as that player might not have counted on 2 attacks this round. This attack will deal and resolve a shadow card, just like the regular attacks during the combat phase. Note that the Balrog makes the attack only to the first player, regardless of his threat.
- Whip Lash: Though not a really awful shadow effect, Whip Lash will discard an attachment from each player. Having a swarm of less useful attachments in play will save you from having to discard a vital piece of your defence strategy. It is because of this that 2 Dunedain Warnings are better than a Gondorian Shield. The new Dale synergy will have an easier time to handle this treachery as they pump out attachments like crazy. Signals are at the moment good targets, as they can be passed around to players who would otherwise have to discard something crucial. Having attachment retrieval cards like Second Breakfast or Erebor Hammersmith will allow you to return those attachments to your hand.
Tips and Tricks
- Try to have every deck capable of defending enemies in one way or the other. Having at least one Tactics hero will open up the possibility of adding Feint to your decks, which can stop the Balrog from attacking you for a turn.
- With a lot of treacheries and shadow effects boosting the Balrog to immense strength, cancellation will be very useful in preventing the loss of a hero. You can also try to put the unique weapon treacheries in the victory display with Out of the Wild in order to prevent permanent boosts to the Balrog.
- Do not play a Silvan deck. There are a lot of triggers in the encounter deck when a character leaves play. This is basically what the Silvan trait is all about, so it would be a better idea to bring a different deck. The same principle holds for cards like Sneak Attack, Gandalf/Saruman, and Reinforcements. Try to only have characters leave play in case you have to chump block an attack from Durin’s Bane.
- Since enemies will not be forced to engage you for the first few turns, I would advise playing down a couple of traps in the staging area, this will handle the threat in the staging area a little. Effects like Arrows from the Trees and Hands upon the Bow will also be effective tools to deal with any extra enemies in the staging area.
- Because players are instructed to set their starting threat at 0, Secrecy cards will be viable for all decks. Try to add some copies of Resourceful for extra resources and try to dig for Timely Aid as well to get some high-cost allies into play for cheap. Early game Secrecy can really give a much-needed boost to your decks. Having your threat set at 0 at the start of the game also means that you can experiment with pairing 3 high-cost heroes with each other. Elrond, Gandalf and Treebeard are just a couple. In regular games, this would put you very close to the Valour threshold, but that doesn’t really matter in this scenario. Don’t bother using Valour cards unless you can get yourself there easily.
- Playing a lot of Doomed cards like Deep Knowledge and Legacy of Numenor is another great way to start the game off with a bang. Remember that this will put you past the engagement cost of the Balrog, so you must be able to handle that. It might be better to save your Doomed cards for round 2. Also, communicate with other players if they would like to play any Secrecy cards before you push them past the 20 threat.
- With your threat close to 0 at the starting rounds of the game, it can be an option to forsake questing for a round or two. This will result in a huge increase in threat, but might also leave you with enough characters ready to deal with the Balrog and other enemies. Be sure to get enough questers out though, as this scenario needs willpower to progress (unlike Morgul Vale).
- Again, DO NOT CLEAR DARK PIT IF THE BALROG IS IN PLAY. You will likely end up losing being swarmed with other nasty cards until you can finally get Dark Pit back from the encounter deck.
- Card draw is quite important in this scenario, as you will be discarding cards due to encounter card effects. You also need to resupply your board with fresh chumps, so try to draw some cards during the sceanrio to prevent your hand from getting empty.
- If players will try to use chump blockers to soak the damage from the Balrog, having 1 player add Horn of Gondor to his decklist will make them generate a lot more resources. Note that this card has been nerfed so that it will only trigger if players lose an ally after it has been destroyed.
This brings an end to the Dwarrowdelf cycle, the second cycle in the game. Quite a couple of these quests were fun to see again and have a high replayability. This is often regarded as one of the strongest cycles in the game, both because the quests are so fun and because of the strong player cards that were introduced in this cycle. Since only the Dwarf trait was really fleshed out at this time, other cards had to be powerful in order to stand out from the rest. After this cycle, more traits got focused and shaped into the synergies that they are today (*cough* Outlands *cough*).
While I usually come back to a few of these quests, some are easily broken with the modern card pool. Fortunately, the Nightmare versions of the scenario’s fix most of the quests, while also increasing the difficulty a fair bit.
With the dark depths of Moria behind us, we turn towards the Realm of Gondor and their ever ongoing battle to keep Mordor at bay. Join us next time as we start the Against the Shadow cycle at the salty quays of Pelargir.

Brilliant!!
LikeLike
Impressive analysis of this great cycle’s climactic ending!
I always come here to find solace when in dire need and always find some light.
Now inspired, I can roll-up my sleeves, chew on some leftover lembas while adjusting my deck and give it a couple more spins… until next time !
Cheers
LikeLike
Hope you manage to beat the quest, it is a tough one for sure!
Glad you enjoy the content on the blog! Best of luck with the quests ahead!
LikeLike
Actually, Regenerate triggers before player actions so you’ll always have to pull out at least 4 cost from your deck to defeat Durin’s Bane
LikeLike
Also, you don’t have to have to clear the last quest card. Once Durin’s Bane is discarded that wins you the game. Per FFG the text that says If Durin’s Bane leave’s play by the effect on Dark Pit, the players have won the game bypasses the requirement to put 1 progress token on the quest.
LikeLike
Thank you for your comments. I rarely play Shadow and Flame these days, so those mistakes must have slipped by when I wrote the article. They have been fixed now for anyone brave enough to face the Balrog in the future!
LikeLike