For many, Hunt for Gollum was their first Adventure pack, but it left the players a bit disappointed. The quest was very swingy with early cardpool cards and became easy in the later life of the game. To make the quest more interesting, the Nightmare version was released a few years after the regular AP. This version adds more ways to lose the game but adds more flavour to the quest where you are really fighting troops from Mordor for the Signs of Gollum. I have come to like this version of the quest over its Normal mode since it adds more dread when you are revealing clues or are looking at cards during stages 1 and 2. In this article, we will take a look at what cards were added, and what new mechanics improved the quest, while also making it harder to beat, even with current decks.
Nightmare Hunt for Gollum
- Found in: Separate Nightmare pack: Hunt for Gollum
- Size: 19 new cards, recognisable by the red borders
- Quest cards: 3
- Increase in difficulty?: Yes, though not a lot. This mode adds a lot more difficulty in other places than normal though. Picking cards for the effects on stages 1 and 2 becomes more challenging, as well as keeping control of the clue cards.
- Fixed loopholes?: There were some loopholes to this quest such as picking whiffing cards for the effects of the stages. This got patched by removing easier cards and packing more punishing cards that can get revealed by even looking at them. Other loopholes involve a lot of location control cards that neutered locations and made questing easy. The new locations make this problem go away, as they tech against location control and try to discourage it.
- New mechanics introduced: Mordor enemies can win if they control 4 Clue objectives, unclaimed objectives get added to Mordor enemies.
- Play this scenario if: You want to experience the original first AP but with a little more bite, you want to test a deck that runs cards which give bonuses against enemies with attachments, you are looking for a Nightmare pack that isn’t too hard, but still a decent challenge.
- Can I run side-quests for this scenario?: I wouldn’t recommend it. This scenario will require you to rush the main quest in order to avoid looking at the encounter deck too often for the effects of stages 1 and 2. Clearing side-quests is only really an option if you are about to clear stage 2 and have no Clue objectives under your control yet.
- What to look out for: Big enemies in the later stages of the game, unclaimed clues get picked up by enemies, unexpected ambushes by the local wildlife, easier to lose Clue cards than in the original, High threat numbers if you don’t watch out with locations, cards revealed from the encounter deck can have 10 or more threat.
New Rules
There are a couple of new rules and conditions that apply to the Nightmare version of this quest. The first to mention is that the players lose if 4 of the Clue cards are ever attached to Mordor traited enemies at the same time. This means that the players will have to hang on to all Clues, preventing enemies from obtaining them. The enemies will obtain these cards faster because of the Forced effect on the Nightmare card. This ability will attach unclaimed objectives to Mordor enemies in play at the end of the Refresh phase. Even if the card is guarded by another encounter card, it gets detached and attached to the enemy instead. When attached to an enemy this way, the objective is considered to be Guarded by that enemy. If there are no Mordor enemies in play at the end of the refresh phase, this effect does nothing and players can ignore unclaimed Clues. These new rules make it likely that enemies will be in control of more Clue objectives, and that the players will be forced to kill the enemies in order to regain control over the objectives.
New Setup
The basic setup for these Nightmare scenarios follow the rules on the new rulesheet. It requires removing some specific cards from the normal encounter deck and replacing them with the new Nightmare cards that were in the pack. This sets up the new scenario. Players will have to resolve this set up before the setup text on quest card 1A, though the order rarely matters. For this quest, the setup remains the same as the original quest.
Cards removed
- 2x River Ninglor (pretty bland location)
- 1x Eaves of Mirkwood (easily countered with location control)
- 2x False Lead (scenario now wants to keep Clues in play)
- 2x Misty Mountain Goblins (easy enemy)
- 2x Banks of the Anduin (easy location)
- 3x Gladden Fields (location was vulnerable to loc. control)
- 3x Eastern Crows (easy enemy)
- 2x Treacherous Fog (pretty bland treachery)
- 3x Evil Storm (treachery that is pretty easy to counter)
It is important to note that not all copies of certain cards are removed by this effect. The developers were looking to make more space in the encounter deck for the new Nightmare cards and therefore opted to leave some copies of locations like Eaves of Mirkwood or enemies like the Misty Mountain Goblins in the encounter deck. Keep a close eye on how many copies of certain cards need to be removed for this effect. Also, yes, there are only 4 cards from the Sauron’s Reach and Journey Along the Anduin set that are left in the encounter deck.
The Quest
The quest plays a lot as usual, with no different setup at the beginning of the game. With more difficult cards in the encounter deck and the easier ones taken out, you will likely face more threat in the staging area on average than in a Normal game. Since location lock is now becoming a serious issue, it will not a wise to pick locations for the quest effect on stages 1 and 2, but instead, go for something else. Do not pick a clue under any circumstance. These clues will find their way into play on their own, taking them from the encounter deck will only cause more problems.
Try to keep as few clues in play as possible for as long as possible. While this will force you to stall a little before you can advance to stage 3, it will keep the enemies at a low enough level that you can easily handle them. Having no Clues will, however, start to trigger effects like Watched Path, so eventually, you will want to pick up one of the Clues, but don’t let them snowball out of control. This quest can be lost in the blink of an eye if you happen to have multiple clues come out at once. Scrying can alleviate the problem by dumping all but 1 Clue on the bottom of the deck or in the discard pile.
When questing on stage 1, I would advise bursting through the stage as quickly as possible. This allows you to bypass several turns of looking at the top 3 cards, potentially revealing a Ravenous Hawk on top of another encounter card. Passing stage 1 into stage 2 gives you one turn of not revealing any additional cards, allowing you to set up your deck a little.
 On stage 2, it is important that you start clearing locations since more will pop up due to the effect on the quest card that happens before committing to the quest. The locations in this quest have a lot of threat but can usually be dealt with by adding some location control cards to your deck. This only leaves the Nightmare locations, which can either be blanked or be travelled to. During this stage, you will also want to find at least 1 clue per player before you advance. This allows all players to quest at the final stage, finishing this scenario quickly. However, getting more clues on the table will also mean that the enemies are becoming a growing threat. You will need to have a plan in place to deal with Hunters from Mordor that will be attacking for a lot, or contributing a lot of threat to the staging area.
After the players reach stage 3, the game becomes a bit easier. You are now no longer revealing an additional encounter card per round (which is especially difficult in true solo) and now only need 8 progress on the quest to win. I will again state that rushing this part of the quest is your best bet, as you cannot allow yourself to lose all of your Clues and being set back to stage 2. Luckily, the Evil Storm is now out of the encounter deck, allowing you to bypass that broken combination if that treachery would be revealed. Questing hard will be rewarded in this scenario, for if you place the eighth progress token, you win immediately. This allows you to move on with your Nightmare campaign to the Carrock, where a new quest stage and a new two-headed Troll are waiting for you.
The Encounter deck
Global
- The Nightmare version of this quest consists out of 48 encounter cards, of which 19 can be found in the Normal version as well.
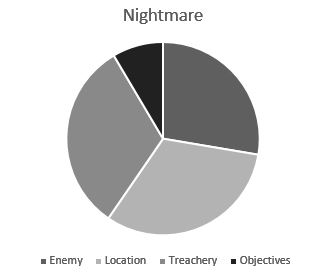
- Shadow effects are on 55% of cards, usually effecting players without Clue cards, though other effects are common as well.
- Average threat on the cards revealed is just 1.2, owing to the high density of Objective and Treachery cards. This does not count the possible increase in threat to cards like Hunters from Mordor, The Old Ford, and Goblin Town Scavengers.
- Surge appears on up to 9 cards, including all of the Nightmare Treacheries, treacheries like Massing by Night will also reveal more encounter cards, and so will the Clue objectives.
- Doomed did not get any new cards, so it sticks to just the Flooding treachery with the Doomed 1 keyword. Pursued by Shadow is also a big jump in threat, especially when picked for the effect on stage 2.
- Immunity
- Dark Pools cannot have progress on it while it is in the staging area.
Enemies
The new enemies in this version replace some of the weaker Goblins from the original quest. They engage pretty easily, which can be troublesome if you also have other enemies still engaged with you. There is also a new Mordor enemy introduced, which will snatch up clues if you are not careful.
- Ravenous Hawk: While being an interesting addition to the quest, the Hawk is a real pest, as there is very little you can do against it. Whenever you look at the top 2 or 3 cards for the effect of stages 1 and 2, if there is a copy of this enemy among those cards, the first player will have to engage the hawk. To make matters worse, this does not satisfy the effect of the stage, meaning that you will also have to pick another one of the looked at cards. On stage 2, this means that you will have to take both cards you looked at, while also still needing to quest. However, at stage 2, you do get to pick who you send to the quest after the enemy has engaged you, this allows you to keep a defender back. If you have a lot of bad luck, you can also reveal multiple copies of this card when looking at the top X cards of the encounter deck. Interestingly enough, the text on the Ravenous Hawk also shuts down scrying decks, as they also involve peeking at the top cards of the encounter deck. With a stat line of 3 attack, 3 defence and 3 hitpoints, the Hawk will take some attention before it is destroyed, making it quite a big nuissance for players also looking to kill other enemies. There aren’t really any ways to avoid this enemy, except to prevent looking at the deck as often as you can. If you are looking for tech against the Hawk, I would advise bringing a Dunedain deck and throwing some traps like Followed into your play area.
- Hunting Warg: This enemy will try to get those Hunters from Mordor out more quickly. If the players don’t manage to kill this Warg during the round it entered play, it will fetch a copy of Hunters from Mordor at the beginning of the Refresh phase. Not only will this add more threat to the staging area, but the timing will also have any one unclaimed Clue objective attach to the new enemy. In order to prevent this from happening, the players should try to kill the Hunting Warg during the combat phase. He only takes 5 attack in total to kill, which shouldn’t be too hard for you. Grimbeorn the Old and Beorn can take care of this Warg on their own. The stats on this enemy are also not very frightening, but be sure that you kill the Wargs straight away. The East Bank has a nasty shadow effect for this guy, returning him to the staging area. Should this happen, either have shadow cancellation ready or be able to snipe the Warg in the staging area with Haldir or Hands Upon the Bow.

Locations
A common strategy with the Normal version of this quest was to run a bunch of location control cards. Northern Tracker and Asfaloth made short work of the original locations which made the quest so easy. To counter this strategy, the Nightmare version offers 3 new locations that are either immune to some forms of location control, or take forever to clear.
- Watched Path: While the threat and the art of this location is the same as the Watched Path from the Wizard’s Quest, this location is a lot more brutal. In the early game, this location will shut down any card draw from a player without a Clue objective. They will still draw a card at the end of the round, but can no longer gain any through card effects. Like I said, this location is terrible in the early game, but during later stages, you will likely have a Clue attached to a hero you control, negating anything on this location. 4 progress make this location a bit of a tough nut to crack with location control, but it is not impossible. For the early game, I would advice blanking the location with Thror’s Key if you managed to find it already. Being a Forest location also opens up some Silvan synergies, bouncing a Woodland Courier twice can rapidly explore this location.
- Hunter’s Lookout: This is a real slog of a location, but if players have kept a lid on the enemies so far, this location shouldn’t be a problem. While in play (active location or staging area) this location grants a +2 defence boost to any Mordor enemy with at least 1 Clue objective attached. This makes the Hunters From Mordor a very fearsome foe, since he now also has 3 defence. Luckily, this effect does not stack with other Clues attached to an enemy, so an enemy holding 2 clues is still only getting +2 defence off of this location. The real issue is when more copies of this location pop up. They will stack their defence buffs on the same enemy, forcing you to chew through 4 extra points of defence. To bypass this buff, either run defence reducing abilities like Rivendell Blade, or go the Direct Damage route, bypassing the defence as well. The locations tend to stay in the staging area, but if you commit a couple of location control cards like Mirkwood Explorer and Northern Tracker to this location, it will be explored soon. I would argue against travelling here, as 6 progress tokens are a lot to place before you can place progress on the current quest.
- Dark Pools: This location looks a lot like the Normal locations of the cycle when looking at the stats. Seeing a 2 progress location gives me flashbacks to days before Asfaloth was a thing. However, this location still counters the mount, as no progress can be placed on the Dark Pools while it is in the staging area. Making this location active is also a bad idea, as each player will have to discard their highest cost ally when the location becomes active (bye bye Brok!). This can cause many decks to lose expensive allies that are difficult to get back into play. The best play would be to have allies like Erebor Guard and Citadel Custodian in play, who are expensive, but not very good. Players can also use effects like Sneak Attack and Reinforcements to cheat allies into play, and then discarding them. The Dark Pools can be avoided through a couple of effects. The first would be to just ignore the location and let it sit in the staging area. Maybe get Guarded Ceaselessly or Power in the Earth on it to lower its threat. The better option would be to use Thror’s Key to blank the location, allowing you to either clear it in the staging area or to travel to it without discarding your 5-cost ally.

Treacheries
The treacheries in this Nightmare version are built around you losing Clue objectives, and the enemy gaining them. It also doubles down on the anti-location control aspect of the quest in the form of a new Condition attachment.
- The Enemy’s Trail: In order to let no Clues go to waste, the encounter deck includes this treachery. When it is revealed, the players must find a Clue objective out of the discard pile and attach it to a Mordor enemy in play. If this effect cannot take place because there is either no Clue in the discard pile, or there is no Mordor enemy in play, the card gains surge. Several tricks can be used to avoid this from happening. You can directly cancel the treachery, avoiding both its effect and the potential surge. This is usually a pretty good deal and gives you a free card during staging. It can also avoid you from losing if you happen to know that this will pull out the fourth Clue and put it on an enemy in play. Players can also try to go for the Surge if they don’t want to reveal yet another clue. This can be done by reshuffling the encounter discard pile into the encounter deck with The End Comes if there happen to be multiple Clues in the discard pile, saving you from future copies as well. A combat approach is also viable, where you have no Mordor enemies left in play. This is the ultimate goal of this quest but would either involve a lot of luck or a combat capable deck.
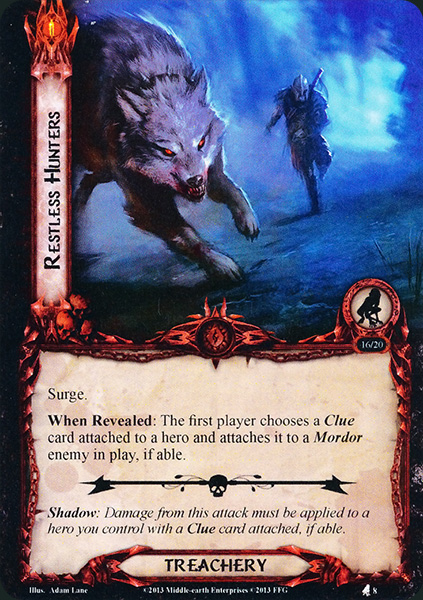
- Restless Hunters: Unlike The Enemy’s Trail, this card will surge no matter what. On top of the surge, this treachery will detach a claimed Objective from a hero, and attach it to a Mordor enemy in play, if able. If unable, the treachery does nothing. In the early game, this card is pretty harmless to the players, as they tend to not have claimed objectives yet. But in the final stage, this can cause a big setback if you lose your last Clue this way. This will reset the quest deck and have you struggle to get back to the final stage. The treachery can be cancelled, and for most cases, I’d advise you do. While this does not change the number of Clues in play, it will put the enemies at an advantage. There are no real other methods to circumvent this treachery, except for having either no Clues attached to heroes or having no Mordor enemies in play.
- The Trail goes Cold: This Condition attachment will slow your progress but isn’t the worst to reveal if you are questing hard enough. The treachery will attach to the active location and will remove any progress that it already had. Then, that location will add its threat to the staging area while active. This is devastating with locations like the Old Ford, which can get pretty crazy in terms of threat. If there was no active location, this card does nothing but replaces itself with the next card of the encounter deck. There are a couple of strategies around this treachery, that limits its damage to your board state. The first is to have Ghan-Buri-Ghan committed to the quest. As he has willpower equal to the threat of the active location, it balances the treachery perfectly. Second, the Woodman synergy loves that the active location has an (extra) attachment on it, turning on several effects. Third, you can, of course, run Condition discarding effects, but with this being the only Condition in the deck, I don’t often find myself including this in a deck. Finally, there are ways to get rid of the active location, and thereby also the attachment. Distant Stars tends to work best, as you can be sure that the Condition is discarded this way. The active location is also replaced by another location, potentially avoiding a Travel cost.
Tips and Tricks
- With many enemies having objective cards attached to them, they become vulnerable to effects like Valour of the North. This can greatly help when attacking or defending the Hunters from Mordor.
- The objectives can only attach to Mordor enemies, so getting rid of as many of those as possible makes the quest a lot easier. If you use None Return every time you kill a Hunter from Mordor, you can thin the deck and make the quest a lot easier. Out of the Wild can take care of any remaining copies in the encounter deck. This negates the additional loss condition and allows the players to better counter certain treacheries.
- If you get the choice, try to place the Clue objectives on the Hunting Warg instead of the Hunters from Mordor. The Warg can be killed more easily which will win you back the Clue faster.
- There is a lot of potentially surging cards in this encounter deck so Lanwyn could be a viable option. Having bonus willpower and readying effects can be a lifesaver during this scenario.
- In most cases, A Test of Will should be used to cancel cards like Old Wives’ Tales and Massing by Night in high player counts. The new treacheries aren’t that devastating that you should keep a cancel effect in play.
- Thror’s Key is your best friend for this quest. Not only can it take care of the Old Ford, but also the new Dark Pools and either the West or East Bank. The locations in the encounter deck aren’t protected very well from encounter card effects, allowing you to blank a few cards and exploring them right away. Use things like Dwarven Tomb or Erebor Hammersmith to recur the attachment for additional uses.
- To be honest, this quest counters allies quite hard, with the Old Ford and Dark Pools as prime examples. This leads me to say that decks that run little or no allies will actually perform better against this quest. Be sure to have plenty of readying effects if you do go this route though, as you need to make up for lost action advantage.
- Some of the best late game cards to draw in this scenario are Secret Paths and Radagast’s Cunning. This allows you to ignore the threat of either the Hunters from Mordor (which get really threatening as more Clues enter play) or the Old Ford locations (which get massive in multiplayer games at the late game).
- Don’t bring a scrying deck. Ravenous Hawk will engage you if it is among the cards you look at. While this does allow you to thin the deck a little, it is generally a problem to reveal such an enemy when there are also enemies like Hunters from Mordor in play.
Playthroughs
- 1 player, true solo: https://www.youtube.com/watch?v=9XwrbNac2xI
- 2 players, updated decks: https://www.youtube.com/watch?v=K_HsURLhM5U
- 1 player, two-handed, progression style: https://www.youtube.com/watch?v=-lezqJk4gqs
- 2 players, updated decks: https://www.youtube.com/watch?v=j1soU_U7EkU
- 2 players, BoF decks: https://www.youtube.com/watch?v=J43ligCIHWk
I hope this article will have you explore this quest again. I have found it a decent challenge, but not on par with some of the other Nightmare scenarios I own. It is great for entry-level Nightmare players, and the theme is improved massively. The next Nightmare scenario will likely be Steward’s Fear, as that is the only other NM pack I currently own. But with the Patreon support and the Con of the Rings coming soon, I will likely have a new batch of NM quests by the end of next month, so then I will continue this series.
