I think that the normal Journey Along the Anduin quest may just be the quest that has been played the most by the community as a group. Not just because the scenario is enjoyable, but also because of the many resets that players will go through during their playthrough because of the shear difficulty spike after Passage through Mirkwood. Because the scenario is played a lot, the Nightmare version had to maintain the good name of the quest, while also making it far more difficult. How did they do this? Well, they threw in some more Trolls and some 10 threat locations, that should keep the players on their toes. In today’s article, we will go over the Nightmare version of this iconic quest, and the various cards that crank up the difficulty to insane levels.
Nightmare Journey Along the Anduin
- Found in: Journey Along the Anduin Nightmare pack
- Size: 19 new cards, recognisable by the red borders
- Quest cards: Remains unchanged, 3 quest cards in total.
- Increase in difficulty?: Yeah, the addition of various Nightmare cards have made it so that this quest is suitable for the expanded cardpool. Normal version wasn’t a push-over, but this one is significantly more difficult.
- Fixed loopholes?: Yes, Hill Trolls can no longer be cheated by Forest Snares. Players will also be forced to recycle the encounter deck more often to make sure all enemies have a shadow card. Location control cards have to be careful of A Flooded Ford now.
- New mechanics introduced: Recycling the encounter deck outside of the quest phase, enemies that only disappear at the end of the quest, giving immunity to damage in some cases.
- Play this scenario if: you are a fan of the normal version and thought that 2 Trolls weren’t enough, you are looking to play a Nightmare quest that is tough, but can be beaten without too much specific deckbuilding.
- What to look out for: Troll enemies, swarms of smaller enemies that keep your defenders occupied, high threat locations, damage immunity for enemies, nasty shadow effects, lot of surging cards, quick rises in threat.
New Rules
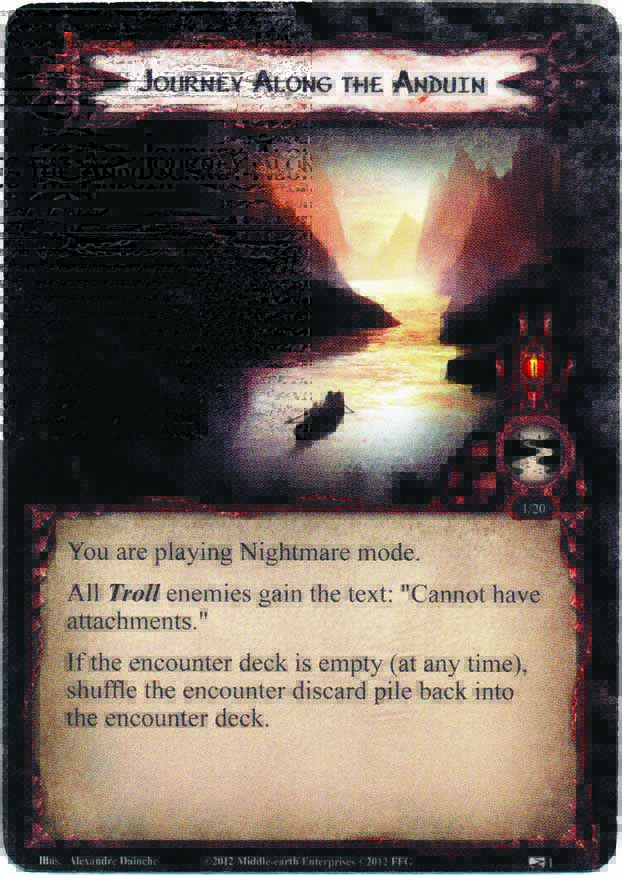
Like every other nightmare scenario, NM Journey along the Anduin comes with a special rules card that remains active throughout the quest. While some of these may be blank for other scenarios, this particular one has 2 new rules that make the quest a lot more difficult. The first new rule states that Troll enemies (Hill Troll and the new Anduin Troll Spawn) gain the text “Cannot have attachments”. The reason behind this comes from the age-old strategy to killing Hill Trolls back in the Core Set days: Forest Snare. This ancient attachment completely neutered the Hill Troll and made the early game of regular Anduin a lot easier (until a second version showed up). Giving all Trolls immunity to attachments means that players will have to find other solutions to their Hill Troll. Besides Forest Snare, this ruling also affects other Trap cards, like Ithilien Pit, Poisoned Stakes, and Entangling Nets, all of which are useful tools against Trolls. It also helps you a little when wanting to play Guarded cards (which is a terrible idea thanks to Gladden Marshlands) since Troll cannot guard these attachments. This allows you to somewhat filter the encounter deck of Trolls, but doesn’t really help in the grand scheme of things.
The second rule that the nightmare card introduces is that should the encounter deck ever run out of cards, the encounter discard pile gets reshuffled back into the encounter deck. While this seems pretty logical, as it is a rule that is used in the game to a lesser degree, it does impact gameplay. Normally, you only check if the encounter deck is empty during the quest phase and then refill it. This can lead to situations where the encounter deck is empty during the combat phase, allowing the players to ignore shadow cards, as they cannot be dealt out. No more, as the encounter deck now resets after the last card has been used up. This means that even halfway through action windows or the beginning/end of a phase, the encounter deck can reset. As a result, your enemies will always have a shadow card, meaning that you should be bringing some tools like A Burning Brand to get rid of them.
New Setup
The setup step of this nightmare version is identical to the normal version of the quest. The nightmare cards don’t change any of this. The players should first remove the cards mentioned on the back of the rules card, and then shuffle in the 19 new red-bordered encounter cards. After this, the players simply have to reveal one card per player from the top of the encounter deck, and add it to the staging area. Revealing any of the new treacheries will be great, as they will just surge. It is better to have those in the discard pile early, giving you enough time to set up before they get shuffled back into the encounter deck when the encounter deck eventually runs out of cards. After these cards are added to the staging area, the players must look for a Hill Troll if there isn’t one in play already, and add it to the staging area as well. after that, the players can begin their first round.
Cards removed
- 3x Evil Storm (Often whiffing treachery)
- 2x Treacherous Fog (Same reason as Evil Storm)
- 2x Banks of the Anduin (Easy location that allowed players to keep recycling it)
- 3x Dol Guldur Orcs (Easy enemy)
- 2x Enchanted Stream (Not super thematic location, could be explored easily in the staging area)
- 2x Despair (Often whiffing treachery, though the shadow effect was punishing, glad to see that gone)
- 3x Misty Mountain Goblins (Very easy enemies)
- 2x Necromancer’s Pass (Not really thematic location)
The Quest

I’ve come to kill you again
While players may have played this scenario several times in the past, the Nightmare version will make it trickier to beat the quest. While the quest is not impossible, you will have to take into account that new rules have been added and new cards can be revealed. I will briefly go over each stage, and what different tactics you should adopt to beat them.
The quest starts off as usual, with you having at least 1 Hill Troll in play. Since you are not playing Easy mode, you will have the chance to be having both Trolls in play at some point, so it will be important for you to keep a low threat (under 30) and engage the Hill Troll when you are ready for it. New heroes like Dain Ironfoot can defend the Hill Troll straight away, but you should also be ready to attack the Troll. Using big attack boosts like Tactics Eowyn and Black Arrow should help you overcome the Hill Troll, who still requires 12 attack in total to beat. Killing the Hill Troll quickly after you engage him will be key, as the new encounter cards tend to mention him a lot. Anduin Troll Spawn for instance, will engage you at the beginning of the combat phase if you are engaged with a Hill Troll. Other cards, like Smoking Blood and Marshland Outlaws will try to prevent damage and heal the Hill Troll, meaning that it will take you longer to kill him. Troll Attack does what the title implies, the Hill Troll makes an additional attack. You would do well if you can kill the Hill Troll early, allowing you to meet the text on stage 1, where no Hill Troll must be in play. It is important however, that you make all progress on stage 1 first, as Pursuit on the Shore can recycle the Hill Troll you just killed. This can cause you to get stuck in a loop, where you cannot advance and will always have to deal with a Troll.

Making the 8 progress on the first stage will be difficult, as a lot of high threat cards can stick in the staging area. Not only the new 10 threat Gladden Marshlands, but also older cards like Brown Lands will limit how much progress you can make on the quest. Try to get as much progress on there in the early rounds of the game, and travel whenever you can. If location lock is looming, try to bypass this through using location control cards. Familiar Lands can be a life saving card in these early stages, providing you have enough attachments on locations. If you are lucky and manage to get enough progress on stage 1 before the Hill Troll is dealt with, then it would be best to play a side-quest and try to clear it. This will give you a slight advantage over the encounter deck while you are waiting to kill the Hill Troll. Reducing your threat through Double Back is a good thing to have, but other side-quests like Keep Watch and Gather Information can also be great to clear. If you do not want to play with side-quests, then using Backtrack will allow you to put any excess progress from the main quest to a location in the staging area. This can clear Brown Lands with ease, and if you quest hard enough, you can also complete other locations this way. Once you have 8 progress on stage 1 and no Hill Troll is left in play, you can advance to stage 2.
Stage 2 can be a slog for most people, as it shifts focus from combat to questing a lot. This nightmare version changes nothing in regards to the actual quest card, but will have some more tricks up its sleeve to make sure you are engaging more enemies. While no engagement checks are made, players will still need to consider that Anduin Troll Spawn engages a player when they are engaged with a Hill Troll. Since you defeated at least 1 of these during the last stage, it means that it can be brought back to life through Pursuit on the Shore, which can be troublesome if you do not deal with it before stage 3 hits. Players will also have to reveal one additional card during the staging step, which hurts more in true solo than in higher player counts. Nothing really changes from this stage, other than you should be keeping the number of enemies in the staging area at a minimum, and quest hard. Try to engage an enemy optionally if you can, as this removes threat from the staging area. Good cards to use at this stage are Wait no Longer and The Hidden Way, as they lower the number of cards you have to reveal that round by 1 and can allow you to either engage an additional enemy, or have a location active that you can clear by questing hard. If you are struggeling to make progress on the active location and the main quest card, look into getting some Blades of Gondolin and Arod out. These cards will allow you to place progress when you defeat enemies, allowing you to focus less on willpower questing if you are getting location locked in the staging area. After the players manage to place 16 points of progress on this stage, they immediately advance to stage 3.
Stage 3 of Journey along the Anduin has always be the “kill-em-all” stage, and the Nightmare version does not bring a lot of changes to this stage. When the players reach this stage, they each have to reveal 2 cards from the encounter deck and add them to the staging area. The new rule where the encounter deck is now always restocked will make sure that each player has 2 cards to reveal. The goal of this stage is to kill every enemy in play, which can be a lot of enemies if you are unlucky, but it could also mean that you immediately win once you reach the stage and the cards you revealed included no enemies. The more likely scenario is that you will have to gather your strength for a few rounds of combat to kill off every Troll, Bandit, Orc, and snake before winning this scenario. The new Brown Water Rats enemy will be the last enemy in play due to their text. If all other enemies are defeated, the Rats are discarded as well, after which the players win the game. If they are playing Nightmare scenarios in progression mode, then they better strap in, as NM Escape from Dol Guldur is an even more difficult version of one of the toughest scenarios in the game.
The Encounter Deck
Global

- Like many of these older scenarios, this encounter deck is pretty big, at 47 cards.
- Shadow effects are split 50/50 among encounter cards. Some of which are pretty nasty, which I will get to later.
- Average threat per card revealed is 2, but this can vary from a 0 threat treachery to locations with 5 or even 10 threat. This quest can ramp up threat in the staging area really quickly.
- The Surge keyword helps with adding more threat to the staging area. 14 encounter cards will surge, of which many will so automatically. Several treacheries only surge if their requirements aren’t met. Massing at Night will also reveal additional cards, but won’t trigger Lanwyn.
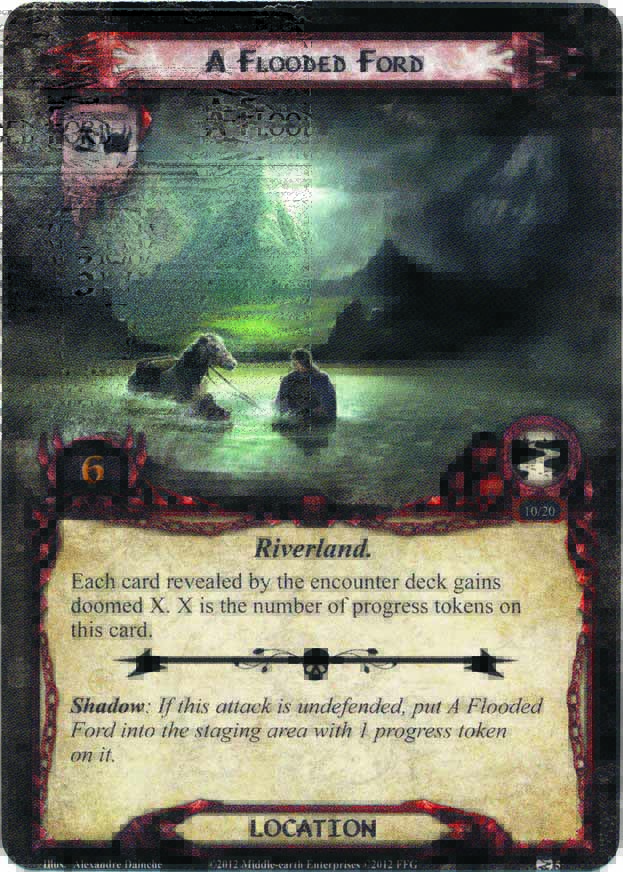
- Doomed is less of a problem, although A Flooded Ford will help the encounter deck to get your threat past 30 if you bring location control. Marsh Adder will also raise the threat of the defending player and Gladden Fields will raise it by an additional point while active.
- Immunity
- Troll enemies cannot have attachments
- Pursuit on the Shore cannot be cancelled
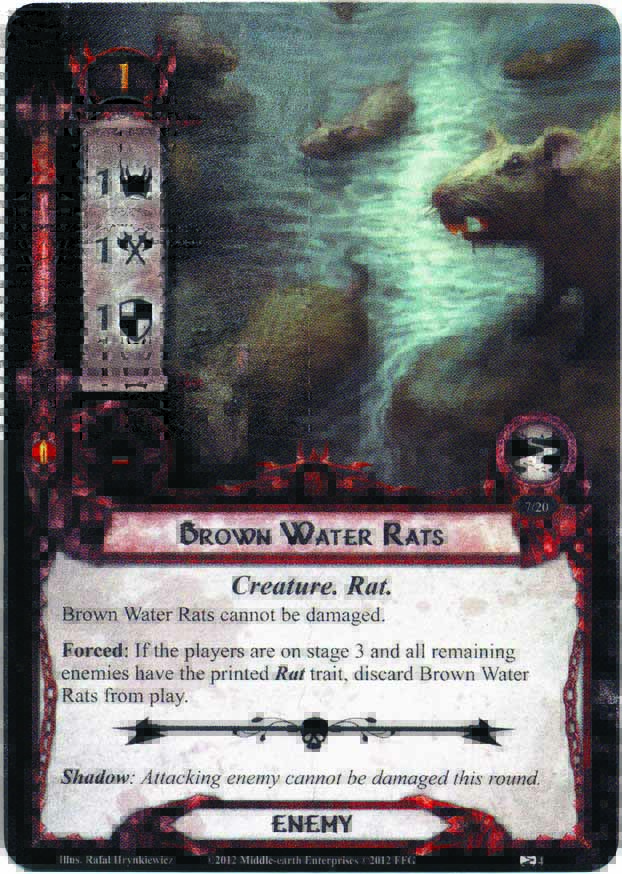
- Brown Water Rats cannot be damaged
- Goblin Sniper cannot be engaged if there are other enemies in the staging area
- While Marshland Outlaws are engaged with you, other enemies cannot be damaged by you (even if those enemies are in the staging area)
From the statistics, you can clearly see that the encounter deck focusses a lot on enemies. The average threat revealed per card is also a lot higher, thanks to locations having 5 or 10 threat. For methods on dealing with the cards from the normal scenario, check the regular scenario analysis. The nightmare cards will be covered below.
Enemies
The wild creatures of the shores of the Anduin are getting reinforcements in this Nightmare version. On top of the nasty enemies like Hill Troll and Marsh Adder, ruffians, rats, and more Trolls join the assault on your raft.
- Marshland Outlaws: These bandits really are annoying to deal with. Not because of their stats, since everything besides hitpoints is pretty average, but because of their passive ability. When the Outlaws are engaged with you, you are unable to attack or deal damage through card effects to enemies with a different title than Marshland Outlaws. This prevents you from dealing that final point of damage to another enemy engaged with you, and means that you will have to prioritize the Outlaws before any other enemy. This can cause you to stall for a turn or longer, giving Troll enemies more chances to kill your characters while you are helpless. Having 21 engagment cost means that the Outlaws will likely engage every round, unless you are playing Secrecy. The 8 hitpoints are tough to chew through, making this enemy require a lot of attention before you are rid of it and can deal with the other enemies engaged with you or in the staging area. It is usually best to target these guys when they are in the staging area, and they would be an ideal target for None Return, but there is a catch. Their high hitpoints makes them very likely to be returned from the victory display thanks to Pursuit on the Shore. If you are able to use traps to your advantage, then these Outlaws are good targets for a Ranger Spikes, which causes them to remain in the staging area, adding no additional threat to the total.
- Brown Water Rats: For a Nightmare card, these rats look pretty easy, having just 1 threat, 1 attack, 1 defence, and…wait, where are their hitpoints? These rats have no hitpoints since they are unable to be damaged. They will continue to harass you and your raft throughout the entire scenario. They have a very low engagement cost, meaning that if they show up early, they will immediately engage any player and will continue to stay engaged throughout the quest. Only once the players are at stage 3 and no other enemies remain beside Brown Water Rats, do these guys get discarded. There are ways around these rats though, as there are cards like Quick Ears that can discard them rather than damage them. Having Keep Watch in the victory display as well helps in making these rats easier to deal with, though their attacks must still be defended. The best card to use is likely Outmatched, where your defender is allowed to ready after having defended the Rats. This helps to keep enough characters ready to deal with the real enemies, while not risking undefended attacks. You will still need to deal a shadow card and resolve it, but at least your character will remain ready. The shadow effect on the Rats is worth cancelling as well, as it can really throw a wrench in your plans for defeating the attacking enemy.
- Anduin Troll Spawn: Ah yes, just what this scenario needed: more trolls. This Anduin Troll Spawn is a slightly less powerful Troll enemy when compared to the Hill Troll, but can still give you a hard time. To start of with, the Spawn will surge if there is no Hill Troll in play, increasing the chances of seeing (another) one pop up. Second, the Spawn may have a low engagement cost of 26, but during the combat phase, will always engage a player engaged with a Hill Troll as well. Remember that this enemy has the Troll trait, so attachments like Traps (Outmatched, Entangling Nets, Poisoned Stakes and such) cannot be attached to the Spawn. This requires the players to help each other out with Sentinel defences in order to bring down both enemies. The Spawn only has 5 hitpoints, so there is a possibility to bring it down over time with direct damage effects. The stats are representative of regular Nightmare mode enemies, so you should come prepared to deal with them. An attack value of 4 is already quite high, but allies like Defender of Rammas and Winged Guardian will stand a chance against this enemy.

Locations
While some of the locations in the normal version were already pretty tough to beat, the two new locations crank it up to a whole new level. Not only can they deal damage to your heroes, but it also can prevent you wanting to clear locations in the staging area through card effects.
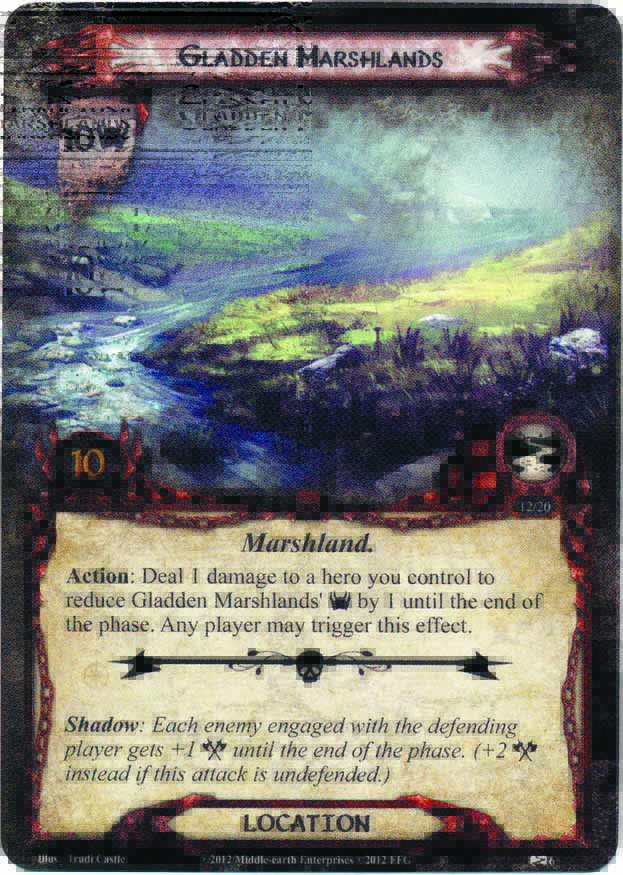
- Gladden Marshlands: Yes, your eyes do not deceive you. This is a 10 threat location with 10 quest points. And yes, there are 3 copies of this card in the encounter deck. Drawing these locations back to back often means that your journey has come to an end, as the location can quickly raise the threat in the staging area beyond what you quested for. Luckily, some niche location control cards offer a solution to this problem. First, you can get this location active before questing with The Hidden Way. Now, you have to reveal 1 fewer encounter card during the next staging step, and have removed one copy from the encounter deck that won’t add its threat to the staging area. Having Ghan-buri-Ghan in play as well will help you to overcome the 10 progress needed to clear the Marshlands, as he will now also be questing for 10. Other events like Short Cut, Strider’s Path, and Distant Stars will all help to remove the 10 threat out of the staging area at least. Should you somehow have a Gladden Marshlands in the staging area, you also have the oppertunity to deal 1 damage to a hero you control to lower the threat of Gladden Marshland by 1. This is a pretty bad trade, and unless you have a reliable way of healing that hero (Athelas, Self Preservation, Lembas, etc) it is not worth it. There are several direct damage effects in the encounter deck that will kill the hero you damage through this effect, so it would be better to swallow the extra threat. You should always prioritise this location when you travel, as you will remove 10 threat from the staging area. Woodmen’s Path will lower the quest point value of this location to 1, making it easier to get rid of by questing successfully. After clearing it, you would help yourself immensely by using Leave No Trace. This adds the Gladden Marshlands to the victory display. Not only does that lower the chances of seeing it come back when the encounter discard pile is shuffled back, but you are then also allowed to use The Door is Closed on the next copy of this location when it is revealed. Eryn Galen Settler is also a good card to use for this location if a second copy is in the staging area.
- A Flooded Ford: A popular strategy against the normal Journey along the Anduin was to use a few Northern Trackers and clear all locations in the staging area. Well, this location pretty much shuts that strategy down. A Flooded Ford has 6 quest points and 3 threat, which by itself makes it a tough location to clear. But the worst part is that the location will give every card that is revealed from the encounter deck Doomed X, where X is the number of progress tokens on the location. This stacks with any other Flooded Fords that are in play, and even triggers if the location is the active location. Blanking the location with Thror’s Key is a good solution to ignore at least one of these locations. The other will have to either be a target of one of the events mentioned for Gladden Marshlands, or you have to be able to deal with it normally. This is done by clearing the location in one go, making 6 progress straight away. This can be done through various effects, like Explorer’s Almanac and questing successfully, or by making it the active location and clearing it there in one go. Another strategy would be to use Mirkwood Explorers if they have been questing successfully for a while. This way, you can clear the location without having to waste progress that could go on other locations or the main quest. Getting rid of this location opens up location control cards again, which can help you to resolve the problem of location lock that this quest tends to have.
Treacheries
The original quest had some nasty treacheries that damaged characters or raised your threat. However, this Nightmare version makes sure that nowhere is save for you, even after you have killed big enemies. That is, if you manage to kill them in the first place, as these treacheries also heal enemies and makes them attack you more often.
- Pursuit on the Shore: This is easily one of the worst treacheries in this scenario, as it can potentially cause you to face the same Hill Troll you fought earlier. When this card is revealed, the enemy in the victory display with the highest printed hit points is returned to the staging area. This will often mean a Hill Troll, but can also trigger on Marsh Adder, Chieftain Ufthak, and the Outlaws if you used None Return. This is a terrible effect, as putting those enemies in the VD wasn’t easy. And now, you have to face them again straight away. There is no cancelling this card either, as it cannot be cancelled as written on the card, which is horrible. There is a silver lining though for the early game, where you can get this card to just replace itself when you haven’t beated the initial Hill Troll yet. But since you have to beat him in order to advance, later stages will have a good target for this treachery. Because of this, be sure to first get the progress on stage 1 that you need, before you kill the Troll. Otherwise you may get stuck in a loop where you have to keep recycling the Troll before you can move on to stage 2.
- Troll Attack: The title of this card perfectly sums up what the treachery does: All engaged trolls make an attack. This is pretty nasty if you have a Hill Troll engaged with you, which also makes it likely that a Troll Spawn is engaged as well. You will need more defenders if you are not cancelling this treachery. If no Troll enemies are engaged, this card surges. Note that the attacks can be cancelled and the treachery will be resolved. Only if there are no engaged Trolls does this treachery surge. This means that Feinted Troll attacks still count. The real danger with this card lies in its shadow effect. In a multiplayer game, this is certain to kill heroes. If the attacking enemy is a Troll, then it makes the same attack against each other player. That attack is considered to be undefended if those players are not engaged with the Troll. This means a 6 attack coming for your heroes, which is enough to kill all but Beorn. Damage cancellation and hitpoint boosting effects only get you so far. Better strategies are White Tower Watchman, Barliman Butterbur and Dori, who can redirect undefended attacks. You can also cancel the shadow effect, which is the best tech against this card. Be sure to have a Hasty Stroke ready for this effect, or it will kill up to 3 heroes.
- Smoking Blood: Unlike Troll Attack, this treachery actually targets all enemies in the game. All damage counters are removed from these enemies, healing them completely. As if that wasn’t bad enough, the players must then raise their threat by the damage removed from all enemies engaged with them. This can lead you to raise your threat by 8 or more with ease, especially if you are playing a direct damage deck or are very close to killing a big enemy engaged with you. This is the treachery you will want to cancel, as the healing and threat raising can be a knock-out blow to your deck if you were counting on killing enemies this round. Enemies in the staging area will also heal, but players don’t have to raise their threat for the damage that is removed. So if you know that Smoking Blood is revealed next, try pushing enemies back to the staging area. Should no damage be removed this way, the treachery replaces itself through surge.

Tips and Tricks
- While the Hill Troll may now be immune to attachments, he isn’t immune to player card effects. This means that you can still use Feint and cards like it to cancel the attacks of the Hill Troll.
- An unchanged strategy is that your deck should start with a threat lower than 30. While there are several threat raising abilities in the encounter deck, you can chance starting at a lower threat to give yourself some extra time before you are engaged by the Hill Troll.
- With a lot more shadow effects triggering during a playthrough of this version of the quest, the players should come prepared to deal with shadow effects. Silver Lamp, A Burning Brand, and Hasty Stroke will all help in best prepare the players for what shadows are coming. Round Shield and Tides of Fate can be used to respond to the shadow effects by boosting defence, which is never a bad idea.
- Forget about global location control cards like Northern Tracker and Warden of Arnor. These cards will trigger A Flooded Ford, making you raise your threat a lot. Instead, go with point-and-click location control cards that can snipe locations like The Brown Lands without problem, saving you from having to take 5 threat in the staging area.
- The encounter deck has a lot of surging cards, making Lanwyn and Minas Tirith Lampwright nice tools to bring for this. You won’t be saying that the Lampwright is garbage if he cancels a 10 threat location. Proper scrying with this technique is advised.
- If you clear stage 1 faster than you can kill the Hill Troll at this stage, look into clearing a side-quest. This will help you to get a quick boost before going into the next stage.
- If you manage to get both Flooded Fords out of the way early, you can use Northern Trackers again to resolve the issue of location lock. If you cannot do this, then try to add more pinpoint location control cards in your deck like Asfaloth, Mirkwood Explorer, and Evening Star to clear troublesome locations in the staging area.
- There isn’t really a point in running victory display shenanigans for enemies in this scenario, as Pursuit on the Shore can return that enemy to the staging area. Instead, try to use it to get rid of locations (Leave no Trace) and treacheries (Out of the Wild). You will be able to add the Rats to the VD, but I am not sure if that is worth the inclusion.
- If you are playing an NM progression style game, then don’t be fooled by the relatively easy NM Passage through Mirkwood that you played before this. This quest really demands strong decks in order to beat it. Bring some strong decks that can take a punch, and deal them out all the same.
Playthroughs
- True solo, VD/Secrecy deck: https://www.youtube.com/watch?v=IaO8wJmLt_I
- True solo, same deck, clean run: https://www.youtube.com/watch?v=LwsqbhhOA1c
- Two handed, progression style: https://www.youtube.com/watch?v=k84HvCq6uRo
- Two handed, modern decks: https://www.youtube.com/watch?v=nV790RpDGBI
- True solo, Boromir pre-errata deck: https://www.youtube.com/watch?v=-BchjD_oYkY
- Two players, BoF decks: https://www.youtube.com/watch?v=9ZaS8rdYWSM
This covers one of the more played nightmare scenarios in this first cycle. I do not own any others of this cycle however, but will be looking to pick some up during Con of the Rings 2019. Until then, I will continue the Nightmare series with what I have and with what other people write for me. If you are interested in writing a Nightmare article like this (on, say, Dol Guldur 🙂 ) then feel free to reach out. Until then, I will go on with my regular scenario analyses.

One thought on “Nightmare Journey Along the Anduin”