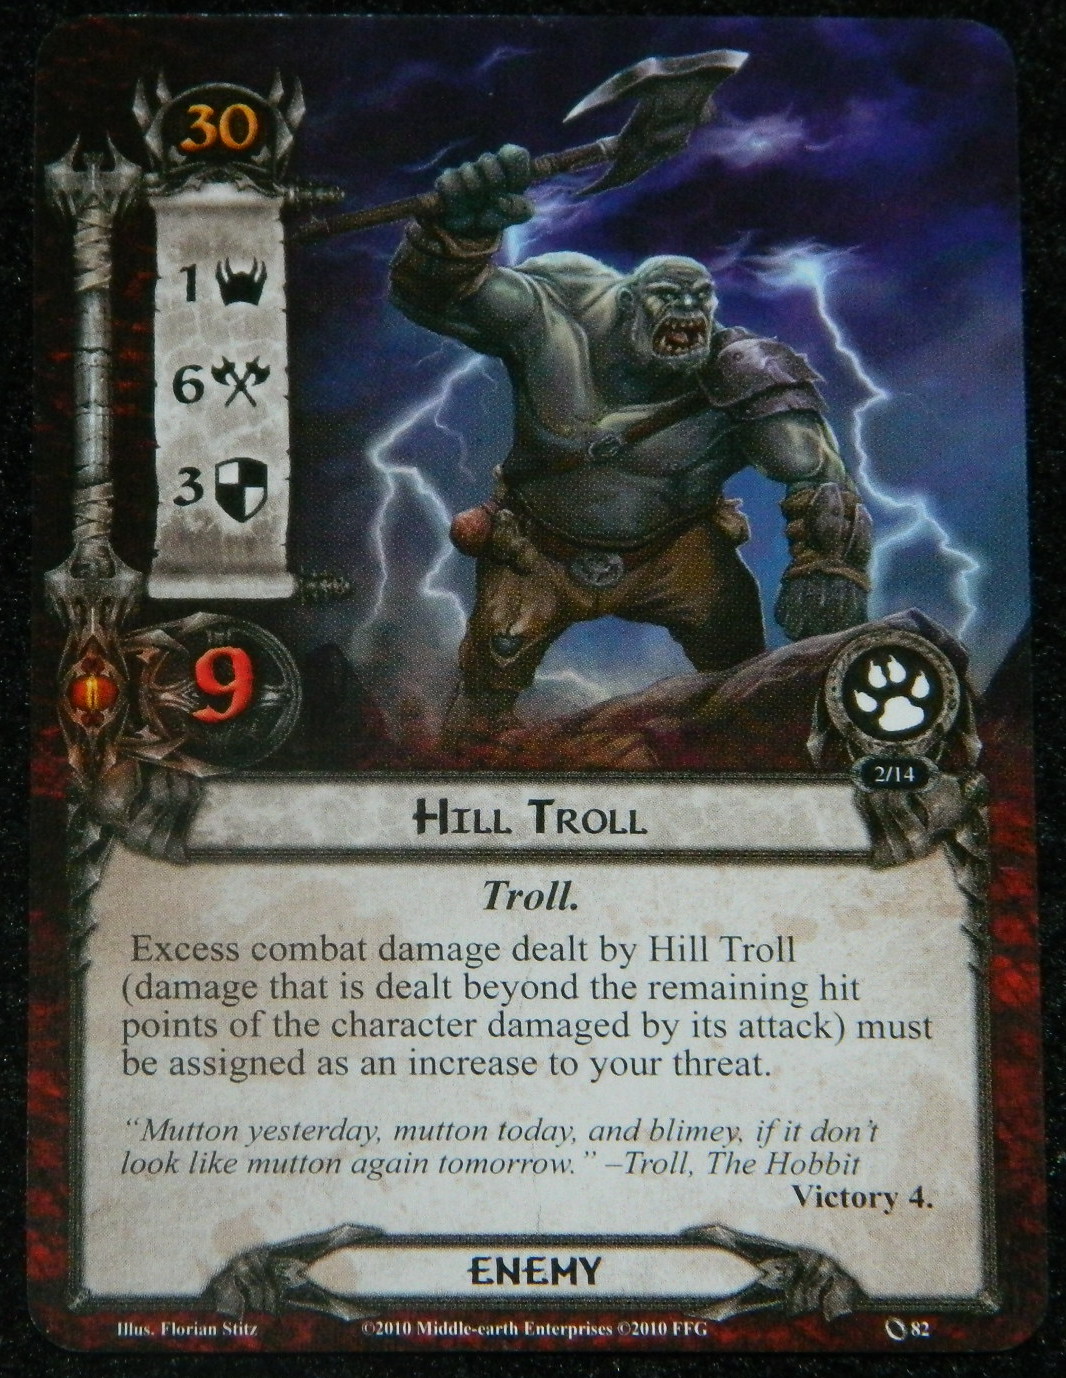
After many players finally manage to beat the first scenario in the Core Set, they move on to the second. They have high hopes to continue the winning streak and set up the second scenario. That is where most of us players met our very first nightmare of the game: The Hill Troll.
The second quest in the life of the game is far from easy, with nasty enemies, a lot of combat, and more encounter cards than you can handle as a new player. Fasten yourself to the raft, it is time for a:
Journey along the Anduin
(or was it a Journey DOWN the Anduin?)
- Found in: Core Set
- Official Difficulty: 4
- Community Difficulty: 5.3
- Encounter sets: Dol Guldur Orcs, Sauron’s Reach, Wilderlands, Journey Along the Anduin
- Quest cards: 3
- Play if: You are on the nostalgic train and want to experience your early game nightmares again
- What is different about this quest?: Requires you to kill the Hill Troll, does not force you to engage, reveals a lot more encounter cards than usual
- Solo or Multiplayer?: I would advice multiplayer, as this quest forces you to do well in combat and questing. More players will allow you to handle the Hill troll easier. However, 4 players may be too difficult as a lot of cards will be revealed. Stick to 2-3 players.
- Can I run Side Quests for this scenario?: Yes, but I would advise going there after the 8 progress on 1B, or during the final stage.
The Quest
Setup
The Setup on quest card 1A has every player reveal 1 card from the top of the encounter deck and add that card to the staging area. This is always a good place to see treachery cards pop up. Most of them do nothing or have a very limited effect. It is always nice to have dealt with say, a Necromancer’s Reach without dealing any damage. It is also nice to see the Hill Troll pop up during this time, as that saves you from revealing him later. The worst case scenario is that you draw another enemy, you will be having plenty of combat in the following rounds, an extra enemy doesn’t help. Drawing 2 Hill Trolls in multiplayer is also a challenge, but at least you have removed both of them from the game afterwards.
After that setup, it is time to search the encounter deck for a Hill Troll if it isn’t already in play. You add him and his 1 threat to the staging area and pass on to the first turn.
Quest card 1: To the River – 8 quest points
This is the quest card where a lot of players have either lost a hero or found themselves scooping after a few turns. The quest card itself cannot be beaten if there are any Hill Trolls in play. The 8 progress is usually not a problem, killing the Hill Troll is. His 6 attack can wipe out some heroes if you don’t draw your defensive attachments first. Chumping is also a bad idea, any excess combat damage from the troll is assigned as an increase in your threat. This makes chumps like Snowbourn Scout and Squire of the Citadel poor defensive options. Better options are allies like Defender of Rammas, who have a higher combined defence and hitpoints.
Attacking the troll back will also prove to be a challenge. His 3 defence is not as high as future trolls, but his 9 hitpoints will take a while to chew through. Having Ranged support from a second player will be incredibly useful.
If you manage to survive the first attack, you have some breathing room. The oldest trick in the book is to wait for the Hill Troll to engage until you have drawn Forest Snare. After the attack, you are able to trap the troll so that it won’t attack you again. however, you will still have to kill him to advance.
Having 8 progress on the quest before the Hill Troll is dead is quite important. You immediately advance once the troll dies. You don’t want to risk revealing another one.
Quest card 2: Anduin Passage – 16 quest points
After all of the trolls have been slain and added to the Victory Display (yay, bye bye Trolls), it is time to board your raft and float down the Great Anduin river. While orcs have no love of water, they will continue to harass you and your board state. So be wary, as Lorien is a long way away still. By this time, the staging area will become flooded with encounter cards. Stage 2B forces the players to reveal an additional encounter card during each quest phase. This is where the quest is also easier with more players. It is less stressing to reveal 5 cards among 4 players, than 2 cards per 1 player.
The quest also states that enemies do not make engagement checks against the players. Players may still optionally engage 1 enemy during the encounter phase. This is a good place to start running Arrows from the Trees, which will clear out the staging area of enemies. However, the locations in the staging area are a larger threat. You will only be able to travel to 1 location a turn, and if you keep revealing more than 1 per turn, you are in danger of entering Location Lock. Bring some location control for this part of the quest. Evening Star, Northern Tracker, and Asfaloth will help you clear the locations, and keep the threat in the staging area low.
During this stage, it is important to prioritise Willpower and Questing over combat. The threat in the staging area can become too much to handle for many players, and some encounter cards will have you remove the precious progress on the quest as well. Be sure to also get your board state ready for the next quest.
Quest card 3: Ambush on the Shore – 0 quest points
At long last, you have made it to shore. This is where the quest flips again from willpower focussed, to combat focussed. The first thing you have to do is adding 2 encounter cards per player to the staging area (as if it wasn’t full already). This is a dangerous moment, as a lot of triggers from the encounter deck will happen at once. However, the silver lining of this is that this is the last time you are revealing cards. You will skip the staging step of the quest phase for the rest of the game. This means that you must still quest and overcome the threat in the staging area, but will not reveal any more cards. This is where you can also clear a lot of the locations in the staging area.
This is where you will confront the enemies you’ve collected in the staging area. You must kill all enemies in order to finish the quest. Fortunately, this is all the enemies you will have to face, however, chances are that a new Hill Troll has reared its ugly head and brought some friends to make your job harder. Again, you will have to finish that Hill Troll off in order to win.
Congratulations, you have now held your own against a tough quest and have had a taste of what LOTR LCG is all about.
The Encounter deck
Global
- There are 47 encounter cards in Normal mode, 32 in Easy mode
- There is a 38% chance of a Shadow effect during Normal mode, 41% during an easy stroll down the Anduin
- The average Threat per card revealed is 1.2 (treacheries count as 0 Threat), this roughly equal for the two modes
- Surge is present on 10% of all cards during Normal mode, 5 cards in total
- The Doomed keyword is not present
- No immunity for any cards.

The encounter deck is focussing more on enemies than during the previous quest. There are also a lot more Treacheries to keep in mind. The overall size of the encounter deck has also increased, making cards like Ranger of the North and Wind from the Sea less likely to show up.
Important to note about this encounter deck is that you will turn over a lot more cards than usual. Not only because there is a lot more Surge added to this encounter deck, but also because the final 2 quest cards are forcing the players to reveal more cards. Cards like Wait no Longer and Gildor’s Council will greatly help you in keeping the cards on top of the encounter deck.
Locations
There are a couple of nasty locations that you might encounter during your Journey.
- The East Bight: Oh no, what is this, a Forced buffer of 6 quest points before you advance? This location might not have a big impact on your threat in the staging area, but you are forced to travel there if you have the option. Bringing location control tech that lets you either blank the text of the card or swap it out from the Active Location slot is advisable.
- The Brown Lands: A 5 threat location is never nice to see revealed from the encounter deck. Even worse, it only has 1 quest point, and you explore it when you travel to it. To counter the insane increase of threat, bring Warden of Arnor, Sneak Attack+Snowbourn Scout, or Asfaloth (doesn’t even have to be attached to Glorfindel).
- Gladden Fields: Another high threat location, but 3 is more manageable than 5. I would advice bringing Warden of Arnor and Strength of Will. This will allow you to clear the location before you have to raise your threat by an additional point during the refresh phase.
- Banks of the Anduin: This one deserves some special mentioning, as it is recycled on top of the encounter deck after you’ve explored it. Since it has no Shadow Effect, it is a good location to travel to and explore. The first enemy will not get any additional effect during combat. If you do not have any combat that round, you will see a 1 threat location next round, let me tell you, there are worse things to reveal!

Enemies
Speaking of worse things to reveal, the enemies in this scenario are quite brutal for the second quest in the Core Set. Creatures, Orcs, Trolls, and Goblins inhabit these shores and don’t like visitors.
- Hill Troll: I’ve mentioned this bad boy a couple of times already. But this is an enemy that you will encounter, so be warned about him. His 6 attack plus excess-damage-is-threat effect will cause you to defend with your heroes during the early game. Keep your threat below its engagement cost until you are certain you can tank the attack and either kill or Snare him. You can also check out this article for more tips on dealing with the Hill Troll.
- Eastern Crows: They surge, they suck. However, if anyone brings Thalin to the quest, they are killed before they can trigger their surge effect. They are recycled into the encounter deck, but at least you have killed an enemy and made sure they don’t drag anyone else out.
- Wolf Rider: Though he himself is not a big threat, his Shadow Effect sure is. He will engage you and make an immediate attack. Afterwards, he is put on top of the encounter deck so that his surge will come into play next round. My advice against him, bring shadow cancellation so that he doesn’t have to attack and be placed on top of the encounter deck.
- Wargs: Oh those puppies pack a punch. They only stay engaged with you if their attack ends up having a shadow effect. Let me remind you that those chances are less than 48% as they themselves have a shadow effect that you won’t reveal. Use Direct Damage to kill them in the staging area, or pull them back to you with Tactics Aragorn.
- Goblin Sniper: See here the birth of the Archery Keyword, 2 years before it is put on a card. The Sniper is a very nasty card as it will deal 1 damage to a character from each player at the end of combat. However, you are not able to optionally engage him if there are other enemies in the staging area. If there are 2 snipers in the staging area, they keep each other protected from optional engagements. Use Direct Damage or Hands upon the Bow to destroy those pesky little Goblins.
- Marsh Adder: This enemy is bad in several ways. First, his high threat will make you want to engage him to clear the staging area by 3 threat. However, his 4 attack is strong enough to chew through quite a few allies. His Forced effect will have you raise your threat by a minimum of 1. And to cap it all off, he requires 8 attack to break his combined defence and hitpoints. He is a nasty piece of work and will require a couple of attacks before you can add him to the Victory Display. Only one copy though.

Treacheries
There are more treacheries in this scenario than the last. However, you can avoid some of the nasty effects if your threat is below 35. The Pursuit by Shadow and Necromancer’s Reach combo will have you damage all your exhausted characters, and raise your threat for all of those that haven’t been committed to the quest out of fear for the Reach. Massing at Night is another terrible card to reveal if you are not playing solo. It will replace itself with X cards, where X is the number of players. Reveal this on Stage 2 with 4 players, and you will be facing 9 cards, with a 10% chance any one of them surge to number 10!

Tips and Tricks
- Don’t start with a threat higher than 30. Not only will this save you from treacheries like Evil Storm and Treacherous Fog (that start becoming horrible past 35 threat), but it also saves you a couple of turns before you have to engage the Hill Troll.
- This quest is incredibly swingy between questing focus and combat focus. Prepare your board state for the next quest card before you advance.
- Always travel, you will get stuck in a location lock if you don’t.
- Try and engage as often as possible during stage 2, this will make the last stage easier.
- Thalin is a good hero to send to the quest, he can kill the crows and deal 1 damage to most other enemies. If you have any other Direct Damage effects, make sure to use them to minimise the number of enemies in the staging area.
- The Hill Troll will be the biggest obstacle in the early game, so having ways to deal with him will be important. Direct damage is a nice way to deal with him, but I will also recommend Ride them Down if you can make a good deal of progress on the quest. This will allow you to discard the Troll without having to engage him.
Playthrough
- Progression style, 2 players: https://www.youtube.com/watch?v=Lx5RL9_0yBA
- Updated card pool, 4 players: https://www.youtube.com/watch?v=FG5cPkIujsk
- Dale deck, 1 player: https://www.youtube.com/watch?v=8mKOOq9t-7w
Have you survived this ride on the river? Good, then I believe the worst is behind us. Oh wait, next up: Escape from Dol Guldur *shivers*.

6 thoughts on “Journey Along the Anduin”