After the betrayal of Captain Sahir at the Temple of the Deceived, he is escaping to Umbar. To cover his escape, the vile pirates attack Dol Amroth, forcing the heroes to fight their way through the Corsair fleet ! A Storm on Cobas Haven has a reputation for being difficult and tricky. But do not fear the dark abyss of the ocean depths, dear reader. Vision of the Palantir is here to guide you safely into harbor.
A Storm on Cobas Haven
- Found in: A Storm on Cobas Haven Adventure pack, Dreamchaser cycle 5
- Official Difficulty: 7
- Community Difficulty: 7.8
- Encounter sets: Corsair Raiders, Voyage across Belegaer, Umbar Fleet, Corsair Pirates, The Dream-Chaser’s Fleet, A Storm on Cobas Haven
- Quest cards: 3
- Play if: You want a showdown against the Corsairs, where you have to defend and escape the harbor. You enjoy ship combat. You want a challenging quest, where you defend against multiple enemies. You like objective cards and locations benefitting the player.
- What is different about this quest?: Sailing. A seperate deck for “smaller enemies” spawning off the ships. You discover and control objectives, representing ships and locations in Dol Amroth. You are able to take over enemy ships.
- Solo or multiplayer?: The quest can be incredibly swingy, due to the presence of huge ship enemies in the encounter deck. In lower player counts you have a higher chance of getting lucky, and avoid the worst of the ship enemies. In higher player counts, they are more likely to appear.
- Can I run side-quests for this scenario?: You can use side quests to stall, since advancing means more ships and more combat. However, the longer you run, the higher the risk of getting a nasty ship enemy.
- What to look out for?: The huge ships that spawns 2 or 3 corsairs. Getting pinned down by archery. Getting location locked from a combination of high threat ships and high threat locations. Getting overrun by tough corsairs when you start engaging the ships.
The Quest
Setup
At first, players are instructed to prepare the Corsair deck. This is done by finding every non-ship enemy in the encounter deck, and shuffle them into a seperate deck, with it’s own discard pile. This deck represents the crew of the ships, and will come into play whenever players engage a Ship enemy. Next, the players prepare their fleet, which requires you to pick one or more of the Ship objectives from the Dream-Chasers Fleet set. Please see this seperate article on the sailing mechanic for tips and tricks on sailing, and for detailed considerations on what ships to pick. Each copy of Dol Amroth warship is set aside, out of play. Short on breath yet? For this setup goes on for a while.

Next, The Raider Flagship and one Scouting Ship are added to the staging area. The Flagship is your main adversary in this quest, and is a nasty enemy. However, the Scouting Ship might represent a more immediate concern. It has a rather low engagement cost of 35, and gets -15 engagement cost if you are off course (which means anything but clear skies – cloudy, rainy or stormy). Additionally it has Boarding 1 (meaning that it comes with an enemy from the corsair deck once it engages) and carries 2 threat, 5 attack, 2 defense and 7 hit points. You can therefore expect combat if you ever fail a sail test. Do not fail the sail tests!
Even though the staging area is crowded with tough ships, we are not completely on our own here. We are next instructed to search the encounter deck for a Dol Amroth objective, and add it to the staging area. Then, we have to shuffle the encounter deck, and resolve the “Guarded” keyword on the objective. This means that you essentially reveal an extra encounter card. You could be lucky and draw a treachery that whiffs, or you can be unlucky and get yet another ship. This first card can lead to some instant scoops in true solo. Even so, we should take a look at the Guarded locations that we have available. For all of the objectives, whenever it is free of encounter cards, it is added to the staging area and the players gain control of it.

First, we have the Sea-ward tower. When the players control the tower, you reveal 2 additional encounter cards for sailing tests, making them much easier. This is worth considering if you run few allies, which generally makes sailing tests more difficult. Tower of the Gull allows you to exhaust it as a combat action and deal 2 damage to a non-unique ship enemy (so no dealing damage to the raider flagship!). If you can stay away from engaging ship enemies, this can be a powerful weapon for dealing with enemy ships. This is a strong contender for your pick in true solo! Keep in mind that this is a combat action so you cannot use it to ping ships before they engage you. The Beacon gives you something to dump those extra resources you generated with Steward of Gondor into. As a planning action you can exhaust it and pay 5 resources to take control of one of the set aside Dol Amroth warships. The ships are decent allies, immune to player card effects, and rock a 2 willpower, 2 attack, 2 defense and 8 hit points, meaning that they can really help you out in combat against enemy ships. However, when you are on course, they get +2 to all stats (except willpower) making them absolute beasts. This is another excellent reason to stay on course at all times! The ships are crucial if you aim to destroy the Corsair Flagship. The beacon is not your obvious first pick. You will need your resources to establish your board state, not to spam ships. Unless you run generous resource generation, this one should go back into the encounter deck. Lastly, we have the tower of the Heron. When the players control it, they reduce the archery total by 4, essentially negating the archery keyword. Again, archery should not be your main concern right away, making it a less useful target to begin play with. You should of course look at the strenghts and weaknesses of your decks when you decide which one to go for, but I would recommend either sea-ward tower if you don’t feel you can spare the allies for sailing, or Tower of the Gull if you are not too combat focused. Tower of the Gull works well with the ability on quest card 1B.
Quest card 1: Outmaneuver the Enemy – 10 quest points

Quest card 1B informs us that we will be doing Sailing tests, and hence should be prepared to commit cheap allies to these tests. Furthermore, it has a forced effect: Whenever a ship engages you, if you are on course, you deal two damage to it. This means that when you control the Tower of the Gull, you can deal four damage to ships at the beginning of combat, possibly destroying it if you can keep it from engaging you for a few rounds and ping it multiple times. However, if you are off course, you deal 2 damage to a ship objective you control instead. Yet another reason to stay on course! Finally, if your course ever goes to Stormy, Raider Flagship gets -50 engagement cost, and will come down to curb stomp you. Needless to say, this is less than desirable. But we have already decided that we will stay on course at all times, so we need not worry about this in the ideal world! You only need to put down 10 progress to advance, but remember that you begin the game with at least 5 threat in the staging area, so you might be a bit stretched on how much progress you can put down. As the When Revealed effect on quest card 2A will reveal another ship enemy, you should think hard about whether you advance without dealing with the Scouting Ship. Furthermore, in the final stage, the number of ship enemies determine how much progress you need to win the game, so think about how much progress you can place in the final round of questing before you decide to leave enemies in the staging area. Build up a board state and see if you can take control of the guarded objective. If you picked tower of the Gull, you might be able to ping the scouting ship for a round or two before engaging it. Also, remember that the ships have the Boarding keyword, meaning that they come with raiders. Remember to hold back allies for defending against the crew. However, your main priority should be to stay on course. If you end up engaging the Raider Flagship, it’s basically game over.

Keep in mind that you can tech against the scouting ship, and effectively negate the looming threat it provides. It is immune to attachments, so no forest snares. But as the scouting ship only has two defence, effects that reduce enemy defense can make it a target of Straight Shot. You can either attack it with a Rivendell Blade (which also provides the weapon you need for straight shot) or play a Marksman of Lorien . Recently, we have been granted another piece which works wonders against ship enemies, namely The Great Hunt. This card allows you to discard a non-unique enemy from the combat area as a combat action, but requires that you pay for the card with resources from three different heroes. The advantage of the Great Hunt is that it essentially bypasses the Boarding Keyword, and thus can be a life saver against the larger ships. Generally, those ships can be game ending, and encounter scrying can do wonders here. The encounter deck can be incredibly swingy. Take every advantage you can get. When I engage ship enemies, I will sometimes allow them to do undefended attacks, if it means I can take down a ship enemy in one turn. For my second ship, I prefer Narelenya as it provides a strong blocker, and an ability that allows me to play many allies for sailing tests. But do not be afraid to take an undefended attack once in a while.

No matter how you deal with the Scouting Ship, you still have to strike a careful balance between questing and sailing. How many characters should you commit to sailing tests? And how should you use your ships? I find it hard to write definite guidelines about this, as it heavily depends on your board state, the number of ship enemies present, and your current course. Generally, I prefer to commit at least 3 characters, or dreamchaser + 1 more. Allies and heroes with readying effects are incredibly valuable here. But it depends of course on how important that test is. Several encounter cards are affected by your current course, so it is really important to stay on course. Encounter scrying and control can also help you here, if you really can’t afford to fail. Otherwise, the usual rules apply: Keep the staging area as clear as possible, build up your board state and stall until you are ready to handle one more ship.
Quest card 2: Battle in the Bay – 16 quest points
When you advance to stage 2, you are instructed to search the encounter deck for a Ship enemy (2 ships if 3 or 4 players are in the game) and add it/them to the staging area. The encounter deck is shuffled, and each unguarded objective in the staging area is attached to a non-unique ship enemy. Hence, if you managed to free your objective in stage 1, it is now taken away from you.
Side 2B instructs you that you will still perform Sailing tests, and that if you ever hit the stormy course, Raider Flagship will once again swoop down and grind you into dust. Remember what we agreed upon regarding sail tests? Good! Never fail them! However, stage 2B comes with an additional caveat – you cannot advance while an objective is guarded. If you have managed to keep a clear staging area, this will not be too much of a problem. But if you have several ships lined up, things can get messy. To advance, you need to defeat at least the ships guarding the objectives. Again, Great Hunt is incredibly valuable. Otherwise, cards like Feint or other ways to block attacks are very effective at ensuring that you can dedicate all resources towards killing the ships in the round that it engages you. I prefer picking a Scouting Ship or a Corsair Skirmisher for stage 2A, but please see a discussion below about the various Ship enemies available. Fight to control the staging area, regain control of the objectives, and quest hard to advance to 3A.
Quest card 3: Break through the fleet! – 5+ quest points

Once you advance to 3A, you make engagement checks against each enemy in play. The Raider Flagship gets -50 for the remainder of the quest. Ouch. To win, you either need to defeat the Flagship, or outrun the fleet. However, this stage gets +5 quest points for each ship enemy in play. So if you have left a lot of ships in the staging area, you will both have a lot of threat in the staging area, and need to quest for a lot for this final stage. Is it feasible to kill the Flagship? It is unique, has 3 threat, 5 attack, 3 defense and 18 hit points. It is immune to player card effects (so no feint), has boarding 1, so you get at least one corsair from it. These stats are not unreasonable. However, the flagship has two additional nasty effects: First of all, it can ONLY be damaged by ship objectives. So you either need a fleet of Dol Amroth warships, or prepare yourself for several rounds of combat. And finally, at the end of the encounter phase, the engaged player draws the top card of the corsair deck, meaning that it keeps spawning enemies for as long as you are engaged with it. This authors has not managed to kill the flagship, but I’m certain it can be done. However, a more reasonable option is to outrun the fleet. With the flagship, the stage will require at least 10 progress to win. If you kept other ships in the staging area, you might need more. If you only have one or two ships in play, you can likely win in one or two major rounds of questing. If you got this far, you already defeated at least one ship, and therefore have decent board control. You therefore shouldn’t have a super busy staging area at this point. Quest hard, and see if you can place the required progress on the stage. Keep some blockers back, but otherwise focus on placing progress. Once you place enough progress, you won the game!
The Encounter deck
Global
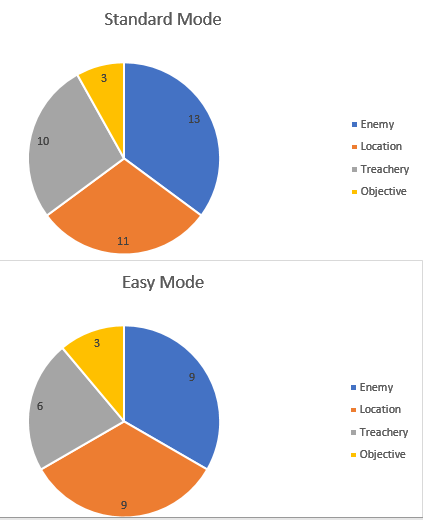
- The encounter deck consits out of 37 cards in Normal mode, and 27 in Easy mode
- The chances of enemies receiving a shadow card with an effect is very rare, only 35% in Normal mode, and 26% in Easy mode. This is one of the quests in the game where shadow cancellation is not a priority.
- The average threat on cards revealed in Normal mode is 1.7 threat per card. In easy mode, this is reduced to 1.6. The threat can range from 0 threat treacheries or objectives, to 5 threat ship enemies.
- The chances of you passing a Sailing test are small, as the ship’s wheel icon is very rare in this scenario. Only 35% of cards have the icon in Normal mode, and 37% of cards in Easy mode. This means that you will likely have to send 3 characters to the test for a reasonable chance of getting 1 icon.
- Surge is only present on 4 treacheries if their effects fail to hit. This means you are likely just looking at 1 card per player for staging during this scenario.
- Doomed 2 is the only iteration of the keyword in this scenario, and occurs if Ramming Speed! fails to perform an attack. There aren’t many other threat-raising abilities in this quest.
- Archery can become a problem with both the Siege Ship (2) and the Corsair Warship (4 if it is in the staging area) having Archery. You can lower the Archery value each round by 4 with the Tower of the Heron. Otherwise, I would advise bringing healing to your decks.
- Immunity
- The Raider Flagship is immune to player card effects
- No ship enemies can have attachments
- Corsair Skirmisher is immune to player card effects
- Dol Amroth Warship is immune to player card effects
- While engaged with an Umbar Captain, ship enemies engaged with you cannot be attacked
- You cannot travel to Belfalas Islet while off-course
These statistics do not count the cards in the Corsair deck, which is only interacted with through card effects and the Boarding keyword. The stats also don’t count the objective that is placed in the staging area at the beginning, nor does it count the Raider Flagship, which can’t be in the encounter deck.
Objectives

In addition to the four ships available for your fleet, we also have the four guarded objectives from Dol Amroth. I already went through them in detail above, which should help you decide which one will begin in play. Once you pick your initial objective, the remaining ones are shuffled into the encounter deck. Depending on the number of players, you might have one or more objectives enter play throughout the quest. The objectives in play can affect what strategy you take. If you get the The beacon early, you can possibly get a few of the Warships into play, which can make a final confrontation against the Flagship more likely to succeed. You are by no means certain to see them, though. The risk of discarding the objectives as either shadow cards or for sailing tests is present. Do not count on seeing more than the initial one, except through special effects such as the Heavy cruiser (and if you see that one, you have a lot of other problems at hand…).
Enemies
The only enemies in the encounter deck are ship enemies, and you are never happy to see those. Ship enemies are brutal, and spawn multiple smaller enemies when you engage them from the corsair deck. The presence of ship enemies can lead to some frustrating moments. You might have the staging area under control, then get a ship enemy during staging, advance to stage 2a where you fetch another ship enemy, and draw a third ship enemy during the next quest phase. It is tough to deal with ship enemies in one turn unless you both have Tower of the Gull and are on-course during stage 1. There are several ways to ensure that you don’t get swarmed by ships. Encounter deck scrying and discarding ships through The Great Hunt were already mentioned in the discussion above. Combat tricks such as feint are very handy to ensure that you don’t need to defend, and can concentrate your forces on attacking instead. But threat control is also really important, as it can help you decide when to engage ships, rather than having to engage them. But leaving ships in the staging area can be a slippery slope. Remember that once you do engage, the boarding keyword ensures that you have more than just a tough ship enemy to deal with. And you need your characters for sailing AND questing, which can easily exhaust all your allies, leaving you without avaiable characters for combat. Therefore, I generally recommend that you deal with ship enemies as they appear, unless you can quest through all of them in the staging area. At higher player counts it is much easier to get overrun, as there are quite a few ship enemies in the encounter deck.
Scouting ship is the first ship you will see in play, together with the Flagship. I already discussed in detail above how you effectively deal with the Scouting ship (NEVER stray from the course. Just don’t do it!). As ships go, this one is not too bad. Low defense and few hit points makes it a manageable threat. You will often sigh of relief when you realize that the ship you drew was “just” a scouting ship.

Light Cruiser is definetely a worse draw than scouting ship. 4 threat, 6 attack, 5 defense and 7 HP ensures that you will have a tough battle on your hands. As all ship enemies, it is immune to attachments to prevent Forest snare/ranger spike shenanigans. In addition it comes with Boarding 2, giving you two draws from the corsair deck. Additionally, these enemies will enter play with a resource on them, which generally makes raiders stronger (see the description of the Corsair deck below for details). These extra enemies means that you will likely be unable to deal with it in the round that it appears. An engagement cost of 37 means that you will likely be able to decide when to engage it, but the 4 threat are not very nice (remember, the flagship will be there too for most of the game).

However, if you thought the Light Cruiser was bad, please let me introduce you to The Corsair Warship. This bad boy only adds 3 threat, which makes it slightly more desireable to leave it in the staging area (however, as you will find out in a moment, you really don’t want to…). It hits for 8(!) which means that you will likely have to block it with one of your ships to minimize the damage. It also packs 4 defense and 9 hit points, making it no small feat to defeat it. It is immune to attachments and has Boarding 3. THREE! This means that in the round that you engage it, you will have to deal with at least 4 attackers. It is absolutely brutal. It is a prime target for the Great Hunt. Even more so than Light Cruiser, you can choose when to engage it, as it has an engagement cost of 44. But as you might have guessed, such a high engagement cost comes at dire cost. While it is in the staging area, it cannot be damaged (negating Tower of the Gull) and gains Archery 4. Hence, if you leave it in the staging area for two rounds, it is the equivalent of an undefended attack (though the archery damage can be distributed of course). However, archery damage can be managed, through healing effects (Warden of Healing is of course state of the art, but Ioreth is another option). Another more recent tech is mithril shirt. While guarded cards in general are really dangerous to play in this scenario, due to the presence of ship enemies, Mithril Shirt only fetches locations. It can negate some archery damage. However, the Warship is a threat you will have to deal with sooner rather than later. Strike hard and strike fast, and see if you can take it down in one strike. A couple of pumped up Erebor Battlemasters are always good for this kind of job.

Corsair Skirmisher is one of the least dangerous ship enemies, with an interesting possible reward for defeating it. It adds 3 threat, has 4 attack (which is pretty tame by ship standards), 4 defense and 6 hit points. it is immune to player card effects and has Boarding 1. It has an engagement cost of 28, making it a threat that most decks will have to deal with when it appears. When you defeat it, the engaged player can discard characters with a combined willpower of 3 or more, and take control of it as an objective ally with 3 willpower. This is a thematic home-run, allowing you to take control of the enemy ship, and requiring your crew to steer it. It is also a ship, meaning that it can damage the Flagship. If you aim to defeat the Flagship, you should aim to take control of the Skirmishers. You can tech with the specific aim of recurring the allies that you discard to take control of it. Glorfindel is so badass that he can sail the ship all by himself, and be back from the discard pile next turn, if you have the resources to pay for him. If you have To the Sea! To the Sea! in play and play Erestor, it will cost you next to nothing. Likewise Outlands kan likely spare a Hunter of Lamedon boosted by Ethir Swordsmen, and recur it next phase with Men of the West. Of course you can also just bring any ally back with good ol’ Stand and fight. All in all, the skirmisher is a fun, thematic card, and most of the time it is not the worst ship enemy in the encounter deck. It is a good candidate for the ship to bring out during Stage 2A.
Siege Ship is the middle ground when it comes to ship enemies – not particular easy but not terrifying either. It adds 2 threat (meh), hits for 5 (ouch) and comes with 5 defense and 7 hit points, making it hard to damage. It has archery 2, making it a potential problem if you allow it to stay around. It cannot have attachments, and can be a nuisance as it gains control of unguarded objectives at the end of the quest phase if it is in the staging area. Remember, we cannot advance from stage 2B unless we have control of all objectives, so this a threat that has to be dealt with. It has an engagement cost of 46, allowing you to pick when to engage it. It does not come with a crew (no Boarding) so you can hopefully engage it and send it to the bottom of the ocean quickly. If you go the ally swarm route, this should be done in a few turns.

Lastly, we have the Heavy Cruiser, strong contender for most hated ship enemy in the encounter set. It adds 5 threat, which can be devastating for your opportunities to quest. It has boarding 2, and cannot have attachments. Furthermore, when it is revealed you search the encounter deck and discard pile for a Dol Amroth objective, and add it to the staging area, guarded by the Cruiser. Good luck advancing to Stage 3A from here, pal. Remember, we need to control ALL of the objectives to do that… The ship attacks for 7, making undefended attacks unpleasent for your fleet. It also has 5 defense and 8 hit points, making it rather hard to defeat it in a single round. This ship can end your game quickly in true solo, as it makes it very hard to quest succesfully. It has an engagement cost of 42, so you can leave it in the staging area for a while if you can quest over it. Otherwise I advice you to deal with the crew first while blocking with one of your ships, and then take it down once the crew is gone.
The Corsair Deck
The Corsair deck is a special encounter deck, representing the crews of the ships that you engage. They generally profit from attacking by stealing resources, making themselves stronger in the process. Various card effects can add extra resources, giving you tougher enemies form the get go. All corsairs have engagement costs, but they only really matter for players cards caring specifically about engagement costs (such as Hobbit decks). You will engage them when you draw them.
Southron Sailor is not a tough enemy, but can cause you problems if your staging area is busy and you can’t dedicate many characters for questing. He has an engagment cost of 28, 0 threat, 2 attack , 1 defense and 4 hit points. When he is engaged with you, ship enemies that you are engaged with add their threat to the staging area. This can be very tough if you draw him with the Heavy Cruiser or the Warship. Otherwise, he is a preferable enemy to draw. He doesn’t hit too hard (meaning that you can take undefended attacks from him), and is rather easy to kill.

Cunning Pirate can be a more dangerous enemy. Without buffs, he has 1 threat, 2 attack, 2 defense and 4 hit points. However, he gains +1 attack and +1 defense for each resource on him. This can be a problem if he spawns from the Light Cruiser, which adds an extra resource. Additionally, when you engage him he forces you to discard an attachment, and place resources on him equal to it’s cost. You can tech against this in two ways – run some 0 cost attachments as damage control (cram, Blood/fire, spare hood and cloak, etc.), you can choose to not run expensive attachments, or you can bite the bullet and sacrifice a more expensive attachment. Generally the final option can be a major setback, as your more expensive attachments are often the backbone of your strategy. Loosing a To the sea, steward of Gondor or even 1-costs such as O Lorien can really hurt your momentum. Therefore, I started running backup attachments when I played Dream-Chaser quests. Furthermore, you have a 4 attack enemy requiring 8 attack to kill when he steals your Steward. Think about it before you underestimate this guy.
Vicious Marauder steals a random card from your hand, and gains resources equal to it’s cost. Whenever he attacks you, you distribute damage equal to the number of resources on him among characters you control. This can really hurt if you sit on a Gandalf waiting for a sneak attack, or you run decks with a lot of cost reduction, such as Radagast or Noldor decks. If you have sufficient card draw, your hand should have several cards, and not be clogged by expensive allies (otherwise you might have a problem with your cost curve). He adds 2 threat, 3 attack, 3 defense and 3 hit points. As the resources do not add to his stats, he is usually a minor problem. If is annoying if he nicks your key combo piece, but then again why is that in your hand and not on the table?

Umbar Captain is a mini boss in the Corsair deck, and he carries the stats to show it. 40 engagement cost, 4 threat, 5 attack, 3 defense and 5 hit points. While you are engaged with him, characters you control cannot damage ship enemies. This is normally not the biggest issue, as this guy in himself represents a threat that must be dealt with right away. His high engagement cost means that you could prevent him from attacking with Gaffer Gamgee, or you could use old combat tricks such as feint. The 8 attack power required to take him down is not trivial, and can overwhelm you if you get him one of the first few turns. Remember, if you see him, you are already engaged with him. He is also pretty dangerous if you get him as part of a Boarding 3 resolution, as he will come with his shipmates. Block him with a chump or a dedicated defender, and bring him down hard. You will have to, if you intend to sink his ship.
Umbar Raider has 2 threat, 3 attack, 2 defense and 4 hit points. With a threat of 24 he will be immune to most hobbit shenaningans. He gets +1 attack for each resource on him, and steals a resource from one of your heroes whenever he attacks. He is a good argument for spending those resources, so ther is nothing for him to steal. In that case, you can quickly bring him down, as he “only” requires 6 attack power. Remember those early days in Moria when goblins required 2 to 4 attack power to go down? Life on the sea has hardened those corsairs… It goes without saying that it should be a priority to deal with these Raiders, so they don’t grow out of control.
Corsair Infiltrator is another Corsair enemy that is a pretty good draw. He has 2 threat, 3 attack, 3 defense and 2 hit points. He gains an extra shadow card for each resource on him, but only collects resources if you leave him in play. When the engaged player collects resources, he steals one of them. This means that he will hinder you form playing cards, and potentially get a lot of shadow cards. 3 defense also means that he might be hard to kill – remember, you have sailing tests, questing and combat against a ship in addition to dealing with this guy. It should be a priority to kill him fast, but it is not the end of the world if he stays for a round or two.

Lastly, we have the Raid Leader , another enemy that can grow in power level if you leave him for too long. He has an engagement cost of 40, 3 threat, 5 attack, 1 defense and 5 hit points. However, that 1 defense is deceptive – when he engages you, you move 1 resource from EACH of your heroes to him. This can absolutely gut you, if you save your resources to play expensive allies, and is yet another reason to spend those resources rather than saving them. His 5 attack also means that you need to chump him, or use a dedicated defender like Beregond or spirit Dain. These dudes (because naturally there are two of them in the corsair deck) can really mean trouble, and overwhelm you if you get him early on. Hope you see him when you have spent all your money on allies and attachments.
Locations
Compared to the nasty ships in the encounter deck, I’m almost relieved whenever I see a location appear. Given that you need allies for so many tasks (questing, sailing and combat), locations can definetely lock you down, prevent you from progressing. Even more so because you are likely to leave some ships in the staging area, as it is very hard to deal with more than one at the time.

Starlit Sea has 3 threat, but other than that, it is almost a free card. 2 progress means that it is easy to deal with (especially with Asfaloth), but even the travel cost is rather benign. If you are off-course, you need to raise your threat by 3 to travel there. This can certainly be dangerous, especially if you are approaching the engagement cost of a nasty ship and you are not yet ready to deal with it. But besides that, I’m happy to see this one. As a shadow card, it can be problematic, as it grants +1 attack, or +2 if you are off-course. But we have already established that we will not go off-course, so we need not worry about the last part.
Fog Bank adds 2 threat and requires 5 progress to be explored. It can give you a well-deserved break from ship combat, as you can hide out and catch your breath. When fog bank is the active location, ship enemies do not make engagement checks, cannot attack and cannot be attacked. Keep in mind that you can still use your ships for sailing tests and questing, so use this advantage wisely. Also note that this only applies to ships and not corsairs, so the fog bank can be used to take out the crew, making combat against the ship easier. One of the dangers of fog bank is that it requires 5 progress, and you might not be able to (or even want to) clear it in one round. Ships and other locations might accumulate in the staging area, and it can therefore contribute to location lock. Caution is adviced. As a shadow effect, it adds the dreaded “enemy makes an additional attack after this one”, which can be brutal with the large ships. However, this is only when you are at the worst setting, so it is very conditional.

Coast of Anfalas can be a problematic location, and might be worth bringing location control for. It has 3 threat and 3 progress, and gets +2 threat if you are off course. This can contribute to severe location lock. Furthermore, traveling requires you to exhaust a ship objective. Generally your ships are a precious resource, and having to use them on this can feel like such a waste. it is easier if you have caught a Skirmisher, or built a Dol Amroth Warship. Thror’s map is also a good piece of tech, allowing you to bypass the travel cost. Generally, I’m less happy to see this one. As a shadow it grants +2 attack if you are off-course.
Belfalas Islet is another location that you will be happy to see. It only adds 1 threat, which means that it is generally safe to leave it in the staging area for when it is needed. You cannot travel to it when you are off-course. It requires 5 progress, which is not trivial. The response can give you a much needed break – when you travel to the Islet, you choose an enemy ship (that is not guarding an objective), and as long as the Islet is the active location, the ship is considered out of play. Of course this does not work on the heavy cruiser, but it can be great against the ships with archery or high threat. Use it wisely.

Cobas Haven is the titular location, and is another helpful location in a punishing quest. It adds 2 threat and requires 4 progress. When it is the active location, you reduce the Boarding value on ship enemies by 1, with no lower cap (so it can be 0). It goes without saying that this can be immensely helpful. I recommend leaving it in the staging area for when you are ready to deal with the various ship enemies. It is handy to have one when you finally need to engage the flag ship in Stage 3A. Another location that you are happy to see.
Treacheries
A Storm on Cobas Haven is a strange quest in that you fear the ship enemies so much, that revealing a treachery can sometimes feel like an easy turn. However, they can throw your plans to the wind, especially if you plan to avoid engagements. As always, Test of Will is a powerful tool in your arsenal.
Boarding Party fetches an enemy from the raider deck for each player, and can generally turn your plans upside down. If you are already getting swarmed, ti can be the final nail in your coffin. In a solo game, this can be ok, as the raiders can be a minor threat compared to a ship enemy. In higher player counts, it can be a candidate for cancellation, depending on how things are progressing. As a shadow card it gives +1 attack, or +2 if you have an exhausted ship objective (which is highly likely).
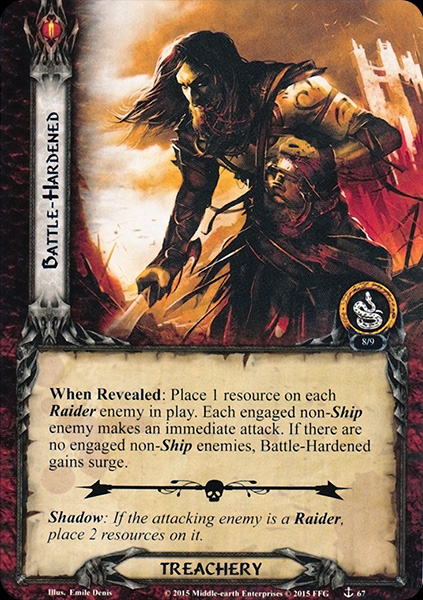
Battle-Hardened is another corsair-specific treachery, that adds a resource to each non-ship enemy in play (i.e. corsairs), and makes every corsair make an immediate attack. If no non-ship enemies are in play, it surges instead. The effect can cause major problems if you just engaged a large ship, or just drew a Boarding party, but it generally shouldn’t cause too many problems if you make sure to clear your enemies. In a major battle, it might be worth to cancel it. As a shadow card, it grants 2 resources if the attacker is a raider, which can be bad if it lands on an Umbar Raider.
Ramming speed! is the first in a trio of thematic treacheries, dealing with the ship battle. This one punishes you if you are off-course, making the engaged enemy ship with highest attack value perform an immediate attack. For each damage dealt by this attack, +1 threat is added to the staging area until the end of the phase. If no attack is made, the card gains Doomed 2 instead, making it more likely that you will engage ship enemies in the staging area. As with most of the treacheries, severity is context dependent. Cancel at your own caution.

Taking on Water is added to a ship objective as a condition attachment, and deals 2 damage to the ship every time it exhausts. Depending on the state of your fleet, you might be able to soak this for a few rounds, but it essentially removes a ship from your fleet, which is bad news. In a highly thematic piece of design, you can discard this condition attachment by exhausting 3 characters, sending them to repair the leak. Depending on how swarmed you are, this might be easy or really hard. Power of Orthanc or Miner of the Iron Hills is an easy way to deal with this condition. As a shadow card, it is added to the defending character if the defending character is a ship.

The Raider’s Assault can be a major setback, especially if you have a nasty ship in the staging area, and you are trying to advance from 2B. It forces you to attach an objective location to a ship not guarding another objective. If the ship is engaged with a player, it is returned to the staging area, meaning that engagement effects such as Boarding will resolve once again. If no ship is returned to the staging area, the treachery gains surge. This can be absolutely game-ending, if you get a strong ship and you are not ready to deal with it because of raiders. While I’m not entirely certain of the intend, it sounds like that this could cause an objective to be attached to the Flagship. This is a prime target for A test of Will, as it can ruin your game.
Tips and Tricks
- Like with all other sailing quests, it is not advised to fail sailing tests. This may be difficult in the early game, as you won’t have enough characters to both sail, quest, and do combat. But if you are able to spam cheap allies into play with Man the Walls or other cost reducers, you stand a better chance. Another good option is Elven Jeweler, as she can be played by discarding cards, allowing you to play her first turn in addition to what you can pay for with resources. In addition, it can be necessary to send the dream-chaser for the first few turns, until your board state is more stable.
- I have mentioned it several times already, but The Great Hunt is the perfect tech for ship enemies. The enemy is discarded, and the Boarding Keyword never resolves. While the great hunt requires resources from 3 different heroes (pushing you towards mono-lore), it is important to note that it does not require a printed lore icon, in contrast to the mono-cards from the Against the Shadow cycle. You can therefore grant lore icons or play A good harvest, unlocking your ability to play The great hunt. It is a powerful tool, so use it.
- Keep in mind that Ship Enemies can only be blocked by Ship Objectives, but with the exception of the flagship, they can be attacked by allies. Your ships have a lot of hit points, but not many abilities deal direct damage to ships. You can therefore afford an undefended attack from time to time. Use this to strategically take out enemies, if negating to block allows you to deal sufficient damage to kill the enemy. The same strategy goes for the corsairs. Several of them attack for 2, and though shadow effects can ruin the day, usually an undamaged hero can survive a 2-3 damage undefended attack. Enemies come in waves in this quest, so you have to survive those waves (no pun intended) and clear out enemies to gain a foothold.
- Make up your mind whether you will defeat the Flagship in combat, or outrun it by questing hard upon advancing to 3A. If your strategy is to kill it, you likely need to spawn a few Dol Amroth Warships before advancing. Your strategy should be reflected in what objective you decide to pick, as discussed above.
- Encounter deck manipulation is great to make sure that the Guarded locations enter play, and not just get discarded as shadow cards and sailing tests. A Shadow of the Past can be used to send a discarded objective back to the top of the encounter deck.
Playthroughs
The quest doesn’t yet have a lot of playthrough videos online as of yet. But the list below will be updated whenever new videos are uploaded.
- True Solo, Seastan deck (with SPippin!?!): https://www.youtube.com/watch?v=ULG4EVowU3o
- Two handed, progression style: https://www.youtube.com/watch?v=zxBZLfJMAA0

5 thoughts on “A Storm on Cobas Haven”