It has been a while since the latest overview of a Nightmare scenario, but since I picked up the entire first cycle in Nightmare mode, I thought I might as well try and bring you all another one of these. The Dead Marshes has been a quest that is easy to forget for most players, since the quest can be over very quickly if the players rush the quest. If the players manage to pass the Escape tests from Gollum, they could end this quest within just a handful of turns. However, this quest is also notorious for putting Gollum in the discard pile, after which it becomes quite a challenge to get him back in order to win the game. The nightmare version of this quest adds more thematic enemies and locations, and doubles down on the Escape test mechanic of this cycle. By removing certain cards and adding in new Nightmare cards, the players run a much higher risk of losing Gollum and eventually dying trying to find him again. But to those looking to complete this scenario in Nightmare mode, hopefully this guide will help you.
Nightmare The Dead Marshes
- Found in: Seperate Nightmare pack: The Dead Marshes
- Size: 19 new encounter cards, 1 new rules card
- Increase in Difficulty?: Yes, this version adds a lot more escape tests and makes it tougher to win them. This will drag out the quest longer, making it more difficult to win. However, most of the enemies in the original encounter deck are removed, removing the threat of getting a double Hill Troll early on.
- Fixed loopholes?: The scenario fixes that Gollum could enter the discard pile, forcing the players to churn through the encounter deck before reshuffling the entire thing. Now, when he is discarded, he is instead shuffled back into the encounter deck. This does not mean that the players can fail Escape tests while he isn’t in play though. The new unique location will gather his resources, making him more slippery when he enters play. Stalling for too long will also no longer be an option, as the Nightmare version prevents the players from lowering their threat permenantly.
- New mechanics introduced: The Mere of Dead Faces will serve as a temporary bank for all of Gollum’s resources while he isn’t in play. This means that players must still pass Escape tests.
- Play if: You want a more haunting quest to play, with Undead enemies instead of large Trolls that have no place in the marshes. You like the Escape tests for some reason. You want to put a heavy willpower deck through a trial by fire. You want an unbroken version of this quest, where Gollum doesn’t take 40 turns to show up again.
- Can I run side-quests for this scenario?: I think you can, if you are sure that you won’t be rushing this quest. When Gollum is not in play, there is no real reason to making progress to advance the main quest. So questing against side-quests will be in your best interest. A good side-quest for this scenario is Rally the West, which will boost willpower on heroes, making the Escape tests easier to do with your heroes. Note that Double Back is not an option, as you are unable to lower your threat.
- What to look out for: Threating out due to no possibility of threat reduction, quest dragging on for too long thanks to Gollum entering the encounter deck over and over again, getting swarmed by Undead enemies that try to make you light candles of your own.
New Rules

The new rules of the Nightmare mode are listed on the special rules card that is placed next to the quest deck. For the new rules, there are two rules that are important distinctions between the Nightmare version and the regular version of this quest. First of all, the card informs players that they are unable to reduce their threat. This straight up cancels all forms of threat reduction, or “set your your threat to X”. As a result, the players are on a strict timer that forces them to complete the quest without too much stalling, else they will reach the 50 threat and threat out. The restriction on threat reduction also means that you have to be careful with your own threat, so Doomed cards and cards like Boromir (who originally was introduced in the same pack as the standard version of this quest) are very poor choices for this scenario. It also means that players will have to watch out when their threat is higher than the engagement cost of enemies, as this can cause combat to happen earlier than expected without a quick tool to reduce your threat. You can still increase the engagement cost of enemies though, which is essentially the same as lowering your threat, except for the whole 50-threat-means-death thing.
The second rule on this card is a quality of life update to the quest to fix a broken mechanic from the normal version of this quest. In the normal version, if you lost Gollum due to giving him 8 or more resources, he would go into the encounter deck. You then run the risk of discarding him while making an Escape test or through a shadow effect. He would then end up in the discard pile, and unless you had access to Shadow of the Past or The End Comes, you would have to wait until the entire encounter deck was empty, before shuffling him back in, which caused you to run the risk of losing him again. With the new rule, Gollum will always be shuffled into the encounter deck whenever the players end up discarding him. This makes him appear during the staging step far more often, which allows players to actually beat the quest. This also means that Gollum turns into a free shadow card and a free Escape value card whenever he is discarded. This also triggers when Gollum is discarded from the top of the encounter deck through player card effects, such as playing a Guarded card. After resolving the keyword, shuffle Gollum back into the deck. The new rule should at least get you Gollum back sooner than you otherwise would, making this a welcome change from the normal version of the quest without hurting the players too much in the process.
New Setup
The new setup of this quest is pretty straightforward, with no added quest stages or difficult extra decks that you have to set up first. You simply remove a good chunk of the normal encounter deck, and add the new encounter cards. Give them a good shuffle, and you should be ready to go. Before you do, please note that as a part of the new setup, you have to find the unique location Mere of Dead Faces and add it to the staging area. This location will stay in the staging area for the rest of the game, collecting resources while Gollum is in the encounter deck. Besides adding that location to the staging area, the regular setup rules for The Dead Marshes are resolved, where Gollum is added to the staging area, and each player reveals one encounter card. With the higher density of cards that force you to make an Escape test, you may end up with a hero down already for the test.
There is a bit of a discussion to be made if Gollum should start with 2 resources on him since he enters play at the same time as the Mere of Dead Faces. I will leave that up to the players to decide, whether or not Gollum enters first, and therefore doesn’t get the added 2 resources, but in either case, you might end up losing him quickly through the quest mechanics. If you are planning on stalling, those 2 extra resources won’t matter too much.
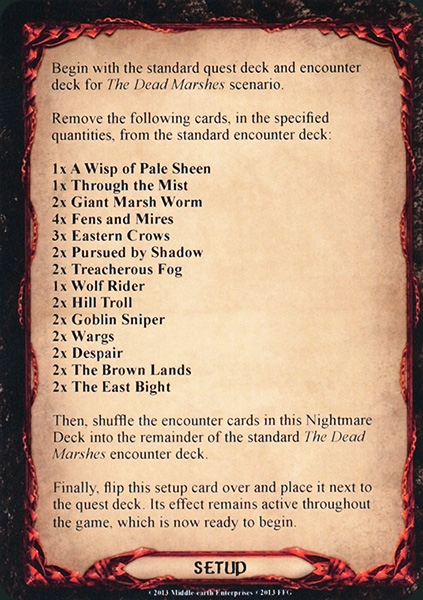
Cards Removed
The following cards are removed from the standard encounter deck to make room for the new Nightmare cards.

- 1x A Wisp of Pale Sheen (Removed some weird art)
- 1x Through the Mist (Removed one copy to make room for other Escape test treacheries)
- 2x Giant Marsh Worm (Removed half the worms to make room for Undead)
- 4x Fens and Mires (2/2 location that was easily explored in the staging area)
- 3x Eastern Crows (Weak enemy that kept the encounter deck filled with Escape 0 cards)
- 2x Pursued by Shadow (If there is no threat reduction, there is little need for more threat)
- 2x Treacherous Fog (Softball treachery that also has no Escape value)
- 1x Wolf Rider (Made no thematic sense)
- 2x Hill Troll (Made no thematic sense, but players will be relieved)
- 2x Goblin Sniper (Made no thematic sense)
- 2x Wargs (Made no thematic sense)
- 2x Despair (No need to restrict progress if players aren’t advancing the main quest)
- 2x The Brown Lands (No thematic sense)
- 2x The East Bight (No thematic sense)
These are some big cuts to the encounter deck, removing the entire Wilderlands encounter set from the original encounter deck except for the thematic Marsh Adder. The Sauron’s Reach encounter set also got cut down to just the 3 copies of Evil Storm. This removes a lot of cards that had no Escape value, making the tests even more difficult. The encounter deck will also be thinner as a result, as 28 cards are removed, and only 18 are added to the encounter deck (not counting The Mere of Dead Faces). This makes Gollum appear even faster than he used to in the Normal encounter deck.
The Quest

With not many new mechanics added, the base game remain much the same from the regular Dead Marshes quest, but with added difficulty. The removal of a lot of cards that didn’t have an Escape value, will mean that you are much more likely to encounter cards for the Escape test with a value greater than 0. Remember that while Gollum is in play, he forces the entire group to make an escape test, with 1 card from the encounter deck per player. It is therefore a good idea to make sure that all players have good willpower going into this quest, as they will need it in order to carry the weight of the team during these tests. Willpower is absolutely essential in this quest, so prioritize it above all else. Also note that when an Escape test must be made, there must be a character committed. You can’t just fail the test and soak up the resources on Gollum, a character must be exhausted for this. Because this is the case, either play with a lot of characters, or have enough readying abilities on your heroes to pass the tests while also sending them to the quest.

Your goal remains the same for this scenario as with the Normal version, you have to capture Gollum. For this, it is important that you move fast, before Gollum has a chance of escaping into the encounter deck. The main quest only takes 12 progress to clear the first stage on, and stage 2 just takes 3 progress before you get to make the final Escape test. During this time, it is important that you have enough willpower to both complete the quest, and win all Escape tests, though scrying and careful planning will be needed in order to be sure that you win those tests. Even then, new encounter cards feature higher Escape values and will add more to the total escape value revealed while in play.
Should you fail to capture Gollum before he ticks up to 8 resources, then Gollum is shuffled into the encounter deck and the players have to focus on clearing the board while waiting for him to return. This can take a while, although a thinner encounter deck and the new rule that shuffles him back in if discarded, can mean that Gollum is back in play faster than he would be in Normal mode. When Gollum re-enters play though, the unique location The Mere of Dead Faces triggers. This location is the only added mechanic that is troublesome to the players (besides the inability to lower your threat). This location will sit in the staging area and will gather resources that would otherwise be placed on Gollum if he were in play. When Gollum re-enters play, the Mere of Dead Faces places 2 new resources on him, and then moves all resources that have accumulated on the location back to Gollum. This can mean that Gollum immediately goes back into the encounter deck if this effect places 8 new resource tokens on him. However, this does lighten the threat in the staging area a lot, as the Mere will start again at 0 resources, and thus 0 threat. If you are revealing Gollum when the encounter deck is really thin (0-10 cards), then this is a great way to remove a lot of threat out of the staging area, and hopefully get Gollum back again either that turn or the next. He will constantly get 2 resources on him though, so you can’t fail too many Escape tests before Gollum flees again.

While I did mention that willpower should be a priority in this quest, it doesn’t mean that there won’t be any combat. The nightmare version adds a lot of very nasty enemies to the encounter deck that are best avoided if possible. As this is a Nightmare version, all sense of encounter deck balance is thrown out the window, and enemies are starting to get stats of 5 and higher for their attack and hitpoints. This makes it very dangerous to stay engaged with these enemies for long, but killing some of them can cause them to make your progression tougher. Lost Soul of Lorien will for example make sure that one of your heroes no longer has any willpower. Other enemies will force the engaged player to make more escape tests, which can be problematic if engaged with the wrong player.
In my eyes, the best strategy is to move as quickly as you can through the quest. Blitz the quest phase and even suffer some resources on Gollum if needed. Advancing quickly means that there will be fewer encounter cards out there for you to worry about, and Gollum will have no time to escape. This can backfire horribly, but if you quest hard enough, you can get through the quest in a handful of turns with Gollum having around 4-6 resources on him. Play a universal readying effect on the first player once stage 2 has been cleared, and have that player go all-out against the Escape test. While there is no guarentee that this will win you the scenario, it is better than sitting in the middle of the swamp, watching all the undead in the staging area engage you and do horrible things. The quest is also rather keen on discarding heroes and doing a lot of direct damage effects, so you will be best off clearing the quest as soon as you possibly can.
The Encounter Deck
Global
- The new encounter deck loses a lot of cards, and is slimmed down to 43 cards, not including Gollum or the Mere of Dead Faces.

- This is a quest where shadow effects are very rare, with only 21% of cards having a shadow effect.
- Out of all the cards in the encounter deck, 65% of cards have an Escape value of at least 1. This can range from 1 to 10.
- The average threat on cards revealed is 1.3 per card. This can range from 0 threat treacheries to 4 threat enemies.
- The Surge keyword can only be found on Devilry of the Dark Land, if its ability does not return any Undead from the staging area.
- There is no mention of the Doomed keyword, but with various effects raising your threat, and the inability to lower your threat, makes it difficult to include player card effects that raise your threat.
- Immunity
- The Mere of Dead Faces cannot be travelled to.
The encounter deck includes a ton of treacheries, and 12 of them will force players to make escape tests. This will mean that treachery cancellation is going to be very important in this quest, as you can bypass all of these tests that way. The low chance of hitting a shadow card effect is also nice, but be warned that the effects that can appear are pretty bad, and have the potential to straight up discard a hero, causing the attack to be dealt undefended.
Enemies
The encounter deck removed a ton of enemies to make place for 4 new sorts of Undead enemies. These tend to mess with the players, forcing them to make more Escape tests or limiting their ability to send characters to the test. None have an Escape value though, so they will be good to discard during the tests.
- Things in the Pools: The first enemy on this list is the Things in the Pools. This Undead enemy will likely sit in the staging area for the majority of the game, as its 50 engagement cost will prevent it from coming down naturally. Players can still engage this enemy optionally though, removing 3 threat from the staging area. I will recommend doing this if you are not going to be engaging anything else in the staging area this round. It is a good enemy to get out of the way early, since it is going to become quite troublesome if left unchecked. This is because of the ability that is active as long as the Things in the Pools is in play. If characters commit to an escape test while this enemy is in play, that character gets dealt 1 point of damage. This can destroy some weaker allies that you might want to send to the test, but the damage will also become annoying on heroes if you keep testing with the same hero over and over again. Also note that the damage will stack on characters if there are more than 1 Things in the Pools in play. There is a total of 3 of these enemies, so taking 3 damage on each testing character could be the end of you. Killing these Things is going to be a high priority, but the designers know this, so they made them extra bulky. The Things in the Pools have a large pool of hitpoints, which is on par with most boss-level enemies. 8 hitpoints is quite a lot, and will need some serious dedication to get through. Luckily, the 2 points of defence make it relatively easy to deal damage, meaning that you will eventually be able to clear this enemy. The attack of 4 is pretty nasty, so you will need a dedicated defender to deal with this. The chances of a shadow effect are pretty low, but you might encounter a second copy of this enemy as a shadow card. Its shadow effect will boost the attack value by +1, or +2 if the attacking enemy is Undead. This will be the case for most of the enemies in the encounter deck, with only some worms and adders that aren’t Undead.
- Marsh-Wight: The next Undead enemy in this encounter deck is the Marsh-wight. This enemy won’t bother player for the start of the game, as it has an engagement cost of 40. However, the threat of 4 might be reason enough to want to engage this enemy. Eventually, you will have to deal with the Wight, as you can’t lower your threat, and this scenario can take long enough for you to reach the 40 threat. Once the Marsh-wight engages a player, that player has to take a regular escape test, dealing 3 cards from the top of the encounter deck. This is quite a lot of escape value that can be revealed in 3 cards, so unless you really can’t take the extra attack. Failing the quest will cause you to place 2 resources on Gollum (or Mere of Dead Faces) and the Marsh-wight will make an immediate attack. This causes you to take its 3 attack twice in the round you engaged the Wight. The Wight isn’t that dangerous while engaged though. 3 attack, 2 defence, and 5 hitpoints is pretty standard for a Nightmare enemy, so you can prioritize killing other enemies before dedicating your attackers to this enemy. There is no real penalty for keeping this enemy alive if it is engaged with you, so you can take it easy.
- Lost Soul of Lorien: There are 2 things that stand out most with the Lost Soul of Lorien. The first thing is its high attack of 5, which is unusual for enemies to have while also having a medium engagement cost. This means that cancelling the attack on this enemy can definitely be worth it, else your defenders might die. The second thing is that the Lost Soul is destroyed with ease. 2 defence and 3 hitpoints is nothing compared to the rest of the enemies in this encounter deck. But the Undead enemy plays into this, as it will force the players to attach this Lost Soul to a hero with at least 1 willpower upon its destruction. This can be a hero controlled by any player, so it doesn’t have to be with the engaged player. While attached, the Lost Soul will be a Condition attachment that will reduce the hero’s willpower to 0. This is obviously meant to hurt the heroes so that they can no longer be of use during standard Escape tests. However, if you have Tactics Theoden on the table, or are boosting willpower on other heroes that usually don’t commit to Escape tests, defensive or offensive heroes can get this Soul and not be too bothered by it. This does remove the Lost Soul from the encounter deck, slightly raising the chances of shadow effects and escape values hitting. But if you have a hero who doesn’t test often and has at least 1 willpower, then they are the perfect target. Note that the Lost Soul is limitted to one per hero, so you can’t stack these on one hero and call it a day.
- Ill-Fated Guard: The final enemy on this list is also the one that will be engaging you the earliest. As a result, the Ill-fated Guard doesn’t have that much threat, but does have a nasty ability while it is engaged with a player. If a player has a threat of 18 or higher, the Guard will engage. This doesn’t cause concern right away, as there is no Forced effect and the attack stat on the Guard is just 2. However, the problem is that the Guard is very difficult to get rid of. This is done for a reason, since the player engaged with the Guard cannot commit more than 1 character to each Escape test. This is very problematic, unless you either have a character stacked up with willpower, or can get rid of this enemy quickly. But that is the problem, the Guard can take quite a big hit. With 3 defence and 7 hitpoints, the Guard will need quite a lot of attackers in order to kill him for good. This can take several rounds, which plays nicely into the strategy of this card. However, as long as you are not the first player for a while and have other players that can do the tests, then you should be safe from most tests. You can then take a few turns hacking away at this enemy before defeating it. If you can, try to have one player engaged with multiples of these enemies. They are easy to defend, and their abilities can’t stack. It will cause one player to be next to worthless for the tests, but at least you got rid of some enemies. Another bad thing about this particular enemy is its shadow effect. It forces the player to discard all attachments from all characters with 3 or more willpower. In the late game, this can totally reset your boardstate when you need it most, as most of your heroes will likely have 3 or more willpower. Heroes like Cirdan, Galadriel, and Eowyn will always feel this effect, so try to move attachments away from these heroes if possible. It also targets allies, which is less of a concern, unless you are playing a Dale deck. The shadow effect is definitely worth cancelling, unless you are in the early stages of the game or have quick replacements for the discarded attachments. Players who play the Forth! The Three Hunters contract are going to especially have to watch out for this shadow effect, as they will have more than 3 willpower after a few rounds, and won’t get their initial discounts on attachments back.

Locations
There are 2 new locations added to the encounter deck in this version. One prevents you from waiting too long for Gollum to return, and the other makes Escape tests even harder by adding points to the Escape value.
- The Mere of Dead Faces: I have covered this unique location during the quest analysis already, since it is a part of the new mechanic in this scenario that stores resources when Gollum is not in play. The location is put into the staging area and cannot leave the staging area, as players cannot travel to it, nor can they quest through the location as it has no quest points. The Mere of Dead Faces is not immune to player card effects though, so there are still ways to interact with it while it is in play. The location has X threat, where X is the number of resource tokens on the location. These resources are only placed here after Gollum has left play. These resources would normally be placed on Gollum through treacheries or failing Escape tests, so this counters the strategy of losing Gollum as soon as you can, and then failing all tests while you clear the board of encounter cards. Since there is no limit as to how many resources can go on the Mere of Dead Faces, there is a chance that the location will quickly blow up to 10+ threat in higher player counts if the players have bad luck with their encounter cards. To get around this high threat, there are a few player cards that can help. Attachments like Power in the Earth and Guarded Ceaselessly can lower the threat, allowing you to make more progress during the quest phase. The biggest help in lowering the threat on the Mere of Dead Faces is Gollum eventually showing up. In that case, the Mere places 2 resource tokens on Gollum, before putting all tokens from itself on Gollum. This lowers the threat of the Mere back to 0, and starts the cycle anew. Note that the Mere also places 2 resource tokens on Gollum at the start of the game, meaning that the players have less time to beat the scenario.
- Stagnant Quagmire: Besides the Mere of Dead Faces, one other location is added to the new encounter deck. The Stagnant Quagmire will want players to forget about it and leave it in the staging area, as it will there be the most effective to the encounter deck. This is because while the Stagnant Quagmire is in play, it will add its Escape value to every Escape test. This can add up, as there are 3 copies of this card in the encounter deck, meaning that every test can get a +6 before an encounter card is even revealed. This is also the case while it is the active location, which means that this location should be explored with all means available as soon as possible. This can be either through travelling to the location and clearing it next turn, or to clear it in the staging area. The 5 quest points will make this difficult, but a dedicated location control deck should be able to chip away at these locations for long enough so that they are cleared. Another very effective strategy is to just include Thror’s Key and play it on one of the Quagmires, as that will neuter at least one copy for the rest of the game. The Quagmire is also one of few cards that has a shadow effect printed on it. This effect forces the player to make an escape test of 1 encounter card. If the test is failed, the defending character is discarded. This is bad for several reasons. The first is that you can lose a hero very easily through this effect. Second is that the attack still happens, causing it to go through undefended. This shadow card can lead to 2 heroes dead in the blink of an eye, so either throw all willpower you have left at this escape test, or cancel the shadow effect.

Treacheries
The treacheries in this nightmare mode focus mostly on making even more escape tests. There are only 3 new sorts of treacheries though, and with 2 of them having just one copy, they will be a rare sight during your playthrough. Still, each of these treacheries are worth cancelling if possible.
- Candles of Corpses: The first new treachery only has a single copy in the encounter deck, but it will hit hard if left unchecked. When the treachery is revealed, all players in order must make an escape test of 1 encounter card. Winning this escape test means that nothing happens, but losing the test will force the players to choose to either straight up discard a hero, or raise their threat by 5. The threat is probably the most obvious choice, but since there is no way to lower your threat in this scenario, it is also very dangerous. It can put players in a nasty position where they suddenly have to engage more enemies than before, though they will have all their heroes left over. Worst case scenario, all players lose a hero this way, which is often reason enough to restart. Fortunately, this does not place resources on Gollum or add any threat to the staging area. But note that the players must still perform an Escape test at the end of the quest phase if Gollum is in play, meaning that players should keep characters back for that. The treachery is also nasty to reveal during Escape tests, since it has an escape value of 5. This can really mess with your plans, and will likely lose you the test when revealed. It is better to set it up so that you reveal this card as a shadow card, though that does require some specific player cards like Scout Ahead to set up.
- Swarming Musquitoes: The two copies of this card will add a lot of misery to your track record of beating Escape tests, as this treachery forces the players to make one with defence instead of willpower. This can be problematic if this hits early, but there are some characters with good defence that could win this Escape test if you do not need their defence in the combat phase. Winged Guardian, Defender of Rammas, and Beregond all come to mind as good characters for this Escape test. You’ll need enough defence to send to this Escape test, as the first player must deal 2 cards from the encounter deck to test against. This has a high chance of containing at least one card with the Escape X keyword, so sending nothing will cause you to fail the test. When the test is failed, the players must add 1 resource to Gollum (or Mere of Dead Faces if Gollum is not in play) and deal 1 damage to each character in play. The 1 damage to each character really hurts, especially since there are a number of other direct damage effects in the encounter deck like Evil Storm. Global healing might help to keep some characters alive, but 1 damage might already be enough to kill off weaker allies or a defender hanging on by 1 HP because of a previous attack. The treachery is better revealed as a shadow card, as there is no effect to speak of. During Escape tests, the treachery will have a value of 3, which is nasty, but isn’t as high as other cards from the Nightmare deck.
- Devilry of the Dark Land: This final treachery is also just a one-of, but is the only new one that doesn’t force players to make an Escape test. But that doesn’t mean that you can simply ignore this treachery, oh no. This one makes Undead enemies do what they do best, reanimate themselves. When this treachery is revealed, the top X Undead enemies from the discard pile are returned to the staging area., where X is the number of players. This can cause a massive boost to threat that may have been unexpected. On top of that, now combat becomes much more of a threat as well, which might prove fatal to some players. If this treachery hits early enough, it might not be returning as many enemies though. If no Undead enemies were returned through this effect, the treachery simply surges. So in the best case scenario, the treachery either surges into something relatively weak (if that even exists in a NM deck) or only returns 1 enemy. You absolutely do not, I repeat, you do NOT want to see this treachery during an Escape test that you hope to pass. This is because this single encounter card has the highest Escape value of all: 10. The fact that this card exists somewhere in the encounter deck should be reason enough to worry that you might reveal it at some point. Since there is just one copy of this card in the encounter deck, you no longer have to worry when it is discarded (hopefully as shadow card), but if you happen to come across it during a scyring search, try to put this card in the Victory Display. That way you have to worry less about its high Escape value and the Undead enemies can no longer be returned from the encounter deck. This is also probably the card you want to just let happen and save your Test of Wills for the next treachery, as long as you can handle the new enemies.

Tips and Tricks
- A very effective hero for this scenario, even in Nightmare mode, is Galadriel. While she cannot lower your threat anymore, she does make sure that the allies you play don’t have to exhaust to quest. This leaves their willpower available for the Escape tests. Galadriel herself can also commit to these with her 4 willpower, in case you haven’t found Nenya yet.
- Speaking of Nenya, you can also use its effect to boost a hero for the Escape test at the end of the quest phase if needed. This is especially helpful when engaged with an Ill-fated Guard, meaning you can only send one character to the Escape test. This way, you also avoid taking damage on Galadriel from Things in the Pools.
- Global willpower buffs are very important if you want to make sure that you can pass Escape tests with as few characters as possible. The Arkenstone, Sword that was Broken, Dain Ironfoot, Visionary Leadership, Celeborn, etc are all great on their own, but if you can stack the effects on top of each other, that will be even better. You then have a higher chance of completing an Escape test without having to place resources on Gollum.
- Note that there aren’t any action windows before sending characters to the Escape test. This means that effects like Nenya and Rosie Cotton must be triggered beforehand.
- Bring treachery cancellation to avoid having to make more escape tests than needed.
- Rush the quest as hard as you can to avoid as many nasty cards as possible and minimize the number of resources on Gollum.
- Once you made it past stage 2, be sure to use a global readying effect on the first player so that they can send every character they have to the final escape test. This gives you the best chance to win the quest. Failing this will reset the quest deck back to stage 1B.
- A great way to get rid of many of these nasty treacheries is to play Guarded X cards. These will discard until a location or enemy is revealed, which in this scenario can discard several nasty treacheries that won’t go back into the encounter deck for a while. It can also serve to thin the encounter deck for Gollum. You do have to be ready to claim the Guarded card though, which in NM scenarios can be quite tricky.
- Scrying can be very useful in this quest, as you can know what you will be up against during the Escape tests. If you are playing Scout Ahead, then you can also put some nasty cards in the Victory Display, which will help out in the long run. High Escape value cards like Devilry of the Dark Land should be prioritzed, or treacheries that force you to make more escape tests.
- If you end up losing Gollum, then you might as well stall a little and clear some side-quests. Rally the West, Scout Ahead, and even Delay the Enemy will be useful as it doesn’t require willpower to clear. That leaves the willpower characters ready to commit to Escape tests.
Playthroughs
There aren’t many playthroughs out there about the Nightmare version of quests, especially with the Dead Marshes. I will update this list in the future if new playthroughs are uploaded by the community.
- True solo: https://www.youtube.com/watch?v=nutc_vfnYZE
- Two players: https://www.youtube.com/watch?v=MEq2AZ-B1g8
- Two handed: https://www.youtube.com/watch?v=MnSeSciaiPk
I will be looking to complete the rest of the NM Shadows of Mirkwood cycle this year, so stay tuned for the final few scenarios I have left to cover. I did most of the easier ones first, leaving some of the tougher ones to be done. If you want to make an article on a Nightmare scenario yourself, please reach out and I’ll get you sorted!

