“Thanks for taking on Temple of Doom! Feel free to sprinkle it with Indiana Jones references!”. Those were the words of my editor and our graceful host, Durin’s Father, when I told him that I would be taking on this beast of a quest. Yours truly is no novice to the art of writing a quest analysis, and yet the blood froze in my veins when I realized the weight of the expectations that were placed on my shoulders. I have only seen Indiana Jones and the Temple of Doom once in my 32-year life. I have some patchy memories of monkey brains, Short Round, and KALI MA! Would I be up for writing about this quest after all? Would I let our dear readers down, delivering a dry, uninteresting analysis rather than a fun cascade of movie references? That’s when it struck me: I could perhaps get by, by citing the Lord of the Rings movies instead! Once they saw my clever references, they would not yearn for Fedoras and bullwhips, if you know what I mean Mr. Frodo. If they were longing for pulp adventure, they would probably play Arkham anyway…
Temple of Doom is the final quest in the Shadows in the East deluxe box and delivers a true challenge for the aspiring Lord of the Rings player. The deck is the first to feature the Power of Morder deck, which can drastically turn a game around and fundamentally alter some of the base rules in the game. It also marks the return of a character from the Against the Shadow cycle, the treacherous Black Numenorian Thane Ulchor, who deceived us as the “noble” Lord Alcaron. We defeated him in the Morgul Vale, but he is back with a vengeance. This quest is by no means easy. But even though one does not simply walk into Mordor, we will guide you there and back again.
The Temple of Doom
- Found in: A Shadow in the East deluxe box, quest 3
- Official difficulty: 7
- Community difficulty: 8.4
- Encounter sets: Temple of Doom, Twisted Tunnels, Easterling Raiders, Ulchor’s Guard, The Power of Mordor
- Quest cards: 5 with 4 different stages 2 that have to be cleared in a random order.
- Play if: You want a re-match against Thane Ulchor. You want a challenge with a high degree of unpredictability. You want to walk into Mordor (or at least a shrine of the Dark Lord).
- What’s different about this quest?: The Power of Mordor deck which alters base rules of the game. Random order of four different stage 2 quests, which can alter the outcome of the quest quite drastically. Timer of 20 rounds (or less) before you lose the game.
- Can I run side-quests in this scenario?: You can, but the quest is quite punishing for threat, so you might not have the time. There are also two encounter side-quests in the deck, so you will probably want to prioritize those over your own side-quests. Remember that time is important here, so you cannot delay too long with side-quests here.
- What to look out for: Threat, powerful attacks, location lock…. Basically this quest throws it all at you. You also have to move fast in order to avoid getting the Power of Mordor cards stacking up.
The Quest
Setup and 1A/1B: The Forgotten Temple


The quest features four different stage 2 cards, and during setup they are all shuffled together, and placed under stage 1A. Thane Ulchor is added to the staging area together with the Tribute to Mordor encounter side quest. Tribute to Mordor requires 12 progress to clear, but cannot be the active quest while Thane Ulchor has any hit points remaining. When this stage is defeated, the players win the game. “hah!” you might think. “I’ll just rush kill Thane Ulchor with my Eagle deck. Easy peasy.” But the enemy is cunning. Ulchor has threat X, where X is equal to the number of quest stages in the victory display. He attacks for 6, has 4 defense and 9 hit points. He is indestructible, meaning that dealing him 9 damage does not send him on a hasty retreat to the victory display. He is also immune to player card effects (so no “Get over here!”), and cannot be engaged until X is equal to 5. and here is the catch. This essentially means that you have to clear the first quest stage, and three of the stage 2 cards in order to engage him. Until then, this foe is beyond any of you. Until the final showdown he will (mostly) just chill in the staging area. Furthermore, whenever he destroys a character, you place one token on the Tribute to Mordor card.

Oh, yes. I forgot to mention that aspect of the Tribute to Mordor card. At the end of the round, you place one damage token on this side quest, and whenever there are four or more tokens there, you remove four and reveal the top card of the Power of Mordor deck. If you cannot reveal a card, you lose the game. This sets a hard timer on the quest, meaning that it cannot go on for more than a maximum of 20 rounds (but to be fair, if you make it for 20 rounds with all the Mordor cards in play, you are a true champion and should have won already…). From the name alone, you can tell that the power of Mordor cards are going to be nasty. We will return to them in a second. For now, let’s briefly return to stage 1. Stage 1B has a surprisingly benign effect: You skip the quest stage! You lucky duck! If you are new to this game, you might think there’s some good in this world, Mr. Frodo. However, the experienced player should now that this is a sign that trouble awaits. Similar to Pelennor Fields, you get a few turns to setup before shit goes fan-wise Gamgee. At the end of the planning phase, you place a resource on the quest card. And once you have placed a second resource there, you advance to the topmost stage 2. It goes without saying that you must use these two turns as efficiently as possible. Resource acceleration, extra allies, getting your contract flipped, if you can get an advantage over the encounter deck, you take it.
The Power of Mordor Deck
Before we go through the individual stages, it is worth taking a little detour to discuss the Power of Mordor deck. It is a strange fate that we should suffer so much fear and doubt over so small a thing… The power of Mordor deck contains a nasty set of five bomb cards that try to hit your deck where it hurts the most. Are you running a deck with a high starting threat? How about we lower your threat elimination cap and block you from reducing your threat substantially! So, do you like drawing cards? How do you like one threat whenever you draw cards, sucker? It is truly a fantastically designed set of cards that tries to take away your advantage over the encounter deck. You have no control over the order in which they appear, and just need to be ready to take it on the chin.

Khamul the Easterling is as far as I’m concerned the only Nazgul to receive a name besides the Witch-king/Tom Bombadil. He’s a formidable mini-boss with an engagement cost of 49, who engages the first player. He has 4 threat, attacks for 6, has 4 defense, and 9 hit points. He is immune to player card effects, and only the engaged player can defend his attacks, or attack him in turn. Because of him (and secondarily because of the treachery Ulchor’s rage which causes Thane Ulchor himself to attack for 6) you need some kind of defense- and attack strategy, so you can deal with him efficiently. He can be especially punishing in multiplayer, if you have a player dedicated for quest or support, because of the combat restrictions. You can chump block him without obvious dangers (besides shadow effects) but since you are on a clock here because of Tribute to Mordor, you want to deal with him rather quickly. Eowyn is as always a good emergency button to deal with hardcore enemies, or alternatively a host of allies buffed with global attack boosts like Fellowship, Narya, Leadership Boromir or Leadership Dain. As for defense, if you decide to bring a dedicated defender, Spirit Beregond with some sort of defense boost is a good option, because he will provide some much needed threat reduction (trust me, you will need it). Another good option is Spirit Dain as he can take an attack from Khamul from turn 1 (or combine the two Dains with Thorongil and add some readying with Unexpected courage for disgusting levels of jank). The best advice for beating Khamul is to hit him hard and fast. A word of caution though – he doesn’t have a victory point value. So when you defeat him, he goes to the discard pile, and can possibly return, which is most likely in 4 player. Khamul is a tough enemy, especially if you get him as your first card, but if your deck is primed for early combat, he is not the worst outcome, as he can be dealt with and goes away. Some of the other cards have more long-lasting effects…

The Tower of Barad-Dur is a 5 threat location with a gorgeous piece of artwork. It is immune to player card effects, has no progress cost, and the players cannot travel there. It simply hangs around in the staging area and delays you. It also reduces your threat elimination level with 5, which can take you to an elimination level of 40 if you run the ring of power. This shouldn’t be too much trouble by itself, but it can be an issue if you run a Saruman-Doomed deck or a Gondor-Valour deck. it can also be inconvenient in a Hobbit and/or secrecy deck. Worst of all is the synergy with some of the other power of Mordor cards, which presses your threat up. This card is less severe in multiplayer, but can be quite punishing in true solo, where 5 threat can be quite a hump to overcome. This is a pretty easy one to get right out of the gate. You need to be able to quest hard, and then you can rather easily overcome it.
Under the Watchful Eye is a weird one that can really ramp up your threat if you get it early. a great Eye, lidless, wreathed in flame. It punishes Seastanigans where you draw half of your deck, by forcing each player to discard down to five cards. Furthermore, every time a player draws a card (including in the resource phase), that player will increase their threat by one. This is an odd one that rarely kills you right away. If you get it early it might cost you a few cards, but chances are that you are playing most of the cards you draw, if you play a high tempo deck anyway. The threat can creep up on you, but the card in itself does not punish you for reducing threat (another card does that, which is some of the cool synergy this encounter set has). If you have some sort of threat management, it can be a minor inconvenience, and one that you easily bypasses. Elrond’s Counsel and the good ol’ G-slap are efficient ways to keep your threat down.

The Armies of Mordor is a card that I suspect is more of a nuisance in multiplayer than in true solo. This card causes a Forced effect that makes enemies unable to receive damage in the turn where they engage you. This can be pretty brutal, as it means you have to survive at least two attacks from each enemy, and risk being overrun. This card makes chump blocking somewhat dangerous, as you will need quite a few allies to take all these attacks. A dedicated defender with readying makes this card much more manageable to deal with, and if I run Dain, Beregond, or a buffed-up Eagles of the Misty Mountain with Radagast’s staff I really don’t mind seeing it as the first one. Of courses this requires that you have attackers who can deal with enemies as they appear, so they don’t overrun you. Furthermore, the presence of Easterling Attachments makes it dangerous to keep enemies around, as they might get buffed in the following questing phase.
Finally we have Covered in Darkness, a card that doesn’t do that much on it’s own, but that can combo nastily with the Tower of Barad-Dur and Under the Watchful eye. This card has Doomed 5, which be inconvenient if you suddenly have to engage a bunch of enemies you weren’t counting on. But it also causes an effect where players cannot reduce their threat by more than one each round by player card effects. If your threat goes up by one each time you draw a card and you suddenly have a threat elimination level of 40, this can be a big problem. Drip threat reduction is a very effective solution here, like Nori or spirit Beregond. Another approach is to play a deck with low threat heroes like Smeagol or Glorfindel. If you play these heroes, your threat can go up by a bunch before it becomes a problem. This is not necessarily a terrible effect, until it suddenly takes victory away from you. But the lack of threat to the staging area makes it a welcome first card.
The power of Mordor deck is difficult because it requires you to be strong in many different aspects of the game, and because it is unpredictable. This is also true for the stage 2 deck which punishes you in a similar random order. That mechanic makes it difficult to plan, and require your group (or your single deck) to be ready for whatever it throws at you.
The Stage 2 Deck
All of the stage two decks have a similar text on side 2A, even though the title tells you what awaits on the flip side. All of the cards say “Forced: Reveal one encounter card pr player”. This is a brutal effect that essentially forces a second quest stage upon you whenever you advance. Especially in higher player counts, this can location lock you or swarm you with enemies. This makes it very dangerous to push too hard on advancing quest stages, as you will reveal a lot of encounter cards in turns where you advance. Throughout this quest you must stand on the edge of a knife, managing a steady pace through the stages, without taking too long, adding tokens to Tribute to Mordor. Take advantage of the fact that you know what stage 2 card you are facing from the title on the 2A side, when resolving treacheries and enemy effects from the advance card reveals . You need to clear three out of four before you can face Ulchor, meaning that you will see all of them. When there are four quest stages in the victory display, you cannot place progress on the 2B side.

Memory of the Dark Years requires 12 quest points to clear, and threatens to location lock you. At the beginning of the quest stage, you will discard the top X cards of the encounter deck, where X is the number of quest stages in the victory display. For each different card type discarded, you will add 2 threat to the staging area for this quest phase, which can make it very hard to place any progress, especially if you revealed a bunch of locations when you progressed to 2A. If you have a strong questing deck, like a Fellowship, Outlands or Noldor, this can actually be a pretty comfortable stage to build up your strength. Word of caution though, the encounter deck milling might increase the risk of getting Khamul shuffled into the encounter deck again, which is a situation that you would like to avoid if possible. It also nerfs scrying decks, by digging deeper into the encounter deck. Worst case scenario, you discard an enemy, a treachery, a location and a side quest, adding 8 to the staging area, but hopefully this is late enough in the game that you can quest through it. It is also worth noting that this discard step is at the beginning of the quest phase, meaning that you commit characters after you discard cards.

The Legacy of Mordor tries to target your heroes rather than stalling you. At the beginning of the quest phase, each player deals one damage to one of their heroes, exhaust them, and cannot ready them until the refresh phase. The stage requires 8 progress to clear, and can be a problem, especially if you are getting overrun with enemies, location locked or playing a hobbit deck where your heroes do not have many hit points. It is also particularly tough on Three Hunters decks, essentially taking away 1/3 of the deck. It can also cause problems towards the end of the game if you have had to take some archery damage or had to use a hero as an emergency blocker. This is definitely something you should keep in mind if you use your hero to block, if do don’t pack sufficient healing.

Shrine to Sauron sounds like a nasty place, and it certainly delivers on that promise. With a whooping 16 progress, you might have to buckle up and stay here for a while. And it carries a dangerous Forced effect. At the beginning of the quest stage, each player will discard the top X cards of their deck (X is as usual the number of quest stages in the victory display +1) and discards all cards in hand AND in play that matches the discarded cards. As the cards you run two or three of usually are pretty important for your deck, this is a serious problem. Glorfindel can be cast from your discard pile, but short of discard shenanigangs like Stand and Fight or Dwarven Tomb, this stage might make it worth your while to run Will of the West. As the first stage 2, this can be pretty tame and even end up fizzling completely. At later stages this can cost you the game. If you get it later in the game, quest hard through it, for stalling here is certain death. Alternatively you can give it a go with a Council of the Wise deck as this deck type will laugh and say “you have no power here!”.

The Lord of Middle Earth is the final stage 2 card in the pile, and probably the least troublesome of the bunch. It has 4 progress pr player, but the players can only place progress by discarding cards from their hands. At the beginning of the quest phase, each player discards one card from their hand, and no more than X cards can be placed on the quest this round, where X is the total cost of all the discarded cards. This can be tough if you lose your hand (for example to Shrine to Sauron) or have played everything in your hand. In a solo game this usually costs a few cards and is no big deal. You usually end up drawing spare copies of unique allies, or draw multiple costly allies where it is not realistic for you to play both. If you stall, this can be pretty bad without sufficient card draw, but this is a stage I often use to stabilize my board presence, and quest conservatively for a round or two. In four player the discard can lead to some agonizing decisions, potentially grinding the quest pace to a halt.
If you make it through three of the quest stages, you are ready for the final showdown against Thane Ulchor. At this point you have probably defeated a Nazgul, accumulated a bunch of threat, and assembled an effective questing machine. Unless you are on the brink of threating out, you should be equipped to come down on him hard and fast. Keep an eye on the Tribute to Mordor to ensure that the death of your final chump blocker does not add a token to take victory away from you. Pile on damage on Ulchor and rejoice! It is over! It is done!
The Encounter Deck
Global
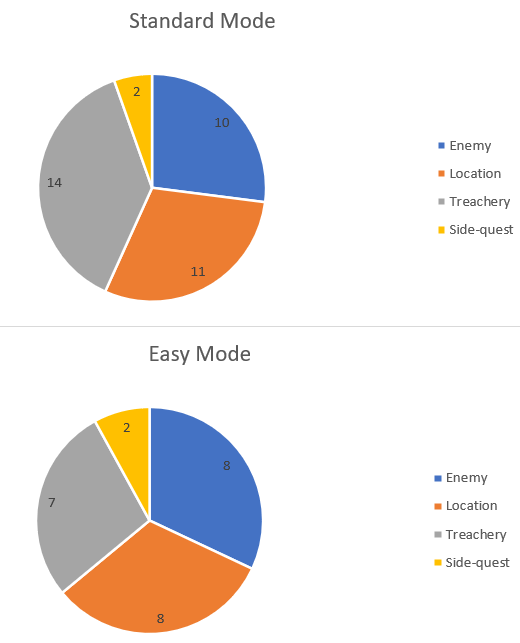
- The encounter deck is made up out of 37 encounter cards in normal mode, this is reduced to 25 in Easy mode, removing mostly treacheries
- The chances of hitting a shadow effect are 59% in either mode
- The average threat of cards revealed is 1.54 in Normal mode, and 1.64 in easy mode. This counts Hall of Horrors as 2 threat, which it will be at the start of the game, but as the game progresses, the threat will go up.
- The threat per individual card can range between 0 threat treacheries and side-quests to 5 threat locations!
- 5 cards in the encounter deck will surge in any situation. 8 other cards will only surge if a certain criteria is not met (like the treachery doing nothing).
- Fearful Shadows is the only card in the encounter deck that has the Doomed keyword. However, with the Power of Mordor deck come more threat-raising abilities, so you really want to keep an eye on your threat in this quest.
- The Easterling Raider and the Recurve Bow have the Archery keyword. Archery is not a focus of this quest, but should not be underestimated. Try and dispose of these enemies as fast as possible to minimize damage.
- Immunity:
- Thane Ulchor is Indestructible and is immune to player card effects. Ulchor can also not be engaged unless players are at the final quest stage.
- Fanaticism gives the attached enemy immunity to player card effects
- The Tower of Barad-Dur is immune to player card effects and players cannot travel there
- Khamûl the Easterling is immune to player card effects and can only be attacked and defended by the engaged player
- While The Armies of Mordor is in play, non-unique enemies cannot take damage during the round they engaged a player
The statistics for the encounter deck do not take the Power of Mordor deck into account, nor Thane Ulchor and Tribute to Mordor. These cards never enter the encounter deck (except Khamûl if you kill him early and reshuffle the deck). The encounter deck has a lot of surge and some high-threat cards in the deck. Combine this with the extra cards revealed when moving to the next stage, and you will be fighting an uphill battle.
Enemies

Ulchor’s Guard is an enemy with an engagement cost of 25, which brings them down to most decks unless you are playing secrecy or doing low threat shenanigans like Glorfindel or Smeagol. They have a threat cost of 2, 4 attack, 1 defense and 5 hit points. The four attack brings them into the range where you either need to chump or use your dedicated defender to fend them off. They also have the Easterling trait, meaning that they are eligible for Easterling attachments (see below). They also have an effect which states that if Thane Ulchor is engaged with a player. Ulchor’s guard engages that player. I found this effect does not matter too much, as you will only engage Ulchor at the very end, and that the low threat will mean that you will engage them as they appear. The main danger is that multiple guards and Ulchor together overwhelms a player, meaning that Sentinel and Ranged (and therefore the new Tireless Thoroughbred) are valuable inclusions for multiplayer games. The low defense means that you can chip away at their life over multiple rounds, if your main damage outlet is not running at full capacity yet. Paradoxically, the shadow effect of this card boosts the targets defense with 2, which can lead to awkward situations where you suddenly lack sufficient attack power to destroy an enemy. Unless you draw this for Ulchor or Khamul this shadow effect is not terrible, as it does not wreck your board state, but rather serves to stall you. If you have a defender capable of handling them, you should be able to deal with them in time. You have four copies in the deck, meaning that you will see them fairly often.
Easterling Raider has an engagement cost of 28, meaning that many decks will have to handle them from turn one. With 2 threat, 2 attack, 2 defense and 3 hit points, this is an enemy that can be blocked by many 2 defense heroes or allies, letting you prioritize your dedicated defender for bigger targets. They also have archery 1 which isn’t really a problem until all your heroes have one hit point left and you haven’t seen the Legacy of Mordor stage yet. This raider can become problematic, however, as they get +1 attack and +1 defense for each Easterling attachment, meaning that they can go form nuisance to threat in a short manner. This is obviously more of a problem at higher player counts, where the risk of revealing this guy followed by a surge train of Easterling attachments is a very real risk. This is particularly true for when the quest stage advances, as this reveals additional encounter decks. If you can avoid Easterling attachments on him and your deck is suited for combat, he can be a fairly easy encounter card to deal with. As the encounter deck contains three copies, he will come out from time to time. The shadow effect can be troublesome, as he adds a +1 attack (+2 if the target has an Easterling attachment). This can be problematic because of high attack enemies like Ulchor and Khamul, but also a punishing bonus for smaller enemies, as you might be inclined to block them with weaker defenders. Hence, some shadow cancellation could be worth considering. When they appear, the main strategy is to deal with them fast, so the attachments cannot buff them further. Keep in mind that the Armies of Mordor card from the power of Mordor deck might stall you, allowing him to stay around and receive buffs in the following round.
Warrior of Rhûn is the nastiest enemy in the encounter deck (at least until Khamul is reshuffled into the deck). With an engagement cost of 34, he might not engage you straight away. 3 threat, 3 attack, 3 defense and 4 hit points means that he requires a bit more effort to take down than the other two enemy types, and his threat might discourage you from leaving him in the staging area. The longer you leave him in the staging area, the more Easterling attachments can be assembled. Furthermore, whenever he attacks he gets the topmost Easterling Attachment attached to him, which can potentially buff his attack power through Fanaticism or the Sword of Rhun. If you have a lot of Easterling treacheries in the discard pile (for example through the self-mill effects of the Memory of the Dark Years stage, he will potentially get several attachments, which makes shadow boosts from Easterling Raider more dangerous. Like the Easterling Raider he should be dealt with fast. The presence of these two enemies, as well as the prospect of facing Khamul and ultimately Ulchor, means that you need a solid attack strategy. Keeping a few key attack allies around like Treebeard or Legolas will allow you to strike hard on these smaller enemies as they appear. As a shadow card he attaches the top Easterling Treachery in the discard pile to the attacking enemy, potentially buffing Easterling Raiders, or providing additional attack power which can cost you allies or even heroes. With three copies, he will be around.

Easterling Attachment Treacheries
Since we have now discussed the Easterling enemies, a discussion of the encounter deck Easterling Attachments is in order. There are two copies of each Easterling attachment.
Sword of Rhun is a Easterling Treachery with Surge. When attached to an enemy it counts as a Weapon attachment, and grants the attached enemy +2 attack. When it is revealed, it is attached to the Easterling Enemy in play with the lowest attack, without a sword attached. This treachery is nasty, and potentially worth canceling. It can turn the smaller enemies into absolute powerhouses, and bring you well above the defense of your main defender. It will turn Ulchor’s guard into a 6 attack, and Easterling Raider+Warrior of Rhun into 5 attackers, which can be problematic for your main defender if you also have Khamul or Ulchor to deal with. If an enemy gets this this bonus, they might be well worth chump blocking, so you don’t risk damaging your main defender too much. Attack cancellation is also a viable strategy to deal with an enemy with a sword. It is generally a card that I hope to see as a shadow card
Recurve bow also has surge, and is attached in the same way as the sword, except that it attaches to the Easterling enemy with the highest engagement cost. It grants the enemy archery 2, which usually isn’t too much of a problem, until it suddenly is and you start losing important characters. It can also seriously hamper trap decks that try to keep certain enemies around, or secrecy/hobbit decks that try to avoid engagement. If you have one or more decks dedicated to handling enemies (and chances are that you have if you hope to defeat Ulchor) and you can take down enemies as they appear, this shouldn’t cause you too many problems. It can also buff the defense and attack of Easterling Raider, which can sometimes be the most annoying problem. As for the sword, this card has no shadow effect.
Fanaticism is another Easterling treachery, but this one is a Condition, not a Weapon. In contrast to the other attachments, this one does not have surge, but it is still nasty. It attaches to the enemy without a copy a fanaticism with the lowest defense (Ulchor’s guard if all three enemy types are in play) and grants +1 threat, +1 attack, +1 defense and immunity to player card effects. This can make an enemy incredibly hard to handle, especially if your deck centers around using player card effects to defeat enemies. If your deck is geared towards a solid defender and loads of attack power, this should only be a minor inconvenience. If the card fizzles it gains surge, so no freebie turns unfortunately. The card has no shadow effect, so once again, it is a card I’m happy to see turn up in the combat phase.

Treacheries
Fearful Shadows has Doomed 1 which won’t matter most of the time, until it suddenly drops you over your lowered threat threshold. It also blanks the text box of each character, except for traits, which can mean that your Dain suddenly can’t discard for boosted strength, or your Sam can’t ready. Whether it’s worth canceling certainly depends on your deck, and especially what heroes you use. As a shadow card it makes the defending character unable to ready until the end of the round, which counters decks relying on readying effects and voltron defenders. Hence, be smart about the order in which you block if you plan to do multiple blockings. You have two copies of this one.
We have already briefly discussed Ulchor’s Rage, which causes Thane Ulchor to make an immediate attack against the first player. If no attack is made for whatever reason, the card gains surge. This can be trivial if your super defender is up an running, but devastating if it hits you early game. Have a plan for getting your defender ready for action fast, or make sure the player with the big defender has sentinel. Can be worth canceling, but you should have a strategy for handling Ulchor sooner or later. As a shadow card, it has the dreaded “deal 1 damage to the defending character” which has killed many a Defender of Ramas, causing a maybe trivial attack to become undefended, when the blocker dies. It is also the kind of shadow effect that will cost you a hero from time to time. You have three copies, so you will see this card from time to time.
For me, the must-cancel card of the treachery set is Place of Evil. What can men do against such reckless hate? With 3 copies, this is a card you will likely face. Place of Evil puts a damage token on the Tribute to Mordor side quest, and either places a second damage or Place of Evil gains surge. This greatly accelerates the clock of the game, bringing out Power of Mordor cards earlier than you counted on, and bringing the game closer to an end. It is incredibly nasty. Avoid it at all cost. As a shadow it grants the attacking enemy +1, and if this attack destroys a character, you place a damage on Tribute to Mordor. This make chump blocking a dangerous game in this quest, but if you have a strong defender, it can be a relief to see a copy as a shadow card.

Locations

Temple of Sauron is a nasty 4 threat location, which requires a single progress to clear. However, when the location leaves play, you place 1 damage token on Tribute to Mordor, bringing you ever closer to defeat at the hands of Mordor. It goes without saying that this location is pretty bad, and a prime target for Thror’s Key, which blanks its text box. If you are doing well and have established a good board state, it should not pose too much of a problem, but it can easily cause you to be overwhelmed by dropping Khamul on you a round before you expect it. It is not as bad as Place of Evil in that you know the extra damage is coming, but it can still be pretty bad. As a shadow it can be outright terrible. Attacking enemy gets +1 attack for each quest stage in the victory display, which can outright cost you the game by knocking out your super defender. This is the kind of shadow effect you bring cancellation for. With two copies, you have a large risk of seeing it.
Hall of Horrors tries to stall you with a potentially high threat count, and makes you more susceptible to death from archery. It has X threat, where X is the number of quest stages in the victory display +1, and requires 5 progress to clear. When it leaves play, each player assigns X damage to a single character they control, which can disrupt your board state quite a lot late game. It is a card you are happy to see early game, but which can contribute to location lock late game, especially if Tower of Barad-Dur is in play. You have three copies, so it will likely make an appearance. The card has no shadow effect.
Twisted Tunnel is a two threat/2 progress location that brings out an enemy. When it is revealed, you discard cards from top of the encounter deck, until an enemy is discarded, and adds this enemy to the staging area. You cry if this discards a recycled Khamul. This is a pseudo surge that can be a major inconvenience, but that also contributes to location lock (a very real threat due to Tower of Barad dur, especially at lower player counts) and potentially recycles the deck. As a shadow card it discards the top card, and adds it to the staging area if it is an enemy. There are two copies in the encounter deck. This card is rarely back breaking, but can facilitate some unfortunate combos, like dropping easterling attachments into the discard pile or provide targets for subsequent easterling attachment reveals.
Narrow opening is an interesting card that places a caveat on the players that can stall them enough to lose momentum if they are not careful. Narrow opening provides 3 threat and requires 3 progress to clear, and while Narrow opening is the active location, each player cannot play more than 1 card pr round. This is an interesting counter to Erestor or other decks which rely heavily on card draw/play combos to gain momentum. If you get stuck here due to location lock, it can be seriously hard to bounce back. When Narrow opening leaves play, each player discards a random card from hand, so if your hand has been filling up with juicy cards due to the 1-card pr round restriction, you are in risk of losing something nice… Usually that should be more of a minor inconvenience than a game ender, and I usually do not mind seeing this card too much. The encounter deck contains two copies.
Crumbling Passage is a clever location, almost more of a treachery than a location proper. It comes with 5 threat and requires 3 progress to clear. However, when it is revealed it is placed as the active location, and the previous location is returned to the staging area. When the location leaves play, it deals 1 damage to each exhausted character. This can cause regular board wipes in silvan decks, and provide serious issues for hobbit decks as well. Especially with the damage pings coming off Hall of Horrors, and easterling archery effects. The encounter deck has two copies, so it is something you could see during your game. It is definitely worth keeping track how many of them are left in the deck, when you decide to throw all your allies in for a yolo quest round. The location has no shadow effect, so you are glad to see it during the combat phase.

Side Quests
Lost in the Dark is a side quest without surge, which usually spells trouble. Let’s face it Mr. Frodo, we are lost. But do not worry, young Peregrin Took. This side quest tries to take away combo pieces for you, by placing your top ten cards under your threat dial. Whenever you raise your threat by any amount, you discard the top card from under your threat dial. If you have secured your combo pieces or if you play a dwarven mining deck you might, you might not care about this at all. It counters swarming strategies like Outlands or Gondor, which relies on playing as much as possible. You can clear it with 8 progress, but think long and hard before you go after this one. How often do you finish the game with less than ten cards in your deck? I tend to view these cards as gone, and focus on the main quest.

Warriors of the East does have surge (because of course it does…) and attaches the top easterling attachment in the discard pile to Easterling enemies whenever they enter play (this means including through twisting tunnels). If that wasn’t bad enough, it is also hard to clear, because when it is selected as the current quest, the Easterling enemy with the highest attack attacks the first player, spending your top defender for the round. This can be a real game breaker, and ideally you need to clear it as fast as possible. But with 8 progress and the potential for nasty location lock, this can be a tough order. Pray you see this one as a shadow card.
This quest is a tough nut to crack, because the random order of quest stages and power of Mordor cards will mean that each attempt might play out very differently. You need a solid all round deck for this one. So be prepared! I ultimately took it down in true solo with a Haldir-Leadership Frodo-Smeagol fellowship deck.
Playthroughs
Wandering Took posted a playthrough on youtube with bigfoamloaf, McDog3 and Nhoj263 (a proper who is who from the LotR community!). Bgamerjoe of the Three’s Company podcast also published a solo.
And there you have it! I’m glad you are with me here, at the end of all things. I hope this quest did not scare you away from this cycle, for even though the difficulty can be back breaking at times, it is also incredibly fun with some great mechanical curve balls. We will be working towards completing the cycle in the coming months, but due to the difficulty and mechanics of each quest, it may take some time to complete all of the quests. We will keep you updated on this!

Hi, great review! I lost a few games trying to beat this quest, but I feel like I’m ready to try it again after reading article.
However, I found a mistake: Hall of Horrors. When it leaves play, each player assigns X damage to A CHARACTER they control not amongst CHARACTERS they CONTROL. It’s preety big difference, becouse it probably kills someone.
LikeLike
Thanks for catching that, it has been adjusted. Best of luck with your next attempt at this quest, it’s a tough one for sure!
LikeLike