When opening this pack, you might be surprised to see no extra copies of Sleeping Sentry in this pack. Still, this more difficult version of the infamous Road to Rivendell quest will be quite the challenge for everyone. The focus this time is more aimed towards the Ambush keyword, and the quest throws a replacement quest card into the mix that has the players lose control of the Arwen objective ally. If this does not scare you enough, read on! I will try and do my best to cover this tougher version of Sleeping Sentry Simulator!
Nightmare Road to Rivendell

- Found in: Road to Rivendell Nightmare pack
- Size: 18 encounter cards, 1 rule card, 1 quest card. Strangely enough, the 18 encounter cards added in contain 0 copies of Sleeping Sentry, which is how I would have made this quest worthy of the Nightmare title.
- Quest cards: 3, of which stage 2 will be replaced in this version
- Increase in difficulty?: Well, the normal version was a bit hit and miss on difficulty level. In true solo, you could rush the quest and avoid the nasty treacheries so that the quest was pretty easy. If you are comparing this version to such a run, then yes! If you are used to getting pounded by enemies and treacheries from the normal version, then this version will still increase the difficulty, but it won’t feel much more difficult.
- Fixed Loopholes?: There weren’t many to begin with, except players keeping a low threat to avoid Ambush. That loophole has been fixed with more triggers of the Ambush keyword, lower engagement cost enemies, and worse effects that trigger when enemies engage you. Players will also no longer benefit from 0 threat in the staging area if all they revealed were Ambush enemies, as those enemies will now add their threat to the staging area, making progress more difficult to get.
- New mechanics introduced: None, but there is a heavier focus on the Ambush keyword. Players will also lose out on Arwen (and her ability) halfway through the quest.
- Play this scenario if: You were fooled into a false sense of security when playing Road to Rivendell once without triggering any of the nasty treacheries. You are a fan of the Ambush keyword and want to see it pushed to a new level. You don’t have a deck that requires either version of Arwen (ally or hero), as you cannot use those here (Barwen still works though).
- Solo or multiplayer?: Tricky, as both have major disadvantages. In true solo, you will be asked to deal with all enemies by yourself while also needing to keep cancellation close by in case a nasty treachery appears. You do get to benefit from Arwen each round, plus you won’t go through the encounter deck as fast, potentially saving you from revealing treachery after treachery. In multiplayer, you will be better equipped to deal with the enemies but might get swarmed, thanks to the many surging cards in the deck. It will also be important for all players to keep a threat around the same level so that one player does not get all the enemies at once. I would suggest 2 players, but you might have to give it a few tries to get this right.
- What to look out for: Enemies engaging in the quest phase and triggering their abilities. Heavier focus on the Ambush mechanic. Enemies will try to kill Arwen, which will lose you the game. The quest will still require a fair bit of progress to clear. Treacheries are lethal and should be cancelled at all cost.
New Rules
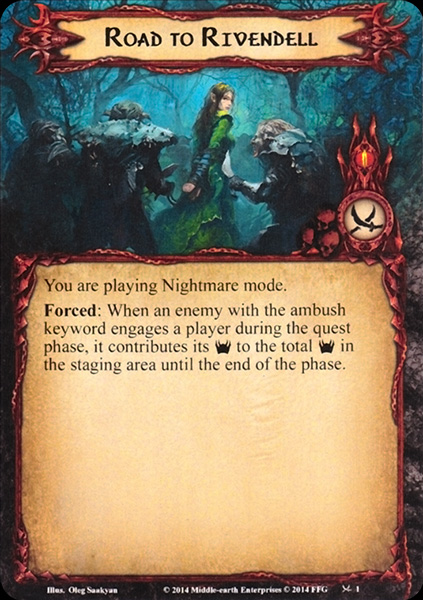
This version of Road to Rivendell has one new rule that the players must remember. Whenever an enemy with the Ambush keyword engages a player during the quest phase it will contribute its threat to the total threat in the staging area until the end of the phase. This is obviously done so that players cannot just reveal all enemies that engage them during the quest phase, and then be left with no threat in the staging area, thus making a lot of progress on the quest card. Instead, enemies that trigger their Ambush keyword will still add their threat to the total of the staging area, so keep an eye out for that. It is easy to forget which enemies engaged you that phase, especially with more players. The phrasing of this rule also means that players who engage enemies on their own accord during the quest phase, will still have to add the threat of that enemy to the total in the staging area, if the enemy has the Ambush keyword. This is important for Dunedain decks, who tend to engage enemies early, and can even use some effects like the Westfold Outrider to engage an enemy that does have the Ambush keyword but didn’t engage anyone. Those enemies will still count their threat to the total in the staging area.
This effect will be in play during the entire game, so please remember to count the threat each time an enemy engages you.
New Setup
With the new rule being a passive ability, the setup for this quest doesn’t change much. Make sure the right Quest Card 2 is put into the quest deck and that the normal quest card is removed from the game. Players will still setup the game as normal, with the first player taking control of the Arwen ally. Players must then each reveal a card from the top of the encounter deck and add the card to the staging area. Note that if the card revealed has the Ambush keyword, they will instead trigger that keyword and make engagement checks with all players. If a player’s threat is higher than the engagement cost of the enemy, the enemy will engage that player and trigger any abilities on the enemy (this happens no matter whom reveals the encounter card). Hobbit players will want to avoid the left-over copies of Goblin Taskmaster, as the 2 damage to a hero will quickly lower the number of heroes that you start this game with. The Orc Raiding Party is also a nasty enemy to engage this early on, as they will drag out more enemies and will quickly overwhelm the players. Sleeping Sentry this early on is also a valid cause for a reset.
After each player has added a card to the staging area, the players flip over quest card 1 to its B-side, and begin the game as normal.
Cards Removed
The following cards are removed from the game before the Nightmare cards are shuffled in. These cards are usually replaced by Nightmare versions or were deemed too easy for this mode. A lot of locations were removed to push the encounter deck into a more enemy-focused deck.
- 1x Orc Outpost (quest card 2): Replaced by Ambush in the Night
- 2x Ruined Road: Beneficial location
- 2x Barren Hills: “Ignore Ambush?? We can’t have that” – Devs
- 1x Goblin Taskmaster: Making way for more enemies, 3 copies remain in the encounter deck
- 4x Black Uruks: Easy enemy that didn’t have an Ambush keyword
- 3x Mountain Warg: Replaced with tougher enemies that don’t stick in the staging area
- 3x Bitter Wind: Pretty easy treachery if you keep spending your resources
- 2x Warg Lair: Useless now that Mountains Wargs are removed from the game, also beneficial location.
- 5x Goblin Spearman: Enough low engagement cost enemies are added to replace them
- 2x Goblin Archer: Not really worth giving Ambush to
- 2x Pludered Armoury: Not a thematic location, also a beneficial one.
Note that all copies of Sleeping Sentry and Orc Ambush remain in the deck for this tougher version. Best of luck with those! Since 26 cards are removed and 18 Nightmare cards are put into the deck, you will even have a higher chance of seeing those infamous treacheries!
The Quest

The quest plays out mostly in the same way as the regular version of Road to Rivendell, but with more combat and more thematic enemies and locations. The first stage will require 20 progress and is usually the stage where players spend the most time. Use this time to quickly get your board set up, especially to get a reliable defender who can defend attacks of 5 comfortably. Willpower will also be necessary at this stage since enemies will continue to add their threat to the staging area for the round if they engage through the Ambush keyword. This makes progress a little slower than in the regular scenario.
The quest can be pretty easy if you manage to avoid most enemies from the encounter deck or only get non-Ambush enemies like the Crebain and Vicious Trackers. These enemies do not really have a lot of synergy with the encounter deck and are easily defeated. However, this kind of luck can only really happen in true solo, and even then, it is not guaranteed. You will eventually have to do some combat, so you’d best prepare your board to take on some nasty enemies that engage during the quest phase. Dunedain decks can actually benefit from this, as cards like Warden of Annuminas will boost their willpower to sort of offset the threat of the engaged enemy.

I will skip over stage 2 for a minute, as that deserves its own segment after I compare stage 3 and the conclusion of this quest. Advancing to stage 3 is probably one of the more difficult moments in the quest, especially if you are advancing in the quest phase. Because you have just finished a round of staging, the When Revealed effect of the quest card will push the balance in favor of the encounter deck, as it reveals an additional card per player. Note that this can easily cause some nasty double-reveals, like a back-to-back Sleeping Sentry that can cost you the game. Even if you manage to live through the immediate effects of advancing to this stage, you are likely going to face a lot more enemies during the combat phase. And at this point, you are no longer allowed to heal characters, meaning that you should have your defence in order at this time.
Luckily, the third stage won’t take you very long to clear if you have managed to keep your questers alive since stage 1. The third stage only needs 13 progress, and there are no other prerequisites for finishing the game. As soon as the players make the final point of progress on the quest, they win! Because there is so much combat at this stage, I would advise bringing cards like Tactics Legolas hero and Blades of Gondolin. The extra progress for killing enemies is extremely useful here, and with most enemies having the Orc trait, the Blade of Gondolin will even contribute with +1 attack per Blade to combat. Killing more enemies this way will help you to beat the quest even faster, even if you are getting locked with locations because you keep losing your questing allies to Sleeping Sentry.
Quest card 2: Ambush in the Night – 12 quest points

Paddling back to stage 2, this is a new and improved version of the classic stage 2. Some things remain the same, like Goblin Gate being added to the staging area, but other things change. To start with, stage 2A has a when revealed effect that adds Goblin Gate to the staging area. This location can easily be found in the encounter deck or discard pile, as it has some pretty radiant artwork. Players then shuffle the encounter discard pile into the encounter deck and start to discard cards from the top of the encounter deck until each player discards one enemy. All enemies discarded this way are instead revealed. This means that any Ambush keywords will get resolved, and enemies might engage players. Hopefully, this act of discarding cards from the top of the encounter deck has discarded some nasty treacheries and locations, as those will not be shuffled back in if the players manage to beat the quest before the encounter deck runs out.

Flipping over to stage 2B, the first player loses control over Arwen Undomiel. She is attached to the Goblin Gate as a guarded objective ally, and the players cannot gain control over her (this overrides her own card text). Arwen is still in play though, and retains all her tokens and attachments that have been placed on her so far. This is important, as she can still take damage and die at this stage, causing the players to lose the game.
Goblin Gate will gain +1 quest point for each enemy engaged with a player. Luckily, the location is not immune to player card effects, so players will be able to ignore this rule on the quest card if they play Woodmen’s Path. The goal at this stage is to travel to the Goblin Gate as soon as possible. It takes priority above all other locations (though some situations might beg to differ). This is because no progress can be placed on stage 2’s quest card unless the players control Arwen Undomiel. If players do go to another location, I would advise them to also select a side-quest for their main quest, since any excess progress will spill over on that at least.
Once the players do travel to the Goblin Gate, it is vital that they clear it as fast as possible (or use Thror’s Key on it). The location has an effect that will give the first enemy revealed from the encounter deck Ambush. Enemies that engage players this way make an immediate attack against the player. Note that this effect stacks with any enemy that already has Ambush. So a Goblin Trapper revealed from the encounter deck while Goblin Gate is active will both make an immediate attack against the player it engages through the Ambush keyword, as well as exhaust a character through its own Forced effect. With several enemies in this deck hitting for 5, it is crucial that players clear Goblin Gate quickly.
After the Goblin Gate is cleared, the first player regains control of Arwen, with all her tokens and attachments. She has remained in play all this time, so effects like the Uruk Elf-stalker could still have damaged her. The players now have to make 12 progress on the main quest in order to advance. This is 5 more than the original stage 2B, but I do not think it will be a big issue for most players that got through the 20 quest points of stage 1.
The Encounter deck
Global
- The encounter deck has increased in size a little compared to the normal version of the quest. It is now 48 cards thick.
- 27 of the 48 cards have a shadow effect, which is 56%. Be aware that shadow effects can discard characters, so bring cancellation for the effects on Undisturbed Bones and Sleeping Sentry to avoid taking big attacks undefended.
- Average threat per card is around 1.6 threat. This ranges from 0 threat enemies to the Goblin Gate at 5 threat.
- Surge is a very common keyword in this quest with 5 cards having the regular keyword. Another 5 treacheries have surge if you don’t meet a condition. The Concealed Woods will also increase the amount of surge in the encounter deck with every enemy with Ambush.
- Doomed is not present in this quest, but while threat increases aren’t common, there are effects that decrease the engagement cost of enemies.
- Immunity
- While Turbulent Waters is the active location, players cannot optionally engage enemies.
- While Crebain is in the staging area, encounter card effects cannot be canceled.
- Progress cannot be placed on stage 2B while the players do not control Arwen Undomiel.
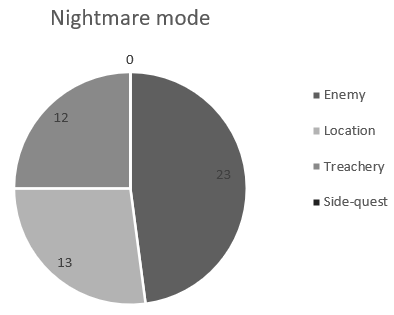
You can immediately see that the encounter deck favors enemies above all other encounter card types. With nearly half of the deck being enemies, you will certainly be doing some combat during this scenario. You must also be wary of the amount of surge in this encounter deck, as it might lead you to engage more than 1 enemy per round, especially if your threat is high.
Enemies
The new enemies have a focus towards the Ambush keyword, with most new enemies having a low engagement cost and/or a mechanic that interacts with the keyword. This makes it more difficult to avoid other enemies too.
- Uruk Elf-stalker: The art on this card answers the question of what bulldogs would look like in Middle-Earth. There is, unfortunately, nothing cute about this enemy, as it is a common method by the encounter deck to end a playthrough. The Elf-stalker has an engagement cost of just 5, and the Ambush keyword. This means that the enemy will always engage the first player since you will not likely have a threat lower than this engagement cost. There is no immediate effect on the Elf-stalker when it engages you, unlike many of the other enemies. Instead, you just add the 3 threat on this enemy to the staging area as per the new rules, and wait until combat. That’s where the Elf-stalker becomes dangerous, as it has a printed attack value of 5. The encounter deck can easily increase this, as the shadow effect on the Elf-stalker themselves will boost the attacking enemy’s attack by +2. If an Elf-stalker attacks and destroys a character, they will deal 1 damage to the Arwen objective. This is placed regardless of whether the players control her or not (as per quest stage 2). So chumping is off the table against this enemy, and you must defend it with a reliable defender if you want Arwen to survive. Another thing you will have to think of, is to heal Arwen of any damage dealt by this effect (if not at stage 3), and to boost Arwen’s hitpoints with cards like Spare Pipe and Squire’s Helm to give you a little more breathing space than her base 2 hitpoints.
Aside from the 5 attack on the Elf-stalker, you will also struggle to deal damage to it, thanks to high stats in the defence and hitpoint departments. A total of 8 attack will be needed to kill the Elf-stalker, which is no small feat. This enemy does take priority over many others though, as it will be annoying to have to deal with the constant 5 attack if you keep the Elf-stalker in play. Cancelling the attacks and playing traps on this enemy will also be a good idea, as you lower the chance of damage being dealt to Arwen. - Goblin Trapper: This is your run-of-the-mill Ambush enemy that will be quite annoying to deal with, but compared to other cards that you might reveal, is not that bad. The Goblin Trapper will make an engagement check when he enters play, and any player with a threat of 30 or higher (not counting modifiers), must engage this enemy. When the Goblin Trapper is engaged, the player engaging this enemy must exhaust a character they control. For swarm-style decks, this is no problem. But decks that rely on their heroes to do most of their heavy lifting will be at a disadvantage with this enemy. The Trapper might just exhaust your defender or your means of killing any engaged enemies. Luckily, you will still be allowed to ready the exhausted character afterwards, but realize that an exhausted character will suffer damage from any Sleeping Sentries that may pop up in the quest phase. But the Forced effect isn’t horrible if you have ways to ready your characters. It can even fizzle if you have no ready characters to exhaust to the Trapper, which can be the case if you must engage multiple copies in a row. The engagement cost of 30 means that decks will likely have some time to avoid this enemy, especially if they have threat reduction. The decks with more expensive heroes do have to prepare for this enemy right out of the gate.
In combat, the Goblin Trapper isn’t that scary. An attack strength of 3 is easily defended, and the Trapper only takes 5 attack in total to be defeated. With just 3 hitpoints, direct damage could even be used here, though it will likely not save you from the Trapper exhausting one of your characters. There are 3 copies of this enemy though, and with the shadow effect on them adding the enemy to the staging area, you are bound to encounter some of these Trappers during your playthrough.

- Raiding Party: The enemies are only getting stronger now, as the Raiding Party has an attack strength of 5 and 7 hitpoints! With an engagement cost of 34 and the Ambush keyword, you are bound to engage this enemy at some point, especially if you are running some expensive heroes. The Raiding Party enjoys inviting more enemies to their party. This is shown in their Forced ability that is triggered when the Raiding Party engages a player, which forces each player to discard cards from the top of the encounter deck. Each player who discards an enemy with the Ambush keyword through this effect, must make an engagement check against that enemy. Note that all players have to trigger this Forced effect, but only you make an engagement check against the card you discard. If the engagement check is failed, the cards are just discarded. If they are passed, then the enemy engages you, and you will have to trigger any Forced effect on that enemy too! This means you could run into both Raiding Parties at the same time and could even get another enemy on top of that. A party indeed!
In combat, the Raiding Party will hit for 5, which requires the same strategy as the Uruk Elf-Stalker. There is no punishment for chumping against this enemy though (aside from losing a character). Killing the Raiding Party will take some effort, as the 7 hitpoints will take some time to chew through. If you are really building against this enemy, I would advise running a Rivendell Blade or Tactics Aragorn with Straight Shot. That way, you don’t have to deal with this enemy at all, allowing you to focus your attack strength somewhere else. - Vicious Trackers: This enemy is a nice change of pace, as it is the only new enemy that does not have the Ambush keyword. This means that it is not targetted by cards like the Raiding Party or Tumultuous Assault. But with an engagement cost of 16, you will still be engaging this enemy soon. It also features the surge keyword, meaning that you will have a chance of revealing another enemy this round to have to deal with as well. While the Vicious Trackers do not have the Ambush keyword, they do support the mechanic. While the Vicious Trackers are engaged with a player, that player is considered to have +20 threat when making engagement checks. This is counted during each trigger of the Ambush keyword but also during the regular encounter phase for normal enemies. Luckily, getting over 50 threat this way does not eliminate you. The only thing that this does is that it forces enemies to engage you easier. If you have a threat well above the engagement cost of most enemies in this encounter deck already, then you do not really have to worry about this enemy. For players that are not keen on engaging more enemies, I would suggest getting rid of this enemy as soon as you can, or try and make them engage another player. The Trackers do not hit very hard but will take some effort to clear out. Note that there are 2 of this enemy in the encounter deck. I would suggest one player getting both copies if possible, since the difference between +20 or +40 threat is not that large. That way, the player could use Forest Snare on both enemies and just tough it out. Dunedain decks will love this enemy, though they will need some support from other decks in order to survive long enough.
Locations
The two new locations in the encounter deck make the foothills and forests of the Misty Mountains more difficult to traverse. These locations also interact with the Ambush mechanic some more, punishing players for engaging enemies that way.
- Treacherous Bluffs: What seems like a relatively tame location at first glance, will turn out to be one of your biggest nightmares once you have played a few games of NM Road to Rivendell. This location does not mess around, so players should try and focus their attention on the Bluffs if they can. It has just 1 threat but will get +2 threat each time an enemy with the Ambush keyword engages a player. There is no limit to this, so in higher player counts, this location can consistently become 5 threat or more. In lower player counts, this location is a bit easier to handle, but it will still be annoying to have to add to the staging area. Considering that there are 3 copies, a single enemy can add +6 threat to the staging area, plus their own threat. But it will become even worse when the Bluffs are in play and a Tumultuous Assault or Orc Ambush trigger. These treacheries will force a lot of enemies to engage all at once, meaning that the Bluffs will continue to grow in threat that round. This isn’t even to offset the threat of enemies that just left the staging area, since all enemies with the Ambush keyword will continue to add their threat to the staging area that round, as per the new rules. Travelling to this location has high priority, and luckily, there is no travel cost. The only price you pay for this location being active, is that you have to clear 7 quest points before progress can be made on the main quest. But Woodmen’s Path can help out here a lot. Another great attachment for this location is Thror’s Key, as you will no longer increase the threat of the location at that point. Instead, you can leave it in the staging area at 1 threat for the rest of the game. This will only pacify 1 copy though, and there are 2 others to be found in the deck.
- Concealed Woods: Contrary to the Treacherous Bluffs, this next location is one that you do not want to get active if you can help it. But the 4 threat on this location does make it appealing if you are given a choice. The reason why you do not want to have this location active is that it will give the first enemy with the Ambush keyword that is revealed from the encounter deck each round, surge. This means that you are staring down an extra encounter card, where that could have been avoided. Instead, try to clear this location in the staging area. With only 4 quest points, it won’t be difficult to clear, and there are plenty of great location control cards that work with this location. Another option is to travel to this location, and try to clear it during the next combat phase with Legolas and Blade of Gondolin. That way, you won’t have this location active next time that enemies are revealed from the encounter deck. It will mean that you have to do some killing this round, but with so many enemies in the encounter deck, I doubt that will be an issue.

Treacheries
There is just one treachery in the Nightmare version of this deck that is added to the deck. The other treacheries from the Normal version are worthy of the Nightmare branding on their own, so the designers didn’t see much in adding more treacheries to the deck.
- Tumultuous Assault: Two copies of this new treachery are included in the new Nightmare deck, which will complement the other nasty treacheries that were already in the base version. Tumultuous Assault is another nasty treachery but can vary quite a lot depending on the number of players and the number of enemies in play. When this treachery is revealed, each enemy with the printed Ambush keyword returns to the staging area. Then, each player makes engagement checks against each enemy in the staging area, as if it were the regular encounter phase. This means that engagement checks are also made against enemies in the staging area without the Ambush keyword. After these engagement checks, enemies with a lower engagement cost than your threat will engage you, which is where the pain really begins. The shuffling around of enemies doesn’t tend to be a problem in most cases, and even then, Ranged and Sentinel can help out other players. But most of the enemies in this encounter deck have a Forced ability that does something nasty when they engage a player. This treachery triggers all those abilities again, which is painful as it can mean that some enemies can trigger their effect twice in a single round. The treachery may very well be worth cancelling if several enemies re-engage players, which can cause extra attacks, direct damage, or exhaustion of characters. But if there is only 1 enemy with the Ambush keyword in play, this treachery is pretty easy to resolve. If there are no enemies with the Ambush keyword in play at the time this treachery hits, the card will surge. Do note that players must still make engagement checks against enemies in the staging area though! This can lead to lower threat in the staging area if regular enemies are engaged this way (remember that the enemies with the Ambush keyword will add their threat to the total in the staging area as per the new rules).

Tips and Tricks

- Losing the Arwen ally to direct damage is an instant loss, so be sure to give her some extra hitpoints with cards like Squire’s Helm and Spare Pipe. Players can also try to use damage cancellation, but with only 2 hitpoints on Arwen to start with, it’s easier to boost that number and try to heal damage off of her.
- If you are unable to boost Arwen’s hitpoints, try damage cancellation and healing. Damage cancellation has the preference here, as stage 3 does not allow you to heal damage. But cards like Honour Guard can still be used effectively to prevent you from losing the game at the very end.
- With the Ambush keyword being focused on some more in this quest, it is important that you try to decrease your threat or raise the engagement cost of enemies in the staging area. While some effects like the Vicious Trappers can be problematic, you can avoid quite a few enemies this way. Hobbits and Rangers have some good cards to use in order to keep below the Ambush value of many enemies.
- Since Undisturbed Bones is still in the encounter deck, if you play without allies, you will have some free encounter cards in the deck. Players should also prioritize defending with heroes so they don’t risk taking an undefended attack while also losing an ally.
- Have each player bring 3 copies of A Test of Will, and make sure you find it early. It is one of the only reliable ways to cancel the treacheries in this encounter deck, which will otherwise kill you in a heartbeat. Make sure the Crebain enemies are out of the staging area though!
- Traps aren’t a bad idea here, as some enemies might get stuck in Ranger Spikes in the staging area, not being able to make engagement checks. Other traps like Followed can help to offset the threat of enemies that just engaged you. If you can keep enemies pacified with cards like Forest Snare and Outmatched, then there are fewer triggers of the Ambush keyword, which will make the second half of the quest easier to complete.
- In multiplayer, be sure to bring some Ranged and Sentinel to the table. It is often the case that most enemies engage just one player, which may need help from others to survive.
- Goblin Gate is not immune to player card effects, so you can mess with it all you like. Not only can you make progress on it with player cards, but you can also play attachments on it. A particular favourite of mine is the Explorer’s Almanac, which allows you to clear the location with excess progress after clearing the active location. Since progress cannot be placed on the main quest at stage 2 anyway, it is a nice sink of progress while avoiding the nasty effect when it is active.
Playthroughs
Since this quest’s normal version is so infamous, some players in the community see the nightmare version as a decent challenge of their skills. As such, there are a fair few playthroughs to be found online.
- 2 handed, progression style: https://www.youtube.com/watch?v=gUGhtPi8X7I
- True solo, Sam deck: https://www.youtube.com/watch?v=7xv8QCHUwUk
- 2 player: https://www.youtube.com/watch?v=76sNvkbxVnI
- True solo, Glaurung deck: https://www.youtube.com/watch?v=-BRLjns8PFc
And that concludes Nightmare Road to Rivendell. We are now a decent way into the NM Dwarrowdelf cycle, but I want to continue a little bit further before going to the Vengeance of Mordor cycle again. These Nightmare articles are a lot of fun to make, as I don’t usually play Nightmare mode, so I at least get to see the cards. If I find nobody to do the Land of Sorrow scenario after I finish the Watcher in the Water in Nightmare mode, I will circle back to that one. Else, I will continue the series so that we can finish this cycle well before the end of the year. I would also like to start looking into redoing some of the normal Shadows of Mirkwood articles, but not quite yet.

