A strong cold reigns on Caradhras. While winter has never been kind in these regions and especially on the Redhorn Gate, Caradhras seems to be especially hostile this year. The weather is unforgiving already, but scouts have reported orcs and goblins roaming the pass, some claiming to have seen creatures even bigger than the monstrous mountain trolls in the snow…
The original version of The Redhorn Gate is the Dwarrodelf cycle’s location-based quest, and one of the less frustrating ones at that (looking at you, Nîn-in-Eilph!). It did suffer from some pretty weak enemies though, with the Mountain Troll being the only real threat, and it was a quite easy as a whole.
Nightmare mode again tries to fix this, and provides us with some neat new snow-themed cards and new combos the encounter deck can use.
Nightmare The Redhorn Gate
- Found in: The Redhorn Gate Nightmare deck
- Size: 19 new encounter cards, 1 rule card
- Quest Cards: 3, the same as in the original version
- Increase in difficulty?: Yes, as always. There are a few new enemies and shadow effects that can make combat a bigger threat and there is some more synergy involving Snow cards and punishing low willpower characters.

- Fixed Loopholes?: Not that I am aware of, since there were no game-breaking ones in the original.
- New Mechanics introduced: The new Blinding Blizzard treachery is shuffled into the encounter deck at stage 2, same as Snowstorm.
- Play this scenario if: you want to play one of the most thematic snow-centered quests in the game, you like a decent but not brutal challenge in a location-based quest
- Solo or multiplayer?: The player count does not matter as much here as in other quests, but I would still suggest you play with only up to three players. This is because you will see more Snowstorm cards in higher player counts that can severely disrupt your questing attempts and Icy Cavern can become very nasty easily in multiplayer.
- What to look out for: Shadow cards and stage 3B might kill defenders, big attacks from Mountain Trolls and Snow Giants
New Rules
In terms of new rules, there isn’t a lot to consider: You only set aside all copies of Blinding Blizzard in the beginning and shuffle them into the encounter deck when you reach stage 2B. This means that this card will be used exactly like the infamous Snowstorm in the original quest. The encounter deck will thus change quite a bit at stage 2B with more of a focus on blocking and hindering the players. Neat!
Cards Removed
These cards are removed from the original encounter deck to make space for the new encounter cards.
- 1x Black Uruks (weak enemies that do not add to the theme of snow and frost), 3 copies remain
- 3x Mountain Warg (weak enemies that do not add to any of the overarching themes)
- 1x Knees of the Mountain (low quest points and threat, no snow artwork)
- 2x Turbulent Waters (weak location, no mechanical ties to the rest of the quest)
- 2x Warg Lair (Mountain Wargs were removed)
- 1x The Dimrill Stair (beneficial location)
- 2x Fell Voices (essentially replaced by Caradhras the Cruel)
- 2x Fallen Stones (had a decent chance to essentially whiff)
- 3x Mountain Goblin (very weak if you were able to clear locations quickly)
The Quest
Stage 1 – Up the Pass – 9 quest points
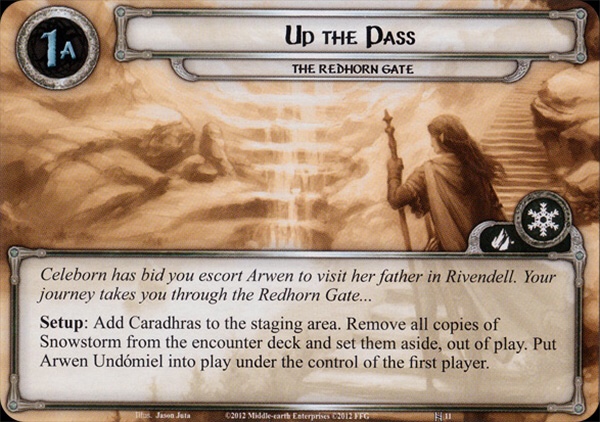

The quest begins with Caradhras in the staging area and Arwen Undómiel under control of the first player. All copies of Snowstorm and Blinding Blizzard are removed from the encounter deck and you will reveal one card per player.
This first stage is quite easy and does not put a lot of pressure on you. Players may try to build up their board stage or clear some side-quests, which will be useful later on stage 3. You should especially try to build up some questing power, since you will need a lot of willpower not only for questing but also for combat (Silvertine Marauder).
These goals can be combined using side-quests like Rally the West or Explore Secret Ways. They will relieve the pressure that locations and quest effects will apply later on.
Especially in Nightmare mode combat is not to be ignored, either. You should be prepared for Mountain Trolls and Snow Giants attacking you quite early on, so having a copy of Delay the Enemy ready to defeat might again help you with multiple issues.
In this quest you won’t have to protect Arwen at all, since there are no sources that deal direct damage where you can’t choose whom to assign it to. She will simply be a great help as long as you don’t use her to block.
Lastly, adding some repeatable location control for the staging area like Asfaloth to slowly clear away Caradhras’ quest points may be a good idea: You don’t want to spend too much time there later on!
Stage 2 – Snowdrifts – 11 quest points
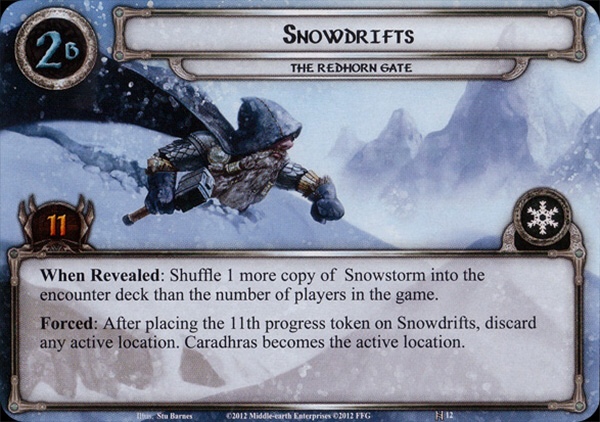
While you progress onto the mountains, the snowstorm gets stronger. As already mentioned, the quest shows this by shuffling extra cards into the encounter deck:


Depending on how frequently they appear, those two cards might shut down some big quest pushes, especially since the encounter deck is already thinned out back from stage 1!
Other than that, stage 2 is not very different from stage 1. Simply adding to your willpower should prepare you for stage 3 quite well.
Once you clear this stage, you will advance to stage 3. However, you must first make Caradhras the active location. The end of the journey is near!
Stage 3 – The Mountain’s Peaks – 13 quest points

When you reveal stage 3, you first shuffle all copies of Snowstorm back into the encounter deck. This has some interesting potential that I will talk about soon.
During stage 3, characters immediately get discarded if their willpower goes down to 0. That makes cards like the infamous Freezing Cold and the Snowstorm cards that will all be back in the encounter deck even more dangerous. Additionally, Caradhras will lower the willpower all questing characters by 1. This not only makes it harder to clear but can also kill most of your questing allies if you reveal a Snowstorm. Always keep a Test of Will handy!
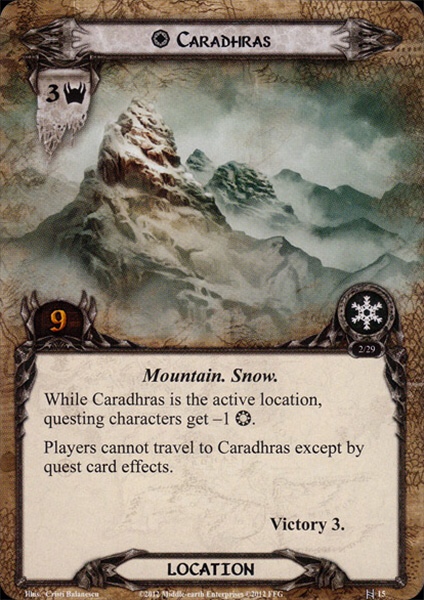
Many enemies and shadow effects will also lower defending characters’ willpower, making it quite easy to lose a Dáin Ironfoot to something like a Frozen Silverlode shadow effect! Having defenders with decent willpower like Gandalf is key!
After clearing Caradhras, you still have to get off the mountains. To finish the quest you not only need to place 13 progress on stage 3B but it also requires you to have 5 victory points. Luckily, Caradhras itself is worth 3 already, but if you didn’t clear any side-quests earlier you will need to look for some of the following cards:
- Fanuidhol (2 victory points)
- Celebdil (2 victory points)
- Snow-Giant (1 victory point each)
As you can see, simply finding one of Moria’s other peaks will provide you with enough victory points to finish (even though they are almost “mini-boss-locations”). Fighting two Snow-Giants is possible but probably too hard to rely on.
Let’s now have a look at the encounter deck!
The Encounter Deck
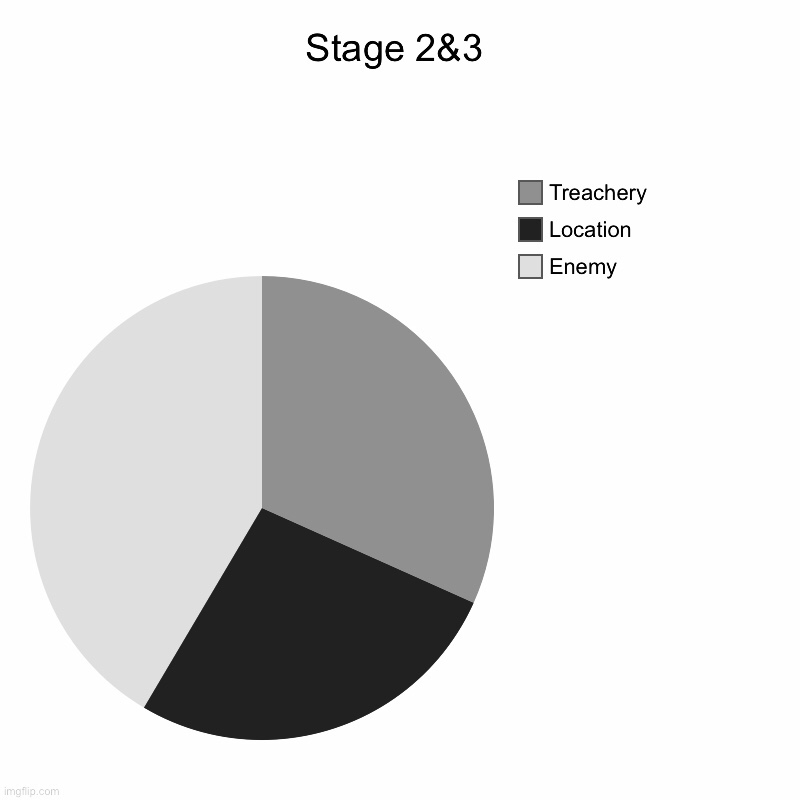
- The encounter deck is quite thin, at 37/41 cards. I will use the stats for solo play for the rest of the article and of course its composition changes on stage 2.

- There is a 57%/56% chance for a shadow card to have a shadow effect. Those are mostly attack boosts and willpower reductions, which will be important at stage 3. Also, Snowstorm‘s effect can discard the defending character!
- Average threat revealed is 2.2/1.9 per card. Keep in mind that Snowstorm, Icy Cavern and Freezing Cold may fluctuate depending on the board state and which characters are committed to the quest.
- 5 cards have Surge: 3 copies of Wolfpelt Goblin and both copies of Caradhras the Cruel effectively Surge, the latter may even reveal two more cards!
- There are no cards that have Doomed or that raise your threat level. Still, questing unsuccessfully might put your threat level at a risk.
- Immunity
- Players cannot travel to Caradhras normally
- While Frozen Silverlode is in the staging area, characters cannot gain willpower from player card effects
- While Blinding Blizzard is in the staging area, heroes do not gain resources in the resource phase
The encounter deck certainly favors enemies, which is a surprise for what is remembered as a location-based quest. In fact, The Redhorn Gate was never a very location-heavy one! Still, the quest can be seen as a “journey-based” one, since that is the entire focus of the story and many cards in the encounter deck will try to slow you down.
Enemies
The original quest’s enemies are replaced with some more snow-themed ones, though they are still mostly orcs. Those new enemies are far more of a combat threat than the original ones though, and they all interact with willpower or locations. You will rarely be happy to see one of them appear, since they may become the focus of a few rounds of combat.
- Wolfpelt Goblin (3 copies)
This one’s stats are very average at the usual “magic number” of 6 combined defense and hit points. Do not be fooled however, you will never be happy to see one. Firstly, they Surge, meaning they are never a “free” encounter card.
Secondly, when a player engages the goblin, they must deal X damage to a character they control, where X is the remaining quest points of the active location. Since engaging usually happens after players travel, there may not be a lot of progress on the active location. This ability can kill a character with ease, so you may want to have a cheap ally ready to sacrifice. Just for good measure, this guy also removes two progress tokens from the active location when engaged, stealing just a bit more of your time.
If possible, just try to avoid these goblins by dealing direct damage to them while they are in the staging area. - Silvertine Marauder (4 copies)
Our second enemy is a regular orc, and it looks like it painted a bandit’s mask on its face? Anyway, with decent stats and beefy hitpoints, the Marauder is quite an impressive foe. Its rules text supports the willpower theme of the quest, as it gets +2 attack if the defending character’s willpower is less than 2. Note that some shadow effects can decrease a defender’s willpower, so you should probably expect this enemy to have 5 attack. Other than that it is fairly streamlined, so general combat tips apply here.

- Snow-Giant (2 copies)
Damn, this is one tough giant! It’s stats are very similar to another enemy’s from a similar nightmare deck. Usually you might try to avoid such huge enemies, but this one specifically prevents that: While it is in the staging area, it will attack the first player anyways! To get rid of its threat you might want to engage it quickly, but then it forces you to discard your ally with the highest willpower. If that is Arwen… We’ll, have fun reshuffling .
There truly are no good options here, so you will want to either quest past it and weather its attacks, engage and kill it or use effects like Fierce Defense to get rid of it. Since it has victory points, even Out of the Wild cannot help.
Locations
There are two very flavourful locations in the Nightmare deck. Either of them will put your characters at risk of freezing at stage 3, so be careful!
- Icy Cavern (3 copies)
This first location has high quest points of 6 and its threat may fluctuate from just 1 to 5 easily. Thrór’s Key will permanently set it to 0 threat and will also relieve you of its travel cost, which has you reveal a copy of the infamous Freezing Cold. That was one of the worst cards to reveal in the original quest, since it would permanently put your heroes at risk for stage 3. Having some condition removal handy will help a lot if you cannot avoid the treachery or this location.

- Frozen Silverlode (3 copies)
Featuring some beautiful artwork, this is a crazy shutdown location: While it is in the staging area, characters cannot gain willpower. This does include any permanent effects like Celebrían’s Stone and revealing it can easily kill some characters at stage 3, so Strider’s Path is one of the few things that can save them. In general, you should try to just travel here as quickly as possible. That will prevent the Silverlode from hindering you too much. Again, Thrór’s Key is awesome, though it will not save your characters if they would die at stage 3.
Treacheries
The two new treacheries do not have a common mechanical theme, but they are both designed in a fun and intriguing way.
- Blinding Blizzard (2 copies)
When you reveal Blinding Blizzard, you add it to the staging area for an undefined amount of time. When you would put any progress on the current quest or Snow locations you place them here instead, until there are 5 progress counters on it. When it reaches that number of 5, you discard it and you can make progress as before. Additionally, while Blinding Blizzard is in the staging area, heroes do not gain resources during the resource phase.
While this is very thematic, simply using the prevalent strategy for this quest (lots of willpower) will get rid of the Blizzard quite easily. Losing one or two rounds of resources isn’t great, but things could be far worse. Therefore, Blinding Blizzard isn’t a scary card to reveal at most times. Still, the design is super cool!
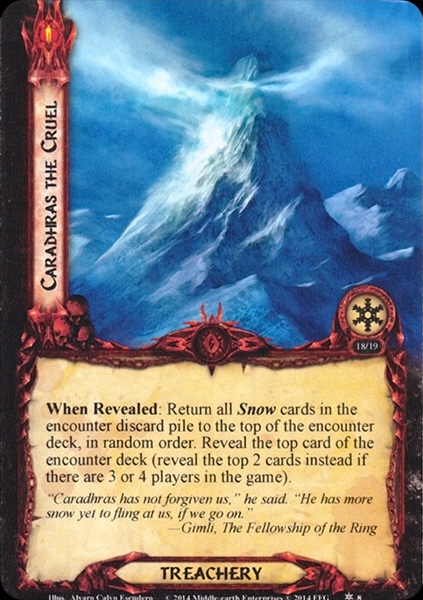
- Caradhras the Cruel (2 copies)
In the books, Caradhras is often portrayed as a sentient entity that tries to keep anyone from passing the Redhorn Gate, and the NM deck for this quest adds a similar mechanic into the game. When you reveal this treachery, you return all cards with the Snow trait from the encounter discard pile to the top of the encounter deck i a random order, then reveal the top card (2 cards if there are more than 2 players). This mechanic of encounter card traits is really used first in the Angmar Awakened cycle, so it is nice to see some of it here. Notable snow cards that this might recur are:- Fanuidhol and Celebdil
- Snowstorm
- Freezing Cold
- Wolfpelt Goblin
- Snow-Giant
- Icy Cavern
As you can see, these are most of the really bad cards in the encounter deck. That makes this a very good target for A Test of Will, especially in a multiplayer game where Caradhras the Cruel would force you to reveal two additional cards.
Tips and Tricks
- Willpower. Seriously, almost every new card punishes characters that have low willpower. In NM mode, this also applies to your combat characters. 2 Is the minimum that makes a character “safe” to use, so cards like Beregond are not a good idea. Either build around defenders like Elrond or use mass-willpower-buffs like The Arkenstone.

- Both of the new NM locations as well as Celebdil and Fanuidhol are incredibly annoying or possibly even game-ending at stage 3B. Thrór’s Key will make them rather harmless for a small price.
- Some condition removal can also be very useful since there are 6 cards that have you attach a Freezing Cold. All of these can be returned to the encounter deck via Caradhras the Cruel as well, so expect a few of them to turn up each game.
- Be very careful at stage 3, since a rogue Snowstorm combined with Caradhras’ effect could kill Arwen on spot, causing you to lose. An even more elaborate combo where Avalanche! causes you to commit her to the quest even if you didn’t want to might come up as well, so try to have some cancellation ready!
Playthroughs
Since Nightmare Mode is rather obscure, there aren’t many playthroughs of this quest. However, you can find a few linked below:
- Solo Bond of Friendship: https://youtu.be/fXnahSOU6qo
- Two players (Gondor Bond of Friendship): https://youtu.be/cJON39hjZnY
- Solo: https://youtu.be/lkIGd0RNEK0
This concludes the Nightmare analysis of The Redhorn Gate! It was quite fun to revisit this quest since it is very flavourful but not too punishing. Only two more analyses are left of this cycle before we advance to the Against the Shadow nightmare quests!
