““The Dead are following,” said Legolas. “I see shapes of Men and of horses, and pale banners like shreds of cloud, and spears like winter-thickets on a misty night. The Dead are following.”
“Yes, the Dead ride behind. They have been summoned,” said Elladan.”
– The Return of the King, The Passing of the Grey Company
The Flame of the West Saga Expansion is probably best known amongst fans for the third scenario, the legendary Battle of Pelennor Fields. However, before we arrive at the final confrontation with the Witch-King, Aragorn must undergo a journey, both physical and metaphorical, through the Paths of the Dead. In contrast to how they were depicted in the Peter Jackson films (seriously, who came up with the skull trap?), the dead were never really a physical threat in the book. They cause the Corsairs to flee, but they do not kill them. How do you make an enemy that isn’t a physical threat? You cause them to attack something different than the hero’s health…
The Passing of the Grey Company
- Found in The Flame of the West Saga Expansion, Scenario 1
- Official Difficulty: –
- Community Difficulty: 6.5
- Encounter sets: The Passing of the Grey Company
- Quest cards: 3
- Play if: You like puzzle scenarios that require a specific deck. You like fighting the Army of the Dead. You like playing with threat. You want to play a quest with a lot of progress required. You like cards with heavy metal sounding names.
- What is different about this quest?: Enemies rarely attack your health but your threat level. The amount of progress required to advance to stage 2 increases with your threat level. You get a special setup turn to get you going.
- Solo or Multiplayer?: In solo, you need to put a lot of progress down and manage our threat effectively. In multiplayer, you can better have one player taking care of the Dead, but everyone needs to manage their threat somehow – otherwise, we will never be done!
- Can I bring Side Quests for this scenario?: You can, but since a lot of progress is required and your threat is under constant attack, this can stall you to the point where you get too far behind. If you have discarded Overcome by Fear, then Double Back can be a good side-quest to lower threat and reduce the quest points on the main quest at the same time!
The Quest
Setup

Setup is pretty straightforward. Because this is a Saga quest, the first player takes control of the fellowship sphere version of Aragorn – this version has the classical Aragorn statline (2/3/2 – 5 hp) and rewards you for putting an artifact on him. If he has an artifact attached, he gains Sentinel and does not exhaust to quest; very versatile. You then continue with the quest setup. You start by setting The Stone of Erech and The Army of the Dead aside, out of play. Then, each player attaches a copy of Overcome By Fear to their threat dial. Yes, you read that right. Threat dials can have attachments now. Additional copies of Overcome by Fear are removed from the game, so there is one copy per player in the game, and each threat dial can have a maximum of one. Since Overcome by Fear is central to the mechanics of this scenario, it is worth spending some time on before we complete additional setup.

Throughout the game, Overcome by Fear may bounce on and off your threat dial. While it is attached, your threat level cannot be reduced. This is a problem because, as we will see, the encounter deck attacks your threat relentlessly, and your threat level determines how easy it is to progress from stage 2. So you want it discarded as soon as possible. However, to do that, you need to spend a Fellowship resource from Aragorn and raise your threat by one. This can only be done at the end of the round. In a solo game, this is obviously much easier to do than in a four-player game, where you may have to wait for Aragorn to get back to you before you can discard it. This can lead to some tense moments when your threat gets high. As a general rule, you want to discard it when you can. There is generally little reason to keep it around. When discarded, it is set aside, out of play, so it can return later. You will usually get plenty of opportunities to get it back into play from encounter cards, but unless the cost of refusing it is excessively high (threating out or costing you a hero), you should generally avoid taking it whenever you can. Trust me. You want to keep that threat low.
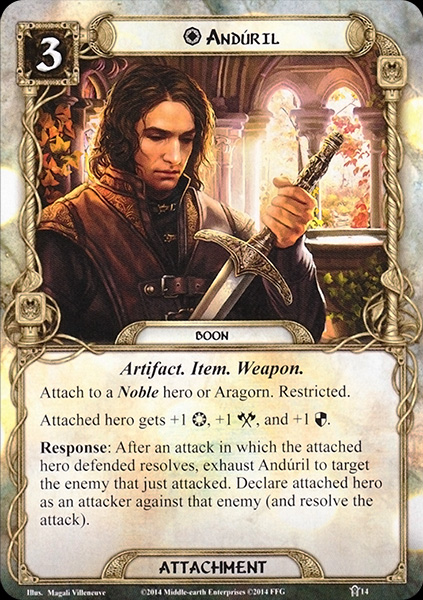
Having dealt with our dial attachment, we continue with setup. If you play Saga mode, you will have some additional setup steps to do before you are ready to flip the quest card. First of all, you are allowed to switch heroes without incurring the +1 starting threat penalty. Then, the first player has a choice to make – they may raise the threat of every player by 1 to search their deck for the boon Anduril, a juicy 3-cost restricted attachment that only goes on Noble heroes or Aragorn, gives +1 to all stats and gives the wielder the response that after the wielder defends an attack, you can exhaust Anduril to strike back – and with Aragorn that is for 4 attack with Anduril, which is definitely not trivial. +1 extra threat is a minor price to pay, so make sure that the first player is the one who has Anduril in their deck in multiplayer. The Keen-eyed Tooks among you may also notice that Anduril is an artifact – and hence you can play him down on Fellowship Aragorn and get his juicy bonuses from the start of the game. It’s a gift that keeps on giving. When you are done drooling over Anduril, you proceed with setting aside burdens from the Frodo side of the story – A Shadow of the Past, Flight to the Ford, The Ring Goes South, The Passage of the Marshes, Shelob’s Lair. You are now ready to proceed!
The Forbidden Door (- Quest Points)

When flipped, stage 1B provides us with a choice – each player may add an additional resource to each hero they control! Each player who does so must raise their threat by 3. This tempting offer is not just granted out of the goodness of the designer’s heart – if you read on, you will see why it is a tempting offer. At the end of the first planning phase, each player discards their hand and advances to stage 2A. So you have this planning phase to play cards from your opening hand. Make the most of it. It is, of course, dependent on what you have in your opening hand whether this is a good idea. But generally, I take the extra resource to get my board state set. Because I will lose what remaining cards I have, card draw such as Daeron’s Runes and hero Galadriel, and cards that recur things from your discard pile such as Dwarven Tomb are all advantageous to have in this scenario. Galdor of the Havens practically shines here as he lets you draw a new opening hand. Decks with Erestor will also be well-suited for this stage, as they tend to build around losing their hand every turn. This time it happens a bit faster than usual, but at least you will draw a lot of cards next turn! Tricks such as playing a couple of allies down (perhaps with Timely Aid ) followed by a cheeky Very Good Tale to get even more allies out are the kind of tricks you can use to get over the setback of losing your hand. And as we will discuss later when we talk strategy, Silvans are particularly useful in overcoming this scenario. But more on that later. Once we have played our cards, we move on to stage 2A.
Stage 2 – The Paths of the Dead (X Quest Points)

When advancing to stage 2 at the end of the first planning phase, we see another “when revealed” effect. Each player must search the encounter deck for a different location and adds it to the staging area. We will cover each location in more detail but note that the encounter set only contains four different locations, so if you play four-player, you will get a copy of each. At this stage in the game’s life, it was common for locations to prevent specific strong player strategies such as location control and treachery cancellation. These locations certainly fit that description. Hence, my choice may vary depending on what my deck is trying to accomplish. In general, my order of choice will be:
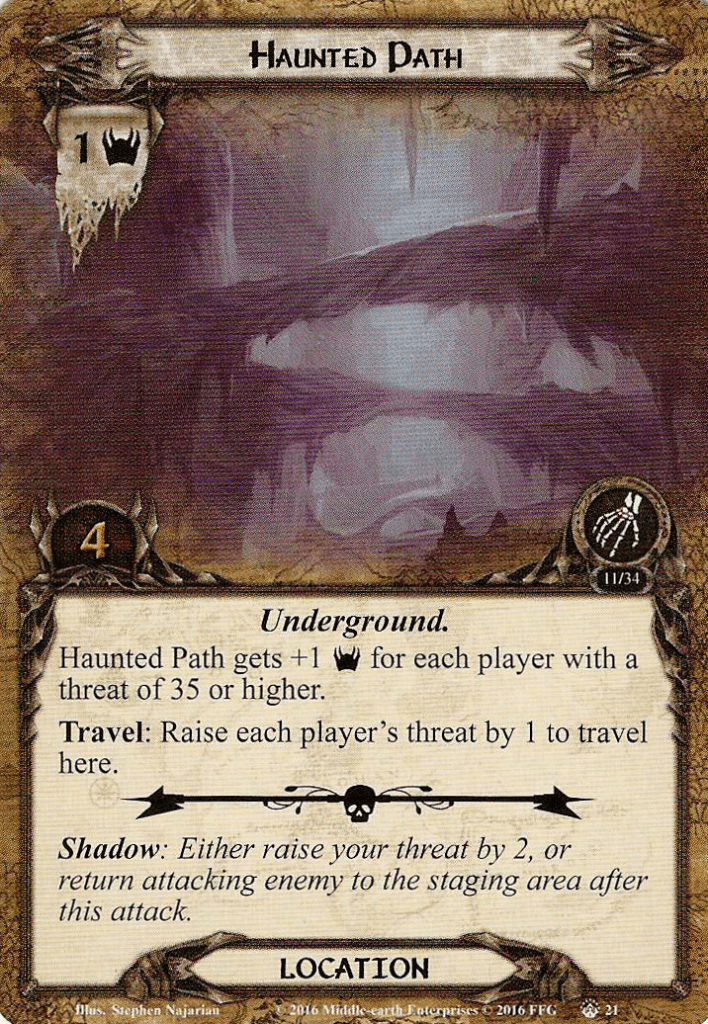
- Haunted Path – low threat, but more threat when players have a threat score over 35 – should not be a problem at the game’s start.
- Deadly Road – punishes cancellation by raising your threat when cancels are played, requires fellowship resources for traveling, but low threat.
- Trysting Place – prevents sniping of enemies in staging area, and brings out an Oathbreaker enemy as a traveling cost.
- Dark Door – Mild effect as it “only” negates location control, by preventing progress placement in the staging area. However, it is a 4 threat location and triggers an encounter card reveal as a Travel cost. I do not like the uncertainty of extra encounter cards.
Once relevant locations have been added, stage 2A is flipped over. The first thing you will notice is that the quest points are not fixed but are equal to the threat of the player with the highest threat – so the number will keep on going up unless threat is managed – and remember, if you are Overcome by Fear, you cannot reduce your threat… This is the main strategy of the encounter deck. Drive the player’s threat up, and keep them at stage 2B forever until they threat out. And it can be relentless! Threat management is not optional here – I needed to side-board threat management cards into my decks to stand a chance against this quest when I did my playthroughs for research. So find out what kind of threat control you can include in your deck and swap it in! Threat is both dealt out through encounter deck effects and also because all enemies in the encounter deck have the Phantom keyword – a keyword invented for the occasion! The Phantom keyword states that “during the ‘determine combat damage’ step of an attack made by an enemy with Phantom, if any damage would be dealt by the attack, it is canceled, and the defending player raises his Threat by an equal amount instead.” So instead of taking damage, your threat goes up. This also means that undefended attacks (usually) are safe to take if you can handle the threat. So a dedicated blocker can help you keep the threat low but is less necessary than in other quests. But this also means that chump blocking is less effective – because you will just receive the damage as threat instead.
OK, so it’s all just a matter of getting our threat levels super low and power quest through, right? Well, there are some additional complications here. First of all, your threat cannot go lower than your starting threat – so no excessive lowering with Spirit Merry and The Shirefolk. Additionally, at the beginning of the planning phase, each player has a tough choice to make – either they must raise their threat by one, or they cannot play any cards this phase. This latter part is a devilishly clever design, as you must constantly make tough decisions on whether you play something or wait to keep your threat low. This is why you ideally want to be setup with the added resources at the end of the first planning phase – even with massive card draw, playing new allies down each planning phase will cost with the increased tax of a threat bump, potentially making it harder to reach the end of Stage 2B if you are the player with the highest threat. And since you need to make a lot of progress to clear locations and accumulate the required progress to advance, you need to be able to quest right out of the gate. There really is no alternative.

So how do you build up a board state with the added threat tax? You have a few different options. One is to just power through it. Take one threat, spam out allies, and have enough to just power through. This, of course, works best if you are doing Outlands, Dwarf, or Gondor swarms, where you generate massive economy and play cards like there is no tomorrow. But this can be tough to keep up with, and most likely, you will need threat management, or you will be at serious risk of threating out. Plus, the discarding of your hand is punishing for swarm decks unless they have strong card draw. If you have a somewhat stable board state, you can make the call on a round-to-round basis. If you have a few good cards to play, take the threat and play them. Otherwise, hold on to them, try to make some progress, and build up a strong hand and resources. Ideally, you want to work towards a somewhat cleared staging area (which is, of course, much more likely in lower-player games). Then you can gradually add more and more cards in bursts. The third option, which is my favorite, is to play cards outside the planning phase. This is where Silvans are very helpful. Thranduil lets you play an ally in the combat phase. The Tree People lets you put allies into play outside of the planning phase too. And if you throw Galadriel into the mix, you also have the option to draw cards and lower your threat. It is a strong tool against this quest. Make a plan for how you will address this added threat. Because it is just a small drip of threat, but as we all know, those drips tend to add up…
As mentioned above, your goal should be to keep the staging area as clear as possible. You need to quest for a low, so get some strong willpower characters in there, get a clear staging area by dealing with locations and enemies as they appear, and place as much progress as you can. Once the end is in sight, you should have a board state strong enough to face the final battle: the Army of the Dead.
Stage 3: The Dead Are Following (5 progress)

When you finally overcome the marathon that is stage 2, your board state is probably in a good place (otherwise, you won’t put down that much progress), and you hopefully have a relatively low threat, and the staging area is somewhat clear, so you are ready for the final confrontation with the Oath-breakers. You begin by adding The Stone of Erech and the Army of the Dead (enemy side face-up) to the staging area. Then, each player can raise their threat by 3 to detach Overcome by Fear from their threat dial and set it aside. Unless you are close to threating out or have no threat reduction in hand, and you can see threat is climbing, this is definitely worth doing if you have the attachment. This is also worth remembering if you are about to advance from 2B – if an encounter deck effect lets you attach Overcome by Fear, you know you have an easy way to discard it in stage 3. With everyone free of fear, we can look at how we win this damn thing.
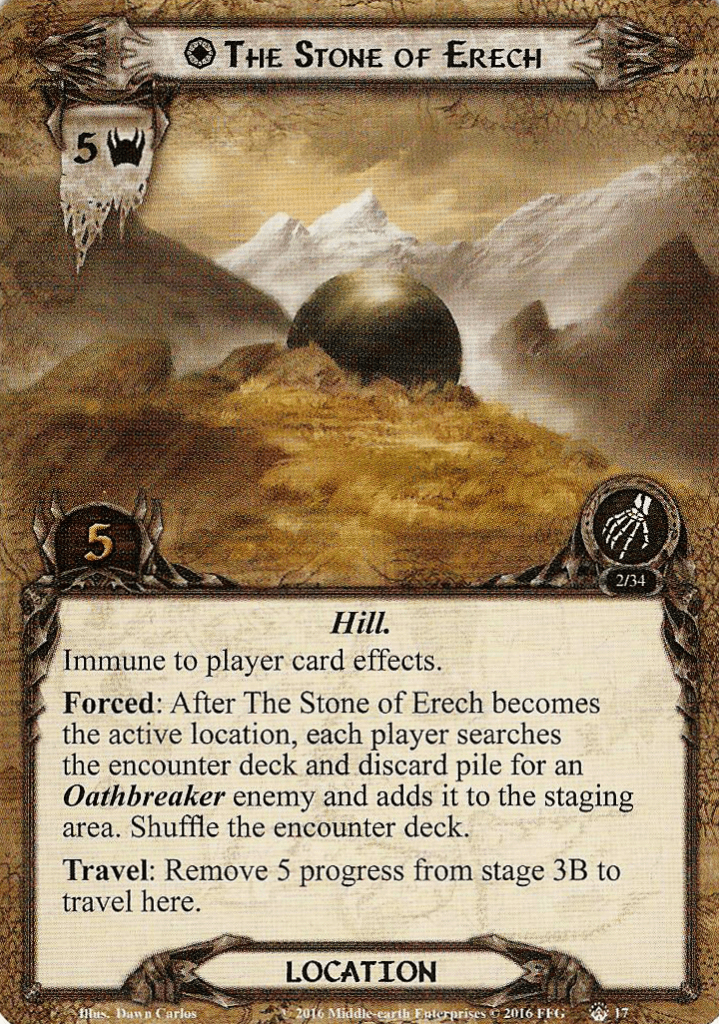
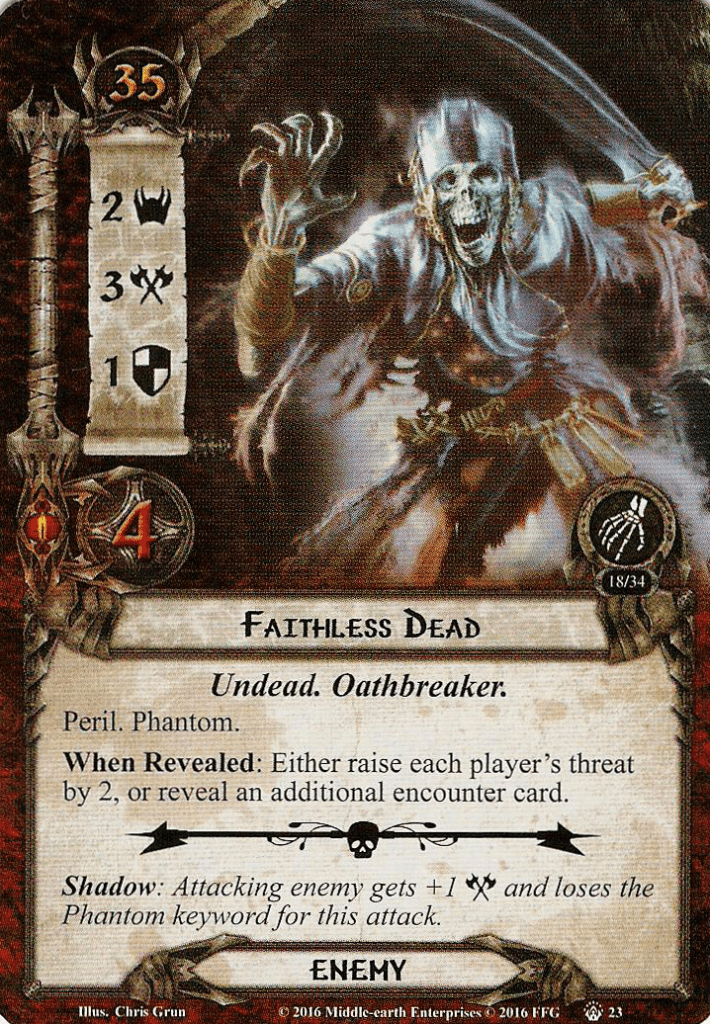
Stage 3B tells us that when the Stone of Erech leaves play as an explored location, we win! So this seems pretty straightforward. The stone itself has 5 threat and require 5 progress to clear, so it is adding a substantial amount of threat to the staging area. It is immune to player card effects (no surprise there), and to travel there, you must remove 5 progress from stage 3B. So you cannot travel to it immediately after advancing to stage 3A. And you need to add sufficient progress if you want to travel to it after the next quest phase. Traveling there also means enemies: After The Stone of Erech becomes the active location, each player searches the encounter deck and discard pile for an Oathbreaker enemy and adds it to the staging area, and shuffles the encounter deck. I prefer either Faithless Dead or Ghosts of Men because they only attack by 3 and because you bypass their “when revealed” effects by adding them to the staging area. This is all the text on the actual location. However, the quest card has some additional effects to add: While Stone of Erech is the active location, each Oathbreaker enemy loses the Phantom keyword and gets -20 engagement cost. So until we clear it, the Oathbreakers are ANGRY! This includes the scenario boss: The Army of the Dead.

With X threat, where X is twice the number of players in the game, 6 attack, 2 defense, and 8 hit points, Army of the Dead is a beefy enemy. However, it “only” takes 10 damage in one swing to bring them down. At this point, we have fought Balrogs and Witch-Kings – it takes more to impress us! It has the Phantom keyword and is immune to player card effects. It also has a Forced effect: When Army of the Dead attacks, you must either attach a set aside Overcome by Fear to your threat dial or discard an ally you control. If you play Saga, you do not want to have Overcome by Fear attached at the end of the game. So I prefer tossing a cheap ally to the effect. It has an engagement cost of 50, so once it gets out, you do not necessarily have to engage it until the Stone is the active location. In multiplayer, it will contribute a pretty hefty threat amount to the staging area, so if you can clear it, it is a good idea to do so straight away. Use a chump blocker or a defender with many hit points (Aragorn is a decent choice here if you dare) and throw your attack power after them. Once you deal 10 damage, they go to the victory display.
Ideally your stage 3 will consist of the following 3 rounds:
- Round 1: Advance. Optionally engage and kill the Army of the Dead
- Round 2: Quest over The Stone of Erech and place enough progress here that you can travel there. Be ready for combat with remaining enemies
- Round 3: Clear The Stone of Erech and win!
You might have to linger for a few rounds if you get swarmed with enemies, or you are location locked, but this can be a vicious cycle. In Solo, the Stone and the Army will add 7 threat, and this number goes up by player count. If you are swarmed with locations, it can be difficult to quest sufficiently and have enough for combat. But if you manage to go through, you will have won! If you play Saga and have Overcome by Fear attached, you add it to the campaign pool as a burden. You will begin subsequent plays with Overcome by Fear attached to your threat dial. If Army of the Dead is in the victory display, add the Army of the Dead boon to the campaign pool. You are now ready to proceed in the Saga!
The Encounter Deck
Global
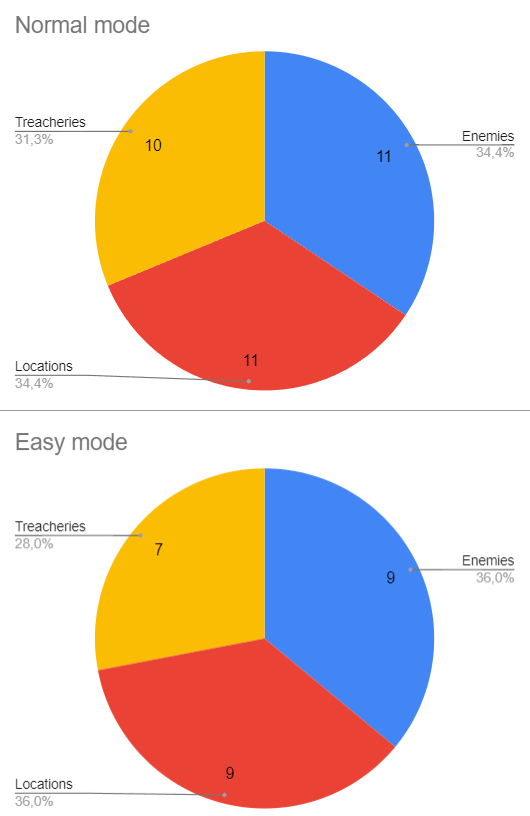
- The encounter deck consists of 32 cards on Normal and 25 cards on Easy.
- On Normal mode, 20 cards have shadow effects, giving you a risk of 62.5% for triggering a shadow effect during combat. On Easy, that risk is 60% with 15 cards.
- Average threat is 1.7 per card on Normal and 1.6 on Easy.
- Surge is present on 2 cards on both difficulty levels (The Way is Shut)
- Peril is present on 10 cards on Normal and 9 cards on Easy (Faithless Dead, Ghosts of Men, The Way is Shut and Whispers in the Dark)
- Doomed 1 is present on 3 cards on normal and 1 on easy (Blood Runs Chill). There are plenty of other ways that the encounter deck raises your threat, so don’t bring any Doomed yourself.
- Immunity:
- The Stone of Erech and the Army of the Dead are immune to player card effects.
- While Overcome by Fear is attached to your threat dial, your threat cannot be reduced.
- While Dark Door is in the staging area, progress cannot be placed on locations in the staging area.
- While Trysting Place is in the staging area, each enemy in the staging area cannot take damage.
Enemies

First off, we have the Dead Man of Dunharrow, a small enemy that wants to slam Overcome by Fear back on that juicy threat dial of yours. With four copies in the deck on both difficulties, it is an enemy you will encounter. With 2 threat, 2 attack, 1 defense, and 3 hit points, it is pretty straightforward to deal with, and most dedicated attackers should be able to take it down easily. It has an engagement cost of 30, meaning that most decks will have to engage it from early game (especially due to the many threat increases). It has the Phantom keyword, so it deals its damage as threat. The truly annoying part comes from the Forced effect when you engage it: you must either attach a set aside Overcome by Fear to your threat dial or raise your threat by 2 (which more or less constitutes an undefended attack). As this is an engagement effect and not a When Revealed effect, this is not something you can cheese with some of the locations that fish out enemies. As a shadow card, it can also be inconvenient or even deadly in the rare situations when Phantom is turned off, as it adds a +1 attack to the attacking enemy. In summary, this is an enemy that slows you down but is relatively easy to clear again. With 2 threat, this is actually a great target for Ranger Spikes, allowing you to keep it in the staging area forever and not have to worry about it.
Faithless Dead is not only a fantastic metal band name but also the name of an enemy that comes in three copies on normal and two copies on easy. 2 threat, 3 attack, 1 defense, and 4 hitpoints make it a step up from the Dead Men, but it should still be something a dedicated attacking duo can take down easily. It has an engagement cost of 35, which in this scenario still means you will face it early. It has Phantom and Peril for its When Revealed effect: Either raise each player’s threat by 2 or reveal an additional encounter card. I usually go for the threat increase, but this might be a solo bias. But additional encounter cards are usually bad for business. I like to take the threat. If two threat kicks you over the edge, things are not going great. I prefer taking this enemy from the encounter deck with Trysting Place as I can then bypass the effect. It also removes a scary shadow effect: +1 attack and Phantom is negated for the turn. So that threat increase you planned to shrug off might suddenly cost you a hero. Ouch.
Ghosts of Men is another great band name, though I do believe they would play a different kind of music than Faithless Dead. Perhaps some more industrial vibes? This enemy has 3 threat, 3 attack, 1 defense, and 5 hit points and comes in two copies. So now we are definitely moving into territory where you need multiple attackers to take it down. It has an engagement cost of 40, so this is one you can leave to attack in the staging area for some time if this is your modus operandi. It has Phantom and Peril for its When Revealed effect: Either attach a set aside Overcome by Fear to your threat dial, or Ghosts of Men makes an immediate attack against you. My choice here varies a bit based on board state. If I have plenty of resources on Aragorn and I have few available defenders (or if defending would make me unable to take it down in one attack), then I might take Overcome by Fear (with the intention of discarding it as soon as possible). But if my threat is well-managed or I have plenty of defenders out, I will not sweat too much about an extra attack. It will likely only be a threat bump. You can fish this out with Trysting Place if you would rather not have to worry about this effect. As a shadow card, it has no effect, so that is a nice place to see it.
With Shadow Host, we are definitely back in metal territory. This is some dark and slow metal, like Tiamat. In our case, it is a mini-boss that is present in two copies on normal and one copy on easy. 4 threat, 4 attack, 2 defense, and 6 hit points make it a threat that you might not be able to deal with right out of the gate. 45 engagement means you can likely engage it on your own terms. It has Phantom and Forced: When Shadow Host engages you, either attach a set aside Overcome by Fear to your threat dial, or it makes an immediate attack, so same thing as Ghosts of Men, but every time they engage you, which might happen multiple times due to card effects we will see in a bit. It is an enemy you cannot ignore, especially because of the threat tag. Unless you get it late game, it will probably have to be your focus for a round or two. So keep an eye out for it as a shadow card (it has no shadow effect) and plan accordingly if it is still in your deck. It can make your threat go up very rapidly if unmanaged.

Locations
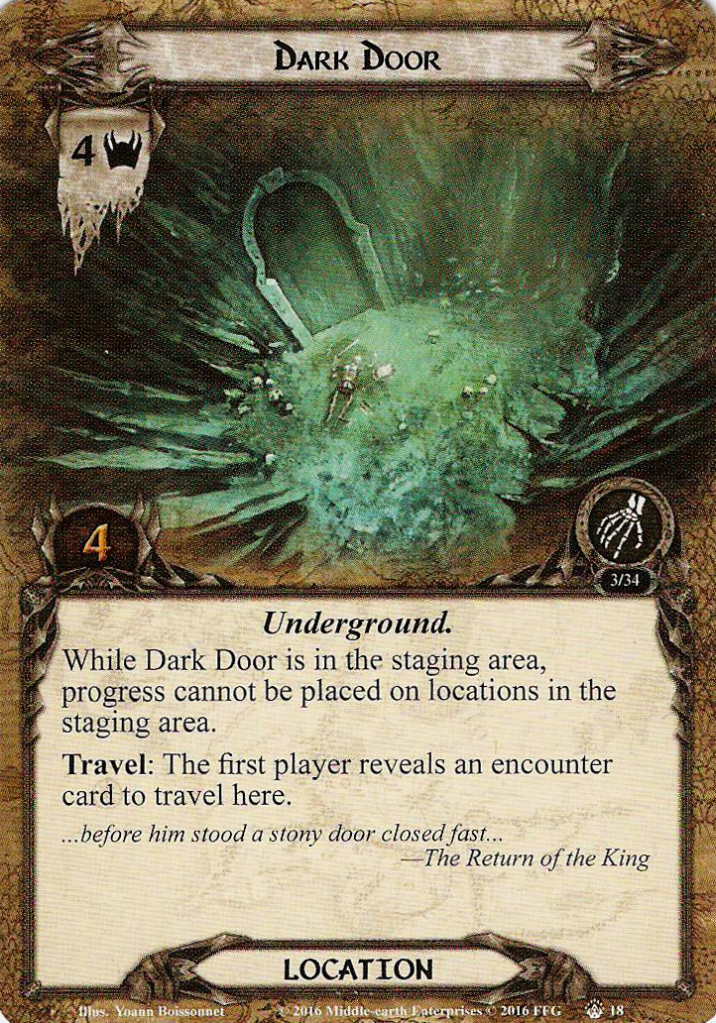
The first location of the encounter deck is Dark Door – which would be a pretty good metal track name. I sense this is going to be a recurring theme in this section. But to return to the actual location, with 4 threat and 4 progress required to clear it, this is a tough one to see during the quest phase. It is the kind of location you might as well travel to because clearing it eats up as much of your willpower than leaving it in the staging area. There is only one problem – the travel cost. To go there, you must reveal a card from the encounter deck. This is, most of the time, bad news, especially at lower player counts. You might get a location to replace it, which can contribute to location lock. Or it can bring out a nasty enemy or treachery. You cannot use most location control to deal with it, as while it is in the staging area, progress cannot be placed on locations in the staging area. However, you can use some of the tried and true location swap shenanigans, such as Westroad Traveler or Thrór’s Map, or blank it with Thròr’s Key. It has no shadow effect, so it is nice to see it during combat. The encounter deck contains two copies on Normal and one on Easy.
Trysting Place is not a catchy name for a song, but a location that comes in two copies on easy and three on normal. With 3 threat and 3 progress to clear it, it can be somewhat bothersome to leave it around for too long, but the low progress threshold makes it an easy target for location control effects. While it is in the staging area, it protects enemies in the staging area from Gandalf slaps and other direct damage effects. To travel there, the first player must search the encounter deck and discard pile for an enemy and put it into play engaged with them. Use it to fish out some of the enemies described above with When Revealed effects! It has no shadow effects. Overall, it is a location that can be a problem if you are getting location locked, but otherwise is a somewhat convenient way to take the sting out of the encounter deck.
With Deadly Road, we are back in metal territory – I can basically hear the Dragonforce riff that accompanies it! It comes in three copies, no matter your difficulty. It is a fairly benign location to encounter with 2 threat and 3 progress required to clear it, with the usual anti-Test of Will tech that later scenarios were so keen to implement: While Deadly Road is in the staging area, it gains: “Forced: After a ‘when revealed’ effect is canceled, raise each player’s threat by 1.” So another threat increase. This should not keep you from canceling treacheries but maybe think twice before doing it. The travel cost is that you must spend one fellowship resource to go there. It is mostly an issue at higher player counts, where Overcome by Fear will bounce in and out of play a lot more, and you, therefore, will need more resources. However, this is such a small price to pay that I don’t spend my location control bypassing it. It has no shadow effect, and it is a location that I usually breathe a sign of relief when I see it.
Lastly, we have Haunted Path. Here we are definitely in goth rock territory. The encounter deck contains 3 copies, no matter your difficulty. With 1 threat and 4 progress required, it is a softball in the early game. At higher player counts, this can get a bit more troublesome, as it gets +1 threat pr. A player with threat over 35. I would argue that this is unlikely yo be the straw that breaks the pony’s back, but of course, it can location-lock you at an inconvenient time. Usually, it is a card I am happy to see. However, the travel cost can be a bit steep, as traveling there requires you to raise each player’s threat by 1. As a shadow card, this one can actually be pretty bad: You must either raise your threat by 2 or return the attacking enemy to the staging area after this attack. This means you can get some nasty engagement effects from some of the stronger Oathbreaker enemies. This is one you potentially cancel if you can.

Treacheries

We were just getting started with the metal song titles in the location section, and luckily the treacheries did not let us down. Blood Runs Chill sounds like it would be written by Mastodon. In our case, it is present in 3 copies on normal and 1 on easy. It has Doomed 1, and when revealed, each player with a threat of 35 or higher deals 1 damage to each exhausted character he controls. This treachery is a good reason to keep your threat low by any means necessary. Especially decks like Silvan or Gondor decks are prone to board wipes when a treachery like this fires. If your threat runs high, this is the kind of treachery you cancel if you can. As a shadow card, it punishes the defender readying. If your threat is 35 or higher, defending character cannot ready until the end of the round. This can be a problem if you have a dedicated defender, and you should therefore be aware of how many copies of this are in the deck if this is your main strategy for combat.
The Way is Shut sounds a little more light than Blood Runs Chill – perhaps it could be a song by Kamelot? It has peril and surge, and when it is revealed, either attach a set aside Overcome by Fear to your threat dial, or progress cannot be placed on the current quest until the end of the round. As we have discussed previously, you should generally avoid Overcome by Fear unless your threat is very low and you have Aragorn around to clear it easily. The second effect stalls you and can be problematic in the final part of the quest, where you are trying to blast through. To my understanding, you can still clear locations, so it is not a completely wasted effort. But you are racing against the clock in this quest, so it is an annoying effect. It comes in two copies regardless of difficulty and has no shadow effect, so combat is where I prefer seeing it.
Whispers in the Dark sounds like a creepy track. Perhaps we are in Dimmu Borgir territory? Here it is present in three copies, for both difficulties. It has Peril and When revealed: Either attach a set aside Overcome by Fear to your threat dial or each character you control gets -1 to each of the three stats until the end of the round. Usually, this will lead to a round of lost questing, potentially forcing you to eat some threat if you had problems questing hard enough. If this is the case, Overcome by Fear might be a better option. It is also annoying if you are in the process of dealing with one of the beefier enemies the encounter deck has to offer. This rewards questing with a few dedicated questers rather than a big swarm of weenie Dwarf or Gondor questers. However, I would usually save my cancellations for worse treacheries. As a shadow card, it punishes undefended attacks, granting +1 attack or +2 if the attack is undefended. This usually leads to a pretty substantial threat increase in the early game or a dead hero in the rare cases where Phantom is lost. I would keep this in mind when I decide where to use any shadow cancellation.
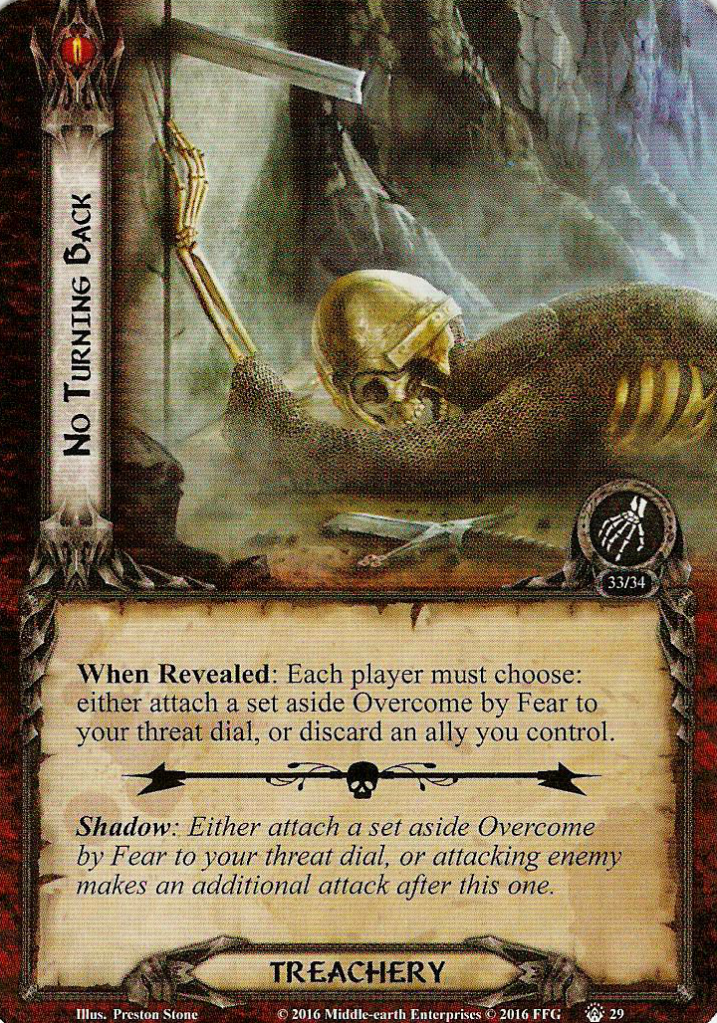
No Turning Back is a difficult one to review because it is not very metal. This could even be some Nickelback stuff or other soft rock… I am sorry to disappoint you, dear reader. I had hoped for a stronger ending! No turning back is present in two copies on normal and one copy on easy. It completes the trifecta of treacheries trying to stick overcome by fear back to your threat dial. However, this one triggers for ALL players – not just the one who drew it! When revealed, each player must choose: either attach a set aside Overcome by Fear to your threat dial or discard an ally you control. Usually, this is not too bad. Because of Phantom, chump blockers will have a tendency to stick around, and you can easily toss a cheap ally two it. There are, of course, niche cases where you play Fellowship or Three Hunters, where you either do not want to discard any allies or you simply have no allies in play. It is not one I often cancel unless my board state is in a tricky spot. Keep in mind that it does not have Peril – you are free to discuss with the table whether you should cancel it! I would be more prone to cancel it as a shadow card: Either attach a set aside Overcome by Fear to your threat dial, or the attacking enemy makes an additional attack after this one. If you have the blockers, this is fine, but otherwise, it can lead to a lot of threat or dead heroes. I prefer to see this one in the quest phase!

Tips and Tricks
- Galadriel and other heroes with consistent threat-lowering effects, such as Beregond, are really solid choices for this quest. You want all the threat lowering you can get, and especially the tax of 1 threat for playing anything in the planning phase can really sneak up on you.
- Card effects that put cards into play outside the planning phase are really valuable. Thranduil is a good example, as he allows you to play an ally in the combat phase. A very good tale can also be utilized to good effect.
- Threat control is not really optional, which means you will likely have to bring some spirit cards into your deck. Plan accordingly. Remember, you are allowed to switch heroes in Saga mode.
- As mentioned above, placing Overcome by Fear on your threat dial is really dependent on the situation you find yourself in. It often depends on your threat and whether you have Aragorn with 1 resource available to clear it. One thing I often look at is how much threat I would get from not taking it. Sometimes eating the +1 threat and a fellowship resource is a better alternative. You generally want to clear it as quickly as you can, so you have the option of putting it back on if the alternative is worse on a treachery or if you plan on playing threat reduction.
- While his ability would be perfect for this scenario, Lore Aragorn, unfortunately, cannot be played because of Fellowship Aragorn. And remember, you cannot play Thorongil on fellowship-Aragorn either.
- If you play standalone or do not want to include Anduril for some reason, consider adding one or more Artifact attachments to your deck for Aragorn to unlock his bonus. It is well worth it to get his free questing each turn.
Playthroughs
- Cardboard of the Rings has quite a few playthroughs of this quest. Chad played through it in his Thematic Saga. He also played through it in his Original Saga. Chad also participated in a Twitch playthrough with Relic of the First Age Sean and community members bigfomlof and Stokesbook.
- One Stop co-op shop also has a nice video and goes through some detail about setup and the Phantom keyword in the beginning. It is also made with real cards (like Chad’s Thematic Saga) if you prefer that compared to DragnCards and/or OCTGN.
- Another set of videos with real cards was uploaded recently by user Carl Swanson (There and back again). You can find the videos here: video 1, video 2 and video 3. I am not really sure about the order of the videos, so please excuse me if I mixed them up.
- LOTRLCGSolo made a progression-style video with the quest.
- Bronco’s Gaming World also made a video with a playthrough recently.
- Card Talk also has a couple of videos where they played this quest as a live stream: Video 1 and Video 2. They also did a theatrical campaign.
Our brave companions made it through the Paths of the Dead! But the Corsairs await on the other side… When the Saga campaign returns, it will be all hands on deck! I can already promise a lot of stupid nautical wordplay…

2 thoughts on “The Passing of the Grey Company”