Frodo has been griefly wounded by a Morgul Blade during the fight against the Nazgûl  at Weathertop. Now, your fellowship tries to make its way to the safety of Rivendell, but you have to cross through dangerous lands to get there while you are being pursued by the enemy. And at the same time, Frodo’s wound keeps getting worse and he will surely perish should you not make it in time.
This quest provides and interesting counterpoint to the two other scenarios in the Black Riders box. Stalling and building a board state is not an option here. From the beginning you are on a hard time counter of at most fifteen turns that will get even smaller when you are not engaging enemies. Because of this you need to be armed with high early willpower and combat prowess (or at least defensive capabilities), if you want to deliver Frodo safely to Rivendell. The Ford of Bruinen location is also one of my favorite thematic moments of the saga quests and make for great gameplay moments where you will feel immensely powerful.
While I talked about the boons and burdens of the saga quests strictly separately in the last two articles, this is more difficult with Flight to the Ford. Although you get more opportunities to play around with the burden deck in campaign mode, you will still have to reveal cards from the burden deck even in standard play. This is why I will treat the burdens as a part of the general analysis and will only go over campaign specifics at the end.
Flight to the Ford
- Found in: The Black Riders Saga Expansion
- Official Difficulty: N/A
- Community Difficulty: 6.3
- Encounter sets: Flight to the Ford, Hunted, The Nazgûl, The Black Riders
- Quest cards: 2
- Play if: You enjoy a tight thematic experience that really feels like a race, you want to test your deck for early pressure from the scenario, you want to continue your campaign
- What is different about this quest?: Time limit/life counter, variable quest points on quest cards, possibility to discard enemies from play through encounter effects
- Solo or Multiplayer?: Both have their own challenges. While you might not be able to quest as quickly in the beginning if you are playing true solo, the lack of pressure put on you by multiple Fell Riders in the staging area, offers the possibility of avoiding combat, at least for a short while. In multiplayer you will usually have higher questing capabilities available from the get-go, but the forced effect on the Fell Riders will put some serious pressure on either the ring bearer’s life or the defensive capabilities of the first player. Because of this, player order will be very important in multiplayer.
- Can I run Side-Quests for this scenario?: With the hard time limit, you’re obviously taking a huge risk when running side quests. Generally, your first instinct should go towards avoiding them for this quest. However, there are two side quests in particular that could work in this scenario, albeit circumstantially. Scout Ahead can be used on stage two to avoid revealing more Nazgûl from the encounter deck and hopefully being able to end the game with fifteen quest points; Rally the West can be used on high player counts (preferably four players) to get a decent boost to questing power. Since this is somewhat reliant on the luck of the draw (early with Rally the West, late with Scout Ahead. You also not want to play with Thurindir, because you’re going to clear one side quest at best), it is not a strategy you should plan for.
The Quest
The Ring-Bearer’s Life
When you begin the game you will set Frodo’s life to fifteen, representing the fading energy still left in him. Should this counter reach zero, Frodo has perished and you lost the game. You can use any number of tracking devices to do this. If you have leftover threat dials they provide a great way to track Frodo’s health.
At the end of the round, the Ring-Bearer’s life gets reduced by one. This means from the beginning on the quest you have a limited time frame to beat it. (Note, that the life value is not hit points and healing is forbidden against this.) However, there are a number cards in the encounter deck, that will force you to reduce Frodo’s life by additional instances. You should probably think about the number of turns available to you as around ten, with the number being slightly lower in higher player counts, especially four players. The big problem you will face early on are the Fell Riders in the staging area. While they are in the staging area, they will offer the first player a choice every round: Either engage them or reduce the ring-bearer’s life by one. This does not trigger anymore, once the Fell Riders are engaged with a player, so optionally engaging the Nazgûl from the beginning (there are only four, so you will have them all in play if you are playing with four players) and spreading them out across the players, is certainly an option. You will of course want to have each player having the capability of dealing with a four point attack somewhat regularly, should you plan on going this route. Alternatively, you might arm yourself with lots of early willpower and just spend Frodo’s life in the beginning of the quest only engaging Fell Riders when you are sure of dispatching them. With a really strong focus on willpower it is certainly possible to still beat this quest this way in a low number of rounds, but you will want to make the most out of the Ford of Bruinen’s effect to discard enemies in play.
 Another card, that forces you to reduce Frodo’s life are the Ettenmoors, that, should you want to remove the two threat without blanking the text box, will have you reduce the life counter by one when you clear it by placing progress on it. (Northern Trackers are not a very good anti-location tech in this quest and you should probably relegate them to the sideboard for this one.) Lastly, you have Pain Assailed Him, which will reduce Frodo’s life by one should you not cancel it. Because there are several cards in the encounter deck, that you will want to save your treachery cancellation for (The Enemy is Upon Us! and The Nine are Abroad in particular), you should plan on being able to tank this effect with the ring bearer’s life. The shadow effect also punishes chump blocking in Frodo’s life force, making solid defensive capabilities even more important. And again, there are shadow effects that you will want to cancel more, like Pathless Country (I told you, I would go over this again.) and The Enemy is Upon Us!. Although the latter is more circumstantially horrible, it will hurt you badly, when it hurts you.
The An Evil Wound attachment on your ring-bearer, while generally just a friendly reminder of the lose condition of this scenario, also offers you the possibility of replacing all damage dealt to Frodo with life counter reduction. You are probably not planning on defending with your fellowship hero anyway, but this especially means that you should not do it, even though a Hobbit Cloak could boost his defence up to four. Road Darkens Frodo ’s effect will still work, however, if you cancel the damage of the attack altogether.
Setup
For setup, you will add The Last Bridge and one Fell Rider per player to the staging area. Because the Last Bridge has a threat value that matches the number of players, this is a perfectly balanced setup for all player counts and you will begin the game with three threat per player in the staging area. While the average solo player will probably plan on beginning the game with three threat in the staging area, the number of twelve in a four-player game is relatively high and another reason why you want to include high willpower right out of the gate.
Excellent heroes to take against this quest are both version of Eowyn (with her Spirit version being an even better quester and her Tactics version being able to quest AND take out a Fell Rider turn one), Cirdan (especially once you got Light of Valinor and Narya on him and can start defending Nazgûl attack with allies relatively safely), Glorfindel (for questing and attacking power in one hero) as well as Celeborn, Sam Gamgee, Thorin Oakenshield and Arwen, all of which boost a willpower value of three and are able to defend one unboosted Fell Rider attack. Gandalf, Treebeard and all of the Aragorns also are good choices with their balanced stats between all three categories, that can help them quest and defend against the Nazgûl. Of course, ally Faramir can also be invaluable in this quest. If you’re planning on having a dedicated defender against the Nazgûl to keep them engaged with you and quest past them, every high defense hero will get the job done, but both Beregonds are, of course, good choices against this quest. Erkenbrand can also provide valuable shadow cancellation, if you bring enough healing effects. Amarthiúl is a fine choice as well, because he will benefit from having enemies engaged with you (although he is the only one of the heroes listed here, that does not have sentinel). Lastly, Beorn, while only a good defender for a short while can be very valuable in engaging and dispatching Nazgûl quickly in the early game. I am also assuming that Grimbeorn the Old will be excellent, if not better, in a similar role once The Withered Heath has come out.
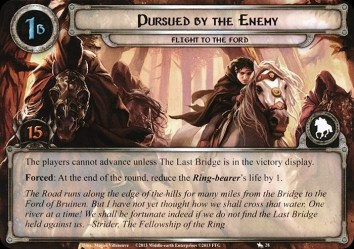
Quest card 1: Pursued by the Enemy – 15 quest points
There really is not much to say about the mechanics of this stage. Because you will have to get the Last Bridge into the victory display to advance and its immune to player card effects, you will have to spend at least two rounds on this stage and need to bring up at least nineteen points of progress.
To achieve this, you will probably have to remove some threat from the staging area. Since the locations are mostly pretty resistant to common location control cards like Asfaloth (with the exception of The Troll’s Camp, which you will want to in order to use its effect), this will mostly revolve around engaging enemies or removing enemies from the staging area. (Note that cards like Ride to Ruin will still work against the Ettenmoors and can be a worthy addition to your deck.) Should you choose to engage a couple of Nazgûl, it is not as important to kill them than for example in A Knife in the Dark. If you can focus on reliably defending their attacks and plan on getting the maximum use out of the Ford of Bruinen on the last stage, you will be fine. Killing them is, of course, nice, but it is not essential to the quest and if you have the option between questing to finish the stage and destroying some enemies you should usually choose the former.
Removing the enemies from the staging area with direct damage or discard effects, is more difficult in this quest. The Fell Riders have a lower defense but six hit points making them even more resistant than their Ringwraith counterparts, countering most of the smaller direct damage effects as for example Galadhon Archer or Argalad. Ride them Down is off the table because of it preventing the much needed progress on the quest. Likewise, Hail of Stones is more difficult to use, because you will lose characters that might as well as have quested or defended this turn, although it can still work in combination with core set Gandalf. Hunting Party will still be of use in this scenario, but be aware that you might not remove net threat from the staging area and can even be worse off than before, in which case engaging and defending the Fell Riders would have been the better option. On the other hand, Helm! Helm! becomes really strong in this scenario. You will still have to defend an attack, but the ability of just ridding yourself of further attacks by the enemy is incredibly strong and often a certain inclusion in your decks if you have Spirit and Rohan available. Staging area attacks are also less worthwhile in this scenario. While they can still be great in the later game, it will take a while to set up your Dunhere or Haldir, so you can’t plan on reliably removing threat from the staging area in the early game, where it is most important. However, another Rohan card, Forth Eorlingas! could be a good card for your decks, if you can muster up enough attack power early. In the end, you will probably still have to engage and defend enemies regularly and you should plan for that. This also means that cards that boost engagement cost like Take No Notice or Noiseless Movement, although still good in grave situations, don’t offer as much utility in this scenario. As do cards that return enemies to the staging area like Fastred, Mablung or Light in the Dark.
Quest card 3: Race to Rivendell – 15/30 quest points
When you reveal this stage you have to add the Witch-king, whom you already know from the previous quest, and Ford of Bruinen to the staging area. The big thing about this quest card is, that it has fifteen basic quest points, but you add an additional fifteen if there are Nazgûl enemies in play. Counting the Witch-king there are nine of these in the encounter deck, which means that, especially on higher player counts, you’re bound to reveal them somewhat consistently. While it is certainly nice to be able to beat the stage on fifteen threat points, the randomness of the encounter deck means that you should always plan to beat thirty quest points. However, if you are able to get rid of all the Nazgûl in play and already have fifteen or more progress on the quest, you will immediately win the game. Ford of Bruinen helps with that, but does not account for any Nazgûl revealed during the staging step of the round you  clear it. The only way to get around this is by using Sneak Attack in combination with Son of Arnor or ally Mablung to engage that enemy between the staging step and placing progress on the Ford. In all games you can also use The Door is Closed! (if you managed to get enemies in the victory display either by None Return or Out of the Wild, which could also be used at this stage to lower the risk of revealing enemies), Risk Some Light and Quick Ears. In the round that you’re planning on clearing the Ford of Bruinen Wait no Longer and Dunedain Hunter are also very good options. However, Interrogation won’t work, because none of the enemies can have attachments. In solo play you have even more options at your disposal. You can use Lore Denethor or Ithilien Lookout to control the cards revealed to some extent, play Gildor’s Counsel to not reveal encounter cards at all, or use Shadow of the Past and Watchful Peace to know exactly what will come up from the encounter deck. This approach will not work in the round you clear the Ford, because it itself has victory points, preventing Watchful Peace from triggering and the top card in your discard pile will be an enemy discarded by the Ford making Shadow of the Past essentially useless. Should you find yourself in the situation that you would win the game if you are not revealing an enemy in later round, they still can do some great work in the late game.
Generally, you will take full advantage of Elrond’s power in controlling the waters of the Ford of Bruinen (and not to forget Gandalf’s finishing visual touches) on this stage. Discarding multiple Nazgûl with the Ford’s effect is not only a huge boon to your ability to beat this quest, it is also a great thematic moment that makes the player’s feel really powerful. Being patient and keeping defending enemies while putting constant progress on the quest, will make the effect even more powerful. While you can certainly kill the Nazgûl and especially the Witch-king with normal attacks or card effects like you did in the last quest, not actually needing to do this can be a huge advantage and lets you focus on what really matters, which is questing to safely deliver Frodo to Rivendell. There are a number of card effects in the encounter deck, that will make this task more difficult however. The shadow effects on The Nine are Abroad and Road Like a Gale will return the attacking enemy to the staging area, which is particularly annoying if it comes up on the Witch-king, because you cannot engage him by card effects like Son of Arnor or Mablung, which would still be possible with the other Nazgûl. This quest needs at least one player to bring shadow cancellation anyway, with a lot of nasty ones in the encounter deck and it even could warrant the inclusion of Dunedain Watcher in your decks, just to have more options in cancellation available. The same goes for Black Steed, which you should not put on the Witch-king if there are other options anyway. Lastly, Road Like a Gale is the ultimate worst card you could reveal at this moment. It will return all enemies to the staging area, which can be quite game-breaking if you were planning to use the Ford’s effect to a great extent. It certainly makes sense to keep one copy of Test of Will back (or have Eleanor in play; you can also use Black Riders Frodo, although you know you will reveal it again anyway) just to make sure that you don’t screw up your game plans completely.
The Fellowship Hero
Your choice of the fellowship hero should be carefully considered. There are not a lot of cards in the encounter deck that will punish you for having the One Ring exhausted, but you should still have an alternative in place for when you cannot use Frodo’s ability safely. Luckily, you will know exactly when you will first encounter the  Witch-king and will usually plan on engaging him anyway to discard him with Ford of Bruinen, so his One Ring-trigger isn’t too dangerous. However, you should be aware that he, although unlikely if you finish the game quickly, could come up from the encounter deck again. The effect on the Ringwraiths can be quite dangerous with the nasty shadow effects in this quest, but if you keep your threat below 35 you can time your engagement of them somewhat and make sure that the One Ring isn’t exhausted or you have the Ettenmoors as the active location. The are also two burden cards, Weight of the Ring and Overcome by Terror, that will force you to exhaust the One Ring or suffer an ill effect, when they come up from the encounter deck. Since all but Black Riders Frodo’s ability can be triggered after staging, this is usually not too bad. (Although you have to resolve a card from the burden deck before travelling to the Last Bridge).
Black Riders Frodo, while having the most dangerous ability if you use it against anything but the last card revealed, can provide much needed additional protection against the horrible treacheries in this quest and can be a great choice. Road Darkens Frodo can be excellent as a dedicated defender to keep Nazgûl engaged with you while questing merrily, but his value diminishes with higher player counts. You can also attach a Hobbit Cloak to him and often will not even take damage from Fell Rider attacks, meaning you won’t need to trigger his ability, keeping your threat low. Any quest that relies on strong early willpower will also benefit from Land of Shadow Frodo. Having an extra two willpower available from the start of the quest can give you the push you need to be successful in the first few turns. Since you can trigger his ability after staging you can also make sure to be safe from the effects that play around with the One Ring. You can also go the Mountain of Fire Frodo route to get more questing allies out with the additional resource and the possibility to play lots of Fellowship sphere cards. Frodo’s Intuition and Fellowship of the Ring both provide willpower boosts, making questing even easier. Although very un-thematic you can also play Banner of Elendil if a player is playing Aragorn in any of his iterations. Combined with ally Faramir’s ability and Sword that was Broken you can generate such insane willpower this way, that it might even be considered quest-breaking, if you can get all the pieces out quickly enough.
The Encounter Deck
Global
- Not counting the Last Bridge, the Ford and the Witch-king there are 42 cards in the encounter deck on normal mode, 31 in easy mode. However, several cards will force you to add cards from the burden deck, making the encounter deck even bigger (and more surgey for that matter).
- Shadow effects appear on 52% of the cards in normal mode and 42% in easy
 mode. Four out of the five burden cards have shadow effects, so it is likely that this number will rise over the course of the game.
 - The average threat is exactly one in normal mode and 1.2 in easy mode. Once you are over the initial threat in the staging area, questing will become fairly easy because of this.
- The only cards with Surge are the Morgul attachments, the number being six on normal and two on easy. Other treacheries will Surge when they have no effect. All of the burdens have Surge as well, so that number will rise during the quest.
- No encounter cards have Doomed or will raise your threat, except for the Panicked burden, which might not get shuffled into the encounter deck.
- As usual, the Nazgûl cannot have non-Morgul attachments. The Last Bridge, Ford of Bruinen and the Witch-king are immune to player card effects.
As you can see the focus of this quest lies on treacheries, even more so in normal mode. But since Piercing Cry also adds an enemy and a lot of the treacheries play around with the Nazgûl and surge when there are none around, this is a bit misleading. The centrepiece of this scenario are the Black Riders and you will need to figure out a way to deal with them.
Locations
As far as locations are concerned, a lot of them are quite vanilla and do not offer much threat, with others having even beneficial effects. Their relative number also rises in easy mode, so bringing location control is more essential if you’re playing that one.
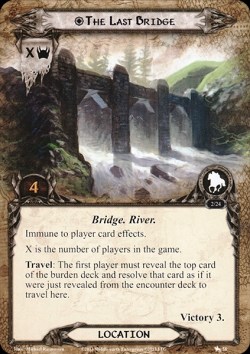
- The Last Bridge: Scaling with the number of players with regards to threat and being around from the beginning of the game, you will have to travel to this location and clear it by regular means to be able to advance to the next stage. To travel to it, you will have to resolve a card from the burden deck as if it had just been revealed from the encounter deck. This means that no matter what you do, you will have to take at least one (random) burden if you are playing campaign mode. The nasty thing about this effect, is that the burden cards all have Surge. So you will also have to reveal a card from the encounter deck after resolving the effect on the burden that came up. The burdens in themselves aren’t that bad and you will usually be able to manage their effect. The worst of the bunch is probably Fear of Discovery, because you will often quest with Frodo, if you do not play him in his Road Darkens iteration. Since the burden deck is random there sadly won’t be much you can do about that. Also note that you can cancel the effects of the revealed burden card with Test of Will or Black Riders Frodo. There are probably better things to cancel, but if things are going so bad that Eaten Alive! would kill a hero, this is good to keep in mind.
- Ford of Bruinen: I already talked about this, because it is the central element of stage two of the quest. Always try to use it to its greatest effect and plan on cancelling any effects that would prevent you from doing so.
- The Troll’s Camp: A callback to We Must Away, Ere Break of Day, this location is hugely beneficial. With only one threat you can keep it in the staging area until you need it most. This moment usually is on the beginning on stage two when you can be sure that no progress will be wasted as excess on the quest or when you find yourself struggling with your defensive work to boost up your capabilities in that area and potentially kill a Nazgûl with the attack boost making it easier in the future.
- Ettenmoors: Certainly a mixed bag; unless you want to let the threat of the Ettenmoors pile up in the staging area (which can manageable if you have enough willpower), you will at some point have to put progress on it and lose some life on Frodo unless you blank it with Thror’s Key. If you do this, you should make sure to clear it in one go (or discarding it using Distant Stars). This means either travelling to it or playing Ride to Ruin or a buffed up Evening Star. The existence of this location also makes it very risky to play Warden of Arnor, because its effect is not a response and thus not optional, meaning you will reduce Frodo’s life by one every time you reveal the Ettenmoors from the encounter deck. But all of these problems come with a positive side. While the Ettenmoors are the active location you will not deal out shadow cards during combat, making defense more manageable and preventing all of the shadow effects in the encounter deck, letting you save your cancellation. This is particularly valuable with the Ringwraiths that would get dealt an additional shadow cards while the One Ring is exhausted.
- The Old Road: Outside of campaign play this is the most vanilla location imaginable. It still is annoying, contributing three threat and having four quest points, but the choice of travelling to it is quite easy. I will go over the different ways to receive burdens later in this article. Let it be said for now that you usually will want to avoid taking the burden card here, although the capability of triggering the effect after staging can be very powerful in putting progress on the quest in situations where you would otherwise get into a lot of trouble.
- Pathless Country: It’s our good friend Pathless Country again. If you read the other two articles about this saga expansion, you already know my feelings: Resistant to most location control, easy to travel to, look out for the shadow effect. Since you should double up on shadow cancellation against this scenario, you will hopefully be able to cancel it, should it come up. A lot of times you will keep enemies around for a while, spreading them out between players. This shadow effect can mean that a player gets overwhelmed by Nazgûl and potentially loses a hero, so definitely be on the look-out for it.
Enemies
All of the enemies in this quest are of the Nazgûl trait. This means that most of the treacheries will affect them and they all can be discarded by the Ford of Bruinen. They are also all immune to non-Morgul attachments, so, as with the other quests in this box, your trap deck will most likely fail horribly.
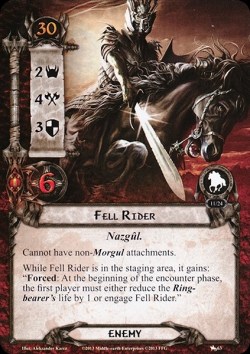
- Fell Rider: You will start with these enemies in the staging area according to the number of players. Especially in higher player counts their threat and the effect that forces the first player to engage them or reduce Frodo’s life means that you should bring early defensive capabilities. The player with the heroes best equipped to handle one or two of their attacks from turn one should be made the first player in the beginning. As outlined above, you can still use effects outside of combat to get rid of them, although their higher hit point pool will make it more difficult. With their four attack, there are quite a few characters that can defend against them. If you have the Ettenmoors as the active location, a Defender of Rammas could safely defend one of their attacks, but since it would get killed by a Power in their Terror, this is a risky approach. It will generally be better to have some solid defending heroes in play and put your readying attachments on those (which is generally sound advice against most scenarios). You can also use chumps, although the shadow effect on Pain Assailed Him will remove a life counter and the one on The Enemy is Upon Us! will remove all (!) progress from the current quest. Removing 29 progress from the second stage will most likely result in a table flip, so, as I said already, bring lots of shadow cancellation.
- Ringwraith: Higher threat, higher engagement cost, higher defence and lower hit points, this enemy is the big brother of the Fell Rider. There is nothing that forces you to engage them, so if you are not ready to deal with them and keep your threat below 35, you can leave them in the staging area and try to quest past them/get rid of them through other means. Destroying them with direct damage is easier against these enemies because of their lower hit points and the strategies laid out in the articles about A Shadow of the Past and A Knife in the Dark will still work with the exception of the ones ruled out above that would hurt your questing power too much. You should at least be ready to defend against them once before clearing the Ford of Bruinen. After that location triggered you should be fine defending against any Nazgûl thrown at you from the encounter deck if you were able to do so beforehand.
- Witch-king: In this quest, this enemy is much easier to deal with than in the previous one. Since you will add him to the staging area alongside Ford of Bruinen, you will hopefully only have to defend one attack from him before discarding him. Since that attack can only be defended by a character with two willpower or more, it will often be a chump if you don’t have Sam Gamgee with a Hobbit Cloak or a decently built up Aragorn. This is the moment where you should have at least one copy of a shadow cancellation card available so you can cancel him returning to the staging area. After he is discarded he can potentially come up again from the encounter deck, but at that moment you will usually be so far in the quest, that you can hopefully quest past him.
Treacheries
There are a lot of treacheries in the encounter deck and almost all of them revolve around the Nazgûl enemies. Some are so nasty that they are a must-cancel in quite a few situations. Because of this Eleanor can do some serious work in this quest. If you attach a Gondorian Shield to her, she can also become a great defender against the Nazgûl if you did not need her response this turn.
- Stricken Dumb: This treachery will play out differently whether you are playing campaign mode or not. Outside of campaign mode, you are free to take all of the burdens, so you might as well take the burden and deal with it later. In campaign play, this decision be much harder. Immediately ending the quest phase, can get you in all sorts of trouble. If you have time to spare, you can certainly do it, but not clearing the Ford of Bruinen this round can hurt you significantly. Remember that you can always replay the quest in campaign mode to accumulate fewer burdens!
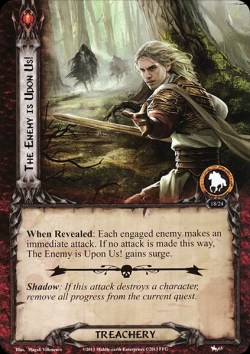
- The Enemy is Upon Us!: One of the very nasty treacheries in this quest, both in terms of its when revealed and its shadow effect. Easy mode rightly takes out both copies from the encounter deck. Often you will be able to deal with one or two additional attacks, but should you have a large number of enemies engaged with you, this (or more correctly the following combat phase) can potentially wipe your board completely. Because of this, it is often a must-cancel. Alternatively, you can, of course, play Thicket of Spears (although you most likely won’t have the resource matches), Out of Sight or Hobbit-Sense the following combat phase, but all of these options are costly and/or situational.
- Pain Assailed Him: With all these bad treacheries in the encounter deck, you will most likely have to tank the effect of this one. It is also one of the reasons why you should plan on beating this quest in as few rounds as possible. The minus two willpower can put a slight dent in your questing aspirations but isn’t too hurtful. Land of Shadow Frodo would also still be able to trigger his effect and quest for two again.
- The Nine Are Abroad: Blanking text boxes is one of the nastiest effects that can be thrown at you from the encounter deck. (Remember that along with traits, characters will also retain their flavour text!) You will often have built your strategies around the different effects on your heroes and allies (though you can still make use of your attachments). When you reveal this treachery, you should take a look at your board state, carefully think about how the rest of this turn will play out and then either let it happen or cancel it. There are certainly situations and character line-ups where this effect won’t be too bad (and hey, at least you can heal Beorn now), but it takes careful consideration and the decision to let it through should not be made light-heartedly. In addition, this card has one of those shadow effects that you will probably like to cancel in the combat phase after travelling to the Ford of Bruinen.
- Piercing Cry: A returning treachery, this card essential comes down to revealing a Nazgûl from the encounter deck with the added possibility that the first player engages it immediately. If the first player can handle it, this offers you the possibility of not having to deal with the threat, making questing easier. It has Peril, however, so you will be alone with that decision. The shadow effect also takes careful consideration. Usually, it will be best to plan on having to deal with at least one more additional attack each turn because both this card and Pathless Country can make that happen.
- Black Steed: More annoying, than game-breaking, this treachery makes the enemy the attached enemy the prime target to be killed by whatever combat prowess you can muster. Outside of Sneak Attack shenanigans with cards like Son of Arnor you won’t be able to discard it with the effect on Ford of Bruinen and it will constantly contribute its threat to the staging area. If you have Tactics Eowyn available this is the enemy you probably want to use her ability on. As with the other quests in this box, Valour of the North can make defending against or killing the attached Nazgûl easier. This also goes for the Pale Blade treachery.
- Road Like a Gale: A must-cancel when you plan on clearing the Ford of Bruinen this round, this card can be quite difficult to deal with when there are multiple enemies engaged because it will essentially be a wasted round of questing. This can still be manageable if you’re not under serious time pressure towards the end of the game, where you hopefully have already discarded a lot of enemies by ways of the Ford, so it will often better to let it go in order to have your cancellation available for more dangerous effects.
- Pale Blade: Without built up defensive heroes this attachment can make the particular enemy quite hard to manage and you will most likely have to resort to chump-blocking. On a Ringwraith, it is probably best to leave it in the staging area and on a Fell Rider, it is easier to deal with. The danger of this card also scales with how early you reveal it. Later in the game or shortly before the big discard at the Ford, it won’t seem like as much of a threat.
- Power in their Terror: Also a returning treachery, this card is the prime reason why you want to primarily defend with heroes instead of allies. Since defending allies often have less than two willpower, they will die quite easily from this effect. Still, some decent defending allies with high enough willpower are Gildor Inglorion, Eagles of the Misty Mountain (and they even get buffed if this treachery kill a couple of other eagles), Treebeard and Knight of the White Tower. All of these could survive a Ringwraith’s attack and still be save from this treachery. Other than that, it will obviously hurt your progress this round, but it should be manageable if you also have decent questing heroes. Ally Faramir can also effectively cancel this treachery, at least for one player.
Burdens
Over the course of this quest you will have to at least reveal one burden card from the burden deck. In regular mode the only other card that offers you a choice between shuffling a burden card into the encounter deck is Stricken Dumb. In campaign mode you also can immediately clear The Old Road by putting the top card of the burden deck on top of the encounter deck and cancel an enemy attack by shuffling the top card of the burden deck into the encounter deck. This includes attacks by the Witch-king, because it is not a player card effect. They all have Surge, so keep that in mind.
- Weight of the Ring: Since you probably will not bring condition removal just to be able to deal with the possibility of revealing this card from the burden deck, it can be quite annoying. Revealing an additional counter card is easier to manage in higher player counts, but going from one to two in true solo is certainly an ill effect. If that’s the case you will most likely not be able to trigger Frodo’s ability for the rest of the game, so include some neutral and Fellowship cards. It also combos with another one of the burdens that I will talk about in a second.
- Overcome by Terror: It’s this one! While you have to get them both into play from the burden deck and then they have to come up from the encounter deck at the same time, it is still a possibility. If this comes up alone, however, you’re usually best off by just exhausting the One Ring and not having access to the ring-bearer’s ability this turn. Because of its relatively harmless effect, it is also a very good card to reveal on The Last Bridge in campaign play, because you will have to deal with it in the future.
- Eaten Alive!: In true solo, this is also a good card to reveal from the burden deck. One damage and Surge is almost always easy to deal with. Should you be playing four player (and especially if you are trying to tackle the campaign with four players) this card can get really dangerous, especially if you are playing with fragile heroes.
- Fear of Discovery: Outside of playing with Road Darkens Frodo as a dedicated defender or playing Fast Hitch on your fellowship hero, this card could just read ‘Double Surge’. If you have the option to do so, exhausting Frodo will be the safer choice, but outside of starting a Surge train, it will often be okay to reveal an additional encounter card.
- Panicked: Not much to say about this. In true solo, it’s basically Doomed 3 and in multiplayer the passing of the first player token will only be really dangerous in very specific situations. Also, a good card to take into your campaign pool.

Tips and Tricks
- Quest like a Nazgûl is pursuing you! Well, this is literally what happens in this quest, but it is still sound advice. Getting that progress on the quest is before time runs out is the most important thing in this scenario. Everything else comes second. Ally Faramir can be a clutch card in this quest.
- That being said, don’t ignore your defensive capabilities. Having at least one (in solo) or a couple (in multiplayer) dedicated defensive heroes on the board will make the task of getting threat out of the staging area by engaging Nazgûl much easier. Put your readying effects on defenders!
- Following up on this: make the player with the best defensive capabilities on his heroes the first player to suffer as little as possible from the forced effect on the Fell Riders.
- While we are at the subject of defending: Chump blocking is definitely an option in this scenario and probably just needed at some point. However, there are quite a number of nasty shadows that punish this approach and you probably want to refrain from chump blocking shortly before finishing a stage just to avoid having to deal with the effect on The Nine are Abroad. You can always keep chump blockers ready if you are running hero Galadriel and still be able to quest with them for one round.
- Attacking power is not as important. You can discard a huge number of enemies at the Ford of Bruinen. While it would certainly be nice to rid yourself of enemy attacks, your focus should lie elsewhere.
- Take full advantage of the Ford. Before clearing it you should have enough cancellation available to just get rid of anything that returns enemies to the staging area.
- Also pack lots of cancellation generally. Although treacheries are generally much harder to cancel than shadow effects, three copies of a Test of Will (Spirit is basically a must-include against this quest) alongside as many copies of Dwarven Tomb as you have core sets can go a long way. Eleanor can also be excellent here, especially since with a Gondorian Shield she defends for a decent four.
- With the number of annoying to dangerous shadow effects, you should also pack lots of shadow cancellation. Don’t overdo it, but pack as much of Hasty Stroke and Sterner than Steel as your deck space allows. Cards with less flexibility such as A Burning Brand, Erkenbrand or Tireless Hunters can also be great, but with the huge amount of attacks that will happen, you want some shadow cancellation that can trigger against any attack and enemy. Because of this Dunedain Watcher can also be a decent card here, providing some additional cancellation against shadow effects.
- While it is nice to get the discounted quest points on stage two, you should always plan on the randomness of the encounter deck revealing yet another Nazgûl. Be prepared to put thirty progress down.
- Trap decks will not work. All the enemies in the deck are immune to attachments.
Campaign Play: No boons, just burdens
Since I already went over the different burden cards, there is not a lot to say about campaign play. In addition to the forced burden you have to take when travelling to the Last Bridge and the added complexity of the choice you’ll have to make when revealing Stricken Dumb, campaign play adds a couple more options that play around  with the burden deck. First, you can just get rid of The Old Road by taking a burden (which you will put on top of the encounter deck, so you know what’s coming up next. Since it surges, it is best done at the end of the staging step, giving you some control over the first shadow card.) and second, you can cancel an enemy attack by shuffling a burden in the encounter deck.
While these are certainly powerful effects, you usually want to avoid using them. Taking too many burdens will come back to hurt in future quests, especially since all the burdens surge, so they are just added danger to the encounter deck. Since you do not have the possibility of playing around with burdens as much outside of campaign play, this quest is designed to be beaten without these added effects and it is probably best to plan on not taking more than the one burden that is forced upon you. Remember you can always replay the quest to get fewer burdens (or better burdens, although that is probably overkill and replaying until you get the absolute best outcome is really not in the spirit of campaign play).
One last thing to note about campaign play are the burdens you might already have picked. In the first scenario, you had the choice between Gandalf’s Delay and The Ring Draws Them. The latter has some dangerous combo with the encounter deck in this quest and is generally dangerous when you reveal it early and have to engage all Fell Riders that start in the staging area. Later in the game, while there will usually be fewer enemies in the staging area, it can combo quite horrifically with Road Like a Gale, which might lead to all enemies ganging up on one player; an effect that can be game-ending in a multiplayer game. Don’t say I didn’t warn you, though. I told you in the analysis of Shadow of the Past that you were taking a risk by choosing this burden.
Playthroughs
- Campaign play, hobbits, one player: https://www.youtube.com/watch?v=mdwfc9W818w
- Campaign play, hobbits and other, four players: https://www.youtube.com/watch?v=ehUPQEimqZk
- Campaign play, hobbits and other, two-handed: https://www.youtube.com/watch?v=CE8Iyzk4P4Y
- Non-campaign play, no hobbits, two players: https://www.youtube.com/watch?v=-IU2yhbqRDk
- Non-campaign nightmare mode, no hobbits, true solo: https://www.youtube.com/watch?v=_lW4CNOZR3w
And there you have it, pack all the willpower you can muster and see Frodo through to the safety of Rivendell. The story will continue with the Council of Elrond in the next saga expansion The Road Darkens.

5 thoughts on “Flight to the Ford”