
When new players want to play the game, they usually don’t have a lot of quests to play. So they turn to the final quest in the Core Set. It is a mistake that they soon learn to regret.
Escape from Dol Guldur is one of the quests that I have beaten once, after many attempts, and never looked back at. The Setup alone can cause some people to scoop and reset until the right hero has been captured. Since this quest is often regarded as the toughest for a long time in the games life, it is important that I write an analysis of it.
A quick note before we begin. If you are a player who is new to the game but you do have some additional expansions besides the Core Set, play those first and get a better feel of the game. The added player cards will also make this scenario a bit easier as it is near impossible to beat with just the Core Set.
Escape from Dol Guldur
(Where you will first break in, then escape…)
- Found in: Core Set
- Official Difficulty: 7
- Community Difficulty: 7.7
- Encounter sets: Spiders of Mirkwood, Dol Guldur Orcs, Escape from Dol Guldur
- Quest cards: 3
- Play if: You have really nothing else to play, you enjoy the pain of resetting over and over again
- What is different about this quest?: Captured Hero, Player cards become enemies, restrictions on allies, Nazgûl
- Solo or Multiplayer?: Tough call, in multiplayer you still have fully functioning decks as you only have to capture 1 Hero, however, the restriction on the allies is more painful than in solo. I would suggest 2-3 players.
- Can I run Side Quests for this scenario?: You can try, but this is a quest where you want to rush through the quests. If you find yourself with enough progress but missing the objectives, you could try and go for a side quest.
The Quest
Setup
The setup on the very first quest card will have you search the encounter deck for 3 objective cards: Dungeon Torch, Gandalf’s Map, and Shadow Key. You must also search the deck for the Nazgul of Dol Guldur which is placed out of play. All objectives are guarded by encounter cards that are placed on top of them. If you are lucky, these will be mostly treacheries that will do their thing, and leave the staging area afterwards. This leaves the objectives ready for the taking. This will be important later. With the guarded objectives in the staging area, we are ready to proceed to the first round.
Quest card 1: The Necromancer’s Tower – 9 quest points
“Randomly select a hero blablabla this hero is turned facedown blablabla and can now not be- NOT BE USED??!? Are they serious?” This sums up part of the frustration that is found at this early point of the quest. Another part is that you will probably have randomly selected your key hero around which your entire deck revolves. Or it may be the only hero of a sphere in your dual/tri/quad sphere deck and you just happen to have drawn half your hand with those sphere’s cards. Too bad, better luck next time. There have been a number of cases where players have scooped over and over again until a certain hero has been captured.
The way around this might be to have a mono-sphere deck, perhaps with access to other spheres via Song attachments. This will still allow you to play the cards in your hand, you only lose a resource per round thanks to that captured hero.
To add insult to injury, the quest card informs players that they are not allowed to play more than 1 ally card each round. This only limits allies played using the traditional methodes, either from your hand or your discard pile (or top of the deck with Gandalf). It does mean that you are able to cheat allies into play with Sneak Attack, A Very Good Tale, or Timely Aid if somebody already played an ally that round. This will strengthen your board state a little, but the restriction is still punishing for multiplayer games. This will require some coordination between players on which allies to play. Swarm decks perform very poorly against this quest because of this effect.
To beat this quest card, players have to make 9 progress, this can be difficult due to the lack of allies and the fact that you will need your heroes to be ready for combat as well. Readying effects can be quite important, as you will need to use your heroes more often. Bringing Spirit Eowyn to the quest is also a good idea, as you can fuel her effect by discarding ally cards that are not important enough to play these first few turns.
Besides the 9 progress tokens, players need to control at least 1 of the 3 guarded objectives in the staging area. It is a good idea to have the 9 progress tokens on the quest before you take control of an objective. I will go into more detail about them later on. Just capture one of the objectives, leave the other 2 in the staging area for now.
Quest card 2: Through the Caverns – 15 quest points
After there is any progress placed on this quest card, you have regained your lost hero. It is like you have just pulled off a Houses of Healing or Landroval, as your hero will be rescued with one damage on him/her. This is usually not a problem unless you brought a Hobbit deck.
The same ally restriction is still in place so you will have to endure a while without the full support from your allies. Make sure that the allies you do play are useful enough, so you can build up your board state for the final stage.
The 15 progress on the stage should be easy to obtain now that you have your board mostly set up. The stage now requires players to have all three objective cards before they can advance. Again, make sure that you first place the progress, then claim the objectives. This will make the negative effects on the objectives easier to endure.
Try and put as much progress onto the quest as possible. Since the Nazgul will enter the staging area once you place any progress, it is good to suffer his base 5 threat for as few rounds as possible. Try and burst through the quest in 2-3 turns. Alternatively, if anyone has their board state in such a good position that they can take the Nazgul, try and kill it as fast as possible. This will be required of you anyway during the next stage.
Quest card 3: Out of the Dungeons – 7 quest points
The first thing you will have to do once you arrive at this stage is to place a card from the top of your deck in front of you. This card will act as an enemy with 0/1/1/1 stats. This is a precursor to the reanimated card we will see in the Dread Realm Adventure Pack in the future. These Orc Guard are not a real threat, as they can be handled by even a single Gondorian Spearman.
Now is the time to get your allies out. All this game your hand has probably become clogged with ally cards. Now is the time to play them. This will result in an easier game from here on out.
The stage only requires 7 progress to be placed on it which is easy enough. However, just like the Passage through Mirkwood quest, you are required to kill the “boss” enemy of this scenario: The Nazgûl of Dol Guldur. If you have not killed him during the previous stage, you will have to kill him now. Once you do, you can pat yourself on the back. You have just won against one of the toughest scenarios in the early life of the game.
The encounter deck
Global
- There are 37 encounter cards that can be revealed in Normal Mode, 26 in Easy mode
- There is a 35% chance of a Shadow effect during Normal mode, 46% in Easy mode
- The average Threat per card revealed is 1.4 in Normal mode, 1.5 in Easy mode
- There are 2 cards that surge in both modes, this is a chance of 5% and lower.
- 4 cards have the Doomed 1 keyword.
- Only the Nazgul of Dol Guldur is immune to attachments, not to all player card effects though.
The statistics above do not include any of the Objective cards or the Nazgul of Dol Guldur.
This scenario really depends on if you are playing easy mode or not. If you are, you will see a lot more locations than treacheries or enemies being revealed from the encounter deck. This can lead to another case of location lock if you are not clearing a location every turn. I would advice bringing at least some location control in order to clear out some of them.
Objectives
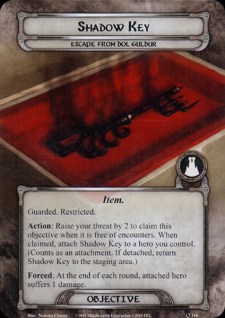
I feel like it is time to address the objectives of this quest. You are forced to control at least one of them to progress to stage 2. You must have all three to continue on to the final stage. There are 3 objectives to choose from, and none of them has the intention of helping you. All of them are restricted and are guarded when they enter play during setup. All objectives force you to raise your threat by 2 in order to claim the objective. If you lose the hero on who the objective was attached or the objective is otherwise detached, the objective is returned to the staging area.
- Gandalf’s Map: This map is probably the best objective to pick for your first objective. The map limits the use you will have of your hero, as it will make the attached hero unable to attack or defend. Put this on one of your questing heroes (like the aforementioned Spirit Eowyn) and you should be ok. You were not going to attack or defend with her anyway.
- Dungeon Torch: The torch will have you raise your threat by an additional 2 points at the end of the round for a total of 3. It is wise to hold off on getting this objective until you have to pass stage 2. It is then your job to either clear the quest as soon as possible or bring enough threat reduction so you do not threat out after coming so far.
- Shadow Key: This is, in my opinion, the nastiest of the bunch. The key will damage the attached hero at the end of each round. This will cause you to lose a hero if you do not have enough healing. Attaching a Self Preservation on the hero is usually enough to make sure that the hero lives. Again, this objective is worth stalling for until you have to pass stage 2.
Now, there is a trick you can use to get rid of these nasty attachments if you are close to losing a hero, or threating out. However, it only works on stage 3. The stage does not require you to have the objectives in order to win. So once you pass stage 2, you are free to lose them. There are a couple of encounter cards who help you with this, but you can also detach them yourself.
In a ruling made by Caleb Grace (the lead designer for the game, and the guy you want to bug with any questions), you can place a third restricted attachment on a hero. You will have to discard one of them immediately afterwards. So if you can get your heroes with 2 restricted attachments, and then place a third on them, you get to discard the objective. Note that this only works on the final stage, since you will have to own all three objectives to pass on. With the new Dale synergy, more options may be possible in the future.
Locations
The locations of this scenario are not really special, most of them you will have seen before during Passage through Mirkwood. However, some of the new locations might surprise you if you are not ready for them.
- Tower Gate: This Dungeon location has the same Forced effect at the last stage of the quest. Once you travel to the Tower Gate, you have to place the top card of your deck in front of you as an Orc Guard. The fact that each player has to fulfil this requirement can be a bit tough, especially for decks that are not set up for combat. The best tech for this card is to bring location control. It only has 1 quest point so Warden of Arnor will take care of it, no problem.
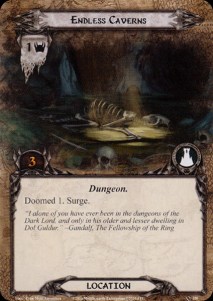
- Endless Caverns: This location has both Doomed 1 and Surge on it. This makes it a tough card to reveal, as it will likely surge into another location. However, at 1 threat I would not advise you to travel to it if there are other options. It is easier to overcome that single point of threat than clear the 3 quest points on it.
Enemies
Some of the nasty enemies from Passage through Mirkwood have returned. I will not analyse them again, so check out that article here. Enemies like Ungoliant’s Spawn, Chieftain Ufthak, and the Hummerhorns are still nasty and will provide you with quite the challenge.
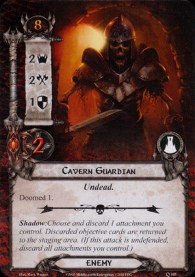
- Cavern Guardian: This is again a very low engagement cost enemy, so Secrecy decks are not to be tested in this scenario. The enemy itself is not really a problem. The 2 attack can be blocked by most characters, and his combined 3 defence and hitpoints makes you kill him quite fast. He is more nasty if you encounter his Shadow effect. If you defend the attack, you must choose and discard an attachment you control. However, if you let the attack go undefended, because you need an attacker against him, you lose all your attachments. This is horrible to many decks that rely on attachments over allies for this quest. If you are at stage 3, feel free to discard your objectives, you will no longer need them. To protect your other attachments, use Armoured Destrier or Hasty Stroke.
- Nazgûl of Dol Guldur: This is the “boss” enemy of the scenario that you will have to defeat in order to win. He is added to the Staging Area the moment any progress is placed on it, so be careful. You will get your hero back, but will also gain a 5 threat increase in the staging area. The Nazgul is not able to be Forest Snared, so that trick you learned against the Hill Troll is of no use to you. However, the Nazgul is not unique, and not immune to player card effects. There will be many amongst you who can think of some nice effects to trigger off of this design flaw. Revealed in Wrath and Straight Shot+Rivendell Blade are some of my favourites. When dealing with attacks from the Nazgul, if any shadow effect resolves, you are forced to discard a character you control. This means that the engaged player must have at least a couple of allies in play, otherwise they will be forced to feed Heroes to the Fell Beast.
Treacheries
Besides the Necromancer’s Reach and the other treacheries, we have come to know and hate by now, there are a couple of new treacheries that impact the players.
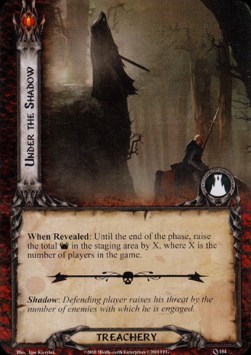
- Under the Shadow: Damn, the art on this card is amazing. The effect on this card is an easy +X threat to the staging area depending on the number of players in the game. This is a really good card to get, as you will not have to deal with a location of an enemy. The threat will just leave the staging area after the quest phase. The Shadow effect can spell trouble for Dunedain decks. You will have to raise your threat by the amount of enemies engaged with you. This is usually no more than 3, but be careful with your threat, especially if you control the Dungeon Torch.
- Iron Shackles: I really like the flavour of this card, though its effect is not really that troubling. You will have to attach Iron Shackles to your deck and discard it the next time you would have drawn a card. In any deck with a bit of card draw, this shouldn’t be a problem.
Tips and Tricks
- Do not bring a Swarm deck. Outlands, Dwarves, and Gondor swarms rely on you pumping out allies each round. However, quest cards 1 and 2 do not allow you to play more than 1 ally card each round. Try instead bringing hero focussed decks that rely on events and attachments.
- Pack readying effects, Unexpected Courage and Light of Valinor will help you to send more willpower to the quest during the early stages of the quest.
- The Nazgul is not immune to player card effects. You can use this to your advantage by using 2 Rivendell Blades and Straight Shot to finish him off. He is also not unique and does not have any victory points, there is plenty you can do to it without that kind of text armour on him.
- Unfortunately, you do still own the third hero once it is captured. Effects like Strider and Vanish from Sight do not work here, so don’t bother.
- Remember that you can discard the objectives if you are about to lose a hero to the key or threat out because of the torch.
- Be sure to have enough allies to discard for the effect on the Nazgul. You don’t want to be caught with your pants down and forced to discard a Hero.
Playthrough
- Updated cardpool, 2 players: https://www.youtube.com/watch?v=V90lxpq3dzY
- Progression style, 2 players: https://www.youtube.com/watch?v=BchGbL76v8I
- True solo: https://www.youtube.com/watch?v=1Ab8iwxDOsE
Man, this has been a long article. But now we have covered all the quests contained in the Core Set. It is now time to move into our first cycle with The Hunt For Gollum.

I’m pretty sure that you can still ‘cheat’ allies into play, via Sneak Attack, Timely Aid, A Very Good Tale, Send for Aid, Stand and Fight, Caldara, or other effects like that. From the FAQ:
(1.16) The phrase “put into play”
If a card effect uses the phrase “put into play,” it means that the card enters play through a card effect instead of through the normal process of paying resources and playing the card from hand. “Put into play” effects are not considered to be playing the card, and will not trigger any effects that refer to a card being played. “Put into play” will, however, trigger any effects that occur when a card “enters play”.
Example: The quest Through the Caverns (CORE 124) has the text, “The players, as a group, cannot play more than one ally card each round.” While this quest is active, a player can put an ally into play with Stand and Fight (CORE 51), even if an ally has already been played this round.
I’m not sure that it makes the quest that much less annoying, but at least there are ways around the ally restriction.
LikeLike
You are absolutely right, mistake on my part. It has been amended as we speak. Thank you for the feedback, I know the analyses are not perfect, but as a community we can make them as accurate as possible.
LikeLike
Thanks. Helpful article.
You say that EfDG had a “Community Difficulty: 7.7”. Is there some site that keeps/manages/lists community difficulty? Or is this just your estimation based on what you’ve seen on bulletin boards, etc?
LikeLike
Glad the article helped. The community difficulty ratings on the blog are taken from the LOTR LCG Quest Companion, where you can find the rulesheets for all scenarios without bringing all the sheets with you. You can check it out here: http://www.lotr-lcg-quest-companion.gamersdungeon.net/mobile.html
LikeLike
For those that might be interested in possible deck-build solutions to this henous quest while solo I managed a win with this deck.
https://www.reddit.com/r/lotrlcg/comments/fwyhb3/escape_from_dul_guldor_solo_deck_story_core/ (for discussion)
https://ringsdb.com/deck/view/203776 (for stats)
LikeLike
Great article. Thanks for the write-up.
Indeed a very frustrating quest. Already during the first round of my first attempt (two-handed solo, easy mode), the staging area was crowded with five locations (for a combined threat of 12). With the limits on allies and resources in the first rounds, it quickly became impossible to manage threat and get anywhere…
LikeLike