Doubling down on the narrative aspects introduced in the Against the Shadow cycle, the Voice of Isengard deluxe expansion and the following Ringmaker cycle sees the players and their heroes meeting the white wizard Saruman himself and running several errands for him, which will eventually lead to a sinister conclusion. This deluxe also features the introduction of the Doomed keyword on player cards which gr ants the players access to cheap and powerful cards in exchange for raising their threat, bringing them ever so close to being corrupted by the dark powers of Middle Earth. The Fords of Isen, the first quest of the expansion also introduces the Time mechanic which punishes the players for dallying on a quest stage too long, representing the pressing needs the heroes need to achieve.
In this first quest your heroes chance upon Gríma Wormtongue and his Rohan escort, who are assailed by a band of Dunlendings, and rush to his rescue, which will (hopefully, should they be successful) lead to them travelling to the Orthanc with him and receiving their first task from Saruman.
The Fords of Isen
- Found in: The Voice of Isengard deluxe expansion
- Official Difficulty: 5
- Community Difficulty: 5.8
- Encounter sets: Dunland Raiders, Dunland Warriors, The Fords of Isen
- Quest cards: 3
- Play if: You want to start off with the narrative of the Ringmaker cycle, you enjoy fighting hordes of enemies, you think the LotR LCG needs a hand size limit, you feel comfortable under time pressure, you want to test a deck against a demanding quest.
- What is different about this quest?: The introduction of the time mechanic, being punished for drawing cards and having cards in your hand, Dunlendings as enemies for the first time, Grima objective
- Solo or Multiplayer?: You might find yourself overwhelmed by enemies on higher player counts, which can especially be a problem on stage 3, where you will have to clear the board from Dunlendings while revealing on average slightly over 50% enemies during each staging step. Cards like Dunland Tribesman and Down from the Hills also become severely more punishing on higher player counts. Since true solo decks might have problems balancing questing and combat power, the sweet spot for this scenario is probably two players or two-handed play.
- Can I run Side-Quests for this scenario?: Running side quests in scenarios with Time counters is generally a risky undertaking. If you think yourself comfortable with being able to clear stage one quickly, you might throw in a side quest here, although it is probably ill-advised. Other than that, if you find yourself wanting or needing to stall on stage two (more on that later), you can definitely clear a side quest at this stage. This is hugely depending on how your game is going though, and the quest could end up being a dead card. Lastly, after you have put enough progress on stage three, but still have to defeat some enemies, you could go for a side quest, although it will probably be too late in the game for the effect being meaningful.
The Quest
Setup
For Setup, you will add The Islet to the staging area and then attach everyone’s favourite Tolkien character Gríma to it. Then, you will have to add one different Dunland enemy (all enemies in this quest fall under that category) per player to the staging area. You have a couple of options here: First, Dunland Prowler is a good choice, because you are avoiding one of the potential surges in the encounter deck. Dunland Tribesman is also a good choice for lower player counts, where his threat won’t skyrocket that quickly. Likewise, Dunland Berserker with his low attack value of two is a decent choice despite his out turn attacks. (Especially consider adding him to the staging area if you’re confident of being able to kill him first turn. Hero Beorn makes short work out of these berserkers.) For your other choices, Dunlending Bandit is more punishing early game, when you will probably have more cards in your hand, but you could consider adding him if you’re planning on playing a lot of cheap and zero cost cards first turn, which will tune him done to a relatively harmless enemy quickly. With your options being limited to six different enemies, on higher player counts you might even consider one of the more dangerous enemies Dunland Chieftain and Dunland Raider and plan on not engaging them until you have lessened their engagement effects a little and built your board state. Be aware though, that easy mode removes both these enemies, which means you’ll have to add Dunland Tribesman to the staging area in a four-player game. This means you’re looking at at least a four threat enemy with the potential of reaching eight threat and more quite easily. (This is definitely one of those instances where removing the big enemies from the encounter deck does not necessarily make the game easier.)
Quest card 1: Fight at the Fords – 6 quest points
Once you start this stage you are on a hard time limit. When the last time counter is removed from the stage, Gríma is overwhelmed by the Dunlending attack and you lose the game. (The quest card does not make this entirely clear, however. The effect that actually makes you lose the game is on the Gríma ally.) This means you have at most five turns to beat this stage, although you should probably calculate your questing power with only four turns in mind to potentially lessen the effect of Down from the Hills a little. Because you have to control Gríma to advance and thus have to clear The Islet you also will need at least two turns to beat this stage. However, this also gives you the chance to destroy a few enemies before you will add more to the staging area on stage 2.
The Islet itself can be annoying despite its one threat and one quest point, especially so if you reveal a location like Fords of Isen or Gap of Rohan which might seem more urgent to travel to in order to get rid of their effects. You might also be unlucky and be forced to travel to a revealed The King’s Road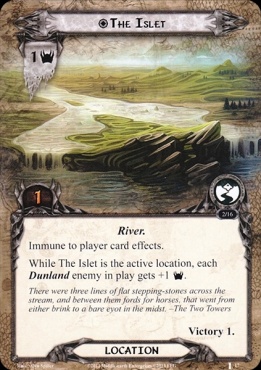 if you weren’t able to play your cards first turn or were forced to draw even more. Letting The Islet sit in the staging area for one or even two (this is not recommended) more rounds can risk your chances to actually be able to clear the stage, but it will also offer you the option to engage and hopefully destroy a couple more enemies which will lessen the threat boosting effect of The Islet. Be aware that it is immune to player card effects and you will not be able to use shenanigans to get around travelling to it as well as avoid its effect.
As you can see, this first quest stage already forces you to balance your combat prowess with your questing ability. If you cannot kill enough of the Dunlendings you can easily be overwhelmed on stage two, and if you cannot quest through stage one you will outright lose the game after five turns. So stalling and building your board state is not really an option here.
Quest card 2: Dunlending Attack – 14 quest points
Once you control Grima and have placed the last progress in stage one you will directly advance to this quest stage. Again, each player searches the encounter deck and discard pile for a different Dunland enemy and adds it to the staging area. You can generally follow the tips during setup for this stage as well, although it will certainly depend on the state of the game and the number enemies already in the staging area. The big exception is Dunland Tribesman. Since you will have a whole combat phase available before needing to quest again you can safely engage him to  avoid his potential threat even on higher player counts. (This is only true if you beat the stage by regular questing and not with effects like tactics Legolas.) With only two defence and three hit points, he is even a good option to immediately get rid of. Furthermore, you will hopefully have fewer cards in your hand compared to the start of the game. This can make enemies like Dunlending Bandit, Dunland Chieftain and Dunland Raider much less punishing, although the other enemies are probably safer bets. (As always, this, of course, depends on what you already have in your discard pile. Sometimes removing the last enemies from the encounter deck and knowing exactly what cards are left in there can be the better play, even if it means adding more dangerous enemies to the staging area.)
When you flip the quest stage you will put two-time counters on it. After the last one is removed each player assigns X damage among characters he controls where X is the number of cards in his hand (starting the whole process all over again). Considering you should not have drawn your entire deck in this quest this is somewhat like an archery effect every two turns (barring Down from the Hills). This means that if you bring some healing you should be fine tanking the damage every time it occurs. This can be especially important because you might find yourself needing to stall your progress a little on this stage. Stage three will (again) have you add one different Dunland enemy per player to the staging area. If you progress to quickly from stage two and have to many enemies engaged with you or hanging out in the staging area, this could lead to you becoming sort of “enemy locked”, where you won’t have enough combat power to kill all enemies before they get replaced by new ones during staging or the time effect on stage three. Because of this, it can be advisable to tank some of the pseudo-archery on this stage until the encounter deck gives you a little breathing room to advance.
Quest card 3: Dunlending Attack – 16 quest points
As announced above, you will have to add new enemies to the staging area again. On this stage it is particularly useful to get them from the encounter deck rather than your discard pile, because you won’t be able to defeat this stage with enemies in play so revealing less enemies during staging is quite useful.
To make matters worse there are three time counters on this stage. Once they have run out you will have to discard the top X cards from the encounter deck, where X is the number of cards in the first player’s hand, and then add all enemies among those cards to the staging area. This makes it important to have as little cards in the first player’s hand as possible when running out of time counters. Discard effects for benefits like Protector of Lorien can be a good choice to decrease your hand size while at the same time working towards those sixteen progress tokens on the stage. This could mean that the time effect completely whiffs, but it is advisable to expect at least one enemy, even on low hand sizes.
Again, you will have to balance your combat power and your goal of having sixteen quest points on the stage when you have destroyed all enemies. Direct damage effects are very useful at this point, so try to keep them back until on this stage. Since four of the six different enemies in the encounter deck have four hit points or less, classic Core Set Gandalf can also work wonders at this stage. Similar things can be said for Saruman, who actually comes in this box and is also a very thematic choice for this quest, although you will have to time his effect correctly.
Once you got sixteen progress on the quest card and have defeated all enemies you have rescued Grima and will escort him the Isengard, where you will meet Saruman and being the next step of your adventure.
The Encounter Deck
Global
- There are 33 cards in the encounter deck in Normal mode; 23 in Easy mode.
- Shadow effects appear on 45% of the cards in Normal mode and 43% in Easy mode, both modes being quite similar in that re
 gard. Shadow effects include attack boosts, attachment discard and additional attacks. Surprisingly, considering the quest mechanics, only one of the shadow effects (the one on Dunlending Bandit) considers the number of cards in a player’s hand.
 - The average threat on each card revealed from the encounter deck is 1.4 in Normal mode and 1.3 in Easy mode. This, however, does not include the potential boosts of Dunland Prowler and Dunland Tribesman, which show
 up in both modes, so expect a higher average than that.
 - Four cards have Surge in Normal mode, with Easy Mode bringing that number down to two. However, Dunland Prowler will probably get surge from your hand size in a lot of cases, while Ill Tidings’ Surge will trigger more occasionally.
- No cards have the Doomed keyword, although there are treacheries that will have you raise your threat for drawing cards or having cards in your hand.
- Only The (relatively harmless) Islet is immune to player card effects, so you usually have all your options open.
- In Normal mode only eight cards won’t have effects that trigger off of drawing cards or having cards in your hand. In Easy mode that number drop to six. In addition seven cards (potentially) will have the players drawing cards from their decks. (Six in Easy mode.)
With over enemies being the most common card type in the encounter deck, this quest is definitely designed to test the martial prowess of your decks. Nevertheless, stages two and three require quite an amount of progress, so questing power shouldn’t be neglected. With the hate on card draw as well as the card drawing effects on several encounter cards you can (and probably should) also leave your card draw cards in the binder for this quest.
Objectives
Once you have successfully driven the Dunlendings away from the Islet the first player will be able to take control of the Gríma objective-ally. This also means that, despite it being included in the deluxe expansion, you won’t be able to use the hero version in this quest.
- Gríma: Gríma is a 2/1/2/3 ally with the exact same stats as his hero counterpart. This alone is a nice addition to your board state in the early game. He also comes with an ability that is somewhat of a mixed bag. Usually the ability to exhaust to draw a card will be at least decent in most situations. However, since you will be punished for drawing cards again and again, more often than not you will find yourself not wanting to use his ability and probably opting for questing with him instead, with can be especially useful if you’re finding yourself short on willpower early on. (He could also defend in a pinch, although this is very risky, because Gríma leaving play is a central loss condition of this quest.) It is noteworthy as well that you cannot choose the player drawing the card, meaning the effect will be limited to the player controlling Gríma. His ability has no limit, so you could also use ally readying effects like Ever Vigilant or Spare Hood and Cloak to draw more than one card per turn. This, however, will often punish you for every instance of using him.

Locations
With only three different locations in the encounter deck, the focus of this quest definitely lies elsewhere. Still, the existing locations can be nasty, especially if you don’t plan your travel phase well.
- The Islet: This one threat/one quest point location starts in the staging area during setup. While it is easy to clear, you will have to travel to it, due to it being immune to player card effects. As pointed out in the quest overview it can be beneficial starting out to not immediately travel to this location, instead letting it sit in the staging area for a round (or two if you’re desperate or feel like taking a risk) until you can safely engage some of the enemies that start the quest in the staging area, since you will raise the threat in the staging area by a significant amount if you do not engage them. After it becomes the active location it is obviously easy to clear, granting you control of Gríma once explored.
- Fords of Isen: This card can become quite nasty when revealed at the wrong moment. With its passive effect you’re probably want to travel to it immediately, which can trigger all sorts of horrible effects and buff enemy abilities due to the Fords’ card draw effect. If timed correctly, however, the card draw effect can basically reset your hand to its starting size, which can function as a decent form of card draw, opening up your deck slots for other effects. The biggest risk is revealing this location on stage three of the quest. With the dangerous time effect on this stage you will not want to travel to this location and risk flooding the staging area with enemies once time runs out. With its relatively high threat and quest points it is both hard to keep around in the staging area (not to mention its nasty effect), while also being difficult to clear using conventional location control. Burst location control like Asfaloth, Evening Star or even Explorer’s Almanac is probably your best bet.
- The King’s Road: Continuing the trend of being nasty occasionally (albeit more occasionally), this 2/2 location is relatively harmless based on its basic stats. With more cards in the players’ hands it can still become dangerous quickly. The additional three quest points for three cards or more in any player’s hand are more of an annoyance than a threat, putting a dent in your management of the time counters but probably not a lot more. Having five cards or more in your hand on stage one however can make clearing the Islet much more difficult, since you will be forced to travel to the King’s Road, thus endangering you exploring the Islet before the time counters run out. You can use cards like Short Cut to circumvent this, but generally it will be preferable to have less than five cards in your hand(s), using discard effects like Protector of Lorien or Spirit Eowyn during the quest phase.
- Gap of Rohan: Rounding out the three locations in the encounter deck, the Gap of Rohan buffs all Dunland enemies in play (which is all enemies in the encounter deck). With it being resistant to the trusted Glorfindel/Asfaloth combo, but having no detrimental travel effects, this is usually an easy choice to travel to, if you don’t have more pressing need to deal with.

Enemies
As can be expected from a quest that essentially depicts a battle, there are quite a few enemies in this quest. Each of these enemies has an effect that either triggers from drawing cards or having cards in your hand, making up the main central mechanic of this quest. With all enemies having the same trait, Rossiel can actually be a reliable defender once you put one enemy in the Victory Display.
- Dunland Berserker: This enemy has the lowest engagement cost of all enemies in the encounter deck, so most decks won’t be able to avoid him. Thankfully, with his two attack, one defense and four hit points, he is also one of the easiest enemies to take on. Since he will at least make one additional attack in the resource phase after being engaged (in addition to whatever card draw effects will happen over the course of the round) due to his ability, you should probably take him out quickly, but being able to destroy him with the magic number of five makes the berserker an easy target to kill and not stay engaged with him for more than one combat phase. You should also be aware that cards like Feint are mostly combat actions, so you won’t be able to avoid his out-of-turn attacks. Also worth mentioning is the shadow effect on this card, which lets the enemy make an additional attack. This shadow effect can throw of your plans quite significantly, so it’s always good to have some form of cancellation or shadow card scrying to plan your combat phase accordingly. Last but not least, with his low threat and endurance this enemy makes a good choice to add to the staging area during setup as well as when advancing to a new quest stage.
- Dunland Prowler: This Dunlending will have Surge most of time which in itself makes the card a good target to add to the staging area during setup and the other possible occasions. The threat boost will happen more occasionally and usually doesn’t make too big of a difference. Other than that, this is a relatively harmless enemy, having only two attack, although it sadly does take six attack (or defense reduction) to take out in one go, which means most of the time and especially early game you will have to exhaust two characters to get rid of this enemy.
- Dunlending Bandit: Having only one base attack, this Dunlending may seem harmless on the surface. Because of his ability boosting his attack by one for every card in the engaged player’s hand, his attack can get dangerously high quickly, especially early game or after having travelled to the Fords of Isen. Hand management or a high defense character like Beregond with his Gondorian Shield are key in order to deal with this enemy. Having an attachment like Protector of Lorien on a dedicated defender can be a good choice to decrease his attack and boost your defense at the same time. Also be aware that it’s the engaged player’s hand and not the defending player’s. This means that defending with a Sentinel character can be dangerous if the engaged player has too many cards in their hand. Needing a combined six attack to take out, the Dunlending Bandit poses the same challenge as the Prowler, but isn’t too hard to take care of.
- Dunland Raider: One of the two stronger enemies that function as the semi-bosses of this scenario, the Dunland Raider is a 3/5/3/5 enemy that can be a serious threat too if you have yet to set up a dedicated hero defender. Luckily, there is only one card in the encounter deck that punishes chump blocking (The Gap of Rohan, which removes a time counter if the attack destroys a character) so that can be a good option if you happen to engage the Raider at the wrong moment. His forced effect has you divide damage among characters you control according to the number of cards in your hand. As long as you are able to manage your hand size properly and bring at least some healing effects you should be fine. Even if you time your engagement of this enemy properly it can still hurt you quite a bit on stage two of the quest, especially when you’re playing solo and don’t have another player ready to take the damage of the time effect.
- Dunland Chieftain: This second big enemy has the exact same statline as the Raider except for one more hit point, making him even harder to get rid of. Again, it comes with a forced effect upon engagement. If you’re lucky (and particularly if your hand size is low) the forced effect can whiff. However, since there is a roughly 50% chance of any card from the encounter deck being an enemy you should plan to engage and be ready to deal with two enemies when you engage the Chieftain. On stage three this can be especially annoying, because you will have to defeat an additional Dunlending before being able to win the quest. Consider taking the Chieftain out of the staging area with direct damage effects or staging area attacks (if you were able to keep your threat below 35), although this can be difficult to achieve because of his six hit points which also makes him resistant to core set Gandalf’s damage effect. On stage three you can also use Ride Them Down once enough progress has been put on the quest. Still, if you are set up when engaging this enemy, you should be able to deal with his attack of five. Keep your threat below 35, engage when you’re ready and you should be fine.
- Dunland Tribesman: I already talked about how annoying this guy is in higher player counts. With four players you’re looking at at least four threat (Remember that his when revealed effect forces every player to draw a card, meaning the Tribesman is buffing himself up.) with the potential of raising the threat even more through the various effects in the encounter deck. In solo you usually only will have to deal with one threat provided you don’t use card draw effects yourself, which makes the Tribesman a good option to add to the staging area on the first stage. On later stages he is always a good option, because the cards added to the staging area aren’t revealed, so you can engage the Tribesman before the next resource phase. Other than that, his four attack can be a nuisance early game, but considering that his combined defense/hit point value is only five, he is relatively easy to get rid of, which means the potentially high threat will probably only be a problem for one turn. His low hit point value also makes him a prime target for direct damage effects (and most of the ranged Silvan or Noldor with a Rivendell Blade will be able to snipe him out the staging area with Hands Upon The Bow), although Argalad’s ability doesn’t trigger of printed threat so it will be difficult to use him in higher player counts (you also should in no cases attach Secret Vigil to this enemy).

Treacheries
Generally, the treacheries are not the most dangerous element of this quest. As with every encounter card, they still have the potential to screw you over when revealed at the wrong time, but in most cases you will be able to manage them more easily than other aspects of the quest. (With one notable exception that can be very dangerous in higher player counts.)
- Old Hatreds/Wild Men of Dunland: Since both of these treacheries function in very similar ways, I will be lumping them together for the sake of analysis. Both have the annoying Surge keyword, but given the fact that they have the potential to do absolutely nothing if you clear the quest stage in the round you revealed them, this is probably a wise design choice. These treacheries function as condition attachments on the current quest (which includes side quests) with effects that punish you for drawing cards. Old Hatred raises your threat every time you draw a card, while Wild Men of Dunland has you deal one damage to a character you control. The former can be quite dangerous over the long run, especially if you are trying to keep your threat under 35 in order to avoid engaging the Raider or Chieftain at the wrong time, while the latter is more of an annoyance, especially if you have healing on the table. Both treacheries have their most dangerous moment on stage three where you don’t know how many enemies you will have to kill before ending the game, which can lead to them being around for quite a while. If you find the effects to be too punishing, consider including some condition removal like Miner of the Iron Hills, Power of Orthanc or ally Elrond.
- Pillaging and Burning: In the early game, when you have yet to get your hand size management methods into play, this is card is the most dangerous with the potential to increase your threat by around five. At this point, when you probably won’t be ready to deal with the more dangerous enemies in the encounter deck, this is usually a hard cancel if able. In the later stages of the quest the card draw becomes the more dangerous part, with the potential of buffing up the Tribesman’s threat by a considerable amount, but if you’re managing your threat well, it will be more of an annoyance than a game-breaking effect.
- Down from the Hills: In solo, this card essentially comes down to choosing the enemy revealed from the encounter deck, which doesn’t make it too dangerous. On higher player counts, however, this card has the ability to completely flood you with enemies. On stage one, you can’t really remove more than one time counter from the quest, while on stage three the choice is between getting the enemies now and being able to choose or letting the time counters run out and taking the chance of adding even more dangerous enemies to the staging area. Even then it can be beneficial to choose triggering the time effect on the quest card because you won’t be revealing the enemies (which only applies to the Prowler and the Tribesman, but considering these are two of the easier enemies to take on it can be worth it). Still, if you reveal this on stage three you can find yourself overwhelmed by enemies and not being able to destroy them as fast as they appear. Keep your hand size under five and cancel the effect if able, if the first player has more than one or two cards in their hand.
- Ill Tidings: The archetypical annoying treachery; the effect in itself, while it can trigger all the card draw effects on the encounter cards, is more of an annoyance if anything. However, it makes your hand management efforts much more difficult in the long run. If drawn back-to-back one player will have some serious issues keeping their hand size low. Couple that with the passive effect of not being able to leave the player’s hand (not even in an Erestor deck you will be able to get rid of it) as well as the potential to surge and you’re looking at a dangerous treachery. Still, if it isn’t the second Ill Tidings in the same player’s hand, it is sensible to keep your treachery cancellation back since you will need it for the more dangerous effects on Pillaging and Burning and especially Down from the Hills. At least you won’t be able to reveal it again once it is in a player’s hand.

Tips and Tricks
- Leave your card draw effects in the binder. This should be quite obvious with all the effects triggering from drawing cards and having cards in your hand. It is still possible to use moderate amounts of card draw if you have enough discard abilities and time playing your cards well, but it still isn’t recommended (If you are choosing to do this, use effects that draw you more cards in a single instance instead of more drawn out effects like Legacy of Durin). However, this does not apply to hero Erestor The cards you draw in the resource phase will only count as one instance of drawing cards, so playing with Erestor can be a good way of seeing a lot of cards without relying on card draw effects. You should also be wary of heroes that offer consistent card draw like Galadriel or Brand, Son of Bain.
- Since hand management is key to successfully beat the quest, Noldor decks are a good choice to tackle this scenario. Although a staple in most Noldor decks, Elven-light is a less valid choice for this, because of its card draw effect. Even non-Noldor decks will find discarding cards for benefits a useful way to manage hand size. As such, cards like Protector of Lorien are very good choices for this quest.
- Aggro decks can help you to establish a board state quickly. Since two of the six different enemies can be destroyed with an attack of five, having someone like hero Beorn on the table can be a good way of defeating the enemies added to the staging area during setup and being able to get your pieces out relatively safely.
- Since there are no enemies with insanely high hit point values (the values range from three to six), direct damage decks can do well against this quest. Four out of the six different enemies even get destroyed by a Gandalf Sneak Attack, which is particularly useful on stage three, where you will need to kill the Dunlendings quickly.
- If you find yourself overwhelmed by enemies on stage three, consider putting some encounter deck manipulation into your deck. Hero Denethor can be useful, especially in lower player counts. More niche effects include cards like Risk Some Light, A Watchful Peace, Ithilien Lookout and Quick Ears. Gildor’s Counsel could be useful as well, although you will need the resources to pay for it. Once The Withered Heath has come out, you also can consider using The Hidden Way to avoid dealing with enemies.
- On a similar note, if you’re running a deck that can play it, Thicket of Spears (or The Wizards’ Voice [sic!] on higher player counts) can be a very good choice to deal with enemies on stage three. By avoiding attacks you might actually clear the board of enemies and win the quest.
- Despite the lack of archery, there are quite a few direct damage effects in this scenario. Healing is particularly important should you find yourself needing to stall on stage two. Even without this stage’s time effect, healing can effectively counter the effects of Wild Men of Dunland and the Dunland Raider.
- In order to time your engagements of the Dunland Raider and Chieftain properly you should try to keep your threat under 35 using threat reduction effects. This is especially important early game when you still need to get your hand management going. In the late game, you might find yourself able to deal with everything the encounter deck throws at you but being able to pick and choose your battles is generally useful on any stage of the quest.
- With the Grima ally in this scenario, players are not allowed to use the hero version. This should be obvious, but on occasion, players might bring a deck with a character that shares a name as an objective ally. In Grima’s case, this can be quite rare in comparison with Arwen for example.
Playthrough
- Progression style, 4 players: https://www.youtube.com/watch?v=JePWnWYBYRg
- True solo: https://www.youtube.com/watch?v=2MoRurMMbTQ
- Progression style, 2 players: https://www.youtube.com/watch?v=CXAnAdODdNw
And there you have it. By managing your hand size and picking your battles you should be able to defeat the Dunlendings, save Gríma and deliver him safely to Isengard. (Although considering the events of The Lord of the Rings you probably shouldn’t have.)

Great write up! The summary and strategy at the end were very well done!
LikeLiked by 2 people
I have a question as I’ve just started this cycle and having cards in hand can be deadly. Can you voluntarily discard cards from your hand on your turn? and if so can you do it during any player actions window or does it need to happen during a certain phase. Thanks for any help. I can’t seem to find this topic in any forums
LikeLike
You cannot discard cards from your hand at will without the right tools to do so. The only way cards can leave your hand is through playing them, encounter card effects, or by using a card that allows you to discard cards. For a full list of these, see this link: http://hallofbeorn.com/LotR?Category=Discard%20From%20Hand . These include various cards that can be triggered in nearly every phase of the game, lowering your hand size. It also helps to make your deck’s cost curve lower by adding in cheaper cards so that you can play them more easily.
You are in luck as well, as a deckbuilding article on this quest is scheduled to be published this weekend, giving tips on how to best beat this scenario consistently.
LikeLike
I’ve noticed small inaccuracy in Fords of Isen location description. West Road Traveler won’t help to avoid the travel effect of Fords of Isen because that effect doesn’t happen when you travel there but when it becomes active location.
LikeLike
You are correct, good catch! I have adjusted the article accordingly.
LikeLike