In the Q&A of March this year, I got asked what my favourite quest was, I answered that for the Angmar Awakened cycle, it was Intruders in Chetwood. I stand corrected: this, this is my favourite quest of the cycle. Across the Ettenmoors brings giant (literally and figuratively) enemies and doubles down on the side-quests even more than Intruders in Chetwood. This makes for a great quest to bring your side-quest decks to, but I like it for even more reasons. You are forced to seek shelter in safe locations from both the Trolls and the weather, which is super thematic. In order to balance this a little, players are forced out of their hiding holes after the turn they travelled to it, but staying there gives them just a brief moment to heal and get their board together before moving back into the wild. The quest looks pretty difficult with all the enemies, but it isn’t really. There is still a good sense of danger as you try to avoid enemies while making progress on various quests. Enough talk, let’s journey:
Across the Ettenmoors
- Found in: Across the Ettenmoors Adventure pack, Angmar Awakened cycle 3
- Official Difficulty: 4
- Community Difficulty: 4.3
- Encounter sets: Across the Ettenmoors, Eriador Wilds, Foul Weather.
- Quest cards: 3
- Play if: You want a thematic quest that is not too difficult if you play it right, you want to face big enemies after getting a bit tired from Orcs and Undead in this cycle, you enjoy the feeling of getting hounded by the weather and finding a safe spot to rest a little.
- What is different about this quest?: Big Troll enemies, safe locations, heavy emphasis on side-quests.
- Solo or multiplayer?: The quest features some quests that require a bunch of progress to go through, making multiplayer a bit easier. You also encounter your safe locations more often, making for great discussions during the travel phase. Solo is also doable, as you can sneak past most enemies while you are getting set up.
- Can I run side-quests for this scenario?: You can, but the encounter deck will also feature a lot of them, so you might want to bring the number of side-quests in your deck down a little bit, since you already start with a side-quest in play, triggering your side-quest archetype cards from round 1 potentially. If you really feel like stalling, you are welcome to add some side-quests of your own to the mix, but remember that Weight of Responsibility will get boosted by it.
- What to look out for?: Big, heavy hitting enemies, Weather treacheries that punish damaged characters, a lot of side-quests from the encounter deck that add new rules and need to be explored first.

The Quest
Setup
When you first see side 1A of the quest cards, you immediately notice the massive wall of text that denotes the setup for this scenario. But don’t worry, it is less complicated than you might think. To start off, the players will have to search the encounter deck for 1 copy of Savage Trollspawn per player, and add them to the staging area. These enemies are only 1 threat, so the start of this scenario is pretty light on threat, allowing you to place a lot of progress early on. With the Trollspawn being at 36 engagement cost, it will be a while before they start engaging you.
Next, the first player gains control of Amarthiul who will help the players in dealing with early enemies, as his base of 3 attack is pretty good for an objective ally. Amarthiul starts with the first player, but players can distribute him at will once they start engaging enemies. Now comes the tricky part: The players will have to put aside all 4 of the Safe objective locations, and the 3 side-quests that are a part of the Across the Ettenmoors set. They then pick one of each at random and add the side-quest to the staging area, guarding the objective. The initial side-quest can make or break your early game, as some of the passives slow you down significantly. The best side-quest to get in my opinion is Lie Low, since you are going to quest against it no matter what. The other two punish you for spending resources and raise the cost to play player cards. These side-quests are generally good to get out eventually, but having some time to set up and prepare for them would be nice. The cards that weren’t randomly picked and added to the staging area will get shuffled back into the encounter deck, finishing setup.
Quest card 1: Into the Ettenmoors – 10 quest points
No When Revealed effect on the flip side of the quest card, allowing you to go to planning straight away. The initial side-quest will dictate how the first round will go, but should you have gotten Lie Low, your planning can continue as normal. The other two side-quests will be more punishing to your start, even more so in Easy mode. Forage for Food will make you deal damage to heroes immediately, making them vulnerable to treacheries and various effects. Scavange for Supplies will increase the cost to play any player card by 1 additional matching resource. This can make many players wait the first turn with planning, until the side-quest has been explored. Exploring it will also allow you to play a card in your hand for free, giving you a boost during the second round (should you clear it in one turn).
The quest phase is done a little differently at this stage. Players can select the main quest as the active quest, but should instead go to a side-quest. This can also be a player side-quest, should they have been played during planning. That way that players can place progress on the main stage by exploring side-quests thereby clearing them both. Whenever any side-quest is explored, the players pour over progress tokens to the main quest equal to the printed quest points of the side-quest. This means that the first stage is explored once 2-3 side-quests have been explored.
Should there ever be no encounter side-quests in the staging area at the beginning of the quest phase, then the players must discard cards from the top of the encounter deck, reveal it, and add it to the staging area. This means that Surge keywords will trigger, and any other When Revealed effects.
For the first round of questing, the players will likely go up against the side-quest they pulled out for setup. Clearing this will grant them some bonuses, but will also remove one of the additional rules from the scenario. On top of that, the Safe location that was guarded by the side-quest will now be free to travel to, should the players want to. Note that clearing the side-quest might activate the main-stage’s effect at the start of the next questing phase if there were no other side-quests revealed that round.
The next few rounds will be spent clearing other side-quests until there is at least 10 progress on the main stage. This stage isn’t really fit for stalling, so players tend to advance in turn 2-4 depending on their ability to clear side-quests. Once the second (or third in some cases) side-quest is explored, the players automatically advance to stage 2.
Quest card 2: A Miserable Journey – 20 quest points
As if the quest didn’t focus on side-quests enough, once you arrive at stage 2A, you will be forced to shuffle the discard pile into the encounter deck and discard cards from the encounter deck until a side-quest is revealed. That side-quest is revealed (triggering all effects) and the players will have to add the side-quest to the staging area. Because of this effect, it is advisable to clear side-quests during stage 1, just to prevent that you have a lot of passive text working against you.
The flip side of this quest stage has a bunch of flavour text, but little game text. The only thing that players have to remember at this stage, is that they will have to reveal an additional encounter card if the active location does not have the safe keyword during the quest phase. This motivates players to go to the safe locations even more, as it saves you from another piece of passive text on quest cards.
The main quest card requires you to make 20 progress on it before you may progress. With generally low threat in the staging area, this is not often a problem. Players might want to explore some side-quests first, as that can perhaps help them to get a grip on the scenario. If the players are not bothered by any active side-quests, they can select the main stage as their active quest, and chip away at the 20 quest points. If a Pressing Needs treachery is ever triggered while you are questing against a side-quest, the main quest is also a good target, getting you closer to the next stage.
There is really nothing else to do at this stage, except to find a couple of safe locations and travelling to them if you need a break from the side-quests and the treacheries. Remember to keep a low threat so you get to engage enemies on your own terms. During this time, you can explore a lot of side-quests, giving you some potentially big buffs if you are running Legacy Blade or Thurindir. To power through the last stage, I will also advise to build up your board state when it comes to willpower. This will help you defeat the final stage a lot faster. After the 20th progress token has been placed on the main quest, you immediately advance to the next stage.
Quest card 3: Journey’s End – 17 quest points
By the time this quest card rolls around, you may have already have all side-quests either in play or explored (at least in higher player counts). In that case, the effect on side 3A of the quest card can be neglected. If you do not have encountered all encounter side-quests yet, the same mechanic triggers as on quest card 2A. Remember that the side-quest brought into play this way will trigger as if it was just revealed from the encounter deck. This includes the surge keyword and any When Revealed effects.
There isn’t much exciting happening at this stage either, as no encounter cards are revealed, nor does the deck reveal more enemies to make it harder for the players. If you have been keeping a clear board state, you will be able to power through the quest and make the 17 progress required for this stage. Once this stage has been defeated, the players win the game.
There is one bit of passive game text on this side of the quest card that is important to take note off. Each damaged character will get a debuff of -2 willpower if they are damaged unless there is an active location with the safe keyword on it. This reduction in willpower is important, since it allows weather treacheries to reduce the willpower on characters as well by damaging them. At that point, it will be best to pile all damage on a few characters that wouldn’t contribute anything to the quest anyway, allowing you to save enough willpower during the quest phase to make progress on the main quest.
There is no real reason to explore any other side-quest at this point, besides maybe Make Camp, which prohibits you from healing characters. The resource focused side-quests are not interesting to travel to, as you will likely not need to play many more cards before you escape the Ettenmoors. Best thing to do at this stage is to yolo quest (without taking chances with those Trolls) and power through to the end of the scenario. This quest stage is usually beaten in 1-2 turns, especially in multiplayer. Once the stage is beaten, the players win the game and can move on to Treachery of Rhudaur in their progression playthrough.
The Encounter deck
Global
- The encounter deck size is pretty big in Normal mode, having 45 cards in it after setup. Easy mode slims this down to 32, making it easier to find objective locations.

- Shadow effects are not very common, as 44% of cards in Normal mode have an effect. This is increased slightly for Easy mode to 46%.
- Average threat on cards revealed is extremely low due to the high concentration of treacheries in the encounter deck. You are looking at 0.8 threat per card in Normal mode, and 0.6 threat/card in Easy mode.
- 3 cards can potentially trigger the surge keyword, but remember that Weight of Responsibility can also drag out more cards from the encounter deck. Another 5 cards will add a Guarded card to them, though those cards are not revealed.
- Doomed is quite a nuisance in this quest, as a fair few treacheries get Doomed 2. On top of this, the Troll-Fells will give every Weather treachery revealed +Doomed 1 if it is active.
- Immunity
- All Objective locations are immune to player card effects
The statistics above do not include Amarthiul and the side-quest plus the objective guarded by it that are set aside during setup. The Trollspawns are included, as their number varies with the number of players. The encounter deck isn’t very high on threat, but is rather treachery focused. Players will have to keep a Test of Will by hand when tackling this scenario.
Objectives
Besides the Amarthiul objective which is common in this cycle, you also get four objectives that can be found in the encounter deck. These safe locations allow you to rest a little and heal up before continuing your journey. They all have beneficial effects when travelling to them, and while they are active, there are a couple of extra rules to consider. First off, all engaged enemies are returned to the staging area (sorry Dunedain player). Next, enemies will not make engagement checks, but players can still drag one enemy per player down optionally, allowing you to keep the staging area clear. Then, all text on the encounter side-quests is blanked, allowing you to heal your characters and pay for cards without taking damage or raising the cost of cards you play. During staging, all treachery cards are blanked, making for a potentially easier round of questing if you hit a lot of treacheries during staging. This last one is important, as it is often missed by players. If the players somehow did not manage to quest through the Safe active location, the players will have to discard the active location, since they can’t stay at the Safe locations forever.
- Amarthiul: Like many scenarios in this cycle, Amarthiul joins your company as they traverse this wild country.
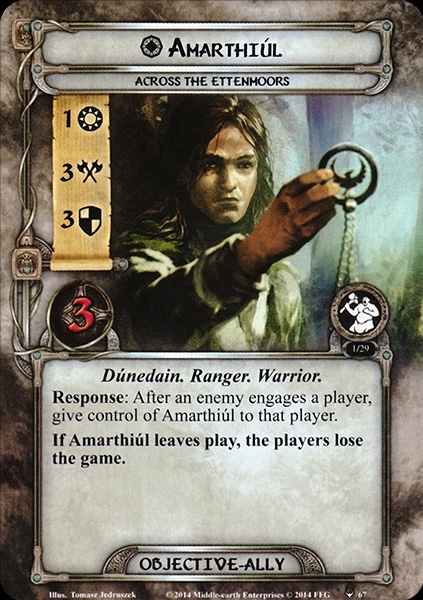 Amarthiul is an incredible objective ally with solid stats for both attacking and defending purposes. What is also unique to him is that he doesn’t move with the first player, but instead can be handed to a player who just engaged an enemy. This allows decks to get a sudden boost in attack strength, which may be enough to overcome the enemy. Be careful when defending with Amarthiul though, he only has 3 hitpoints, and if you manage to get him killed, you immediately lose the game. He is best used for offence. Note that he isn’t immune to player card effects, and can be healed just like any other ally. You can also play the new attachments on him from the Ered Mithrin cycle, designed for allies. This allows you to have an incredible attacker/defender on the table, who can move to whoever needs him most.
 - Secluded Cave: This Safe location boasts the highest printed quest points on a safe location, which will limit the possibility of making progress on the current quest. Chances are that you will not be exploring the location at all, preventing you from clearing out a side-quest. However, it is tempting to go to this location, as you will be able to negate treacheries and side-quests, and will be able to pull yourself together. The Secluded Cave is a good destination for players who just triggered the Lost in the Wilderness side-quest, losing their hand. When players travel to the Secluded Cave, they get to draw 3 cards, potentially giving them something useful to play.
- The Hoarwell: Being the only river in the region, the Hoarwell allows your characters to heal a little when you travel here. The response on the location is powerful, healing all characters for 1 point. This frees up a lot of damage from characters, making them able to commit to the quest again, or to trigger abilities again if Cold from Angmar was attached to the current quest. With 3 quest points, you are likely to clear the location and make a decent amount of progress on your next quest.
- Abandoned Camp: The effect on the camp seems the weakest in my eyes, as players can return any 1 card from their discard pile to their hand. There isn’t much discarding going on in this quest, but at least this location can return a favourite event to your hand during the later stages of the game. The mediocre effect on the location is offset by the low printed quest points here. This will make sure that you overcome the active location and make a big push against either a side-quest or the main quest. This will come in handy during stages 2 and 3, when the main stage will require a lot of progress.
- Patch of Woods: Probably the best location to get during the early game. Patch of Woods will serve as a buffer of 5 quest points when active, but players get a great benefit when travelling here. All heroes immediately get a resource added to their resource pool. Combine this with the likelihood that you didn’t spend resources if Scavenge for Supplies or Forage for Food were in play, and you will be set for an amazing next turn. With more resources, and no restrictions on spending those resources, the players can really catch up to the encounter deck and put out some good cards during their next planning phase.

Enemies
The enemies in this encounter deck are something different that the regular host of Orcs or horde of Undead enemies, the Ettenmoors are home to Trolls and Giants. These make for fearsome foes with huge stats and abilities that feed off of the damage you have been taking during your time in their land. The enemies all have a relatively high engagement cost though, so sneaking by them isn’t difficult for most decks if you are looking to stall a little in the early game. Just be sure that Lie Low isn’t in play when the encounter phase is active, since that will draw down a lot of enemies to you if you weren’t counting on it.
- Savage Trollspawn: These enemies will be the most common encounter you have during this scenario. The Trollspawns start of in the staging area, as they are added there during setup. With only 1 threat, they are not a problem to leave in the staging area for a time, while you build up. They have an engagement cost of 36, which is easy to avoid for most decks that run an average hero lineup. When engaged, the Savage Trollspawn will get +1 attack for each damaged character you control. If you have been healing, this is usually not a problem, making this Troll enemy only hitting for 2. In later stages or if you don’t draw into your healing early, the Trollspawn will hit for a lot, making it worthwhile to chump (also considering its shadow effect). To defeat the Trollspawn, you only need to overcome 3 points of defence, and then chew through 6 hitpoints. This can take a while, and makes Direct damage decks less than ideal for this quest.
- Ruthless Hill-troll: With 31 engagement cost, this enemy will come down much more often than you’d like to. On the surface, the Ruthless Hill-Troll doesn’t look as bad as his Anduin counterpart, but once you start chipping away at those 12 hitpoints, you will find that this Troll has a nasty surprise for you when it gets angry. After you have placed 3 or more damage on the Troll, it gains +2 attack and +2 defence, making it both harder to defend and tougher to kill. There are two strategies to this enemy, in order to avoid its buff. First, note that his base defence is only 1. This opens up Straight Shot if you are running Tactics Aragorn or another defence reducing card. The event will allow you to simply discard the Troll at the cost of an exhausted weapon. The other method is to attack for 13 straight away. This may require some Ranged support, but if you can deal all 12 points of damage in one attack, you can defeat the Hill-troll before it gets its boost. Remember that all damage is assigned simultaneously, so he won’t get his defence boost until after he has been defeated.
- Cruel Mountain-Troll: Now we come to the big baddies of the encounter deck. This enemy and the Coldfell Giant which is the next on the list are so big, that all their copies were removed from the encounter deck for Easy mode. The Mountain-troll has the highest engagement cost and will often stay in the staging area unless Lie Low triggers its effect. There is no engagement effect, but when defending its 6 attack, you must be careful. For each point of damage that is dealt beyond the hitpoints of the defender, you must remove 1 progress token from each quest in play. Having 6 attack makes him not too bad though, as decent tower defenders like Beregond can comfortably tank this enemy and not get killed (unless a nasty shadow effect hits). But even if you do decide to chump this enemy, you won’t find losing the progress tokens that bad if you are questing hard enough. There may even be cases where there is no progress to remove. Attacking the Mountain-troll will take some effort, but a Rivendell Blade–Straight Shot combo is a great way to get around this enemy.
- Coldfell Giant: Another enemy that got removed for the Easy version of this quest. The only Giant in this quest will do 1 point of damage to 3 different characters you control when he engaged you. This is painful on its own, as there are a number of synergies at work that feed off of damaged characters. You will want to heal this area of effect damage straight away. With 41 engagement cost, you are not likely to be engaging this guy regularly in the early stages of the game, so he will contribute his 3 threat to the staging area for a while. When engaged, the Giant will hit for 5 points of attack, which will take some effort to defend, but shouldn’t be impossible. Killing the Giant is a whole other matter though. 4 defence makes it tough enough to withstand a lot of single character attacks, so attacking in unison will probably be the best way to overcome him. 7 hitpoints will take a while to get through on your own, but with direct damage and Ranged support, you should be able to kill the Giant within 2 turns. Remember that you can always ask for Amarthiul as soon as this enemy engages you, giving you more attack strength to deal some damage to the Giant.
- Goblin Pursuer: A wimpy Goblin is also found in the Ettenmoors, as he pursues you from Mount Gram. This enemy is not a threat at all when compared to the much bigger Trolls and Giants in this scenario. The Pursuer is annoying though, as damaged characters cannot be declared as attackers or defenders against this enemy. This means that you will have to be careful to not deal damage to all your characters but leave some behind to be able to attack and defend this enemy. The 1 hitpoint allies come to mind as decent options. Defender of Rammas can always defend this enemy, and your Silvan Archers will most of the time be able to snipe the Goblin as well. Grimbeorn the Old is also a great hero for this enemy, as he can one-shot him with his ability.

Locations
The Ettenmoors do not feature a lot of new locations. Many of the locations in this encounter deck are made up by the general Eriador locations from the encounter sets. These locations you will have encountered before, so I will not cover them here, check the Weather Hills article for more details. With that said, there are 2 new locations that you should really pay attention to in this quest.
- Troll-fells: We don’t get beneficial locations that often, but I guess this location falls a bit in the middle here. While it is revealed without guarding a safe location, you can look through the encounter deck and discard pile for an objective location and attach it to the Troll-fells. This will make it easier to find the objectives, allowing you to also travel there once the Troll-fells have been explored. However, exploring the Troll-fells might be less appealing than it seems. While in the staging area, it only contributes 1 threat, but as the active location, the Fells will give each Weather card Doomed 1. This stacks with other Doomed effects, potentially raising your threat within range of the Trolls. The best strategy to claim the location underneath the Troll-fells is to use an Explorer’s Almanac. This does not make the location active, and even allows you to travel to another location. But you will still be able to clear the location during the quest phase, allowing you to travel to the Objective location during the travel phase. If the Fells are not guarding a location, then there is really no use in travelling there, just let it sit in the staging area contributing just 1 threat.
- Barren Moorland: This Normal-mode-only location has a passive effect that will make every ally that enters play act like Ally Quickbeam. This is because whenever an ally enters play, the controller must choose to either exhaust the ally, or to deal 1 damage to it. The exhaust option is usually best, as you will want to avoid taking damage. However, if your healing is online and you can heal the damage straight away, go for that option instead. The passive effect only happens when the Barren Moorlands are in the staging area, but it does stack between the two copies of it. This makes it crucial to clear the location as soon as you can. However, the location has a travel cost that is not to be taken lightly. When travelling to the Moorland, players must deal one damage to each exhausted character. I don’t know about you, but I would like to avoid triggering Necromancer’s Reach if possible. The ways around this is to either clear the location in the staging area, which is not impossible but will take some time, or the players can use Thror’s Map or South Away to negate the travel cost of the location. This shuts down the passive effect immediately, allowing players to play allies again without exhausting or dealing damage. Check the Playthrough links below to see how this location can break the game with the right decks. It is exploitable, and should be a lot of fun to try.

Treacheries
The treacheries in this encounter set are mostly focused on Weather effects, dealing damage to your characters. These can be annoying, as you discovered during your time in the Weather Hills. Besides them, there are also a couple of side-quest orientated treacheries that you first encountered in Intruders in Chetwood. These force you to pick different side-quests or reveal more cards. The new treacheries in this scenario focus on two things: getting enemies and motivating you to go to Safe locations. Let’s take a look at them.
- Arador’s Bane: Arador was the grandfather of Aragorn II and was killed during an expedition in the Ettenmoors. I think it is a nice nod to the lore to have a treachery named after him, even a horrible one such as this. When this treachery is revealed, all players, in turn order, must engage an enemy from the staging area with a higher engagement cost than their threat and deal it 2 shadow cards. Each player that is unable to do this, must search the encounter deck and discard pile for either a Troll or a Giant enemy and put it into the staging area. Important to note is that only enemies with a higher engagement cost are eligible targets for this effect. This probably rules out the Goblin Pursuer and some of the medium-tier enemies in the later stages of the game. If the players need to find a Troll or Giant, I would advise to pick the Savage Trollspawn, as that is likely the least problematic enemy to have sitting in the staging area. This treachery is also quite a good one to cancel if players cannot handle enemies, but be aware that the Weather treacheries are also a good target for cancellation, so weigh your options when you decide to cancel this.
- No Rest: “There ain’t No Rest for the weary, Ents don’t grow from trees…” whoops, got side-tracked there a little. This treachery will act as a condition attachment that attaches to an exhausted hero if there is any. If not, it will go on a ready hero. The Condition will make it unable for the attached hero to ready (through card effects and at the end of the round) and the attached hero does not collect resources during the resource phase (but can collect them through player card effects). This treachery isn’t the worst, as you only lose a questing character for a few turns. If you have the option, select the least useful hero, taking into account that you will be short a few resources, so don’t put it on your off-sphere hero in a dual sphere deck. The players don’t have to run Condition removal of their own, as this treachery gets discarded as soon as the players travel to a Safe location. All in all, this treachery may look dangerous, but the lack of keywords, no shadow effect, and the fact that it ends up discarding itself makes it pretty innocent.
Note that Treacheries do not resolve while you have a Safe location as the active location.

Side-quests
This scenario is focused on getting out side-quests. These force new rules on the players, or punishes them when they do not quest against them. Some of the side-quests are already familiar to players, but this scenario adds 3 new side-quests on top of it. These make the passage through the moors a lot more difficult, as you are being side-tracked continuously. Note that encounter side-quests are blanked while players are at a Safe locations, giving them a small break from the additional rules.
- Lie Low: Out of the three side-quests you can get at the start of the game, this is probably the best one. It doesn’t restrict your ability to play cards nor does it damage your characters. Lie Low requires 8 progress to clear, which can be done in 1-2 turns, depending on the number of players. The card has the forced effect that only triggers if there was no progress placed on it this turn. This means that even attempting clearing this side-quest will save you from the rest of the effect, as long as you make progress. If this card was revealed during staging, the forced effect will trigger in any case, since you are unable to place progress on the quest this round (unless Pressing Needs allows you to shift to this stage instead). The effect on this card is simple, yet effective. The engagement cost of every enemy in play gets reduced by 20. This will require a great deal of Hobbit synergy or Secrecy to avoid enemies once this goes off. However, this is generally not a bad thing if players are prepared for combat. The players can even return all enemies to the staging area anyway, if they travel to a safe location in the meantime. The Response when players clear this side-quest is a nice way to avoid more combat, as you get to pick the nastiest enemy in the staging area and shuffle it back into the encounter deck. Since this response only triggers on enemies in the staging area, be sure to at least have a target for this. You can achieve this by travelling to a safe location on the previous turn, returning all engaged enemies to the staging area.
- Forage for Food: This side-quest really piles on the damage early on and is a terrible combo with Hobbits. While this side-quest is in play, the players must damage any hero that spends resources. Luckily, you don’t have to deal 1 damage per resource spent, but only 1 damage when any number of resources are spent from the hero’s resource pool. This can pile on the damage quickly, and makes for a rough start when combined with Weather treacheries. The strategy to this side-quest is to hold off on planning, and clear it as soon as it comes out. The side-quest only requires 6 progress tokens, which is similar to some player side-quests. Once the players have defeated this stage, they get to heal 1 damage from each hero. This effect is nice, as heroes can take quite a beating during this quest. Having the encounter deck heal for you is a nice benefit to have. Later in the game, you will not find this side-quest as necessary as others, but certainly in the early game, be sure to take out this side-quest quickly. Not only will it deal damage to heroes when you use resources to pay for cards, but also when they trigger abilities like that of Leadership Aragorn and Tactics Imrahil. Be careful with those abilities while this side-quest is in play.
- Scavenge for Supplies: I like the theme of this side-quest, even though its passive effect is a real pain. Scavenge for supplies will increase the cost to play any player card by 1. This is devastating for the early game, as you will likely not be playing many cards, especially in a multi-sphere deck. However, remember that 0 cost cards will now also need additional resources, so playing Elrond’s Counsel is going to cost you. This side-quest has to be explored if the players want to get back on equal footing with the encounter deck. If this is your initial side-quest, try to clear it turn 1, so you get to play more cards next turn. There are 2 effects that trigger when this quest is explored. First, the players must find one Troll enemy in the encounter deck or discard pile and put it into play engaged with the player with the highest threat. Then, each player gets to play a card for free from their hand. A beautiful combo would be to play a free Forest Snare on the just engaged Troll, but any high cost card you can get out for free is welcome. The engaged Troll is likely to be another Trollspawn, as those are generally the weakest Troll enemies in the encounter deck. Also, remember that you can ask for control of Amarthiul if you want to deal with the Troll immediately. Players can also travel to a safe location to return the engaged enemy to the staging area.

Tips and Tricks
- While bringing side-quests of your own is debatable, you can certainly bring cards that focus on having side-quests in the Victory Display. Since Stage 1 will force you to clear at least 2 side-quests, cards like Vigilant Dunedan and Rider of Rohan are activated early. Legacy Blade is also a useful weapon for this quest, allowing you to strike back at the Trolls. My favourite hero for this quest is Thurindir, as he can get to insane levels of willpower when you are clearing side-quests every turn.
- You should be able to avoid most enemies during the early game. There aren’t many encounter effects that raise your threat, so a little threat reduction allows you to sneak by enemies and engage them as you please. Be aware that Lie Low can counter this strategy, so have a backup plan should the side-quest end up with no progress on it for a turn.
- Healing is important in this scenario, as many treacheries will both damage characters, and punish you for having damaged characters. Being able to heal off some of that damage allows you to commit more characters to the quest, and make use of more abilities. Once stage 3 rolls around, your quest characters should be healed up, or else you will struggle to make progress.
- Stacking up Amarthiul with attachments like Squire’s Helm and Hauberk of Mail will be great in increasing his defensive capabilities in case you need them. His Warrior trait also opens up Raiment of War, making sure that you won’t be losing him as quickly.
- Condition Removal cards can be used in this scenario, but I would not recommend it. No Rest gets discarded on its own, and Cold from Angmar only stays in play until you clear the quest it attaches to. As long as you can quest hard enough, you will not need condition removal unless you have nothing better to play (even then, get more healing in your deck).
- Tighten out Belts is actually really useful in this scenario, as there will be rounds where you don’t want to be spending resources. In that case, the event will add more resources to your heroes’ resource pool, making it easier for you to recover from a round of no planning.
- While it is fun to do, try to avoid bringing a dedicated Ent deck to this quest. The enemies and treacheries feed off of damaged characters, and you will find it difficult to get a foothold.
- A very useful card to bring to the quest is Sword of Numenor, as the majority of enemies has more than 5 hitpoints. This can allow you to get more resources and to have more attack on the table. Try it out sometimes, as that weapon doesn’t see a lot of play in other quests.
Playthroughs
The community also likes this quest, as can be seen by the many playthrough videos out there. I also included a video where Seastan breaks the game, using the Barren Moorland as a way to play every ally that has ever come out.
- 3 players, progression style: https://www.youtube.com/watch?v=cooWlct4USw
- 2 handed, progression style: https://www.youtube.com/watch?v=5k3ZRulOtKE
- 2 players, updated decks: https://www.youtube.com/watch?v=EF818MF3CeY
- Breaking the quest two-handed: https://www.youtube.com/watch?v=NLSMnbYRcHg
- 3 players, progression style: https://www.youtube.com/watch?v=QxrMp2T1jWE
With you surviving the journey through the High Fells, you travel further south, to warmer climates and less Troll infested areas. The ancient land of Rhudaur lies now before you, with new challenges to face as you uncover the linage of Iarion, and the Treachery of Rhudaur.


Arador’s Bane says “must either X or Y” -> player may choose to search the encounter deck for Troll or Giant even if there is eligible enemy for engagement in the staging area to avoid engaging that enemy.
LikeLike