“Keep to the green grass. Don’t you go a-meddling with old stone or cold Wights or prying in their houses, unless you be strong folk with hearts that never falter!” ~Tom Bombadil
With this sage advice and a clap on the shoulder, the hobbits are sent on their way from Tom Bombadil’s house. They had survived an ill-fated “short cut” through the Old Forest, thanks to Tom’s timely help, and spent some time tucked safely away in his home. If they follow Tom’s instructions, Bree is just a day’s trip away. Alas, the journey does not go as planned and Frodo soon finds himself struggling for his life inside a great barrow.
I remember the first time reading the books, way back in my teenage years, being utterly confused by this chapter of the book. What the heck is a wight?? “Barrow” wasn’t in my vocabulary at the time, and the movies obviously didn’t help with this part of the story either, so it wasn’t until this quest came out that I came to understand what actually happened in this part of Frodo’s journey. Now, having played this quest many times over in my various campaigns to bring the ring to Mordor, this is a favorite of mine and always a good challenge, especially in multiplayer, where it’s a lot tougher than solo. There are wights everywhere, no ally is safe, your threat is rising rapidly, and Frozen By Fear just might ruin every plan you make. If you are to survive the night in this haunted landscape, your “heroes” are going to have to be worthy of that title. Another timely rescue from Tom Bombadil wouldn’t hurt either…
Fog on the Barrow Downs
- Found in: Fog on the Barrow-Downs print on demand scenario. Part of the 2014 Fellowship event.
- Official Difficulty: N/A
- Community Difficulty: 7.8
- Encounter Sets: It’s print on demand, so the pack is entirely self-contained, though you will need The Black Riders if you want to play this scenario in saga mode.
- Quest Cards: 4, but there are four separate copies of the fourth stage.
- Play if: You want to play the COMPLETE saga. You want a tough multi-player challenge. You want to play your attachment-focused deck. You’ve always wondered what a wight was.
- Solo or Multiplayer?: This isn’t that tough in solo but gets harder with every player you add. In solo the quest is a lot more predictable and consistent, and the tricky locations are much easier to navigate. Each additional player you add increases the potential threat from Ancient Barrow, increases the chance a Stone Ring will buff your enemies and spread their when engaged effects, and increase the likelihood you’ll have to deal with crippling treacheries like Frozen By Fear, I’m Waiting For You! or Chill Fog. Questing on stage 3B is also much trickier when you don’t know which of your decks might get stolen away to 4A, leaving the rest of the group to handle all the threat in 3B themselves. Winning this quest with four players is quite the challenge and will most likely require forethought, coordination, and deck-teching.
- Can I bring Side-quests?: Yes, please! You will find them quite helpful here, either in slowing your pace on 2B so you don’t move on to 3A until you’re ready or in giving you something to do on 3B while your buddies are trapped in a barrow and you can’t progress on the main quest. One that you might normally keep in the binder but would be particularly helpful for this quest is Rally The West, due to having to rely on your heroes in stage 4 and to needing to defend with willpower when North Downs is in the staging area.
- What to watch out for: So many things! Losing allies one at a time or all at once, rising threat, losing the ability to trigger actions or responses, having to defend with your willpower instead of defense at times, lots of enemies that you want to kill quickly, having your deck isolated and needing your heroes to handle everything on their own. This quest hits you from most every direction.
The Quest
This quest uses the “Peril” keyword, which you’ll be familiar with if you’ve played saga quests before. Peril basically means that instead of one player drawing the encounter cards for everyone, each person draws their own encounter card along with any cards it surges into. Whenever a player draws an encounter card with Peril on it they must read it quietly to themselves and resolve it entirely on their own, without advice or assistance from others. The only quest cards here at the beginning with Peril are Long Groping Arm and Dreadful Song, neither of which throw particularly tough choices at the player drawing them. Perhaps more importantly Peril means only the person who drew these cards has the ability to cancel them, but as these aren’t the treacheries most people will want to cancel anyway that’s also not a big deal. Later on the deck will add in several copies of Great Barrow, which has the peril keyword. There’s nothing to cancel or choose there, so peril is there merely to signify who it is that gets trapped into the barrow and sent to stage 4A on their own.
Setup
Not much setup required here. Just set aside the locations Standing Stones, Hollow Circle, and all five copies of Great Barrow. If you’re playing this as part of campaign mode you can add in the Fellowship Frodo of your choice. There’s nothing preventing you from playing with him here even if you aren’t in campaign mode, as technically this is a saga quest and he belongs in it, but feel free to play without him as well. Your call if you want a free hero or not.
Quest Stage 1: The House of Tom Bombadil – 1 quest point
“Now is the time for resting. Some things are ill to hear when the world’s in shadow. Sleep till the morning light, rest on the pillow! Heed no nightly noise! Fear no grey willow!” ~Tom Bombadil

A free round! Three cheers for Tom Bombadil!! Still, as my friends said the first time we played this, if this game gives you a free round, it’s because it’s about to throw the kitchen sink at you. Enjoy it while it lasts.
If possible, use this round to buy whatever attachments you can. There is nothing in this game that messes with your attachments so they are always a safe purchase. If you have a useful event, like Captain’s Wisdom, this would be the perfect round to use it. Or maybe save your money and play Tighten Our Belts at the end of the round. Avoid buying allies if at all possible. Any ally you buy on this stage is liable to be stolen away by an Ancient Barrow before you can even use them and just make the threat in the staging area your next turn higher. If you have an ally that does something helpful, like Gleowine or Imladris Stargazer, that might worth playing right away, but in general any ally you buy now is a safer buy next round, especially if you can spend the resources elsewhere. This round and all future rounds you’ll want to spend resources as quickly as you can, or else Chill Fog will steal them and skyrocket your threat.
At the end of the round—AFTER refresh phase ends but before the next round’s resource phase begins—place one progress on this quest and move on to 2A.
Quest Stage 2: Across The Downs – 14 quest points
…and now we’re underway. 2A has us add Hollow Circle to the staging area and reveal an encounter card per player. This is the perfect time to draw some of the treacheries in the deck, if you get lucky. Frozen By Fear, in particular, is beautiful to see here, as its “Until the end of the round” effect only lasts until you finish revealing all the cards from 2A and begin the next round. Dreadful Song is a nice sight here too, as you have no questing heroes yet and thus it whiffs. If you chose not to add any allies last round then Ancient Barrow is a lucky draw too, as it can’t steal anybody and remains merely a low threat in the staging area.
On 2B we learn that our threat will rise by an extra one every round we are here, and we cannot advance until we clear Hollow Circle. I think just about everyone has the same thought at this point, thinking about how quickly they can get through this stage and away from the threat raising. THIS IS A TRAP!!! You NEED to stay at 2B as long as it takes to get your board state under control. (Ironically, waiting here is exactly what got the hobbits into trouble in the book, but in our case it is quite necessary.) If you go into stage 3 without being ready you WILL get overwhelmed, one way or another. So pack some threat reduction into your deck, quest cautiously or with side quests, and plan to stick around for a while.

At some point you need to choose to travel to Hollow Circle, which will bring out a new host of wight enemies. This is another choice whose timing really matters. You really want to kill enemies the round you engage them as often as possible due to their nasty “when engaged” effects, so if you still have engaged enemies you haven’t killed off yet it’s probably not time to travel here yet. On the other hand, if you wait too long to travel here and already have all the progress you need on 2B, you may still be dealing with this wave of enemies when you hit stage 3, and that’s rife with danger too. Best advice I’ve got: travel here when you think you can kill all the enemies it brings that very round. Fortunately you can choose which enemy you engage with so you have some foreknowledge over what you’ll need to accomplish this.
Quest Stage 3: Lost In The Fog – 16 quest points

3A calls for another round of encounter cards; the first player adds Standing Stones to the staging area and each other player reveals a card. After this is finished it’s time to shuffle all five copies of Great Barrow, along with the discard pile, into the encounter deck. 3B tells you that to win you will need to explore Standing Stones (and thus, at least one Great Barrow and stage 4) and make 16 progress. But you can’t place progress on this stage while a Great Barrow is in play, making this another great place for side quests until you try to quest out. There’s also a tiny little detail that any player being eliminated, even in their own stage 4, raises everybody at stage 3’s threat by a whopping ten. Brutal. Leave no man or woman behind.
Questing on this stage is really, really tricky, especially in multiplayer. Any player is liable to draw a Great Barrow at any time and disappear from the stage. So if your fellowship has one deck providing all the questing power and they disappear, you might suddenly be facing a serious shortfall in willpower. Everyone needs to quest as if this will happen. At the same time, you could quest everyone you’ve got and then YOU draw Great Barrow, and now your questing is meaningless and your heroes are in for a fight. Balance is key here. Quest with all the allies you can and make sure you have a plan for combat with your heroes.
The quest phase, where anybody could randomly fall into a Great Barrow, is nerve-wracking, but eventually somebody is going to have to go into one of their own volition. When the first player travels to Standing Stones, that player searches for a Great Barrow and adds it to the staging area, thus sending them into their own stage 4.
Only when the staging area is clear of Great Barrows can you progress out and win. If you’ve weathered the quest to this point you should be capable of this, unless you’re near threating out or, God forbid, another Great Barrow reaches out and grabs somebody and you have to wait for them/you to escape. There are a total of five Great Barrows in the game so if you keep track of them you should have some idea of what your odds are. There’s nothing more heartbreaking than questing for the win, with one player at 48 threat, knowing you’ve got to get out that turn or you’re toast, only to reveal one more Great Barrow.
If you are playing in campaign mode, remember the campaign card has the instruction “While any player is at stage 4B, the first player cannot lose control of the first player token.
Quest Stage 4: Trapped Inside A Barrow – 9 quest points

Now you’re in it. You’ve found a Great Barrow, either by choice from traveling to Standing Stones or by the fickle fate of the encounter deck, and now you’re trapped inside it, separated into your own staging area away from everyone else. It’s up to you to get out alive…no one else can help you while you’re in your own staging area, and you can’t help them.
If you were questing, the Great Barrow tells you to remove all your characters from the quest (on 3B) and create your own staging area, drawing a stage 4 quest card for yourself. 4A tells you to discard from the encounter deck until you find an enemy and add that enemy to your new staging area. Then it tells you to discard X allies, where X is the number of enemies engaged with you. So, if you have no enemies engaged with you, then you would need to discard ALL your allies. I made a mistake my first several playthroughs of this quest in thinking that the enemy you add is engaged with you immediately, allowing you to keep at least one ally, but this is not so. Think of it this way: X is equal to the number of enemies already engaged with you before you revealed stage 4A.
This means that you need to have a plan for this stage BEFORE you get here. There are several options:
~Keep your threat low enough that you don’t have to engage any enemies until you’re ready for them. The lowest engagement cost on an enemy here is 30, but that’s the Barrow-Wight, unfortunately the deadliest and most prevalent of them all so to plan on this direction you’ll likely need your threat to be under 30. With all the threat-raising in this quest, that may be a tough ask, but if you can do it this is a reliably safe option.
~Have a HERO ready who can handle the worst attack an enemy can throw at you. In this case, that would again be the Barrow-Wight, with an attack of 5. The highest possible shadow addition to that (against heroes) is +2, so if you can safely defend an attack of 7 you’ll be safe. There are no Stone Rings in your staging area here in stage 4 to boost their attack or defense, so this is truly the max you’ll see.
~If you have an ally you can’t afford to lose, keep an enemy engaged with you while you’re in stage 3, so you know you can keep at least one ally. If that ally can defend multiple attacks, like Treebeard, Hama, or Vigilant Dunadan, this can be a great plan. You’ll want to choose the enemy you keep engaged with you wisely, as they each have different affects that will mess with you as long as you keep them there. And if you have a Stone Ring in the staging area, these will apply to everyone.
~Have an option ready to bring an ally into play after you reveal 4A, but in or before combat phase. Sneak Attack, Reinforcements, and Stand And Fight are all good options for this, or if you’re using a Rohan hero then tactics Elfhelm is a good solution, even if you don’t have a sphere match, or the same with a Dunedain hero and Ranger of Cardolan. Some heroes, like tactics Prince Imrahil or Thranduil, can get an ally into play in the combat phase all by themselves that may save your bacon inside the barrow.
~A good old Feint might be your solution too, or something similar.
In all of these scenarios, remember that if you are relying on using an Action or Response to accomplish your plan, then your plans may be utterly ruined by an untimely Frozen By Fear drawn earlier that round when you were still a part of stage 3. If you don’t think your fellowship can cancel that when it shows up in stage 3 questing, then you may want to have a backup plan ready with it in mind.
Also, keep in mind that you will be defending against enemies here with your defense. If you had previously been keeping a North Downs in the staging area so as to defend with your willpower, that won’t help you here. Inside the barrow you’ll need actual defense.
Assuming you survive your first round in stage 4, you’ve now got to find a way out of the barrow. 9 quest points will do it. You can’t get location locked, as drawing a location on stage 4 only raises your threat then it disappears. Hopefully everyone’s threat is low enough that you don’t have to rush through this stage and can kill off the enemies before they pile up on you. As with most of this quest, a major key to winning is to bring plenty of threat reduction so you can take your time. Since the locations don’t stick around the only way to lose here is to be overrun by enemies, thus killing off all your heroes, or to threat out. As long as your fellowship is safe from threating out, there’s no need to rush here. Kill off your enemies, if you can, then get out.
The Fellowship Hero
If you are playing this as a stand-alone quest, not as part of a campaign, you don’t HAVE to play with Frodo. But it’s a free hero, so why wouldn’t you?
There’s nothing in this quest that punishes you for using Frodo’s ring, so you can pick any Fellowship Frodo you like without fear of repercussions.
~Maybe the least helpful Frodo would be The Road Darkens Frodo, who raises your threat to defend safely. He could help in a pinch, but you really don’t want to be raising your threat voluntarily much here.
~The Land of Shadow Frodo could be nice, especially if you plan to defend with your willpower. Since his effect lasts the entire round he could pull off double-duty both in questing and in defending with one resource. Throw a couple willpower-boosting attachments on him and you could have a defending force.
~Mountain of Fire Frodo gives a resource each round, which is always helpful. Make sure you have a use for those resources and they don’t just pile up, or you’ll just be giving Chill Fog more ammunition against you.
~My personal preference is The Black Riders Frodo. There are just so many tough cards you could reveal in this deck that having the ability to just throw one back in and try again is enormously helpful. That Ancient Barrow going to ruin your day? Throw it back in. Need more ways to dodge Frozen By Fear? Frodo to the rescue.
The Encounter Deck
Global
- The encounter deck of this scenario consists out of 34 cards in Normal mode, and 27 in Easy mode.
- There is a very low chance of hitting a shadow effect in this scenario. Only 30% of cards in both modes have a shadow effect.

- Average threat per encounter card revealed averages around 1.4 between both modes. This ranges from 0 threat treacheries to 3 threat locations. This did not count the threat of Ancient Barrow, as that is variable.
- Surge is on 7 cards in the entire encounter deck, with most being the fallback keyword when a treachery whiffs.
- Doomed 1 is on Frozen by Fear, and is the only instance of the Doomed keyword in the game. There are however many other effects that raise the threat of the players.
- Immunity
- Both unique locations are immune to player card effects
- Great Barrow is immune to player card effects and players cannot travel there
- The When Revealed effect of Tom Bombadil cannot be cancelled
- Any card with the Peril keyword is immune to all players except the one that revealed the card.
The statistics above do not count the two unique locations or any copies of Great Barrow, as those do not start in the encounter deck at the beginning of the game. The rest of the encounter deck is relatively evenly distributed, which makes Wingfoot a tricky card to rely on during a playthrough with few players.
Objective

Tom Bombadil to the rescue! He may not completely vanquish all your enemies and basically end the quest, as he does for the hobbits in the book, but you’ll certainly be glad to see him! When you reveal him, the you can pick any player at your stage (you unfortunately can’t pick another player trapped in a barrow, as thematic as that would be) and hand control of Tom to them. He’ll add his willpower to the quest and most likely defend an attack. At the end of the round you’ll have to discard him and shuffle the discard pile back into the encounter deck.
He’s NOT immune to player card effects, so if you have readying cards like Narya, Grim Resolve, or Ever Vigilant you could get multiple actions out of him. There are probably plenty of other tricks you could try, if you’re feeling creative, but no matter what you do he HAS to be discarded at the end of the round. That effect cannot be canceled.
Unlike a lot of other “friendly” encounter cards found throughout other quests and the player card pool, he doesn’t surge. Huzzah!!
Sadly, there’s no shadow effect, which always bums me out. I hate it when objective allies in encounter decks don’t have shadow effects—it seems like such a wasted opportunity for a thematic win. If you’re struggling to beat this quest, you may want to house-rule a shadow effect on him of “Shuffle Tom back into the encounter deck.” This way you won’t miss him. (Hopefully after reading through all of this, you won’t be struggling anymore.)
Enemies
There are only three different enemies you will see throughout the entire quest and they are remarkably similar, so before we delve into what makes them distinct it makes sense to start with what they all have in common.
- They’re all non-unique. There are no unique enemies in this quest.
- They all have the “Wight” trait. So if you’re playing with Rossiel she’ll only need one in the Victory Display before she can defend all of them solidly. Mighty Prowess isn’t seen in many decks but could be consistently helpful in a multi-player game here.
- They all have only one defense and a high number of hit points. This makes them a great target for Straight Shot, provided you can drop their defense somehow, perhaps through tactics Aragorn. Conversely, all the hit points make this a tough quest for direct damage decks, as very few cards or even reliable combinations of cards will do enough damage to take them out. Taken together, a deck without much attack can take one of these guys down over a few rounds.
- That’s not ideal, though, because every one of these wights restrict you in some manner while they are engaged with you. You’re going to want to kill them as quickly as you can, or keep them in the staging area until you know you can kill one.
- They all also do something mean to you when they destroy a character in an attack, so you’ll want to plan for a reliable defender.
- None of them have shadow effects on them.
- Last but definitely not least, they all are boosted when Stone Ring is in the staging area.

Ok, down to the specifics. In a cruel twist of the game designer’s imagination, the meanest enemy in the deck has the lowest engagement cost. That would be the Barrow-wight, a heavy hitter weighing in at a mere 30 engagement cost. This guy hits hard, with a natural 5 attack, and at 3 has more threat than the other two enemies. His game text is all about your threat, preventing you from reducing it while he’s engaged with you and raising it when he kills someone. In all but a few circumstances, this is the guy you’re going to want to make a priority of killing as quickly as you can. This is also the enemy you are most likely to encounter, as there are 4 copies of him in the deck vs. just 3 of the other enemies.
Next up we have the Cold-wight; he’s going to mess with your cards. You can’t draw cards through card effects while he’s engaged with you (so heroes like Erestor, Pippin, and Arwen with Elven-light hate him) and you’ll lose a random card from your hand when his attack destroys a character. But he only has 5 hit points so he’s the easiest to kill. If you know you can safely defend his attack, this is often the best guy to grab when an encounter card instructs you to search for an enemy and put it into play engaged with you.
Lastly there is the Dark-wight. He has the highest engagement cost at 40 and only 2 threat, so ideally you can leave him in the staging area for a while while you deal with the rest of the enemies. When you do engage him he has the lightest attack at 3, but he’s the hardest to kill with 7 hit points. This makes him the most likely candidate for an enemy to keep engaged with you, if you decide to go that route for whatever reason. He’s going to mess with your resources though so once again certain decks will hate him. While he’s engaged with you, you cannot gain resources from any card effects (Steward of Gondor, Resourceful, Arwen, etc.). Perhaps more painfully, if you allow his attack to kill someone you’re going to have to discard ALL your resources. If you’ve already spent them all or lost them through Chill Fog, this might be your best opportunity to chump block painlessly, but at other times it could be devastating.
What the wights in this quest lack in differences they make up for in sheer numbers. Throughout this quest it feels like they are everywhere. This is definitely a swarming quest, where you just need to fight through the sheer numbers of enemies arrayed against you. Normally in a quest like that you might try a deck that wants to have a bunch of enemies in front of it, like a Dunedain deck, but because these wights all have when engaged effects they can really shut decks like that down. Don’t engage them until you’re ready for them, then kill them quickly.
Locations
In contrast to the uniformity of the enemies, the locations here are all wildly different from each other. The travel phase is where some of your most important decisions will happen in this quest, unlike a lot of other quests, so you’ll want to have a plan ahead of time for how you want to navigate them. This starts in deck-building. Each location offers a specific challenge to your deck that you would do well to keep in mind before you start. We’ve already discussed the locations that come out at different parts of the stages (Hollow Circle, Standing Stones, and Great Barrow) in that section of this article and the strategy around them is strongly connected to those quest stages, so there’s no need to rehash that here. That still leaves three distinct and memorable locations. Let’s look at them one-by-one.

- North Downs. Your combat phase will look drastically different if this in your staging area. If it is, your beefed up Beregond or Redwater Sentry is practically useless for defending. Defense is a useless stat (until stage 4B, that is) and willpower has twice as much value. If North Downs is in the staging area, Glorfindel with The Favor of the Lady and/or and a Star Brooch becomes a stud defender, for one example. There are any number of uncommonly used willpower-boosting cards that become far more valuable when you are both questing AND defending with your willpower. So you could put those in your deck and plan ahead to leave the first North Downs you see in your staging area as long as you can. It’s only two threat so it’s not going to hurt your questing much to leave it there. It also has the worst shadow effect in the quest, so keeping it in the staging area keeps it out of the hands of attacking enemies. However, the effectiveness of this plan is partly dependent on how many players you have. In a solo game, you might not even see it all game, and even if you do you could likely travel to it without problem. In a three or four player game you’re going to HAVE to leave it in your staging area; you might even have all four copies piled up in your staging area before the game ends as you’ll likely never be able to afford to travel there. Two players is where the real choice lies. If you’re preparing for a two player game make sure you know if you’re going to try to travel here or leave it out.
- Stone Ring. Probably the biggest reason you can’t travel to North Downs whenever you would like to is this bad boy. Traveling here is practically a MUST whenever it shows up in your staging area, which with four copies in the deck happens all-too often. Thankfully there is no travel cost, so that part is free, but the cost if you choose NOT to travel there is pretty ridiculous. To start with, it boosts the attack and defense of every enemy. If you are unfortunate enough to have two or more of them in your staging area, they stack on each other and boost every enemy by two or more. As if that weren’t enough, they also spreads the pain of the wights’ when engaged effects to everyone. Did your non-combat deck not kill off that Dark-wight it was forced to engage last round? Well now no one can gain resources from card effects while it remains engaged. Ouch. On the bright side, there are only three quest points here, so it’s not that hard to travel through or clear with location control, so that’s one option you have. And there are some circumstances where you might wish to travel somewhere else before going here, but think very, very carefully before choosing to leave this in the staging area.
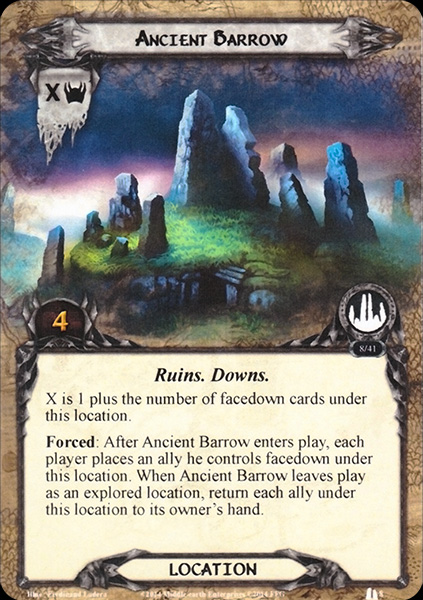
- Ancient Barrow. In my opinion, this is one of the most thematically brilliant locations in the entire game. In the book, Frodo’s “allies” Sam, Merry, and Pippin get separated and stolen away inside a barrow. He finds them eventually when he is stolen away too and ends up there himself. In effect he travels there…and he doesn’t get them back until he, with the help of Tom Bombadil, “explores” that location. Even then, though, they are still unconscious and must be revived by Tom’s singing…or in our case, by spending the resources and buying them again. Truly outstanding game design here. Unfortunately for us, that means we have a vicious location to deal with. It’s not so bad in solo, where the max threat of this location is 2, but every player you add to the game makes this location tougher and tougher to deal with. At full strength, this one encounter card can add 5 threat to the staging area and take away an ally from each player, some of whom surely were questing before they were stolen. I’ve even seen two of these arrive in the same round and just decimate our fellowship’s board state. Just brutal. Some ways to counter or plan for this:
- Don’t have any allies out! Nothing for Ancient Barrow to steal this way.
- Keep a cheap ally out that you don’t mind losing, like a Galion or a Snowbourn Scout. This is particularly important if you have a strong ally you don’t want to lose, like a Treebeard or a Northern Tracker.
- If you can get an Ancient Barrow in your staging area with little to no allies under it, perhaps one drawn during stage 2A, leave it there! If it’s not in the deck you can’t draw it and it can’t steal your allies. You only really want to travel here if the threat is killing you, you really need an ally it stole back, or you’re doing so well that you’ve got nothing else to do.
- A card like Thror’s Key that blanks a location would seem to be the perfect solution, but unfortunately it the timing on it triggers after the barrow has stolen the allies. So you can’t save them, but you could at least reduce the threat of this location down to zero. (The card says X is 1 plus the number of allies under it, but if the text is blanked like Thror’s Key does then X is equal to zero, as it has not been given a value and the default value for X is zero.) If you do choose to place Thror’s Key on Ancient Barrow, then keep in mind that you will no longer get the allies underneath it back in your hand when you explore the location, as that is part of the text you blanked. Presumably they would get discarded when you explore the location, though I could see an argument being made for discarding them the moment you play Thror’s Key.
- There are a lot of rule ambiguities about this card, like that one. I sent in a query to the game designer and will update this section when I hear back. When I asked the community about it I got mixed responses, so my best advice for now would be if you have a rules question regarding this card take your best guess at it and move on. 🙂
Treacheries
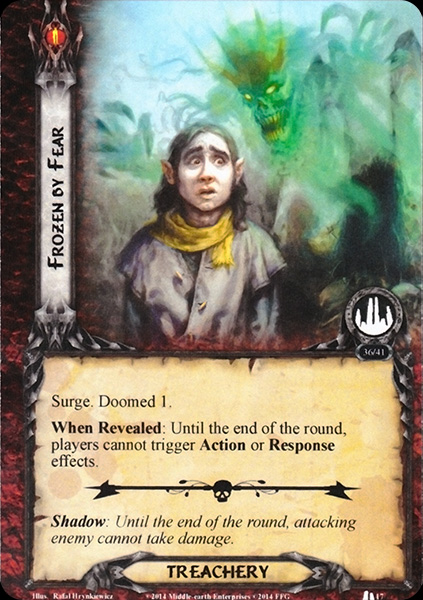
- Frozen By Fear. Let’s start with the elephant in the treachery room. This card is TERRIFYING (thematically, this is perfect) and you NEED to plan with it in mind every single planning and quest phase. It’s one of the harshest treachery cards I can think of across all the quests in the game, and there are a whopping three of them in the deck. I’ve heard a lot of talk around the community about how treacheries that blank text boxes are the worst in the game, but I’d put in my two cents that this effect is worse than that because in addition to preventing many of the abilities on your cards in play, it also prevents you from playing just about everything in your hand. If you don’t cancel this in some way, for the rest of the round there are no more events like A Test of Will or Sneak Attack, no more readying affects like Sam Gamgee‘s or Unexpected Courage, no more boosting effects like Protector of Lorien or Galadriel with Nenya. Some cards have passive text and these still remain in effect, thankfully, like Rossiel with A Burning Brand attached. But the harsh truth is that this card is likely to leave you quite helpless. So what can you do? Well, cancel it anyway you can. Obviously A Test of Will is for this, but it’s not your only option. Eleanor could be a useful choice for this quest, although if she uses her ability on this card it will still surge, so you’ll wind up drawing two cards to replace it. Not exactly ideal. If you could get one of these into the victory display through Out of the Wild or Scout Ahead and then completely negate it with The Door is Closed, that would be great, but that takes some luck and a fair bit of set-up. If you complete Scout Ahead (or any other side quest) then Halfling Bounders are another option. If you choose the fellowship Frodo Baggins from The Black Riders he’s really helpful here, as he can send it back in to the deck without it surging. It’s still in the encounter deck and you might just draw it again right away, but often that’s a chance worth taking. Sometimes you’ll look at your board state and think you can survive the round if you don’t cancel this, but this card also surges and whatever comes next might be just the card you can’t handle. I’ve chosen not cancel Frozen By Fear before and the very next card was a Chill Fog we weren’t ready for that pretty much took our fellowship out. BE AFRAID OF THIS CARD!!! It takes away all your back-up plans and basically says that all you can do the rest of the round is use the inherent defend/attack actions of your ready characters. Oh, to add insult to injury did I mention this card has Doomed 1 as well? Even the shadow effect is pretty much the last thing you want to see in this game too, as now you’re stuck engaged with whatever enemy drew it for at least another round. Yet in spite of that I always cheer when I see this as a shadow because then I know there’s one less to draw during the quest phase.
- Chill Fog. This one can either be a little bee sting or a Hummerhorn-sized death bomb, depending on how prepared you are for it. If your deck is running smoothly and you are able to spend the resources you get each round, this won’t cause any problems whatsoever. Maybe you even intentionally make sure someone has a resource around each round so as to keep this from surging. But if you have resources piling up somewhere or are trying to save up for something this card is bad news. Don’t take more than one round to save up for something, if at all possible. And make sure you have plans for how to use Frodo’s resources so they don’t just sit there waiting for this card to strike so they can turn against you. There are only two copies of this in the deck so it’s not as frequent a problem as some of the other cards we’ve discussed, but it’s another one you need to remember every planning phase.
- I’ll Be Waiting For You!. Here’s another reason not to leave any wights engaged with you if you can help it, and another reason to not rush through this quest until you’re in control of the board. If this hits you when a bunch of enemies are engaged with players it could be a game-ender. Once you ARE in control of the board state, there’s an argument to be made for one player to keep one enemy engaged with them so as to keep this card from surging when you see it (perhaps the player who wants to keep a good ally in play if/when they go to stage 4). But with all the things that can go wrong in this quest leaving an enemy out that you could have killed might just be asking for trouble. The shadow effect on this card is another reason why you want to defend with heroes when at all possible. Not too many allies can survive a +3 attack shadow. Combined with even the light-hitting Cold-wight that’s still an attack of 6, and you’ll have to deal with the punishment these wights deal out when they kill off a character.
- Long Groping Arm. This might be the friendliest treachery in the deck. All-too often there already is an enemy engaged with you so really this only means a 2-5 threat increase to the staging area for the phase. If you don’t have an enemy in front of you this is a little harsher, but still not likely that bad as you get to choose which enemy you want to engage. If you’re not ready for an enemy that can be rough, but if you’re not ready for an enemy you might be playing the wrong quest in the first place. It’s gonna take a lot of fighting to escape the Barrow-downs.
- Dreadful Song. With all the need for your cancellation elsewhere, this is likely not the card to use your Test of Will on. You’re better off bringing condition removal. So long as you have some, this card is an annoyance to see but not typically crippling, though perhaps it is worse when playing solo. Take note that it has to go on a questing hero controlled by the player who drew this, so your options where to put it will be limited. When choosing who gets it, keep in mind that the loss of willpower will hurt doubly if you have North Downs in the staging area and need to defend with your willpower. If you don’t have condition removal or can’t find yours, the threat raising on this card will add up over time and make this a card worth cancelling, but you’re likely better off just including the condition removal and living with this card until you can remove it.
Burdens
For those playing campaign mode, there are no burdens earned in or through this quest. Hooray! Honestly, just beating this quest in multi-player is burdensome enough.
Boons

“Then he taught them a rhyme to sing, if they should by ill-luck fall into any danger or difficulty the next day.
‘Ho! Tom Bombadil, Tom Bombadillo!
By water, wood and hill, by reed and willow,
By fire, sun and moon, harken now and hear us!
Come, Tom Bombadil, for our need is near us!'”
I have a bit of a beef with this one. The campaign card says in resolution that you have earned the Ho! Tom Bombadil! boon card. It’s a lovely, one-use card that you can use in any future quest that starts in your hand and basically acts as A Test of Will. Thematically, it’s a song that Tom taught the hobbits to sing if they got in trouble on the Barrow-downs and he would come help them, which is exactly what happened and how Frodo manages to escape from the barrow they all get trapped in. It’s a thematic home run and it makes a lot of sense as a boon.
But what bothers me about this is that we are given this boon after completing this quest, rather than at the start of it. Tom has the hobbits memorize this song before they go to bed the night they stay at his house, which coincides with stage 1A of this quest, and specifically says this is to help them the next day while they are walking through the Barrow-downs. So, thematically, this card would make the most sense if we earned it at the start of the quest and could use it IN the Barrow-downs, where it is quite needed. As it is now, in my campaigns I often find myself using it several quests later when I’m in Moria, where it loses all thematic value as Tom Bombadil isn’t anywhere nearby at this point in the story.
That said, next time I play a campaign I plan to grab this at the start of THIS quest and most likely will use it in that play-through. I would recommend you do the same.
Tips and Tricks
- Load up your deck with attachments! Once you’ve got them on there’s nothing in the quest that will make you lose them. You’re going to need your heroes to do most of the heavy lifting in this quest so load them up with as many goodies as you can.
- Don’t rely heavily on allies as you likely won’t be able to keep them. In fact, if you’ve ever wanted to try a deck without any allies, this is your big moment. Give it a shot! (Here’s one I made that should handle this quest easily in solo, or be a strong addition to your fellowship.) https://www.ringsdb.com/decklist/view/9209/allies-schmallies-1.0
- Bring enough threat reduction that you never need to feel hurried or need to rush through the quest. Raising your threat by one extra each round on stage 2B can cause rash decisions, and Chill Fog can strike at the worst possible time, so protect yourself and bring threat reduction.
- Bring condition removal.
- Bring enough card draw. If you wind up top-decking it, your resources will pile up and Chill Fog will eventually become a game-ender.
- Bring side quests. Scout Ahead is great, especially if you can remove one of the nasty treacheries with it. Rally The West is excellent here, as that boost to willpower will help both questing and defense, and you’ll be relying on your heroes a lot. Double Back is quite useful too.
- Do your best to kill all enemies the round you engage them. Don’t let them linger. Bad things happen to those who are engaged with wights.
- Take your time on stage 2B! You do NOT want to move on to stage 3A until you feel in control of the quest.
- Have a plan ahead of time for how you want to handle stage 4. I’ve listed several you could try in that section above.
- Have a plan ahead of time for what you want to do with North Downs, as discussed in that card’s section.
- Never, EVER forget about Frozen By Fear when you are planning your turn or it will inevitably wreck you.
- In general, the theme here is PLAN AHEAD! This quest is very tough in multiplayer and may require you to deck-build specifically for it.
Campaign Play
There are only two little pieces on the campaign card. The first states “While any player is at stage 4B, the first player cannot lose control of the first player token.” And thus Frodo remains in place as well, which is the main reason for this. You can’t have Frodo slipping away while he’s supposed to be in a barrow just because the first player token moved, or jumping into someone else’s barrow because they just became the first player.
The other text we’ve already discussed in the Boon section. At this point the players are supposed to earn the Ho! Tom Bombadil! boon. If you want to play strictly by the rules, go ahead and grab that here and use it in your next quest or beyond. But if you want to retain the theme of that boon I hope you consider my suggestion to earn that at the start of this quest. Either way, keep in mind that it’s a one-use boon, so use it only in time of great need.
Playthroughs
There are several playthroughs of this scenario to be found online, most by players going through their campaign. Check out the links below for more deckbuilding ideas or if you enjoy seeing other people dragged into barrows.
I would love to see somebody do a four player playthrough of this, as that’s where the biggest challenge can be found. If you’re up for this challenge, let me know and I’d be happy to join you!
- 2 players, Thematic campaign: https://www.youtube.com/watch?v=a0_tuv6uO_s
- 2 players, campaign mode: https://www.youtube.com/watch?v=upvOWGhGX-4
- True solo, campaign mode: https://www.youtube.com/watch?v=eKNzJD06Sdc
- 2 players, older decks: https://www.youtube.com/watch?v=7iZMeQoO3u4
- True solo, campaign mode: https://www.youtube.com/watch?v=es-5aMeHjQk
“They rode down the bank and looked up and down. There was nothing to be seen. ‘Well, here we are again at last!’ said Frodo. ‘I suppose we haven’t lost more than two days by my short cut through the Forest! But perhaps the delay will prove useful–it may have put them off our trail.’
The others looked at him. The shadow of the fear of the Black Riders came suddenly over them again. Ever since they had entered the Forest they had thought chiefly of getting back to the Road; only now when it lay beneath their feet did they remember the danger which pursued them, and was more than likely to be lying in wait for them upon the Road itself.”
You’ve evaded the Black Riders, survived Frodo’s shortcut through the Forest, enjoyed the hospitality of Tom Bombadil, and now escaped the clutches of the wights. But now it’s time to say goodbye to Tom, though we all wish he would continue with us. As he says,
“Tom’s country ends here: he will not pass the borders.
Tom has his house to mind, and Goldberry is waiting!”
But the danger isn’t over yet. There are Black Riders out and about and a long road ahead. Any advice for us, Tom?
“Tom will give you good advice, till this day is over (after that your own luck must go with you and guide you): four miles along the Road you’ll come upon a village, Bree under Bree-hill, with doors looking westward. There you’ll find an old inn that is called The Prancing Pony. Barliman Butterbur is the worthy keeper. There you can stay the night, and afterwards the morning will speed you upon your way. Be bold, but wary! Keep up your merry hearts, and ride to meet your fortune!”

Now that we’re 5 years later, I should consider trying this one with the Three Hunters contract…not only for no allies, but also for big willpower on heroes (for questing and defence both).
LikeLiked by 1 person
As I recall I wrote this before that contract came out. A good Three Hunters deck should handle this quest with relative ease, especially playing solo. It’s fantastic tech against this quest.
LikeLiked by 1 person
That’s what I assumed (though I didn’t look up when the contract was released). I enjoy that you mentioned the idea of a no-allies deck, though…perhaps that’s where FFG got the idea for the contract! 🙂
LikeLike