One of the best things of this game is that it can dive deep into passing mentions of places and characters that were in the books. This cycle is a prime example of this, since we don’t know much about Harad from the books. It has led us to the great jungles that were only mentioned a few times, and now we get to encounter the Black Serpent, a Harad warchief that was mentioned in the Battle of Pelennor Fields, but of whom we know nothing else. This scenario builds on this enemy and makes us raid his camp. It is fun to have the table turned on the enemy when it comes to ambushes, but this foe will not go down without a fight!
The Black Serpent
- Found in: The Black Serpent Adventure Pack, Haradrim cycle pack 4
- Official Difficulty: 8
- Community Difficulty: 7.3
- Encounter Sets: The Black Serpent, Harad Soldiers
- Quest cards: 3
- Play if: You want a more difficult quest during this cycle, you enjoy the capturing of objectives from enemies, you want to play a scenario where you attack the enemy and not the other way around.
- What’s different about this quest?: constant boss enemy in the staging area, annoying Haradrim immunities, progress is quickly removed from quest cards, passive effects on locations in the staging area.
- Solo or multiplayer?: I would suggest keeping the player count low for this one. In higher player counts, you will get location locked very easily. With locations having passives while in the staging area, you really got to keep the number of locations in the staging area at a bare minimum. However, true solo is also quite tricky, as you have to deal with a lot of attacks, especially when advancing quest stages. I will recommend a 2-player or 2-handed setup for this quest. For solo, you have to solve the issue of having enough willpower and more defenders, but it is not impossible. Multiplayer needs Ranged/Sentinel support and a location control player.
- Can I run side-quests in this scenario?: Not really. The quest tries to remove progress from the main stage in order to prevent the players from progressing. Not having progress there can leave you open to more attacks and more dangerous enemies. The quest also features several side-quests that will have a higher priority than the player side-quests that you play. It is therefore best to leave your side-quest deck in the box and go with a more combat-orientated deck for this one.
- What to look out for: A lot of combat, Southron Champion side-quest, boss-level enemy who remains in the staging area, progress is removed from quest cards, preventing progression, enemies can often be immune to counterattacks.
The Quest
Setup
The quest starts with the players finding the three Harad objectives and removing them from the game. These three objectives will be the cards that have to be claimed during this quest in order to sneak into the prison during the next scenario. But getting these cards won’t be easy. As a looming threat, the players add the Black Serpent to the staging area. This unique enemy will make attacks against the first player each round and will scale as the quest advances. After he is added to the staging area, the first player randomly selects one of the Harad objectives, and reveals them to the staging area. This will trigger the Guarded keyword on the objective, causing the card to be guarded by either an enemy or a location (depending on the objective). This is a nice way to filter the encounter deck a little by getting rid of treacheries and side-quests, which won’t turn up until the encounter discard pile is shuffled back into the encounter deck whenever the deck runs out of cards.
Quest card 1: The Crossroads Fort – 6 quest points
The quest starts at stage 1B, and actually doesn’t have a lot of text on it that has to be kept in mind. One of the passive abilities is that the quest forces players to take control of any unguarded and unclaimed Harad objective attachment, so that cards like No Quarter and Bold and Grim will hit with more consistency. This rule also ties in to the advancement requirement, where the players must control all Harad objectives in play in order to advance. This rule is shared with the other 2 quest cards, meaning that you must control the objective before you can either hunt for the next one, or win the game.
So in terms of rules, this quest stage isn’t all that exciting. But that opens up the possibility of stalling here before advancing to the next stage. And that is exactly what you will be wanting to do. Advancing to the next stage right away will put you at a serious disadvantage against the enemies that will be revealed, and you will be unprotected by having no progress on the main quest. So it is important to build up your boardstate at this stage, before moving on.
You can still start making progress on the main quest though. Like Escape from Umbar, the enemies and shadow effects will try to remove progress from the main quest, preventing you from advancing. However, with just 6 quest points on the main quest, you can easily place all progress in one burst if you want to. So building up a few progress tokens here will help you by cancelling certain effects on enemies. These can usually be found on the generic enemies that either do something horrible, or the players have to remove two points of progress from the quest card in order to prevent this. By having more progress on the quest, you can take quite a lot of challenge away from the encounter deck. Remember that you can have more progress than quest points on this stage, as long as you do not control the Harad objective at this stage.
However, this tactic is something the encounter deck tries to discourage. Not only are there several effects that remove progress during the combat phase, but several other cards limit the progress you can place on the quest card. Having a single Broken Courtyard in the staging area will prevent you from having more progress on the quest than there are quest points. This limits you to 6 progress for the rest of the round to work with, which can be tricky in higher player counts. That way you are not likely to advance the stage when you do end up claiming the Harad objective at this stage, since there has probably been an effect during combat that removed progress from the quest. And even if there is nothing happening during the combat phase, there are also other effects that straightup remove all progress from the main quest or prevent you from advancing because of their rules.

These are of course our two side-quests, and they can be infuriating if drawn at the wrong time. Southron Champion will prevent you from advancing until the Champion is dead and the stage defeated, and the new Don’t Let Them Escape! side-quest will remove all progress from the main quest card at the end of the round. This prevents you from building up any amount of progress while you wait to clear any other requirements. Southron Champion is best encountered late into stage 1, as you will be best equipped for the task at that point without the Black Serpent intervening that much. Don’t Let Them Escape! is a good quest card to clear in higher player counts, but doesn’t do much if you are counting on clearing the main stage each round in one go. It also gives you a good reason to simply discard any progress you made during the round to encounter card effects if you are not planning on advancing the quest before the end of the round.
Then there is the Black Serpent himself. This boss-level enemy sits high in his tower and will mostly let his minions do the battles at this stage. However, at the end of each encounter phase (which is not the combat phase, so no Grimbold cancellation will save you) the Black Serpent will make an attack against the first player. This attack is not a very big deal at this stage, since the Black Serpent is only hitting for 3 (4 if the Banner is attached to an encounter card). However, he does get a shadow effect for this attack, and can kill heroes if left unchecked. Always have a plan ready for this enemy. This plan can be to chump, but a more attractive strategy is the ability on Serpent himself. The players can discard one point of progress at this stage to cancel the attack. No shadow card would be dealt, and at this stage, it is the more attractive option. During the majority of this stage, progress on the main quest won’t do you a lot, especially if you have an odd number of progress on there. So cancel the attack if you don’t have a spare defender.

Once the players have claimed the Harad objective at this stage and feel like they are ready to advance, they can move on to the second stage by making 6 progress on the main stage. Questing hard will usually get you there, or you can try and save some progress on the main stage over the course of a few turns in case Don’t Let Them Escape! is in play. After the last point of progress is placed or if the players reclaim the objective while the main quest has 6 progress on it, the players advance to stage 2 (assuming the Southron Champion side-quest is not in play).
Try to transition during the combat phase, as that removes a very tricky combat phase as soon as you reach stage 2. It will be more difficult to do than transitioning during the quest phase, but it will make stage 2 a little easier for you.
Quest card 2: Battle in the Camp – 5 quest points
The transition to stage two is one that you have to be prepared for. You no longer have any progress to remove from the quest, so you will have to suffer all effects on enemies and shadow cards, which can lead to a few discarded allies or multiple attacks by the same enemy. To start the transition to this quest stage, the encounter discard pile is shuffled back into the encounter deck. Then, one of the set aside Harad objectives is revealed into the staging area at random and its Guarded keyword is resolved. This drags out a random enemy or location for you to deal with during this stage. But since it is only one extra card, this effect is easier to swallow in multiplayer.
Flipping over to side 2B, we find the same text that unguarded Harad objectives must be claimed by the players as soon as it has no attachments. This means that the objectives cannot remain in the staging area until the players are ready to claim them in order to move on (see Hunt for Gollum as an example). The fact that the players have to claim the objective is important at this stage, since the Black Serpent is considered to be engaged with each player controlling a Harad objective. In solo, this means that the Black Serpent will be engaged with you for the majority of the stage, unless you manage to lose the objective you already controlled from stage 1.

The Black Serpent now begins to play a more active role during the combat phase. Not only are his stats boosted by 2 now, but he will also be making more attacks per round now that he is considered to be engaged with every player who controls a Harad objective. The Serpent will also continue to make his attacks against the first player at the end of the encounter phase as usual, and the cost to cancel this attack is now 2 progress. You will need a lot of defences ready to deal with these attacks, especially during the round that you transition to this stage. This is especially true if you advanced during the quest phase (which happens 9 out of 10 times), since you now have no progress on the quest and the Black Serpent will be coming for both the first player and the player controlling the Harad objective in the next few phases.
While the Black Serpent is still immune to damage, you can still cancel his attacks through various player card effects. This can save you in case you have no progress on the main quest to discard to the Serpent. Lowering the Serpent’s stats with events or attachments is also allowed, as he is not immune to those things. Traps don’t work (yet) since the Black Serpent will stay in the staging area during his attacks, but they are effective against other enemies as well.
This stage is very combat heavy, so you really want to blow through this stage in one turn if possible. Getting locked at this stage is a difficult pit to crawl out of, so try your best to make all 5 progress on the main stage. If the new objective is attached to an enemy, try to engage it during the round you got to this stage, and kill it right away. If the objective is attached to a location, either use progress-placing effects to clear the location, or travel to it during the travel phase. This way you can knock it out during the next quest phase, and transition to stage 3 right away.
The requirements for this stage are similair to stage 1, and if you manage to hold on to the objective you already have from stage 1, then you should be able to quickly progress. Since the quest card only needs 5 points of progress, you can try and make all of the required progress in one turn, making Don’t Let Them Escape! not really a threat at this stage. Southron Champion can really screw you over at this stage though, as you will be forced to remain at this stage while you defeat them. But all the while, the Black Serpent will also be making up to 3 attacks per round, each hitting for at least 4 attack. But if you can claim the two Harad objectives at this stage, do not have the Southron Champion in play, and have the 5 progress required for this stage, then you progress to stage 3.
Quest card 3: Defeat the Serpent – 6 quest points
The one objective that has remained out of play up to this point now goes onto the Black Serpent. Both the Banner and the Garb are very tough cards to get at this stage, as they provide buffs to the boss-enemy rather than a generic enemy that you would normally have. The Garb will give the Serpent a base threat of 5, which is pretty significant and tough to overcome, but also grants the Serpent immunity to player card effects, which is probably worse. The Banner will give him and all other Harad enemies a +1 to their attack, making this final battle even more difficult.
On top of adding this objective to the Black Serpent, the encounter discard pile is shuffled into the encounter deck and each player reveals one encounter card. This can really lead to a location lock if you managed to draw a lot of locations between this string of encounter cards and the one from the previous quest phase. Proper location control effects will be needed in order to be able to make any progress on the main quest this stage. After each player has revealed one encounter card, the quest card is flipped over to side B.

The title of this quest card really says it all, you have to defeat the Black Serpent and claim the final objective that is attached to him. As usual, the quest card forces the first player to take control of any objective that is unattached. You really want to hang on to these objectives as you want to be finished as soon as the Black Serpent is defeated. If you don’t win as soon as you claim the Black Serpent’s objective, you run the risk of encountering him again as he does not have any victory points.
But since the Black Serpent has the text that it cannot leave the staging area or take damage, you first have to get around fixing that. This is done by having at least 6 points of progress on the main quest card. You will likely have to make those 6 points in one quest phase, as otherwise the Don’t Let Them Escape! side-quest will discard it. If you have managed to get rid of all copies of Broken Courtyard, you can have more than 6 points of progress, which will help to cancel effects on enemies and shadow effects. This will make combat easier and gives you a buffer of progress that you can lose without having to lose the ability to kill the Serpent.

Once you are able to place at least 6 points of progress on the main quest, you can optionally engage the Black Serpent from the staging area. This enemy has now grown to a +3 to all his stats, and his objective may even have given him additional effects. One effect that you shouldn’t forget about is that he will continue to make an attack against the first player unless you remove 3 progress from the main quest. If you have the progress to spare, great! Otherwise you might have to chump this attack or the one that he makes during the combat phase. The Serpent no longer attacks each player that owns an objective, so that is at least helpful. What is important to note however, is that the Black Serpent can have a shadow card that ruins your plan, especially if you have exactly 6 points of progress on the main quest. Broken Courtyard can return him to the staging area, Serpent Guard can make him immune to damage, and Chaos in the Night removes all progress from the main quest, which makes the Serpent immune to damage again. Cancelling the Serpent’s shadow effects for both his Forced-effect and his regular attack will save you from having to dance with this enemy for several rounds.
As long as you have at least 6 points of progress on the main quest after all enemies have attacked, you can counter attack the Black Serpent. If you haven’t lost either of your other objectives, killing him will win you the game. So it is time to go all out and use one-time effects like the Black Arrow and/or Tactics Eowyn to really cut through his 8 hitpoints. Don’t forget that the Black Serpent gains +3 through his ability, so it will take 12 attack to bring him down in one swing. Once you defeat the Black Serpent, he goes to the discard pile and you get to claim his objective. If this is the third objective you own, you immediately win the game (assuming you haven’t lost any progress on the main quest, you still need 6). This allows you to take his tokens and create a fake caravan to infiltrate Cirith Gurat and rescue the prisoners there in the next scenario in the cycle.
The Encounter deck
Global
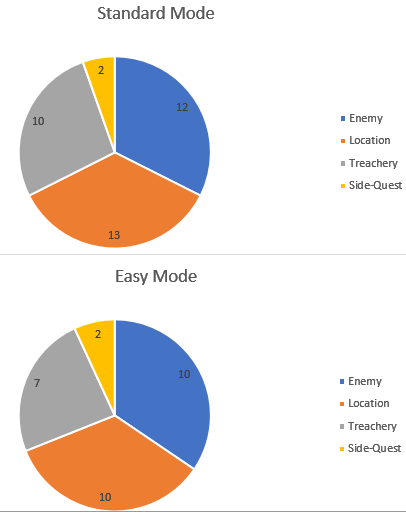
- The encounter deck is of average size, with 37 cards in the standard deck, and 29 during Easy mode
- The chances of a shadow card are equal in both modes, at 62%. Shadow cards tend to remove progress from the main quest and punish chump blocking.
- The average threat per card revealed is 1.45 threat/card. This is equal between both Normal and Easy mode, and ranges from 0 threat treacheries to 4 threat locations.
- Surge will appear on 6 cards in this encounter deck, so there are chances you end up revealing more than one card per player. But the cards they are attached to aren’t the worst to reveal.
- Doomed 1 is the only occurance of the Doomed keyword in this quest, and it is on Bold and Grim, of which there are 3 cards in the encounter deck. There are various other ways to raise your threat though, so Doomed may not be the most ideal archetype to bring to this quest.
- Archery 2 is only on the four copies of the Southron Archer. Dealing with this enemy early is advised, else you can have as much as 8 points of Archery per round.
- Immunity
- The Black Serpent cannot leave the staging area and is immune to damage.
- The Southron Champion is immune to player card effects and immune to damage while the side-quest has quest points remaining.
- If no progress is removed for Serpent Guard, enemies engaged with you are immune to damage for the rest of the round.
- While Summons from Mordor is attached to an encounter card, players cannot lower their threat.
- The enemy guarding the Serpent’s Garb is immune to player card effects.
These statistics do not take the Black Serpent into account but they do include all other encounter cards. The encounter deck will be thinned somewhat thanks to the objectives that enter play, but they can be guarded by most cards of the encounter deck. The spread of this encounter deck shows that it is well-balanced, with roughly the same number of treacheries as locations and enemies. The threat on the cards is relatively low at the beginning of the game, but cards like the Desert Bastion will grow in threat as the game goes on.
Objectives
In order to infiltrate the Orc stronghold of Cirith Gurat to save Kahliel’s people, you must appear as if you were the Serpent’s caravan. To do this, you need 3 Harad objectives that can be found in the Serpent’s camp. These objectives are guarded and will provide negative buffs to you while attached to encounter cards. Once you get control over the objectives, you can raise your threat by one and exhaust the attachment for benefits.
- Banner of the Serpent: The first objective on this list is the Banner of the Serpent. This objective is the only one that can be guarded by either a location or an enemy. While attached to an encounter card, this objective will boost the attack value of each Harad enemy (each enemy in this scenario) by one. This can really screw with your defence math, as not only are mediocre enemies now hitting harder, but the attacks that the Black Serpent makes are now also stronger. A counter to this buff would be to clear the Keep Watch player side-quest, which gives all non-unique enemies a -1 to their attack, which cancells out the Banner. Remember that the Black Serpent and the Southron Captain are both unique and will still get their +1. Once the attached enemy has been defeated or the location explored, the first player claims the Banner and attaches it to a hero they control. Always attach it to a hero who has some hitpoints left, else an unexpected chain of Bold and Grim may take out that hero. A 4+ hitpoint hero that usually quests or attacks is the safest option. Once attached, you can exhaust the Banner of the Serpent and raise your threat by 1 to give each Harad enemy engaged with you a -1 to their attack until the end of the phase. This is a great debuff to stack on Keep Watch, but also helps out in the later stages of the game to help defend the Black Serpent. There are several +X attack shadow effects in the game, and this effect might save a hero. Just remember to exhaust this objective before flipping shadow cards and resolving attacks, as it is still an Action, not a Response.
- The Serpent’s Garb: Not sure how some heroes are going to fit in this piece of armour, but that is none of my business. The Garb is exclusively guarded by an enemy and is probably one of the worst objectives to have left over for stage 3. The attached enemy gets +2 threat and is immune to player card effects. This makes it harder to defeat the enemy, especially if it is a tough one, and claim the objective. The two points of threat are not really much of a concern, as the players can hopefully engage the enemy quick enough that the threat doesn’t matter much when questing. The immunity is a much bigger issue in my eyes. Still, once the players defeat the attached enemy, the first player claims the Garb and attaches it to one of their heroes. The Garb now gets an action where it can be exhausted and the controlling player can raise their threat by 1 to choose any Harad character in the staging area to get -2 threat until the end of the phase. This helps out to make that last bit of progress you might need, and is usually worth doing if you get to keep all of that progress. There must still be a Harad enemy in the staging area, but the Black Serpent remains there for the majority of the game, so he is a valid target.
- Summons from Mordor: This objective can only be guarded by a location, which means that players with a lot of progress-placing player cards can swiftly claim this objective as soon as it comes out. A good thing too, as this scroll provides a passive effect that prevents players from lowering their threat. This is problematic, as the quest has several effects that slowly but surely raise your threat towards troublesome levels. Threat reduction is important in this quest, and removing the passive effect that locks you out of threat reduction is a priority. So travelling to the location and clearing it as soon as you can is a smart thing to do if you do not have progress-placing player cards with you. When the location is explored, the first player gains control of the Summons from Mordor and attaches it to a hero they control. I will advise to attach this objective to your off-sphere hero if you have any. The Summons allows you to exhaust it and raise your threat by 1 to gain a resource to the attached heroes pool. This is a slippery slope when it comes to resource generation, but can help out to get some high cost cards into play more quickly. The extra resource per round at the cost of 1 threat reminds me a little of the Magic Ring and Grima, and certainly has its uses. Just remember to keep an eye on your threat and you should be ok.

Enemies
The Haradrim enemies you faced in Umbar make a return in this quest. This means that most enemies in this encounter deck will force you to remove progress from the main quest card or a bad thing happens. The roster of enemies is expanded with more Haradrim enemies from this pack, including the Black Serpent himself, who starts in play in the staging area. For an overview of the enemies from the Southron Soldiers encounter set, please check out their synopses in the Escape from Umbar article.
- The Black Serpent: The titular enemy of this scenario is the Black Serpent himself. He is added to the staging area at the start of the game and will continue to stay there until the players are able to make 6 progress on the final quest card. But that does not mean that the Black Serpent can be ignored until the very end of the game. The Black Serpent will scale with the stage that the players are at, since he gets +X to his threat, attack, and defence ratings, where X is the main quest’s stage number. This starts out as a general buff of 1, but grows to 3 when it becomes time to deal with the Black Serpent at the climax of the scenario. Taking him out early is not possible thanks to his 50 engagement cost, the fact that he cannot leave the staging area, and that he cannot take damage at all. He loses this text at the end of stage 3, but for the majority of the game, you cannot touch the Serpent.
But that doesn’t mean he can’t touch you (that sounded weird). The Black Serpent will have a Forced effect for the entire duration of the game where he makes an attack at the end of the encounter phase. This attack can be cancelled by the players at the cost of X progress from the main quest. This starts as an easy 1 progress, but at the final stage, you’d be forced to discard half the stage’s quest points worth of progress. Discarding the progress in the early game is recommended as the cost is low and you are trying to get a foothold against the other enemies. But if you don’t lose the progress thanks to side-quests and can defend the Serpent, try and do so in order to save progress for shadow effects. This attack will also happen even if there is no progress on the main quest and when the Black Serpent is engaged with a player. This will make him attack twice per round at the very least (once at the end of the encounter phase, and once during the combat phase). Shadow cards are dealt for all of his attacks.
Attacking the Black Serpent only really has an effect when you have 6 progress or more on stage 3. Only then can you pierce the 4 points of defence and chip away at his hitpoints. Since the Black Serpent is not immune to player card effects or attachments, there are ways to get traps on him to lower his stats or deal continuous damage. Once you have a shot at the Serpent, throw everything you have at it in order to kill him. This will free up a Harad objective and will likely win you the game unless other objectives got stolen in the meantime. Defeating the Serpent does not put him in the victory display, meaning that stalling too long after defeating him can see his return once the discard pile has been reshuffled. However, you do not need to kill him again at that point, as the objectives are the only requirement for beating the game. Using big, one-time effects like Black Arrow and Tactics Eowyn is a sure way to defeat him and claim his attachment. - Serpent Guard: This is the only new generic enemy in the scenario, but you will see this enemy a lot. There are four copies of this enemy, and with an engagement cost of just 28, you will be encountering it early on. When the Serpent Guard engaged you, you get the option to either remove two points of progress from the main quest, or all enemies engaged with you cannot take damage until the end of the round. This means that not only can you not deal damage through attacks, but other players can’t use Ranged on your enemies and direct damage is rendered useless until the end of the round. This is very annoying if you were planning on taking down the Southron Champion or the Black Serpent this round, but they suddenly got immunity to damage while engaged with you. Removing the progress is a fair deal to cancel this, but only do this if you have a chance of killing any of your engaged enemies this round. Otherwise it might not be worth it and the progress is better saved for other effects. While you are unable to damage enemies engaged with you, enemies NOT engaged with you are still fair game. This means that you can still deal damage to enemies in the staging area and to enemies engaged with other players. Pushing enemies to those places and attacking there is therefor the recommended strategy and something you can build your deck around. Rohan can easily attack into the staging area, Dunedain players can engage enemies from other players, and if you are able to push enemies away from you after the Serpent Guard engaged you, you can still use Ranged characters to kill enemies engaged with others. The best tool against this enemy are the Ranger Spikes, as they simply trap the Guard in the staging area where it can remain until the end of the game without having too much to do (except trigger the Southron Soldier’s shadow effect, but that’s rare). Defending the Guard is pretty easily done, and the 1 defence, 4 hitpoint setup leaves it open to a Sneak Attack Gandalf during the next round, when the Guard can take damage again.

Locations
The setting of this scenario is an abandoned fort in the middle of the desert where the Black Serpent has set up camp. The locations in this scenario prevent you from making a ton of progress on the quest card thanks to their own quest points, but travelling to these locations is still very much worth it. This is because most of them have a passive ability while the location is in the staging area.
- Roofless Tower: Our first location immediately introduces us to one of the first passive abilities that locations will have while in the staging area. The Roofless Tower will prevent players from playing events full stop. When an event is played while Roofless Tower is in the staging area, the players must either remove one progress from the main quest, or cancel the effects of the event. This really hurts players who rely on Elven-light to draw their cards, as that event is often played multiple times per round. But also other easy events you play will now remove progress from the main quest or the event becomes a dead card in your hand. The Roofless Tower also prevents players from playing cards like Test of Will during the quest phase if there is no progress on the main quest, leaving the players vulnerable to treacheries. Luckily, there are allies and heroes that can do what events do. Balin can replace Hasty Stroke, Eleanor can replace A Test of Will, and there are also allies that do the same thing while circumventing the Roofless Tower. Of course, the best course of action will be to explore the Roofless Tower in the staging area or to travel to it. Travelling will require one hero to be exhausted, but if you didn’t reveal so many enemies this round, there should be a player capable of exhausting a hero as payment. As soon as the Roofless Tower is the active location, the passive effect is no longer in effect. With 2 threat and 4 quest points, this location isn’t that big of an issue for location control decks, but try to keep that event restriction in mind. No progress on the main quest will mean no events to be played by the group.
- The Serpent’s Redoubt: This is probably the worst location in this encounter deck. Not only does it have the highest threat, but the passive ability is also very annoying in the early game. Seeing this location early will really put on the pressure on your deck. While the Serpent’s Redoubt is in the staging area, there is a new passive ability in effect that triggers each time you play an ally from your hand. You then either have to remove one progress from the main quest, or exhaust that ally. That means that if you have no progress on the main quest at the time, all allies you play from your hand enter play exhausted. This is no problem for Ents, but for other allies, this is problematic. This means that you won’t be getting a lot of stats on the table quickly without also paying for readying effects like Strength of Arms. There are some counters to this location though. Thror’s Key simply blanks it, though you are still left with a 4 threat location in the staging area. You can also play allies but not from your hand. Glorfindel ally, and allies brought into play through other card effects won’t trigger this location. You can also travel to this location, but that does come at a cost. In order to travel here, the first player must search for an enemy in the encounter deck or discard pile and put it into play engaged with them. This will trigger the effect on that enemy, so the first player either has to remove progress from the main quest, or suffer the effect of the enemy that just engaged. Honestly, for this effect the Southron Captain might be the best pull, provided that the first player is capable of defeating it. Don’t forget that the first player also has to deal with the Black Serpent, putting a lot of pressure on his defences this way. Cancelling the travel cost through South Away, Ghan-buri-Ghan, or West Road Traveller is the ideal strategy, clearing out a lot of threat and getting rid of the passive ability (unless the second copy also happens to be in the staging area).
- Desert Bastion: In the early game, this is one of the easiest encounter cards that you can reveal. Just one threat and no passive ability to really hurt you all that much. So this location tends to take the backseat while you travel to other locations. But as you start collecting more objectives and more Desert Bastions start to come out, this location does start to become a problem if you are light on willpower. This location gets +1 threat for each objective that the players control, meaning that it will go up to 3 threat (or in very rare cases 4 threat if stage 3 doesn’t have all progress yet). At that point, you might want to give these locations some attention, though the 5 quest points will make it difficult to explore. Still, in lower player counts, you won’t be revealing a location each round, meaning that you will be able to travel to the Bastion and clear it during the next turn to free up some threat in the staging area. This is not a priority location to travel to, so try to focus on others first.
- Southron Camp: Location control players will grow to hate this location thanks to the punishing passive that this location sets up. While the Southron Camp is in the staging area, it removes all progress from locations in the game (including the active location) at the end of the round. That means that if you want to clear locations in the staging area, you better do it in a single round. The Southron Camp itself has only 3 quest points, so it can be cleared relatively easy in the staging area if the players have the right tools for the job. Asfaloth and any other progress-placing card will knock out this location with ease, allowing you to start piling progress on locations again without fear of losing the progress at the end of the round. If there are no location control players in the game, then you must make sure that you clear your active location each round, else this location will be removing progress from there, locking you out of the option to travel. Speaking of travel, if you want to travel to the Southron Camp, each player has to raise their threat by 1. This is not much, but doing this often will lead to some problems. I tend to have a Mirkwood Explorer ready with progress to pop this location when it comes up, allowing cards like Northern Tracker and Rhovanion Outrider to build up their progress again on locations in the staging area.
- Broken Courtyard: Our final location looks not all that menacing at first glance, 1 threat and 3 quest points is the lowest of all locations in this pack. But the fact that it surges gives it at least more teeth than you would think. The real punishment comes with the passive ability on the Courtyard. While it is in the staging area, the main quest cannot have more progress on it than printed quest points (similar to Escape from Umbar, where that mechanic was built into the quest cards). This prevents players from stockpiling progress on the quest cards and using it to pay off all enemies and shadow effects. This limits the progress to just 6, which may be enough for solo players, but forces multiplayer games to involve some difficult choices on what to cancel and what to let through. Because of this, I recommend filtering this location out of the encounter deck with scrying effects, and putting it in the victory display if possible. Thror’s Key is also a good tool here to make sure that you can continue to make as much progress as you need in order to pay off enemy abilities. With no travel cost and just 3 quest points, it isn’t difficult to get rid of this location. But there will likely be locations in the staging area with a higher priority, which keeps this location in the staging area for the majority of the game, limiting the progress that players can make.

Treacheries
A lot can go wrong during your attack on the enemy’s camp, and these treacheries represent that. While most treacheries are new, there aren’t as many of them in the encounter deck.
- Nowhere to Hide: While also discussed in the Escape from Umbar article, I will keep this one brief. This treachery drags out an enemy from the encounter deck and puts it engaged with you. This triggers the effects on enemies like the Serpent Guard, Southron Soldier, and the Southron Archer, so you either have to discard points of progress or suffer their effects. But in this scenario, you are unlikely to already have progress on the main quest left over if Don’t Let Them Escape! is in play, so you either have to cancel this treachery or hope for an easier enemy. This treachery is a good way to thin the encounter deck though, as the cards you discard for this effect might have been worse to reveal than an extra enemy. Revealing a Serpent Guard might screw with your plans the most, as he will grant enemies engaged with you immunity to damage unless you remove progress (which you are unlikely to have). This can stretch the fight at stage 3 on for a little longer, as you cannot deal damage to the Black Serpent at that point. Cancellation is still an option, though there are better targets for your Tests of Will in this encounter deck.
- Bold and Grim: In the early game, this card won’t do much but surge and raise each player’s threat by 1. But as soon as you start collecting the Harad objectives, you will start taking damage from this treachery. Each hero that has an objective attached, will take one damage when this treachery is revealed. This does not scale with more objectives on the same hero, so that is a smart strategy if you can pull it off with the timing of being the first player when a new objective is free from encounters. The attached hero should always be prepared for this treachery, and have hitpoints to spare. Healing attachments like Lembas and Self Preservation are excellent cards to have on that hero, saving them from death by this treachery chaining into itself. There are only 3 copies of this treachery though, so 4+ hitpoint heroes will be safe as long as they remain unharmed by Archery or enemy attacks. The shadow effect of this treachery is worth cancelling, though there is a chance of it hitting the Black Serpent or Southron Captain, in which case it won’t do anything. Additional attacks from smaller enemies are still nasty though, so if you don’t have enough defenders, try to cancel the shadow effect to avoid losing an objective, or taking another attack.
- No Quarter: This is the card that has screwed many players over during their solo playthroughs or even 2-player games. This treachery either surges twice (revealing 2 extra encounter cards), or the players must detatch an objective they control and resolve the Guarded keyword on it. This is always worth cancelling, as this treachery can start a surge chain that can reveal itself again and many other surging cards, which is often a death sentence to decks that are already struggling against this quest. Resolving the Guarded keyword on the objective is fine if you want to start from scratch, but leaves you open to getting another copy of this treachery resolving its surge 2. Always cancel this treachery or try to avoid it with Firyal and other scrying effects.
- Chaos in the Night: The next treachery has cost a few rounds off of people’s games as this treachery either stalls you for a round, or drives up your threat. When this treachery is revealed, it either forces each player to raise their threat by 3, or they can no longer place progress on quest cards until the end of the round. Since progress is mandatory to move through the stages and to finally deal damage to the Black Serpent, I often go with the threat option. But if you already have all the progress you need on the quest cards and don’t want the threat, then you could choose the other option. The threat is usually the best choice, but it is case-dependent. The shadow effect on this treachery punishes chumping in a way, but only really hurts if Don’t Let Them Escape is no longer in play. Chumping the Black Serpent at stage 3 is not ideal without a way to cancel the effects of this card as a shadow card though.

Side-quests
The side-quests in this scenario feature one of the most infamous side-quests of them all, again. Southron Champion really is a quest that grinds your game down to a halt before you can advance. There is also a new side-quest that will limit your progress even more, making clearing these side-quests a priority during this quest.
- Southron Champion: I have covered this side-quest in depth during my review of Escape from Umbar, so please check out that post for more details on how to get around this side-quest. It is the most annoying one in this scenario, as it prevents you from moving on or even winning the quest. Players who try this scenario on Easy mode will have a better time if they remove this side-quest from the game, but do still include it during Normal mode. As for when you should be lucky to find this side-quest, I suppose it hurts the least when you reveal this as you are almost ready to beat the first quest. It allows you to stall for a little while longer, but at that point you will be best equipped to deal with the Champion before moving on to the final two stages. When looking over the enemies in this encounter deck, the Serpent Guard will hurt the least, though a +2 stat buff to all stats makes every enemy a serious threat, so you should have some defenders or chumps available to block the Champion for at least one turn. Defeating the side-quest allows you to defeat the Champion, after which you can move on to the next stage of the game or meet all requirements to win and finish the game.
- Don’t Let them Escape!: This is the only new side-quest in the scenario and it is really a big reset button on all quest cards. At the end of each round, whatever progress is left on the main quest is removed as long as this side-quest is in play. You can either accept that you are losing all the progress and have to start from 0 during your next quest phase, or you can try and beat this side-quest in order to save your progress so that it carries over to the next round. I have found that it is not impossible to make the 5 or 6 progress on the main quest in a single round, though that does get easier with more players. Instead, you can accept this side-quest and regard it as a free encounter card that does nothing if you build around losing progress from the main quest. You can (and probably will) remove progress from the main quest to cancel the Black Serpent’s attacks and to ignore the engagement effects on enemies. You can spend your progress as much as you want, since the side-quest will get rid of any progress that is left after combat. It also allows for tricks like Back-track, where you can move progress from the quest to locations in play, though with Southron Camp, you will likely end up losing progress on those locations as well. If you don’t like to remove progress at the end of each round, then you can try to beat this side-quest. It is often recommended to do if you have the time during the first stage while building up. But remember that this will put you at 0 progress during combat, meaning that the Black Serpent will make an attack against the first player, and enemy effects cannot be cancelled by removing progress anymore. Also, when choosing this side-quest as the current quest, an extra encounter card has to be revealed. This makes the side-quest easier to overcome in multiplayer, where an extra encounter card is easier to endure than in solo, where it is basically a double staging step. Remember that this effect is triggered each time that the quest is selected as the current quest, so if you do not beat the side-quest in one go, you have to reveal another encounter card for when you try again. You don’t remove any progress from side-quests at the end of the round though, so that helps at least. Upon completing this side-quest by making 6 progress on it, the main quest gets to keep all its progress during the transition to future rounds. I don’t tend to focus on this side-quest, but if you can knock it out while you are building up your boardstate, go ahead. It does make it easier at the later stages to not have to quest through the stages in a single round.

Tips and Tricks
- Try to make as much progress on the quest cards as you can without transitioning until you are ready. Not going after the objectives can help with this. Having more progress to spend on enemy abilities will make engaging enemies a lot easier.
- Try killing enemies in the staging area. Whether it is through direct damage or effects like Haldir or Dunhere, not having to engage enemies will preserve progress and saves you from nasty shadow effects. Serpent Guard enemies are no longer immune to damage while in the staging area, so they are fair game if you manage to push them back.
- Try to transition to stage 2 by claiming the objective in the combat phase after enemy attacks have been resolved. This allows you to bypass the combat phase at stage 2 while you have no progress on the quest phase. It can also mean you ignore the Black Serpent for the entire stage if you blow through it in one turn.
- Bring effects that can bypass travel costs on locations. Cards like The Serpent’s Redoubt are very annoying to travel to, but need to be out of the staging area as soon as possible, so using Thror’s Map or Ghan-buri-Ghan is very much worth it.
- If you have access to Lore, try to get all (or most) copies of Broken Courtyard in the victory display. This will allow you to make more progress on the main quest than the printed quest points, which can act as a buffer to fund enemy abilities while still being able to progress when you have all objectives under your control. You will also remove some surge from the encounter deck, which is always a good thing.
- Shadow cancellation can really win you the game quicker in this quest. Hasty Stroke can prevent for instance a Serpent Guard shadow effect on the Black Serpent which would make sure that he doesn’t take damage. This can save you several rounds of making enough progress and eventually bringing him down to 0 HP. Cancelling Chaos in the Night also helps massively at these later stages of the game, allowing you to progress while chumping. Broken Courtyard is also a good target to cancel, since re-engaging enemies will mean that their effects trigger again.
- If you are not willing to progress to the next stage yet, but are aiming to make a lot of progress, then try to use Explorer’s Alamanac to clear some locations in the staging area with left-over progress. This is useful to clear Ruined Tower and Serpent’s Redoubt without having to travel to those locations. This gets rid of their passive effects, and resolves your location lock somewhat.
- If you have Don’t Let Them Escape in play, try to spend all the progress on the main quest that you can in order to make things easier for you. You are going to lose the progress anyways, might as well make some use out of it.
- With most locations having a passive ability, Thror’s Key will be useful to cancel at least one of them while you explore the rest. This can save you if you for instance reveal two of the same location back to back. You can Key one of them, and travel to the other one.
Playthroughs
The quest is quite popular with the community for posing quite a challenge. Here are a few playthrough videos for you:
- True solo: https://www.youtube.com/watch?v=6RK7db0rgwY
- 2 players: https://www.youtube.com/watch?v=10QU0kvcyIA
- 3 players: https://www.youtube.com/watch?v=Z35C4euYhcs
With the Black Serpent now covered, all of the Haradrim scenarios have been claimed by authors on this blog. That means that the cycle will soon be completed and we can move on to the next one. If you would like to claim a scenario from the Ered Mithrin cycle to cover for yourself, please reach out and I will get you sorted! In the meantime, we will try and get the rest of the articles out as quickly as we can, while keeping them in depth enough for players to enjoy.

3 thoughts on “The Black Serpent”