The Haradrim cycle picks up right where the Dream-chaser cycle has left us. No month long skip to the next area, no, you are dropped in Umbar during City of Corsairs, and now you need to get out. This is done in a fast paced quest with a lot of enemies and all new cards for those trying out this quest for the first time. The scenario can be hard if you don’t keep it under control, and has a unique mechanic that will require you questing hard. Despite all of this, Escape from Umbar is a popular decktesting quest among the more experienced players who need their decks to both quest hard, and be capable of killing enough enemies. This quest may take a few attempts to learn, but once you know when to remove progress and when to place it, you will be able to get through the scenario with relative ease. That is, until Southron Champion comes out and ruins your day.
Escape from Umbar
- Found in: The Sands of Harad Deluxe box, scenario 1
- Official Difficulty: 5
- Community Difficulty: 5.5
- Encounter Sets: Escape from Umbar, Harad Soldier, Harad Territory
- Quest cards: 2
- Play if: You want a fast paced quest, you want a quest to test your deck against to see if it can survive against a scenario where both questing and combat are important, you want to experience that feeling of revealing Southron Champion again.
- What is different about this quest?: Additional loss condition if no progress is left on main quest at the end of the round, enemies must be killed in order to progress and win, enemies remove progress from quest stages.
- Solo or Multiplayer?: While this quest can be completed in any player count, I would say that it is slightly easier with more players. This allows you to have more dedicated decks that place progress on the quest, and decks that kill enemies in order to advance. There is still a balance to this as more progress will be removed during combat, but you will be able to compensate for that with your fellowship.
- Can I run side-quests in this scenario?: I really don’t recommend using your own side-quests for this scenario. The main quest will require a lot of attention almost every turn, as you need progress on it to compensate for different encounter card effects. On top of this, the encounter deck also gives you a few side-quests of its own that are difficult to ignore. Running player side-quests is a sure way to lose quickly, so best leave those in the binder.
- What to look out for: You absolutely have to be able to make enough progress on the main quest in order to avoid the loss condition on Seize them, there are a lot of heavy hitting enemies in this scenario, Archery, Southron Champion side-quest, extra requirements for beating main quest stages.
The Quest
Setup

The quest begins with a bit of setup for the players, which will bring out a lot of encounter cards from the start. This means that all players will have to start moving quickly, and have an answer for the enemy that starts in play engaged with them. The players first add the objective card Seize Them to the staging area. This card adds some additional rules to the scenario that didn’t fit on the quest cards. These rules force players to always have progress on the main quest card if it has been in play for the entire round. This last part is to protect you from automatically losing once you advance to stage 2. This rule means that you must find a way to make progress on the main stage during your first turn, and can’t just stall a little and deal with other cards which I will get to. On top of this, there are many cards in the encounter deck that will be removing progress from the main quest, forcing you closer to that loss condition. One of these progress removing effects is on Seize Them itself. This effect will force players to discard progress whenever an enemy destroys a character. The progress removed has to be equal to the threat of the enemy that did the killing. This rules out chump blocking for the entire game, forcing you to use dedicated defenders. Luckily, the check on the no-progress-on-main-quest rule only happens at the end of the round, so if you didn’t make progress through questing, there are still cards in the encounter deck and the cardpool in general that can help you out.
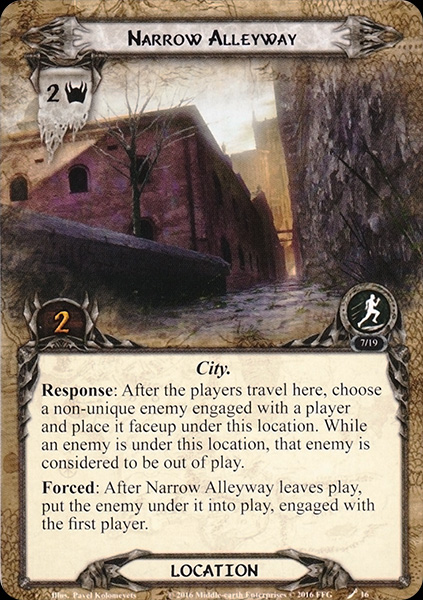
Some of these helpful cards are locations, and wouldn’t you know it, you start out with some in the staging area. Each player has to pick one different location from the encounter deck and add it to the staging area. There are 5 different locations, so even in 4 player games, there is still a choice to be made on what location to best leave in the encounter deck. When it comes to picking a location to add to the staging area, the first pick should always, ALWAYS, be Narrow Alleyway. In true solo, this will give you some time to deal with your enemy if you are lucky. This is a part of the best route to take for your first round, and will be a common sight in the many playthrough videos at the end of this article. The second location you might want to consider is Umbar Square, thanks to a relatively low threat and a solid ability to help you place more progress during the combat phase. From there, you can use your own judgement to find a location that best suit your needs. I tend to avoid Port of Harad in 4 player games, as it starts out as a 4 threat location that can grow pretty quickly.
After each player has picked a different location and added it to the staging area, the players each find a copy of Umbar Sentry and put it into play engaged with them. Yes, you start out with an engaged enemy right off the bat, which will mean that you must be ready to fight during your first round. It is the smallest enemy in the encounter deck, but can still hit pretty hard. This is a great setup for Dunedain decks that like enemies being engaed with them, as they now don’t have to play a Dunedain Hunter or Wait no Longer to get another enemy engaged with them. The Sentries will also add to the Archery total and will boost Port of Harad. After each player has engaged a Sentry, the game can begin.
Quest card 1: Stranded in Umbar – 15 quest points
The B-side of this first quest card doesn’t have a lot of rules on it that need to be kept in mind, but the ones there are pretty important. To start, the quest stage can never have more than 15 progress tokens on it. This means that any extra tokens are immediately removed. This is done to prevent players from rushing the quest each round and then removing a bunch of progress for enemies or shadow effects. Instead, there can only be 15 progress tokens on the location at the same time, which is exactly how many you need to advance to the next stage. However, things aren’t that simple. While any player is engaged with at least one enemy, the players cannot advance to the next stage. This means that tricks have to be used to push enemies back into the staging area, or players will have to be ready to kill any engaged enemy. Cards that can help with pushing enemies back include the Guardian of Ithilien, Ally Mablung, Fastred, and the Ithilien Archer to name a few. Killing enemies directly will be your primary method of getting rid of engaged enemies however.

Because of this rule, the players start with an Umbar Sentry engaged with each of them. Else players could rush the first quest stage and hope they didn’t draw into Nowhere to Hide. These enemies will have to be dealt with from the very first round, although there are ways for some players to avoid their copy. Players can for instance first travel to the Narrow Alleyway, which causes the first player to select any engaged enemy with them and put it underneath the location. This frees up the first player when it comes to combat, assuming no other enemies were engaged before travelling. Because of this, the first player should be able to send more characters to the quest, or assist other players by having Ranged and/or Sentinel characters ready to lighten the load on other players. This allows the group to keep a lid on most of the early game. The Umbar Sentries aren’t a big threat during combat, especially if the players are able to remove some progress to make them hit for only 2. Keep in mind that the enemies do still have Archery values, and that chumping is a bad idea here, since the Seize Them would force players to remove more progress when a character dies to an enemy attack.
The goal at this stage is to get a grasp on the enemies by making sure that the group has enough progress on the main stage. This is easier said then done, but the locations in this game will really help with this. Finding other ways to clear threat in the staging area and make progress on the active location so more can spill over to the main stage is also advised. This allows for a bit more freedom when it comes to choosing between removing progress or letting some nasty effect trigger. You should find windows to pick the nasty effect every once in a while though, as that will keep progress on the quest which you’ll need to eventually advance. Especially when you hit the 15 required points of progress on the stage, you’ll have to bite the bullet and discard that enemy to Southron Archer, just to make sure you advance.
Once 15 progress has been placed on the main stage, the focus should shift to making sure no player is engaged with an enemy. This can be done through travelling to another Narrow Alleyway, though this only buys about 1 turn of relief. Players can also have Umbar Square active at this point and suffer the loss of a few points of progress before placing those points back when they defeat an enemy. The real killer at this stage is the shadow effect on Southron Soldier. This can unexpectedly force an engagement from the staging area. Shadow cancellation will be very important here, as the one extra enemy can cost you another turn, during which you’ll have to reorganize and hope no new enemies engage you.
Another killer at this point in the scenario, and pretty much throughout the entire quest is Southron Champion. This side-quest quickly earned a reputation in the community as one of the worst side-quests in the entire game. I will go over the specifics of this side-quest later in the individual card review, but a new enemy is created named “The champion”. This enemy has boosted stats and the ability to block the players from advancing the main quest. It’s immunity also prevents cards lik Revealed in Wrath from blanking him, so he must first be defeated in order to beat the stage. Revealing this side-quest at any point in the game will come with a collective groan of the players, as you now have a new objective that has to be cleared in order to win. Complete the side-quest in order to damage the Champion, defeat him, and then you are able to advance the next quest again. Fortunately, you only get one Champion per game, though that is still one too many for plenty of players. I would advise removing this side-quest for easy mode and simply add in a different card that would otherwise be removed.
You can advance this quest stage at any point in time, though the two most likely times are at the end of the quest phase and after all enemies were defeated during the combat phase. Regardless, if there are 15 points of progress on this stage and no enemies are engaged, the players move on to stage 2.
Quest card 2: Flee the City – 15 quest points
Advancing to the next stage, you are required to end the current phase immediately. This means that if you somehow wanted to attack an enemy in the staging area or do a Combat Action, you’ll have to do that before killing the last engaged enemy in play, before advancing the quest during the combat phase. This is also important when advancing during the planning phase, as killing the last enemy or placing the last progress token immediately pushes you to the quest phase, which can be a bit of a weird timing issue. Regardless, you advance to the next phase of the round, but will also need to do some other things before flipping the quest card over to side 2B.

The encounter discard pile will be shuffled back into the encounter deck, and the players have to each discard cards from the top until they each reveal an enemy. All those enemies engage the players, possibly triggering some attacks from the Southron Soldier, or you have to ditch an ally to the Southron Archer, since you cannot discard progress tokens from the main quest card. After each player has another enemy engaged with them, the players may flip this quest card and start their game again.
The B-side of this quest card is very similar to the previous quest card, so there isn’t much else you have to worry about. The only big difference is that the main quest forces you to reveal more enemies whenever a player is not engaged with an enemy. At this stage, you will likely keep your enemies engaged instead of killing them, especially in solo playthroughs. In multiplayer games, you still only add one enemy from the top of the encounter deck if multiple players are not engaged with an enemy. This is a good way to get around the surge on the Umbar Sentry, but will keep more enemies in play during this stage.
Like the previous stage, this quest card cannot have more than 15 progress on it. This is again to protect the scenario from being too easy if you could overquest each round and discard excess progress to encounter card effects. You still need all 15 points of progress on the main quest in order to beat the scenario, but like the previous quest stage, no player may be engaged with an enemy at the moment you want to defeat the stage. This can be difficult since more enemies are revealed by the encounter deck if you kill the ones engaged with you. It will be best if each player can engage an Umbar Sentry and somehow trap it in either Forest Snare, or Outmatched. These traps allow you to keep an enemy engaged with you, while keeping enough characters ready to deal with second or third engaged enemies. Again, Dunedain decks will be best able to deal with this number of enemies engaged with them. Forest Snare will be best in this case, as the Umbar Sentries will no longer force the players to choose between removing progress or suffering a 4 attack strength attack during the combat phase. Note that their Archery does still count.

Like the last stage, you will have to be careful with losing progress to encounter card effects as Seize Them can still cause you to lose the scenario. Be sure to keep making progress during the quest phase, and find ways during the Travel and Combat phase to make more progress. Chumping will also still lose you more progress, so avoid that if you can. Southron Champion will also prevent you from winning this scenario, as the side-quest prevents you from completing the stage while the side-quest is in play. This can cause the quest to drag on for a while longer, but if you manage to focus your attention to the Champion, you will be able to beat the scenario without that obstacle.
A popular way to end the scenario in solo is to have one enemy engaged with all 15 points of progress on the main quest. As combat can either remove progress or bring in more enemies, it is instead advised to have a Narrow Alleyway ready in the staging area for you to travel to. This puts the enemy engaged with you underneath the location, allowing you to meet all requirements for beating this stage. Completing this stage causes you to immediately win the scenario. You can now rush out of the city and into the desert beyond, in hope to shake off your pursuers. But the heat may prove to be an even deadlier foe in the next scenario: Desert Crossing.
The Encounter deck
Global
- The encounter deck is made up of 36 encounter cards in Normal mode, and 28 in Easy mode

- Shadow effect chances are very low compared to scenarios from other cycles, only 42% in Normal mode, and 32% in Easy mode
- Average threat on cards revealed is 1.27 threat per card in Normal mode, and 1.32 in Easy mode. You will be revealing a lot of other cards per player though
- That’s because there are a fair few cards in the encounter deck that surge, 6 to be exact.
- The Doomed keyword is not present in the encounter deck, but Injured Companion can still raise your threat
- Archery 1 appears on all 5 Umbar Sentries, Archery 2 on all 4 Southron Archers. There are also other direct damage effects on other cards.
- Immunity
- Haradrim Estate cannot have progress while in the staging area
- The Southron Champion side-quest cannot be beaten while the Champion is in play, and the main quest cannot be beaten while this side-quest is in play
- The Champion is immune to player card effects and cannot take damage while the Southron Champion side-quest hasn’t got 4 progress on it.
- Neither main quest card can have more than 15 points of progress on it and cannot be beaten while there are engaged enemies.
These statistics do not account for the Seize Them objective in the staging area. The Port of Harad was regarded as a 0 threat location, though it might be as high as a 13 threat location if all enemies are engaged.
Objective
‘Seize Them’ is the only objective in this scenario and will act as an additional rulesheet for this quest. It is added to the staging area during the setup and will never leave the staging area. It serves as a reminder that the city’s guard are trying to capture you and it will limit your progress during this quest. I have already discussed this card in depth during the setup portion of the quest analysis, so I will just quickly go over the card again. The biggest threat from this card is the fact that if the main stage has been in play during the entire round and still has 0 progress on it, then the players automatically lose the game. This will put pressure on the players to keep questing, which is thematic enough. The other part of this card is easily forgotten, so please read the objective carefully. This parts instructs the players that whenever an enemy destroys a character through an attack, the players must remove progress from the main quest equal to the enemy’s threat. This prevents players from chump blocking, which is something you should take into account when deckbuilding for this scenario. You are better off having a solid defender in your hero lineup with some strong defensive allies over an army of chumps.
Besides that, there is nothing you can do to ‘Seize Them’ but don’t go ignoring the objective. At the end of each combat phase, recall if there were any characters killed in combat and by what enemy. Hopefully this will not remove the final point of progress from the quest, as the check for the loss-condition is soon after the end of the combat phase, and you don’t have many windows left to place progress on the main quest stage.
Enemies
You have stumbled into one of the largest cities under Haradrim control, so obviously there will be a lot of enemies for you to slay. These enemies tend to have abilities where either progress has to be removed from the main quest, or something nasty has to happen. Because of this, be sure to have enough progress on the main quest to buy yourself some time against these enemies.
- Umbar Sentry: This enemy is the one that starts the game in play with you. They are the weakest enemy in the encounter deck, but can still be nasty enough to deserve attention. The stats on these enemies are nothing to write home to about, but their keywords and ability is annoying. They will first of all surge into another encounter card. This can lead to a surge-train in lower player counts, as there will be up to 5 of these enemies in the encounter deck at the same time. Revealing multiple per round can quickly put pressure on your deck to properly defend them all. Their engagement cost of 28 is low enough that most decks have to engage these enemies from game’s start, although secrecy decks and lower threat decks can keep these enemies in the staging area for a while. When the Sentry engages, there is no direct effect, unlike some of the Southron enemies in this encounter deck. An often overlooked keyword of these enemies is that they have Archery 1. this means they will do 1 point of direct damage to a character in play at the start of the combat phase. This can be annoying if you have several in play and not that many hitpoints to go around (looking at you, Hobbits). Some healing will be required, especially in multiplayer games where there can be a lot of enemies in play with the Archery keyword. The ability of the Sentry will be the big synergy of Harad enemies in this cycle: “remove progress, or else…”. In this case, the “or else” is pretty tame. When the Sentry attacks, you either remove 1 progress from the main quest, or the Sentry gets +2 attack for this attack. This means that the Sentry will now hit for 4, plus any boost from its shadow card. Removing 1 progress is often worth it, especially if you have progress to spare. But in multiplayer games, those points of progress removed can really start to add up. Taking a couple of 4 attack strength attacks will allow you to either spend the progress on something else, or to save up for next round. Killing the Sentry is easy, thanks to its low defence and its 3 hitpoints. The hitpoints also open up the possibility of dealing enough direct damage to handle these enemies straight away. These enemies will be pretty swarmy, especially in solo, as there are 5 of them. But even non-combat focussed decks can take care of these enemies with relative ease, as long as you remove a progress.
- Southron Captain: This is the commander of the Haradrim forces in the city and will be the toughest enemy to face excluding Southron Champion. The Southron Captain starts with a base attack of 5, which is pretty hefty, but with an engagement cost of 40, he can be avoided for the majority of the game if you don’t travel to Umbar Street while there is a lot of progress on the main stage. You will want to engage him at some point though, as he is a passive buff to the threat of each other enemy in the encounter deck. Keeping him in play will result in you having to overcome more threat on each enemy you leave in the staging area. Engaging the Captain will not trigger any progress removal effects. Instead the Captain will buff every other Harad enemy engaged with you with +1 attack. This does not include himself (neither did the threat buff). The strategy to taking on this enemy is to have him engage you by himself. If you have no other enemies engaged with you, he won’t buff any enemies. This means that you only have to deal with him now, and that will be a challenge by itself. 5 attack pretty much demands a solid defender on the board, as chumping means you have to remove 2 points of progress from the main stage. Attacking the Captain back is tricky, as he has 3 points of defence, and 6 hitpoints protecting him from direct damage effects. Another measure of defence is that he is unique, so cards like Keep Watch do not affect him. Killing the Captain will require a lot of characters, or you can use an Eowyn attack buff to take him out. You won’t be seeing a lot of him, since he is a 1-off in the encounter deck, but upon defeating him, he does not go to the Victory Display. You could use None Return to send him there though, making sure that you won’t have this commanding officer pop up again when the discard pile gets reshuffled. This is also the worst enemy to get for Southron Champion, at which point you might as well give up.
- Southron Solider: A beefy enemy with solid stats all around, the Southron Soldier will be a problem in the early game, but you can manage to kill him after a few rounds. With 3 threat and 32 engagement cost, he won’t be adding his threat to the staging area for long and will likely engage players during the first few rounds (unless your threat is low enough to avoid him). Whenever the Soldier engages, he makes an immediate attack against the player or that player has to remove 2 progress tokens from the main quest. Remember that this attack does not mean that the Soldier doesn’t attack during the next combat phase. He can make 2 attacks in rapid succession. I tend to have extra defenders in place in order to take the extra attack, but remember that Combat Actions on player cards do not work (no Feint here). This can make it tricky to work around. You can always remove the 2 progress from the main stage, but being to liberal with that can see you getting defeated through Seize Them! Killing the soldier takes some work, as his 5 hitpoints makes him surprisingly difficult to kill properly. It also protects him from a Sneak Attack Gandalf combo, unless you stack that with other direct damage effects. The really troublesome part of this enemy is his Shadow effect. This causes you to engage another non-unique enemy from the staging area and deal it a shadow card. This means you suddenly have to take another enemy, preventing you from possibly advancing to the next stage. This can be very hit-or-miss, but if this effect hits another Southron Soldier or a Southron Archer, they will both trigger their Forced effects, causing you even more pain. Cancel this shadow effect if you are in danger of engaging another enemy.
- Southron Archer: Another member of the city guard, the Southron Archer hurts in many ways. His 2 threat isn’t that significant and thanks to his reasonable engagement cost, you can avoid him for a while, during which you can draft a plan on how to deal with this enemy. However, even from the staging area this enemy will hurt, as it has Archery 2 (as expected from an….Archer….yeah, makes sense, good design there). The Archer will be putting the hurt on your characters each round and while one Archer is little reason to worry, there are 4 in the encounter deck. Adding the 5 Umbar Sentries to this, and you have a heap of Archery damage that will swiftly cut through even the biggest Ent swarm. It is therefore paramount that you deal with this enemy. Engaging it from the staging area is not really the way to go though. This triggers the Forced effect on the Archer which gives you the choice to either discard an ally you control or remove 2 progress from the quest. If you have no allies, you must pick the progress option. If you don’t have allies or progress to remove, this effect does nothing. In that situation you will have to look at making some progress on the main stage before the combat phase is over! I tend to have a sacrificial ally ready for this enemy, preferably one that has been hit for a lot of damage. Since this was not through combat damage, you can safely discard an ally without too much problem. When engaged, the Archer attacks for 4 and still has his Archery to worry about. The attack will require a good defender or you will lose some hitpoints through his attack. Attacking the Archer back can be a pain. He has 3 points of defence, which is troublesome, and 4 hitpoints. Remember when I said that engaging him is a bad idea, that’s because you will want to defeat this guy through a Sneak Attack Gandalf or stacking various other direct damage effects. This saves you the ally you would otherwise lose, and gets rid of the Archery in time. This is the best target for your events, as he is non-unique and dies pretty quickly if you ignore his defence.

Locations
The streets of Umbar will pose as the setting for this scenario as you dart across squares and through alleys. These locations can have beneficial effects, so be sure to keep them in mind when discussing strategy with your party.
- Narrow Alleyway: Of all the locations in this scenario, this one will be one of your biggest weapons against the scenario, especially in lower player counts. I have already covered some mechanics behind the Narrow Alleyway and why you should always select this location for setup. Once the players travel to the Narrow Alleyway, they may select select any non-unique enemy engaged with a player. That enemy get placed face-down underneath the Alleyway and is considered to be out of play whilst underneath the location. This can allow players to advance the quest if that was their last engaged enemy, or they can get rid of a nasty enemy for a while. The perfect target is of course the Southron Champion, who may be immune to player card effects, but not to encounter card effects. Upon exploring the Narrow Alleyway, which only takes 2 progress, the players have to put the enemy back into play, engaged with the first player. This can put some pressure on the first player, so make sure that in the previous combat phase, that player killed a few enemies engaged with them, giving them enough characters to deal with this enemy. The other trick you can use with this location is to swap it with other locations while it is active. This allows players to travel to the Alleyway again, placing yet another enemy underneath it. This lowers the density of non-unique enemies in the encounter deck, which is a big help. Cards that are great for this are The Hidden Way and West Road Traveller.
- Umbar Street: The Umbar Street is not a really important location, but it can mess up your plans a little. The 3 threat on the location gives players enough cause to travel to it at some point, although exploring it in the staging area is easy thanks to the Street’s 3 quest points. When active, the Umbar Street will lower the engagement cost of enemies by 1 for each point of progress on the main quest. This can be as much as -15 to the engagement cost of enemies and makes it so they come down a lot faster. Even a change of -5 to the engagement cost can have big consequences for the engagement phase, so players must do the math in advance to see if they don’t accidentally bring down more enemies than they want by travelling here. This effect can be nullified through player card effects, with Lore Pippin, Take No Notice, Advance Warning and such cards to make sure enemies either don’t make engagement checks, or their cost gets increased as well. Exploring the location in the staging area is still the go-to strategy with this location though, as there are other locations that are worth more to have active.
- Umbar Square: One of those more worthy locations is the Umbar Square. This is another beneficial location to have active, as it allows players to make progress on the main quest, bypassing the active location. One point of progress gets placed on the main quest for each enemy killed (not discarded, the enemy must die as a result of combat). This is a great location to have active during the combat phase if you are counting on killing a lot of enemies and want to transform that into some more progress on the main quest. It is also the only encounter card that can help prevent you from losing to Seize Them during the combat phase (player cards like Legolas and Blade of Gondolin can also help if you include them). The cost for this beneficial effect is the Square’s travel cost. In order to travel to the Umbar Square, the players must reveal the top card of the encounter deck. Careful scrying of the deck can reveal whether or not it is worth it to travel here. You can also use cards like Ghan-buri-Ghan and Thror’s Map to travel to this location without having to resolve the travel cost.
- Port of Harad: This location has a very simple strategy behind it in order for the players to completely ignore it: Thror’s Key. The Port has X threat, which is equal to the number of engaged enemies. This constantly shifts, so keep an eye out every quest phase on how much threat this location is worth. The location can get out of hand pretty quickly, so travelling to one seems like a smart move. This does mean that you must resolve its travel cost. This deals X damage among characters in play, which is the same value as the threat. In optimal times, this only deals 1 to 2 damage among characters in play, but with Archery and other direct damage effects, you don’t really want to deal with that. This is where Thror’s Key comes into play. This attachment can be placed on the Port as soon as it is revealed. This blanks the text box and reduces the threat of the location to 0. You can now leave it in the staging area forever, as it is no longer a threat. Should you want to travel to this location, you also no longer have to resolve its travel cost.
- Haradrim Estate: The balance of stats on this location is a little weird, as we don’t see 1 quest point locations that are not immune to player cards that often. This location is protected from progress while it is in the staging area though, so you don’t get rid of its 3 threat that easily. Instead, the players must travel to this location in order to be rid of it. This does come at the cost of the Travel cost on this location though. This is in part beneficial, but only if the first effect is also triggered. When travelling to the Estate, the players must search the encounter deck and discard pile for a Harad enemy and put it into play engaged with the first player. The players may then place 1 progress on the main quest, bypassing the active location. This effect allows you to survive the round if you didn’t make any progress on the main quest and have no progress remaining. Having at least 1 progress gives you at least a fighting chance and the possibility to not lose to Seize Them at the end of the round. The enemy you should pick for the effect should always be the Umbar Sentry. This enemy is the weakest of them all and has no effect for engaging you. The other choices are just a lot more dangerous, so stick to this enemy for the Estate.

Treacheries
Escaping an enemy city is not without its dangers, and several treacheries may be encountered along the way. These hurt your party and will limit your progress that round. Cancellation will be an option, so be sure to pack some.
- Enfeebled: And this is why you should always trigger your readying effects before staging. Enfeebled will force every player to exhaust one character. Until the end of the next combat phase, no characters can ready through player card effects. In the best case scenario, you weren’t really working with readying effects. Then this treachery only shuts down one character for you. Worst case scenario: You use a lot of readying effects on your characters (especially heroes) in order to take multiple attacks per round with ease. Well, now you can’t anymore. This treachery forces you into a state of only having each character do one thing that round. This can be worth cancelling if you were counting on doing multiple actions with one character during later phases. The shadow effect on this card makes it even worse, as the defending character cannot ready until the end of the round. This means that the next refresh phase will not ready your defender, and leaves it down for the entire next round. This can hurt your deck a lot, as you need your defender to be ready for combat. You could play a readying effect like Cram next planning phase in order to resolve this, or straight up cancel this shadow effect if it matters to you.
- Injured Companion: This scenario throws a lot of choices your way, and this treachery is no different. Injured Companion requires you to choose between discarding a character you control, or raise your threat by the number of characters you control. Note that heroes do count towards this number, but if you don’t want to raise your threat, you can always discard a hero if you want (Pro tip: Don’t). The choice between discarding a character or raising your threat is really dependant on your situation, so their is no clear answer as to what you should do. In the early game, I tend to favour the threat increase, as I don’t have that many characters out yet. Once you get over 5-6 characters though, you might want to consider discarding a damaged one for this effect instead. Your call.
- Enemy Pursuit: Another choice based treachery, but this time you either have to remove all progress from the main quest, or deal damage among characters in play equal to the number of progress tokens on the main quest. In multiplayer, the damage will be stacking up on the many Archery damage that you will have taken, but you will also have more characters in play to distrbute this damage to. If you are planning on making a lot of progress though, go with the progress removal option. You will have lost a round of extra progress, but the damage can really hurt if you would have to discard allies through it. Again, the decision must be based on your situation, as there is no clear-cut perfect solution to this choice.
- Nowhere to Hide: A simple treachery in design, but combined with the enemies in this encounter deck, it can have massive consequences. The treachery will discard cards from the top of the encounter deck until an enemy is discarded. This enemy then engages the first player. Since this changed that enemy’s status from “not being engaged” to “engaged”, any effects on that enemy (looking at you, Southron Soldier and Archer) will trigger. The bad part of this treachery is that it forces an enemy to engage you, which means that you will not be able to advance the quest if no-one was previously engaged with an enemy and you were just looking to advance by placing a ton of progress. Because of this, the treachery is worth cancelling if you are in such a situation. This treachery will also force more enemies to engage you, so it is a good incentive for having you kill more enemies that are already engaged with you in the previous combat phase.

Side-quests
While running away from the small army of Haradrim, you may be faced with some difficult choices when it comes to side-quests in this scenario. Several may pop up during your playthrough, but remember to make sure that the main quest always has progress on it. Exploring side-quests can help you by getting rid of nasty rules, but it shouldn’t be the priority in this scenario.
- In Enemy Territory: On of the things I like about this game is that you can have 20 cards in your hand and continue to draw more! This is almost never punished (except with Dunland enemies) and can cause you to have a full hand with a lot of options. However, this all comes to a stop when this encounter side-quest hits the table. In Enemy Territory will first surge, as it has generally has no other When Revealed effect. This means the encounter deck gets to play this new rule for free. Once this side-quest hits the table, the players are no longer able to have more than 5 cards in their hand at any given moment. This is mostly a concern when this side-quest first hits, as some players may have a ton of cards in their hands that they will want to play. They must discard down to 5 cards right there, so any duplicates of unique cards are likely to find their way into the discard pile. Noldor decks are best suited for this kind of encounter side-quest, as the discard pile is an extention of their hand. This side-quest also becomes a problem during each resource phase, when players draw their new card. If this puts them above 5 cards in their hand, they must immediately discard down to 5. In practice, I don’t find this side-quest that annoying if it pops up during the middle and later stages of the quest. At that point you are already set up and don’t have a large handsize unless you are really going for a mono-Lore deck. The side-quest is not worth exploring since you have more pressing matters at hand with your main quest. The 8 required points of progress is way too much progress needed to explore this quest and get your handsize back. When this quest is explored, the players do get to draw one card, which is nice, but perhaps a little underwhelming. This is not a priority quest card and should largely go ignored.
- Southron Champion: Oh this side-quest, this darn side-quest. Southron Champion is one of the most memorable encounter cards of this cycle, and not because it is a happy moment when you reveal it. This quest card will not only stall you, but will also make sure that you have a new enemy that is protected from all sorts of things, and buffed beyond reason. When this side-quest is revealed, the players must discard cards from the encounter deck until a Harad enemy is discarded. If you are lucky, it is an Umbar Sentry. If you are unlucky…well now you have a Southron Captain with buffed stats and immunity. The new enemy is added to the staging area and given a resource token (or any other token you like). This enemy will now be referred to as “The Champion” and will gain the following buffs: +2 to all stats except hitpoints, immunity to all player card effects, and immunity to any form of damage while the side-quest is in play. This makes the foe unbeatable while the stage is in play. And while the Champion is in play, the main quest cannot be beaten. This means that your next course of action should be something like this:
- Stop crying over having revealed the Southron Champion. Punch a wall and get over yourself, you can get through this.
- Survive the next combat phase. The Champion might stay in the staging area if you are lucky enough and have low threat. If not, either chump or be ready for a big attack. Be careful with chumping though, as the +2 threat of the Champion makes you remove more progress from the main stage. During this phase, try to keep as much progress on the main quest
- During the next quest phase, if the main quest has at least some progress on it, go to the Southron Champion side-quest if you are sure to place at least 4 points of progress here. After the 4 progress tokens have been placed on the side-quest, the Champion can be damaged.
- This is what you should do in the following combat phase. Pile up all attackers you have and bring down the pain on this enemy. Remember that the Champion is still immune to player card effects, so no tricks allowed that debuff him.
- Once the Champion has damage equal to its hitpoints, it is destroyed. This in turn discards the side-quest and moves it to the staging area, you can now return to the main quest and rest assured that the Champion has been dealt with
There is also another way to deal with the Champion that involves him being put underneath the Narrow Alleyway during the next travel phase. This buys you a round in which you could potentially advance the quest stage, since the Champion is considered to be out of play. Switching the Alleyway with the Champion underneath it with another location allows you to keep him underneath the location for the rest of the game. You now no longer have to worry about the Champion. You can freely explore the side-quest if you want, but since the Champion is no longer in play, placing 4 progress tokens will immediately explore the side-quest. That means that should the Champion return, he no longer has the title and the buffs.

Tips and Tricks
- Cards that place progress whenever enemies are killed are a lifesaver in this quest. Core Set Legolas is amazing in this quest if he can kill enough enemies. Blade of Gondolin and Arod will only help to make more progress on locations and quest cards in play.
- If you are having trouble with the scenario, there is no shame in trying the easy mode of the quest first. I will make an addition to this mode, as the Southron Champion side-quest really should have a golden ring around its encounter set icon. I remove it for my easy mode plays, and it saves a lot of headaches. If you feel like this is somewhat cheating, you can compensate this by adding in one of the set aside encounter cards back in the encounter deck.
- Healing will be an important tool for you as this quest loves dealing out direct damage through the Archery keyword and through other card effects like Port of Harad. Being able to heal all that damage off will allow you to survive a bit longer by having more characters to battle enemies or place progress on the main quest.
- Dunedain decks will have an advantage in the early game since you start out with an enemy engaged with you. During the rest of the scenario, you will constantly be engaging enemies, so it will be good to benefit from this through the Dunedain archetype. Be aware that you can’t keep the enemies engaged forever though, since the stage transition and the ultimate victory over stage 2 require that you have no enemies engaged with you.
- There is a fun, yet complicated trick you can pull with the Narrow Alleyway. Since only exploring the location will free the enemies from underneath the location, you can swap the location through effects like The Hidden Way and West Road Traveller. This returns the location to the staging area, with the enemy still underneath. Travelling to the same location again will allow you to keep stacking enemies underneath the location, without freeing them. This lowers the enemy density in the encounter deck and will make the scenario easier on you.
- You will have an easier time avoiding the effect on ‘Seize Them’ by not chumping with your allies. Have a defensive hero in your starting lineup and have a backup of strong defender allies ready for multiple attacks. Allies like Deorwine, Jubayr, Defender of Rammas, and Greenwood Defender will allow you to survive enough attacks without losing the ally, thus not removing progress from the main quest.
- Shadow cancellation will be important in order to avoid losing characters to enemy attacks. This would cause you to lose progress from the main quest, and can probably cause you to stall for a round while making more progress again. Other shadow effects can cause you to suddenly engage enemies, which can be a problem as well when you try to advance the quest. Always be ready to cancel the shadow effects from enemies here, it will save you a lot of trouble.
- Try putting the Southron Champion underneath the Narrow Alleyway. This removes him from the game for a while and allows you to more easily survive the rest of the combat phase. You can now also freely advance the main quest.
- Always ready your characters before the staging step. Enfeebled can leave those characters down, which will put you at a massive action disadvantage until the end of the combat phase.
- If you don’t have any progress on the main quest after the quest phase, consider travelling to either Umbar Square or Haradrim Estate. These locations allow you to make progress during the later phases of the round and will protect you from losing to Seize Them.
Playthroughs
This quest is a very popular one among decktesters. It has been played a lot by people, so there are also a host of videos out there where people go through the scenario. Be sure to check these playthroughs out, as they will help you to understand how fast you need to move in this quest. There are also many others out there for you to enjoy, but here are 10 videos to get you started.
- 3 players, updated decks: https://www.youtube.com/watch?v=4vWJXzn1xiE
- True solo, Seastan deck: https://www.youtube.com/watch?v=_kiLLdqUK7g
- True solo, Secrecy deck: https://www.youtube.com/watch?v=w627WAUQdVw
- 2 players, progression decks: https://www.youtube.com/watch?v=SeMlHajQXg4
- True solo, updated deck: https://www.youtube.com/watch?v=uA0ImKOhLfo
- True solo, Seastan deck: https://www.youtube.com/watch?v=aiqryxiFKDI
- 2-handed, updated decks: https://www.youtube.com/watch?v=-5CeafKoO7c
- 4 players, 4x-Mono-Leadership decks: https://www.youtube.com/watch?v=gjG3hJFHObo
- 4 players, 4x-Mono-Lore decks: https://www.youtube.com/watch?v=a7mmXOmc-Rc
- True solo, updated deck: https://www.youtube.com/watch?v=przwPJFFPn4
With this scenario completed, the entire Sands of Harad box has already been discussed. Our focus will now shift to the Haradrim cycle and the many scenarios that can be found there. We are also nearing the point where we are just one cycle behind the release schedule of FFG, so I will have to see how I can avoid catching up too quickly.

10 thoughts on “Escape from Umbar”