Being so close to the end of this cycle, I cannot help but draw parallels with traditional Pokémon games. Before you face the champion of this region, you must first defeat the Elite Four. Well, in this scenario, you are facing the Elite Three, which are three boss-level enemies that are very difficult to defeat. Luckily, you do this with a little help, as you are freeing the slaves of Nurn and rallying them to your cause. Beat this scenario, and you have a rebel army big enough to challenge Ulchor. But you have gotta catch all those slaves first and defeat the Elite Three guarding them!
The Land of Sorrow
- Found in: The Land of Sorrow Adventure Pack, Vengeance of Mordor cycle, Pack 5
- Official Difficulty: 9 (we are really going towards the top end of this scale)
- Community Difficulty: 7.6 (though not many people have rated this quest yet)
- Encounter sets: The Land of Sorrow, Easterling Raiders, Rolling Plains
- Quest cards: 2
- Play if: You want to play one of the most difficult scenarios in the game. You enjoy a good prison break. You liked the three-boss-structure of The Three Trials but want to play such a game without the Time keyword. You would like to play a quest that takes place in Mordor, but without the Power of Mordor deck.
- What is different about this quest?: 3 different bosses to defeat twice, 3 objective allies that help you out in return for their survival, a lot of Archery and direct damage to characters, very difficult scenario to beat in any player count.
- Solo or multiplayer?: I would suggest bringing a few friends along for the ride. While you will be facing more enemies and more archery, I think you can make a net-positive with a higher player count. True solo makes it very difficult to beat this quest as you have to take down all three of the bosses twice on your own. The downside to having multiple players is that stage 2 will take a while and will reveal more cards per turn at that stage. But if you have a few players focusing on combat and the others dealing with the quest and healing the group, I think you stand a good chance once you have overcome the first few turns.
- Can I bring side-quests to this scenario?: I do not recommend it. While there can be a situation where no progress is needed on the main quest, there are two encounter side-quests in the deck that you would rather explore. The main quest will also take quite a lot of progress to clear, so I would avoid bringing side-quests of your own.
- What to look out for: Direct damage, threating out at stage 1, constant attacks from boss-level enemies, having a lot of characters exhausted and being punished for it, losing any of the objective allies will lose you the game.
The Quest
Setup

Strap in because we have quite some setup to get through. To start with, the players are instructed to find the three unique Camp locations and add them to the staging area. Players then take a random Captive objective ally and place them underneath the Camp location as a guarded objective. Players can see what objective goes to what location, which might influence the order in which they clear the locations. After the objectives have been distributed randomly, it is time to do the same with the Warden enemies. Attach these to the Camp locations as well, but deal them face-up, so you can see who is guarding which location. These Warden enemies are not considered to be in play yet, so the only threat you have to calculate per set of three cards is the location’s threat.

If there is more than one player, the players continue with setup by discarding cards from a shuffled encounter deck until they discard X locations, where X is one less than the number of players in the game. These locations are then added to the staging area. That means that in a four-player game, you will start off with 6 locations in the staging area! No wonder this quest has a difficulty rating of 9.
Some locations will help you out more than others at this point in the game. Rolling Plains is ideal to reveal, as you will be able to ignore the +2 threat that the location gets upon getting revealed. It will hurt when more copies appear from the encounter deck, but at least that gives you time to explore the copy in the staging area. Rocky Outcrop and Working Fields aren’t ideal, as they limit what the players can do. However, it is unlikely that at this early stage, you need healing. Readying characters by player card effects is more dire though, so the Outcrop will be a bad location to get now. Lastly, the Watch Tower is fine to reveal this early on. It will only add 1 threat and 1 Archery to the total, so you are not at a huge disadvantage early on in the game. It will become worse at stage 2, so pay some attention to it.
Once all the setup is complete and the locations are added to the staging area, the players can flip over quest card 1 and start their game!
Quest stage 1: Slaves of the Dark Lord – 15 quest points

Flipping over to stage 1B, we get a few more passive rules that prevent players from rushing this stage. First, the Camp locations are immune to any player effects. This prevents players from making them the active location sooner and prevents progress from being placed on them through other means than question successfully. Players are also not allowed to travel here while a Warden enemy is in play. This means that players are free to travel to the first Camp location but will have to defeat the enemy under it in order to travel to the next one. This does not prevent the players from traveling to other locations that appeared from the encounter deck during their first few rounds, which is useful to lower the threat in the staging area in case a Warden takes longer to kill. This is especially true for the Warden who engages from the Barracks, as they cannot take damage during the round they engage.

There is also a Forced effect on this quest card that is worth noting, as I personally forgot about it during my initial playthrough. It led to a hard-fought victory, but this effect would have definitely killed me much earlier on. It forces all players to raise their threat by 1 for each Camp location in the staging area at the end of the round. This serves to prevent the players from stalling until they are ready for the Warden enemies. It urges the players to travel to Camps as soon as they can or suffer increased threat at the end of each round. This causes you to have to engage more enemies early on and end up with a higher threat towards the end of the game. Players with the One Ring should really watch out that they don’t threat out by this effect stacking on top of their own threat each round. Threat reduction is advised, especially getting it early on!

Now comes the difficult part, finding a way through this first stage. I would advise traveling to the Barracks on turn 1. This will get you a Warden enemy who cannot be damaged until the next round, but you will likely not have enough attack for him anyways. Because this Warden is sent to the staging area, players can choose which player engages it. The optimal strategy will depend on what Warden you get under the Barracks location. You will have very little time to build up, so focus on getting a defender up first, and then prioritize willpower over all else. You need enough willpower to clear the large amount of threat you will get in the staging area, and you need to clear the active Camp location as well in order to receive the objective ally. On top of all that, this stage requires 15 progress to clear, so you’d better get started on that early on, especially in lower player counts

Making 15 progress on the main quest is not enough to defeat it, but at least you can divert your willpower to side-quests afterward. The players will also need all three objective allies in order to advance. Note that this does not mean that all three Warden enemies must be defeated. You need to defeat a minimum of two in order to travel to the next camp location. Since stage 2 revives the Warden enemies, I would actually advise you to keep the last Warden enemy in play but damage him so that he only needs 1 more damage to be defeated. Then kill him once you advance to stage 2.
While you are busy battling the Warden enemies, you are unable to travel to the next Camp location. Try to travel each round to a regular location if that is the case (and there are enough regular locations in the staging area). The normal locations are all horrible, and while you could clear them with location control, I doubt you will be bringing much of that to this quest. Travel each round to reduce the number of passive effects in the staging area and to lower the threat (or even lower the Archery total!).
While one player is engaged with a Warden enemy, the rest of the players (if you are not going against this quest solo) should engage the rest of the enemies coming out of the encounter deck. These won’t be much easier than the Warden enemies, thanks to the many attachments that these Easterlings can get. So the player who is taking care of the Warden should not be distracted by other enemies attacking them as well. However, Ranged and Sentinel can be used for those regular enemies. Help each other out in this quest; else, you will not get very far.
Once all three Camp locations have been explored, all three objective allies rescued, and the quest card has 15 progress on it, the players advance to the next stage. This first one can take a lot of time, thanks to how tough the Wardens are to handle in the early game. Remember to move quickly to the next Camp after killing the Warden, so you do not have to raise your threat again at the end of the round.
Quest stage 2: Lead the Revolt – 10 quest points
While I put 10 quest points in the title of this segment, that’s far from the truth. This quest card can be a much longer slog than you might think. That’s because the quest card will get +10 quest points per player, which means that in a 4-player game, this quest card can have a maximum of 50 progress required for it! That’s unheard of aside from some niche quests like Siege of Annuminas (which is an Epic Multiplayer quest), and Fire in the Night (where your goal isn’t to clear the quest card…). But I am moving too fast here, as we still have all the lovely text on the A-side for this quest card to go through!

2A starts by informing you that the Warden enemies you killed aren’t actually dead yet and are revived from the Victory Display by the first player. Remember to not kill the final Warden enemy during stage 1, so that you do not have to revive that one. Damage him until he has very few hitpoints remaining since you will otherwise have to kill all three again during this phase. Each player (except the first player) must discard cards from the encounter deck until an enemy is discarded and add that enemy to the staging area. Remember that if the Warriors of the East side-quest is in play, those enemies will receive attachments from the discard pile. This includes the Warden enemies, potentially making them much more difficult to beat.
As I mentioned, flipping over to stage 2B, the quest gets +10 quest points per player. This is where it will be useful to have prioritized willpower during the early game since you will have to make a lot of progress to win this quest. You also have to defeat each Warden enemy to win, but do not beat them immediately! This is because the Forced ability on this quest punishes players for not being engaged with a Warden enemy. As punishment, they must reveal an encounter card from the deck whenever they commit characters to the quest. Having one or two players prioritize questing can reduce the number of cards you end up revealing, but in reality, you are likely looking at double the encounter cards per round unless you are engaged with a Warden. This is difficult to beat and is where cards like Gildor’s Counsel will be useful to reduce the number of encounter cards revealed per round. Players could also try not to quest with their characters but instead boost the willpower of another player who is questing. Leadership Faramir ally, Galadriel with Nenya, and certain events can be used to increase their willpower without you having to reveal an additional card from the deck.

The key to this stage is to move quickly. You have beaten the Wardens before, so you can do it again, but preferably not at the cost of revealing more encounter cards per round. Make most of the progress first, and tank the Warden’s attacks. For 2 player games, you can certainly kill one of the Wardens immediately, making the end game a little easier. Another reason to move fast is your threat, which won’t be increased by the main quest this stage but will be quite high at this point. Moving quickly will reduce the chances of threating out and losing the game by the very end.
After all the progress is placed on the main quest, the players should kill the Warden enemies engaged with them. Once all Wardens are dead as well, and all progress is on the main quest, the players have won the game. Double-check that you didn’t accidentally lose an objective ally along the way, as that would cost you the game too. If all three made it to the end, then you may cheer loudly, as you just beat a level 9 difficulty quest! For you progression players, I hope you are ready to see how a level 10 quest feels like as you conclude the cycle on the Fortress of Nurn!
The Encounter deck
Global

- The encounter deck is made up of 42 encounter cards at the start of the game. This is reduced to 29 cards if you are playing in Easy mode.
- Shadow chances are pretty average, at 52% in Normal mode, and 55% in Easy mode. Most shadow effects will grow with the more Camps you explore, and will exhaust characters.
- Average threat on cards revealed is low, at 1.4 threat per card in Normal mode, and 1.5 threat in Easy mode. This is calculated by taking the Watch Towers as 1 threat, which will grow as the players progress.
- 7 cards in the encounter deck will surge no matter what. This is increased by 4 if certain criteria are met on Broken Captives and Nurn Slaver.
- Doomed 1 appears on Weary Lands and on Broken Captives if no characters are exhausted. However, there are many more other effects that will raise your threat. Threat reduction will be essential for this quest.
- Archery will be a common keyword in this quest. 2 copies of Recurve Bow can add Archery 2 each. 3 copies of Watch Tower will increase in Archery value as time goes on. Easterling Raider and Easterling Guard also each have Archery 1 and Archery 2 respectively.
- Immunity
- While Working Fields is in the staging area, characters cannot be healed.
- While Rocky Outcrop is in the staging area, characters cannot be readied by player card effects.
- All Wardens and all Captives are immune to player card effects.
- Only the engaged player can declare attacks and defenders against each of the Warden enemies.
- Allies cannot attack or defend Ulwarth.
- The enemy that engages players because of The Barracks’ effect cannot take damage that round.
These statistics do not include the three objective allies, three unique locations, or the three unique enemies that start the game in the staging area. It also relies on players not having cleared any camps yet; otherwise, certain cards will start to surge (Nurn Slaver) or grow in threat (Watch Tower).
Objectives
There are three objective allies to be earned in this scenario, all of which will be useful in more ways than one. It is important that these allies are rescued and stay alive for the remainder of the quest, as losing even one of the objective allies will cause you to lose the game right away. Unfortunately, these allies cannot really be built around, as all three are immune to player card effects. Still, their abilities and base stats are solid enough to be useful to the players.

- Arador: Our first objective ally is a Gondorian who got captured by Mordor. He is the defender of this group, and has some impressive stats! The 3 defence and 5 hitpoints remind me a bit of Chief Turch from the Ringmaker cycle. The response on Arador allows you to even get more use out of him, as you get to ready him once per round after he is declared as a defender. This is a dangerous gamble though, as you are unable to heal Arador of any damage thanks to his immunity, and you are also unable to boost his defence in any way. But that hasn’t stopped hero Beorn before, so why should it stop Arador? Damage cancellation is still possible, and players will still be able to use effects like Entangling Nets to make defending with Arador a little safer. It is still a risk you are running, so keep in mind that Arador does not take unnecessary defences. Once he dies, it is all over. The readying effect on him is nice though, and you could even use his 1 attack strength to help out against some enemies. He is best use in an emergency once, and then never again, just to be safe.
- Edrahil: The next objective ally is Edrahil, who is a Silvan elf. Unfortunately, there is no synergy to be had with the Silvan trait thanks to the immune to player card effects. However, Edrahil is still very useful to have, thanks to the 3 willpower! This is significant on an ally, and you can even benefit from the response on Edrahil as you are questing successfully with him. If you do, you get to choose a player to draw 1 card. This does not have to be you, you can choose any player who is still digging through their deck for something. This is an easy effect to forget, so please set a reminder to draw 1 card when questing successfully with him. There isn’t much point in not questing with this ally, as you don’t get very good other stats besides willpower. Edrahil has the lowest number of hitpoints and only has 1 attack. The 3 hitpoints is a bit concerning with treacheries like Cruelty of Mordor in the deck. There is no way to heal Edrahil, so damage cancellation or redirection is the only way.
- Farin: Well, he’s better than Nalir, I’ll give him that! Joking aside, Farin reminds me a lot of Azain Silverbeard in that he is a 3 attack Dwarf ally with a damage spreading ability. Farin is even a bit better than Azain, as he does not have the wasted stats in defence, and 2 extra hitpoints. The response on him is also a lot easier to trigger, as you get to do one point of damage to an enemy engaged with you when you declare an attack with Farin. He does not have to kill an enemy first, and sometimes, his damage alone is enough to kill a high defence enemy like the Warrior of Rhun. The 3 attack he brings is useful too, as you can pair him up with other attackers to deal solid damage against the bosses in this scenario (except for Ulwarth). Farin also runs the least risk of taking damage out of the three objective allies, so you can probably survive with one or two points of damage on him. It’s not ideal, but he makes for a decent Archery pin-cushion in the beginning of the game. His single point of willpower is not really used often, as you cannot boost it with cards like Leadership Dain Ironfoot. He is much more useful to kill some enemies, and deal out some points of extra damage to other enemies engaged with you.

Enemies
The fields of Nurn are not unguarded, as Ulchor has placed Easterlings as guards for the slaves to make sure none escape or are freed. Aside from the Easterling Raiders encounter set, the quest offers a few new enemies. Three of these are unique bosses, which are the focal point for this quest.
- Borlach: Of the three Warden enemies, Borlach hits the hardest, with 6 attack. You cannot lower this attack by player card effects nor can Sentinel defenders of other players help you out here. It is important for this enemy specifically that you have a proper defender. The other common tactic with enemies like this, chumping, will be stopped by the Forced effect on Borlach. Much like Troll enemies, he has an effect where excess damage must still be dealt to other characters you control. It is phrased so that you can split the damage between different characters, but this will leave you vulnerable to treacheries, and could even take out some characters thanks to the enormous amount of direct damage in this scenario. The safest bet will be to get a defender like Dain Ironfoot or Beregond set up quickly, and then tank the hit by Borlach. Make sure to have some way to cancel shadow effects as well, as that might cause him to hit harder or make extra attacks.
Borlach will also be affected by the location that he starts under. The Storehouse will be bad, as 9 attack is a lot more difficult to stop than 6. Chumping the 9 attack is also difficult, as it will leave several characters damaged or discarded.
Attacking Borlach back is also tricky, as he has defensive stats similar to the original Hill Troll, and we all know how tough that one is to take down. Borlach has 1 fewer point of defence, but is immune to player card effects, reducing the options you have to deal double damage with Heavy Stroke for example. This will be an enemy for who you might want to use Eowyn’s ability or other big abilities like Black Arrow and Haradrim Spear. Try to kill Borlach in one turn, though that might be difficult without Ranged characters being able to help. During the later half of the game, you should have enough attackers on the board to kill him a little more easily. - Ulwarth: Ulwarth is much less of a threat than Borlach in terms of stats, but his ability is quite annoying. Allies cannot be declared as attackers or defenders against him. This is no problem for decks that focus on their heroes to do a lot of the heavy lifting, like decks with the Three Hunters contract or that only use allies as support for healing and card draw. Ulwarth has just 4 attack, which can more easily be stopped by mid-tier defensive heroes and could even be taken undefended if you are feeling like living on the edge. The single point of defence and 6 hitpoints is also easy to chew through, though you will need to make sure that you have enough attack power on your heroes for this. Especially if Ulwarth is making additional attacks, this can be a problem. I have had it happen several times that my regular swarm deck could not bring enough attack power on my heroes to best this Warden, which can cause him to remain in play for a lot longer than anticipated. During stage 2, Ulwarth should be sent to the player with the best stats on their heroes, who will have the easiest time against him. If you happen to engage Ulwarth along with an additional Warden enemy though, you are in for a bad time. Big hero abilities will be the best way to deal with him, as the immunity to player card effects limits your options. Effects like Unseen Strike can be great against this enemy, provided you have a low enough threat.
- Lorgan: This Warden is in the middle of the others in terms of stats, but that actually makes him an issue in some cases. The lowest engagement cost means that having the lowest threat of the three is not that big of a hinderance. The 5 base attack is worrysome for both heroes and allies, and this is combined with a sneaky effect that will end up having major consequences later on. Each time Lorgan attacks, the defending player must raise their threat by 1. This is doubled if a character was destroyed by the attack. Spirit ally Elfhelm is a great way to nullify this effect (assuming you are not losing characters to him). But having 3 defence and 8 hitpoints makes Lorgan quite sturdy. This means he can stay around for a while, raising your threat each time he attacks. Luckily, your allies can help to kill Lorgan, even if other players are unable to help you. The threat raising might not seem that important at face value, but with this quest taking quite a while and with several effects raising your threat, you’ll wish you killed this Warden sooner.
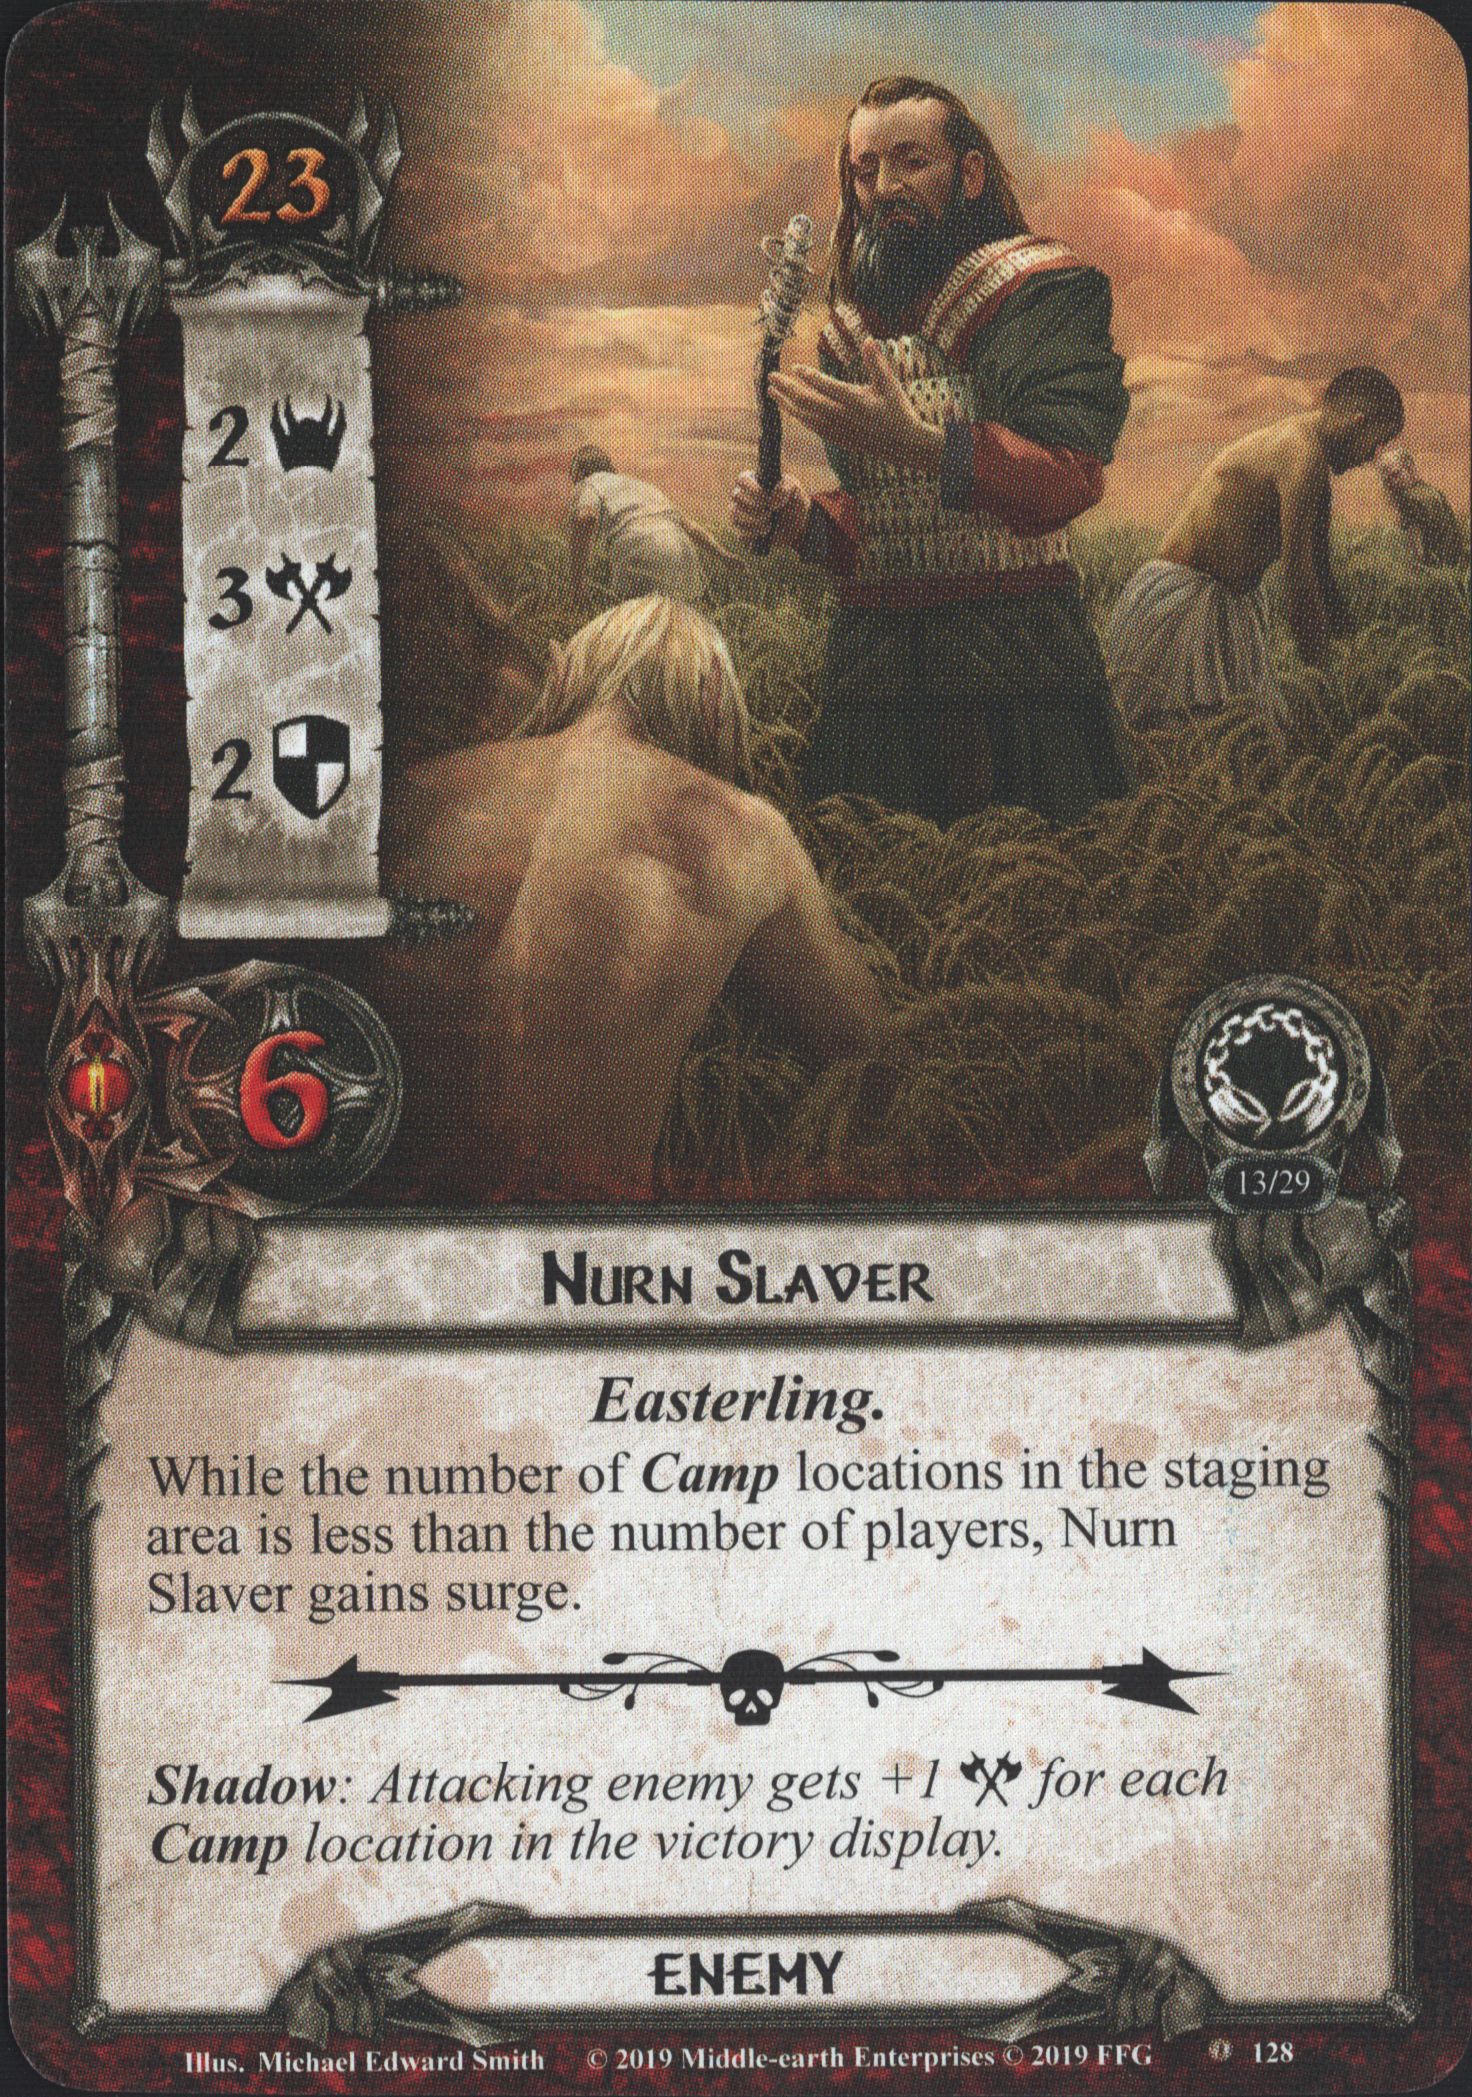
- Nurn Slaver: One of the two generic enemies that are new to this scenario is the Nurn Slaver. This is an all-round enemy that can be quite bulky, and can become a problem if he starts to get some attachments on him. A Recurve Bow would be trouble, as the Slaver is quite difficult to kill, meaning that you have to deal with more Archery each round. Luckily, the Slaver only has 2 threat, which he doesn’t add to the staging area for very long. But when he is revealed, his text box will trigger, which has the players compare the number of Camp locations in the staging area to the number of players in the game. If there are fewer locations than players, the Slaver will surge. This might miss in the early game, but during stage 2, the Slaver will always surge, as there are no Camps left in the staging area.
During combat, the Slaver isn’t that dangerous compared to other enemies in this encounter deck. Without attachments, he only hits for 3, without any additional effect. The problem comes when trying to defeat the Slaver. With 2 defense and 6 total hitpoints, it will require some effort to get rid of him. Players could attempt a strategy with a Rivendell Blade and Straight Shot, but that might require more setup than you would like. And with 4 copies of this enemy in the deck, you want a repeatable solution that you can use on all copies. A strong attacker will be the best solution here, perhaps even one with Ranged. While you cannot use Ranged for the Warden enemies in the game, the regular enemies are still eligible targets for this! - Easterling Guard: What’s worse than an enemy with Archery? How about an enemy that triggers the Archery keyword so that you have to deal double the damage this round! That’s what the Easterling Guard is all about. It is one of the rare cases that I would suggest you bring the Dunedain Lookout to the quest for a particular enemy. When the Easterling Guard is revealed, players must assign X damage among characters in play, where X is the current Archery total. If you are doing ok so far, you might only be at 5 or less on that value, but there are some cases where you have a ton of Archery on the table, and now you have to trigger it all! This effect includes the Archery 2 on the Easterling Guard as well, so you will always have at least 2 damage to deal to characters. Hitting this enemy multiple times in a single quest phase (there are 3 copies in total) will likely lead to a loss, as you have to deal out more and more direct damage to your characters. Cancelling this When Revealed effect will save you a lot of damage, especially in the later stages of the game when any Watch Towers in the staging area will be adding 4 to the Archery total. Don’t forget that players will still have to deal Archery at the beginning of the combat phase as well!
As for the enemy itself, it has 3 threat, but will come down to engage players pretty quickly thanks to its 32 engagement cost. The Easterling Guard is tough in combat, so try to engage him while you do not have a Warden enemy engaged with you, as both will hit pretty hard. This is where multiplayer becomes important, as one player can take the Warden while the other takes the Guard. The Guard hits for 4, but there are some nasty shadow effects in this scenario that can boost it to 7 if you aren’t careful. Also, remember that Easterling attachments are still a thing, and a Sword of Rhun on this enemy would be quite deadly. But since each player should be setting up a big defender for this scenario, you can use them to defend. Killing the Easterling Guard will take some effort, thanks to the 5 hitpoints on this enemy. The 2 points of defense can mean that you won’t be able to kill the Guard in one turn, which means you will have to suffer through more Archery during the next round!

Locations
The wide fields of Nurn are quite an empty place, so you will be seeing many of the locations from the Rolling Plains encounter set in this quest. However, there are some settlements and slave fields in this place, including three unique Camp locations that start the game in the staging area. These locations must be explored to gain control of the objective allies.
- The Storehouse: Out of all three locations, this is the one that scares me the most and is the one that you will want to save until last. If the players decide to travel to the Storehouse, they add the Warden enemy underneath it to the staging area. That enemy gets +3 attack and -30 engagement cost for the round. At -30 engagement cost, each of the Wardens will be engaging you unless you bring a weird Grey Wanderer Smeagol deck to this quest (and even then, you have to get lucky to hit Ulwarth for this location). All other decks will be engaging the enemy this round. This is bad, as the Wardens each are strong in their own way and benefit a lot from the +3 attack (not even counting shadow effects yet). Ulwarth is “just” hitting for 7, but it can only be defended by heroes. This is still possible but will demand a strong defender like Beregond or Dain to be defending here and take minimal damage. Lorgan is probably the best one to have here, as chumping is a viable strategy to stall him for a round. Yes, you will be losing an ally and raising your threat by 2, but at least it doesn’t matter if he hits your ally for 5 or 8. Borlach is horrible to get with this effect, as his 9 attack is very difficult to defend. Note that any excess damage must still be assigned to other characters. So even if you defend with ally Gandalf, you have to deal 1 damage to another character with this! Also, note that the Broken Captives shadow effect can cause the Warden to make an additional attack with that +3 boost. This is very tricky to resolve, so have some shadow cancellation ready in the rare case that this comes to pass.
The location itself will require 4 progress to clear, and it will reward you with the objective ally underneath it when you do. - The Barracks: As mentioned in the quest overview, the Barracks is likely the camp that you will want to travel to first out of the three. It has the most quest points with 5, so make sure your early willpower is sufficient in order to clear it quickly, thereby rescuing the objective underneath it. There is no real strategy around the 5 quest points of the Barracks, as the location will be immune to player card effects during stage 1.
You will want to go to the Barracks first because when it becomes the active location, the enemy underneath it will go to the staging area and cannot take damage during this round. If you travel here early, you might still have a low enough threat to avoid the Warden enemy for that round, which negates the immunity to damage on it. That means that all players should have a threat of 28 or lower in the worst-case scenario that Lorgan is under this location. Luckily, you know which Warden is underneath the location, so you can prepare a bit in advance. Clearing the Barracks will take some effort, but it is not the end of the world if you don’t clear it in one round. You probably didn’t engage the Warden this turn, and it is impossible to defeat them anyway, thanks to the immunity to damage for a round. That means that you will at least take 2 rounds to defeat the Warden, blocking you from travelling to the other camps. Clearing the Barracks in one go is still preferred though, as it allows you to travel to some of the other locations in the staging area and gets you the objective ally underneath the Barracks. - Slave Quarters: The final Camp location has the fewest quest points and will be the easiest to clear. However, it should probably be travelled to after the Barracks, as players will need some time to set up for the first Forced effect. This causes the Warden enemy underneath to engage the first player and make an immediate attack. Note that the Warden will attack again during the combat phase, so you, as first player, must be ready for 2 attacks here. Other players cannot help with Ranged or Sentinel but can help by drawing away any other enemies in play. That way, the first player can take care of the Warden enemy. Since the enemy will always engage the first player, try to time it so that the first player is the person who can best deal with this enemy. If the enemy would engage a player that is not yet ready for it, travel to a different location first. Once the players clear the Slave Quarters, they gain control over the objective ally underneath it.
- Watch Tower: The first of the two generic locations is the Watch Tower, which will become progressively worse as players rescue more and more Captive objective allies. The location has a variable threat of X, where X is one more than the number of Captive objective allies that the players control. This location is relatively mild in the early game, only having 1 threat. However, once the players reach stage 2, they will be in control of all three objective allies, making the location a 4 threat location, which can be troublesome, especially if more copies are in the staging area. Aside from the threat, there is another value impacted by the number of objective allies that the players control. While the Watch Tower is in the staging area, it gains Archery X. This adds a lot to the Archery total and will be terrible for lower player counts, as they will have to deal with the 4 points of damage each turn with fewer characters. However, the location only gains Archery if it is in the staging area. Travelling here will nullify the Archery, as well as take the threat out of the staging area. The downside to this is that there is a Travel cost to this location, where the players have to reveal the top card of the encounter deck. This can be brutal, as the encounter cards in this quest don’t hold anything back. The best-case scenario is that you reveal another Rolling Plains so that you don’t have to worry about the extra threat during the quest phase. But in all likeliness, you will be adding an additional enemy to the staging area, dealing more damage to your characters, or exhausting more characters. The travel cost of this location is best to be avoided via player card effects. Players can also attempt to clear the Watch Tower out of the staging area, though the 5 quest points make that difficult. While you could use Thror’s Key to blank the location, making it have 0 threat and no Archery, Thror’s Key will be better suited for other locations like the Working Fields and the Rocky Outcrop.
- Working Fields: Speaking of the Working Fields, let’s discuss this gem of a location. The Working Fields acts a lot like the Rocky Outcrop from the Rolling Plains encounter set, in that it will sit in the staging area and shut down a thing that the players can do. In the case of the Working Fields: as long as a copy is in the staging area, players cannot heal their characters. In a quest that dishes out a lot of damage through effects like Archery, Overseer’s Whip, and Borlach, that is rather unfortunate. This quest punishes you a lot for having damage on characters, so not being able to heal it off will be a problem very quickly. But while the Working Fields blocks healing, it does not prevent players from cancelling damage with cards like Mithril Shirt and Honour Guard. These can be temporary solutions, as you probably have to deal more damage than you can cancel. Still, it will provide some relief while you try to clear the Working Fields or find a way around them. The easiest way is to travel to the Working Fields. They are a decently high priority destination, though, with 3 copies in the encounter deck, you might deem it no longer worth it if more copies appear in the staging area. Travelling to the Working Fields also requires that each player deals 1 damage to a character they control. If a player is maxed out on damage on their characters, then you might not want to travel here without using a player card effect to bypass the travel cost. Players can also use location control to clear the location from the staging area. With 3 threat and 4 quest points, it will definitely be worth it if you can use effects like Asfaloth, Evening Star, or Mirkwood Explorer to clear the location from the staging area. Again, this will be more difficult to do with more than 1 copy of this location in the staging area, but maybe you can clear one of the locations in the staging area and travel to the other. Finally, Thror’s Key can be used to blank one copy of the Working Fields so that players can heal again. This isn’t a perfect solution, as the location will still be contributing 3 threat to the staging area (unless players run Familiar Lands alongside the Key). Try to heal when you can, especially right before staging. You don’t want your Wardens of Healing shut down for a few rounds because of this card!

Treacheries
Liberating the slaves of Nurn is not going to be easy, as the guards are strong, and the slaves are exhausted. There is more than enough space for three new treacheries that are unique to this scenario. These focus on exhausting and damaging characters. These come on top of the extra attachments from the Easterling Warriors set and the damage + exhaustion combo treacheries from the Rolling Plains encounter set. You’ll have a lot to cancel in this game!
- Cruelty of Mordor: We start off with probably the worst of the new treacheries, in my opinion. At least, this one will have caused the most instant losses compared to the other ones, where you die from related causes later in the round. Not with this one though, you will be faced with a difficult choice, but first, each player must deal 1 damage to a character they control. This can be a hero, ally, or objective ally. I will recommend putting this damage on an already damaged character because of the next part. This is where the players are faced with a choice. Either they raise their threat for the number of damaged characters they control (good luck, Ent decks), or they deal an additional point of damage to every character who already has at least 1 damage on them. The first option is dangerous but a good selection in the early game. You won’t go up by a lot of threat yet, but it is better than potentially losing the character you just dealt damage to. This will almost certainly put you past 50 threat in the late game, losing you the game. The other option, dealing damage to already damaged characters, is a sure way to kill your allies quickly. This is especially dangerous if this extra damage kills one of your objective allies, which loses you the game. If your characters have enough hitpoints to spare, or you have enough healing opportunities left, go for the damage. Luckily, each player gets to decide for themselves to take either the threat or extra damage, so you aren’t locked into one choice. Cancellation will be mandatory in the late game unless players have managed to heal all their characters before this treachery hits.
- Overseer’s Whip: Oh look, another effect that damages characters. It really is a reoccurring theme in this set and will be the main thing to watch out for against this quest. The Whip will surge when it is revealed and will attach to the lowest engagement cost Easterling enemy. Remember that the three Wardens will be eligible targets for this attachment, though the Nurn Slaver and Easterling Raider will have lower engagement costs. While attached, the weapon will act like a reverse Dwarrowdelf Axe to the enemy, but luckily you do not have to deal the damage to your defender. Instead, the damage must be dealt to an exhausted character you control. If you do not have any (if you just played a global readying effect and used a readying attachment on your defender), this effect does nothing. It is an annoying attachment that will start to deal damage to your questing characters, which lines them up to be killed by Cruelty of Mordor or exhausted by Broken Captives. Healing this damage off will be ideal, or otherwise stack the damage on an already damaged character for minimal impact. Killing the enemy with this attachment does not take the highest priority (Wardens and Archery enemies will be more important) but don’t leave the enemy alive for too long before it wil whip your exhausted characters to pieces.
- Broken Captives: Broken Captives is a simple but deadly treachery that could be on the level of Sleeping Sentry towards the end of the quest. When this treachery is revealed, each player must exhaust each damaged character. Should there be no damaged characters, then the treachery gains Surge and Doomed 1. This is to prevent this being a free encounter card at the start of the game, though people could, in theory, trigger this treachery for 1 or 2 allies like Quickbeam and the Veteran of Nanduhirion (about the only thing he’s good for). That way, you prevent the card from surging into a worse encounter card at the start of the game.
As for the main effect, obviously, this is going to hurt decks that are unable to heal or cancel damage taken by the different ways this quest dishes them out. Players will also be exhausting defenders, which can be deadly in the combat phase. And while you could try to use something like Need Drives Them or Free Peoples, the Rocky Outcrop will prevent players from readying characters if the location is in the staging area. Cancellation is the only way to prevent a significant loss in action advantage then.
The shadow effect also deserves special mention, as it will cause Warden enemies to make additional attacks. That means that you’d better have readying on your defending hero or have 2 heroes to defend with for Ulwarth. Lorgan will also be raising your threat an additional point or two if he makes an additional attack that way. Luckily, shadow cards dealt to Warden enemies are not immune to player card effects, so that they can be cancelled.

Side-quests
Besides the Warriors of the East and An Arduous Journey side-quests, the scenario offers no other unique side-quests. The quest doesn’t offer much time to explore side-quests, but you will have a much easier time with this scenario if you can get rid of them quickly. If you can make sure you have enough progress on stage 1B as fast as possible, you will have some time to explore these side-quests while clearing the final Wardens. The reviews for the side-quests not unique to this scenario can be found in the River Running scenario overview.
Tips and Tricks
- If you want to be able to survive the archery and direct damage effects from this quest, you better bring some healing. This quest throws a lot of damage at players, and you cannot survive long without it. Archery is the main culprit, but other effects like Borlach’s ability, Overseer’s Whip, and Cruelty of Mordor will really need to be healed off. Elrond will be vital to your survival in this quest, as he will increase your healing effects by an additional point!
- Keep your objective allies alive! Losing even one of them loses you the game. Try not to assign direct damage to them if you can help it, as you won’t be able to heal the damage off or increase the hitpoints on the allies. Edrahil is especially squishy and will be the cause of some lost games if you keep putting damage on him.
- As you cannot heal your objective allies, try running some damage cancellation in your deck. Honour Guards are very valuable in this quest, and you might even get to use their Valour effect. Vigilant Guard can also be used to redirect damage to a hero and have it be healed there.
- Losing by threat elimination level is a serious issue in this quest. Spirit Elfhelm ally will help with the many smaller jumps in threat, such as Lorgan’s ability. But make sure to pack some bigger threat reduction effects as well, since you will be able to avoid threating out to a treachery like Cruelty of Mordor. Free to Choose and The Galadhrim’s Greeting helps to lower you down some more.
- Archery is dangerous in this game, especially if it gets dealt out multiple times, thanks to the new Easterling Guard enemy. Try and get some allies with a lot of hitpoints to serve as pin-cushions (Beorn or Gandalf are ideal). Players can also invest in some cards that buff ally hitpoints, such as Squire’s Helm or Hardy Leadership for Dwarves. Remember that healing will still be more important than stacking the damage high on some characters though. It is a good alternative if you do not have access to quick healing.
- Mithril Shirt is amazing for this quest, as you can put all the little pings of damage on that hero, who automatically prevents the damage. This is great for the Overseer’s Whip, some of the Archery, and treacheries. This does not even count as healing, so the Working Fields does not prevent you from using this Guarded attachment. The location it attaches to might be a problem, but the reward will be very solid.
- Since players are unable to help each other with Ranged or Sentinel against the Warden enemies, each deck should have a strategy to defend and deal damage to the Wardens. And since Ulwarth cannot be defended by allies either, each player should invest in starting the game with a defence-focussed hero. Only that way are you sure that you can handle the Wardens when they start engaging.
- If you are able to heal characters, heal before the quest phase. You may run into a copy of Working Fields during the quest phase that you might not be able to remove from the staging area for a while. Broken Captives will also be exhausting more characters that way, as will Cruelty of Mordor. It’s best to go into the quest phase with as little damage on your characters as possible, and even then, try to stack the damage on certain characters instead of spreading it out.
Playthroughs
With this being a relatively new quest, there aren’t that many playthroughs to be found on it. If more playthroughs are uploaded in the future, they will be added here.
- True solo: https://www.youtube.com/watch?v=T50XA-7soqw
- 2 players: https://www.youtube.com/watch?v=UKV5X99or0E
And that concludes my analysis of Land of Sorrow. We are now approaching the end of the cycle and will conclude with The Fortress of Nurn as soon as we can figure out a proper strategy for that quest. I myself won’t be writing that quest analysis, but I will hand it off to someone with a bit more experience with that quest in particular. In the meantime, I will continue with a few other projects I have on my list, which include the continuation of the NM Dwarrowdelf cycle, which I hope to finish this year. I will also start doing some reworked articles on older quests, with the Hunt for Gollum being next in line. But I think the next article I write will cover one of the contracts in-depth, providing new players with some tips and tricks for each of the contracts. I started doing these a while back but haven’t returned to it since. I really should focus more on the traits and other important cards, though I have enjoyed these months covering nothing but scenarios. You will soon see all the new articles appear on the blog!
