Few quests were more divisive in the early years of the game than the Battle of Lake-Town. The epic fight against Smaug required a focused deck, and strategy sites like Tales from the Cards provided guides for how to bring the beast down. Battle of Lake-Town represents an earlier design philosophy of the game, where quests required specific tailoring and fine-tuning of your deck for success. Yet, there has always been something enticing about the classical dragon boss fight. Maybe because it is such an important event in Tolkien’s world, or maybe because bringing down a terrible dragon is such a staple of the fantasy genre. No matter the reason, Caleb decided to re-visit this theme in the third adventure pack of the Ered Mithrin Cycle with Fire in the Night, the heroes’ first showdown with the dragon Dagnir. And did he deliver!
Fire in the Night
- Found in: The Ered Mithrin Cycle, Adventure pack 3
- Official difficulty: 7
- Community difficulty: 8.1
- Encounter sets: Fire in the Night, Grey Mountain Goblins, Dark Woods, Gathering Gloom
- Quest cards: 1
- Play if: You want an epic battle against a dragon. You enjoy side quests. You like quests that rewards dedicated defenders. You want to play a quest with a title that sounds like a Scorpions song (“Fi-re in the ni-ight”)
- What’s different about this quest?: Lots and lots of side-quests – an actual deck dedicated to them. A big dragon enemy. The fact that there’s a single quest card and that you track hit points for the city you are defending. A beneficial location (remember when that was a thing?)
- Solo or Multiplayer?: 3 or 4 players would be best, as Dagnir can be tough to deal with in lower player counts.
- Can I run side-quests in this scenario?: You can, but you risk the stacking negative effects from the side quest deck overwhelm you. It is recommended to shift your focus to the encounter side-quests first, as those can be deadly if they stack up too quickly. You can still get your benefits this way for having side-quests in the Victory Display (Hobbit Bounder, Vigilant Dunedan, Legacy Blade etc).
- What to look out for: Weak defenders. Lack of quest power (you need to clear a LOT of side quests). A big dragon, you dummy! Hrogar’s Hill burning down, causing you to lose.
The Quest
Setup
Fire in the Night only has a single main quest card, which comes with the following instructions: The players search the encounter deck for the eight side quests, and shuffles them into a seperate quest deck. The first player adds Dagnir to the staging area, and the remaining players reveal an encounter card each. This unfortunately means that setup gets quite swingy in multiplayer, whereas a solo player has more control over the early rounds of the game. Dagnir is a formidable enemy, which is appropriate for a great wyrm of the North! Immune to player card effects (so no Feinting and Feigned Voices), has an engagement cost of 50, X threat where X equals one plus the number of side quests in the victory display, a whooping 7 attack, 5 defense and 20 hit points. Furthermore, Dagnir cannot take more than X damage from non-quest effects each round, and cannot leave the staging area. However, when 3 side quests are in the victory display, Dagnir is considered to be engaged with each player. This means that Dagnir will leave you alone for some time, but when you have cleared enough of the side quests, she is coming for you and she is coming for you hard. How do you get side quests into play you ask? Let’s proceed to stage 1B.
Quest card 1B: Hrogar’s Hill – 50 quest points
The first thing you notice about Hrogar’s Hill is that it apparantly requires 50 progress to clear. This seems absolutely crazy, until you realize that you don’t actually need 50 progress in order to beat it. Don’t despair, Peregrin Took. In fact, the stage cannot be defeated while Dagnir has hit points remaining. Instead, you win the game if Dagnir has no hit points remaining. As explained above, Dagnir will engage you once you get three side quests in the victory display, so you need to clear at least three to really hand out damage.

Also, the quest comes with a clock – if the quest card has damage equal to it’s quest point value, the players lose. So your goal is to keep Dagnir from burning down the town and to chase her away. How do we accomplish this goal? At the end of the planning phase, the players reveal the top card of the side quest deck, and adds it to the staging area. Then, Dagnir makes an attack against Hrogar’s Hill, where no shadow card is dealt. The first player can declare a defender against this attack. I assume this means that another player cannot defend it with a sentinel defender. However, excess damage from the defense must be assigned to Hrogar’s Hill. This means that if you decide to neglect blocking, Hrogar’s Hill will last 8 turns, not counting encounter card effects. Keep in mind that once you reach the magic number of 3 side quests in the victory display, Dagnir will attack twice per round. You NEED a good defender here. It is not optional. One option is to go for the defender heroes, and load them up with attachments. Dain or Beregond are both good options, and can easily be brought to 7 defense with attachments such as Gondorian Shield, Hauberk of Mail, or Ancestral Armor (though the last one can only go on Dain). Another option is to utilize the old Stargazer and Zigil Miner combo to build up a huge amount of resources on your defender and then block with Blood of Numenor on your defender (though this option limits you to Gondor and Dunedain defenders). The Ered Mithrin Cycle opened up for ally super defenders by providing attachments for allies, which turns them into excellent blockers. Load up a Guardian of Esgaroth with a wild stallion, a Hauberk of Mail, and an Armor of Erebor and you have a defender with 7 defense and 6 hit points. It’s a four-card combo, but with the card draw of Dale, it’s doable. Can you chump block your way past Dagnir? I doubt it, though it might be possible for the combat phase. Remember that Dagnir tramples extra damage onto Hrogar’s Hill in the planning phase. In a Rohan deck, you might be able to recur Westfold Horsebreaker for chump blocking with Eomer using Guthwine, if enemies come out. But you need a good defender to succeed. Let’s take a look at the quest deck to see what we need to accomplish:
The Quest Deck
Quest cards in the quest deck comes in two flavors: 10 progress cards that provides a bonus when cleared, and 5 progress cards that only have bad effects while they are in play. As mentioned above, a new quest card will be revealed every turn, meaning that the effects will stack if you don’t clear them. This is why I was a bit reluctant about playing side quests in this scenario – while it certainly can be done, the negative effects will pile up, and once you have completed three of them, Dagnir comes down to play. You better be ready for that! A thing I really like about the quest deck is that it composes a little story, telling you about the challenges arising from Dagnir’s attack. You must prioritize between dousing the flames, ring the bells to rally the Woodmen, and face Dagnir and her horde of Gundabad Goblins. It’s a great flavor home run! I’ll go through the quest cards individually and talk about how you should prioritize them.

First card is Draw her Fire, a 5 progress quest that makes shadow cards on Dagnir immune to player card effects. Furthermore it has a Forced effect, causing Dagnir to make an immediate attack against the first player once this quest is selected as the active quest. As described above, you already need to take quite a lot of hits from Dagnir, so this is a quest I usually leave in the staging area. Unless you specifically run shadow cancellation (which has become harder to due with the nerfing of burning brand) then it’s not really a priority. it might be the effect that ends the game, but often it won’t matter much. A great exception to this is the treachery card Bright Flames, which I will talk more about below. Once your defender is up and running, it might be worth clearing as it “only” requires 5 progress.

Fortify the Defense is a more pressing problem when it appears. 10 progress, and while it is out, characters do not count their Defense for attacks made by Dagnir! This basically forces you to chump block until you clear it, meaning that it should be prioritized. Remember, you might have to defend against Dagnir twice per round, and you can’t really protect the town while this is active, as excess damage is assigned to the town. Once you clear it, each player either draws three cards or add one resource to each hero, so there’s a pretty strong payoff for clearing it. It is not too bad to see early in the game, as you probably don’t defend Dagnir until you got a good defender, but late game it can cost you the game.

Rally the Woodmen is another 10 progress quest that matters little early game but can be quite the setback late game. While this one is out, allies cannot attack Dagnir, making it hard to overcome her high defense. Once you defeat it, each player gets to search the top-5 cards of their decks for an ally and put it into play, possibly providing a very strong boost for your board state. This can help to place some more damage on Dagnir this round, with new attackers entering play.

Douse the Flames provides another highly pressing problem, as it sets the Hill on fire, dealing 5 damage to Hrogar’s Hill at the end of the quest phase. This is obviously something you need to deal with as soon as it comes out, otherwise this and Dagnir will bring the quest to a rapid ending. When you manage to clear it (which requires 10 progress) you get to heal 10 damage from Hrogar’s Hill, so if you can do it within two turns, you will have negated the damage. But as with many other side quests, this can cost you the game at the wrong time.

Hold the door! Hold the door! holdor! Hodor! This quest requires 10 progress and while it is active, players cannot reduce their threat. This is another quest I’m happy to see, as it rarely ends the game that you cannot reduce your threat for a turn or two. Their might be times when this matters, but as you reveal this after the planning phase, you should not have a Galadhrim’s Greeting in hand if you are at 49 threat! When you clear it you reduce each player’s threat by 5, which is a nice little bonus, but nothing too exciting. There are several treacheries in the encounter deck that raise your threat, so if the game drags on too long, going to this side-quest may be worth it, unless there are more pressing side-quests to clear first.

Defend the Town is a nasty side quest, especially in true solo. While it is the active quest, you reveal an additional encounter card during the quest phase. This is a threat you must handle immediately as it can very easily spiral out of control. Furthermore, at the end of the encounter phase you deal one damage to Hrogar’s Hill for each enemy in the staging area, which is not too bad (if you have many enemies there, you have bigger problems than this card). It only requires 5 progress, which should make it manageable in a turn or two. Do note that Dagnir will always be in the staging area, so damage will start to pile on Hrogar’s Hill slightly faster than it normally would.

Rout the Goblins is another 5 progress card. It gets +5 progress for each goblin enemy in play, making it a bigger nuisance in multiplayer than solo. When revealed each player must search the encounter deck for a different goblin enemy, and put it into play engaged with them. As we will see below in the encounter deck analysis, this can be very tough in a four-player game. Try to clear the enemies quickly, and clear this once you have dealt with them. At higher player counts this might become a progress sink, as new enemies are revealed from the encounter deck, soaking up your progress. However, since this side-quest has no negative effect after it’s When Revealed effect, it has a very low priority when deciding to choose a side-quest to go up against. Making just 5 progress and trying to kill the Goblins might give you a window eventually in which no Goblin enemies are in play, causing you to complete this quest card without devoting too much time on it.

Finally we have Face the Dragon which punishes you for chump blocking. When this card is out, Dagnir heals 5 damage after destroying a character. This card requires 10 progress, but once it is cleared you get to deal 5 damage to Dagnir which can be used quite well if you are smart. Remember, Dagnir can only take X damage each round from non-quest effects, meaning that this can be used to set up the killing blow. As we discussed above, chump blocking is a risky strategy, so if you have a dedicated defender, Dagnir shouldn’t heal too much from this. In multiplayer this might be a bigger issue, as Dagnir will attack each player later in the game. In that case, you should prioritize this earlier. Also note that this 5 damage does not count towards the damage cap on Dagnir, allowing you to do some serious damage to her during the round you clear this side-quest.
Strategy

Early game, try to get a board state established, and let Dagnir take a few swings at Hrogar’s Hill. You ideally want to reach a state where you can block Dagnir’s free swing and block her in the combat round, using the setups described above. Once she comes down, try to maximize damage on her for each round. Ranged characters are extremely useful in multiplayer, due to Dagnir’s high defense value. Resist the urge to chump block too much – it won’t do you much good for Hrogar’s Hill and will cause a tempo loss if you have to play out new defenders each round. If you manage to stay on curve for dealing damage while clearing a side quest per round, you can bring down Dagnir in 5 rounds (4 rounds with Face the Dragon). Try to get high quest power in addition to some serious attack power. Galadriel is good for this, as allies don’t exhaust to quest when they enter play. This is particularly good with Celeborn in the classical Silvan build. Outlands or Dwarf swarms also allow for some really strong attackers that can potentially provide a lot of questing power. Finally, Gondor swarm with readying tricks and stat boosts can make short work of most threats, including dragons.
Your goal will be to deal 20 damage to Dagnir through regular attacks or by clearing Face the Dragon. Once Dagnir has no hitpoints remaining, the Dragon retreats and the players have won the game. You do not need 50 progress on the main quest card. In fact, you shouldn’t ever have to select the main quest as the active quest, as the encounter side-quests are the priority here. Clearing all 8 side-quests is quite the feat, allowing you to deal more damage to Dagnir each round. This will take quite a few turns, and you probably won’t want to keep Dagnir around for that long, as she will continue to put damage on the main quest. Should Hrogar’s Hill ever get 50 damage on it, then the players lose the game.
The Quest Deck
Global
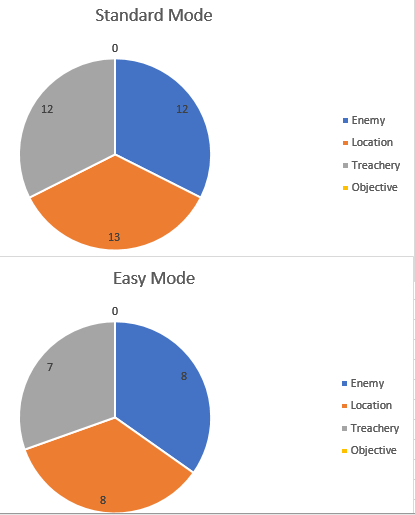
- The encounter deck consists out of 37 cards in Normal mode at the start of the game. This drops down to 23 in Easy mode.
- Shadow chances are equal between both modes, at 65% each. Most effects buff enemy attack strength or deal damage to Hrogar’s Hill.
- Average threat per card is 1.56 threat/card in both modes, although this is only valid until the players explore one side-quest. The Burning Watchtower grows in threat the more side-quests are explored. The range of threat is 0 threat treacheries to 4 threat locations (with Burning Watchtower being able to be even higher during the later stages).
- 8 cards have the surge keyword, though for 5 of them, it is only triggered if the treachery cannot be resolved.
- Doomed 1 is present on 4 encounter cards. The Gathering Gloom encounter set also tries to raise your threat through other means.
- Immunity
- Dagnir is immune to player card effects, cannot leave the staging area, and cannot take more than 1+ the number of side-quests in the VD worth of damage per round.
- Goblin Troop cannot have player card attachments
- While Dark Black Woods is in the staging area, no more than 1 progress can be placed on Forest locations in the staging area each round.
- While Accursed Forest is in the staging area, when revealed effects cannot be cancelled
- Stray Goblin cannot be optionally engaged
- Several extra immunity rules are on the encounter side-quests, which have all been covered earlier in this article.
Note that these statistics do not take any of the encounter side-quests or Dagnir into account, as those cards cannot be in the encounter deck. Like many scenarios in this cycle, the spread of treacheries, enemies, and locations is pretty even, giving you an equal taste of all card types.
Enemies
Other than Dagnir, who has been covered enough in the quest analysis, there are some other enemies present on the battlefield. These Goblin enemies have the tendancy to swarm you, so other than your regular big defender for Dagnir, it is worth investing into smaller defenders for these enemies.
- The encounter deck contains it’s own mini bosses in the Goblin Troop. This bad boy is present in two copies, cannot have attachments (so no traps here!), has an engagement cost of 35, a threat of 3, 5 attack, 4 defense, and 6 hit points. If the troop shows up, it will take your attention from Dagnir for a round or two. Furthermore, when Goblin Troop is engaged with you, each other goblin gets +1 attack and +1 defense, so you can easily get overrun. It can be taken out with a The Great Hunt, as it is not immune to player card effects. Otherwise you need to block it and pile on damage. As a shadow card he grants +2 attack, which can be absolutely devastating on Dagnir or even a smaller goblin.
- Stray Goblin is a pest that can cause you to get overrun very quickly if you are unlucky. The encounter deck contains 3 copies, so you are fairly certain to see it. With an engagement cost of 50, 1 threat, 2 attack, 0 defense and 3 hit points, it is fairly easy to deal with once you engage it. It also has Surge, meaning that it often brings company. The problem is that you cannot optionally engage it – but once a player engages another enemy, Stray Goblin tags along. This can become a serious problem if they accumulate in the staging area or if more enemies show up. You might have a situation where one player engages a whole group of goblins. Make sure to clear enemies as they show up to avoid being swarmed. Worst case, a good ol sneak attack + Gandalf will clear him easily. You can’t even avoid him if you get him as a shadow card, as that adds him to the staging area.
- Dragon’s Thrall has an engagement cost of 30, 3 threat, 3 attack, 3 defense, and 4 hit points, meaning that you will have to do some work to bring him down. After he engages you, you must either deal 3 damage to Hrogar’s hill or he makes an immediate attack. This can be a trap – 3 damage might not seem like a lot, but if you see a few of these, damage might accumulate. 3 attack means that you can block him with most decent defenders, so that shouldn’t be too much of a problem. He combos with Stray Goblin, as you then potentially have 3+ attacks to deal with that round (two from him, one from the Stray). And his low engagement cost means that he is coming down unless you manage your threat or run secrecy. Be sure to keep a spare chump blocker or a secondary defender for this one, or run heroes that can take an undefended attack of 3. But be careful… With the goblin troop and shadow effects, his attack might kill a hero… The shadow effect is also annoying, dealing 3 damage to Hrogar’s hill if the attack destroys a character. As Dagnir is an ever-looming presence, this is quite likely to trigger. The encounter deck has three copies.
- Orc of the Flame is the final enemy of the encounter deck. 25 engagement cost, 2 threat, 2 attack, 2 defense and 3 hit points makes him fairly manageable (though you might still have to dedicate at least two characters to deal the killing blow, directing your resources away from Dagnir). When he is revealed, the first player must either deal 3 damage to Hrogar’s hill or 2 damage to a hero he/she controls. If it is possible, go for the hero damage. Chances are good that you are running some sort of healing to take care of your main defender, and if that healing is Warden of Healing, you can easily clear those damage again. Avoid pinging of Hrogar’s hill if you can. This enemy, I don’t really mind seeing as they are generally a lesser threat than the other enemies. The shadow effect on this enemy grants +1 attack, or +2 if Hrogar’s hill has 25 or more damage. These attack boosts means that a defender should have a large hit point pool so he can take the odd damage from Dagnir if these boosts trigger. With four copies in the encounter deck, you will see this one.

Locations
The town of Hrogar’s Hill and the surrounding forest of Mirkwood is the scene where this battle takes place. The forest in dangerous, but will be a necessary evil to travel to eventually. The town’s locations are more forgiving, providing you some defences against the Dragon and her minions.
- Accursed Forest is a high-threat piece of anti-test of will tech. 4 threat makes it a good target for Secret Paths while 4 progress means that you have to Asfaloth it a few times before it leaves. While it is in the staging area, When revealed effects can’t be cancelled, so if you run A test of will, you need to deal with it. It’s traveling cost is nasty though – reveal a card from the encounter deck. The sheer tempo pressure of an extra card early in the game can knock you over if you are not careful, or lead to location lock or enemy swarming. This one is a nasty location, that I prefer to see as a shadow card. There’s a total of two in the encounter deck.
- Dark Black Woods has card art remarkably similar to Accursed Forest, so don’t mix them up if you reveal one. This one is slightly gentler, with 3 threat and 3 progress, and an ability meant to counter Asfaloth and location control shenanigans. Specifically, while this location is in the staging area, no more than one progress can be placed on each Forest location in the staging area each round. The travel effect lets each player discard an encounter card, and adds all discarded enemies to the staging area. This has the potential to ditch some nasty treacheries, but in a four-player game this might also overrun you. The advantage is that you can choose when you trigger the travel effect, and save it for a turn where you can handle an enemy or two. In solo this ability becomes a watered-down version of accursed forest, with the probability for an encounter card reveal. There are three copies of this location in a Normal encounter deck.
- Town Gate can be a severe problem or a location that solves itself for a minor inconvenience. It has 3 threat, 4 progress and a travel effect causing Dagnir to attack the first player. As we have discussed above, extra Dagnir attacks can be quite brutal and potentially cost you some important allies or heroes, so caution is advised. However, if you leave Town Gate in the staging area, it will gain a resource token at the end of the quest stage. When Town gate has 3 resources, it is discarded and Hrogar’s hill takes 4 damage, indicating that the gate has been breached. If you can take the extra attack it is worth it, otherwise it might be a sacrifice worth taking if Hrogar’s Hill is not just about to die. On Normal you have two of these in the encounter deck.
- Wooden Palisade is something as rare in this game as a benevolent location! It only comes with 2 threat, requires 3 progress to clear, and while it is the active location, Dagnir gets -2 attack. This can be an absolute life saver in the game when Dagnir first comes down until your defender is up and running, so think about when you want to travel there! The travel effect readies a hero the first player controls, so it can also be used as an emergency switch if he/she gets overrun by goblins. There are three copies in the encounter deck, so chances are good that you will see at least one. With no shadow effect, you will almost always be happy to see it.
- Burning Watchtower is unfortunately less nice (it would be weird if a burning tower was a good place to hide out…). It has X threat where X is one more than the number of side quests in the victory display, requires 5 progress and has a travel effect dealing X damage for each player among characters he/she controls. This is a location you won’t mind early game, but late game it can be a pretty severe amount of damage. Once you have your board state setup, this should not be too much of a setback. As for the other locations in this game, this card has no shadow effect and you get three of them in a standard encounter deck.

Treacheries
Doing battle with a huge fire-breathing Dragon and her minions at night isn’t without its dangers. These treacheries try to increase your threat, give Dagnir extra attacks, or deal damage to Hrogar’s Hill.
- Gathering Gloom is a treachery with Doomed 1 and when revealed, each player must either raise his or her threat for each ally he/she controls, or reveal an encounter card. This can be a minor inconvenience or a major punishment for swarm decks. It’s a treachery I’m happy to see early game, as a small threat increase won’t matter too much, as most of the goblins have fairly low engagement scores anyway. In multiplayer, this can be pretty punishing if all players are setup and someone is getting close to elimination range. In that case, a Test of Will is recommended. The shadow effect punishes chump blocking, as the defending player has to discard a character if the attack killed a character. With Dagnir attacking this might be a very likely scenario, and this can absolutely wreck your board if you run out of chump blockers (again, a likely scenario as Dagnir attacks every round once you clear the third side quest). The deck contains two copies.
- Swarm of Bats is another inconvenient treachery that can really screw you over at the wrong time. This treachery causes ALL players to discard ALL resources from EACH of their heroes and raise their threat for each resource discarded this way. If no resources are discarded, the card gains surge. This seems to be a counter to Steward of Gondor/zigil miner decks that build momentum through resource acceleration, but it can also seriously hamper your early game progress if you are building up resources. It is certainly a card you test of will unless it only costs you a couple of resources. With three of them in the deck, it’s a card you are likely to see. As a shadow card it gives attacking enemy +1 attack, or +2 if defending character has an attachment.
- Powerful in Wrath is a treachery with Doomed 1, which causes the active location to be discard, symbolizing that Dagnir lands on top of it and wrecks it. Then, Hrogar’s Hill is dealt damage equal to the threat value of the active location. of course this can snatch victory away from you, but most of the time it should not be too much of a problem. If no location is discarded, the card gains surge. This might be inconvenient if you are trying to camp out at the wooden palisades, but it might also be a blessing in disguise if you are getting location locked. Similarly it can cause you to “overquest” if you are trying to stall putting the third side quest in the victory display. This is usually not a card I will cancel, but keep in mind that it is there, and that it can wreck your plans. The shadow effect is almost worse than the main effect, as excessive damage from the attack it dealt to Hrogar’s Hill. again, this punishes chump blocking, highlighting why you should have a good defender for this quest. The deck contains two copies.
- The Dragon’s Fury is a treachery that is very worthy of your Test of wills. With 3 copies it is very likely that you will encounter it. It causes Dagnir to immediately attack the first player, where excessive damage must be dealt to Hrogar’s hill. These surprise attacks once again punishes chump blocking, and can really mess up your calculations for how much time you have left to kill Dagnir before Hrogar’s hill burns down. Unless you have a buff defender with lots of readying, this will likely present a problem, and if this is revealed early game, it can cause an instant hero loss. The shadow effect is also terrible, causing the attacking enemy to make an additional attack. If this is your run-of-the-mill goblin this might not be an issue, but if this is for Dagnir, then you might be in deep trouble Sonny Jim.
- Bright Flames causes each player to assign X damage among characters he/she controls, where X is one more than the number of side quests in the victory display. This is a treachery that I’m usually quite happy to see. A swarm deck can distribute the damage out, and usually you will run healing against this quest anyway. It might cause some losses but usually it is manageable. As a shadow effect it is much worse. +1 attack for each side quest in the victory display usually means death for the most hardcore defender if the attack comes from Dagnir late game. This card alone makes it worth running shadow control. The deck contains two of them.

Tips and Tricks
- Before you even begin this quest, think about how you want to handle Dagnir. You have to be able to quest hard and take repeated attacks from one of the toughest bosses the game has to offer. This is not an easy feat. Your deck should have a hero or an ally you can find consistently that can handle her. You also need to think about how you will deal enough damage to kill her.
- Bring healing for your defender. Lots of shadow cards means that the defender will take the odd point of damage even if you bring him to 7 defense. Warden of Healing is a good way to make sure that your defender does not die from a thousand cuts.
- While defending/attacking is important, think about how you will quest consistent enough to to clear side quests as they appear. You can’t allow them to accumulate as the Forced effects will grind you down.
- This quest has side quests as a core mechanic. Use that to your advantage! Bring all your side quest toys, your Legacy Blades, your Riders of Rohan, and your Thalion. They reward you for playing the game without added effort.
- For extra willpower, bring Thurindir and East Road Ranger, who will both get bonuses to their willpower by going up against side-quests and having many of them in the Victory Display. The extra side-quest you draw with Thurindir might be a good destination if you reveal Rout the Goblins as you first encounter side-quest.
- Remember that Dagnir does not care about what side quests are in the victory display. You might bring a few of your own, so you have an option if you don’t care about a particular Forced effect in play (for example Hold the Door, Rally the Woodmen or Face the Dragon). A player-side quest might be a good alternative here, and can help you build momentum.
- I ultimately beat this quest with a Dale deck, using Bard, Brand, and Lanwyn. I blocked Dagnir with a Guardian of Esgaroth loaded up with defensive attachments, and used Wiglaf with Ancestral Armor and Hauberk of Mail. Keep this in mind if you keep facing defeat.
Playthroughs
There are not many playthroughs of this quest out there. We will continue to add playthroughs as they are released by the different video channels.
- 3 player modern deck: https://www.youtube.com/watch?v=Nz-o9RzslMM
- 2 player progression decks: https://www.youtube.com/watch?v=MS-QdEjj9Ko
This wraps up Fire in the Night! A quest I enjoy very much. Next up is Ghost of Framsburg, a quest that players were less enthusiastic about.

Nice review, but I think you may have made a mistake: the extra encounter card for Defend the Town is only revealed while it is the active quest, not while it is in the staging area. So you might have made the quest harder than it is (although It’s still challenging) 😉
LikeLike
Thank you, the article has been adjusted accordingly. That does make that quest a little easier, though you will want to go up against that side-quest quickly after revealing it in order to prevent damage accumulating on Hrogar’s Hill.
LikeLike