The fifth adventure pack of the first cycle takes us to the Dead Marshes. This will not be the last time we visit this place in the game, but for now, we do not have to worry about the undead residing here. We are here to finally capture Gollum, who is trying to escape us by making escape tests. These require the players to commit high-willpower characters in order to prevent Gollum from escaping into the encounter deck. While this teaches the tests and prepares players for encountering such tests in future cycles, this quest is generally pretty forgettable. You can beat it relatively fast (sub-3 rounds), and when you’ve beaten it, there usually isn’t a reason to go back for. But let’s discuss the details of this quest and what you can include in your deck to stand a better chance against the quest.
The Dead Marshes
- Found in: Shadows of Mirkwood cycle, pack 5
- Official difficulty: 5
- Community difficulty: 3.8
- Encounter sets: The Dead Marshes, Wilderlands, Sauron’s Reach
- Quest cards: 2
- Play if: You want to see how the game handles tests, you fancy a struggle with Gollum to get him to behave.
- What is different about this quest?: Escape tests, Gollum objective, resetting quest stages
- Solo or multiplayer?: Multiplayer is a bit easier since you can get more willpower to the table to make progress on the quest and still pass any Escape tests. However, more players do increase the chances of you hitting an Escape test treachery, so all players should prepare to pass these, or else Gollum will be very difficult to keep a hold on.
- Can I run side-quests for this scenario?: While there is technically nothing stopping you from going to a side-quest or two, I would not recommend it. The longer you stall, the more tokens Gollum will accumulate and the greater the risk of him escaping into the encounter deck. Even if you do manage to advance to stage 2 on time, Gollum will likely have gotten more resources, thus resulting in more encounter cards being revealed for the final Escape test. If you are going to do a side-quest, Rally the West is pretty solid, as it increases the willpower for questing and Escape tests. Alternatively, you can also setup for some future Escape tests with Scout Ahead.
- Can I bring Guarded (X) cards?: While there is a chance that you hit a Hill Troll with it, the rest of the encounter deck is relatively tame, and you can avoid a lot of horrible treacheries if you are playing Guarded cards. However, be careful not to play too many, as you can get overwhelmed by the threat in the staging area. You might also not like the encounter cards you get since Impassable Bog will certainly take a while to explore for you to get your Guarded card.
- Player cards to avoid: You are not allowed to bring the Smeagol/Gollum hero to this quest, as there is an objective with his name on it. The rest of the cards are free to be used.
- Optimal starting threat: With the Hill Troll in the encounter deck, I would be very careful in bringing a deck with a threat of 30 and up. There are also still the treacheries that trigger when players exceed 35 threat. Some threat reduction will be needed, as some Escape tests will raise the player’s threat when they are failed.
- Traits to add to the Victory Display: Goblin, Orc, Troll, Creature, Wasteland, Escape, Dead Marshes
- What to look out for: Gollum escaping into the encounter deck, prolonging the game. Several enemies can hit quite hard. Characters have to be left ready to deal with Escape tests, losing Escape tests can quickly end the game.
- Any changes from the original cards?: None.
The Test
This quest introduces the players to the many tests that are in this game. The Escape Test in the Dead Marshes is meant to represent Gollum’s attempts to escape capture. The test will take place at the end of the questing phase if Gollum is in play. You can also be forced to make an escape test because of a treachery card that got revealed during staging. In order to perform an Escape test, players must first commit characters who are using their willpower for this test (or attack power with Through the Mist). For Gollum’s effect, every player may commit characters to the test. But there are some tests where only the first player may commit characters. Be sure to leave some characters ready if you are the first player. Even if you are not the first player, you must still have at least some characters ready in case Lights of the Dead gets revealed, forcing every player to make a test.
Then, players are instructed to discard a number of cards from the top of the encounter deck. For Gollum, this is equal to the number of players in the game. Players then compare the committed willpower to the Escape value on the revealed cards. Not all cards have this keyword, so they are considered to be Escape: 0. This can get boosted with The Heart of the Marshes. When comparing the values, if the players have committed more willpower than the Escape Value, they pass the test, and nothing happens. If they manage to get willpower lower or equal to the Escape Value, they fail the test. Each card that forces you to make a quest has an effect that resolves if this happens. Usually, this means that you must place resources on Gollum and, in some cases, raise your threat.
Try not to commit everyone to these tests unless it is the final one. If you happen to reveal a treachery during staging which forces you to make a test, do not send every character you have. You will have to make another test at the end of the quest phase as well.
Characters that work well with these sorts of tests are: Galadriel (both her effect and her high base willpower), Cirdan the Shipwright (high base willpower), Spirit Eowyn (you are able to increase her willpower, but only before the test!), Lindon Navigator (can quest and test), Rider of Rohan if there is a side quest in the Victory Display (can quest and test). Also, consider using ally Faramir to boost your characters for both the quest and the test. Readying effects like Light of Valinor and Unexpected Courage are good attachments to have in case you need to do multiple tests.
The Quest
Setup
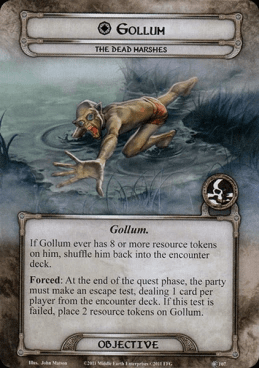
The game starts with the players taking the Gollum objective and adding him to the staging area. He will stay there during the quest to accumulate resources. Once he has 8 or more, he will disappear into the encounter deck. Use an 8-sided die if you can to keep track of the resources, as it is much simpler than stacking tokens up high.
Players are then instructed to shuffle the encounter deck and reveal 1 card per player. There are several cards that you do not want to hit early on. Treacheries that force you to make an Escape test will take away willpower even before the first quest stage. You also won’t be able to cancel these unless you are bringing Eleanor. Other cards you don’t want to see are the bigger enemies of this scenario, like the Hill Troll and the Great Marsh Worm. The rest of the encounter cards won’t be fantastic (unless you get Evil Storm/Treacherous Fog with everyone’s threat below 35). Add all revealed cards to the staging area and flip the quest card; you can now start round 1.
Quest card 1: Into the Marshes – 12 quest points
Stage 1B has nothing but flavor text, but that does not mean it is a simple stage. You will spend the majority of the game here, building up your board state and performing Escape tests. Try to go through this stage as fast as you can, though, as that reduces the chance that Gollum gets 8 resources and flees into the encounter deck. To do this, willpower should be everyone’s priority so that they can quest hard and still win escape tests. Aside from that, I would recommend traveling each turn if you can to reduce the threat in the staging area and to minimize the effect that Impassable Bog’s When Revealed effect will have. Location control by placing progress on locations in the staging area can also help.
Combat should really be left until after you have set up your willpower. Unless you start with enemies in play immediately and get about 30 threat, you can afford to wait a few turns before the enemies become a big enough problem to have to engage them. Secrecy decks can do well in this quest, but be careful of the sudden Warg Rider. Ranger decks will also have a lot of fun in this quest, setting up traps and taking care of enemies from the staging area with direct damage or straight-up discarding them.
The tests that Gollum forces each turn are the biggest problem at this stage since he will reveal a card for each player in the game. If you are able to use scrying effects to know what’s coming, you can better prepare for the test. This works best in lower player counts, where you aren’t revealing so many cards each turn. But if you are able to use a copy of Far-sighted before the test, you should be able to see how much the total Escape value will be. In true solo, Rumour from the Earth or Henamarth Riversong are also very effective for this. If you know what is coming, you can keep more characters back for combat or to set up for the next turn. Trap deck users should try Interrogation as well for whatever enemy is unfortunate enough to fall into their trap.
The quest stage requires just 12 progress to clear, and again, I would suggest you rush this. As long as you can keep the number of resources on Gollum low enough, you can make it through the second stage without much trouble. If you lost Gollum during this stage, settle in for a longer game and try to make some progress on side-quests instead. You can also run cards like Explorer’s Almanac and Backtrack to redirect progress from the main quest to locations in the staging area, setting you up for an easier time while digging for Gollum. Should he escape, try to get as many encounter cards into play as you can handle to find him faster. You can, for instance, use the Dunedain Pathfinder and Dunedain Hunter to slim the encounter deck a little more. Guarded (X) cards are also an idea, but if you discard Gollum from them, he will end up in the discard pile, causing you to have to wait for him even longer!
If Gollum ever ends up in the discard pile because he was discarded from the deck for an Escape test or as a shadow card, then you will have a hard time getting him back into play. Without using player cards, you would have to wait until the 53-card-thick encounter deck is empty before you reshuffle it. And then it is just the question of when you are going to find Gollum again! And there is no guarantee that he won’t be discarded again to a shadow effect or something. So you will be better off using some player card effects to retrieve Gollum should he ever be discarded. Shadow of the Past can put the top card of the encounter discard pile back onto the encounter deck. This will be worth it if you have Gollum on top of the discard pile after the combat phase (or after shadow cards have been dealt). That way, you can reveal Gollum at the start of the next quest phase and have him in play again. If you somehow managed to have a few encounter cards on top of Gollum in the discard pile, then multiple players might have to use multiple copies of this event to retrieve him. It will be costly, but the most effective way to retrieve him. The alternate route is to use the End Comes to shuffle the discard pile with Gollum in it back into the deck. You then save a few rounds you would otherwise spend draining the deck before reshuffling, but it does not give you a guarantee you will get him in play again. Still, it’s one of the few cases where that event actually does something useful.
Quest card 2: The Capture – 3 quest points
Once you have made it to the second stage of the quest, you are greeted with a mostly blank stage 2A, but flipping over to 2B, you are given the instructions on how to capture Gollum finally. You have to first make the three progress on this stage, after which the first player chooses a player to make an Escape test. 1 card is dealt for each resource token on Gollum, potentially getting 7 cards! However, only a single player may perform the test, so they will have to bring all their willpower to the test in order to stand a chance. Other players must also send their willpower buffs to that player before the test starts, giving them the best odds of passing the test. If they successfully pass the test, they automatically win the scenario. But if they lose the test, the quest deck is reset to stage 1B. This effectively does not do much but set a 12-progress barrier between you and your next attempt. This is enough time for Gollum to try and escape. He can also obtain more resources during this time, making the next attempt more difficult.
It is important to note that if Gollum is not in play during this stage, the quest is reset to 1B automatically upon reaching the 3 progress on this stage. You will have to find Gollum before this time or go back to the previous stage to find him. Luckily, there is no real penalty for going back to the previous stage or advancing to 2A; you just need the extra progress in order to make another attempt.
The Encounter Deck
Global
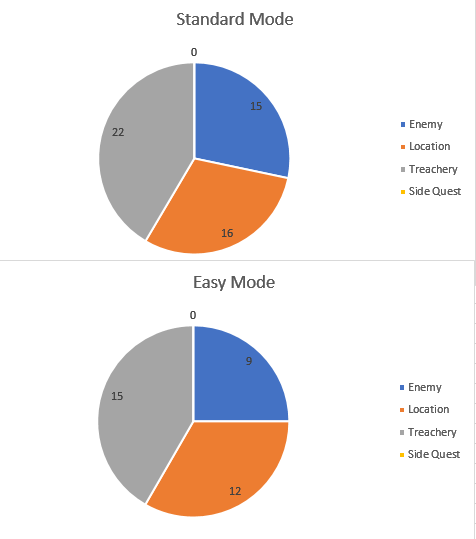
- The deck contains a staggering 53 cards in Normal mode, which is trimmed down to 36 in Easy mode.
- Shadow chances are very low, at only 19% in Normal mode and 17% in Easy mode.
- Average threat on cards revealed is also extremely low, at 0.8 threat/card.
- 4 cards in the encounter deck will surge.
- Doomed is not present on the cards in the encounter deck, but there are various ways in which you will be forced to raise your threat, so some threat reduction will be useful to bring.
- No cards are immune to player cards effects or anything.
There is a good balance between card types, with slightly more treacheries than other types, though most of the treacheries follow the same format in which you have to perform an Escape test in some way. Enemies will be relatively rare, and there won’t be much combat to do in a higher player count game.
Objectives
Gollum has finally been found during this cycle and is the only objective in this scenario. He is not an ally, as he will be during later quests, so he cannot take damage or be used for any action. Instead, he will remain in the staging area during the game unless he escapes. Gollum will force you to make Escape tests at the end of each quest phase. You will have to deal 1 card per player for this test. However, the entire party may commit characters to this test, which makes it easier. You also know whether or not those characters will be required for combat. If you fail the test, you are forced to put 2 resources on Gollum. Between this effect and a couple of treacheries and locations, resources tend to pile up on Gollum. If he ever has 8 or more resources on him, you will be forced to shuffle him into the encounter deck. You will now have to find him again. If he happens to be revealed during staging, he loses all his resources. This makes the second stage of the scenario very easy if you can advance to that quickly afterwards.
Enemies
Only 1 new enemy is added to the standard encounter deck enemies, and it is not even an undead enemy! You’ll have to play a different quest set in these swamps to battle the spirits of the dead!
- Wolf Rider: Hobbit and Secrecy players must be alert when playing this scenario, as the Wolf Rider enemy has a sub-20 engagement cost. Any deck with a threat of 10 or higher will be engaging this enemy so that it won’t stay in the staging area for very long. When the Wolf Rider is revealed, it will automatically surge, even if Thalin deals a damage to him. The surge is annoying, as it means that on top of the next card you reveal, you now also have a 1 threat enemy sitting in the staging area that is going to come down soon. However, this is probably the ideal way to reveal the Wolf Rider, as its shadow effect will be worse (we’ll get to that). In combat, the Wolf Rider is pretty pathetic. With an attack of 2, it can easily be defended by most allies, and it only takes 2 attack to kill it. With 0 defence, any hit towards the Wolf Rider will damage it and will most likely kill it as well. 0 defence also opens up Straight Shot, in case you don’t want to deal with this enemy at all. But the best way to get around the Wolf Rider will be direct damage. 2 hitpoints are easy to get through with just one or two direct damage effects. Gondorian Spearmen with Spear of the Citadel will be a proper defence against this enemy, but you can also use effects like Goblin-cleaver if you want. Even without tricks, the Wolf Rider is just annoying and not really a threat. Shadow: The shadow text on this enemy is quite unique and quite lengthy. When the Wolf Rider is revealed as a shadow card, it will turn into an enemy and attack the defending player. That player can declare a defender. The Wolf Rider gets its own shadow card (don’t worry, it’s not another Wolf Rider. There is only 1 copy in the encounter deck). After the combat phase, the Wolf Rider is returned to the top of the encounter deck. This means that you will be revealing it next round with the surge keyword. However, since the Wolf Rider will be engaged with you, you can still kill it. If you do, its game text is no longer in play so that he won’t be returned to the top of the encounter deck.
- Hill Troll: Yes, the Hill Troll is back from Journey along the Anduin, and I’m afraid to say that this isn’t the last time you will face this enemy. The Hill Troll’s most important stat is actually its engagement cost, which is 30 threat. This means that you should either keep a low threat or increase the engagement cost of the Troll in order to have enough time to build up your boardstate. A starting threat of 27 is ideal in my eyes, as that gives you some wiggle room in case you have to raise your threat by a few points during the quest phase. But you will still have enough stats on the table with your heroes to deal with the Troll without having to rely on a host of allies. The threat of the Hill Troll has a value of 1, so you will be able to quest over the Troll without too much trouble. While the Troll is in the staging area, you can start to chip away at its health using direct damage effects if you get those early. While no single effect will place enough damage on the Troll, you can make it easier to kill by using a couple of Ranger Bows or using Hail of Stones a few times. If you get ally Gandalf in play early, this may be a tempting target, so if there are no other more immediate threats (Wargs would be a priority for me), use Gandalf on the Hill Troll to save yourself some time and probably characters. You can also take this time to dig for events like The Great Hunt, Put Off Pursuit, and Hunting Party that can potentially get rid of the Hill Troll from the staging area. If you don’t go through the encounter deck in one go, you shouldn’t see it again (there is another copy that you might see, though. But these cards are a good solution to the immediate threat).
If you have not dealt with the Hill Troll before your threat reaches 30, he will engage you. Make sure that this is the only enemy engaged with you so that you can dedicate all of your attention to him. His attack of 6 is pretty big but gets worse when you realize that the Hill Troll’s game text punishes you for chump blocking with smaller allies. Any damage dealt beyond the defence and remaining hitpoints of the defender is instead dealt as a threat increase. Since this quest has some hard limits to what your threat can be before things go from bad to worse, you will want to avoid raising your threat unnecessarily. So defence should be done by a strong defender like Spirit Dain (who can take no damage from the Hill Troll without needing any tools) or Beregond (ideally with a Gondorian Shield). You will need a solution for the Hill Troll quickly since your deck will likely not survive an ongoing assault by the Troll, especially if you get nasty shadow cards.
Attacking back should be a top priority so that you can get rid of the Troll as quickly as possible. This is where any direct damage you dealt to the Troll will come in clutch. 9 hitpoints is a lot to overcome, especially with a defence stat of 3. But it is not impossible. Some big, one-time effects like Eowyn and Black Arrow will be useful, as well as any other players who can help with ranged attacks. Killing the Hill Troll will put it into the Victory Display, allowing you to breathe a little easier (until the next one arrives). - Goblin Sniper: While the stats of the Goblin Sniper aren’t much, its textbox provides the main reason why this enemy is a dangerous reveal from the encounter deck. The Sniper has just 2 threat, but with a 48-threat engagement cost, you will probably not engage this enemy naturally in your game (except when playing a Valour deck, but even then, 48 is living on the edge). Optional engagements seem like the logical solution, but the textbox on the Sniper prevents players from optionally engaging this enemy while there are other enemies in the staging area. With the four unique Trolls entering the staging area at stage 2, you might have a few enemies too many in the staging area to worry about this Sniper. This means that there is a real chance that there will be a Sniper in the staging area for a long time unless the players can counter it. A double Goblin Sniper in the staging area locks both versions down, with the one preventing the other from engaging. This is bad because they also deal 1 point of damage to a character of each player at the end of the round while they are in the staging area. A natural counter to these enemies is direct damage effects like Arrows from the Trees, Hail of Stones, or Galadhon Archer. Stacking these effects will get through the 2 hitpoints of the Sniper in no time, clearing the board of the menace. Players being able to attack into the staging area is also a great tool to have. Haldir of Lorien, Hands Upon the Bow, or the Rohan synergy of attacking the staging area will clear these enemies out as well. Target other enemies in the staging area so that it is the only one left. A single Warden of Healing will take care of the damage of both Snipers; you only have to deal with the threat.
- Marsh Adder: This enemy is much at home in this scenario and will serve as a boss-level enemy that tries to increase your threat. There is only one copy in the encounter deck, but despite this, the Marsh Adder is not unique, meaning it is vulnerable to several player card effects that can only target non-unique enemies. The Marsh Adder is not an immediate threat, as it has an engagement cost of 40. However, it has 3 threat, meaning that in some situations, you will want to engage it earlier to remove the threat from the staging area. But do be careful with this, especially if you are close to one of the threat thresholds (29 and 34). That’s because the Marsh Adder is quite aggressive and will cause you to increase your threat each time it makes an attack. The obvious solution to this is to cancel the attacks with Feint and Feigned Voices. Not only will this negate the game text on this enemy, but you also avoid the 4 attack, which can be substantial for many decks. Killing the Marsh Adder isn’t as easy as other enemies, thanks to its 7 hitpoints. 1 defence isn’t a lot, but the Adder will soak up a lot of damage. You do need to commit a lot of attention to this enemy, but fortunately, when you defeat the Adder, it is removed from the encounter deck and placed in the Victory Display. I will advise killing the Marsh Adder as quickly as possible so that you don’t have to deal with the threat increase every round. Forest Snare is also a decent solution for this enemy during this quest.
- Wargs: The warg enemies in the game are often decently threatening, but they are most famous for their annoying tendencies to hop between being engaged with players and sitting in the staging area. This is the very first enemy that started that trend, simply named: Wargs. They have a relatively low engagement cost of 20 and decent all-around stats. They suffer a little in defence and hitpoints, making them a common target for Gandalf. These enemies are annoying because each time they attack, they return to the staging area if their shadow card had no effect. And since the quest has about a below 20% chance of getting a shadow card with an effect, you are bound to return the Wargs to the staging area at some point. The Wargs having a shadow effect themselves lowers your chances even further! The trick is the same as with the Marsh Adder, don’t let them attack. Their attack strength isn’t really frightening, but if they do not attack, they cannot trigger their Forced effect. They will still get a shadow card, but you don’t really care whether or not it has an effect. Cancelling their attacks is just a temporary solution but should keep them engaged with you, allowing your characters to kill the Wargs. You can also slowly chip away at their health, though you will likely need several effects to kill off the Wargs. As I mentioned, their defence is not very strong, allowing you to kill them with just 4 attack. This enemy can prolong your games at the end, so try and kill the Wargs whenever you see them. That helps you to end the game faster. Shadow: The shadow effect on the Wargs themselves is pretty basic. It is a straight-up boost to the enemy’s attack by 1. However, if you are taking the attack undefended, you are looking at a +2 buff. This is quite substantial, as it can more easily kill a hero. And since the quest features quite a few weaker enemies, you might be tempted to take an attack undefended. This shadow effect punishes that hard, so be sure your heroes can take the hit of +2 and have a healing option down the line.
- Eastern Crows: These are about as weak as enemies are ever going to get, but that is not without cause. The Eastern Crows only have 1 threat, 1 attack, and 1 hitpoint, but they do Surge into another card and have a nasty recursion effect that keeps putting them back into the encounter deck. If you get this enemy to guard your Guarded X attachment, that’s great! You cannot have a more ideal target. But in most cases, you will end up revealing this enemy and having its Surge grab the next card on the pile. An interesting combo with these enemies is that if Thalin is committed to the quest, his 1 point of damage is dealt before the Surge on the Crows can trigger. This causes the Crows to die, which makes it a free encounter card to reveal. As the game text on the Crows isn’t in play at that point, they also don’t get shuffled into the encounter deck. This is a combo that should be exploited by Core Set players as much as possible, as it can save you from some nasty encounter cards that might be harmless as shadow cards. With an engagement cost of 30, it can take a little while in this scenario before the Crows come down, but players can always optionally engage them if they want a quick and easy kill. The Crows aren’t a threat during combat but note that if you take them undefended, some shadow effects become worse, so you are running that risk. The Crows are best defended by heroes like Beorn, who don’t have to exhaust to defend. When the Eastern Crows are defeated, they get shuffled back into the encounter deck. This means that their Surge will be added back to the deck, which can be troublesome down the line. In higher player counts, it can be a good strategy just to keep the Crows alive, as they won’t be a big deal to defend but can be dangerous in the encounter deck. Killing them with Legolas or other cards that benefit players from killing enemies (Blade of Gondolin, Foe-Hammer, Proud Hunters) is still beneficial, especially if you have Thalin committed to the quest in the future. Shadow: The shadow effect raises the attack of the enemy by 1 in the early game. Once your threat reaches 35 and higher, the attack raise will be doubled. This can be quite dangerous as the Crows are common in the encounter deck, especially when killed. So make sure you have a little space between your character’s defence and the attack strength of the enemy to make sure this doesn’t accidentally kill your character.
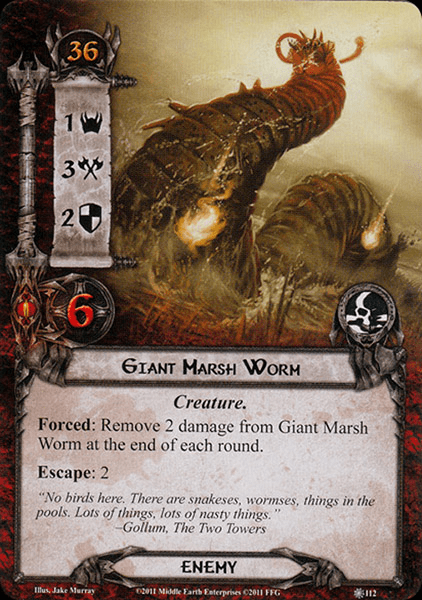
- Giant Marsh Worm: This is the only new enemy for this quest, and it is more of a damage sponge than an actual threat. The Marsh Worm will stay in the staging area for a long while until the players reach the danger zone of 36+ threat. But while the Worm is in the staging area, it only contributes a single point of threat, so there’s no reason to bring it down sooner unless you got no other enemies to worry about (or want to take care of a Goblin Sniper). While engaged, the Marsh Worm will attack for 3, which can be taken care of by most heroes and even some defensive allies. With limited shadow cards in this quest, you don’t have to worry about getting an attack buff on it too much. Attacking the Worm back will take some dedication by your defenders. 2 defence isn’t too troublesome, but 6 hitpoints is quite a lot. To make things worse, if you cannot kill the Worm in one shot, it will start healing 2 points of damage at the end of each round. This makes direct damage effects not so suitable for this enemy. This effect also completely negates the Poisoned Stakes trap card, so there’s no point in running that for this enemy, either. Instead, focus on dealing enough damage to do more than 2 damage each round; if you can only muster 4 attack strength that combat phase, focus on a different enemy if possible. Otherwise, just start slowly chipping away at this enemy.
Locations
The Dead Marshes are tedious to get through, and the new locations added to this quest make that very clear. They will make Escape tests more difficult to pass and will be a nuisance in the staging area as well.
- The Brown Lands: Out of all the cards in the encounter deck, this is the one with the most threat that you can reveal out of a single card. With 5 threat, you will lose a lot of progress that round, possibly preventing early progression to stage 2. The most important thing is that you still do quest successfully, as raising your threat will be less than ideal. But there is good news as well: apart from the 5 threat upon you revealing the card, the location is quite tame. This is due to its single quest point, which allows you to explore the Brown Lands in the staging area easily. The best tool for this is Warden of Arnor, as the attachment straight up discards the location after it is revealed. Other good cards to use are Spirit Aragorn and Asfaloth. Do note that Spirit Aragorn will need to have at least 5 willpower to place the progress on this location. If you do not have access to these fancy location exploration cards, don’t worry. The location clears itself when the players decide to travel to it. This makes it the best target to travel to in the travel phase. However, if The East Bight is also in the staging area at the same time, then the players have to travel there first, leaving The Brown Lands in the staging area for the next round. There you can explore it with Rhovanion Outrider or Northern Tracker, but if you cannot clear it or travel to it, then this location will be a big obstacle towards your progress. If you can travel here, do so. It places one point of progress on itself, which is enough to clear it (unless players used Elf-stone or Put Off Pursuit). If the location clears itself, then players are not able to travel to any other location unless a travel action is used, like South Away!, Thror’s Map, or Ghan-buri-Ghan. The best remedy against this location is to just have some progress-placing cards ready to get rid of this location.
- The East Bight: The mirror image of The Brown Lands is The East Bight, which does not have a lot of threat, but does take a lot of willpower to clear. While you would be tempted just to leave it in the staging area, the textbox on The East Bight forces the players to travel there if they have no other active location. This puts a buffer of 6 quest points between the players and making progress on the quest card so that you will need more willpower next round. This effect also blocks the players from travelling to more threatening locations like Brown Lands. If this goes on for too long, the players might end up with a location lock because of this. There are some ways that players can get past the East Bight more easily. The first is to make progress on it regardless of questing successfully. If you can guarantee to place progress on the location each round with effects like Lorien Guide and Map of Rhovanion, then the quest points become easier to overcome. Players can also find a way around the location by returning it to the staging area and making another location active. This can be done through The Hidden Way or West Road Traveller. This allows players to travel to other locations at the cost of returning the East Bight to the staging area. But since the location only has 1 threat, it is much easier to overcome this way. Spamming out willpower next round can also help, as you will need a big quest push to get through the location in one shot.
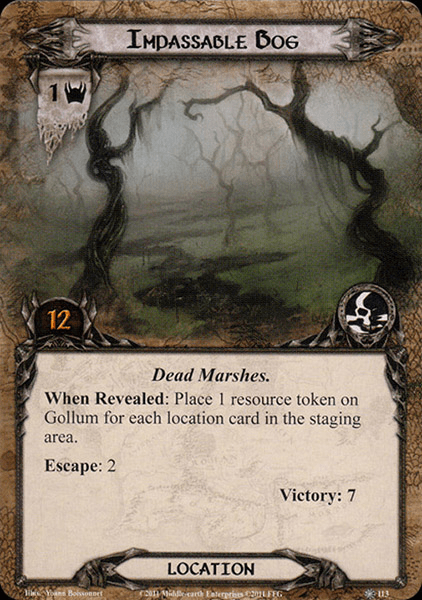
- Impassable Bog: This is quite a tricky location, simply due to the fact that it has 12 quest points, making it one of the toughest locations in the game to explore. And strangely enough, there isn’t really a reason for going here since the When Revealed effect won’t linger while this location is in the staging area. However, when we look at the When Revealed effect itself, we can see that you will want to try and clear as many locations from the staging area as possible, and the 4 copies of this card are not going to help with this. When this location is revealed, 1 resource token is placed on Gollum for each location card in the staging area. This includes the copy you just revealed. This can immediately cause Gollum to escape, so keep some cancellation ready for this location. Even if you don’t lose Gollum through this location, it will still sit in the staging area, waiting for the next copy to add even more resources to him. So travelling seems like a good idea. But with 12 progress required to clear this location, it will be a major roadblock on your way to completing the quest. Only if you are stalling because Gollum is in the encounter deck will you have enough time to go here. Or you can use Woodmen’s Path. This reduces the quest point value to 1, allowing you to instantly progress after making any progress on this as the active location. It’s preferable to clear it in the staging area since your Northern Trackers will need some turns to clear this. Other tricks, like spilling over progress from questing successfully with Explorer’s Almanacs can also work, but you need more willpower than you probably have. The good news is that when the Bog is explored, it gets added to the Victory Display for 7 points. So once you have explored a copy, you won’t face it again. There are just the other copies in the deck to worry about, but perhaps they will be revealed during an Escape test, where they add 2 points to the test’s total.
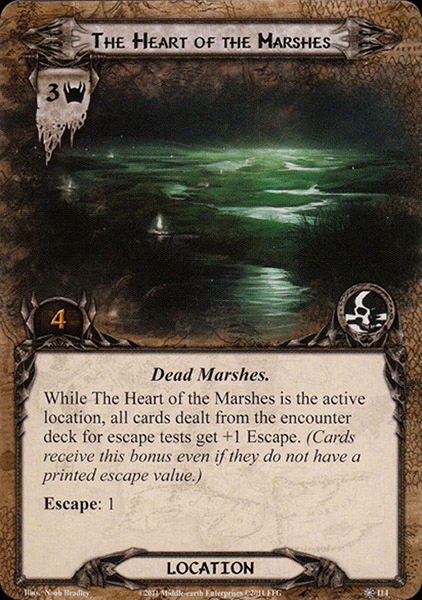
- The Heart of the Marshes: A more balanced stat line for this next location, with 3 threat and 4 progress required to clear it. There’s no brutal When Revealed effect this time, but if you decide to travel here to avoid the 3 threat, then you have to be careful during any future Escape tests. The Heart of the Marshes will add a point to the Escape value of every card, even those without a value. Those are usually deemed to have Escape: 0, but that now turns into Escape: 1. You can memorize this a little easier by just understanding that you are going to get at least 2 Escape points if you are forced to make a test with 2 encounter cards. You can compensate your willpower during the tests for this, sending a bit more than you usually would. If you have had no issue clearing the tests before this point, then the added +1 won’t matter too much, but in a higher player count game, the Escape test for Gollum can become pretty nasty with this active. So not travelling would be a smart move. Instead, focus on clearing these locations in the staging area. You can also travel here, but clear it during the combat phase or before starting the new quest phase. As long as you do not have to make an Escape test while this location is active, there is not much to worry about. Cards like Map of Rhovanion and Lorien Guide can help clear this location before it becomes a problem.
- Fens and Mires: This final location is pretty tame if you are handling location control well. There are, again 4 copies of this location, but with just 2 threat and 2 quest points, it’s not a terrible card to have to reveal. The threat in the staging area can easily be countered by something like Guarded Ceaselessly, and with just 2 progress required to clear the location, any progress-placing cards will do well here. If you do not run any location control and instead have to travel here to explore it, think twice. The location has a Forced effect that requires you to place 1 resource token on Gollum as soon as the Fens and Mires become the active location. This is not a travel cost, though, so if you do not have Gollum in play and still want to travel, you totally can. In fact, this is the ideal time to travel here since there is no downside in that case. Otherwise, you might want to avoid going here and leave the location in the staging area. With threat and quest points balanced, you would be better off going to a different location instead.
Treacheries
The new treacheries focus on making more Escape tests and placing additional tokens on Gollum. In higher player counts, this can put the players under some stress, as they can be forced to make several tests per round this way.
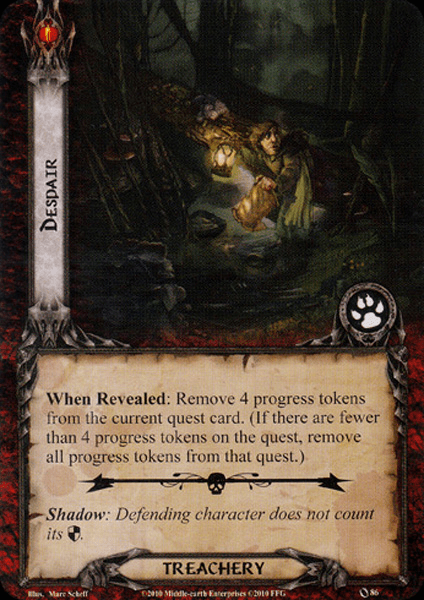
- Despair: It will be a good day when you reveal this from the top of the encounter deck. Not because the When Revealed effect is beneficial to the players, but just so you know, there is a lower chance of having this card pop up as a shadow card later on. The When Revealed effect on Despair is quite tame. The biggest thing that Despair does is remove progress from the current quest card. It does this to a maximum of 4 progress tokens, or all if you have fewer than 4 on the quest card. Note that this targets the current quest, so if you have 6 progress on stage 1 but have selected a side-quest for this phase with no progress on it, this treachery does not remove any progress since the side-quest is the current quest card. But even without side-quests, this treachery is not much of an obstacle during this quest. The lack of surge makes this treachery pretty underpowered, and it is often not worth wasting cancellation on. Especially since there are a lot of other treacheries in this quest that will be more worth canceling, you should have plenty of willpower to make up for any lost progress. Shadow: That is not the case with the shadow effect, though, which has taken the lives of many heroes over the years. Despair causes the defending character not to count defense for defending this attack. That means that the damage dealt is equal to the attacker’s attack strength. And if that attacker happens to be a big enemy, you can probably say “goodbye” to your defender, as it is unlikely they have 4+ hitpoints left. If you are comfortably defending with Dain or Beregond, that have a ton of defence built up, then it is all nullified by this shadow card, and any Troll can one-shot them both with this. Always have cancellation ready for this shadow effect, and keep track of where the two copies are in the encounter deck/discard pile. It just might save your hero from an early demise.
- Evil Storm: If you want another reason aside from the Hill Troll to keep a low threat during this scenario, then check out this lovely treachery. While players have a threat of 34 or lower, this does nothing; it doesn’t even surge. However, once any player reaches 35 threat or higher, and this treachery triggers, then they will have to deal 1 damage to each character that they control. While this sounds a lot like Necromancer’s Reach, it also does damage to ready characters, meaning that there is no escape for the weaker utility allies or characters that got damaged earlier and are just clinging on to life with 1 hitpoint remaining. The Evil Storm will deal 1 damage to all, causing potential board wipes in the later stages of the game. Keeping a low threat is the best remedy against this treachery, allowing you to save your cancellation for other treacheries that aren’t as forgiving. If you reveal this at a low enough threat, you will actually like seeing this treachery, as it does nothing at all.
- Pursued by Shadow: In a quest all about keeping a low enough threat, the last thing you would want is to suddenly have to raise your threat by quite a large amount. That is what this treachery can potentially do to you. When it is revealed, Pursued by Shadow raises each player’s threat by 1 for each character not currently committed to the quest. Don’t mind cards like Late Adventurer or Hobbit Pony; you can’t trigger those right now. This treachery looks at the number of characters you have left and forces you to raise your threat for each one of them. A higher threat can put you within the engagement costs of certain enemies and can mark you as a target for Evil Storm and Treacherous Fog. Cancellation is possible, but there are also other options to minimize the damage of this treachery. Free to Choose is not a popular event, but it can neutralize this treachery on the spot for you. The only problem is that you should have it in your hand early. It also only lowers your threat and not that of your fellow players. To ensure players reduce their threat again, Galadhrim’s Greeting can provide you with -2 threat after staging at the cost of 3 resources. If this puts everyone below 35 again, then it is a good card to play. Double Back is also a great counter to this treachery, as long as you manage to clear it quickly. Cancellation is also an option, but save it for other treacheries if you can. Shadow: The shadow effect on this card is quite unique, as it requires the defending player to return an exhausted ally to their hand. This can be quite bad if your only exhausted ally is the one defending this attack, as that will cause the attack to become undefended. Make sure you always have an ally to return who is not defending, just to avoid a nasty undefended attack if you are unlucky. Certain decks like the Silvan, Rohan, and Eagle archetype will love returning an ally to your hand, as that can trigger some interesting synergy in your deck. But if you have the option, return the character you either don’t need or who is easy to bring back into play. Should you have no (unexhausted) allies, the defending player must instead raise their threat by 3. The ally is usually the better of these two, so if you see this shadow coming, exhaust an ally before it triggers to avoid unnecessary threat increases.
- Treacherous Fog: This final treachery is a kind of combination of Evil Storm and Driven By Shadow. When it is revealed, it raises the threat of each location in the staging area by 1. This can be bad if you are already in the early stages of location lock, but if you managed to keep a lid on the locations you keep in play, this treachery shouldn’t add more than 3 threat on its own. The stinger comes in the second part of the treachery, where players with a threat of 35 or higher must choose and discard 1 card from their hand. The fact that players get to choose the card they discard makes this treachery hit a little softer, as players can discard copies of unique cards that are already in play if they want to. It would have been worse if the discard was random. The fact that this also only targets players at a threat of 35 or higher makes it quite a tame treachery that doesn’t do a lot compared to the rest. Only if you are really struggling with locations would this be worth cancelling, just because it saves you from a ton of threat. But even that threat is temporary, making this a better reveal than yet another location.
- A Wisp of Pale Sheen: You might know this card as a contender for the title of “worst art in the game”, though I personally think there are worse offenders out there. This treachery sucks for a few reasons. The first is that it has a rather high Escape value at 4, meaning that if you reveal any of the 3 copies of this card during an escape test, you will have your work cut out for you. The second part that makes this treachery a bit of a problem is the fact that its When Revealed effect does not allow players to make an Escape test, but instead forces players to immediately place 2 resources on Gollum. As a consolation, the players may exhaust a Lore hero to reduce this effect to 1 resource, which can shape the way the rest of the game is played out. Since Gollum leaves the staging area if he has 8 resources, and he tends to get them in pairs, then if he has 6 resources on him, the ability to exhaust a Lore hero can buy you some extra time. This does not have to be a hero with the printed Lore icon either, so if you have played a copy of Song of Wisdom, or have given another attachment to the right character like Ring of Barahir or Nenya, then those heroes are also eligible. Sadly, there isn’t really a lot of readying in Lore, save for Fast Hitch if you are bringing a Hobbit hero with you. And if you do not have any Lore heroes with you at all, then this treachery will just place 2 resources on Gollum. The “good” thing here is that if Gollum is already in the encounter deck (or discard pile), then this treachery won’t do anything. You don’t even have to do an Escape test unlike the next three treacheries.
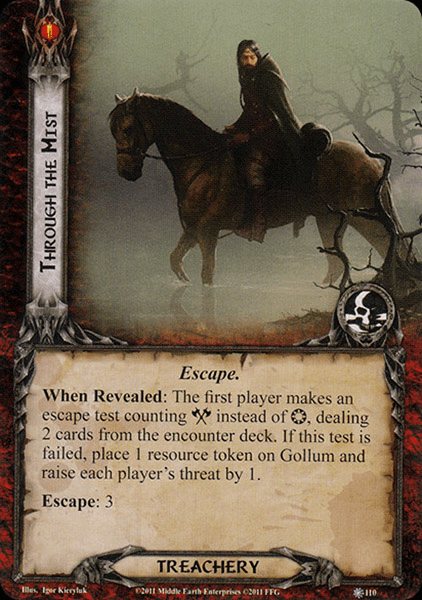
- Through the Mist: The first of these additional Escape test treacheries gives an interesting twist on the tests. Instead of committing your willpower to it, you have to use your attack strength. This can throw off the first player a lot, especially if they weren’t the combat deck at the table or if they are engaged with so many enemies that they can’t spare the attack strength for this test. In such cases, canceling this treachery can be understandable. If you are doing the test, keep in mind that certain weapons like Dwarven Axe will help you in getting more attack strength to the test, potentially clearing it easier with fewer characters. For this test, you have to reveal 2 cards from the encounter deck. If you pass the test, nothing happens. However, if you fail this test, 1 resource is placed on Gollum, and every player must raise their threat by 1. The resource is obviously worse here, but if you continue to fail tests like this, all those extra bits of threat are going to start adding up. If you find yourself crossing the 35 threat level, start considering playing some threat reduction, as it leaves you open to some worse treacheries.
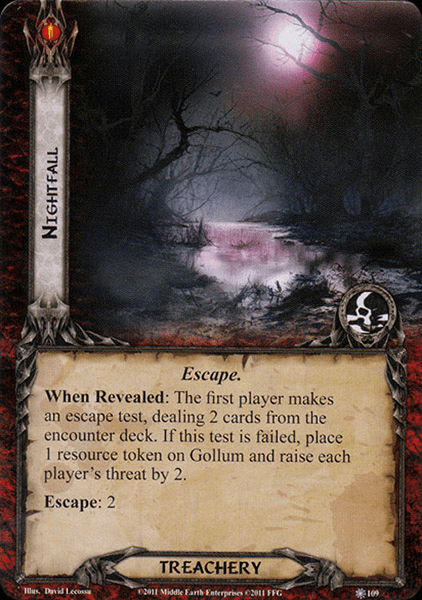
- Nightfall: Again, this treachery forces the first player to make an escape test, though luckily, you have to use your willpower for this one. You have to reveal the top 2 encounter cards from the deck for this test and then see whether or not you won or lost the test. Remember that there are no action windows during the staging step, so there’s no way to increase your willpower by means of events during this time. Effects like ally Faramir should also have been used before the staging step in order to increase your willpower for this test. If you pass the test, nothing significant happens. But if you should tie the total escape value or commit less willpower than it, each player must increase their threat by 2, and 1 resource is placed on Gollum. This test sees you increase your threat a little more than Through the Mist, but it is still not significant enough that I would suggest canceling the treachery. But if you really cannot afford to raise your threat (for instance, because of a Hill Troll engaging you), or if you want to keep characters back for sending them to the escape test at the end of the quest phase, then you could use someone like Eleanor to get rid of this treachery and replace it with hopefully something better.
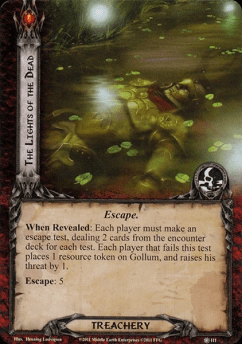
- The Lights of the Dead: By far the worst of the treacheries in this set, as it forces each player to make an Escape test, not just the first player. Each player gets dealt 2 cards from the encounter deck and must exceed the Escape value with the willpower on their committed characters. This can be tough for some players to do, but remember that there are a fair number of cards in the deck with an Escape cost of 0 (though Heart of the Marshes as the active location at this time is bad!). The only good thing about revealing this treachery is that you know it is out of the encounter deck, at least since this one comes with an Escape cost of 5, the highest in the deck (excluding Nightmare mode). If a player passes the test, nothing happens. But should they fail, then 1 resource token is added to Gollum, and that player has to raise their threat by 1. Luckily, this is done per player individually, so you don’t have to face constant increases in threat. However, this does come at the cost of potentially adding several tokens to Gollum during the staging step, and you still have his end-of-quest-phase test to do. Avoiding this treachery at all costs can prevent a quick reset or the long search for Gollum in the encounter deck. If you manage to find this card with Out of the Wild or Scout Ahead, remove it from the game! This will help you during escape tests too!
Worst cards in the encounter deck
- Enemies
- Hill Troll
- Marsh Adder
- Double Goblin Sniper
- Locations
- Brownlands/East Bight combo
- Impassable Bog
- Treacheries
- Evil Storm with a threat higher than 35
- The Lights of the Dead
- A Wisp of Pale Sheen with Gollum in play
- Any treachery requiring you to make additional escape tests
- Shadow effects
- Despair
Tips and Tricks
- Bring a lot of high-willpower characters. Characters that do not have to exhaust to quest are also highly advisable, as they can help with the quest and with the test.
- Do not commit everyone to the escape test if you have to make one because of a treachery. Remember that you have to do another test at the end of the questing phase. Each player should have characters ready to commit to these tests in case a treachery comes up.
- Plan for the final escape test and who is going to attempt it. That player should keep as much willpower back from the quest in order to pass the test. Other players should also try to boost that player’s characters with some extra willpower if they are able.
- Bring Shadow of the Past if you manage to lose Gollum, and he gets revealed as a Shadow card or is discarded with another effect. This will allow you to save a lot of time milling the encounter deck for him before shuffling the discard pile back in. Scrying for Gollum, in this case, can also be very effective.
- Location control is important to limit the effect on Impassable Bog. Try to clear as many locations as possible to prevent resources from piling up on Gollum. Bring a Test of Will for the Bog to cancel the When Revealed effect.
- Galadriel shines in this quest with her high willpower and ability to keep allies ready when they commit to the quest.
- Remember that this quest does not have a lot of shadow effects; this can come into play when defending the Wargs. Really have a way to either reengage these enemies, like Tactics Aragorn or have a way to deal damage to them in the staging area.
- There is no action window during an Escape test, so you cannot boost your willpower or attack strength after the cards have been revealed. Your best bet is to use willpower/attack strength-boosting attachments on whoever is testing, or to use your willpower boosts at the beginning of the quest phase.
Playthroughs
The quest is not super popular, so most playthroughs will only be progression playthroughs, using a limited cardpool. But if these decks can make it through, then you can certainly win this quest with a more modern deck.
- True solo, progression style: https://www.youtube.com/watch?v=pbM4QdUOHUE
- Two player, progression style: https://www.youtube.com/watch?v=V45zC5yj6Fw
- True solo, progression style: https://www.youtube.com/watch?v=LRdG9KJ4qa8
With Gollum captured and the end in sight, my next article will be on Return to Mirkwood. That will likely be a longer article since the quest is a bit more difficult than this one. It also has some tougher enemies and some nasty mechanics in its 4 quest stages. But I should be able to complete it before the end of the year. That will see the entire first cycle revisited, meeting the goal that I set earlier this year. Some other articles will also be popping onto the blog this month as well, including the yearly overview.

Hello! How is your health?
I hope it’s OK?
LikeLike
Hi Eugene,
Thanks for your concern. I’m happy to report that I’ve been scanned again a few weeks ago, and it showed no further tumors. So I get to at least be at ease that I’m healthy again. I’ll be undergoing a monitoring track for the next 5 years to keep an eye on things, but nothing as intense as the past few months.
LikeLike
This is a really good news!
Thanks for your site and what you do.
It is very interesting
LikeLiked by 1 person
What happens If Gollum has no tokens during te resolution of mission 2B? Zero cards dealt tô the final scape test? It is a automatic success?
LikeLike
Yes, if you manage to not get any tokens on Gollum once you clear that stage, then 0 cards will be dealt for the escape test and you would only have to overcome an escape test worth 0 points. You do still need to commit someone to the test though, else it would be 0 willpower against an Escape value of 0. You lose in such a tie. But any ally with 1 willpower would be able to clear the test for you, so that shouldn’t be an issue.
LikeLike