While this first Adventure Pack of the Against the Shadow cycle is best known for being one of the best stand-alone pack to buy for its player cards, The Stewards Fear is also a very enjoyable scenario. In it, players are forced to unmask a conspiracy set by an unknown opposer of Gondor against the Steward. This scenario is unique as there are 3 different plots that can be put in place by 3 different Villain enemies. This leaves the scenario with 9 different setups, making each playthrough a different experience. On top of it, 3 of these random setups are significantly harder as the Villain and the plot synergize with each other. So let us look what dwells in the shadows of Minas Tirith in:
The Steward’s Fear
- Found in Against the Shadow cycle, Adventure Pack 1
- Official Difficulty: 5
- Community Difficulty: 6.3
- Encounter Sets: The Steward’s Fear, Streets of Gondor, Brigands
- Quest cards: 3
- Play if: You enjoy a compelling narrative, you like to uncover secret plots and conspiracies, you have a side-quest deck you want to test out, you haven’t played this one in a while.
- What is different about this quest?: Explore locations to make progress, Underworld deck, different plots and villains.
- Solo or Multiplayer?: I would suggest players handle this scenario with up to 2-3 people. In solo, it might be hard to find enough locations to clear, while in a 4 player game you might be location locked. You can try with 4 players, but bring some location control cards to handle a large number of locations that might get revealed. Solo players will also have to have ways to deal with a lot of enemies engaging because of the Underworld keyword. In multiplayer, this becomes less of an issue. If you only have yourself to play with, consider doing this scenario two-handed, it helps broaden your deckspace a little and solves some problems you might have on your own.
- Can I run side-quests for this scenario?: Absolutely. The first 2 stages of the quest will require you to clear 4 locations each in order to progress. All excess progress on the quest card is wasted. This could be used to clear some side-quests for at least 6 turns. This can make the game a little easier for players.
- What to look out for: Unexpected enemies when locations are cleared, different conditions for losing, no progress on stages 1 and 2 but the requirement to clear 4 locations on each card.
The Quest
Setup
This is the first scenario that actively uses a second deck alongside the main encounter deck. This deck is referred to as the Underworld deck and will have to be made during setup. This deck consists out of all enemies from the Streets of Gondor and Brigands encounter set, but not the Underworld Dissidents from the Steward’s Fear. None of the Villain enemies are added to this deck. The 3 Clue objective cards are shuffled into this separate encounter deck as well. After that, it is set apart from the regular encounter deck. This deck will only be used for adding cards to locations to satisfy the Underworld X keyword. This keyword adds X cards facedown to the locations with the keyword. Once the location has been explored, all facedown cards are revealed and added to the staging area. The cards from the underworld deck will not be used for shadow cards or during staging. The cards from the Underworld deck that get discarded, are placed in the regular encounter discard pile. If ever the Underworld deck is empty, players will not reshuffle that deck, but they will have to ignore the Underworld keyword from there on out.
Besides this additional deck, the players shuffle the 3 plot cards and the 3 Villain cards. Then, they randomly select one of the Villain cards (without looking at it) and put it out of play. The other 2 Villains are removed from the game as well but don’t look at them. The same is repeated with the Plot cards. The choices of these 2 cards will decide an additional lose condition and the final boss of this scenario.
Players will also have to look in the encounter deck for the unique Roots of Mindolluin location and put it aside, out of play. This location will become active once players hit stage 2.
Besides this setup, no other cards are added to the staging area, making it look quite peaceful when compared to the previous scenarios. Players now flip over the quest card to side 1B and begin the game.
Quest card 1: Conspiracy
When this stage is revealed, players look for the unique location The Fourth Star and make it the active location. Since the location has the Underworld X keyword, players have to stack X cards underneath the location from the Underworld deck. X is the number of players in the game.
Having a location start off in the active location slot will be great, as players are able to explore it and get their first token on the quest stage on turn 1 if they make 5 or more progress during the first quest phase. The Fourth Star isn’t worth any victory points so you might see it again during the game. Now, players have to deal with the Brigands that lurked in the tavern. This kind of adding enemies to the staging area can be unexpected, and players might not have a plan to handle some of the nastier enemies. With all enemies being Brigands, they will have some terrible effect going off when they engage a player. They also tend to have a low engagement cost so you won’t be able to prevent them from coming down unless you are playing cards like Advance Warning.
Speaking of the first round, with no other cards in the staging area, now is the perfect time to draw into some of the nasty cards the encounter deck has in store for you. A Knife in the Back will not do much as you might not have any allies out in the first round. Lurking in Shadows is another card that will just surge, as there will be no Brigand enemies engaged with players at this point in the game yet.
To complete this part of the quest, players will have to have explored 4 active locations. Clearing locations in the staging area with location control cards does not count. The best thing players can do is to clear the active location each turn and travel to a new location immediately afterwards. This will cause players to spend 4 turns at this stage if they can reliably clear the active location and travel to a new one. Having A Prisoner and A Scrap of History objectives claimed can reduce this number of rounds. These clues are very useful if players are struggling to find and clear locations. However, I would argue that players save these objectives for stage 2, as the Plot revealed at that stage will require players to speed things up. It also helps to have the ability to clear the active location with location control cards. Cards like Strength of Will, Mirkwood Explorer and Asfaloth can target the active location, clearing it without the players needing to make progress that round.
Location control is a real threat in this scenario, so clearing a couple locations in the staging area cannot hurt if players have other options to travel to. City Street is probably one of the biggest contributors to the location lock, as it will not only surge but also prevent players from travelling to any other (higher threat) location. Playing a copy of The Evening Star can make short work of this problem though. Be careful not to clear all locations in quick succession, as this might cause you to add a host of enemies to the staging area because of the Underworld mechanic. This keyword still triggers if the location is cleared in the staging area.
At this stage (and the next one) it is a good idea to lay down some side-quests that you might want to explore. They can soak up any excess progress you would otherwise make on the main quest and provide players with a permanent bonus. There are no clear go-to side-quests here so you can clear what fits best to your situation.
Once the fourth token has been placed on the stage, players immediately progress to the next stage.
Quest card 2: The Grand Design
As soon as this quest card is revealed, players will reveal the set-aside Plot card they randomly selected at the start of the game. They add this Plot to the staging area and will have to enforce its effect for the rest of the game. The Plot will count as an additional losing condition or will cause players to raise their threat a lot faster so that they can threat out at 50 in just a few turns.
Besides adding the plot to the staging area, players also make the set-aside Roots of Mindolluin location the active location and trigger its Underworld 1 keyword. As long as this location is in play, all other locations gain a static +2 quest points, making it more difficult to clear the potential location lock in the staging area. Clearing this location is, therefore, the top priority in order to get out of the lock.
The same conditions apply to this stage as the previous one, clearing the active location will grant you a resource token on the stage. Having 4 of these tokens allows players to progress to the final stage. This will again take more than 4 turns to clear if the players don’t make use out of any Clue objective they find along the way. Side-quests are still a viable option at this point. I will stress that at this stage, players should hurry up. The plot will drive them close to defeat with every passing round. If players have gathered any Clue’s at this point, now is the time to redeem them and make some more progress on the quest.
Quest card 3: The Confrontation – 15 quest points
Now things get interesting. You have successfully cleared the locations and are ready to face the big Villain champion at this stage. The set aside Villain card gets added to the staging area as soon as the stage is revealed. No matter who it turned out to be, it is in your best interest to kill the Villain as soon as possible. This will prevent them from draining your deck, making additional attacks or raising your threat. Each of the Villains synergises well with 1 of the plots. If you are so unfortunate to draw the combo, it is imperative that you deal with the situation as soon as possible.
Besides adding the Villain to the staging area, the leftover Underworld deck gets added to the regular encounter deck and is shuffled. This will increase your chances to reveal enemies during staging, but you won’t have to deal with the Underworld keyword anymore.
This stage no longer requires you to clear the active location, but that you make 15 progress on the stage like normal. Besides this, players will have to have beaten the Villain and it is no longer in play. Note that none of the Villains has Victory Points, so it is theoretically possible to reshuffle the dead Villain and add it to the staging area during staging in the next round. But since it is crucial that you kill the Villain as soon as you can to avoid its effects, this is a risk you will have to take. The progress required for this stage should be achievable if players can actively dispose of locations in the staging area. In a multiplayer game, getting 15 progress should be easy and not take more than 2 turns.
And that is it, you have unmasked the conspiracy against Gondor and fought off the initial attack. Now you must hunt down the mastermind who has fled to the nearby Druadan Forest. Next time we will deal with that tricky scenario which cranks the Archery level-up to 100 and tries to clear your heroes of all their resources.
The Encounter deck
Global
These encounter deck statistics are based on the encounter deck at the start of the game, without any contamination of the Underworld deck.
- The standard encounter deck has 28 cards to reveal at the start of the game in Normal mode, 23 in Easy Mode.

- Shadow effects will appear on 61-69% of the cards between the two modes respectively.
- Average threat on cards revealed is 1.6 between both modes. This doesn’t count the fact that a lot of the cards surge.
- Surge is a keyword that is present on a lot of cards. Not only on treacheries that fail to trigger but also on City Street and Unwelcome Discovery.
- Doomed is actually not present in the deck. Local Trouble and other mechanics will raise your threat outside of the keyword, so be warned.
- Only the Umbar Assassin has the Archery keyword. This should be pretty manageable, in the next scenario the Archery keyword will be more troublesome.
- Immunity:
- Lost in the City cannot be cancelled
- Daughter of Beruthiel cannot be optionally engaged
- Market Square is immune to player card effects
The deck features a heavy focus on locations and treacheries. It will also tend to reveal more than just 1 card per player, so having ways to cancel Surge or benefitting from it will be a great asset in this scenario. The enemies will end up in the encounter deck at stage 3 or when the encounter deck has to be reshuffled. The statistics above are only valid at the start of the game.
The Underworld Deck
This deck is where players draw the encounter cards to put underneath the locations with the Underworld keyword. Cards that get discarded from this deck go to a shared discard pile with the regular encounter deck. Once the Underworld deck is empty, players no longer trigger the Underworld keyword. The cards can be reshuffled into the regular encounter deck if it ever runs out of cards or the players arrive at stage 3.
- The Underworld deck starts with 12 cards in Normal mode, 11 in Easy mode.
- Since the threat isn’t added to the staging area with the Underworld mechanic, this stat is not important to this deck. Same holds for Shadow effects.
- Clue chances improve in Easy mode from 25% to 27% of finding a clue. While this is great overall, it makes Unwelcome Discovery a bit worse.
Plots
There are 3 plots in this scenario that provide players with an increasing difficulty slope between stages 1 and 2. These plots will urge the players to move faster and finish the game before they lose due to the additional losing conditions described on the Plot cards.
- Poisoned Councils: This Plot is probably the easiest to remember, but can be devastating if you have had a lot of threat raising to do on the first stage. This Plot will require you to raise your threat by an additional 2 at the end of the round. This is on top of the 1 threat that is standard at the end of the round.
 Combine this Plot with a copy of Local Trouble attached to your hero and you have a big problem threat-wise. While you cannot be sure if this plot will trigger on your playthrough, bringing some threat reduction can easily save you some rounds before you hit that cap at 50. Poisoned Councils also synergizes with the Daugther of Beruthiel Villain, who requires you to raise your threat in order to keep her engaged with you. Drawing this combo will require you to defeat the Villain in 1 or 2 turns, else you will threat out. This Plot doesn’t cause all players to be eliminated once one of them reaches 50, unlike the other 2 plots. This is probably the lesser of all evils.
 - Unholy Alliance: Just like in Journey Along the Anduin Stage 2B, this plot will require players to reveal an additional card during staging. This will result in even more treacheries and locations getting added to the staging area, making it difficult to overcome the building threat in the staging area.
 Enemies will also appear more often, making it harder for players to pass the second stage. This Plot hurts most in solo, where you are revealing double the amount of cards during staging. There is no real way to avoid this Plot, except if players were to play Gildor’s Counsel consistently each turn. With a lot of enemies engaged, Unholy Alliance hopes to destroy a hero. Undefended attacks will be out of the question once this Plot turns up and players will have an increased need for healing for their heroes. A Knife in the Back can also be game-ending at this point. This Plot synergizes well with the Hand of Castamir Villain who discards additional cards from the encounter deck and makes more attacks when players are revealing more treacheries each turn.
 - Up in Flames: While this Plot can be devastating if players are playing with certain card draw heroes (looking at you, Erestor), it can also be easily countered. This plot tries to empty your deck by discarding cards at the end of the round.
 The number of cards you have to discard will steadily increase to the point where you are running low on cards. If any player has at some point no cards in his deck, all players lose the game. However, the card pool offers a great solution to this problem: Will of the West. This card allows you to shuffle your discard pile back into your deck before you run out of cards. In order to not have the event discarded due to Up in Flames, players can utilise Silver Harp, Dwarven Tomb or Map of Earnil to retrieve the event. Dwarven discard decks will love this plot, and Noldor can use some cards in their discard pile as an extension of their hand. I would not advise players to invest a lot of their card slots to card draw because of this effect. You don’t want to end up drawing your final card and losing the game because of it. Telemnar’s Bane will force players to discard even more cards, draining your deck faster.
Objectives
Fortunately, not all is evil in Minas Tirith and the guards are still present. There are a couple of benefitting objectives the players can find to help them make more progress on the stages and clear some locations if players were unable to quest successfully. I would recommend saving the objectives for the second stage of the game, as that is when players have to hurry in order to not get eliminated because of the active plot. These objectives can pop up as a result of the Underworld keyword and will sit in the staging area, unguarded.
- A Scrap of History: This objective will save you 1 resource on quest stages 1 and 2. This means that players will have to clear 1 active location less, and will save them roughly a turn or 2. Like I mentioned earlier, try to claim this objective on stage 2, when you are in pressing need of progress. I will note here that players will have to claim this objective while they are questing against the main quest, not against a player side-quest that they failed to clear that round. The resource goes on the current quest, so either clear the side-quest or go up against the main stage for once.
- A Prisoner: This objective does the same as A Scrap of History, only now you get to place 2 resources on the stage instead of 1. Always try to claim this objective first, as it can easily save you 3 rounds of staging. The same advice still holds as with A Scrap of History.
- Secret Map: At a quick glance, this objective seems to place 3 resources on the stage like the previous 2 objectives, but better. Don’t be fooled though, actually read the card! This objective can put 3 progress on the active location, potentially clearing it if the players haven’t amassed enough progress this round to clear it. Secret Map can save you from getting stuck with 1 location in the active location slot forever while the staging area is becoming clogged.

Enemies
While most of the enemies you will encounter during this scenario will be the same as you encountered in Pelargir, there will be 1 new non-unique enemy that will get added to the staging area during staging. Besides that, there are the 3 Villains of which you will only encounter 1 per playthrough. The other Brigand enemies will be a pain to engage (especially if they are forced to engage). Using Direct damage will be the best way to not have to deal with the horrible effects on most of these enemies.
- Daughter of Berúthiel: The first Villain the players can encounter is the Daughter of Beruthiel, named after the crazy cat Queen who ruled Gondor a long time ago. This 10 engagement cost Villain boasts the highest printed attack strength out of all Villains but has the weakest defensive stats. However, the Daughter has a few tricks up her sleeve to avoid getting dealt damage with regular attacks.
 First of all, she can’t be optionally engaged, making it hard for players to know who she will end up engaged with. At only 10 engagement cost, she can engage virtually everyone aside from the hardcore Secrecy player. After Daughter of Beruthiel attacks, she will bounce back to the staging area, ready to engage again during the next round, all the while contributing her 3 threat to the staging area. To counter this effect, the engaged player can raise his threat by 4 in order to force the Villain to stay engaged. This can be troubling if the players have some copies of Local Trouble lying about and/or have gotten the Poisoned Councils Plot. This will have everyone’s threat in the upper 30’s or even in the 40’s when stage 3 comes along unless someone has been playing a lot of threat reduction cards. A nice way around having to raise your threat is to Feint the Daughter. She makes no attack, which doesn’t trigger her Forced ability. This will also keep 1 character ready who would have otherwise have to defend the attack. Now the players can deal some damage to the Villain, potentially killing her. Her bouncy behaviour can also make her a good target for any traps left in the staging area, Poisoned Stakes and Entangling Nets will be a good fit.
 - Telemnar’s Bane: Telemnar was the 26th king of Gondor and ruled during the time of the Great Plague that wiped out his line, that is probably why his Bane is wearing a plague-mask as worn during the Middle Ages. This villain has some well-rounded stats, but his 7 hitpoints are the most noteworthy.
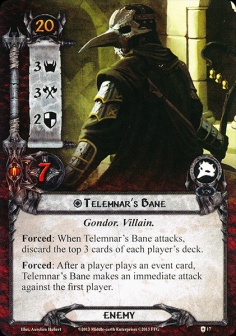 This enemy will require quite some attack strength to kill. While this 20 engagement cost enemy doesn’t attack for a lot, he is attacking more than once per round probably. Every time any player plays an event card, Telemnar’s Bane makes an immediate attack against the first player. This enemy can be nasty as he is unable to be feinted. Since those cancellation effects are often events, the Villain makes another attack. Andrath Guardsman will also not be an option, as the Villain is unique. Discarding Grimbold will be a very good option when Telemnar’s Bane is engaged with the first player. Players will then be able to play any events they want. Telemnar’s Bane synergises well with the Up in Flames Plot that forces players to discard cards from the top of their deck. Every time Telemnar’s Bane attacks (including attacks from his Forced ability) each player has to discard the top 3 cards of their deck. This is only really a threat while Up in Flames is the active Plot, besides that, there is no real downside to the effect, other than you will not be able to play the discarded cards.
 - The Hand of Castamir: This last Villain is probably the best rounded of them all. The Hand of Castamir is a reference to Castamir the Usurper who was on one end of the Civil War and eventually lost.
 This character makes an immediate attack against the first player whenever a treachery is revealed from the encounter deck. In a multiplayer game, players will want to kill this guy before the next staging step, otherwise, he could make 2/3 attacks outside of the combat phase easily. However, the Hand of Castamir can also make himself attack the first player multiple times. Whenever the Hand attacks, players must reveal the top card of the encounter deck, reveal the effects, and then discard it. This will trigger effects like Surge/Doomed/When Revealed effects. Obviously, this card is aimed at treacheries, as locations and enemies will have very few effects to trigger on their own. When a treachery is revealed this way, the Hand of Castamir will attack again and again, until a location or enemy is discarded from the encounter deck. Without proper cancellation or scrying, this effect can get out of hand easily. However, a simple Feint will neuter this enemy, stopping all attack-chains. With all of these effects, heroes might die, so Unholy Alliance seems like a good fit to this terrible Villain.
 - Underworld Dissident: Finally, the Underworld Dissident is the one enemy who starts the game in the encounter deck rather than the Underworld deck. This breaks the monotony of locations a little, but can also screw your planning for engagements for the round. At 25 engagement cost, it is likely that the Dissident will come down and play with at least 1 of the players. When attacking, the Dissident will get a boost to its attack strength of 1 for each Underworld location in play. In a location lock, this will be a fearsome attacker, though he is a bit sub-par if you have managed to keep the staging area clear of locations. Probably the best way to defend this character is by defending with a Gondorian Spearman+Spear of the Citadel. Not only is this a thematic win, but it won’t matter how many locations are in play, the Spearman will survive. Other direct damage effects can also certainly help, though I wouldn’t recommend bringing Thalin to this scenario, there are very few targets for him, especially in the early game.

Locations
Like Pelargir, Minas Tirith is a big city, with a lot of streets and houses. This amounts to a lot of locations that the players will encounter during their travels. Players will have to clear 8 locations at the very least in order to confront the final boss so you might do well to learn a bit about the locations and how best to clear them.
- The Fourth Star: This unique location starts off as the first active location. While it has 5 quest points that have to be cleared, the players all get to draw a card after the Fourth Star is explored. Note that it doesn’t get added to the Victory Display like you would expect. The tricky part about this location is that the Underworld X can lead up to 4 cards that get revealed from underneath the location in a multiplayer game (or more than 4 if you revealed Sewers during staging). This can cause many players to have to engage an enemy before they are ready for them. I would, therefore, suggest players communicate whether or not they are in good shape to handle an enemy each. If not, try to place some progress on the location, but not clear it this turn. While this will not allow you to travel this turn, it will save you from some attacks during the Combat phase.
- Roots of Mindolluin: The roots of the very mountain Minas Tirith was founded on will become the active location as soon as the players assemble 4 resources on the first stage. It immediately becomes the active location, meaning that players will have a new location to clear for Stage 2 without having to travel there. The Roots of Mindolluin have 5 quest points, which is a little on the high end of the spectrum. If players are facing location lock, they might be unable to clear this location in 1 round. It is vital to clear this location though, while it is in play, all other locations in the staging area will get +2 quest points, making location control a lot harder. This boost will also count for Roots of Mindolluin itself if players decide to swap the location with a West Road Traveller. The Underworld 1 keyword is very easy to overcome, as only 1 card will not be a huge problem for the players, unlike The Fourth Star. In a 4 player game, this 1 enemy should be easy to handle.
- Storehouse: A basic 2/2 location that will be an easy target to clear with location control. There isn’t anything special about this location, but it will force a card to be put underneath it from the Underworld deck. Think of this location as a non-surging City Street. This location has low priority to make active, but it will be nice to get rid of 2 threat in the staging area. It is an Underworld location though, meaning that it will boost the attack strength of the Underworld Dissident while it is in play.
- Sewers: Much like the Storehouse, but a bit bigger. This Underworld location requires 3 progress to clear, which is a bit more difficult to get with the standard location control cards. When this location gets revealed, however, it will force another card from the Underworld deck to be placed underneath the active location before it gets cleared. Drawing multiple copies of this location in the same round can make the active location a pain to explore, as you will add a host of cards to the staging area from underneath the active location. If players have no active location, the when revealed effect on this card does nothing. This location will have a bit higher priority to travel to than the Storehouse, as it contributes 3 threat to the staging area. Players will be able to explore this location in 1 go with the Secret Map objective.
- Houses of the Dead: This is the only unique location that doesn’t get targeted by any quest stage. It is also probably the nastiest new location added to the encounter deck. 4 threat is nothing to sneeze at, and by having 4 quest points it is also a bit of work to clear this location in the staging area. But I will recommend players clear this in the staging area. When this location becomes active all players will have to exhaust all characters they control. While this effect may be harmless if there are no enemies in play, this will not often be the case. In order to prevent players from having to play expensive events like Grim Resolve or Strength of Arms, I would suggest you try to clear this location in the staging area. For added benefit, try to use Leave no Trace in order to put this 1-off location in the victory display after you clear it. This will prevent you having to reveal this location again in the future. Please note that the exhaust-all-characters trigger is not a travel cost, so cards like Ghan-Buri-Ghan will not prevent you from exhausting your characters. Thror’s Key will be of use here, so that could provide some useful tech against this scenario.

Treacheries
Now, these treacheries aren’t the worst, they do drip with theme. One of them is actually a real treachery from one of your allies! Bringing cancellation will be useful as it might save you some characters or a round of questing. I will say that you won’t be able to stop Lost in the City, which will drag out some more locations. In solo, this card is great, as you might need more locations to clear. In multiplayer, you will have to cut your losses and try to clear the locations in the staging area ere you become locked.
- Unwelcome Discovery: This card’s title perfectly describes itself. This is a treachery you would rather not see. It will not only replace itself with Surge but will also add a card from the top of the Underworld deck to the staging area. If that card is an enemy, it gets added to the staging area. If that card is one of your wanted objectives, tough luck, you will have to discard it. You could play cards like Shadow of the Past in order to place the objective back on top of the encounter deck. This will guarantee a free card during the next staging step or a shadow card without effect. During the later stages of this scenario, the Underworld deck will have likely ran out of cards, so this treachery will only replace itself. The sting of this treachery is definitely felt during the first few rounds, as it basically surges into 2 cards. It can also keep this surge-train going by revealing a City Street, another Unwelcome Discovery or cards like Knife in the Back/Lurking in Shadows that might surge.
- False Lead: Oh now this treachery should be cancelled whenever it turns up. Drawing this card as the final card of your staging step will cause the encounter deck to have played some cards for free since the players won’t be able to make any progress. On the flip-side, if the players know that this card will come up during the staging step because they scried the encounter deck, they can do some nice tricks to save themselves. To start off, if you know this card turns up, don’t bother questing with anybody unless them exhausting has a benefit (Nothern Tracker, Arwen). Since the quest phase ends without resolving, you won’t have to raise your threat from questing unsuccessfully. This saves you some characters that you can use during the combat phase or for effects like A Very Good Tale. If you have any location control or the Secret Map, now would be the time to trigger those, in order to clear the active location. This will allow players to still add a resource token on the stage and travel to a new location during the Travel phase. In the later stages of the game, adding another round to your game will be terrible, so try to cancel this treachery should it pop up. There is more than 1 copy of this in the deck, so be prepared to have some rounds without making progress. With any luck, you will reveal this treachery before any other encounter cards, allowing players to do a bit of housekeeping in the staging area.
- A Knife in the Back: Well, don’t you feel like a fool for playing Gandalf this turn? This treachery will pick any ally under the control of the first player. That ally is declared a traitor and will deal X damage to a hero the first player controls. The effect does count any buffs the ally would receive from Leadership Boromir or Celeborn. This hopefully doesn’t discard any ally you really needed, nor will it discard a powerful ally like Erebor Battle Master which will deal a lot of damage to your hero. This treachery really deserves to be cancelled if you are running the risk of losing something valuable or if you have Unholy Alliance as the active plot. Damage redirection is also something that could really help you in this regard. Discarding an Honour Guard in Valour can save a hero from falling to this theme-dripping treachery.

Tips and Tricks
- Since the quest stages are cleared by exploring locations, you can quest against side-quests instead. This will make your excess progress tokens have a use. It will also make your quest a bit easier. You have a wide variety of quests to choose from, and you will have at least 6 turns worth of progress that can be used to clear these side-quests.
- Finding locations is critical during the first few rounds and can be tricky if you are playing in true solo. If you find yourself clearing locations faster than you reveal them, try adding in a Dunedain Pathfinder. This way you can make sure you have a location to make active this turn.
- While clearing locations in the staging area will not result in resources on the main stage, it will help you to overcome a lot of threat in the staging area. Location lock is a real issue in a multiplayer game and players would be wise to clear locations before they get stuck. City Street is always a good target to use Asfaloth on. Northern Trackers can also pull their weight, as you can always travel to newly revealed locations or to the immune Market Square. Location control will also be useful if you are forced to end the quest phase without resolving it because of False Lead. This will still open up the active location slot and allow players to travel to a new location this round.
- A Test of Will is a great card to include in this scenario. Any untimely False Leads will cost you a turn if you can’t make progress. Cancelling treacheries like A Knife in the Back will save you from losing a random ally (and potentially a hero) and Lurking in Shadows will save you from another engagement of any engaged Brigand enemies.
- There are ways in which you can explore 2 or 3 active locations in 1 turn, providing you with 2 resources on the quest in 1 turn. Using Legolas during the combat phase can clear locations like Storehouse and City Street outside of the regular quest phase. Players can also use Thror’s Map to first clear the active location like normal at the end of questing. Then, during the travel phase, they travel to a location. The players then unleash their location control cards on the active location (or Secret Map if it is in play) clearing a second location. Players can then use Thror’s Map to travel to yet another location and use other types of location control to clear it in the same round. This isn’t required, as players can also keep this location active for the following quest phase. But for the transition between stage 1 and 2, this technique will work in powering through this quest, provided you have the locations to travel to. This will also bring out some more enemies with the Underworld keyword, so watch out to not explore more than you can handle.
- There is a lot of surge to be resolved in this specific scenario. Packing cards like Lanwyn and Minas Tirith Lampwright will definitely help you out here. Lanwyn will be sure to ready and/or receive her willpower bonus. Since a large part of the encounter deck consists out of Treacheries and Locations, Minas Tirith Lampwright has about a 50/50 chance of hitting. Cards like Wingfoot are also some great includes in your deck. You will very likely reveal treacheries and locations, allowing you to ready a Ranger Hero.
- If you are finding this quest difficult in true solo, consider going two-handed. This allows you to focus your decks more and churn out more willpower. It also frees up some deckspace for tricks and location control cards, helping you aleviate location lock.
So ends the analysis on one of the more enjoyable and replayable scenarios in the game. This is in stark contrast to the next AP: The Druadan Forest. I can almost feel the archery keyword when mentioning the scenario. I might skip this one for later and move on to a scenario that is less challenging and is, therefore, easier to write about: Encounter at Amon Dîn. Don’t worry, Druadan Forest will come soon enough.

A Prisoner and A Scrap of History have actions, not quest actions, so you can claim them outside the quest phase. Since a side-quest can only be the current quest during the quest phase, you don’t have to let these clues interfere with your stage one/two side questing. It also means if you have a way of engaging an enemy (or making a strong attack into staging) you can advance from stage two to stage three between player defenses and player attacks in the combat phase, and take a free shot at the villain.
LikeLike
Hi. You mention using Ranger Spikes against Daughter of Berúthiel, but I guess that you mean Poisoned Stakes. In fact the Daugther/Spikes combination locked myself out of a win because I couldn’t engage her 😦
LikeLiked by 1 person
Good catch, she would get stuck in the staging area without a way to engage her. Should have been Poisoned Stakes. You can also try combining the Ranger Spikes with cards that attack into the staging area like Haldir or Dunhere, but if you are not going with such a build and have no direct damage, then you will lock yourself. I’ll adjust the article, thanks for the comment!
LikeLike