Oh yes, it is time to dip our toe into the nightmare scenarios. And what better place to start our misery than the very first (and easiest) scenario in the game: Passage through Mirkwood. The developers used this quest in its Normal mode to introduce players to the game and to have a relatively easy quest to lure people into a false sense of security when it comes to the difficulty of this game. In Nightmare mode, the developers are adding in new cards that require you to exhaust characters and reacting of characters being exhausted or not. It is still a relatively easy quest when compared to other Nightmare scenarios, but at least it has some challenge to it. Also, give this article from Darkling Door a read on how to best prepare yourself for the scenario, including some decklists that work against the scenario.
Nightmare Passage through Mirkwood
- Found in: Separate Nightmare pack: Passage through Mirkwood
- Size: 19 new cards, recognisable by the red borders
- Quest cards: 4 with 2 different stages 3
- Increase in difficulty?: Yes, there was no way it would be easier, there is a big jump between Normal and Nightmare. The big differences are the removal of beneficial cards and adding tougher enemies.
- Fixed loopholes?: There weren’t really any in the Normal mode, so no.
- New mechanics introduced: Encounter deck feeds on exhausted characters
- Play this scenario if: You don’t want to feel like a chump when saying: “I beat Passage through Mirkwood”, you want to try Nightmare mode, but don’t feel like getting crushed at every attempt, you want to enjoy the amazing artwork of these cards, you want Passage to be a bit more of a challenge for your decks.
- What to look out for: Overexhausting characters, taking undefended attacks, discarding heroes to Hummerhorns and the new Ungoliant’s Spawn, taking a lot of direct damage to exhausted characters.
New Rules
There are no new passive rules in the Nightmare version. The only new text that is included on the Nightmare card is that during setup, the players will have to reveal a card per player and add it to the staging area. This only takes effect at the beginning of the game, so players can disregard this rulesheet afterwards. This effect makes the start of the game a bit more difficult, as there is a lot more threat in the staging area, and the players might have to engage more enemies from the get-go.
New Setup
The basic setup for these Nightmare scenarios follow the rules on the new rulesheet. It requires removing some specific cards from the normal encounter deck and replacing them with the new Nightmare cards that were in the pack. This sets up the new scenario. Players will have to resolve this set up before the setup text on quest card 1A, though the order rarely matters.
Cards removed
- 1x Ungoliant’s Spawn (Replaced by a Nightmare version)
- 1x Black Forest Bats (Easy enemy)
- 3x Forest Spider (Easy enemy, one stays in the encounter deck)
- 3x Dol Guldur Orcs (Easy enemy)
- 1x Old Forest Road (Beneficial location, one stays in the encounter deck)
- 2x Forest Gate (Beneficial location)
- 3x Mountains of Mirkwood (Somewhat beneficial location)
- 2x Caught in a Web (Another condition treachery replaces it)
The Quest
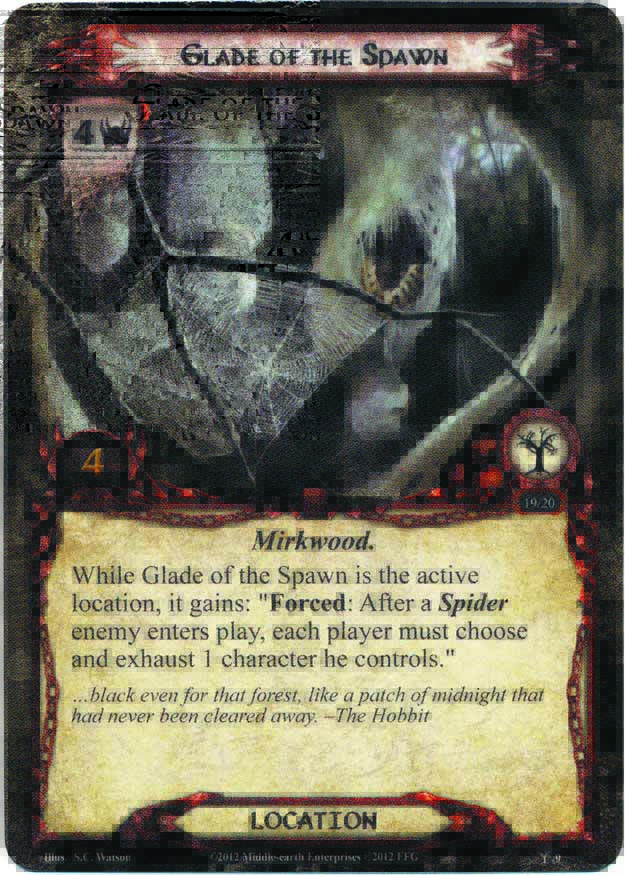
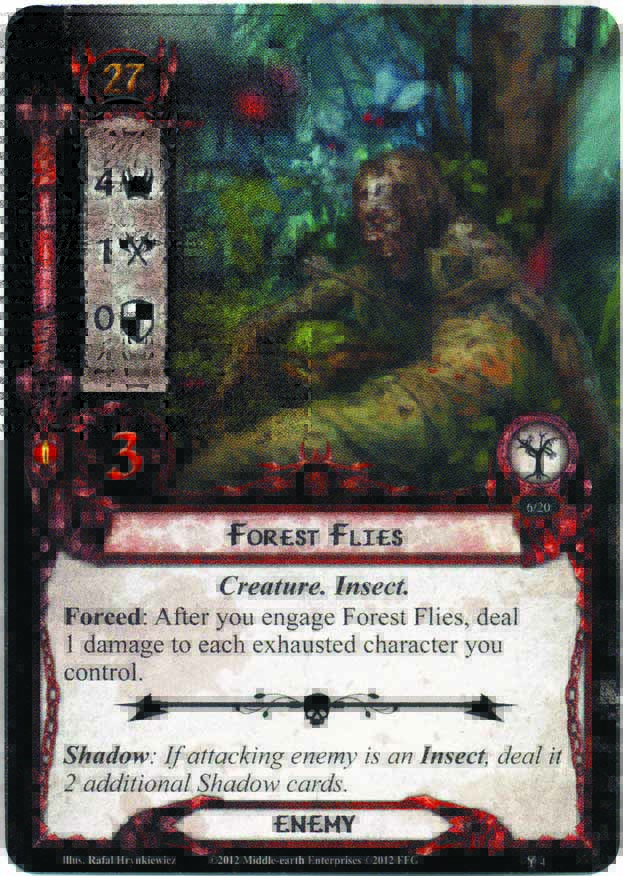
The quest doesn’t change much between this version and the original Normal version. The objective remains the same, and the game starts very much in the same way. The first big difference is during set up. Each player is instructed to reveal an encounter card after the Old Forest Road and the Forest Spider have been added to the staging area. Besides the normal cards of this scenario, players can now also start revealing Nightmare cards that will make the scenario very tricky from the start. Glade of the Spawn and Forest Flies will add a lot of threat to the staging area, the Spider’s Web will hurt a hero right out of the gate, and the new Ungoliant’s Spawn will be tough to take down in the first rounds.
There are some good cards to reveal at this part of set up though, Ungoliant’s Spawn won’t actually trigger her When Revealed effect, making it easier on your questing characters. Backtrack! will also not do anything except surge. It is good to get that treachery out of the encounter deck early, as it could recycle Ungoliant’s Spawn later. Necromancer’s Reach is likely one of the best reveals, as it doesn’t trigger anything, doesn’t surge, and won’t be damaging your exhausted characters later in the game. Driven by Shadow is also an easy treachery, it will only boost the cards already in the staging area until the start of the planning phase, making it only last when you are not questing.
After this setup, the players will have accumulated a fair bit of threat in the staging area, meaning that they will have to quest hard during the first few turns. Remember that the first player can send an additional hero to the quest if you are planning on travelling to the Old Forest Road that turn.
The rest of the quest is much the same as the regular scenario, only with tougher enemies and nastier locations. The new encounter cards feed off exhausted characters, so having readying abilities on heroes and allies will save you from having tougher enemies or having to damage other characters.
 The different stages 3 are also still the same, though having Beorn’s Path in play might be even luckier than in normal mode. If you go to “Don’t Leave the Path” (which you have left a while ago) you will have to find the new Ungoliant’s Spawn and kill her. Since the quest stage adds the enemies instead of revealing them, the effect on Ungoliant’s Spawn is negated. Since stage 2 only requires 2 progress tokens, you could clear it in the combat phase after you advanced to it in the questing phase. This will keep the Ungoliant’s Spawn in the staging area for the next turn but allows players to bypass the nasty When Revealed effect on her.
The same winning conditions apply to the quest as with the original quest. Players must either defeat Ungoliant’s Spawn at “Don’t Leave the Path” or they must make 10 progress on Beorn’s Path and not have Ungoliant’s Spawn in play. This shouldn’t be too difficult, as players will likely have a lot of experience with this quest. If the players defeat the last stage, they win the game and have defeated their first Nightmare scenario. Now the rat-infested waters of the Anduin await them in the Nightmare version of the classic Journey Along the Anduin.
The Encounter deck
Global
- The Nightmare version of this quest consists out of 37 encounter cards, of which 18 can be found in the Normal version as well.
- Shadow effects are about 50/50, with a lot of effects targetting exhausted characters and getting worse if the attack is handled undefended.
- Average threat on the cards revealed is 1.8 threat/card, with a lot of cards at 4 threat. So packing Radagast’s Cunning/Secret Paths is a good idea.
- Only 3 cards in the encounter deck surge, so you can be pretty confident you are only revealing 1 card per player per round.
- The Doomed keyword is not present in this quest, so you are free to bring your own threat raising abilities. There is some threat raising in this quest, though that is very rare (Ungoliant’s Spawn shadow effect for example).
- Immunity
- Only the Abandoned Camp is immune to player card effects.
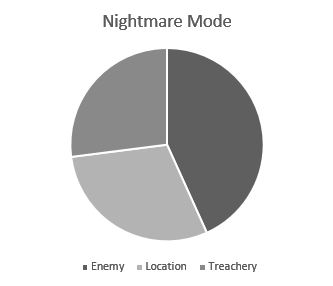
These stats do not count the Old Forest Road and the Forest Spider that start in the staging area. It is unlikely that these cards find their way back into the encounter deck. Comparing the pie chart to the Normal mode, there are more treacheries in this scenario, at the cost of locations. The rest of the stats are as expected, higher than Normal mode. It is a Nightmare version for a reason of course.
Enemies
The enemies in the Normal mode weren’t too difficult, so the nightmare version replaced some of them with tougher enemies. It also focuses more on the creatures and insects of the forest, rather than the Orcs.
- Ungoliant’s Spawn: The boss enemy of this scenario is back and has gotten an overhaul.
 Her stat line has remained the same, except that her defence has increased to 3, making her slightly harder to kill. The art is also horrific and will haunt your dreams for a while after playing this scenario. That is because the Spawn has gotten a new When Revealed effect that will stick in the back of your head after you have revealed her once during a game. The effect will lower the willpower of all questing characters and will discard those characters when their willpower has been reduced to 0. This does not discriminate between allies and heroes either, you will have to discard heroes as well if they were questing for 2 or less. This single effect can destroy a board state and can cause an instant scoop if the players are not prepared for it. In order to prepare for it, the players should start using global willpower boosting effects like Faramir (triggered before staging), the Arkenstone (saving your unique characters), Sword that was Broken, and trait specific boosters like Visionary Leadership, Dain, and Celeborn. This not only saves you your questing characters but will also make sure you don’t lose the quest since every questing character loses 2 willpower. Using effects like Hobbit Pony and Late Adventurer are not affected by this ability, as it only targets characters that are committed to the quest at that time. Killing the Spawn can be done in many ways, but a combination of high attacks can quickly get rid of her. Killing the Spawn will likely win you the game, though that depends on the quest stage you are at. The last thing to note about this enemy is the ridiculous shadow effect that can cause many players to threat out, especially if the attack was undefended. Raising your threat by 10 is one of the highest threat raising abilities out there.
 - Ungoliant’s Brood: While also carrying her name, these spiders are a lot smaller than Ungoliant, but still pack a punch. They have a solid line of stats that are spread pretty equally. 5 hitpoints make them very tough and can allow them to withstand the direct damage from Gandalf. The real trouble with these Spiders comes when you are engaging them. If you do, your cards won’t be able to ready until the end of the round. Since the refresh phase happens before the end of the round, this leaves your cards exhausted for the next round as well. This not only affects heroes and allies but also your exhausted attachments. If you exhaust characters or attachments after you have engaged the Brood, those cards will still be affected by the passive effect of the Brood. Global readying effects will help a lot with this and will prevent you from not contributing to the game next round. This is particularly nasty in a true solo game, as you can’t be carried by other players. It is advised that one player should take all the Broods at once, if possible, as the passive effect will only trigger on that player, sacrificing him for a turn so that the rest of the players can continue. The best tech against this enemy is Ranger Spikes, though it is hard to pull that off unless you know the enemy will be revealed soon.
- Forest Flies: Straight Shot, that is nearly all there is to this enemy. Avoid engaging it all together and snipe it out of the staging area when it is revealed. If you don’t, this enemy will contribute a massive 4 threat to the staging area, which really screws with your plans. However, since it only has an engagement cost of 27, it will come down to hurt the players sooner rather than later. When it engages players, they will have to deal 1 damage to each exhausted character, just like Necromancer’s Reach. This direct damage combined with other direct damage effects can lead to your characters dying quickly. During combat, these flies don’t hurt so much, as they only have 1 attack strength and no defence. They are killed with ease, but you should also declare a defender against them if you can. This prevents a lot of nasty shadow effects that get worse when attacks are left undefended. If you do let these flies go through undefended, you may risk losing your attachments, exhausting all your characters or raising your threat by 10! It is therefore advised that you kill the flies in the staging area, bypassing their forced effects and avoiding their attack. If you decide not to kill the flies, they become a great target for Followed, as they will lower the threat in the staging area by 4. Other good cards are Proud Hunters, Emyn Arnen Ranger, and Beorning Guardian, who all feed off of the high threat this enemy has.
- Spiders of Mirkwood: This enemy looks innocent enough until you realise that the Spiders get +1 attack for each exhausted character you control. This can result in an enemy who attacks for 8 with ease. When you are declaring a defender, you will likely have to exhaust that character as well, further increasing the attack strength of this enemy. You can best use a chump blocker against this enemy, or use a wide range of direct damage effects to kill it before it can attack. 4 hitpoints make it an ideal Sneak Attack Gandalf target. With a very low engagement cost of 18, you will likely have to face these spiders early, and not even Secrecy decks are safe from it. It is best to engage this enemy in the early game when you don’t yet have a lot of allies. This puts the enemy at a reasonable 5ish attack, which is manageable. Deciding with the other players who gets the Spiders of Mirkwood is also a good idea, allowing the player with the least exhausted characters to take the Spider, thereby reducing the threat it poses to the group.
Locations
There are two terrible new locations in the Nightmare version, but they have the Mirkwood trait, rather than the Forest trait, like the Normal cards. This prevents synergy with cards like Cloak of Lorien or Woodland Courier. An easy change to miss, but it can have big effects for specific decks.
- Glade of the Spawn: This is a perfect example of some more gruesome art in these Nightmare packs, I would really hate being the guy with his ribcage open and serving as a lunchbox for some spiders. The location itself is also quite fearsome, with 4 threat and 4 progress tokens required to clear it. This location will add a lot of threat to the staging area, so travelling to it may seem like a smart move. While in the staging area, the Glade is a great target for Secret Paths, lowering the threat of the location to 0 for the phase. While this location is active, players will have to exhaust 1 character each when a Spider enemy enters play. You may get lucky if you can clear this location quickly, as not all enemies are Spiders. If you do happen to draw a Spider during staging, it is bad luck. Keep a chump character in reserve for this effect if this location is in play. For solo games, this is the ultimate location to draw with The Hidden Way, as you both avoid the threat, and will likely clear it during the same turn without revealing another encounter card. This location is also suitable to be targetted with location control cards, either exploring it right away or reducing the threat it has on your board state. An Explorer’s Almanac will also be a great way to get rid of this location in the staging area, bypassing its effect as it won’t be the active location.
- Abandoned Camp: While this 2/2 location might seem pretty light in contrast to the Glade of the Spawn, it is actually a very dangerous location to explore. First off, it is immune to player card effects, making location control useless against it. You will only be able to explore this location by travelling to it and placing progress after questing successfully. But I am not sure that you will want to be doing this. The Forced effect on this location is pretty bad and will be laying waste to your characters. When the Abandoned Camp leaves play (note that it doesn’t say explored) the players will have to deal 2 damage to every exhausted character they control. This destroys most allies and can definitely pile up on exhausted heroes. There is no way to cancel this effect, so players will have just two options to avoid damaging their characters. Number one: Don’t travel to the Abandoned Camp and just let it sit in the staging area. The 2 threat isn’t that big a deal for most players, and the immunity prevents you from exploring the location accidentally. The other option is to ready all of your exhausted characters with Grim Resolve or effects like Lure of Moria for Dwarves before you explore this location. It is adviced that you use these effects before staging, as that might also damage your characters with Necromancer’s Reach. This method is often expensive, but does work great. It even leaves characters ready for combat. Exploring just one of these locations with Ents is also a lot of fun, as this will trigger your Booming Ents and will raise their attack strength immensely. Do get some healing on the board though, as there are multiple copies of this location in the encounter deck, and it could get recycled with Backtrack!

Treacheries
- Backtrack!: Hey, we have an Event with the same name as this treachery! This treachery does do a lot like its title suggests: it pulls out the top enemy or location of the encounter discard pile and adds it to the staging area. While this can be beneficial with Old Forest Road, it can also be horrific with Ungoliant’s Spawn during Beorn’s Path. In most cases, it will just add a regular location or enemy to the staging area, not triggering any when revealed effects. While it can be frustrating to revisit a location or to kill an enemy again, it is not the worst card in the deck, so save your cancellation for other treacheries. Remember that this card will also surge into another card, basically causing you to reveal 1 additional location or enemy from the discard pile, but also revealing a card from the encounter deck. Note that the treachery doesn’t target other treacheries and will only surge if there is no location or enemy in the encounter deck when it is revealed. You could argue to add The End Comes to your deck to prevent this treachery from happening, but you should really ask yourself if that is worth grabbing the card from your bike spokes where it has sat for 5 years.
- The Spider’s Web: This is the new treachery that you will want to cancel. This treachery will replace Caught in a Web as the Condition attachment in this scenario. It is, however, much more harmful to the attached hero and to the board state of the player who controls him. The player with the highest threat must first exhaust all heroes he controls. Then he gets to choose one of those heroes and attaches The Spider’s Web to that hero. While attached, the treachery counts as a Condition attachment with the forced ability to damage the attached character by 1 point each time the hero readies. This can rapidly drain a hero of their health during this quest. Not only will you have to hold that hero back for questing or combat, but you will also have to dedicate some healers to that hero should you ready him during the quest. Many encounter cards will require you to exhaust a character, making that hero more of a target, especially if you don’t have other characters ready. Try to cancel this card when it pops up, this will not only cancel the attachment but also cancel the text that requires the hero with the highest threat to exhaust all heroes they control. The other option that players have, is to discard the condition attachment with cards like Elrond, Miner of the Iron Hills, and Bulwark of the West. This gets rid of the treachery, but you will still have your heroes exhausted from the initial effect. This is particularly dangerous as the player with the highest threat is targeted, making combat a lot more difficult. This hurts even more in lower player counts and early in the game.

Tips and Tricks
- Willpower buffs like the Arkenstone, Faramir, Sword that was Broken, and faction-specific willpower boosts are all very useful in overcoming the threat in the staging area. It also shields your questing characters against the When Revealed effect of the Ungoliant’s Spawn, preventing her from killing half your board.
- Global readying effects will prevent characters from taking unnecessary damage from Necromancer’s Reach or Abandoned Camp. Try to use Strength of Arms or Grim Resolve after committing characters to the quest. This prevents the Necromancer’s Reach from doing anything. You will now also have enough characters left to neuter the Spiders of Mirkwood and to pay the cost of some shadow effects that demand you to exhaust a character.
- Try to recycle Old Forest Road to the top of the encounter deck after you have explored it. This can be done with A Watchful Peace or with Shadow of the Past. This will give you a beneficial card for your next quest phase and can ready a hero if you can travel to it. In solo, you cannot reveal a better card than this one, so recycling it will be worth the cost.
- Don’t take enemy attacks undefended! A lot of shadow effects get worse when attacks are left unchecked. This can cause you to lose characters more easily or even lose all of your attachments. Even commit a character to defend those Forest Flies, as their shadow may be worse than the initial attack.
- Try to ready your characters as early as you can. This might come in handy when you are engaging Ungoliant’s Brood. This will otherwise prevent you from readying that character this round (including the refresh phase).
- Location control will be your friend against some of these locations. If you can avoid paying the Travel cost for some locations, you will find yourself better set up against the scenario. Try to use specific location control cards like Asfaloth and Mirkwood Explorer to focus on some locations first, instead of using Northern Tracker to slowly pick away at a location.
Playthroughs
Since this is the first and probably the easiest Nightmare scenario, there are plenty of playthroughs to watch:
- 2 players, Progression style: https://www.youtube.com/watch?v=C80gvWrQsdY
- 1 player, updated decks: https://www.youtube.com/watch?v=ej8JcfRcTVU
- 2 players, updated decks: https://www.youtube.com/watch?v=DpMQViegxFA
- 2 players, updated decks: https://www.youtube.com/watch?v=wYuOAj2zhHg
- Two-handed, Progression style: https://www.youtube.com/watch?v=2Tb3YiRSyQE
- 2 player, BoF decks: https://www.youtube.com/watch?v=xMwkojqmsJg
And that’s it, the first of (hopefully) many Nightmare analyses on the blog. I am currently in the process of collecting Nightmare packs so I won’t be doing these in order. I am only going to make articles on Nightmare packs I own, to have a better feeling of the quest. I will invite anyone interested to make a Nightmare article themselves. You already have the basis of the quest and now also a template to use for your article. I might do another Nightmare analysis of The Hunt for Gollum (as I own that one as well), though I will first start with the Angmar Awakened cycle with the very first quest: Intruders in Chetwood.

4 thoughts on “Nightmare Passage through Mirkwood”