It was GenCon 2017 when all the players there got their first look at the brand-new POD quest for that year. It promised to be an epic battle following the siege of Dol Guldur during the War of the Ring. Players were gearing up for a fun quest that could also be played with up to 12 players. And at the end of the weekend, they had all lost. Dol Guldur was still standing, and no team had managed to get past stage 3. This is the brutality that this quest has in store for us, where you really have to bring decks that can take advantage of this quest’s mechanics in order to be able to defeat it. Later that year, during the Fellowship events, players were more successful, though they had been warned in advance by the GenCon players that this required some planning beforehand.
This is the last ever major POD quest ever released (not counting Hunt for the Dreadnaught), and it proves to be a brutal slaughter until you finally manage to clear out the pits of Dol Guldur, defeat the four Lieutenants guarding the final stages, and managing to deal enough damage to the citadel to bring it down. The mechanics mirror that of Annuminas, where you had to defend the city and prevent tokens from being removed from the objective. Now, you have to kill enemies and clear locations in order to make progress and free Mirkwood from the shadow of Sauron.
This article will only focus on the regular version of this quest. A dedicated Epic Multiplayer article can follow soon.
Attack on Dol Guldur

- Found in: Attack on Dol Guldur Print on Demand pack
- Official Difficulty: None, POD packs don’t get a rating
- Community Difficulty: 9.3, second highest difficulty only after Mount Doom.
- Encounter sets: Attack on Dol Guldur
- Quest cards: 3 stages, though stage 2 is just a transition and stage 3 can be chosen between 4 different stages, each with its own boss and benefits.
- Play if: You have a large team of players who are prepared for their biggest challenge in an Epic Multiplayer game to date. You somehow want to challenge yourself and your decks to see if you can beat one of the toughest scenarios out there. You don’t mind hitting your head against a brick wall over and over and over…
- What is different about this quest?: Rotating stages 3B, Possibility for Epic Multiplayer, Indestructible final bosses, Objectives to be earned, Defeating enemies and locations brings down the total health of the citadel; Locations can only be traveled to 25% of the time.
- Solo or multiplayer?: This quest is as close to impossible to beat as you can get in solo. You really are going to need help here, preferably with 2-3 players. This helps to spread the enemies among players, allowing some time to focus on canceling treacheries or clearing locations.
- Can I run side-quests for this scenario?: No, you cannot. You will need to make enough progress each turn at stage 3 to ensure nothing bad happens from the stage’s Forced effect. That requires at least 5 progress, but preferably 10. This gives you no time for side-quests at all. Stage 1B isn’t much better since you will need the progress to get the two objectives. If you don’t want those and prefer to take the time clearing 3 side-quests, I would suggest going for some with a permanent effect, like Keep Watch, Explore Secret Ways, or Rally the West.
- Can I bring Guarded (X) cards?: No, I do not recommend it. You could get lucky if you scry beforehand, and getting rid of treacheries this way can be super useful, but the chances that you hit a Forest Battleground or Mirkwood Olog-Hai are just too high. Dol Guldur locations aren’t much better since most cannot be traveled to until you are at the right stage. You would also put more threat in the staging area than necessary, preventing valuable progress from finding its way onto the quest card.
- What to look out for: Continuous boss-battle, progress lost via encounter card effects, threat increases, inability to travel to most locations which leads to location lock, big enemies to bring down, and constant negative effects from inactive quest cards.
The Quest
Setup
Before resolving the setup on quest card 1A, decide which mode of this quest you want to play, Standard or Epic Multiplayer. There are campaign cards in this set that should be resolved before you start with the actual quest setup. Since I will only discuss the Standard game mode in this article, I will forget about Epic Multiplayer for now, but its setup is largely the same as for Standard, just with 2 additional staging areas.
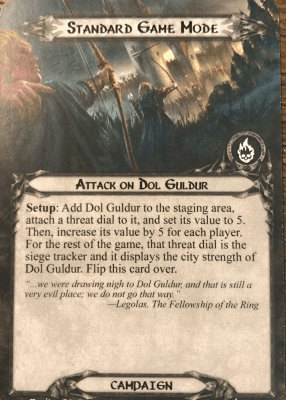
The Dol Guldur objective is placed in the staging area and will get a threat tracker attached to it to keep track of the city’s strength. The goal of the game is to bring this strength down to 0, which can be achieved by defeating enemies and clearing locations. These encounter cards have a Siege value in the lower right corner of the card. This value is deducted from the objective at the end of each round. Note that this does not happen instantly, as this could mess with the timing of when you are able to defeat the Lieutenants.
At the start of the game, the objective will have a Siege value of 5+5 per player. This can make it range from 10 in true solo to 65 in Epic multiplayer. Once the value is set, the Campaign card is flipped over to reveal the win conditions. We ignore this part of the card for now and instead focus on the setup on stage 1A.

To begin the game’s proper setup, the four Lieutenants are placed aside, out of play, as well as the Host of Lorien objective card. The other objective card, Power of Lorien, is added to the staging area alongside one copy of Dol Guldur Marauder per player. This is the weakest enemy in the encounter deck but can grow its stats the longer it stays in play. Once the enemies are added to the staging area, flip the quest card over and start your first turn.
Quest card 1: Assault on the Golden Wood

The first stage is really an endurance test, where you have to survive for three turns before you are able to advance. But these turns are quite important, as the more progress you make, the better your position will be going into the next stages. You must also use this time of relative ease to build up your boardstate and clear the staging area of as many enemies as you can. This leaves you with mostly locations in the staging area since many cannot be traveled to until stage 3.
At the end of every round, the players must move all their leftover progress to the Power of Lorien card. This is to ensure that players cannot build up progress on the main quest on the first turn to then remove progress here and there during subsequent rounds to encounter card effects. The progress is instead saved on the objective so that you can still keep track of it for stage 2 when leftover progress is turned into boons that you can carry with you to Dol Guldur. When the progress is moved to the Power of Lorien objective, also place a resource token on the quest card. Once there are three resource tokens here, the players must advance to stage 2 immediately
Another thing that happens at the end of the round is an optional response. The players may all raise their threat by 1 to choose a stage (including themselves in Standard mode). Each player at that stage draws a card and adds a resource to a hero’s resource pool. This is usually worth the increase in threat, though doing this can often cause you to have a higher threat going into the next stage. If you are digging for a card or are looking to accelerate your boardstate, this is worth doing. But discuss this with the rest of your team since this is not an individual decision. Most people will just do this without much hesitation.

This stage will revolve around making as much progress as possible (30 ideally, but at least 10) in three turns. The first turn is usually the best time to make most of this progress, though keep in mind that each player will likely engage a Dol Guldur Marauder. These small enemies will engage at 24 threat, so you might have to leave bigger enemies that were just revealed in the staging area. Revealing locations this early on will also hinder progress, though you can try to use Guarded Ceaselessly and Power in the Earth to reduce the threat of the locations you cannot travel to. Familiar Lands is also an event that can work wonders in this quest with the right setup to ensure the most progress is placed on the quest each turn. Note that during this stage, defeating enemies and locations does not remove city strength from Dol Guldur. That only happens during stage 3. So killing everything will not lower the siege value that you have to overcome, but it will help to give you an easier time when transitioning to the next stages. The best you could do is to damage all enemies up to 1 HP remaining and then kill them all during stage 3.
Once the third resource token has been placed on the main quest, the players advance to stage 2 and leave Lorien for Dol Guldur. Note that you do not get to trigger the Response on the quest card during round 3 since you will advance before you get the chance to trigger the effect. At most, you can raise your threat for this effect twice in the game.
Quest card 2: Crossing the Anduin

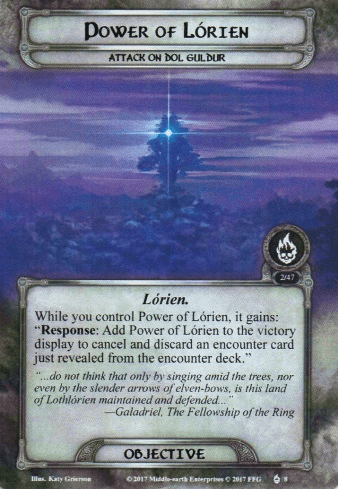
This is really more of a transitional stage to setup the mayhem at stage 3. That is where you will start to actually reduce the city strength of Dol Guldur and will get to “enjoy” shifting between stages. For stage 2 however, you are awarded with the objectives for this quest if you made enough progress. 10 progress on Power of Lorien will get you the copy of Host of Lorien. This is a very strong Silvan ally that will be able to help out with Ranged and Sentinel as well. If you still have 20 progress left on Power of Lorien after that (so 30 progress in total), you can remove it and take control of Power of Lorien. This will give the option to cancel and discard any encounter card just revealed from the encounter deck. It is basically a universal The Door is Closed that does not require setup. It is only a one-time use of this, though, since you have to put it in the victory display when you use it.
If you didn’t have enough progress for either objective, you get nothing, and the progress is just discarded from Power of Lorien. You then flip over stage 2 and trigger the When Revealed effect. With this, each player must search the encounter deck for a Dol Guldur location and add it to the staging area. In higher player counts, this can end up causing a location lock, though there is a limit of 2 copies for each of the 4 locations. If you are “lucky,” all Dol Guldur locations are already in play, and you do not have to get new ones. If you are given a choice, consider picking one where you can travel to this round. It should match the stage you are about to select. With more than one player, try to choose different locations since you will be forced to go to different stage 3’s at the end of each round. This gives you the option to travel next turn as well, assuming you manage to clear the active location slot.

Keep in mind that the Dol Guldur locations have different passive effects that will harm you while these locations are in the staging area. If you are picking several locations, try to go for some that keep your decks open. The Shadow Road is usually my last pick since it will dissuade you from playing events in the quest phase. Gate of Dol Guldur or Dungeon Door are usually better to get.
Once each player has added a location to the staging area, the team must choose which of the four stages 3 to go to. They all have different Lieutenant enemies and effects for placing not enough progress or at least 10 progress. Read up on the stages to decide which stage to go to next. You will see several stages over the course of the game, so it won’t lock you out of any destinations right away. Once a stage is selected, the players go there and follow the instructions on sides A/C/E/G.
Quest card 3A/B: The Siege of Dol Guldur

This first quest card is probably one that you will want to go to often, as it helps to bring down the city’s strength faster (as long as you can make enough progress). To begin with, the players remove all tokens from the Lieutenant enemy at this stage and set it aside. You now take the stage-specific Lieutenant enemy and put it into play. For this quest stage, that is the Bane of Amon Lanc. This Troll enemy is pretty big and will be hitting for a lot, depending on how expensive your deck is. If the Bane of Amon Lanc is already in the victory display at this point, you do not have to add him to the staging area. This can sometimes happen if you’ve killed the Lieutenant but were forced to increase the city strength of Dol Guldur before the end of the round. It is more common in Epic Multiplayer games, where another team has taken care of this enemy already. In most cases, you will just be adding the Bane to the staging area. If the city strength is 5 or lower (10 or lower in Epic Multiplayer), the Lieutenant will make an immediate attack against each player.

So I think it will be best to discuss the Bane of Amon Lanc next since this enemy will be making some attacks over the course of the game, and you will want to prepare for it. This Lieutenant enemy has 5 attack, which will be boosted by the cost of a random card from your hand. You must pick one at random and discard it, which will grant the Bane some boost in attack strength. Of course, it will be best to have a cheap hand at this point, with only a few cheap or even free attachments/events. At that point, the Bane can still be defended by a dedicated defender without issue. But if you see that you have some 3+ cost cards in your hand, it might be a better call to chump the attack instead. There is no immediate punishment for chumping this enemy, but some shadow effects might be worse.
A common trait for all these stages is that the Lieutenant enemies get -1 engagement cost per progress on the main quest. If you manage to keep a threat below 30 during this time, you will be able to avoid this enemy during the regular combat phase. Beyond his printed stats, the Bane of Amon Lanc also has immunity to player card effects and is indestructible. He can have damage but won’t leave play when the damage exceeds his hitpoints. This only changes once Dol Guldur’s City Strength reaches zero. Damaging the Bane of Amon Lanc won’t be easy since he has 3 points of defence and 9 hitpoints. But you will have had some experience killing big enemies during this quest, so it shouldn’t be a problem bringing this enemy down.

Another thing that all quest cards share is their end-of-round effect. At the end of the round, the players must either remove 5 progress from the main quest or do a terrible thing. For The Siege of Dol Guldur, that thing is truly horrific, as you will have to increase the city strength of Dol Guldur by 3. This can mess with your victory conditions and will greatly delay any plans for a quick win. It buys the encounter deck another round to try and beat you. If you score between 5 and 10 progress for the quest, there is nothing that happens, and you are free to swap quest stages as instructed by the campaign card. If you score more than 10 progress at the end of the round, you get to reduce the city strength of Dol Guldur by 3 points, which can help out a lot during your fight, especially in lower player counts. Because of this effect, the Siege of Dol Guldur should be traveled to as often as you can, provided that you are able to make the 10 progress for it.
Quest card 3C/D: The Tower of Sorcery

The next quest stage that you can select will help decks that are desperately looking for combo pieces to make their decks work. Side-quests for this scenario are not a good idea, so you won’t have had the chance to get Gather Information at this point. Luckily, this quest card gives you a chance to find what you are looking for, but let’s start at the C-side of the card first.

Like the previous quest card, you must remove all tokens from the Lieutenant in play and set it aside. You then find the quest-specific Lieutenant for this stage, which is the Sorcerer of Dol Guldur, and add him to the staging area. Should Dol Guldur‘s City Strength be less than 5 (or less than 10 in Epic Multiplayer mode), the Sorcerer makes an immediate attack against each player in turn order. This is troublesome since the Sorcerer has the highest base attack stat of all Lieutenant enemies in play and comes with a nasty Forced effect. This forces the defending player to discard the top card of your deck and then discard all copies of that card from play. This not only targets cards that you control but also any copy that another player might have. With a bit of luck, it hits an event, or you are playing a Council of the Wise deck, but decks that run 3 copies of several allies must be very careful with this Lieutenant. Outlands decks are not the best archetype to bring to this stage unless you found all copies already. The 6-base attack is also difficult to deal with and will usually be chumped by an ally.
The same text can be found when you flip the card over to side 3D, here as on the other quest cards. The Sorcerer gains -1 engagement cost per point of progress on this stage, meaning that you will want to keep a low threat in order to avoid having to discard more cards from the top of your deck and potentially losing cards in play already. Avoiding a 6 attack enemy is generally a good thing to think of, regardless of what quest it is.
At the end of the round, the quest card will require you to discard 5 progress from it in order to avoid doing a bad thing. This stage’s bad thing is discarding the hand of all players except for one card of their choice. This effect hurts many decks that have not been able to play everything in their hand yet, but if you are playing Noldor or only have a single card in your hand, this effect does next to nothing. If you manage to achieve 10 progress on this stage, you get to instead search your entire deck for a card and add it to your hand. This works much in the same way as Gather Information or Word of Command and can help the players find the card that they are in need of most in this situation. It helps to get ahead of the encounter deck and can get combos going a lot faster next turn!
Quest card 3E/F: Battle under the Trees
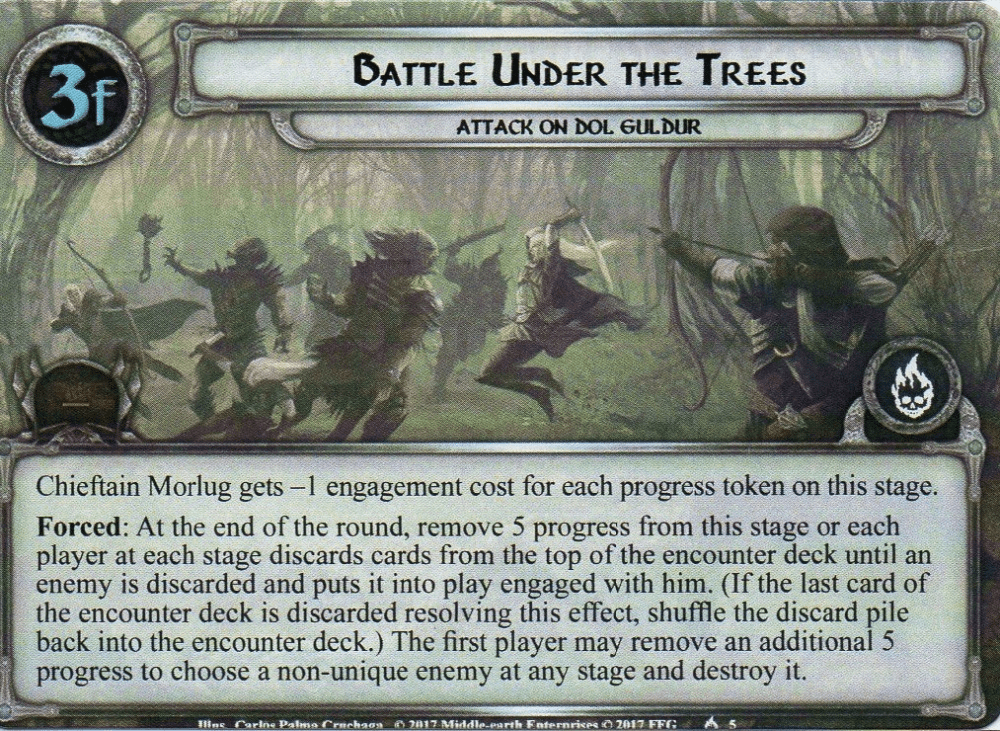

This next quest stage takes place in the forest surrounding Dol Guldur and is focused more on combat than the other stages. If you are having an easy time clearing enemies and are now stuck with an empty staging area (when it comes to enemies, I doubt you’ll clear all locations), then this is the stage to go to. It begins in the traditional way by putting the previous Lieutenant out of play and adding in Chieftain Morlug. Then, if the players are far enough in the game that Dol Guldur’s city strength is 5 or less (10 or less in Epic Multiplayer), Morlug makes an immediate attack against each player in turn order.
This extra attack is troublesome, and you really want to avoid going here if the city strength is low enough. Not that Morlug himself is that bad, he just hits for 3, but his Forced effect requires you to discard cards from the encounter deck until any enemy is discarded and then put that enemy engaged with you. There is no further requirement for the enemy, so it can range from a Marauder to a Host of Dol Guldur. That’s the real problem here, as now each player will have to tank an attack from Morlug and figure out what to do with a random enemy in the combat phase, on top of whatever will engage from the staging area.
Side 3F is what you’ve come to expect at this point, but I would strongly recommend not having a high threat for this stage, as you will be engaging a lot of enemies there and will get another one for Morlug. While this can lead to a big push against Dol Guldur if you manage to kill all those enemies, it might be too much for a regular deck to overcome, having to both defend and kill all engaged enemies. And if you are not making enough progress for this stage, things will get even worse since 5 progress is required to avoid triggering the negative Forced effect on this stage. It will discard cards from the top of the encounter deck and put the first enemy discarded this way engaged with a player. This must be done for each player at each stage, so it can quickly snowball from there. Should this effect drain the encounter deck, you must reshuffle the encounter discard pile into the encounter deck and continue. If, however, the players manage to get 10 progress on this stage, the first player may choose a non-unique enemy at any stage and destroy it. Note that this will add the Siege value of that enemy to the total of that round, so Dol Guldur’s city strength will be reduced for this. It’s a nice tool to get rid of tough enemies like the Host of Dol Guldur or an Olog-hai.
Quest card 3G/H: Dungeons of the Necromancer


Our final quest card for this stage is the covert mission into the Dungeons of the Necromancer. The rewards here can be very good, resulting in free allies. But if you do not make it far enough, you will be caught by the Lieutenant, that will force you to discard allies instead. If you are playing a Three Hunter’s deck (first of all, good luck), then you will find no real benefits here, except for not having to rush the quest very hard since there is nothing to lose either.
We start as per usual by removing the previous Lieutenant from the game and adding in the Dungeon Dweller. Should the players already have made it to the end game and have fewer than 5 (or 10) city strength remaining, the Dungeon Dweller will make an attack against each player in turn order. This Lieutenant doesn’t stand out much among the rest of its peers but will have a very simple Forced effect. When the Dungeon Dweller makes an attack against you, you must discard an ally from play. If you have no allies, this effect does nothing, but note that this can target the Host of Lorien, which would be a shame to lose. The rest of the attack will be relatively easy to defend compared to some of the other Lieutenants.

3H works the same as the other stages, keep a low profile in order to avoid the Dungeon Dweller, but ensure you make enough progress to remove enough to avoid the negative effect and potentially get the positive effect! The negative effect will target every player (at each stage) and will force them to discard an ally they control. In a multiplayer game, this can result in a big loss in action advantage and board control, though there are some good targets for this effect. Core Set Gandalf is going to leave play anyways, so discarding him is no extra cost. Some other allies can also be brought back from the discard pile and will make good targets. If the players manage to remove a total of 10 progress from the stage, they may choose a player at any stage to search the top 10 cards of their deck for an ally and put it into play for free! This does require a bit of luck, but getting this stage early in the game can get you a nice discount on useful allies like Firyal and Elfhelm. It does involve a bit of luck with your top 10 cards, so there are some risks involved with this stage.
The endgame and how to beat the quest

With all four stages sharing similarities but not showing how to actually beat the quest, I decided to take an extra segment to explain how to actually survive for long enough to beat this quest. The goal here is to kill enemies and clear locations with a Siege value in the bottom right corner. Collect any cleared locations and enemies that were defeated in a separate pile next to the encounter discard pile since you will have to add all those values up, and then subtract that from the city strength on Dol Guldur at the end of the round. After having done that, the cards can be added to the discard pile as per usual. You continue to do this until the city strength is reduced to 0. At that point, the Lieutenants will lose their Indestructible keyword and can now be destroyed by the players. The players can only win if there are no Lieutenant enemies in play and Dol Guldur’s city strength is at zero at the end of the round. That means that you might have to last a little while longer after defeating the Lieutenants if you happened to have to resolve the Forced effect for The Siege of Dol Guldur. For more info on your win conditions, consult the campaign card. Players have had issues in the past with deciding when exactly they win, so keep yourself to the following checklist:
- Dol Guldur‘s city strength is at 0
- There are no Lieutenants in play
- It is the end of the round
Once those three boxes have been checked, congratulations! This is not an easy quest to beat, but you did it anyways (or you forgot one of the many timing windows, which can be forgiven)! Now to find enough people to do it all again in Epic Multiplayer mode!
The Encounter Deck
Global

- The encounter deck is made up of 40 cards. There is no easy mode for this quest, so the encounter deck remains unchanged.
- Shadow chances are 50%; many effects try to discard progress from the main quest, so making extra progress will help you to prevent falling short.
- The average threat on cards revealed is 1.5. This can range from 0 to a lot since Forest Battleground technically doesn’t have a limit!
- 6 cards will surge automatically, and 2 more cards will surge once the city strength is low enough. This can cause a pretty serious surge train to appear in multiplayer games!
- Doomed 1 appears on 4 cards, but remember that there are a lot of other effects, like Blackened Woods, that will raise your threat as well.
- Archery appears on 3 copies of Amon Lanc Archer and 2 copies of Host of Dol Guldur. This will result in quite a lot of direct damage during the game.
- Immunity
- Dol Guldur locations can only be traveled to during the right stage.
- Lieutenant enemies are immune to player card effects and will be deemed indestructible while Dol Guldur has any city strength left.
- Beast of Taur-nu-Fuin cannot have attachments, and its shadow effects cannot be cancelled.
- Host of Dol Guldur cannot have attachments.
The encounter deck is decently balanced but has a preference for enemies. This is especially true after you have gone through the deck once since many of the locations will stick in the staging area for a while. The lack of an easy mode did make this analysis easier, but it will also mean that you have to face the entire deck during your attempts. If you cannot handle that at the beginning of the game, try and use sleazy mode.
Objectives
It wouldn’t be a special quest if there weren’t some objectives to take control of! This quest gives you two possible boons to add to your team while also giving a location objective that you have to bring down in order to finally beat the game.
- Power of Lórien: The first of two beneficial objectives you can get is the more expensive one out there, requiring a total of 30 progress to be placed in the first three turns. The objective starts in the staging area and will act as a pool for any leftover progress from the main quest at the end of the round so that each round starts with an empty pool in order to not make the decision to either remove progress or do a horrible thing easier. If the players do not secure the 30 progress during their first three turns, the Power of Lorien card is discarded. That means it might get reshuffled into the encounter deck once it is empty, which means it can reappear again. It can either be an empty shadow card if it is dealt as one or a free encounter card if you reveal it during staging. If it is revealed again, it will just sit in the staging area, not doing anything. You cannot discard it again, so you only get one freebie, though that is a real blessing in this quest.
The first of two beneficial objectives you can get is the more expensive one out there, requiring a total of 30 progress to be placed in the first three turns. The objective starts in the staging area and will act as a pool for any leftover progress from the main quest at the end of the round so that each round starts with an empty pool in order to not make the decision to either remove progress or do a horrible thing easier. If the players do not secure the 30 progress during their first three turns, the Power of Lorien card is discarded. That means it might get reshuffled into the encounter deck once it is empty, which means it can reappear again. It can either be an empty shadow card if it is dealt as one or a free encounter card if you reveal it during staging. If it is revealed again, it will just sit in the staging area, not doing anything. You cannot discard it again, so you only get one freebie, though that is a real blessing in this quest. - Host of Lórien: While starting the game out of play, the Host of Lorien is actually the objective you will interact with most. It is the easiest of the two objectives to earn, requiring just 10 progress on Power of Lorien in order to obtain it. The first player gets this ally when transitioning to stage 2, but it will stay with that player for the rest of the game. The Host sports some amazing stats (especially for a Silvan ally) with 3 willpower, attack, and defence, 6 hitpoints, and both the Ranged and Sentinel keywords. So it does not matter who has this ally since it can help across the table. The one negative about the Host is that it is immune to player card effects, which means it cannot take advantage of attachments or buffs like Celeborn‘s. In exchange, you do get to use the stats on the Host a lot, as it does not require you to exhaust it to commit to the quest. This protects it from the Necromancer’s Rage and means you can both use it for 3 willpower and for attacking or defending across the table in the same turn. The 3 defence, 6 hitpoints, and Sentinel keyword make it a worthy defender that can stand up to the Host of Dol Guldur without dying (if the shadow cards are kind). It can also withstand a lot of punishment from the Lieutenants and other smaller enemies, leaving your own allies to deal the damage back to your enemies. This is certainly a card that’s worth keeping around once you earn it. Should you ever lose this ally because of damage dealt beyond its hitpoints or through a “discard an ally” effect, then the Host of Lorien is put out of play and cannot re-enter play for the rest of the game.
- Dol Guldur: This is your main objective during the game and the only one that is not actually benefitting you. At the start of the game, this objective gets a threat counter attached to it, which will display the city strength based on the number of players. Once the players reach stage 3, they can start to bring down the city strength by killing enemies, clearing Dol Guldur locations, or making 10 progress on The Siege of Dol Guldur quest. All of this will slowly bring down the city strength, which is the first requirement for clearing this quest. Once the city strength is at 0, all Lieutenant enemies will lose their Indestructible keyword and can now be killed. That is the second requirement met for clearing this quest, after which you just have to survive until the end of the round! In the meantime, there aren’t that many effects that can boost the city strength, except for failing the Siege of Dol Guldur quest card or having it trigger from the campaign card’s effect. Primarily, this card is just an extra rules card with a counter attached, though you get to see a pretty nice depiction of Dol Guldur without too much corruption going on.

Enemies
The pits of Dol Guldur are filled with some of the worst enemies that you have ever seen in the game. They are led by four Lieutenants that will be the final boss for each of the four different final stages. The primary focus of these enemies is to remove progress from the main quest so that players do not earn the objectives or do not get 5 / 10 progress on the main quest during stage 3.
Lieutenants
Their Lieutenant enemies are quite similar and will rotate in and out of play depending on which stage 3 you are. They are all Indestructible until the city strength is at 0. They are also immune to all player card effects, have 3 threat, and has an engagement cost of 45 which will be decreased by each point of progress on the stage. Upon defeat, the Lieutenants will go into the victory display, but they do not have a Siege value since they can only be defeated while Dol Guldur has 0 city strength remaining. While each Lieutenant enemy can take damage at any point, those tokens will be discarded once the players move to a different stage, so I would not bother damaging these enemies before you can actually kill them. I did cover each Lieutenant in the review of each stage, so I will go over them a bit faster here.
- Sorcerer of Dol Guldur: The Sorcerer is probably the strongest enemy based purely on stats. He has 9 hitpoints and the highest base attack out of all Lieutenant enemies at 6. This makes him difficult to defend, and chumping is often done in order to avoid losing a hero to a bad shadow effect. Remember that there is no way to cancel the attacks of Lieutenants since they are all immune to player card effects. On top of the high attack that the Sorcerer has, it also has a Forced effect that can turn out pretty nasty. Once he attacks, you must discard the top card of your deck. Then, you must discard each copy of that card from play. This only targets attachments and allies but can get rid of some powerful cards that you are relying on. It is like a mini Savage South, only this time, you get to keep any copies of the discarded card in your hand since those are not in play. But this attack will target copies in play with other players as well. The worst case scenario is that this effect discards a copy of the ally you are defending with, making this attack go through undefended. You can also lose a big defensive attachment on a defending hero, which can also lead to a dead hero. Minimize the number of attacks that this enemy makes in order to reduce the risk of losing cards you paid for. You can also play a Council of the Wise deck to avoid losing cards altogether since you will not have any duplicates in your deck.
- Bane of Amon Lanc: This Troll Lieutenant is also an enemy you will want to avoid making a lot of attacks against you since his attack stat is a bit unpredictable. The base stat of 5 is bad enough, but the Forced effect will again discard a card from the top of your deck and boost the Bane’s attack by the cost of the card. You will have some control over this by limiting yourself to playing only cheap cards. If you hit a 6-cost Beorn for this effect, it is your own fault for including him in the first place. Keep your cost curve low for this enemy, or invest in a good defender that can tank an 8 attack enemy. Killing the Bane will also be a challenge since it has 9 hitpoints and a defence of 3. This is the time to really use your single-use attack buffs like Tactics Eowyn and the Black Arrow for maximum damage.
- Chieftain Morlug: The Orc Lieutenant stands out for having the lowest attack of all Lieutenants but the highest defence overall. The low attack stat is compensated by the fact that the Forced effect will drag out an additional enemy for you to deal with. This enemy is the first one discarded from the top of the encounter deck, so you will have little control over which it is going to be. This uncertainty can lead to a risky combat phase since you can suddenly find yourself engaged with a Host of Dol Guldur out of the blue. Because Morlug will do this each time he attacks, it is not advised to go to his stage once the city strength is low since he will attack each player and get each of them a new enemy. This makes him less of a threat, though underestimating a 3 attack enemy can be dangerous with the shadow effects in this quest. The good thing is that, while player card effects cannot target Morlug, they can target the enemies he drags out, plus you get more enemies to kill in order to bring down the city strength even further.
- Dungeon Dweller: The final Lieutenant is the big spider that dwells in the dungeons. This enemy doesn’t stand out too much with its stats, but it will still need to be defended by a big ally or dedicated defensive hero. The Forced effect with this enemy targets the allies under your control. You will have to discard an ally each time that the Dungeon Dweller attacks you. This makes additional attacks hurt even more since it cuts into your action advantage. However, if you do not have any allies under your control, you can simply ignore this Forced effect. This can make it useful to transfer some allies like Blue Mountain Trader and Rider of the Mark to other players for a while so that you do not lose them. If you are about to lose an ally, make sure that you have gotten to use them this turn and that they are exhausted. This makes the loss hurt a little less. Luckily, completing this stage can get you additional allies, so they could be replaced easily, but keep a Stand and Fight in hand when you are about to engage this enemy!
Standard enemies

- Dol Guldur Marauder: This is probably the enemy you will see the most of during your game. Not only because there are 4 copies in the encounter deck but also because those copies start in play during setup. It is a pretty basic Orc enemy, though, which tends to be a good target for the various effects that pick out an Orc enemy from the encounter deck. It comes with 2 threat, but thanks to an engagement cost of 24, you will not suffer the threat for too long. Instead, the Marauder will soon engage the players and give them a choice whenever they attack. The players must choose to either remove 1 progress from the main quest or place a resource on the Marauder. The resource translates to a buff of +1 attack and +1 defence for the enemy. This can get out of hand if he starts to make additional attacks and the players are unable to get past the increased defence. On the other hand, the loss of a point of progress can mean that players are unable to get all the objectives during stage 1 and will fail to reach 5 or 10 progress at the end of the round during stage 3. If you have been doing well, then sacrificing a bit of progress to keep this enemy small will be a decent trade-off. This is especially true if you are otherwise unable to kill the Marauder since 5 attack is harder to get on a single attacker than 4 in the early game. Later on in the game, this enemy will be a good target for any effect that drags out an Orc enemy, like Forest Battleground. With base stats of 3 attack and just 1 point of defence, you can easily kill this enemy and claim its single Siege point. Even with one resource on him, the Marauder is still small enough to defend with a decent ally and kill in one turn. From there, it gets harder to get rid of this guy, though direct damage can help.
- Mirkwood Olog-Hai: From one of the weakest enemies in the encounter deck to one of the strongest! The Mirkwood Olog-Hai is a big Troll enemy that you will have to engage early enough at 34 threat. A good thing, too, since it has a threat of 4, which will steal plenty of progress that could have been better used on the main quest. The base attack of 6 is pretty bad but made worse by the Forced effect on this Troll. For each excess point of damage dealt to a character (beyond defence and hitpoints), a point of progress must be discarded from the main quest. This can swiftly drain the total and will likely cause you to fail the Forced effect on stage 3, snowballing you towards a loss. However, unlike its brethren, the Mirkwood Olog-hai is not immune to player card effects and can even have attachments! That means you could cancel his attacks and even play a Forest Snare on him during the early game. This then allows you to save this enemy until stage 3, where you can kill him in order to claim the three Siege points! Killing the Olog-hai is difficult, though, thanks to 4 printed defence and 9 hitpoints. Go at it with some Rivendell Blades to bring down the defence, allowing you to do more damage during your attacks. Ideally, you don’t want to keep this enemy around for too long since that 6 attack will be difficult to defend on top of the other enemies and Lieutenants that you will have to deal with. Killing him also provides a very nice chunk of siege value to the total!
- Battle Warg: This is arguably the weakest enemy in the encounter deck, requiring just 4 attack to kill, and it can die to just 2 points of direct damage. But the Battle Warg has some tricks up its paws before it goes away. First of all, it surges, causing you to get several copies potentially (there are 3 in total in the encounter deck) or get another enemy on top of the Warg. It also has an engagement cost of 18, meaning that secrecy decks will also likely have to engage this enemy rather soon. When the Warg engages you, it triggers its Forced effect, which requires your to either discard 1 progress from the main quest or discard an attachment you control. If you do not control any attachments at this point, you must discard a progress, and vice versa. Losing attachments is never fun, but if you have a cheap attachment that you can discard for this effect, it can save you a point of progress. Attachments like Cram and Dunedain Remedy are easily discarded, but I can imagine Dale Decks also have plenty of options to discard for this effect, even if they’d rather not take it. With 3 attack, the Battle Warg is not really an issue to defend, but keep in mind that shadow effects can make it a bit more difficult. Killing the Warg is easy, at 2 defence and 2 hitpoints. But there is an argument to be made for not killing this enemy for a while. If you manage to trap it with an Outmatched or Forest Snare, this enemy can rather stay engaged and no longer trigger its Forced ability or Surge keyword. Alternatively, this is also a good enemy to kill quickly in the staging area before it engages so that the Forced effect can be ignored as well. Hands Upon the Bow works well, or any direct damage effect (Thalin, Argalad, Fresh Tracks).
- Amon Lanc Archer: Another Orc enemy, but this one is a bit nastier right out of the gate. It has 2 threat and an engagement cost of 36, meaning that you could leave this enemy in the staging area for a while. However, the Archer has Archery 2 (figures…) and will continue to deal damage to your characters. Combine this with potentially losing willpower from Necromancer’s Rage and restrictions on healing for Dungeon Door, and you start to see the issue. This is also not the only enemy with Archery, so there’s a good chance that you will be dealing a lot of damage to your characters each turn. So perhaps it’s a good idea to engage this enemy? Well, not really. When the Amon Lanc Archer engages you, you are given a choice between discarding two progress from the main quest or dealing 2 damage to an ally you control. The effect this has on your allies really depends on the sort of deck you are playing. Some archetypes have many allies that are able to take 2 damage and survive (Noldor, Dwarves, Ents), and some archetypes will have to sacrifice an ally since none can take 2 damage and live (Silvan, Hobbits, Rohan). The ideal target for this effect is any temporary ally that has more than 2 hitpoints, like Core Set Gandalf or any ally that was brought into play with Sneak Attack (though that’s strange in the engagement phase). Once engaged, the Archer will hit decently hard at 4, but you should have plenty of defenders able to survive the hit. Killing the Archer will be a higher priority than some of the other enemies since the Archery keyword will continue to deal damage at the start of each combat phase, even when the Archer is engaged with you. 1 defence and 4 hitpoints aren’t anything to really worry about when fighting back. It should be easy enough. You are awarded 1 point towards the Siege value for that round when you kill the Archer. Nothing major, but at least you have reduced the Archery value that round!
- Beast of Taur-nu-Fuin: You sometimes forget that Sauron has the nickname “Lord of Werewolves,” so it makes sense that we have some of those stalking the woods around Dol Guldur. This is a rather strong enemy, though, having an attack of 5 and requiring a total of 8 attack to defeat. It is not the strongest enemy in the game, but certainly, one you will want to try and avoid while you can. The Beast does add 3 threat to the staging area and will engage at 31 threat, so you can likely not avoid this enemy for very long. The enemy also comes with a few additional rules, where it cannot have attachments (so no Guarded (enemy) attachments either), and the shadow cards dealt to the Beast cannot be canceled. This matters since the Forced effect will give the players the option to either remove 2 progress from the main quest or the Beast of Taur-nu-Fuin gets dealt an additional shadow card. Having a 5-attack enemy with 2 shadow cards that cannot be canceled is a huge risk and will likely require some strategy to avoid the attack. Players could try to discard the shadow cards before they are revealed or cancel the attack altogether. I would not recommend removing 2 progress from the main quest unless you are doing very well. Consider that 50% of cards in the encounter deck will have a shadow effect, which is slightly increased since the attacking enemy itself does not have an effect. This gives you a below 25% chance that both shadow effects will be nothing, so be prepared for increased attack, additional attacks, or other nasty effects going off. Chumping this attack is definitely not advised since that can trigger several shadow effects as well. Killing the Beast will take some effort, as 3 defence will block a lot of incoming damage. 5 hitpoints also makes it sturdy enough that direct damage effects alone won’t kill it. But get some good attackers together, and this enemy should fall without too much trouble. When you do, you get to claim 2 siege points, which is a nice reward for killing a pretty big enemy.
- Host of Dol Guldur: But that was not the biggest and baddest of them all. No, that title goes to the Host of Dol Guldur. This enemy mimics the dreadful Host of Angmar from Siege of Annuminas but with some tweaks made to better fit this scenario. The Host of Dol Guldur has a variable threat of X, where X is the number of players at your table (Epic Multiplayer games don’t cause this enemy to go up to 12 threat, luckily). With an engagement cost of 40, this enemy will stay in the staging area for a while, where it is completely understandable that you will want to keep them there. That’s because this enemy has 8 attack, which is the highest printed attack in the scenario! Killing the Host quickly is also difficult, thanks to a defence of 4 and a staggering 12 hitpoints. This means it requires 16 attack in total to bring down the Host, which will likely take a well-developed boardstate or several players helping one another to survive. Because of that, you will want to wait to engage this enemy until you can safely kill it. But there are two reasons why you would really want to engage this enemy quickly. The first is that this enemy has Archery X. This might not be a big deal on its own, but between several copies of this enemy and the Amon Lanc Archer, you will be taking a lot of damage each turn. The second reason is the Forced effect on the Host. When it is in the staging area by the end of the encounter phase, players have to remove X progress from the main quest. In solo, this is no big deal, as I think most people can agree that this enemy is worth keeping in the staging area for 1 progress. But in higher player counts and with several copies in the staging area, this cost might become too great. You will have to overquest by a lot each turn, which will drag down the Lieutenant enemy each turn as well. You will need an answer for the Host sooner rather than later. And that answer cannot be in the form of an attachment since the Host is immune to attachments. This means that Forest Snare or Poisoned Stakes do not work here. The best thing you can do is to try and cancel the attack of 8, or simply chump it and hope the shadow effect isn’t too bad. Attacking back will be easier if you find a way to lower the defence of the Host. Killing the Host does come with a major bonus. You get to lower the city strength of Dol Guldur by 4, which is the most for clearing any card in the encounter deck!

Locations
There isn’t a huge focus on locations in this quest, but it does have four locations tied to the four final stages. These locations cannot be traveled to unless you are at the corresponding stage. This can lead to a location lock if you are not careful and change stages in order to explore as many locations as possible.

- Forest Battleground: Let’s start with the locations that are not tied to a particular quest stage but are instead able to be explored at any time. This makes them great destinations in the early game or if you are stuck at a certain stage 3 that you do not have the right location for. To counterbalance the flexibility of the location, it is also worth no Siege points, which means that exploring will not build towards completing the quest any sooner. But Forest Battleground is bad enough that you will really want to go here since it will have a lot of threat. It starts with 1 threat but will gain +1 threat per ally controlled by the player with the most allies. With swarm decks on the table, this can easily go to 10+ threat, making it the worst card to reveal if you are hoping to make a lot of progress this turn. But there are some cards that can help lessen the burden of this location. You could use Secret Paths to reduce the threat to 0 for a turn. You can also use Strider’s Path to immediately make it the active location, though this does push any active location back to the staging area. Alternatively, Thror’s Key will be good here since you can then leave the location in the staging area for the rest of the game. There are 2 copies, though, so it is not a solution if the other copy turns up. Alternatively, players can try to raise their willpower in order to counteract the sharp increase in staging area threat. Ally Faramir’s ability on the player with the most allies will be amazing (as long as those allies are questing). The Free Peoples can also work or any local effect that boosts the willpower of the swarm.
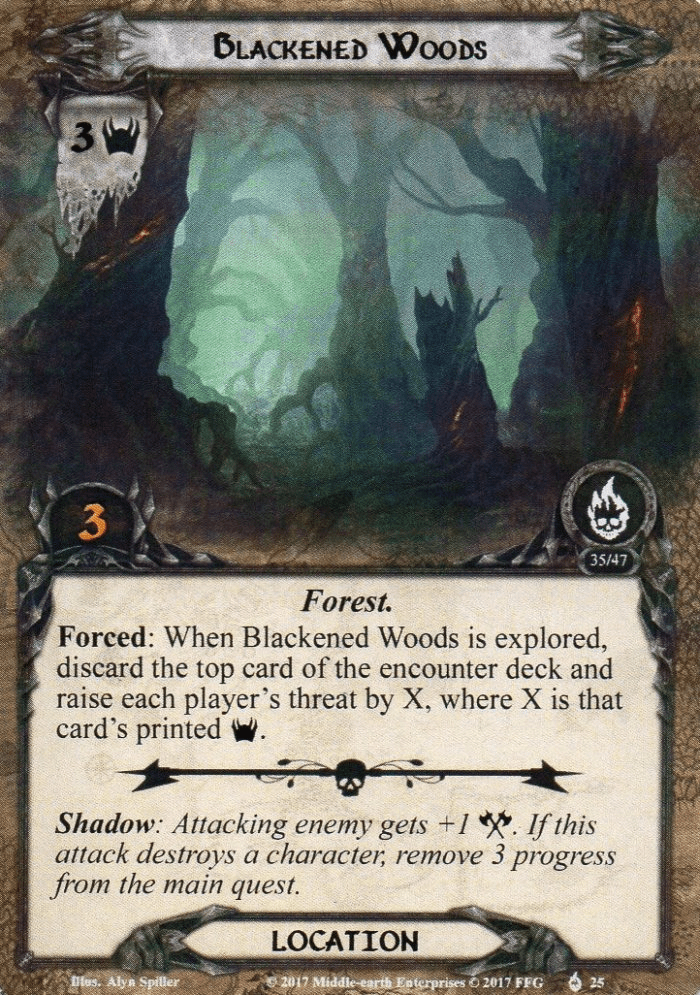
If none of these cards are playable at the moment, players will have to stomach the threat for a turn but may decide to travel here if there is no better alternative. Traveling comes at no cost, though the location will take 5 progress to clear, which is the most out of any location in the deck. Once the Forest Battleground is explored, each player must also find an Orc enemy from the encounter deck or discard pile and add it to the staging area. This can fill the staging area with enemies again if the players were looking for some easy targets during the combat phase. All in all, I think this is a location you really have to keep in the back of your mind when building for this quest. Large ally swarms will be punished, so have a way to counter the insane threat this location provides. - Blackened Woods: The other location that is free to travel to at any stage is the Blackened Woods. This does not have the potential for an insane amount of threat, but 3 threat is still enough to eat away at your progress while it is in the staging area. Traveling is possible, but I would argue this is the lowest priority destination during the travel phase, except for locations that you aren’t allowed to travel to yet. 3 points of progress are required to clear it, which isn’t too much. The problem is that you have to raise each player’s threat once you do clear the location. Players have to discard the top card of the encounter deck and raise their threat by the threat of that encounter card. With a bit of luck, you hit a 0-threat treachery, but you can also hit a 4 threat Olog-hai. The average threat in this quest isn’t too bad, especially since the threat boosts on Host of Dol Guldur and Forest Battleground do not count. But clear too many of these locations during your game, and threat will really start to be an issue, especially if Gate of Dol Guldur does not allow you to lower your threat by much. This location is best explored while it is in the staging area, allowing you to travel to other locations instead. Yes, you will have to raise your threat from time to time, but with a bit of luck, it won’t be too bad. One player can also sacrifice their threat by raising it by 3 to discard (and thus, not technically explore) the Woods with Heirs of Earendil, which is a great event for this quest.
- Gate of Dol Guldur: The first of four locations that can only be traveled to or receive progress in the staging area while you are at a particular stage. If you are on any stage other than 3B, you are stuck with the Gate sitting in the staging area. Luckily it only adds 2 threat there, but it will also add its passive ability to the game. This will only be in effect while it is in the staging area but will restrict the amount of threat that players can reduce to 1 per round. This is enough to stabilize from the end-of-round raise but obviously won’t cover any Doomed effects or other threat raises. If you start low enough, it can be ignored for most of the game; you just cannot play your Elrond’s Counsel or Galadhrim’s Greetings, but if you are really struggling with this, try to blank the location with Thror’s Key or go to stage 3B when you get the chance. It’s a pretty good stage to be at since it allows you to lower the city strength of Dol Guldur further!
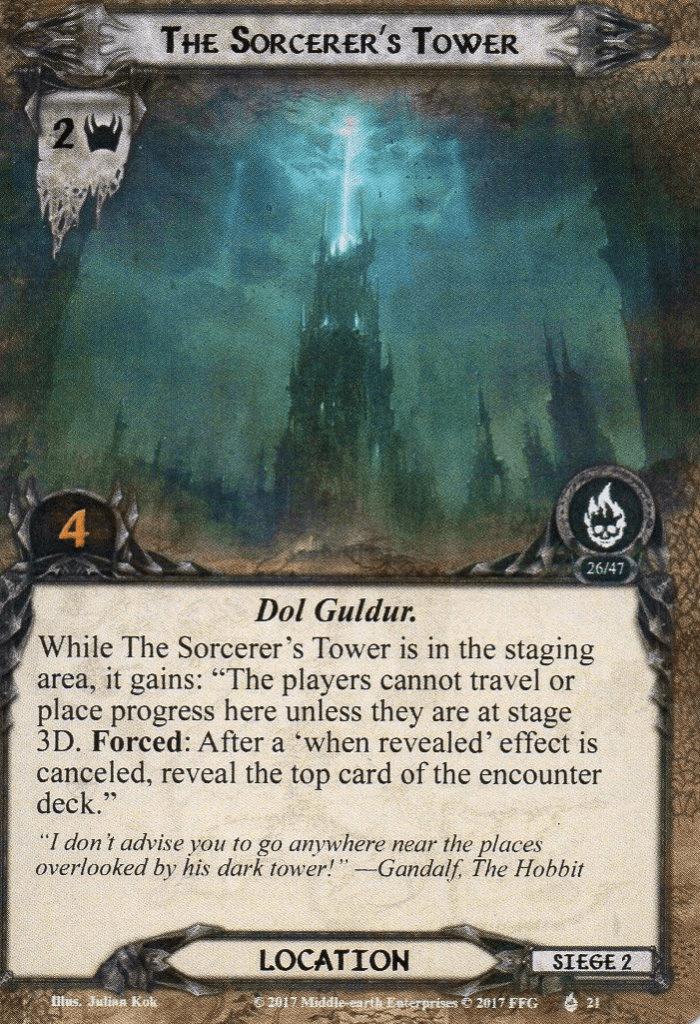
- The Sorcerer’s Tower: If you thought that you would just bring a ton of cancelation effects to counter the many horrible treacheries in this encounter deck, think again. The Sorcerer’s Tower comes with a passive effect that will reveal the top card of the encounter deck each time a When Revealed effect is canceled. This means that while you may have dodged a bullet with your Test of Will, you will pay for it with another encounter card. If you are using effects like Eleanor, you will even have to reveal two cards, as her effect requires you to reveal one as well. This makes it a nasty passive to have in the staging area and usually means you have to suffer through any When Revealed effect that the encounter deck throws at you. However, if you are at stage 3D, you will be able to travel to this location and also be able to make progress on it while it is in the staging area. Placing 4 progress on it while it is in the staging area will require some effort, but if you have been saving up some progress-placing effects like Mirkwood Explorer or Evening Star, then this is the point to use them! Traveling is also an option, but considering that you might want to clear both copies, I would prepare to have some progress-placing effects as well. Alternatively, you can also don’t bring any When Revealed cancelation, which renders the passive effect a bit pointless. At that point, it becomes a 2 threat location that can be easily overcome during the quest phase, so you can focus on traveling elsewhere or going to different stages.
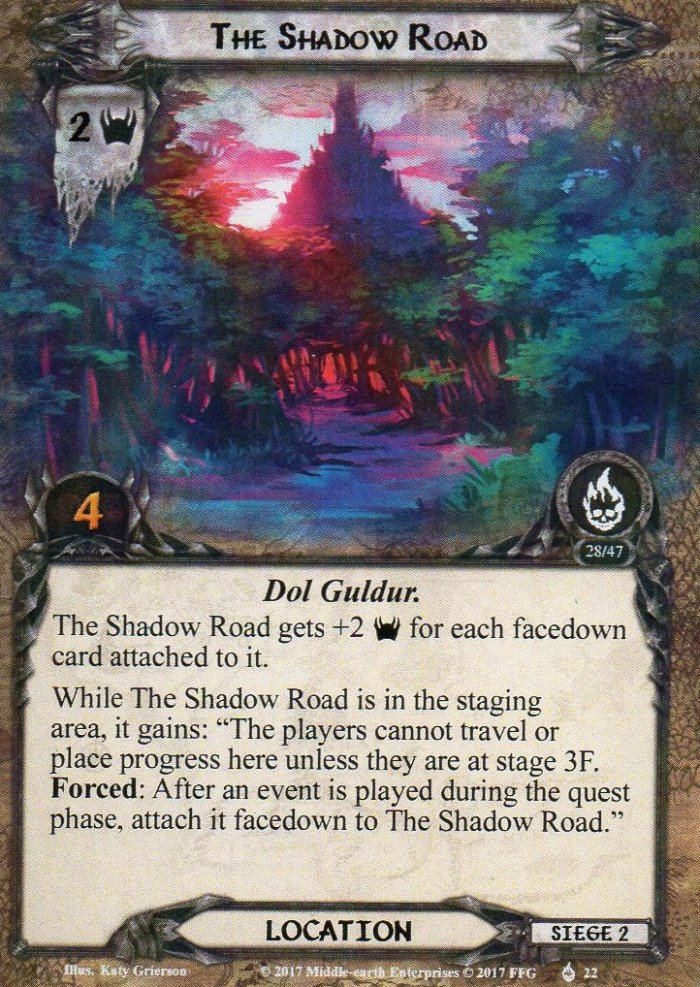
- The Shadow Road: The next stage-specific location is The Shadow Road, which can only receive progress in the staging area or be traveled to while the players are at stage 3F, Battle Under the Trees. This location can be a deciding factor for going to that stage since it can balloon to a very high threat, thus preventing more progress from ending up on the main quest. The Shadow Road starts the game as a 2 threat, 4 quest point location, but will gain 2 threat for each card placed face-down underneath it. These face-down cards are any events that the players use during the quest phase, which can accumulate quickly! Not only can this be willpower boosts or cancelation events, but also anything to deal with attacks made during the quest phase. This location is obviously worse in higher player counts, as more players will want to play events during the quest phase. You also have to set some sort of reminder because this is an easy thing to forget. While there are two copies of this location in the encounter deck, the events played during the quest phase can only be put underneath a single copy of Shadow Road, so only one copy gets the threat boost. I would advise stacking everything underneath a single copy instead of alternating between the two. This allows you to travel to a single copy of the location while you are at 3F, allowing you to clear a lot of threat all at once. Having a single high-threat location also makes it a better target for effects like Spirit Aragorn, threat-reducing attachments, and Secret Paths, though this is an event that will boost the threat of the location in subsequent rounds. Thror’s Key is also excellent for one copy of this location, as you can now clear it in the staging area, travel to it at any point, or just ignore it because the threat will not be increased by cards underneath it.
- Dungeon Door: The final location corresponds to quest card 3H Dungeons of the Necromancer. This is usually a popular quest stage, thanks to players getting a free ally if they do well, so you will likely be traveling to this location while you are there. The Dungeon Door comes with the same restrictions as the previous three locations and has its own passive effect. While it is in the staging area, the Dungeon Door prevents characters from being healed by more than 1 point per round. This makes one of Elrond’s abilities useless and will force players to invest in ways to prevent damage rather than find more ways to heal the damage off characters. This limit on healing is kind enough to still allow some damage from being healed, which will make treacheries like Necromancer’s Rage less brutal since the willpower debuff could be healed off with a timely form of healing (as long as the characters only took 1 damage). As stated before, the location is a pretty popular destination, as players will be allowed to heal completely again as soon as the location becomes active. Because of this, it is not unheard of that people will bounce this back into the staging area in exchange for something like a Forest Battleground during the next quest stage since this location isn’t too bad as long as there is only one copy in play. Once both copies are in play, I would start to at least clear one of them and then travel to the next one if able.
Treacheries
Making our way back to Dol Guldur gives us the time to revisit some classic treacheries from the first cycle. The cards are all worth canceling, but with limited Test of Wills, you are going to have to endure a couple of these nasty effects every now and then.
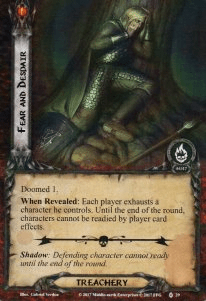
- Fear and Despair: This first treachery hinders your ability to ready characters through player card effects, which means that before you start to reveal cards during the quest phase, you should use any Unexpected Courages or other readying effects that you have. The treachery will raise each player’s threat by one, which isn’t the end of the world. It will then force everyone to exhaust a character they control, and then characters cannot be readied until the end of the round by player card effects. This will hurt players with Three Hunters decks and those without a lot of allies the most, whereas swarm deck will generally be ok with this treachery. Remember that while players cannot ready characters themselves, they can still be readied during the refresh phase as per usual. That is not the case when this card’s shadow effect, which will target the defending character and prevent them from readying until the end of the round. That means they miss the refresh phase and will stay exhausted during the next round as well. Again, you should use your readying ability before revealing the shadow effect if you want to be safe.
- Power Sevenfold: This is a pretty notorious treachery that will hurt most in multiplayer. It will again raise each player’s threat by 1, which is starting to become a trend here. The biggest issue is the When Revealed effect, which will force each player to search the encounter deck and discard pile for either a location or an enemy. If you pick a location (it must have the Dol Guldur trait), it must be added to the staging area. If you pick an enemy (it must be an Orc), it enters play engaged with you. There is some free choice with this treachery, but the limitations on the traits that the new encounter cards must have will mean that it can put you in some tough positions. If you are at a particular stage and do not have the right location to travel to this round (assuming you can travel this round), the matching Dol Guldur location will be a good pick. Don’t go for too many locations, though, since you will end up with a location lock rather quickly. The options for the enemies range from easy (Dol Guldur Marauder), to annoying (Amon Lanc Archer) to downright horrible (Host of Dol Guldur). Luckily, you do not have to take different enemies than other players, so you can freely choose for a Marauder. In true solo, this treachery is basically a selective surge card, but it ramps up in brutality when you add more players to the game. Getting both copies back-to-back is usually a reason to end the game, as you will probably not be able to overcome all those additional enemies and locations. It is definitely worth canceling if you can do it unpunished.
- Servant of Sauron: A pretty basic treachery that could even whiff during the first few rounds while there are no Lieutenants in play. This treachery will force the highest engagement cost enemy in the staging area to make an attack against the first player. This will often hit the Lieutenant in the staging area, forcing them to make an attack and resolve their Forced effect. Since the players won’t have progress on the main quest during the staging step, it is difficult to see this hit any other enemy, but during stage 1, you can also expect attacks from the Host of Dol Guldur and the other enemies that were either just revealed, or you wanted to keep in the staging area for a while. In an ideal world, there are no enemies in the staging area, causing this treachery to simply surge. It will surge no matter what, but if you can avoid a big attack in the quest phase, it will surely help you out. The shadow effect on this card is worth canceling if it hits a big enemy or if you are out of defenders. Additional attacks are never ideal, and with 3 copies of this card in the encounter deck, you could risk getting chained into several more attacks.
- The Necromancer’s Rage: This is a straight upgrade from the classic Necromancer’s Reach. The treachery deals 1 damage to each exhausted character like the regular version. However, it has an additional effect that each damaged character will get -1 willpower until the end of the phase. This hurts your questers in two ways. First of all, you deal damage to them unless they are questing without exhausting, or you readied them beforehand in anticipation of this or Fear and Despair. Second, if they did end up taking damage, they now suffer -1 willpower, severely hindering the amount of progress you are going to make. You can offset this with effects like Faramir, but you are still going to be taking damage and not make as much progress as you’d like. Find ways to send questers without exhausting them to the quest, or invest in cards like Sailor of Lune that cannot be damaged while there is an event on top of your discard pile. Star Brooch also works, as it protects your willpower from being reduced. The damage can still be an issue, especially if locations don’t allow you to heal any damage. Getting hit by this treachery several times will eventually ruin your boardstate, so consider canceling this treachery if you have the option. Luckily, there are only 2 copies of this card in the game. It can also be revealed as a shadow card, which wasn’t an issue with the Reach version, but this Rage does have a shadow effect. It deals 1 damage to the defender and then reduces their defence by the amount of damage that they have. This means that damage sponges like Beorn will see their defence reduced all the way to 0, but the direct damage dealt can also kill off your defender before the attack is resolved. This will make the attack go through undefended, potentially dealing serious damage to a hero. With this in mind, don’t chump with 1 HP characters, or get some reliable shadow cancelation.
- Fastness of Mirkwood: The final treachery on this list is designed to slow you down and not grant you as many boons as you otherwise might get. When it is revealed, no more than 5 progress can be placed on the current quest this round. This means that if no other encounter cards discard any progress, you will just have enough to avoid the negative effects on any stage 3. But you will not be able to get the benefit of discarding an additional 5 progress. During stage 1, this will also slow down your progress massively and could mean that you miss out on Power of Lorien. Because you can only make 5 progress, any encounter card that would remove progress from the quest will cause you to have to do the negative effect at stage 3, so this isn’t ideal. Even worse, this treachery can surge if Dol Guldur’s city strength is at 5 or lower. This will only matter for the end of the game but can prevent you from reaching a city strength of 0 if you are going to The Siege of Dol Guldur and were hoping to get the additional 3 resources removed from it. You can still clear the active location, at least, but this one treachery could slow you down overall.

Tips and Tricks
- Keep your campaign card close, as it will instruct you on how to actually beat the quest. It also mentions that you will have to trigger a random Forced effect from a stage that was not in play this round, which is an easy thing to forget.
- Keeping a low threat will really help you to avoid the Lieutenant during stage 3. If you keep a threat below 30, you can usually avoid them without sacrificing progress on the main quest. In order to maintain a low threat, try to prioritize traveling to any Gate of Dol Guldur in order to be able to lower your threat.
- Attachments for locations are vital in this quest. Not only can you get some benefits when exploring a location, but you can also reduce the threat of the locations you cannot travel to yet. Thror’s Key is essential in order to blank Forest Battleground or any of the quest-specific locations.
- While 30 progress might be a lot to get during the first few rounds, try to go for at least 10. That way, you get a pretty solid ally that can quest and tank some attacks from the Lieutenants or the Host of Dol Guldur.
- While the quest-specific locations are immune to progress while not at the right stage, you can still discard them through Bilbo’s Plan and Heirs of Earendil. It comes at a different cost, but if the passive effect is bothering you, it might be the right call.
- Strider’s Path will bypass any restriction on traveling to a location, as it is not in the staging area yet, thus not being protected or providing its passive ability. Try to use this event in order to travel to locations that you are otherwise not allowed to go to, though keep in mind that any location currently active will be pushed back to the staging area. It’s a good tool in combination with cards like Lorien Guide, Steed of Imladris, and Map of Rhovanion that could clear the active location before the staging step.
- Invest in ways to cancel enemy attacks with Feint or killing enemies before they attack with Roheryn/Quick Strike. This allows you to avoid some big attacks and reduce the risk of losing progress due to shadow effects.
Playthroughs
The reputation of this quest has meant that not a lot of successful playthroughs can be found. Still, these videos will be useful to get a glimpse at how brutal this quest can be against even the best decks out there. The nice thing about this being an Epic Multiplayer quest is that you also get to see the same game from three different tables’ perspectives.
- True solo, progression: https://www.youtube.com/watch?v=WaG7BFDEHa4
- True solo, progression: https://www.youtube.com/watch?v=Fm77W9ozwIE
- 4 players, Epic Multiplayer: https://www.youtube.com/watch?v=nHT4WaTjujQ
- 4 players, Epic Multiplayer: https://www.youtube.com/watch?v=eYK99F2D8Oc
- 4 players, Epic Multiplayer: https://www.youtube.com/watch?v=bOjhn2PtOS4
And with that, the Print on Demand scenarios have all been covered. It has taken quite some time, but because these scenarios are so unique and unlike anything else in the game, I feel that the extra time required was warranted. I hope that this article has inspired some brave souls to attempt this quest again at some point, and I am looking forward to hearing how you fared.
As for the blog, we will look to other parts of the game now that the PODs are finished. I do not see the need to redo any of them, so it would be best to focus on the Nightmare analyses and try to complete the Sagas. With the completion of this series of quests, we draw closer to completing the blog and having written an article on every quest ever released!

2 thoughts on “Attack on Dol Guldur”