It has been a while since I have made a Nightmare article, and since another author will be taking on the Ringmaker cycle, I will skip ahead and move on to the Angmar Awakened cycle. This should be in everyone’s recent memory since this was the first cycle that received the repackaged treatment. As a result, the regular quests can now be played in a campaign mode, but in case all of that is too easy for you, there is always Nightmare mode! Though the Nightmare packs are no longer being printed (and with the popularity of the game, relatively difficult to find), players can still “enjoy” this mode via digital platforms such as DragnCards. That way, you avoid having to pay hundreds for a pack of just 20 cards per scenario. I will continue the Nightmare content of this cycle, though 3 quests have already been written about by past authors. I will plug in the gaps before moving on to the next cycle!

Intruders in Chetwood was the introductory quest for the side-quest mechanic and the Angmar Awakened cycle as a whole. The quest is relatively straightforward, but clearing the War Parties in time has always been a roadblock for many players entering this cycle. Moreover, the players will be distracted by several side-quests that are in play alongside the main quest, which add lose-conditions, buffing enemies, or waylays the players in other ways. The normal version of this quest is pretty fun and can be a decent quest to play with random decks. The Nightmare version doubles down on the side-quest mechanic. Almost all new encounter cards interact with the 6 side-quests in the encounter deck, bringing them back from the Victory Display even if the players have cleared it before. Two new side-quests are also introduced that will buff the Orc War Party and raise the threat of the players if they ignore the quest. All these never-ending distractions make for a tedious quest that requires some luck, but it is not impossible. If you manage to avoid some of the side-quests and kill the War Party early, you can rush this quest and beat it before it overwhelms you.
Nightmare Intruders in Chetwood
- Found in: The Lost Realm Nightmare pack, scenario 1
- Size: 19 cards are added to the encounter deck.
- Increase in Difficulty: Yes, though, this is still a relatively easy Nightmare quest once you know what the encounter deck is doing. It can set up some nasty combos, but if you quest well enough and clear the side-quests, this scenario isn’t much different in difficulty than the original.
- Fixed Loopholes: Players used to bring Northern Trackers to this quest to get rid of the location lock. That’s no longer a valid strategy, thanks to the Northern Chetwood location that will fetch a side-quest if the progress does not complete the location. Location control is still important for this quest, but bring different cards than the Northern Tracker.
- New mechanics introduced: None, the quest focuses more on side-quests but does not spring any new mechanics on the players. There will be new ways to get side-quests into play, though, which is a change from the original.
- Play this scenario if: You are decktesting for other Nightmare scenarios. This is a good quest to play since it requires you to kill big enemies, make a lot of progress, and ensure you get your deck running fast enough to keep up with the encounter deck! If you enjoy side-quests, this is also a quest you should try, as 2 new side-quests are added!
- Solo or multiplayer?: You will want to keep the player count as low as possible. This is a quest best done in solo, perhaps with 2 players. Add much more to that, and you will get more side-quests than you can beat. Location lock is also made more difficult in the Nightmare version, so you will want to avoid revealing too many cards during the quest phase.
- What to look out for: Location lock, encounter deck stalling you out, losing due to threat elimination, side-quest overload, losing Iarion.
New Rules

The new rules card for the Nightmare version of this quest has no added text beyond reminding you that you are indeed playing Nightmare mode. This is nice, as it allows you to ignore this card for the rest of the game.
New Setup
There is also no new setup for this quest. The first player simply takes control of Iarion and adds one Orc War Party to the staging area. Then, each player must add 1 different location to the staging area in order to begin the game. In true solo, always go for the Shrouded Hills. It is a low initial threat, and you remove a card with Surge from the encounter deck. For higher player counts, the single copy of Chetwood Forest is nice so that you can engage an additional enemy during a turn. Rugged Country could work, too, though you will have to travel there on turn 1 or risk it becoming a 4-threat location. Outlying Homestead and the three new Nightmare locations aren’t ideal, but I’d go with Northern Chetwood if I were playing this in 4 player (not that you should do that…). Once you have added the War Party and the required locations to the staging area, you can begin your first turn.
Cards removed
The following cards are removed from the encounter deck to make way for the new Nightmare cards. These old cards are either too easy or do not focus on side-quests, which hinders the synergy of the encounter deck.
- 1x Angmar Orc (Easy enemy)
- 3x Angmar Marauder (Easy enemy)
- 2x Chetwood Forest (Beneficial location in the right circumstances)
- 1x Outlying Homestead (Makes way for the new locations, several copies still in the deck)
- 2x Borders of Bree-land (Did not focus on side-quests)
- 1x Rugged Country (Easy Location)
- 1x Shrouded Hills (Easy location)
- 3x Surprising Speed (Replaced by A Great Host)
- 2x Sudden Assault (Replaced by Kill Them)
The Quest
Without any additional rules in place, the scenario plays out very similarly to the regular version of the quest. The only thing worth noting is that any explored side-quests have a chance of coming back if their corresponding encounter card brings them back from the victory display. The setup remains unchanged, so the initial strategy will still be to make a bunch of progress on the main quest on turn 1 and then hope to avoid side-quests for as long as possible. This will not be so easy, considering that there are 2 additional side-quests, and almost all NM cards will have a way to fetch a side-quest for you.

During the first rounds, try to prioritize the main quest, as you will want to beat the scenario as soon as possible. The only side-quests that should really worry you at this point are Orc Rearguard (limiting your progress) and Rescue Iarion (you lose if time runs out there). All other side-quests can mostly be ignored if your boardstate is strong enough. For the endgame, you might want to explore Shadow the War Party as well, though maybe clear it after having placed the 30 progress required for the main quest. That way, you will win whenever you have defeated the final Orc War Party (assuming Kill Them! doesn’t remove progress).
Willpower should be your primary focus, with threat reduction in second place. As long as there is no Outlying Homestead in play, you will be able to lower your threat to compensate for having to raise your threat at the end of the round for the number of enemies in the staging area and for Protect the Bree-landers. If you are playing with more than one player, then having one deck draw down some enemies every turn will be useful. Remember that there are no forced engagements in this quest, so each player can only engage a single enemy each round unless they are playing Dunedain characters, then can engage more enemies if they wish.
The Orc War Party is the main threat in this quest, as it hits hard and gets buffed by two of the side-quests. The usual advice to put them in the victory display still works, though Kill Them! will be able to retrieve them from there. Cancel that treachery if possible, and you will have an easier time going through the scenario. Remember that you cannot win this scenario while any Orc War Party is in play, so you will have to find some way to get rid of them. A fantastic tool against them is The Great Hunt, as it can discard them without damaging the War Party or applying attachments on them, to which they are immune. Once the War Parties are out of the staging area, you can also deal damage to other enemies in the staging area if you want to invest in cards like Hands Upon the Bow and Haldir.

Towards the end of the game, you have to make sure that no War Parties are going to be revealed, as that will delay your progress. Scrying can be quite useful here, allowing you to avoid the worst cards. I would recommend Scout Ahead for this, though bringing another side-quest to this scenario will further buff Shrouded Hills and Weight of Responsibility. Instead, look to Firyal to discard any unwanted side-quests, War Parties, or copies of Kill Them!, or use other cards like Lore Denethor and Gildor’s Counsel to give you an edge over the encounter deck.
Once 30 progress is made on the main quest, clear any side-quests that are preventing you from resolving the quest. Mainly Rescue Iarion, as you will need to control the objective ally in order to win the game. Shadow the War Party might also be necessary to clear at this point in order to engage and kill the War Parties left in play. Once there are no War Parties in play, Iarion is under your control, and there is 30 progress on the main quest; the players win the game!
The Encounter deck
Global

- The new encounter deck is made up of 38 encounter cards.
- The chances of hitting a shadow effect are exactly 50%. 19 cards have a shadow effect. These effects can boost enemy attacks and send enemies back to the staging area.
- Average threat on cards revealed is 1.7 threat/card. This can range from 0 threat treacheries and side-quests to 5 threat locations.
- Only the Protect the Bree-landers side-quest has Surge. Other cards like Weight of Responsibility can still reveal more encounter cards.
- Doomed appears on both Outlying Homestead (1) and Pressing Needs (2). Keep in mind that you have to raise your threat at the end of the round for the number of enemies still in the staging area, so threat can become an issue in this quest.
- Immunity
- While Outlying Homestead is in the staging area, players cannot lower their threat.
- Orc War Party cannot have attachments, and other enemies cannot take damage in the staging area if the War Party is also in the staging area.
- Orc Rearguard prevents more than 3 progress being placed on the active quest card while it is in play.
- Shadow the War Party provides additional buffs to the War Party, including cannot be engaged or dealt damage.
These stats do not assume that you are going against a side-quest, which would boost the threat of Rugged Country. It also does not count the copy of Orc War Party that starts in the staging area or the extra location that has to be placed in the staging area for setup. For solo, I went with Shrouded Hills since that’s the easiest pick. If you go with another location, you add 1 surging card to the encounter deck with a variable threat.
Enemies
The Orc War Party has some new attendees in the Nightmare version of the scenario. Aside from the regular Orcs, we get 2 new enemies that will interact with two of the side-quests. Beyond that, these new enemies hit harder and take longer to kill than the enemies that were removed.
- Orc Abductor: We immediately begin with one of the tougher enemies that you’ll encounter, which would be a mini-boss in a regular scenario. The Orc Abductor has 2 threat, 4 attack, 4 defence, and 5 hitpoints. There are 3 copies of him, making it easy to encounter him during your game. The engagement cost of the Abductor does not matter for this scenario, but at 45, your Hobbit and Ranger characters can get a nice boost when attacking or defending against him. You’ll want to engage this enemy as soon as possible, too, since it has a Forced effect that triggers at the end of the round if the Abductor is still in the staging area. If that is the case, you must find the side-quest “Rescue Iarion” and reveal it. This causes you to lose Iarion and puts you on a timer to retrieve him. Failure to do so in time will cause a Game Over. This side-quest has a high priority since you cannot win the quest without Iarion. So engaging the Orc Abductor will be your best bet, though shadow effects and treacheries can push him back to the staging area. Ensure you have a way to cancel shadow cards for this enemy so that he stays engaged with you. Forest Snare is also a good card to bring for this guy since you can leave him engaged with you all you like. When engaged, the Orc Abductor hits for 4, which you should be able to defend with relative ease, considering there are stronger enemies in the encounter deck. The 4 defence is the more tricky part, as it will be difficult to deal damage to the Abductor. Again, there is no rush in killing him, but you’d rather have him in the discard pile than engaged. Direct damage and defence reduction can help out here. Otherwise, you will have to dedicate 9 attack to this enemy.
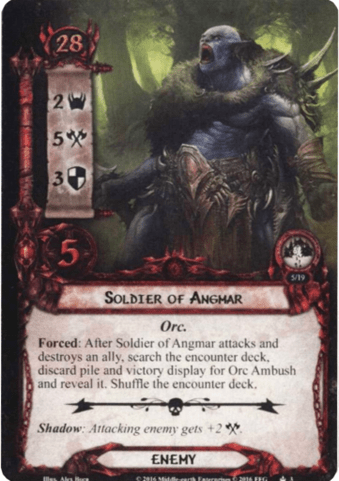
- Soldier of Angmar: The other enemy that is introduced in this version of the quest is the Soldier of Angmar. He hits harder at 5 attack, has a lower engagement cost if that matters to your deck, and will take 8 attack to kill. The 5 hitpoints make it difficult to kill him before he attacks, so you will need a reliable defender for him or use effects to cancel his attack if you cannot deal with it at the moment. That’s at least a better solution than chumping the attack. That would force the effect on the Soldier to trigger. This fetches the “Orc Ambush” side-quest from the encounter deck, discard pile, or victory display. It will boost the stats of all Orc enemies in play and gives every player an additional enemy to deal with. The side-quest can make combat a drag, so if you can avoid it by not defending with allies, you do not run the risk of boosting the enemies. Without the Orc Ambush side-quest in play, the Soldier of Angmar will still take 8 attack to bring down, which will require some dedicated attackers. You can also try to soften him up by dealing direct damage beforehand. You can also leave this enemy in the staging area a bit longer than the Abductor, reducing the risk of adding the side-quest to the staging area. This enemy only has 2 threat, and while you will have to raise your threat by an additional point if he’s still in the staging area at the end of the round, it might be worth stalling a bit before bringing him down. It’s definitely an enemy you need a plan for.
Locations
The locations around Chetwood and Bree-land will be a bit more dangerous in this version. All original locations are still in the game (except Borders of Bree-land) but in lower quantities. The new locations all focus on bringing in a side-quest from the encounter deck, discard pile, or victory display.
- Northern Chetwood: In the regular version of this quest, location lock was a pretty serious concern, so many players brought cards that place progress on locations in the staging area. The most common among these is Northern Tracker, which will chip away at all locations in the staging area during the game. Well, better bring something else for the Nightmare version since Northern Chetwood will quickly shut that down. The location is meant to dissuade players from placing small bits of progress every turn until a location is explored. When any number of progress tokens is placed on Northern Chetwood (and it is still in play), the players must find the Lost in the Wilderness side-quest, reveal it, and lose their entire hand as a result. This is not only true while the location is in the staging area but also when it is the active location. So it is vital that you place all 6 points of progress at once, else you will be stuck with another side-quest and tempted to go there in order to retrieve your hand. There are some tricks around this, though. Mirkwood Explorer will be a fantastic ally to bomb one of these locations with 6 progress all at once if you have quested successfully with him for 6 turns. It’s quite the ask, but towards the end of the game, you can just get rid of one copy, which is pretty nice. You can also attach a Woodmen’s Path on the location if you intend to travel there at some point. Now, any progress will clear the location, as the number of quest points are reduced to 1. Not bringing any location control and never going to this location is quite tricky. You will leave a 4 threat location in the staging area, potentially even 3 copies of it. But if the side-quest is already in play, then there is no punishment for slowly exploring the location.
- Greenway Path: This will be the highest priority destination during the Travel phase, and let’s hope that both copies do not appear during the same quest phase. The stats on Greenway Path are fine, at least for a Nightmare location. But if it is still in the staging area at the end of the round, then players have to search for the Shadow the War Party side-quest and reveal it. This will push back any Orc War Parties, boost their threat, and prevents players from engaging them. If you somehow have cleared the table of the War Parties at this point, then having the Path in the staging area at the end of the round isn’t the worst, but remember that Kill Them! can retrieve War Parties from the deck, discard pile, and even the Victory Display. So you’ll likely want to travel here and spend some time exploring this location during the next quest phase so that you can avoid the extra side-quest. Alternatively, you can use progress-placing effects in order to clear this location in the staging area, but I would really only suggest that if both copies are in the staging area at the same time. Travel to one of them and clear the other in the staging area. Thror’s Key is also a nice attachment for this location, allowing you to have it sit in the staging area forever, only adding three threat to the total while you knock out the other locations in the staging area.
- Outskirts of Archet: With 5 threat, this is likely the most threat you can add with a single card during your game unless you somehow return 4 enemies with A Great Host. It is not uncommon to see so much threat on a single card in Nightmare, though, and most of the advice I gave for similar locations still stands. Use Explore Secret Ways to ignore the threat for a turn and try to clear it in the staging area. With only 3 quest points, it is remarkably easy to clear this location if you put some effort into it. Traveling will also get rid of the 5 threat, but it comes at a cost. You must find Protect the Bree-landers and reveal it. Not only does this trigger the surge keyword on the side-quest, but you are also stuck with the side-quest again, which will ramp up your threat. Finding ways to ignore the travel cost would be ideal. Either swap this location for something already in the active slot with West Road Traveller or cancel the Travel cost outright with South Away! or Ghan-buri-Ghan. If you have enough willpower, you can also leave it in the staging area where it will not actively harm you, but 5 threat will cost you a lot of progress. Better slap an Explorer’s Almanac on here in order to clear it with any excess progress you might get.

Treacheries
There has been a bit of a shake-up with the treacheries for this quest, though some nasty ones like Weight of Responsibility are still in the deck. Two new ones are added, which will either bring in another side-quest or cause the War Party to make additional attacks.
- A Great Host: This treachery replaces the Surprising Speed treachery from the original encounter deck. That treachery just returned an enemy to the staging area for each player, but this upgraded version is a bit tougher. This treachery does still return one enemy per player, which will increase the threat in the staging area (especially with the higher threat on these new enemies). On top of that, you are going to be stuck with more enemies in the staging area than you can engage later on in the round. The nice thing is that if there are no engaged enemies, this first part of the treachery does nothing (unlike Surprising Speed, which would surge). After all enemies have been added to the staging area, the players are given a choice to either search the encounter deck/discard pile/victory display for the Orc Rearguard side-quest or each player has to deal 4 damage to a character they control. In 99 out of 100 cases, the 4 damage is a lot better than getting another side-quest that limits your progress each turn. The 4 damage must be dealt to a single character you control, but you can easily discard an ally for this effect. It would even trigger cards like Horn of Gondor. If you only have heroes, though, the choice becomes a bit more difficult. Attachments that boost hitpoints or Mithril Shirt can help to soften the blog, but you are going to have to bring at least one hero with 5 or more hitpoints. Hobbits can’t handle that amount of direct damage all at once. But getting Orc Rearguard into play can also be horrible, as it will greatly slow you down on the main quest. It is almost mandatory that you clear the side-quest in order to win, though you can still make progress on locations. If you have an Explorer’s Almanac on an Outlying Homestead, you might not even really feel the progress restriction. Use your best judgement when facing this treachery, but have an ally ready to discard to this effect.
- Kill Them!: The second of the new treacheries is far worse. While it might not interact with any side-quests, it does focus on the Orc War Party! This is also a treachery that can lead to an instant loss on turn 1, as one player would need to defend 2 attacks of 6. The treachery will force the players to search the encounter deck, discard pile, and victory display for an Orc War Party and add it to the staging area. If all copies are already in play, then this first effect does nothing. However, having added a War Party back into play does mean that players are not able to beat the scenario during that quest phase (unless you have a lot of tricks up your sleeves). Once the new copy of the War Party is in the victory display, the players are given a choice. Either they remove all progress from the main quest (resetting them back to 0 after all their efforts), or each Orc War Party in the staging area makes an attack against the player with the highest threat. This can be brutal since you are likely unable to take the attacks if there is more than one War Party in the staging area. It also shuts down some defenders, meaning you are unlikely to engage a War Party this turn, prolonging the game and raising your threat further. If Orc Ambush is in play, the attacks will be even stronger, which can quickly end the game for you. With 3 copies of this treachery in the encounter deck, you better have some cancellation at the ready. If this hits more than once per turn (or even in subsequent rounds), it is likely an unwinnable situation for you to overcome. If you are playing this quest in multiplayer, make sure you are not the player with the highest threat so that you at least can avoid this treachery! Removing all progress from the main quest is only possible if there is progress on the main quest, to begin with. It is not an ideal choice, but if Orc Rearguard is not in play, you can easily recover the lost progress in a round or two.

Side-quests
2 new side-quests are added to this scenario. With the original ones remaining in the deck, there is now a total of 6 in the encounter deck. All of these can be revealed naturally, but they will also have a Nightmare card that can drag them out if you meet certain requirements. Even if you clear the side-quests, there is no guarantee that that’s the last time you’ll see them!
- Shadow the War Party: The first of the new side-quests that are introduced in the game will buff the Orc War Party and will prevent the players from beating the quest while it (and a War Party) is in play. When the side-quest is revealed, each engaged Orc War Party is returned to the staging area. This incentivizes the players to kill any engaged War Parties during the same round that they enter play. But the When Revealed effect isn’t the real issue here. The biggest problem that this side-quest adds is that each copy of the Orc War Party gets +2 threat, cannot be engaged, and cannot take any damage while the side-quest is in play. So if there is a War Party in play at the moment, the side-quest will prevent the players from engaging and killing it, which is a requirement for completing the scenario. However, if this side-quest is revealed without an Orc War Party in play, the effect doesn’t do anything. This card only affects the Orc War Party, not other enemies. So if you managed to avoid any copy of Kill Them! and managed to clear any War Parties that came out over the course of the game, then this side-quest can mostly be ignored. It only really becomes a problem when all copies are in play, and you have to clear this after completing the main quest, delaying you further.
- Protect the Bree-landers: A more active threat is this second new side-quest. I believe the artwork was repurposed for the Angmar Awakened campaign in the repackaged expansion, but that is a different side-quest altogether. This one is much worse. First of all, it surges, which will drag out an additional encounter card already. From then on, this card will act as more of a timer, which will accumulate resources over time. A resource gets added at the end of the round when no progress was placed on this side-quest that round. After that, the players must raise their threat by the number of resources on this quest card. They must also do that if they did not add a resource there this turn. This is a tricky encounter card that is not necessary to clear if you want to beat the quest, but ignoring it will come at a great cost. Add this threat increase to the increase for the number of enemies in the staging area each round AND the regular point at the end of the round, and you will find yourself nearing your elimination level quickly. Having this quest card in play at the same time as an Outlying Homestead will be very dangerous, as you will also not be able to lower your threat or use cards like Free to Choose to ignore the threat increase. If you hit this quest card early in the game, it will be a high priority. It is likely to take a few rounds to clear, thanks to its 10 quest points. But as long as you are making progress on it, you do not have to add resources here, which is a welcome relief. You do still have to raise your threat at the end of the round by the number of resources, but at least it is a reduced amount. The location that brings this quest into play can be easily avoided, so once you clear it, you won’t have to face it again.

Tips and Tricks
- Forget bringing your own side-quests. This is not the scenario to do so. You would only boost effects like Shrouded Hills and Weight of Responsibility. There will be plenty of side-quests to go to; it will just be a matter of keeping them in the victory display.
- Cards that put the new Nightmare cards into the Victory Display are quite valuable here. If you manage to get all copies of a card that would return a side-quest from the VD into the VD themselves, you can be assured that the particular side-quests will never come back.
- Bring threat reduction to this quest! While there might not be so much Doomed in the deck, the fact that you have to raise your threat at the end of the round for each enemy in the staging area can cause you to reach your elimination level sooner than anticipated. Add to this any threat that Protect the Bree-landers might cause, and you’ll reach it even sooner!
- Having a way to engage more than one enemy per turn will help you in higher player counts and against any enemies that were returned to the staging area by some effect. Engaging more enemies will help you to lower the threat in the staging area, and you no longer have to raise your threat by as much at the end of the turn. Dunedain decks are advised against this quest, making use of Halbarad, Tactics Aragorn, Son of Arnor, etc.
Playthroughs
With the base scenario being rather popular, the Nightmare version is often used by players to decktest their decks for Nightmare mode. As a result, there are a fair few playthroughs to watch before you set out on your own quest!
- True solo, Restricted Progression mode: https://www.youtube.com/watch?v=JNWbaUUOL2A
- True solo, Harad deck: https://www.youtube.com/watch?v=_IazU4YQ6yU
- Two players: https://www.youtube.com/watch?v=GuktVhtniDg
- True solo: https://www.youtube.com/watch?v=W27Yh4N85tg
I hope you are all excited to get going with Nightmare articles again. I’ll try and do at least 1 per month so that I can hopefully finish the Angmar Awakened cycle before the year is over. More Nightmare content will release alongside this series as other authors are stepping up for the Ringmaker and Dream-chaser cycles. Before long, we will have to start looking into the Nightmare Saga scenarios…
