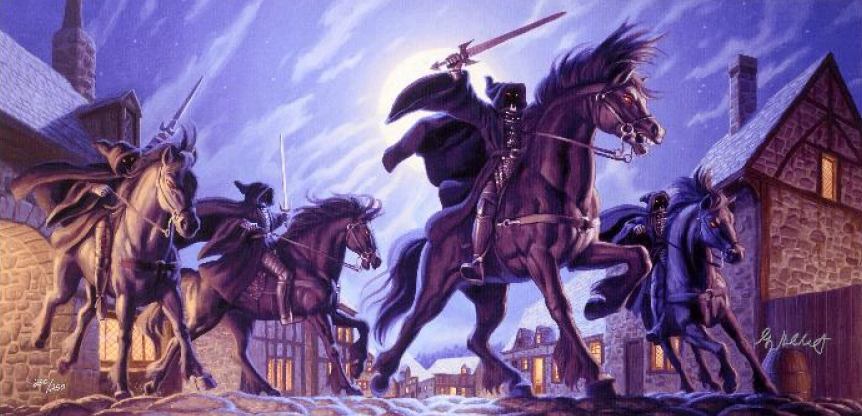
After arriving in Bree, Frodo and his companions are becoming a part of the mischievous schemes of some spies of Mordor, get assailed by the Black Riders and are finally fleeing to Weathertop, where they have to battle the Witch King. In this quest you will take your fellowship through these adventures, visit the Prancing Pony and make your way through the Midgewater Marshes, all before finally having to defend against a fierce Nazgûl assault on Weathertop.
While compared to the previous quest in the first saga expansion this quest could be  criticized for some thematic missteps (still being attacked by the spies from the Prancing Pony on Weathertop for example), it still brings across the overall feeling of the hobbits desperate last stand at Weathertop and the danger they face in the Prancing Pony across really well. It’s also a very demanding quest, with a balanced encounter deck of locations, strong and weaker enemies and some nasty treacheries, forcing you to do well in every area of the game. Because of this, it is a quest that a lot of new players can struggle against, especially if they came directly from the core set and are trying to take this quest on in true solo. There are some ways to tech against this quest, even in solo, but if you are coming to this quest with such a limited card pool, one of the best tips to give you might actually just be to tackle this quest two-handed, which will take a lot of the pressure of the last stage from just one player. An interesting part of this quest are actually the locations which offer a variety of effects that you will have to time carefully, making the travel phase a little more interesting than usual.
As with the article about A Shadow of the Past, I will treat this quest as a one-off at first and only go about the differences and intricacies of campaign mode in a separate section at the end.
A Knife in the Dark
- Found in: The Black Riders Saga Expansion
- Official Difficulty: N/A
- Community Difficulty: 6.7
- Encounter sets: A Knife in the Dark, Hunted, The Nazgûl, The Ring
- Quest cards: 3
- Play if: You want to continue your campaign, you want to play a quest that forces you to do well in all areas of the game, you have quite a bit of time to spare, you enjoy this part of The Fellowship of the Ring, you always wanted to throw an apple into Bill Ferny’s face.
- What is different about this quest?: The Fellowship hero, Peril keyword, out-of-play Nazgûl, a difficult to engage enemy starting in the staging area, a lot of early pressure on your threat, unique locations.
- Solo or Multiplayer?: This quest certainly becomes easier when you’re not playing true solo. If you’re not planning on tweaking the deck to remove Nazgûl from the encounter deck, the last stage can be very difficult for one player alone. Since this quest also features a very balanced encounter deck, it can be difficult to tackle this scenario with a more specialized deck, but offers these types of deck the chance to shine in multiplayer. However, if you are reaching three of four players, the effect on exploring The Prancing Pony can be quite devastating and accurate timing as well as the inclusion of ranged and sentinel characters is a must. Likewise, higher player counts might become enemy-locked after travelling to Midgewater, also requiring accurate timing and sufficient questing power.
- Can I run Side-Quests for this scenario?: Sure, it is not really a quest that is tailor-made for the inclusion of side quests, but if you are able to get rid of Bill Ferny quickly, stalling advancement a bit on stage one is certainly an option to clear a few side quests. On stage two the forced effect will effectively prevent you from clearing side quests safely. On stage three there is no progress to be put on the quest, which again could offer the opportunity to get some side quests into the victory display, although it may be too late for them to have any meaningful effect. Delay the Enemy can do a lot of good on this stage, but it can be difficult to commit a lot of attacking characters to the quest while having to deal with a lot of enemies (make sure you’re confident of clearing it in one turn). Lastly, Scout Ahead, if able to get a Nazgûl out of the encounter deck is a very good side quest to make the last stage easier, even if you had to shuffle in some of the out-of-play enemies.
The Quest
Out-of-play Ringwraiths
The encounter cards Bill Ferny, Squint-Eyed Southerner and Unwanted Attention will force you to make a choice between either suffering a nasty effect or shuffling one of the out-of-play Ringwraiths into the encounter deck. There is also the forced effect on the second stage, which will require you to make reliable progress every turn.
Let me tell you a little personal story about the Ringwraiths: The first time I ever played this quest I was playing it blind. Since I was confident of dealing with any Nazgûl getting revealed from the encounter deck, I took the option of shuffling a Ringwraith in quite a few times until there were none left to shuffle in. After successfully beating stage two, I remove the quest card, look at stage 3A and read the following sentence: “Search the encounter deck and discard pile and add each Nazgûl enemy found to the staging area.” The game was over at that point.
Without the effect on the last stage, which also requires you to kill all of the Nazgûl  enemies in play, it is different to understand the threat the shady working of the spies from Mordor present to Frodo and his fellowship. You will want to go out of your way to avoid any kind of attention in order to avoid the Ringwraiths at all cost. In game terms this translates to picking the option that does not include shuffling one of the four Ringwraiths into the encounter deck (an enemy that has a dangerous statline of 3 threat, 5 attack, 4 defense and 5 hit points). This presents some gameplay challenges that really inform how you approach this quest. You will want to get rid of Bill Ferny quickly, Squint-Eyed Southerner basically becomes a surging card and Unwanted Attention will severely hurt your questing power if you can’t cancel it. Even when trying to avoid having to deal with additional Ringwraiths, it can sometimes be unavoidable to do so. When you cannot remove two heroes from the quest because you did not commit enough heroes, hoping to kill some enemies this turn or wanting to avoid raising your threat from Bill’s effect, you either have to cancel the effect or have to take the Ringwraith. Note, that Unwanted Attention has the Peril keyword, meaning you can only cancel it with your own cards or with Black Riders Frodo should you be the first player at the moment.
In higher player, shuffling one or two Ringwraiths into the encounter deck will usually be manageable. Especially in true solo, however, the existence of Unwanted Attention alone warrants the inclusion of Spirit for access to Test of Will and choosing Black Riders Frodo as your Fellowship Hero.
Setup
Setup is again quite simple for this quest. After setting aside the Ringwraiths (hopefully forever), the Witch-king, Midgewater and Weathertop you will add Bill Ferny and the Prancing Pony to the staging area. This setup does not scale with the number of players and you will start with five threat on all player counts. For solo players this mean that you could potentially have to overcome nine threat right out of the gate. Even if you cannot achieve this and maybe underquest a little in the first round, bringing heroes with relatively high willpower or some form of quest insurance (e.g. Spirit Eowyn or Galadriel with Nenya) is advised.
Quest card 1: Trouble in Bree – 8 quest points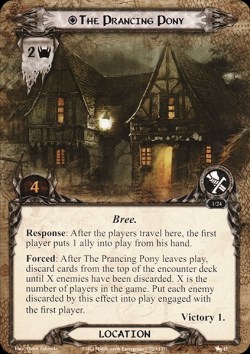
While this stage itself does not have any difficult effect to overcome and you just have to explore the Prancing Pony and put eight progress tokens on the quest, there are still some things you will want to achieve on this stage before advancing: 1) You want to get rid of the menace of Bill Ferny sitting in the staging area, that is unengageable in normal ways. 2) You want to build your board stage enough to deal with the forced effect that triggers after exploring the Prancing Pony.
In order to get rid of Bill Ferny there are several approaches you can take:
- Direct damage:
The developers made the smart design choice to give Bill five hit points, so you cannot just nuke him out of the staging area with Sneak Attack and Gandalf. If you combine Gandalf’s effect with just one point of damage from something like Hail of Stones or Ranger Bow, however, sneaky Gandalf is definitely a good option to get rid of Bill. Similar effects can be found on Argalad (you will have to boost his attack by one point, however), Arrows from the Trees or Galadhon Archer. You can also utilized staging area attacks to your advantage using heroes like Haldir or Dúnhere or other cards that allow this like Hands Upon the Bow, Great Yew Bow or Forth Eorlingas!. Since Bill has three defense this could take a while, however. Lastly, be aware that cards like Ride them Down and Hunting Party don’t work against Bill Ferny, because he is a unique enemy.
- Card effect engagements
Several player cards allow you to engage an enemy with an enagegement cost higher than your threat outside of the usual optional engagement during the encounter phase. If you can use one of these tricks to pull Bill Ferny down, you can then kill him relatively safely, since he only boosts a measly one attack. It could still take more than one round in the early game with his combined defense/hit points value of eight, but you can be sure to dispatch of him sooner rather than later if you manage to get him down into your play area.
Cards that would allow you to do this are Son of Arnor (who is an option right out of the core set), Westfold Outrider, ally Mablung, Tireless Hunters and Tactics Aragorn. While this is a really easy way to deal with Bill quickly, it will require the use of quite a bit of deck space on the player’s part to reliable pull this of. (If you are not planning on using Aragorn’s ability that is.) You will want to include enough cards to be somewhat sure to draw it early, but this will take up card slots in your deck that you might otherwise use for different effects. Aside from Aragorn, the best of these cards is probably Mablung, because his effect can still be useful later in the game to avoid having to deal with one of the Nazgûl enemies for one round.
- Threat management
This is not really a way to get rid of Bill Ferny, but more of a way to be able to deal with his effect. If you area able to manage your threat appropriately, you can just ignore Bill hanging around in the staging area and don’t worry about his effect. Aside from lowering your threat back down with the usual effects like Galadhrim’s Greeting, Elrond’s Counsel, Double Back or Spirit Merry, the spirit ally Elfhelm can do some work in this quest, although his ability of course just effects one player. Aside from that you can also ignore Bill’s effect when you’re relying on high willpower allies like Ethir Swordsmen to do your questing for you (this will also save you from the effect of Power in their Terror) and/or if you use attachments to turn your Fellowship Frodo into a questing powerhouse, possibly boosting his willpower even more with Rosie Cotton. This will of course leave you more vulnerable to Unwanted Attention, so you want to make sure that you are able to cancel it when it comes up.
- Getting your threat up to 38
If all else fails, you can of course just purposefully raise your threat to 38 and then engage Bill Ferny on his turns. This is dangerous however, because the engagement cost of the Nazgûl enemies is only 35 so you will have no way to avoid dealing with them outside of shenanigans. You should include a way to lower your threat below that threshold after killing Bill Ferny. Lore Aragorn is usually the best way to this and you can of course give control of him to other players through Desperate Alliance. This can also work well if the player running Lore Aragorn plays Song of Eärendil on one of their heroes to take the threat for the other players, quickly get to 38, engage Bill Ferny and then immediately lower their threat with Aragorn’s ability.
When deck-building for this quest you should consider which of these approaches you want to take. They definitely all have their merits, but having a plan in place to deal with Bill Ferny is a clutch part in planning to take on this scenario.
With regards to the Prancing Pony the correct timing of travelling to it and exploring it is very important. After you travel to it the first player is able to put one ally into play for free. (It also says “from his hand”, so you can make use of all effects that might trigger from this wording.) However, after exploring it the first player (which will usually be another player in a multiplayer game), will discard cards from the encounter deck until a number of enemies equal to the number of players is discarded and put them into play engaged with him. While this will not pose much of a threat in true solo, especially with the free ally you got from the travel effect, in higher player counts the correct timing of exploring it is of particular importance. Ideally you want a player engaging those enemies that is equipped to deal with them (you could of course run cards like Hammer-Stroke to redirect the enemies to another player), which in three or four player games will likely include support from other players’ ranged and sentinel characters. It is a good strategy to hold off travelling to this location until after you have built a board state capable of dealing with this. In higher player counts, the order of players is also very important, if you want to utilize the free ally to the biggest extent. Since you determine the first player before drawing your starting hands, there really is no strategic tip to be had here, but if you want to get some allies out before having to deal with the enemies, consider choosing the player with the most combat capable heroes to be the last player in the beginning and travel to the Prancing Pony before they become the first player. While usually a weird card to include in any deck, the Prancing Pony also might justify the inclusion of Follow Me! in a player’s deck if you’re planning accordingly. In case there is a Weather Hills in the staging area it could also take some pressure of the player engaged with the enemies when travelling to it after exploring the Prancing Pony. If you have to hold off travelling to the Prancing Pony this is the perfect time to clear a few side quests, since you will not be able to advance before clearing it anyway.
Quest card 2: Into the Wild – 6 quest points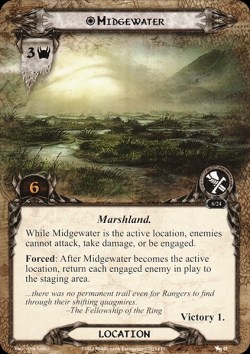
Although only having six quest points, this stage will put some serious pressure on your questing power. After revealing it you will add Midgewater to the staging area and place on progress on the quest for each player in the game. However, at the end of every round you will also have to remove that amount of progress from it or shuffle an out-of-play Ringwraith into the encounter deck, so you will want to make enough progress every round. This isn’t made easier by the fact that you can’t advance until Midgewater is in the victory display, which will require to put six progress on that location providing a considerable buffer before the quest. After you travel to Midgewater you will also return all engaged enemies to the staging area and will not be able to engage them until after exploring the location, which could be quite a threat boost, making it even harder to put the needed progress on the quest.
Because of this, timing your travel to Midgewater is equally important as with the Prancing Pony on the previous stage. Ideally, you don’t want any or only very few enemies around when travelling to it. Be aware that you cannot use your usual direct damage effects or staging area attacks against all remaining enemies because they will become immune while Midgewater is the active location. However, since Midgewater is not immune to player card effects, there are a lot of ways to circumvent its effect. You can use any number of location control effects to clear it while it is still in the staging area or you can use Thror’s Key immediately after advancing to just blank its text box and keep dealing with enemies normally.
Quest card 3: The Ringwraiths Attack – no quest points
After advancing to this stage you will have to put every Nazgûl in the encounter deck and discard pile into play in the staging area. Additionally, you will also add Weathertop and the dangerous Witch-king. After this, it becomes an all out battle between you and the Nazgûl. There is not progress to be put on the quest card, so you just have to quest for enough to don’t raise your threat to high.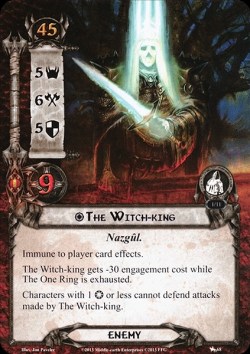
In the best case, you will only have to deal with the two Riders of Mordor and the Witch-king. If you were able to manage your threat, you can engage them one at a time providing you don’t exhaust the One Ring. Since you will have to exhaust the One Ring to travel to Weathertop, I usually don’t find it’s worth it to do so, because you’ll likely have to engage the enemies anyway with their lowered engagement cost, meaning you won’t be able to take advantage of Weathertop’s effect if you did not shuffle a bunch of Ringwraiths into the encounter deck. Instead the location to travel to is usually a Weather Hills. If you can keep it as the active location long enough to kill all other Nazgûl in play, you will still trigger the win condition of the scenario. Again, this requires some timing, but it will often be preferable to engaging all enemies at one, especially in true solo.
The Witch-king itself is a capable boss enemy, that is immune to player card effects and will take a combined attack of 14 to destroy. Additionally you won’t usually be able to use your dedicated defender against him, because you can’t defend with characters with willpower lower than two. That means, outside of a built up Aragorn or Sam Gamgee with a Hobbit Cloak, you will usually find yourself chump blocking with one of your questing allies. (Of course you could put something like Celebrian’s Stone on Beregond, but that would be overkill.) This will especially become the case if you have to keep him around for more than one round, which is likely outside of having being able to muster up a monstrous attack value.
At the same time, you will still be questing and revealing encounter cards during the quest phase. (This is not Journey along the Anduin.) You want to be able to somewhat counter the threat in the staging area, although it usually won’t be too punishing to fail the quest by a little. Just countering the threat in the staging area is particularly valuable after you put a Nazgûl out of play by way of Weather Hills. There could also be some of the spies popping out again, so you should have a way ready to deal with some additional enemies.
The Fellowship Hero
During the analysis of A Shadow of the Past I talked about how there wasn’t anything dangerous punishing you for exhausting the One Ring. This changes in this scenario. There are a number of different encounter cards that will have effects triggering from an exhausted One Ring. This makes the choice of your Fellowship Frodo particularly important and you will not be able to use his ability every time you liked to, because you would get punished to severely from exhausting the ring. Rider of Mordor, the Witch-king, the Ringwraith, Shady Breelander and Lure of the Ring all have those effects.
 This is especially the case with Black Riders Frodo. While it is excellent tech against the dangerous treacheries like Unwanted Attention or Power in their Terror, you will also have to exhaust the One Ring during the quest phase, which leaves you open to engagements by Riders from Mordor or even the Witch-king with their lowered engagement cost. In true solo he can still be very good, because you won’t be revealing as many cards. In higher player counts, his effect becomes more of a gamble, when you will remove several more encounter cards after the one you cancelled.
Road Darkens Frodo is likely a better option because you will trigger his ability after engagement checks are made and will not suffer from the effects of the encounter cards. As with A Shadow of the Past, he provides a good way of defending against Nazgûl. His value diminishes a bit, however, because of the fact that you have to target the attacking enemy and can not use him to defend against the Witch-king because of this.
Land of Shadow Frodo can provide some much-needed quest insurance on stage two of the quest. You can always trigger his ability after staging when you know whether you really need it or how dangerous it would be. The possible attack boost is triggered after engagement checks so you will be safe using it. With some Daggers of Westernesse, he even can become a quite capable attacker against the bigger enemies, being able to get up to seven attack with his ability.
Lastly, Mountain of Fire Frodo, while unexciting, always provides excellent utility. You can use his ability only during the planning phase, which will allow you to gain an additional resource when you most need it. Particularly in this case you want to include a number of fellowship and neutral cards, because you will not be spending his own resources. Song attachments also work, of course. This is generally a good tip for this quest, because you won’t know how often you can trigger Frodo’s ability safely and want something else to spend his resources on.
The Encounter Deck
Global
- There are 35 cards in the encounter deck in normal mode; 24 in easy mode. This
 is not counting anything that starts the game either out of play or already in play. It is also noteworthy that on easy mode you will only set to Ringwraiths aside out of play and start the game with no Riders from Mordor in the encounter deck, making the last stage significantly easier.
 - There are a lot of shadow effects in this quest, and even more so in easy mode. The percentages are 63% in normal mode and a whopping 75% in easy mode, so definitely bring shadow cancellation. The out-of-play Ringwraiths also have a shadow effect (even though it only is shuffling the card back into the encounter deck), so you will potentially be looking at higher numbers. The dreaded Pathless Country also makes a return, warranting the inclusion of shadow cancellation through its existence alone.
- The encounter cards have an average of 1.2 threat in normal mode and 1.4 in easy mode. Shuffling Ringwraiths in could up this number as always.
- Six cards have Surge on normal; four on easy, but you should consider Squint-Eyed Southener having Surge, so the numbers are more likely to be nine and six.
- The Peril keyword is found on eight cards in normal mode with easy mode bringing that number down to four.
- Doomed does not come up in this quest, although Lure of the Ring and Bill Ferny have the potential of increasing your threat.
- The Witch-king and Weathertop are immune to player cards effect and the Nazgûl, as always, cannot have non-Morgul attachments. Since you start with no Nazgûl in the encounter deck on easy mode, your trap deck could still do good work in that mode, but its value get diminished on normal.
While there is a higher number of treacheries than anything else in the encounter deck (on normal mode that is) quite a few of them have Surge making sure that you will reveal a balanced amount of locations and enemies among a couple more treacheries each turn. This is a very balanced encounter deck that will force you to do well in all areas of the game. Because of this very specialized decks will usually only work in multiplayer games.
Locations
Aside from the three generic locations in the encounter deck, there are also the three unique locations that will get put into play on each quest stage. Since I already covered these in the passages about the specific stages, I won’t delve too deep into these locations in this part of the analysis, instead focusing more on the three locations you might regularly encounter.
- The Prancing Pony: The interesting part about this quest is that the locations actually offer choices. Here you have to time the moment to travel to it carefully as to getting as much value as possible out of the free ally while at the same time making sure to be able to handle the enemies coming out a little later. Having ranged or sentinel in multiplayer will definitely be a boon.
- Midgewater: If you are not using location control or Thror’s Key against this location, there are two central things to consider before travelling to it: 1) Will you be able to overcome the threat of the enemies returned to the staging area and still put enough progress on the quest? 2) Will you be able to handle the enemies returned to the staging area as well as every other enemy revealed during staging once you have explored it? Using the location management tools outlined above is probably the better option, but if you’re confident or didn’t draw the right cards, these are the central aspects of this location.
- Weathertop: As said during my thoughts on stage three I often find it not worth it travelling to this location. Exhausting the One Ring essentially means you will have to engage the Witch-king and the Riders of Mordor with no means to returning the former to the staging area, removing a significant amount of threat from there anyway and preventing you from dealing with the Nazgûl one at a time. In most of my playthroughs I just have it sitting there, contributing its four threat, preferring to travel to Weather Hills. (If you care about score this might be a different matter, but since I never in my history with the game have calculated a score, I really can’t talk about this aspect of the game properly.)
- Chetwood: Aside from the Nazgûl, you will also have to deal with some spies from Mordor in this quest. Chetwood buffs up the threat and attack of this enemies while in the staging area, making it a dangerous card to reveal in multiplayer games when you reveal a number of spy enemies alongside it. If you don’t need to travel to a Weather Hills or one of the unique locations at this moment, this is usually the location to travel to, just to remove its buff from the game. It is also noteworthy that its effect does indeed stack with multiple copies of Chetwood in the staging area. In these cases it will often be preferable to hold off travelling to another location and removing at least one copy of it from the staging area.
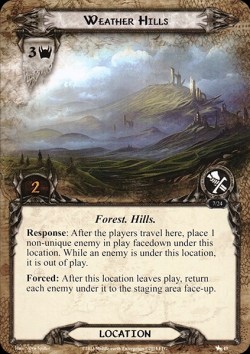
- Weather Hills: This location is your best friend. When travelling you will put a non-unique enemy (so no Bills or Witch-kings) facedown under it out of play, returning it to the staging area after explored. While generally useful just to ease combat for one round, this location becomes insanely beneficial on the last stage of the quest. If you put a Nazgûl enemy under it, it will contribute to the win condition of the quest. If you can couple this with the Saruman ally, you can even get two enemies out of play for a turn, leaving your characters open to deal with the Witch-king and winning the game. It is often a good idea to leave one of these locations in the staging area after revealing it, to be certain to have it available on stage three, although it provides a good panic button in all cases. Note that you can choose an enemy engaged with you, but return it to the staging area after clearing Weather Hills. This means it can also function as a way of returning Riders from Mordor to the staging area, you did not plan on engaging. If you choose to use this location to win the scenario, it is very important to time the moment you travel to it properly or just quest for as little as to not explore it.
- Pathless Country: Making a return from the last scenario (where I already talked about it), this location is relatively resistant to location control while in the staging area, but with not travel effect it is often easy to travel to and only contributes two threat if that’s not an option at the moment. The shadow effect is even more dangerous in this quest with the higher number of enemies around and should it come up on the Witch-king it can make your life very difficult should the then engaged player not have the proper means of dispatching him. Keep at least on copy of your Hasty Strokes or Sterner than Steels back for the last stage, in case this comes up as a shadow.
Enemies
The enemies in this quest provide an interesting variety from relatively harmless, but swarmy, to big and dangerous. You will also have to deal with a huge number of tough enemies on the last stage. At this point it is probably worth pointing out that easy mode changes this aspect of the quest significantly. Since you will remove the two Riders of Mordor from the encounter deck, you will start the game with no Nazgûl around. Should you be able to avoid shuffling one of the (in this case only two) Ringwraiths into the encounter deck, you will only have to deal with the Witch-king at Weathertop. This also means that the effect on Piercing Cry will completely whiff, at least in the beginning, giving you essentially a blank encounter card. Easy mode removes two of the three copies from the game though, so it’s nothing to plan for.
- Bill Ferny: After having dedicated 750 words on killing him/throwing apples in his face above, I won’t go over him again here. Having a plan in place to deal with him is certainly key and there are multiple ways you can achieve this.
- The Witch-king: The big boss enemy of this scenario poses a considerable threat with his six attack, five defence and nine hit points. Since it gets -30 engagement cost when the One Ring is exhausted, you usually won’t want to trigger Frodo’s ability at inappropriate times while he is in play or at least plan on optionally engaging him anyway. Since he is immune to player card effects you will just have to muster up the fourteen attack needed to kill him or be prepared to have him around for multiple rounds. You should keep this in mind when building your deck for this quest and have your board prepared when advancing to stage three. Keeping him around for multiple rounds is made even more difficult by the fact that only characters with two willpower or more can actually defend against him. Outside a buffed up Aragorn, Theoden or Sam Gamgee with a Hobbit Cloak (provided the One Ring isn’t exhausted) there are not a lot of heroes that can safely defend against him. In that case chump blocking with one your questing allies is often the best bet, even more so considering the fact that there are no shadow effects that punish this approach. One last thing to note about his enemy is the fact that he has no victory points, meaning that he can come up again if you take too long killing the other Nazgûl. This will become more important in the next quest, however, and for now this fact is probably best ignored in your plans.
- Ringwraith: This enemy is essentially the Black Rider from the last scenario, only with one less threat. Ideally you don’t want any of these around, but it is advisable to plan for at least one of these getting shuffled into the encounter deck by an uncancellable effect. All the direct damage (for example Hail of Stones and Ride the Down) and discard (for example Hunting Party and Helm! Helm!) approaches laid out in the last article will still work against this enemy. With the huge number of shadow effects around in this quest its effect can become quite dangerous and chaining attacks are a possibility. If you plan on engaging this enemy, don’t exhaust the One Ring.
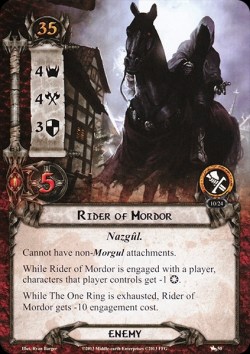
- Rider of Mordor: Slightly weaker than the Nazgûl you’ve already encountered in this expansion, the danger of this enemy is that he can get very annoying when you keep him around engaged with you for several rounds. With the debuff on willpower it can put a serious dent into your questing aspirations outside of a player running a dedicated combat deck in a multiplayer game. Because of this you should plan on killing this enemy immediately after engaging. This means it is often a good choice to keep him around in the staging area when revealed early, because the debuff can be more threatening than the four threat in the staging area, although this approach is made more difficult by his trigger from exhausting the One Ring, which will lead to a forced engagement outside of very low threat decks. Of course, nuking him from the staging area is always an option. It also makes an excellent target for cards like None Return, Out of the Wild and Scout Ahead, because once they’re in the victory display you cannot put them into play on stage three. One last thing about this enemy is that the negative willpower it forces on you will make it more difficult to properly defend against the Witch-king. This is one more reason you do not want to exhaust the One Ring too early on stage three, because you will have to engage each Nazgûl and often will have to take the Witch-king’s attack undefended leading to an almost certain hero death.
- Shady Bree-Lander: A relatively weak enemy, that can be defended by a lot of the dedicated defending allies when Chetwood is not around. Since he dies to the magic number of five attack, which is often easy to achieve right out of the gate, he should not pose too much of a threat. If you plan on taking several specialized decks to a multiplayer game, however, you have to time your triggering of Frodo’s ability properly, because he might end up engaged with a player not planning on fighting this enemy through forced engagement.
- Squint-Eyed Southerner: First of, treat this enemy as if had the Surge keyword. Revealing an additional encounter card will in almost all cases be preferable to making the game significantly harder on stage three. After this, it is also pretty weak, easy to defend with his measly two attack and usually quickly dispatched. With an engagement cost of 33 and only two threat you can even keep him around in the staging area for a while. Lastly, both of the spy enemies make good targets for Ranger Spikes. Since they are the only two enemies that can actually trigger it and both have only two threat, it’s basically just setting them aside out of play, although you will still have to account for the threat boost of Chetwood.
Treacheries
Since treacheries make up the biggest part of the encounter deck in normal mode, it is advisable to include some form of cancellation. Quite a few of them (Unwanted Attention, Black Breath and Power in their Terror) can become quite dangerous and proper management of their effects is certainly key for success in this scenario.
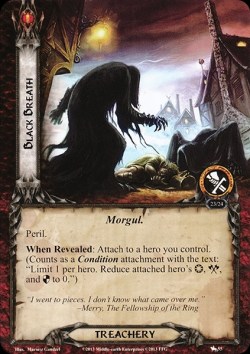
- Unwanted Attention: This will be most likely the reason you’ll have to shuffle a Ringwraith into the encounter deck at some point. If you don’t have two heroes committed to the quest, there is no possibility aside of cancelling it to prevent this from happening. Since it has the Peril keyword, cancelling can often be difficult. In solo, this makes a good target for Black Riders Frodo since you definitely don’t want anymore Nazgûl in the encounter deck. In multiplayer being forced to add a Ringwraith isn’t as dangerous, so it won’t matter as much. If you can remove two heroes from the quest (Your Fellowship Frodo makes a good target to use for this effect), failing to quest a little bit will often be preferable. On stage two failing to quest or triggering the Ringwraith effect usually won’t make a difference, so it will be the choice between cancelling or just sucking up the Nazgûl. You also cannot use effects like Hobbit Pony to commit characters after revealing this only to immediately remove them, because there won’t be an action window to do so.
- Black Breath: Because it is also very difficult to cancel having the Peril keyword, his is a good reason to include some condition removal like Miner of the Iron Hills, Power of Orthanc or Bulwark of the West. If you have to keep it around for a while, Fellowship Frodo makes a good target, as do characters with effects that don’t rely on their own stats to contribute like Dain Ironfoot, Galadriel or Eleanor. If you have no way to deal with this treachery it can become quite the nuisance, so plan at least some way of getting rid of it when building your decks.
- Pale Blade: While it can certainly whiff, especially on the earlier stages where you won’t have a Nazgûl around all the time and only start out with two in the encounter deck (or none on easy), this treachery can be punishing when you’re planning on getting rid of Nazgûl with direct damage effects; discard effects will still work though. On the last stage, the Witch-king will often make the best target for it because he cannot take non-combat damage already and will probably destroy a character with his attacks anyway. Defending against or killing the attached Nazgûl can also be made easier with Valour of the North.
- Power in their Terror: This is the last of the seriously dangerous treacheries in the encounter deck. Punishing a lot of ally swarm strategies outside of dwarfs (with Dain) and Outlands, you will also have to plan on countering this when building your deck for this quest. Solutions include building up your heroes into questing powerhouses or relying on high willpower allies only, although it will still punish dedicated combat decks since they usually won’t have enough willpower on their allies. If you have ally Faramir on the table, this treachery is a reason for one of the rare instances that you want to trigger his ability before the staging step to prevent it from wrecking your board state. One last possibility is, of course, cancelling it and when first playing this quest I included Eleanor in my two-handed fellowship just to counter this treachery and be able to keep going. Revealing this back to back in a multiplayer game will in almost all cases completely destroy any board state and severely hinder your ability to win against this scenario. It also is very dangerous on stage three where it might prevent your questing allies from chump-blocking and is also one more reason to make sure to be able to kill the Rider of Mordor in one turn.
- Piercing Cry: Making a return from the previous quest, this treachery is pretty laughable in easy mode where you will start with no Nazgûl in the encounter deck. In normal mode, it is pretty much equivalent to revealing a Rider from Mordor which you should be prepared to do anyway. If you want to put it into play engaged with the first player, you should usually only to this later during staging in multiplayer as to not reveal a Power in their Terror directly after it.
- Lure of the Ring: While you could safely exhaust the One Ring in the previous quest, here, this treachery provides more of a tactical decision. You will have to take into account the enemies in play and how many cards you have yet to reveal. When in doubt, it will probably be better to raise the first player’s threat and include some threat reduction into your decks.
Tips and Tricks
- This quest can provide a serious challenge in true solo. Consider downgrading it to easy mode or build a two-handed fellowship should you find yourself having too much trouble.
- Time your travels to the different unique locations appropriately. This is one of the interesting mechanics of this quest and ill-timed travelling can be very dangerous.
- While you have to balance every aspect of the game against this scenario, bringing sufficient willpower is especially important with Unwanted Attention and Power in their Terror being able to lower your questing power very suddenly.
- Traps work very well against the spy enemies. It is not a strategy that will win you this scenario, but throwing a couple Ranger Spikes into your deck probably won’t hurt.
- Be careful with the One Ring. This is a very thematic aspect of this quest and one you should pay attention to. Using the ring at the wrong time is really dangerous and you should have a strategy in place that does not revolve around it. Because of this, it also makes sense to include cards that you can use the excess fellowship resources for.
- The Weather Hills locations is your best friend. You can use them to make the combat phase significantly easier and even to outright win the scenario.
- Using victory display shenanigans like None Return can make stage three much easier and is one of the best strategies against this quest.
- Have a strategy against Bill Ferny in place from the get-go. You don’t want to suffer from his effect too much.
- Don’t shuffle out-of-play Ringwraiths into the encounter deck if you can help it. Any additional Nazgûl will make the last stage much more difficult and hinder your ability to win this quest significantly.
- Keeping your threat below 35 and not exhausting the One Ring is your best bet to deal with the Nazgûl on stage three one at a time.
- I said it before and I will say it again for the next quest: The shadow effect on Pathless Country is very dangerous. Have shadow cancellation in place.
Campaign Mode: Boons and Burdens
There are no burdens to be given out in this scenario, although you will have the burden you chose from A Shadow of the Past still in play/in the encounter deck. Instead, after resolution, each player will choose one of four boons to attach to one of his heroes. These boons can also set up future boons, so keeping that in mind is definitely valuable.
I won’t go into too much detail about the individual boons. Each of them will grant you a trait (Ranger, Healer, Warrior and Noble) and plus one to a stat (or two to hit points). There are several approaches you can take with this. The first one is just giving  a hero that uses one of his stats every turn a boost to his main stat. For example, if you got Beregond you can give him Tireless Ranger, Eowyn could get Noble Hero and Eomer will get a lot of value out of Valiant Warrior. You can also focus more on the traits and use them to set up one of the multi-trait cards that were introduced in the Haradrim cycle like Well Warned, Coney in a Trap, Proud Hunters or Hunting Party. Lastly, the Treason of Saruman expansion will introduce boons that have to be attached to heroes with the traits granted by the boons given out here. They are, with the exception of the very limited Hands of a Healer, all very good and as such worth it to be a part of your decision-making process here, although you can, of course, attach them to every hero with the needed traits, not just the ones you give the trait to at this point in the campaign.
Playthroughs
- One player, campaign, Hobbits: https://www.youtube.com/watch?v=iinz3z9UY0c&t=570s
- Two players, non-campaign, Hobbits and other, progression mode: https://www.youtube.com/watch?v=bC9AY0ilOmc
- Four players, non-campaign, Hobbits and other: https://www.youtube.com/watch?v=Ne3U4eeqkBw
- Two players, campaign, updated decks: https://www.youtube.com/watch?v=r8d1dLs3lDk
- Two players, thematic campaign: https://www.youtube.com/watch?v=zY5Ox9CVhfQ
You will have to balance all the aspects of the game to do well in this scenario. Should you achieve victory, you will successfully drive the Nazgûl away from Weathertop. Frodo, however, is gravely injured and has to be taken to Rivendell as quickly as possible. This will be the adventure you will take on in the last quest of this saga expansion: Flight to the Ford.

Unfortunately, the Mountain of Fire’s Frodo’s action is a “Planning Action,” so it can only be used during the planning phase. You can’t wait until the end of the round to trigger it.
LikeLike
thanks for catching that, I’ll make sure the article is updated!
LikeLike
Just read this fine post. Always nice to sum up my own misadventures while reading your articles 🙂
LikeLike