
After finding your way to the Temple of the Deceived in the previous scenario, you are faced with a long cave system that has large portions underwater. This starts off one of the easier quests in the cycle, that has a pretty standard strategy in order to beat it. That doesn’t mean it isn’t fun though. The thrill of going underwater and needing to clear large locations is nice and thematic. On top of that, the quest plays a little with people’s fear of what touched their foot when swimming. Was it seaweed, or was it an eel? This all makes for a great scenario for beginning players, but also is enjoyable for veterans.
The Drowned Ruins
- Found in: Drowned Ruins Adventure Pack, Dream-chaser cycle 4.
- Official Difficulty: 6
- Community Difficulty: 5.1
- Encounter Sets: The Drowned Ruins, Stormcaller Elite, Drowned Dead
- Quest cards: 2
- Play if: You want to play a quest where you can stall a little and don’t have to hit the ground running, you like the option of choosing your own path, you have a deck to test, you want an easier scenario in the Dream-chaser cycle.
- What is different about this quest?: Underwater locations, double sided locations in the Grotto deck, 2 objective allies, plenty of time to clear side-quests.
- Solo or multiplayer?: You can play this quest with any number of people, but it gets easier in higher player counts. That way, you can clear Underwater locations more easily and have less trouble dealing with the enemies in this scenario. The start favours an even number of players, as it is easier to overcome the number of locations in the staging area that way. Playing in true solo also benefits you slightly, as you get control of both objective allies and get to keep them throughout the game. However, this does make it harder for you to make the progress needed to clear the Underwater locations.
- Can I run side-quests for this scenario?: Yes you can, in fact I would even strongly advise you to clear out some side-quests in the early game before going Underwater. Either one of the Spirit side-quests are a good option, and for most others, there is a case to be made. Try your side-quest deck against this scenario at least once. Thalion will also be a great card to bring to this quest because of this.
- What to look out for: Staying underwater too long, location lock, not being able to play attachments and allies sometimes, threating out at the final stage.
The Quest
Setup
The unique Shrine to Morgoth location (double sided) will start the game out of play. This one will be brought in once the players advance past the first stage. Then, the players need to prepare the new Grotto deck. This deck consists out of all double sided locations (excluding the Shrine to Morgoth) and exists separately from the encounter deck. The Grotto deck needs its locations to be ordered so that the Grotto side of each location is face up and you don’t know what the Underwater location is. You will be able to see the top card’s Grotto side, and get to use that in your strategy if you want. This is the gimmick of this quest, where you don’t know what lies beneath the waters. Players then add 2 Grotto locations from the deck to the staging area, or 3 if there are 3 or more players. As indicated on their objective sides, the first player gets control of Captain Sahir, and the last player gets control of Na’asiyah, both with the objective side face up. If you are the only player in the game, you get control of both objective allies. The players are now ready to start the game and can flip the quest card.
Quest card 1: The Grotto – 15 quest points
At this stage is where you will spend the majority of the quest. This is because the requirements to move on are pretty steep and shouldn’t be rushed. In order to advance the stage, the players not only need 15 progress on the main stage, but will also need to have 3 Underwater locations in the Victory Display. The 15 progress generally isn’t the problem, but players tend to stall for a long time until they go underwater for the first time, let alone the third time.

Stalling really is the key at this stage, as there is nothing really punishing you for taking your time to get a proper questing army on the table before you attempt going underwater. Get some side-quests out for when you clear the 15 progress on the quest card, else that goes to waste. As the main quest itself doesn’t have any keywords, the players can also use Backtrack to clear locations in the staging area with excess progress tokens. This is useful when Underwater locations appear in the staging area, or if you want to clear Drowned Cave. Clearing the Grotto locations in the staging area doesn’t really help you all that much, as the quest card dictates that once a double-sided location is explored, it gets replaced by the top card of the Grotto deck.
A note on these Grotto cards is that once they are explored, they don’t go into any discard pile. The rules state that because they are double-sided, they can never go into a discard pile or into the encounter deck. If the players clear a location with the Grotto trait, they shuffle that location back into the Grotto deck before replacing it with a new location from that deck in the staging area. If the players clear a double-sided location with the Underwater trait face-up, they add that card to the Victory Display, as indicated by the victory points at the bottom of that card.
The way that you flip these double-sided locations is through travelling to them. Once you travel to a Grotto location in the staging area, you may decide to leave it as it is, or to flip it to the Underwater side. Flipping it removes all points of progress and any attachments that you had on the location. The attachments rule is a little weird, as it doesn’t state anywhere that you do remove them, but otherwise Woodmen’s Path would strip the quest of any difficulty it may have. It should be noted that the Grotto side of the location will benefit the players a lot when it is active, while the Underwater side of the location will have severe consequences for the players. Not only are Underwater locations difficult to clear thanks to their many quest points, but they also restrict the players from playing cards. This is because the main quest card reads that while the active location has the Underwater trait, the players will be unable to play attachments or allies. This only limits to attachments and allies played from your hand, so abilities like Ring of Thror for attachments, and A Very Good Tale and Tactics Imrahil for allies can still play cards while Underwater. This is an important rule that tends to be forgotten when playing the quest (by me at least). When going Underwater, the players will have to clear that active location during the next quest phase in order to avoid a deadly Forced effect that triggers if an Underwater location is active at the end of the quest phase. This effect depends on the type of location you have active, but should be avoided at all costs. The Underwater locations also have passive effects of their own which I will get into during the individual card reviews.
Use this time to get a lot of questing characters ready and to boost your willpower so that you can clear Underwater active locations in a single round. You will have to dedicate a lot of characters to the quest, but be sure to keep combat characters ready in case you have engaged enemies with you.

There is also a way to avoid going Underwater at all during this stage. This is done through a lot of luck and location control, but can be achieved if you play your cards right. The Ancient Depths treachery will add locations to the staging area with the Underwater side face-up. This leaves them vulnerable to progress placing cards that can then start to chip away at the location’s quest points. Clearing the location in the staging area will still add it to the victory display, without you suffering from the effects of being Underwater. Doing this 3 times will need a bit of luck with your treacheries, but can result in you passing this stage without having been underwater once.
If the players have eventually cleared 3 Underwater locations and made enough progress on stage 1, they advance to the next stage. I would advise that the players have at least one dedicated defender or chump blocker ready to go when they advance, just to make the transition easier on you (don’t pick Sahir to do this next defence, just saying).
Quest card 2: Sahír’s Betrayal
What has the world come to if we can no longer trust the word of a pirate. At this stage, Sahir shows his true colours and betrays you in order to get his hands on the key and the chest that you find at this stage. First, the previously set aside Shrine to Morgoth becomes the new active location. Make sure that the Grotto traited side of the location is face up. Then, Sahir flips to his enemy side and removes any damage and resource tokens that he might have. He then makes an immediate attack against the first player, hitting for 6 attack. This attack can be defended by a Sentinel character if needed, but it can also be chumped. While technically, this would place resource tokens on Sahir, you can ignore that part of his text, as Sahir immediately runs away and gets set aside, out of play. On top of that all, each player must find an Undead enemy in the encounter deck or discard pile and add them to the staging area. Note that it can only be an Undead enemy, meaning that the Creatures introduced in this scenario are not eligable targets. As the cards are only added to the staging area, Throngs of the Unfaithful are a good target for this, as their surge gets ignored for this effect.

With all those enemies now in the staging area, and you no longer controlling Sahir, you have come to the final stretch of this quest. When flipping the quest card to 2B, there is nothing new to note, only the same restrictions that players cannot play attachments or allies while underwater. The card that you will want to read for your new rules is the active Shrine to Morgoth. This card reads that at the beginning of the next quest phase, the Shrine gets flipped to its Underwater side. This side will no longer give players the option to flip back, so once you go underwater at this stage, you stay there. This means that you will have to play any allies and attachments you have in your hand during the next planning phase after the players have transitioned to this stage. This will be your last opportunity to play cards, so try to make the best of it.
Before that planning phase though, you have the opportunity to still make some progress on the Shrine to Morgoth while it is Grotto side face up. When the location flips, you transfer any progress already on it to the other side. This means that for instance Legolas can kill some enemies and start chipping away at the 18 quest points on the active location. Other progress placing events, allies, and attachments can also be used at this stage to try to pile on as much progress as you can before flipping the Shrine to its Underwater side. In multiplayer games, you might even fully explore the Shrine this way even before it turns over, in which case you automatically win. However, this is a very rare case, as placing 18 points of progress on a location during one round is no small feat. Another way to avoid going to the Underwater side of the Shrine to Morgoth would be to use Doom Hangs Still. This skips the entire quest phase, meaning that the location does not get the chance to flip over. This does come at the cost that you can’t make progress on the location through questing though. But if you have enough progress placing cards, it is a fun way to ensure that you clear the Grotto side of the location.

But the far more likely case is that you won’t be exploring the Grotto side before the next quest phase, which leaves us with the scenario that you have to flip the Shrine to its Underwater side. Remember that this does not progress tokens, where it would have done that for the other locations in this quest. The Underwater side of the Shrine has the same stats as the Grotto side, and is still immune to attachments and cannot be cheated into the staging area. The Forced effect on this side of the location is the interesting part here, and will force you to quest hard in order to survive. If the players have the Shrine to Morgoth as the active location at the end of the quest phase, they must raise their threat by 5. This can quickly spiral out of control and leave the players with a threat higher than 50, at which point, they are eliminated. Couple this with an untimely Powerful Undertow, and you can get threated out in a heartbeat. Cancellation is advised for the treachery at this point, as you may have already stalled long enough that your threat cannot suffer to be raised in steps of 5.
In order to safely beat this scenario, the players must put all of their willpower combined to the quest and yolo their way out of it. 18 progress points is quite a lot to make on a single round of questing, but you have had plenty of time to prepare for this. Use any global willpower boosting effects during this round so that you can safely explore the location. Once the location is explored and added to the victory display, the players have won the game. They can now go back to their fleet and pursue Sahir across the ocean back to Middle Earth. What the heroes don’t yet know, is that the entire Corsair armada has been mobilized as well in an attempt to stop you. The cycle continues with this epic sea-battle off the shores of Dol Amroth.
The Encounter Deck
Global
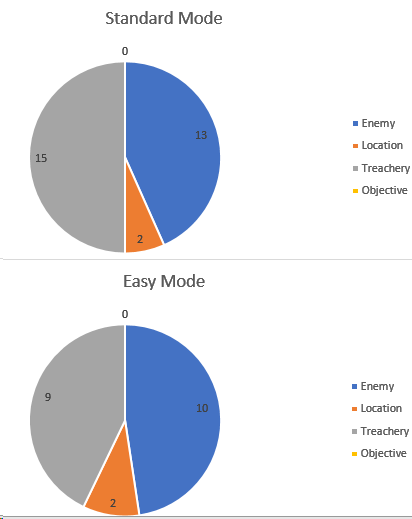
- The encounter deck consists out of 30 cards in Normal mode, and 21 cards in Easy mode.
- Shadow chances vary a little across the two modes. In Normal mode, the chances are 60%, but these get raised to 67% in Easy mode. A lot of shadow effects are influenced by you being underwater or not.
- Average threat on cards revealed is relatively low, at 1,16 threat/card in Normal mode, and 1,3 threat/card in Easy mode. However, this does not count the potential high threat location potentially revealed by Ancient Depths.
- Surge is not very common in the encounter deck, with only 2 cards triggering the keyword at all times. 3 others only surge if the requirements of the treachery are not met.
- The Doomed keyword is also rather rare, appearing only on the Powerful Undertow if the active location isn’t Underwater. But stalling at stage one and the Shrine to Morgoth will make sure that you will be raising your threat a lot in the later stages of the game, so Doomed player cards might not be a good idea without threat reduction as well.
- Immunity
- Shrine to Morgoth cannot enter the staging area and is immune to attachments
- Ancient Depths cannot be cancelled
- While Drowned Cave is the active location, Undead enemies cannot be engaged.
- While engaged with Soulless Cadaver, your deck cannot be searched.
The statistics above do not count the double sided locations found in this scenario. These either go into a separate Grotto deck, or are set aside out of play during the start of the scenario. This explains the lack of locations in the encounter deck, as only the Drowned Cave is in there.
Objectives
This scenario features 2 objective allies that we get to see more of in the cycle as both objective ally and enemy. Captain Sahir and Na’asiyah have agreed to help you on your journey to find the Shrine again. While the two of them do take a lot of resources, they can help you in overcoming the early game by having 2 extra bodies on the table. Remember to move these objectives each round so that Sahir is with the first player, and Na’asiyah with the last player.

- Captain Sahir: The captain of the Stormcaller continues to help you throughout the first part of the scenario. While initially Sahir mostly fills the role of defender in case of emergency, he can become a solid quester or attacker after a few rounds. This is thanks to his ability that allows him to get +1 willpower and +1 attack for each resource on him. These resources can come from the player controlling Sahir, and can only be spent once per round to fuel his ability. The good thing here is that once the resources are on Sahir, he will get his stat boosts for the rest of the stage, so there is no need to keep refueling them. Eventually, Sahir can get up to 6 willpower which will help you to clear those Underwater locations quickly. Especially in true solo, you will want to make use of Sahir as a quester once you have more resources on your heroes than you actually need. Remember to also keep a resource available on your heroes for him when going into the quest phase. That way you can boost your total willpower by 1 in case you really need it. This reminds me a little of spirit Eowyn, who also has adjustable willpower depending on you sacrificing something in return. In multiplayer, you can get away with not questing with Sahir ever, and use him as a defender. Since Sahir flips halfway through the scenario, your resources will be lost to you. I have detailed the enemy side of Sahir earlier, so I won’t repeat that strategy here.
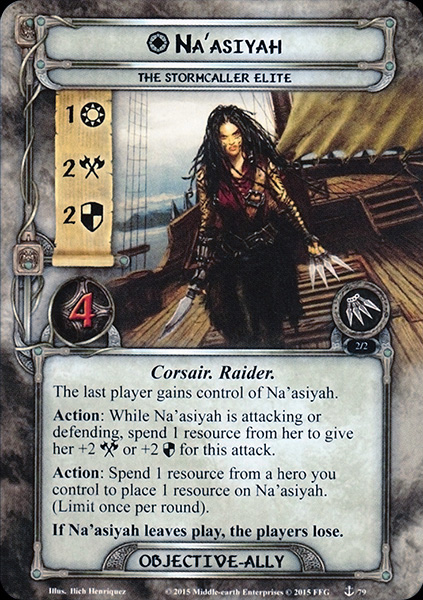
- Na’asiyah: Joining the last player is the captains first mate: Na’asiyah. This objective ally does stay with you throughout the entire scenario. Her stats and ability are a teaser for the hero version of her that is to come in the next Adventure Pack, so this can also be seen somewhat as a hero review, though far less in depth. Like with Sahir, the player controlling Na’asiyah can spend a resource to add a resource to Na’asiyah. You can only spend 1 resource per round, but there is no limit on how many resources Na’asiyah can hold at any time, unlike Sahir. These resources don’t influence her base stats, but can turn Na’asiyah into the strongest attacker or defender on the board through her ability. This ability allows her to spend resources from her pool to get +2 attack or +2 defence for this attack. As this is the same text as her hero version, you can spend any number of resources off of her in order to boost her stats through the roof for any one attack. While this can be pretty costly in terms of resources, it is a nice emergency button to have to deal with an enemy that suddenly engaged the last player.
Locations
The locations take centre stage in this scenario again, as the Grotto deck and the two-sided locations will be the focus of your game. Note that I will talk about the Underwater locations last, except for the Shrine, as that has the same name and both are unique.
- Shrine to Morgoth: I have covered the majority of the text on this final location in the scenario overview, as clearing this location is the only way you can get out of this scenario. But I will mention that this location is immune to effects like West Road Traveller and cannot have any attachments. These restrictions force you to make the full 18 points of progress while the location is active, which can be tricky to do in a single turn, especially in lower player counts. However, if a player has been saving up Mirkwood Explorers throughout the first stage of the game, they can spend the progress from those allies to make short work of this location. Be sure to have a low threat at the moment this location becomes active, as the threat gain of 5 can be a game ender for most people. Exploring this location completely will add it to the victory display, and means that the players have won the game.
- Drowned Cave: This is an odd location for this scenario, as it is the only one in the game that actually can be revealed from the encounter deck. There are only 2 copies and each will contribute 3 threat to the staging area. Important to note here is that the location is Underwater but has no victory points. This means that should the players travel here, the same restrictions on playing cards hold as with the other 3 larger locations. On top of not being able to play allies or attachments, all Undead enemies engaged with players will be returned to the staging area when the location becomes active. Players will not be able to engage Undead enemies, meaning that the enemies will contribute their threat next round. This does not mean that there is no combat to be had, as the Cave Eel is now eligible to be engaged. Clearing the Drowned Cave shouldn’t be difficult, as it only has 4 quest points to overcome. However, should the players fail to clear it, then the Cave will force the players to discard the top 10 cards from their decks. This is good for Mining and Noldor decks, but most other players will find this annoying. Get some Will of the West in play if you need your cards back. The players may then return the Cave to the staging area in order to get back out of the water. The real power of this location lies in the fact that players can potentially cheat both into the Victory Display, thereby nearly satisfying the requirement of 3 locations for the first quest card. Getting this location in the victory display can be done through Leave No Trace if it has been explored. Scout Ahead and Out of the Wild will also work, though you’d have to be lucky in order to find the location in the cards you are allowed to look at.
- Cursed Caverns: Being the first of the three Grotto locations, the Cursed Caverns has the highest stats of them and in my eyes the worst effect. To start off, the Cursed Caverns will add 3 threat to the total if it is in the staging area. Then, if players travel to it, they have the option to flip it to an Underwater location (Twisting Hollow or Sunken Temple). If the players do not go Underwater, they are left with a 5 quest point active location, that gives them a response once they clear the location. This response is optional, like all responses, and will allow the players to raise their threat by 2 in order to draw the bottom card of their deck. As the bottom card’s cost matters in this scenario (due to the Drowned Dead encounter set), you will also probably know what card is underneath your deck. While 2 threat for 1 card is a bad trade (compare it to Deep Knowledge), it can still help you if you are desperate for a card. In the end, this location is the worst option out of the three, and should only be travelled to if the players want to remove some more threat from the staging area.
- Undersea Grotto: In sharp contrast, the Undersea Grotto is potentially the best location to have active. With low combined stats of 2 threat and 3 progress required to clear, the Grotto will often be your destination during the travel phase. When the location is active and not flipped to its Underwater side (Dark Abyss, Twisting Hollow), the first ally played by the players each round is reduced in cost by 1. This is a nice bonus to have and allows players to get some more bodies on the table. The cost reduction can even lower the cost of cards to 0 if you play 1 cost allies or combine it with cards like Man the Walls or O Lorien.
- Water-logged Halls: The last Grotto location in the Grotto deck are the Water-logged Halls. There are only 2 of them and they are rather average in their stats. However, the Halls have quite a nice effect that will help players in the early game to make a lot of progress on either the main quest or any side-quests. When the Water-logged Halls are the active location and haven’t flipped to their Underwater side (Sunken Temple, Dark Abyss), all Undead enemies in play get -1 threat. Be sure to remember this debuff, as it can save you some points of progress when questing. While this won’t help a lot in clearing Underwater locations (unless Explorer’s Almanac would be in play on a location revealed through Ancient Depths), it can help in clearing side-quests more easily while keeping characters ready to deal with the enemies during the combat phase.
- Sunken Temple: Out of all 3 double sided Underwater locations, this one is the least dangerous in my opinion, though the effect can be devastating for some decks. When the Sunken Temple is the active location, all attachments in play are considered to be blank, except for traits. The traits can still be used for things like Foe-Hammer on Weapon attachments, but that is about it. This can get in the way of dealing with enemies, but if you are prepared for it, you shouldn’t find this restriction that difficult. If the players do not manage to clear the 10 quest points of this location before the end of the quest phase, they will be forced to discard 1 resource off of each objective-ally and hero in play. While I would normally say that it isn’t that big of a deal, as you can spend those resources in the planning phase beforehand, it gets more difficult since you cannot play allies and attachments. So you are bound to lose some resources through this effect. But with the amount of time you get to set up, I rarely find this effect to be that dangerous, especially compared to the others.
- Dark Abyss: This underwater location is the one that you don’t want to see revealed for Ancient Depths, as it has the highest printed threat of any card in the quest. Having to deal with 5 threat in the staging area is going to be tough. But this isn’t a cause of concern when the Dark Abyss is the active location. You will need a little more progress to clear this location than you needed for the Sunken Temple, though if you play Ghan-buri-Ghan, this is made easier thanks to him having 5 willpower. If the players are unable to clear this location in one turn, they must deal 1 damage to each character in play. This does include the objective allies, so you’ll have to be careful with them. Since there isn’t too much direct damage coming out of the encounter deck, you can probably survive taking 1 damage to each character, though having this location active for multiple turns is going to start to do some damage.
- Twisting Hollow: Lastly, we come to the location with the highest quest point value out of all locations in the scenario besides the unique one. Requiring 14 progress to clear, the players will have to bring their best questers in order to attempt to clear this location in one turn. Should they fail to do so, then each player must discard 1 character they control. Be sure that each player has a character to drown to this effect, as objective allies and heroes are also eligible targets for this effect, and you wouldn’t want to discard those. There isn’t much strategy to this location besides questing hard, so bring all the willpower you have if you want to get through this quickly and save your characters.

Enemies
The undead are upon you once again and will get some support in this scenario by the local wildlife. The new creature enemies will tend to leave you alone while you remain out of the water, but will make going under even harder.
- Cave Eel: One of the things you wouldn’t want to see underwater is a hungry Cave Eel looking for a next meal. Luckily, this enemy has not grown legs and lungs yet, so it can be avoided most of the time if the players don’t go Underwater. While in the staging area, the Cave Eel will add 3 threat to the staging area, which is quite a lot since you will not be able to get rid of it easily. While the active location isn’t Underwater, Cave Eel cannot be engaged, leaving him looking menacing in the staging area for the majority of the early game. Once the players do venture Underwater though, the 20 engagement cost will surely let the Cave Eel engage a player. When engaged, the Cave Eel isn’t really an enemy of importance, as there is no special ability on him. The base attack of 3 can be blocked easily, even by allies. Attacking the Cave Eel back is a bigger hurdle, as the Eel boasts a 4 defence value. This means that you will have to commit a decent attacker in order to get rid of this enemy. One of the more fun interactions is to use a Mirkwood Runner against this Eel, as it can one-shot it. If the players do not handle the Eel during the round that they are Underwater and they emerge from the active location during the next turn, the Cave Eel will go back to the staging area unless the players travel to a new Underwater location. This can get frustrating, with the Eel bouncing back and forth between the staging area and the players. In order to get rid of the enemy quickly, try using direct damage. Argalad in particular can get rid of the Cave Eel with ease once he has a weapon.
- Sea-Scorpion: To further increase the list of “Things I don’t want to find underwater”, we have the Sea-Scorpion. This enemy can be engaged at all times and will also take 6 attack to kill, just like the Cave Eel. However, this enemy can get nasty if the players are stuck at an Underwater location. This makes the Sea-Scorpion a 4 attack enemy, which can be dangerous if you don’t have a defender. But the rest of the stats and effects on this enemy are pretty bland, nothing to write home about. Be sure to deal with this enemy while above the water, and you’ll have nothing to worry about.

Treacheries
Walking around a flooded cave system is not without its risks, especially if the waters are teeming with the Undead and other critters. These treacheries will force you Underwater, or will try to make your voyage even harder.
- Ancient Depths: We start with one of the nastier treacheries that you will come across. This treachery will immediately place the top card of the Grotto deck in the staging area, and flips it to the Underwater side. This means that there is a very high threat location in the staging area now, and it won’t go away unless you travel to it. Getting this treachery early can put a dent in your progress for quite a few turns. However, if you are looking for a location to travel to in order to go to the Underwater side, then this is the perfect target. You can also start to chip away at the location in the staging area with progress placing cards. This allows you to potentially clear an Underwater location in the staging area, adding it to the Victory Display without having to travel to the location. Having it in the staging area also opens up the possibility of location attachments (especially Woodmen’s Path, and Explorer’s Almanac), though the Sunken Temple ignores those. The nasty part of this treachery is that it can add up to 5 threat to the staging area at once, and it cannot be cancelled. This can cause players to come short on progress to clear their active location, potentially needing them to spend another turn there. Getting this treachery often will also lead to a heavy location lock, if you are not bringing location control.
- Into the Abyss: This is a rather unique treachery that I applaud the designers for in terms of ingenuity. It is however, quite devastating to players looking to play allies and attachments after they come out of the water. When this treachery is revealed, each player must choose a card type and discard any card that isn’t of that card type from their hand. While players are likely to call Ally, Attachment, Event, or Side-quest, they can also name other card types if they wish to discard all cards in their hand. Why you would want this is beyond me (maybe Eregion Survivor?), but you are bound to discard at least some cards thanks to this treachery. Players will have to make a decision on what cards they want to keep in their hands. Do you want to play the allies in your hand next turn? Or do you want to keep your events ready for the combat phase? The choice will depend on your situation and the deck type you are running. If players don’t want to discard any cards, they can still cancel the effect, though it is not the worst treachery in the game. If any player discards no cards through this effect (either because their hand is empty or they only have cards of 1 type in their hand), this treachery gains surge.
- Tangling and Grasping: I always have a bit of a scare when I feel something underwater against my leg, luckily in this art, it is only seaweed. That does not take away that this treachery is pretty dangerous if you are just barely committing enough willpower to the quest. When this treachery is revealed, each player must remove a character from the quest. This hurts you in your willpower, though you can choose to get rid of a smaller ally when you are not Underwater. This is because the treachery gets worse when you are Underwater. In that case, each removed character will have to be dealt 2 damage. This will lead to you either discarding an ally and lose a little willpower, or damage a bigger character at the cost of potentially losing more willpower. Good targets for this effect will be heroes like Theodred, who have already done their share before this treachery removed their willpower. Another good tool against this treachery is Windfola, who allows players to recommit their removed hero. All in all, this treachery will hinder your progress, especially in multiplayer, but remember that you also have the objective allies who can take a bit of damage when committed to the quest.
- Powerful Undertow: Out of all the treacheries in the quest, this is the one that has cost me the most games. This is the treachery that you will want to save your Test of Will for, especially near the end of the scenario. When this treachery is revealed, it will severely punish players when they are Underwater, and will hinder the players and stall them for a round longer if they are above water. When this treachery is revealed, the players cannot choose to flip the active location this round. This does not include the Shrine to Morgoth, as that location flips by itself. This does mean that when players travel to a Grotto location, they cannot go Underwater. While this is annoying, it gets worse if the players were already Underwater. This will mean that if they do not quest through the active location this round, they will have to stay Underwater for another round, not allowing them to rebuild their board with allies and attachments. And all of that was just the first sentence of this treachery. If you are currently Underwater, then you will have to trigger the Forced effect of the active location as if it is the end of the quest phase. This means discarding cards for Drowned Cave, discarding characters for Twisting Hollow and so on. This is extremely dangerous with Shrine to Morgoth, as the threat increase of 5 can lead to you losing then and there. If you are not Underwater, you have to raise your threat by 3 through the Doomed keyword. Considering there are 3 copies of this treachery in a Normal encounter deck, you will want to cancel these if you can, as the effects can lead to a quick loss if timed poorly.

Tips and Tricks
- Turtle, just turtle in this quest. Building up your board is easy during the first stage, as you have nothing besides your threat pushing you onward. You can stall for a couple of turns before even attempting to go underwater. Side-quests will help a lot with this, but don’t forget the 15 progress on the main quest.
- Remember that you cannot play attachments and allies while being underwater. I had to reset a lot of games because I made that exact mistake. Use this time to save resources and play a lot of cards next turn when you emerge from the water.
- Because there will be rounds in which you don’t play a lot of cards, this quest is excellent for Tighten Our Belts. This leadership event will further increase your ability to play a lot of cards when out of the water. Having more resources isn’t a bad idea in this quest, so bring the event if you feel like you need it.
- Pacing on when to go underwater and when to stay up top is important. I will advise to go Underwater after you have built up, and then power-quest through the active location. Don’t go underwater 2 rounds in a row with different locations, or you’ll be sitting on your resources and cards for a while. On top of this, you will likely need characters ready to attack and defend, so alternating between yolo-quest rounds and rounds where you clear the table of enemies would be the best strategy.
- Since Sahir is going to betray you in the second part of the scenario, you can start to damage him by having him take some defences. 2 defence and 5 hitpoints is enough to defend most enemies with relative ease, allowing you to keep your defenders healthy. When Sahir flips at stage 2, he automatically heals all damage, so you don’t have to worry about losing him.
- With all locations in the deck having the Underground trait, Dwarf decks will find they have a bit of an advantage. Use Untroubled by Darkness to really burst through the quest and you can even use Ever My Heart Rises to lower your threat consistently, while also readying the character.
- Don’t forget to move the Corsair objective allies around. This can be important if you need more characters to take on an attack. Keep track of where the allies should be and move them together with the first player token.
- Speaking of the Corsair objective allies, it can be a wise idea to move resources over to them. This will get you some great willpower out of Sahir and will turn Na’asiyah into a real killer or a solid defender, just like her hero version. If you have spare resources and don’t need them anymore, you might as well pass them on to the objective allies.
- While you are not able to play allies and attachments directly from your hand while Underwater, you can put them into play through various other effects. Sneak Attack, Tactics Imrahil, Send for Aid, Timely Aid, and A Very Good Tale are some examples of ways to technically not play allies, but put them into play. This can help you in the final stretch of the game if you start to run low on allies.
- With nearly half of the encounter deck being treacheries, it would be foolish to not bring some treachery cancellation. Be sure to save them for treacheries like Powerful Undertow, as that can be pretty dangerous. Note again that Ancient Depths cannot be cancelled.
- Noldor and Mining decks will do quite well against this scenario, as there are several encounter cards that will discard cards from your hand and deck. This can fuel your engine by having more cards in your discard pile, or benefiting from having discarded cards like Ered Luin Miner.
Playthroughs
The quest is well loved by the community as a break before the final 2 scenarios of the cycle which are pretty brutal. As such, there are a lot of playthrough videos for you to enjoy. They can be quite lengthy though, because of the turtle strategy and the higher player count.
- 3 players, modern decks: https://www.youtube.com/watch?v=3DCQPTKIing
- 3 players, progression style: https://www.youtube.com/watch?v=9HHVw54Xw5w
- 4 players, progression style: https://www.youtube.com/watch?v=hf66YHYpsLg
- True solo, updated decks: https://www.youtube.com/watch?v=MVaqtFrZa4E
With this quest under our belts as well, we will track back a little and see how we came here. The next scenario that I will discuss will be the Temple of the Deceived, and the interesting map mechanic that I hope we get to see more of.

Honestly, the Drowned Ruins has to be one of the most disappointing quests from the Dream-Chaser cycle. The most reliable way I’ve discovered to beat it is just turtle, manage your threat so you don’t engage that many enemies (don’t want to lose Ancient Depths as a shadow card), let Ancient Depths reveal the Underwater locations you need, and either Rhovanion Outrider or Northern Tracker them away without ever traveling to them. Basically, you win the quest by not doing what you’re supposed to. It’s even worse, from the looks of it, in NM (which, admittedly, I don’t have), where the presence of the Grotto-flipping treachery provides a disincentive not just to traveling to Underwater locations but to any locations. And, since NM doesn’t remove Ancient Depths, you can STILL beat it by just turtling and waiting for Ancient Depths to allow you to location control the Underwater locations you need.
LikeLike
This is such an interesting quest, with what I’d call a good level of difficulty. I’ve never even considered deliberately trying to play to the Ancient Depths + location control strategy, though as long as you can keep threat under control, that sounds like it could often work.
For those disappointed in this approach, my suggestion would be … don’t use it!
LikeLike