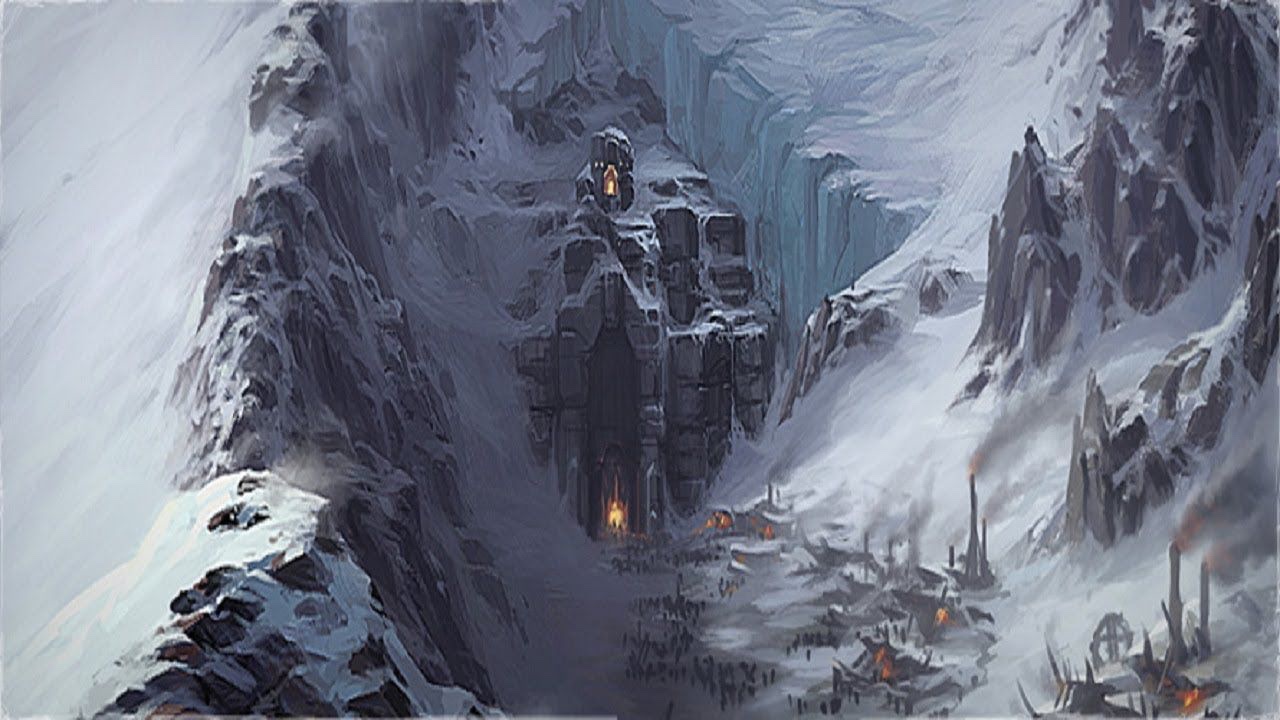
This is it. You traveled through the wilds of Rhovanion, hunted down a cold-drake in the Withered Heath, protected a town from a dragon, fought against ancient spirits in Framsburg and claimed the sword Wormsbane to finally defeat Dagnir, one of the most dangerous dragons since Smaug was killed. But the sword you found was broken, and the only way to reforge it is to find the First Forge, which is in Mount Gundabad – Dagnir’s lair.
This is the only way to keep Dagnir from wreaking havoc across Rhovanion, though, so you travel to Mount Gundabad and enter the mountain through Urdûg’s secret passage to reforge the sword and slay the dragon…
This is one of the harder scenarios of the cycle, but one of the more interesting ones as well. It features a core mechanic very similar to Flight from Moria, but with some tweaks and definitely feels different enough to be remembered as an independent quest. It removes the weird instant win quest card though, which was very luck-dependant. You will have to fight your way to victory in this one!
Mount Gundabad
- Found in: Mount Gundabad adventure pack, Ered Mithrin cycle #5
- Official difficulty: 8
- Community difficulty: 7.9
- Encounter sets: Mount Gundabad, Fell Beasts, Deep Underground, Afraid of the Dark, Lost Caves, Dragon Might
- Quest cards: 8, with 7 different stage 2s
- Play if: you want to reforge a sword, you want a great experience of sneaking into a dragon’s lair, you want Flight from Moria with a different dynamic, you want a boss-fight that feels different from the others
- What is different about this quest?: trying to find the right quest stage in the quest deck, reforging a sword, deep mechanic on its apex
- Solo or multiplayer?: The quest is manageable in both, although in multiplayer, Dagnir will do some less attacks through encounter cards. Also, in solo you’ll have to guess threat in the staging area more often to not over-quest.
- Can I run side-quests in this scenario?: You can, as that will allow you to have a safe solution for over-questing and accidentally advancing, but Dagnir’s threat and some other cards will grow by finishing side-quests. Scout Ahead is great because it allows you to know how much threat is going to be in the staging area in the following rounds. Double Back can help you avoiding Dagnir, as some encounter cards lower her engagement cost.
- What to look out for: sudden attacks by Dagnir, some harsh shadow effects, direct damage across the board, over-questing can get dangerous, information missing on stage 1A
The Quest
Setup

First, you add Dagnir to the staging area where she’s going to stay for most of the game. Then, you set The First Forge aside, out of play, and (Important part) create the cave deck. You also shuffle Dagnir‘s Hoard and Throat of the Mountain into the cave deck. (This piece of information was missing on my stage 1A card, so if you have an older print of the AP, watch out!)
After that, you create the quest deck by shuffling all stage 2 cards with the 2A side faceup together and placing them under stage 1A. Of course, you also get Wormsbane and attach it with the Broken side faceup to a hero. Finally, you shuffle the encounter deck and discard cards from it until X locations are discarded, where X is the number of players minus one. Then, you flip stage 1A over.
Dagnir
Let me just talk about Dagnir a little, because she is going to be in play till the end. Dagnir will stay in the staging area for most of the time, committing threat to the staging area which will grow when you defeat quest stages and starts as 2 (1 + number of quest cards (side-quests, too!)). She has indestructible and is immune to player card effects. That, combined with her high attack value and pretty high defense will keep you from optionally engaging her in the beginning, although if you feel brave, you can start piling up some damage on her. Also, keep in mind that you can get her back into the staging area by advancing to a new stage 2A. The last third of her textbox is what’s going to make you try to defeat as few quest stages as possible to avoid additional attacks. When you finally engage her, try to defeat her in as few rounds as possible to avoid additional attacks and effects like this one. Yep, that’s pretty cruel.
Stage 1B – The Side Door
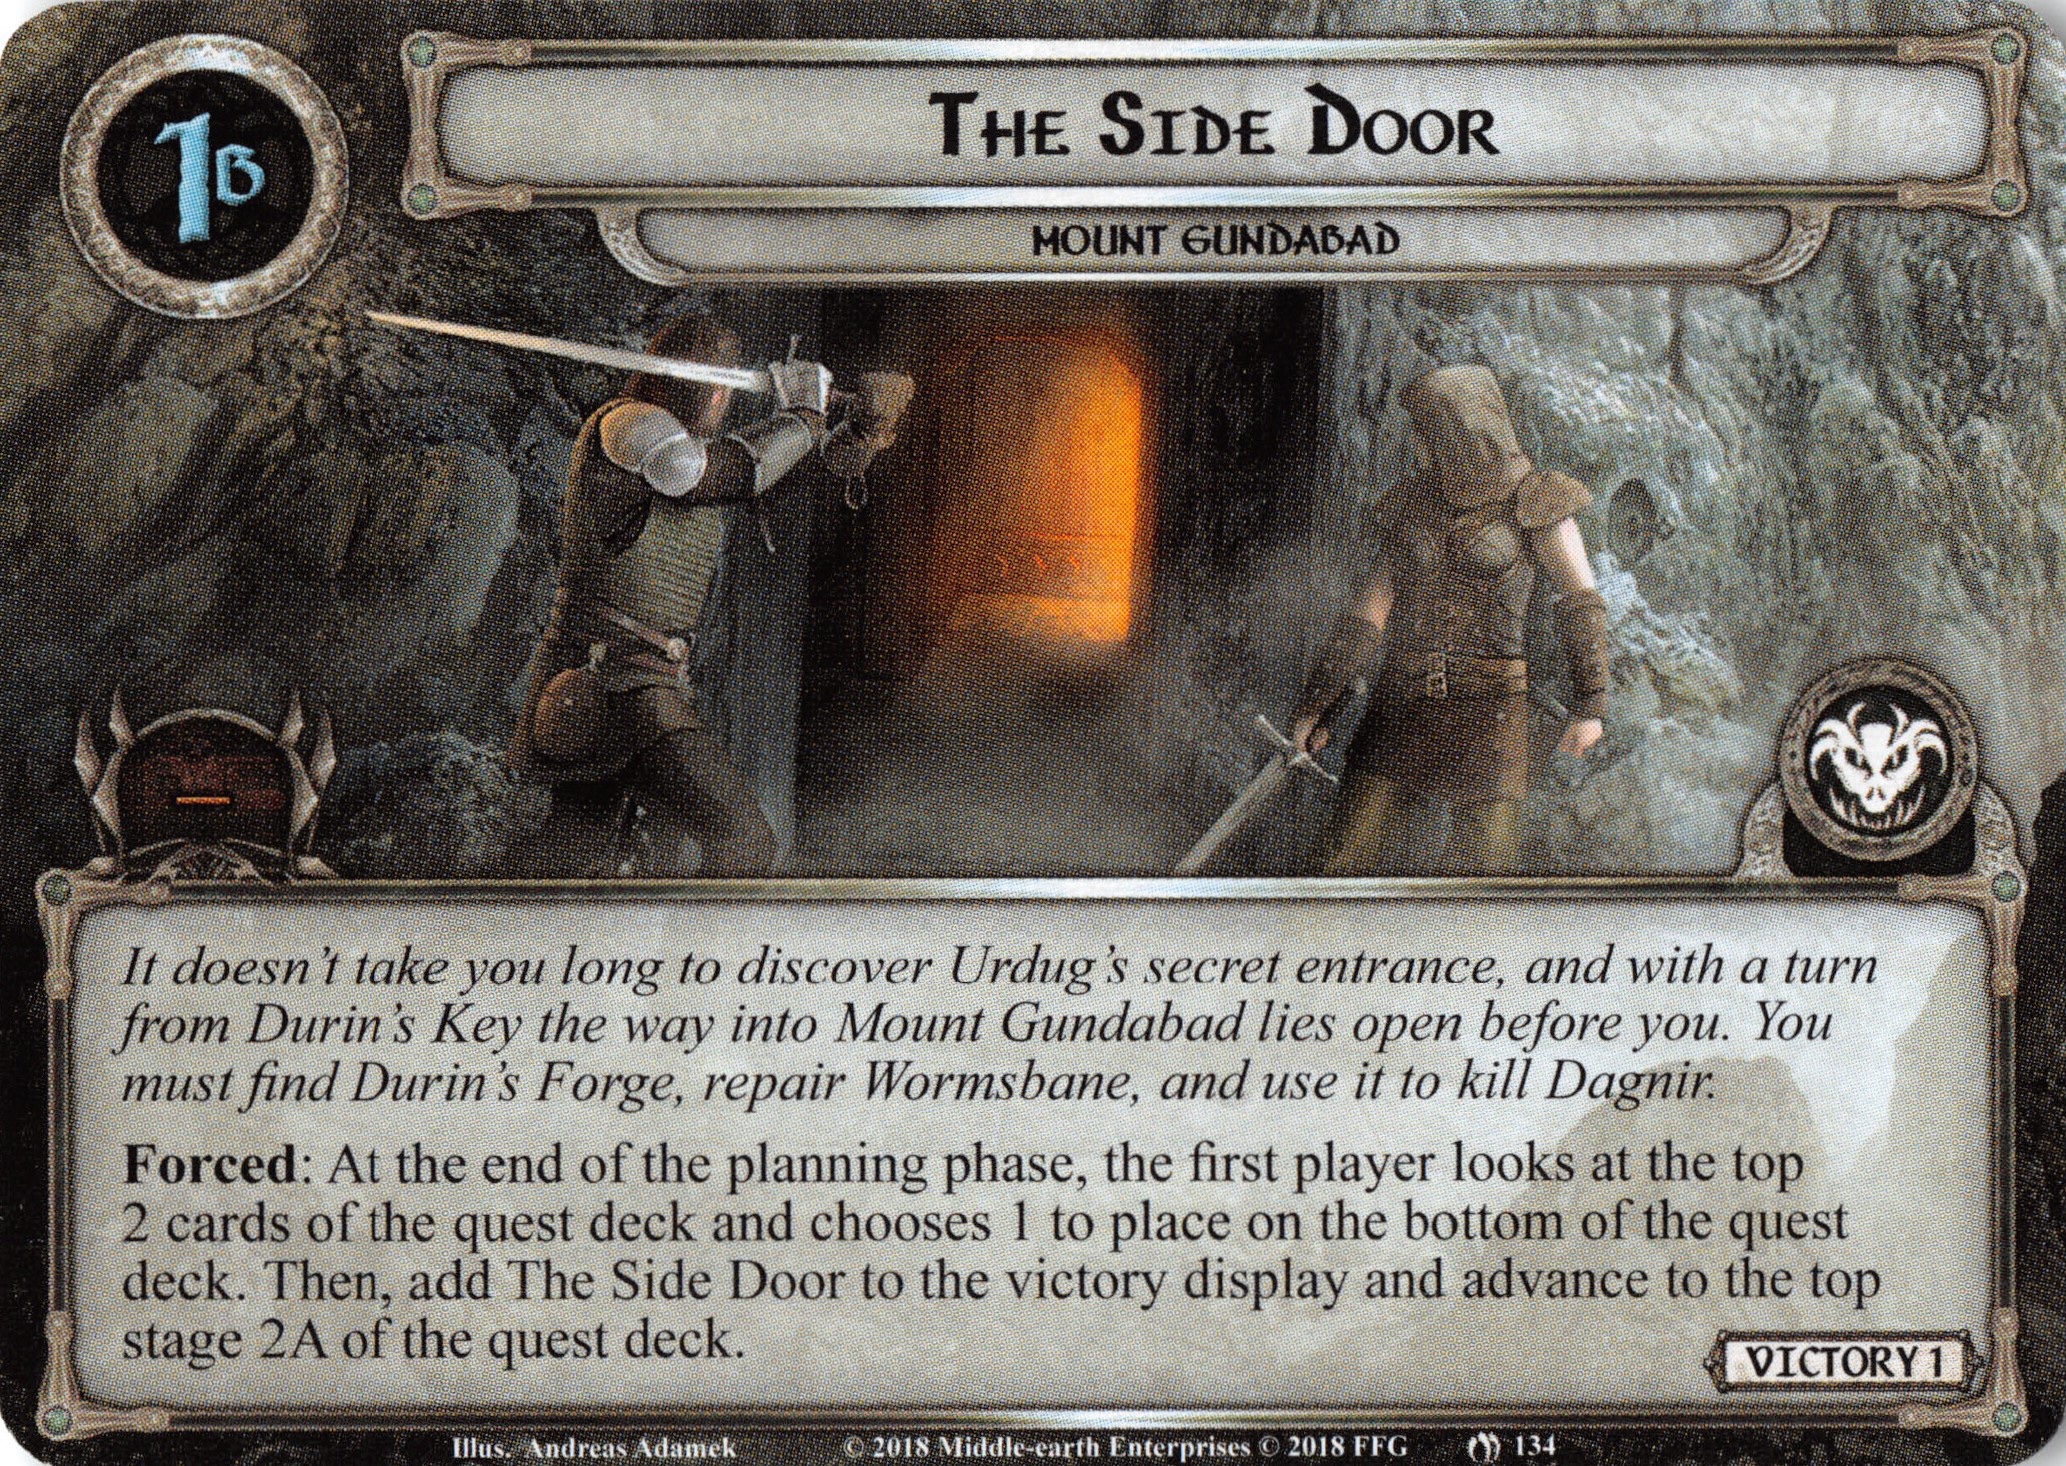
Nothing happens upon revealing this stage. Players do the resource and planning phase as normal, but at the end of the planning phase, the first player looks at the facedown top two cards of the quest deck and chooses one of them to put it under the quest deck. The other one gets put back on top of the encounter deck. If you can get The Upper Levels by this effect, definitely do so (why is described a little further down). Frenzied Warrens, Imminent Pursuit and The Great Worm are good targets to put under the deck, while The Lower Deeps, Dagnir’s Wrath and Foreboding Darkness are rather harmless or actually beneficial in early game. More information on these is found below, as well.
Stage 2A – Exploring Gundabad
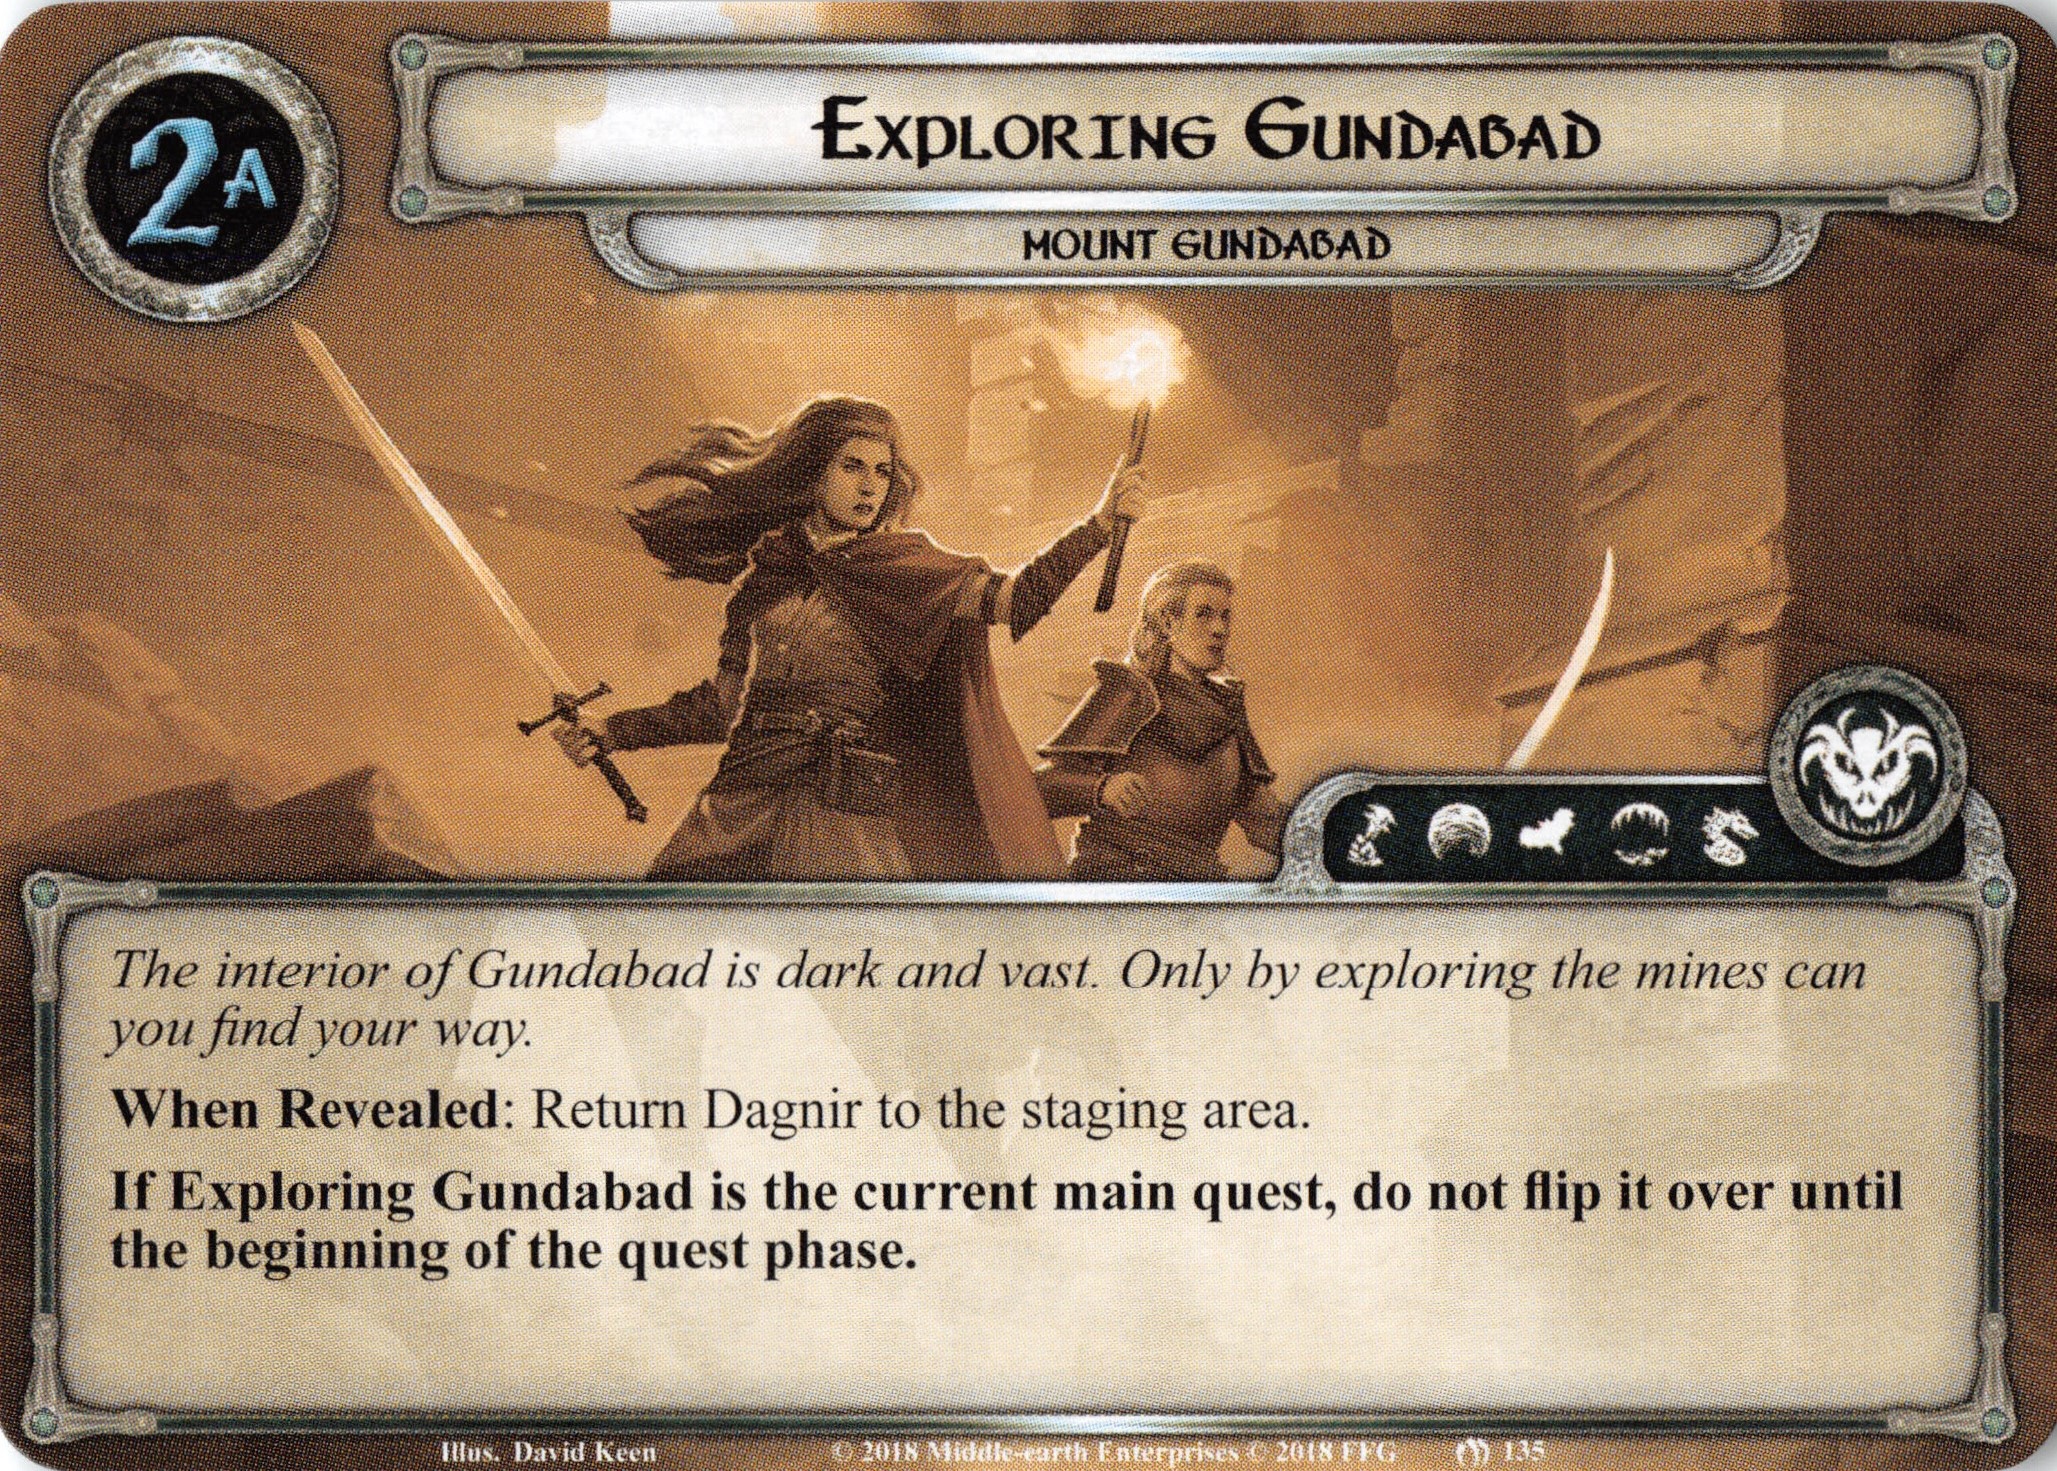
This is the “A-side” of all cards in the quest deck. If you are engaged with Dagnir when you reveal this card, you put her in the staging area, so she’ll commit her threat to the staging area. The text also states that you don’t flip this card over until the quest phase begins, which makes every time you flip it over a little exciting, but less than in Flight from Moria. I, personally, find the change to be a little more boring, but I guess it was made for balancing the quest a little better.
Stage 2B: The Upper Levels – 3 quest points
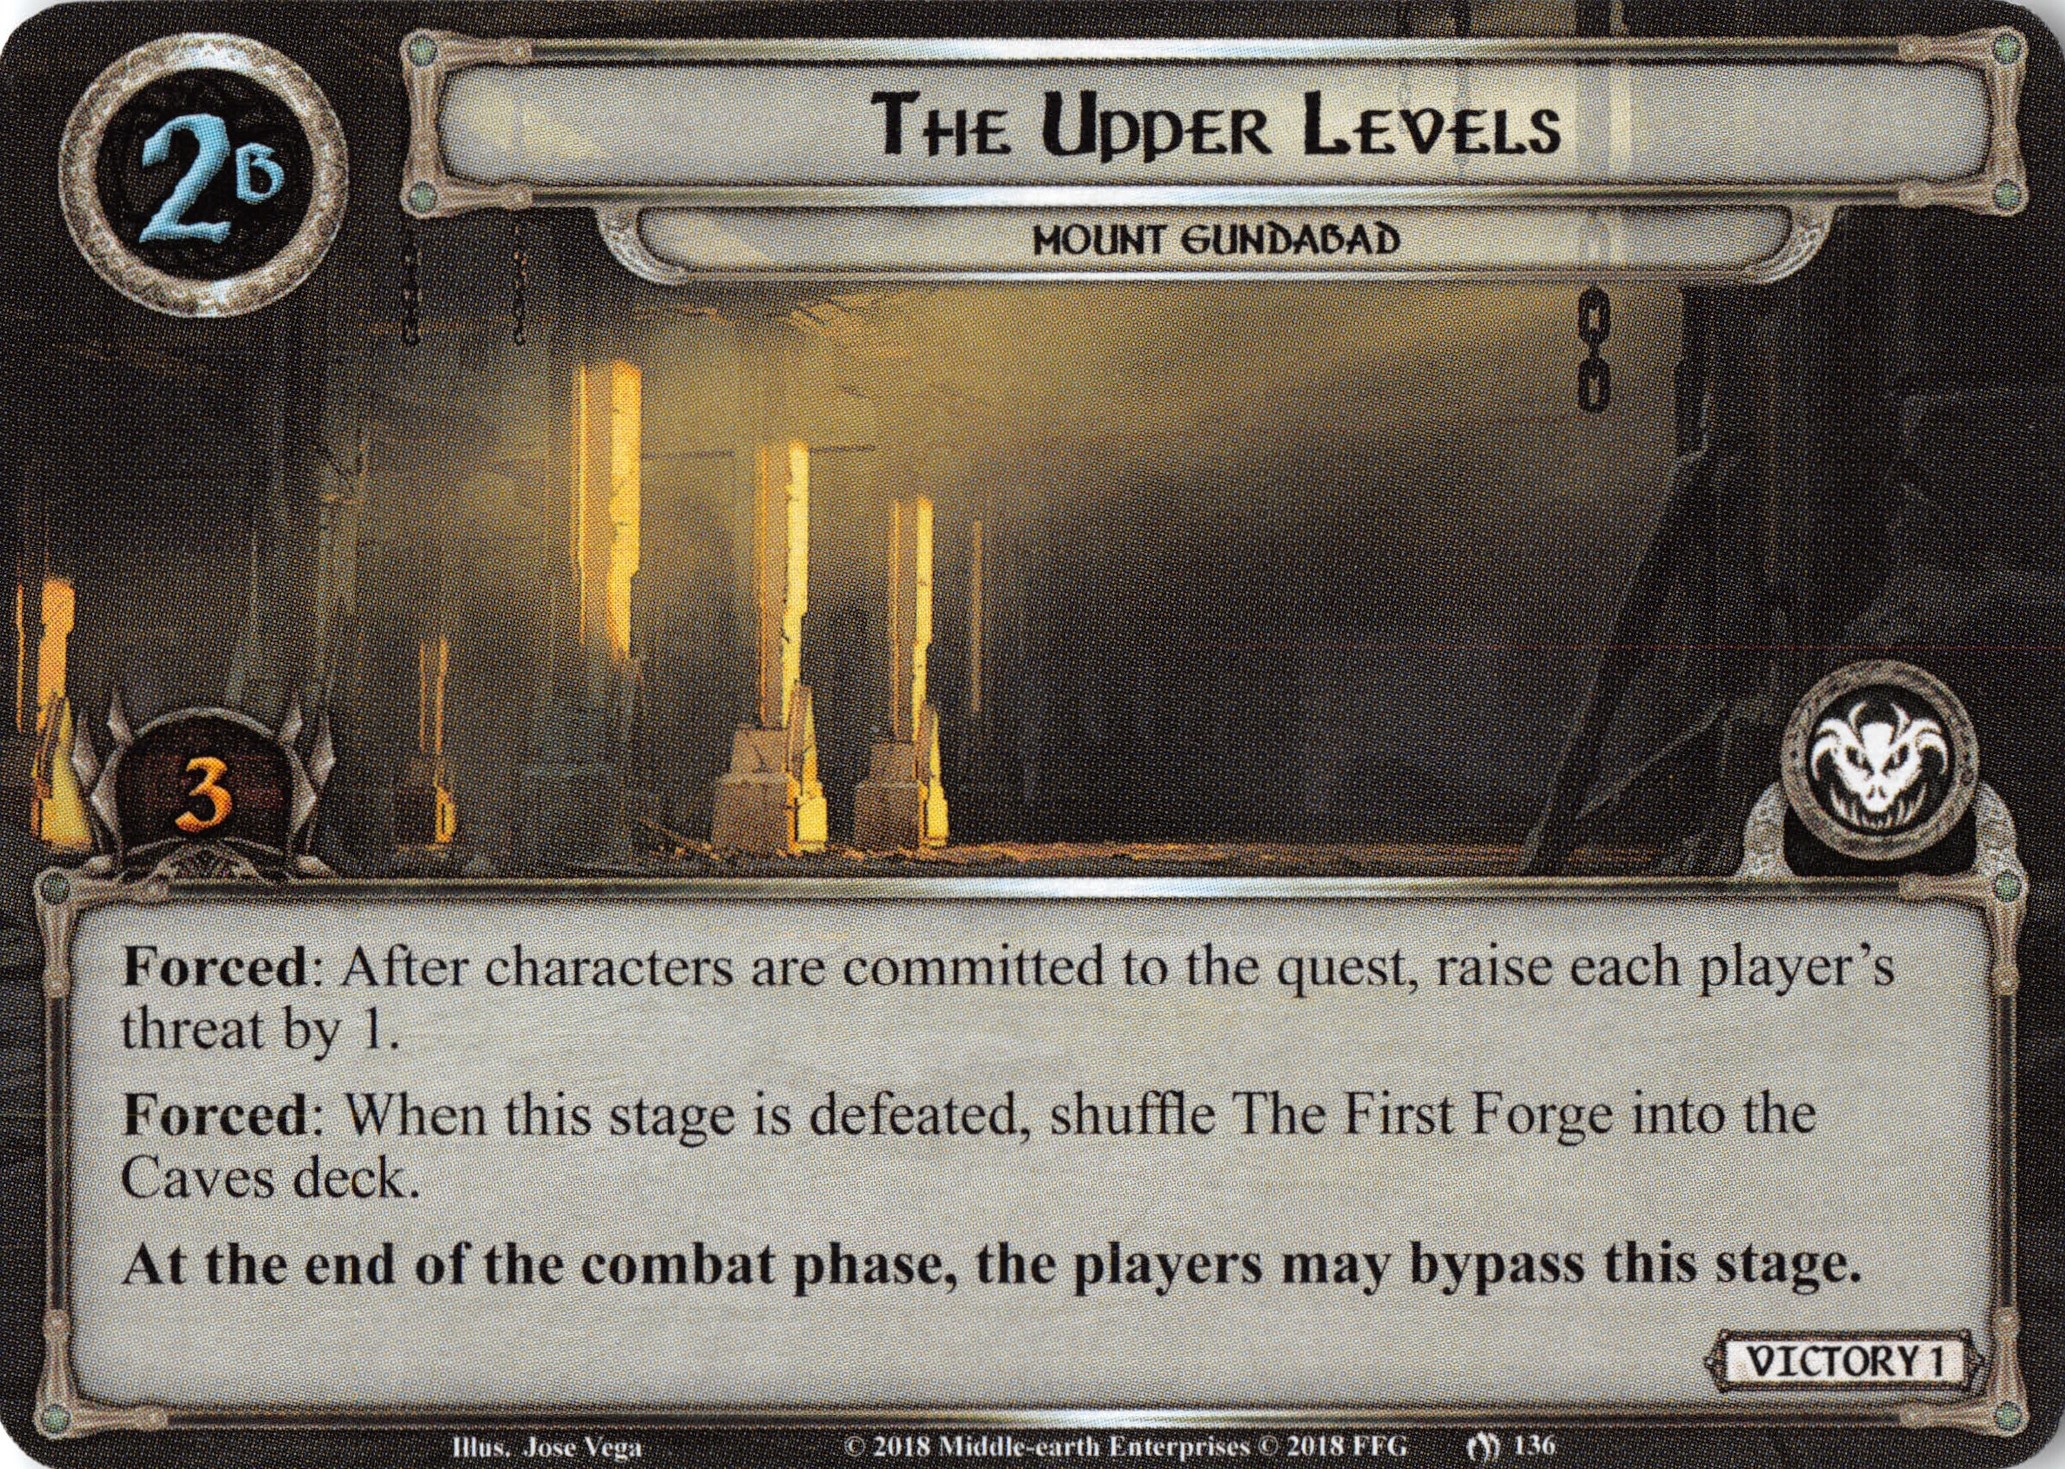
This is the ideal stage to get at the beginning of the game, as it enables you to complete the first step to finishing the game: finding The First Forge. To do that, you need to defeat this stage, after which you shuffle The First Forge into the cave deck, meaning that it is beneficial to travel to deep locations in order to thin the cave deck. This stage also has a forced trigger that raises each player’s threat by a little each round. That is not too much, but it can bring you closer to doom when cards like Mines of Gundabad come into play and lower Dagnir’s engagement cost. Finally, as with most stage 2s, you may skip this stage at the end of the combat phase, flipping it to the 2A side faceup and putting it under the quest deck (which you’ll rarely want to do, as it just makes you need more time to dig through the deck)
Stage 2C: The Lower Deeps – 3 quest points
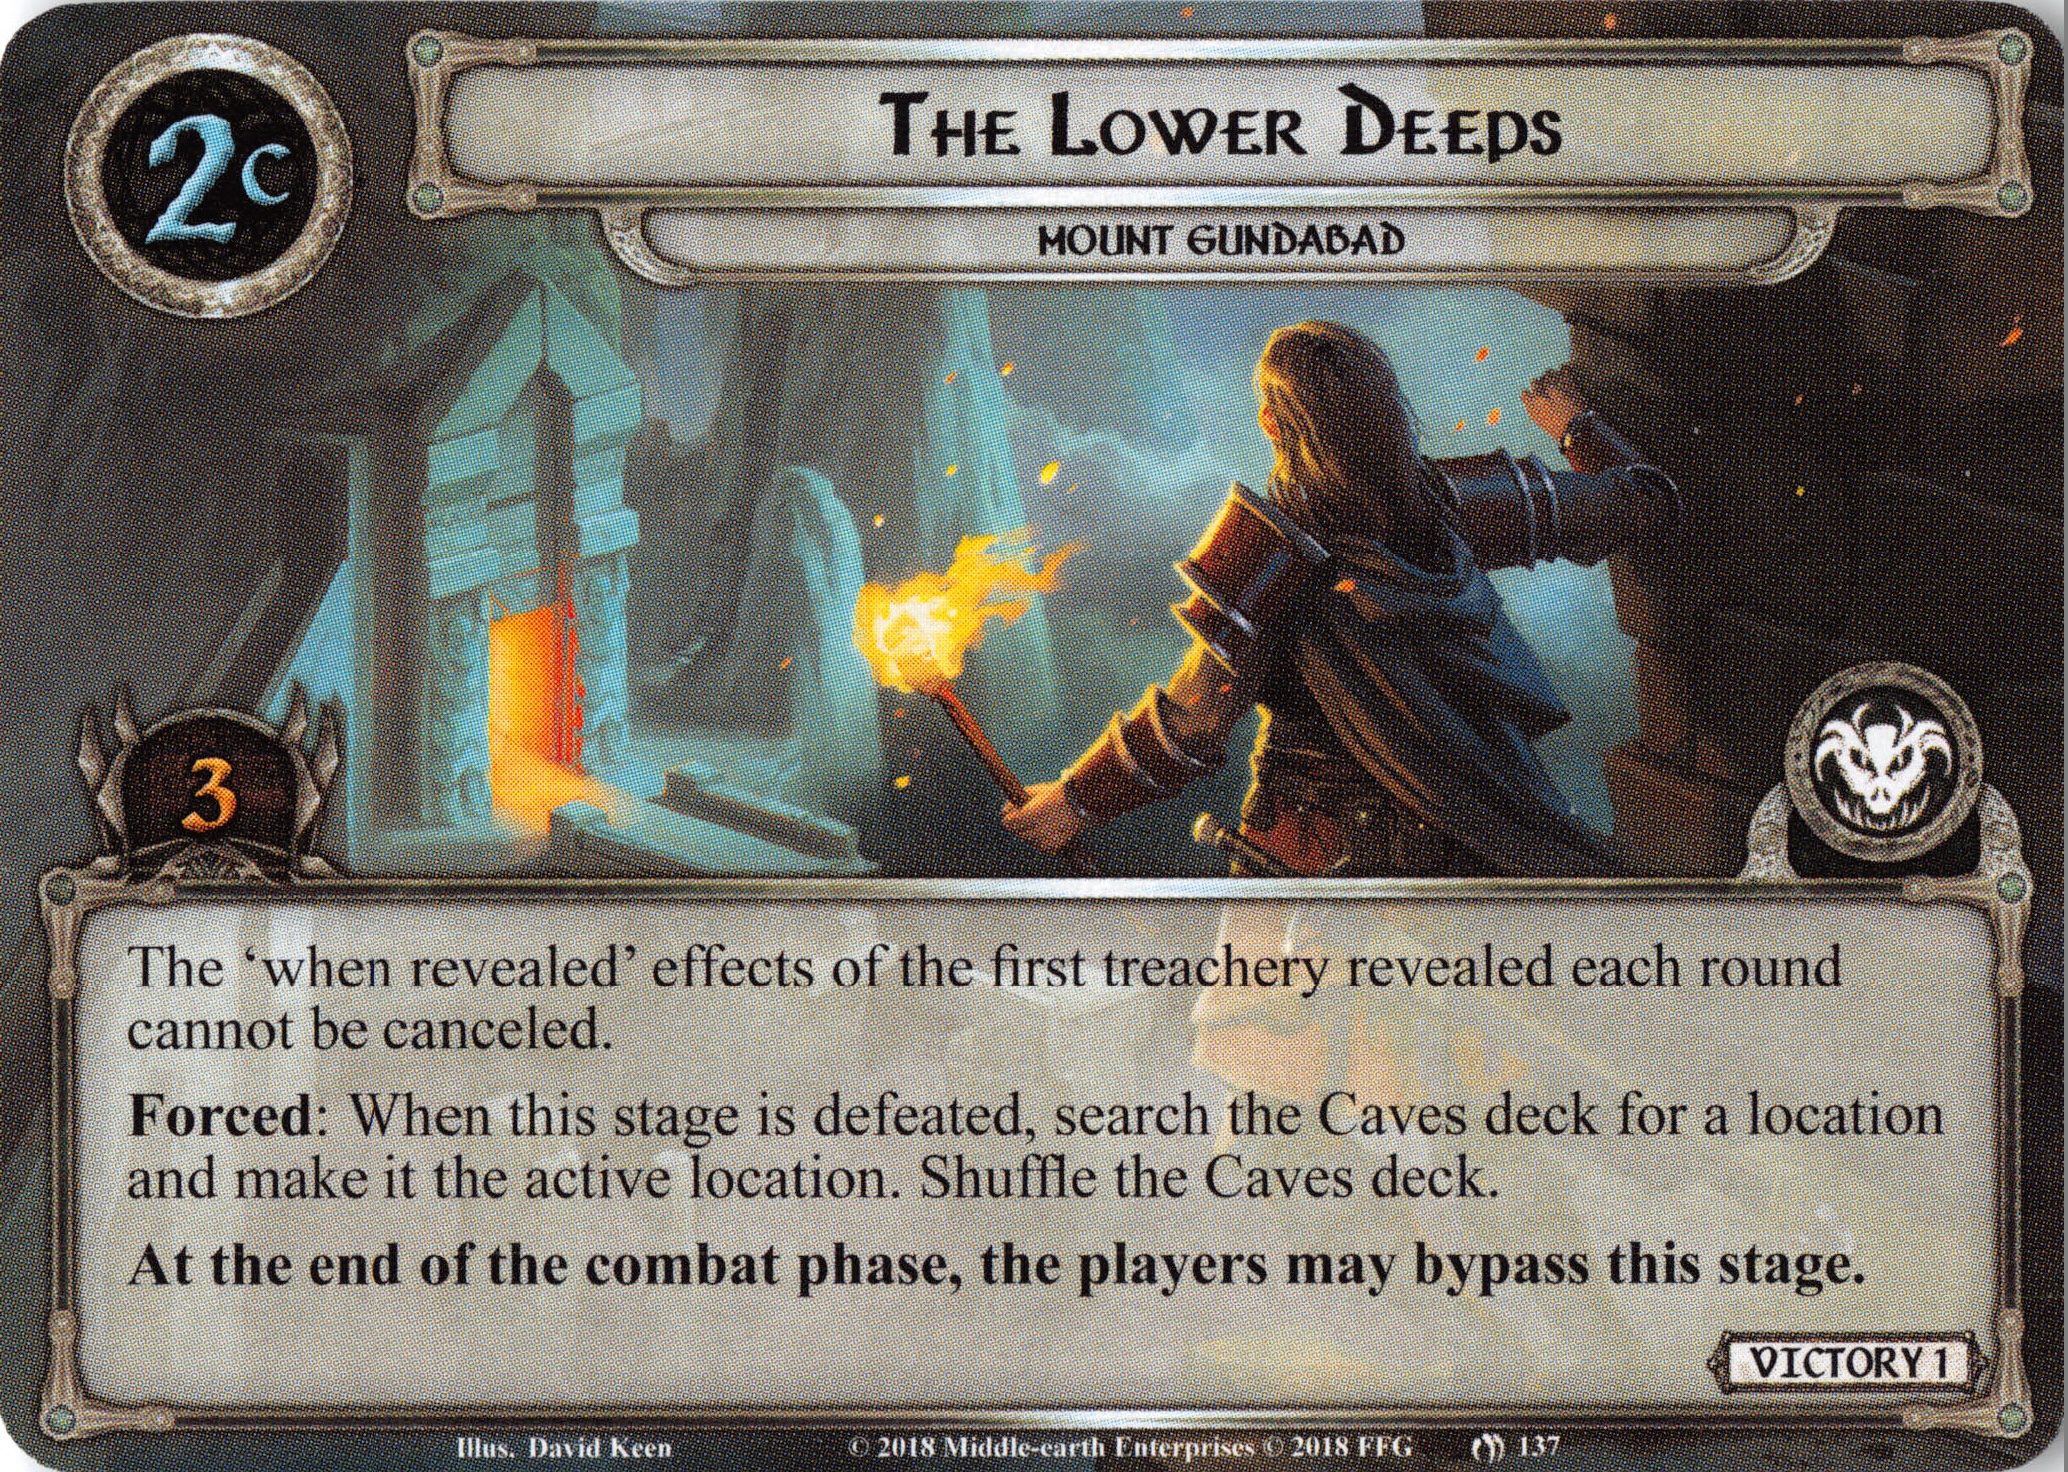
This can be a dangerous stage to get to, both because it’s low quest point value will sometimes just let you finish it accidentally – making some encounter cards (and Dagnir) quite a bit nastier and because you can’t cancel ‘when revealed’ effects while it is the active quest stage, leaving you vulnerable to cards like Dragon‘s Breath and Wilderland‘s Bane. The card makes up for that by having a Forced effect that can be beneficial if you have already shuffled The First Forge into the Cave deck. Other good cards to fetch are Throat of the Mountain, Lost Armory and Ancient Treasury. Like most others, this quest stage can be bypassed, which I would not advise you to do, as you’ll almost always have a beneficial location in the cave deck to get into play.
Stage 2D: Frenzied Warrens – 5 quest points
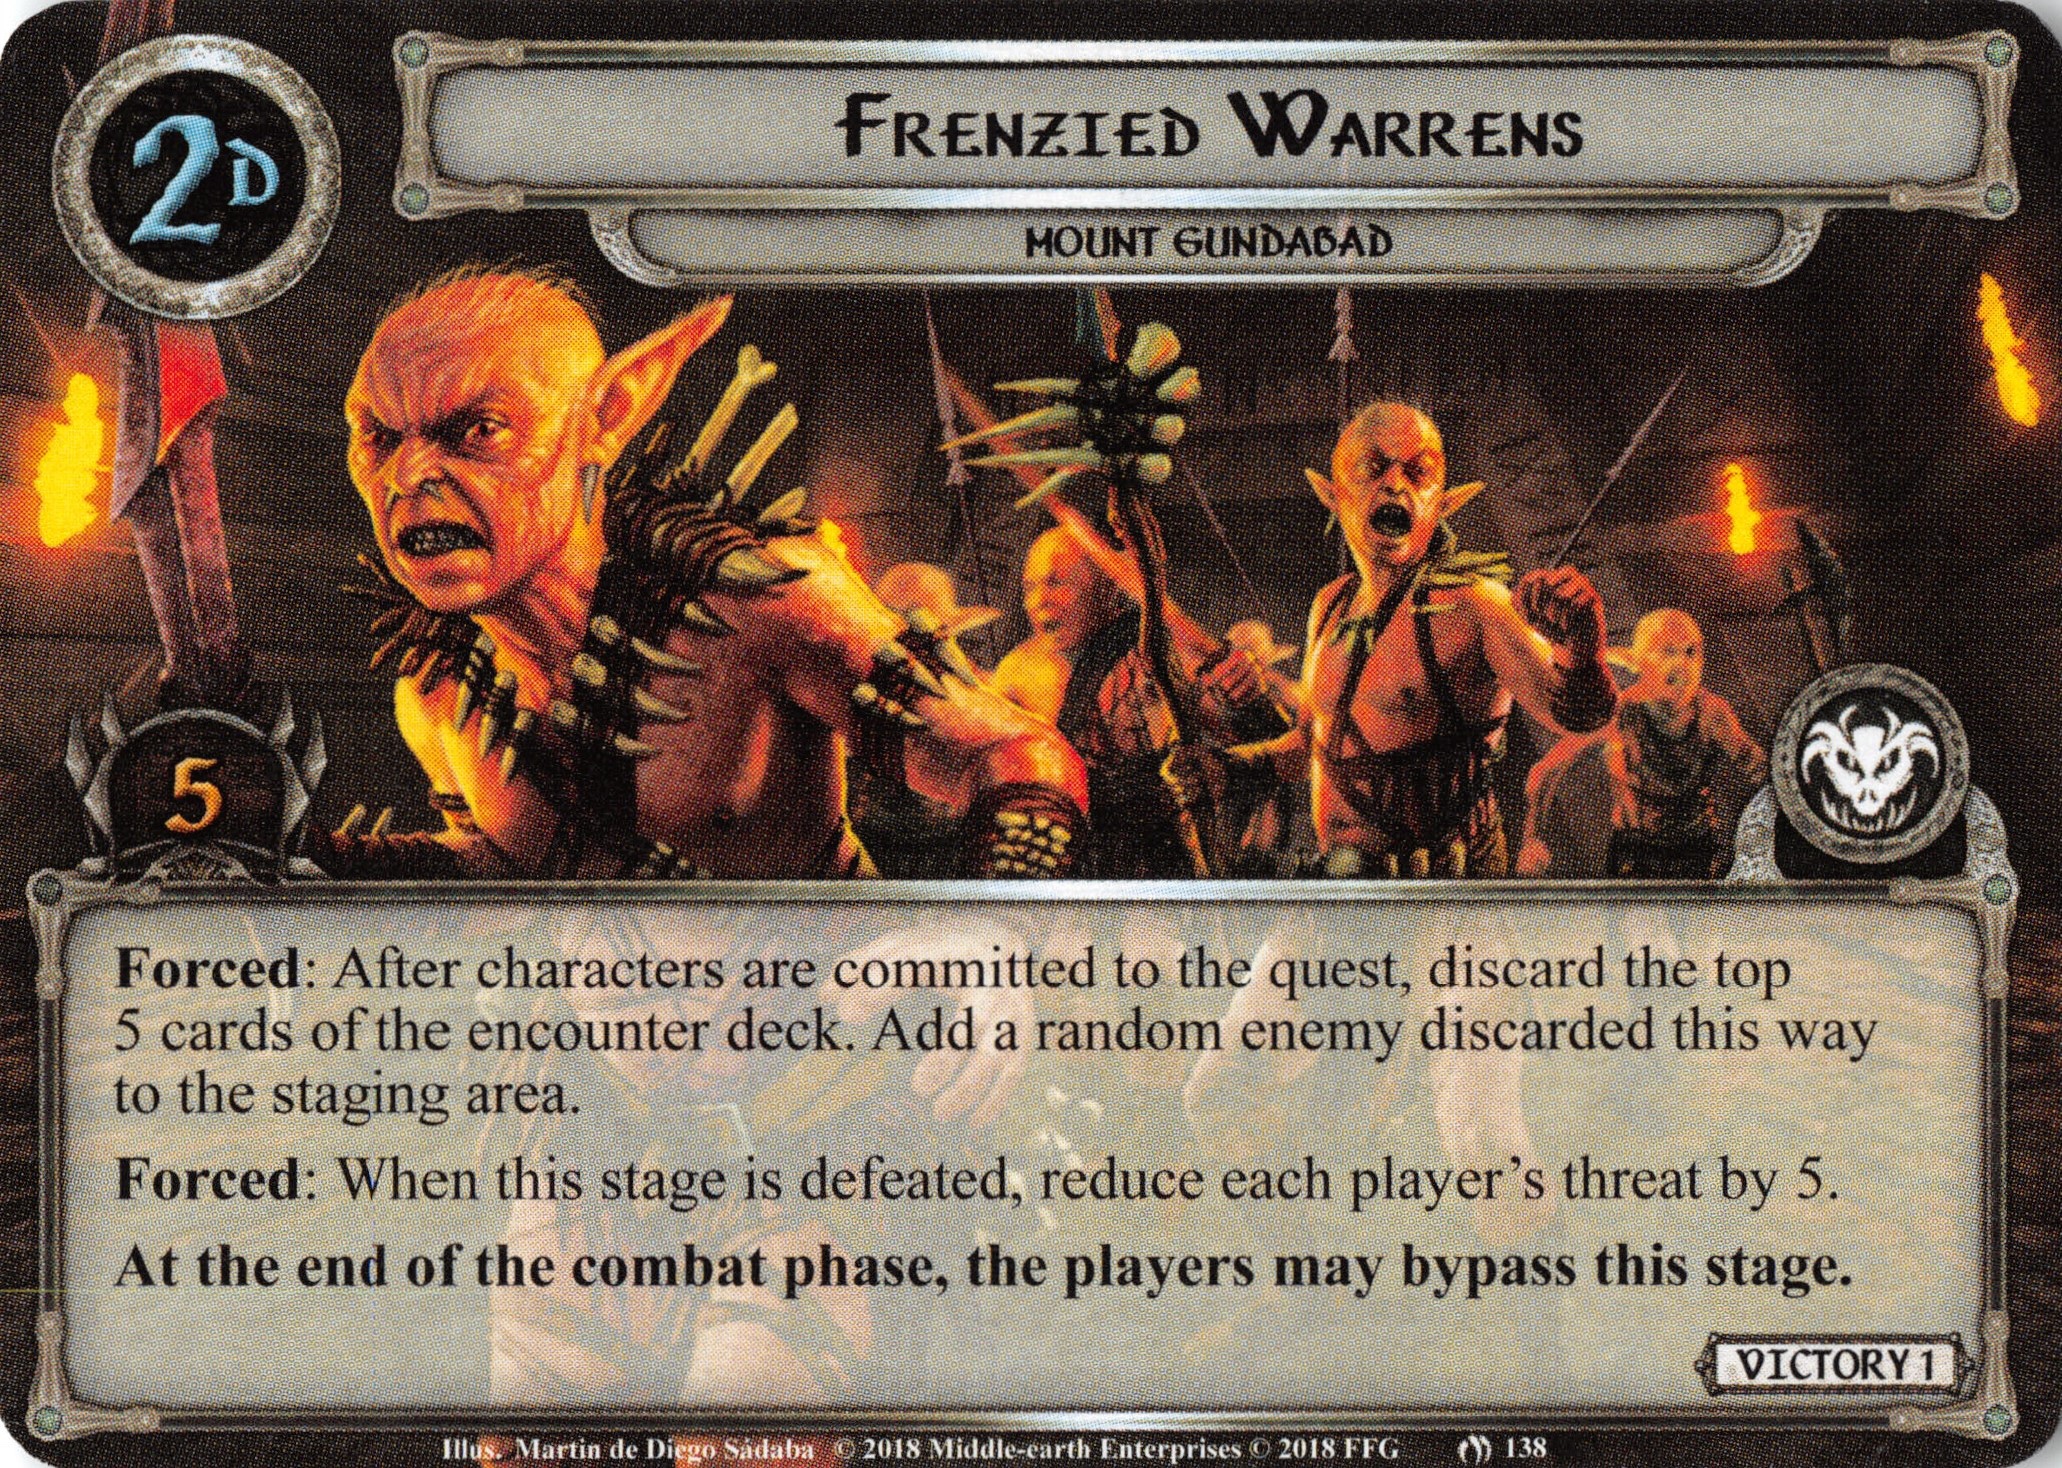
This is a dangerous stage, especially in early game when you are less able to handle additional threat and enemies. Even though the density of enemies in this encounter deck is pretty low (~28%), discarding an enemy this way is pretty likely (~80%), so, unless you want to use some scrounge here, just act as if you would definitely discard an enemy this way. The second effect is actually beneficial: after defeating (not bypassing) this stage, each player has to lower their threat by 5. That can is beneficial as it helps you to avoid Dagnir engaging you. Beware, though, as Valour decks might fall out of Valour range by this effect. Like most other stage 2s, this one may be bypassed at the end of the combat phase.
Stage 2E: Dagnir’s Wrath – 7 quest points
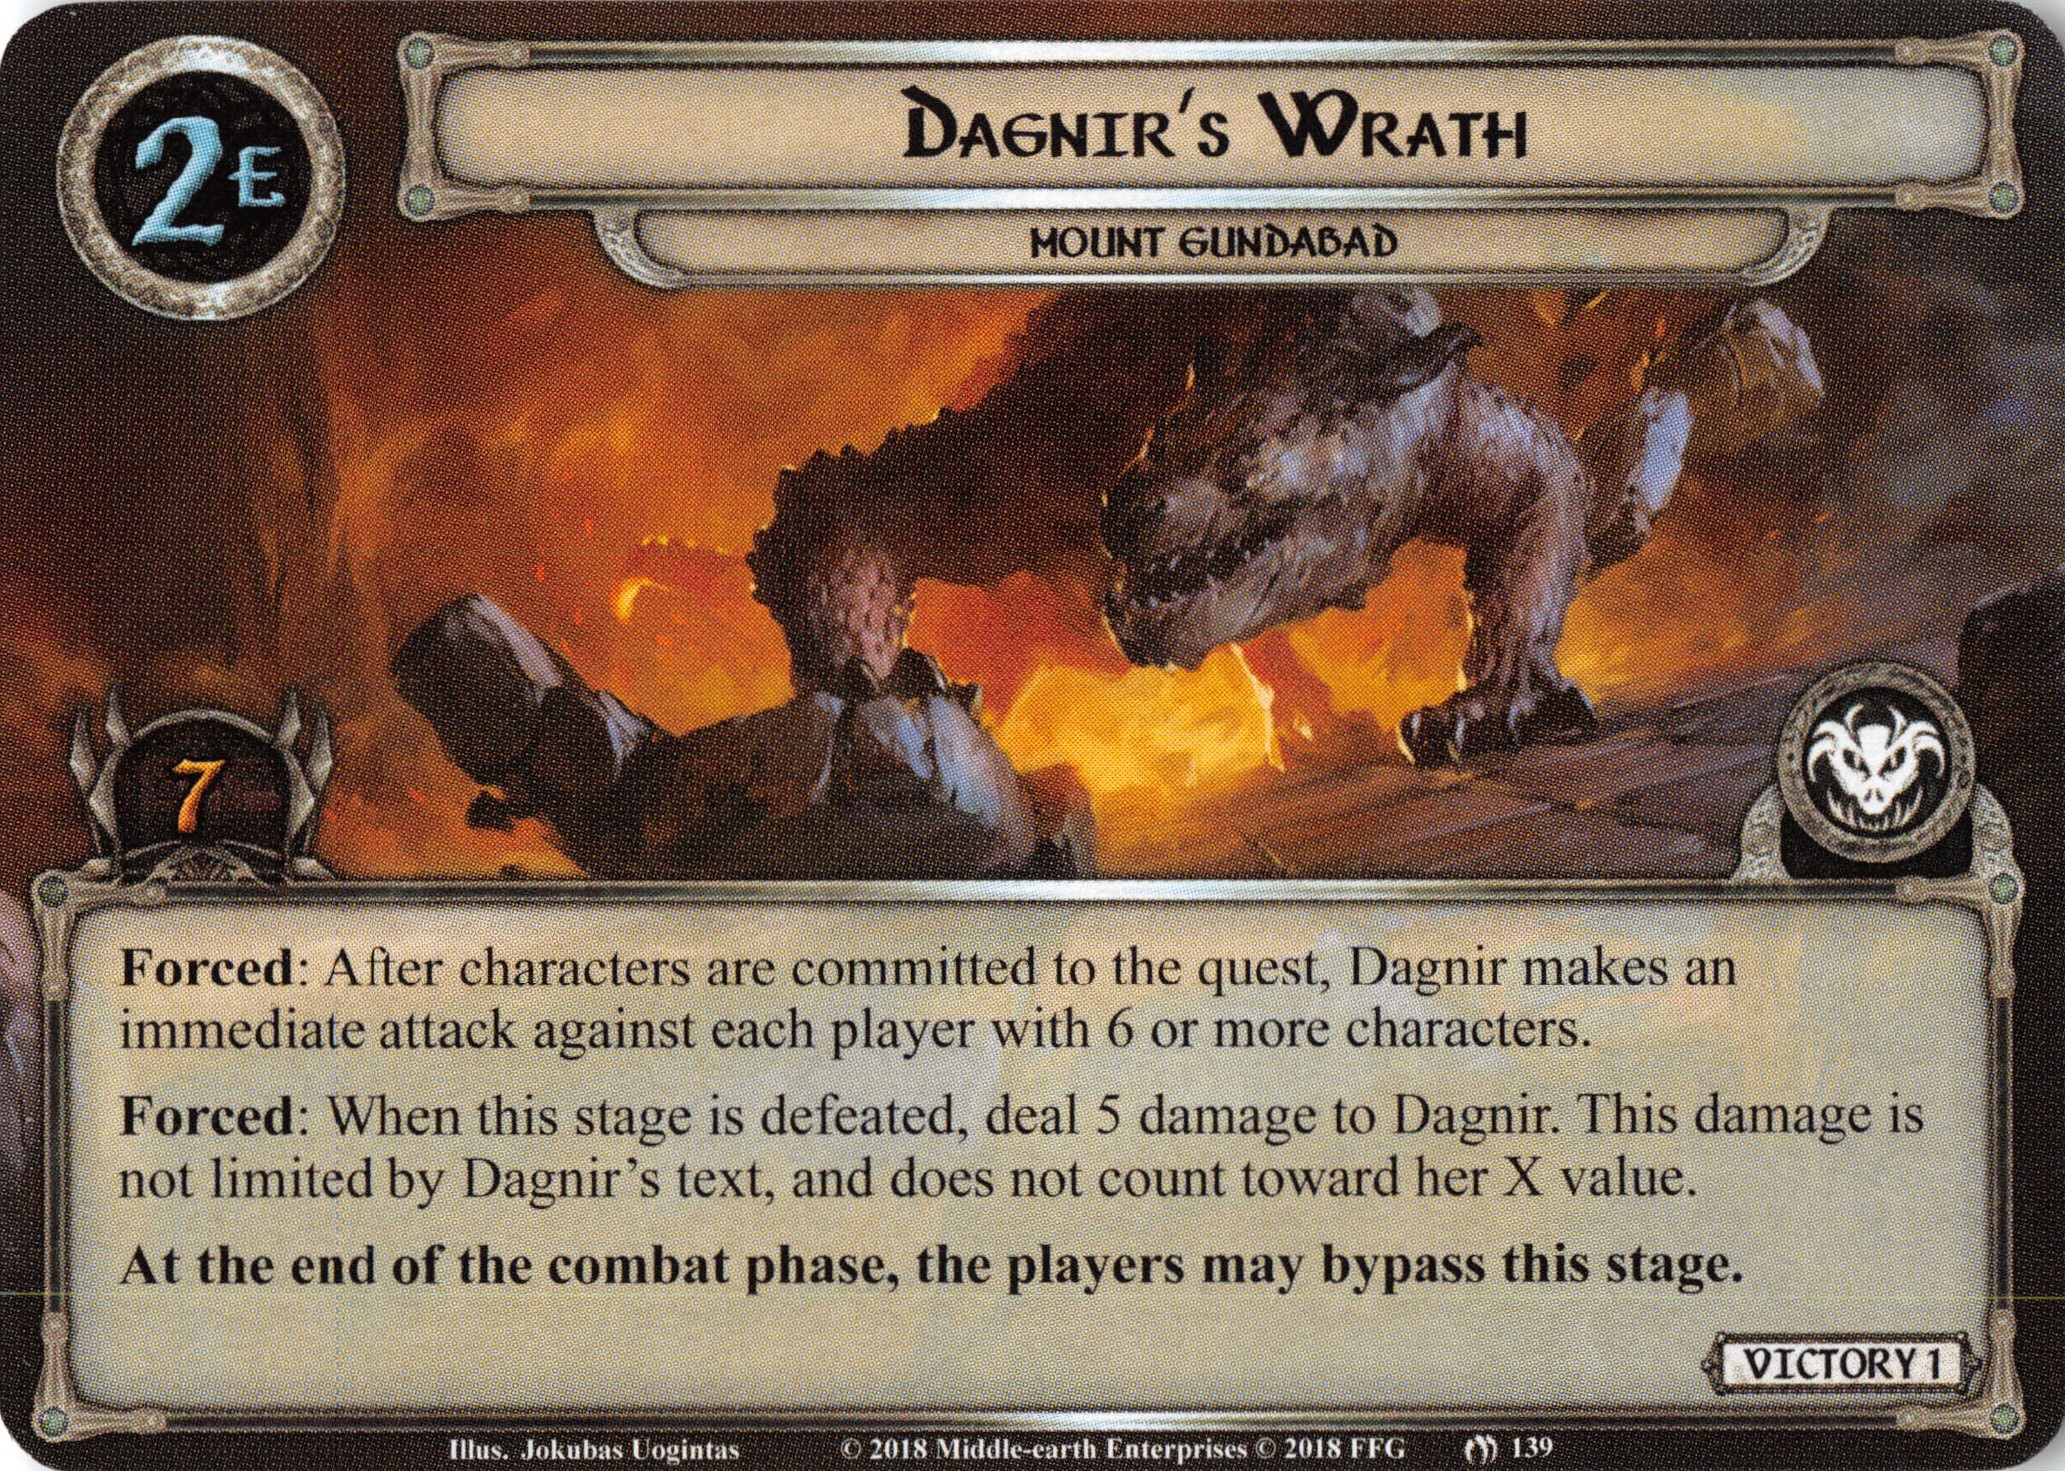
Flee for your lives! The dragon is here! No, seriously. In late-game, you might just want to skip this stage as early as possible as Dagnir will make an additional attack against each player every round. There is some silver lining in that this stage is quite a good one to see in early game, as it allows you to deal some additional damage to Dagnir upon defeating it. It is another one of those stages that feel very thematic, as maintaining a low profile can help you here. Again, players may bypass this stage at the end of the combat phase, but you’ll still have to deal with the attacks.
Stage 2F: Foreboding Darkness – 4quest points
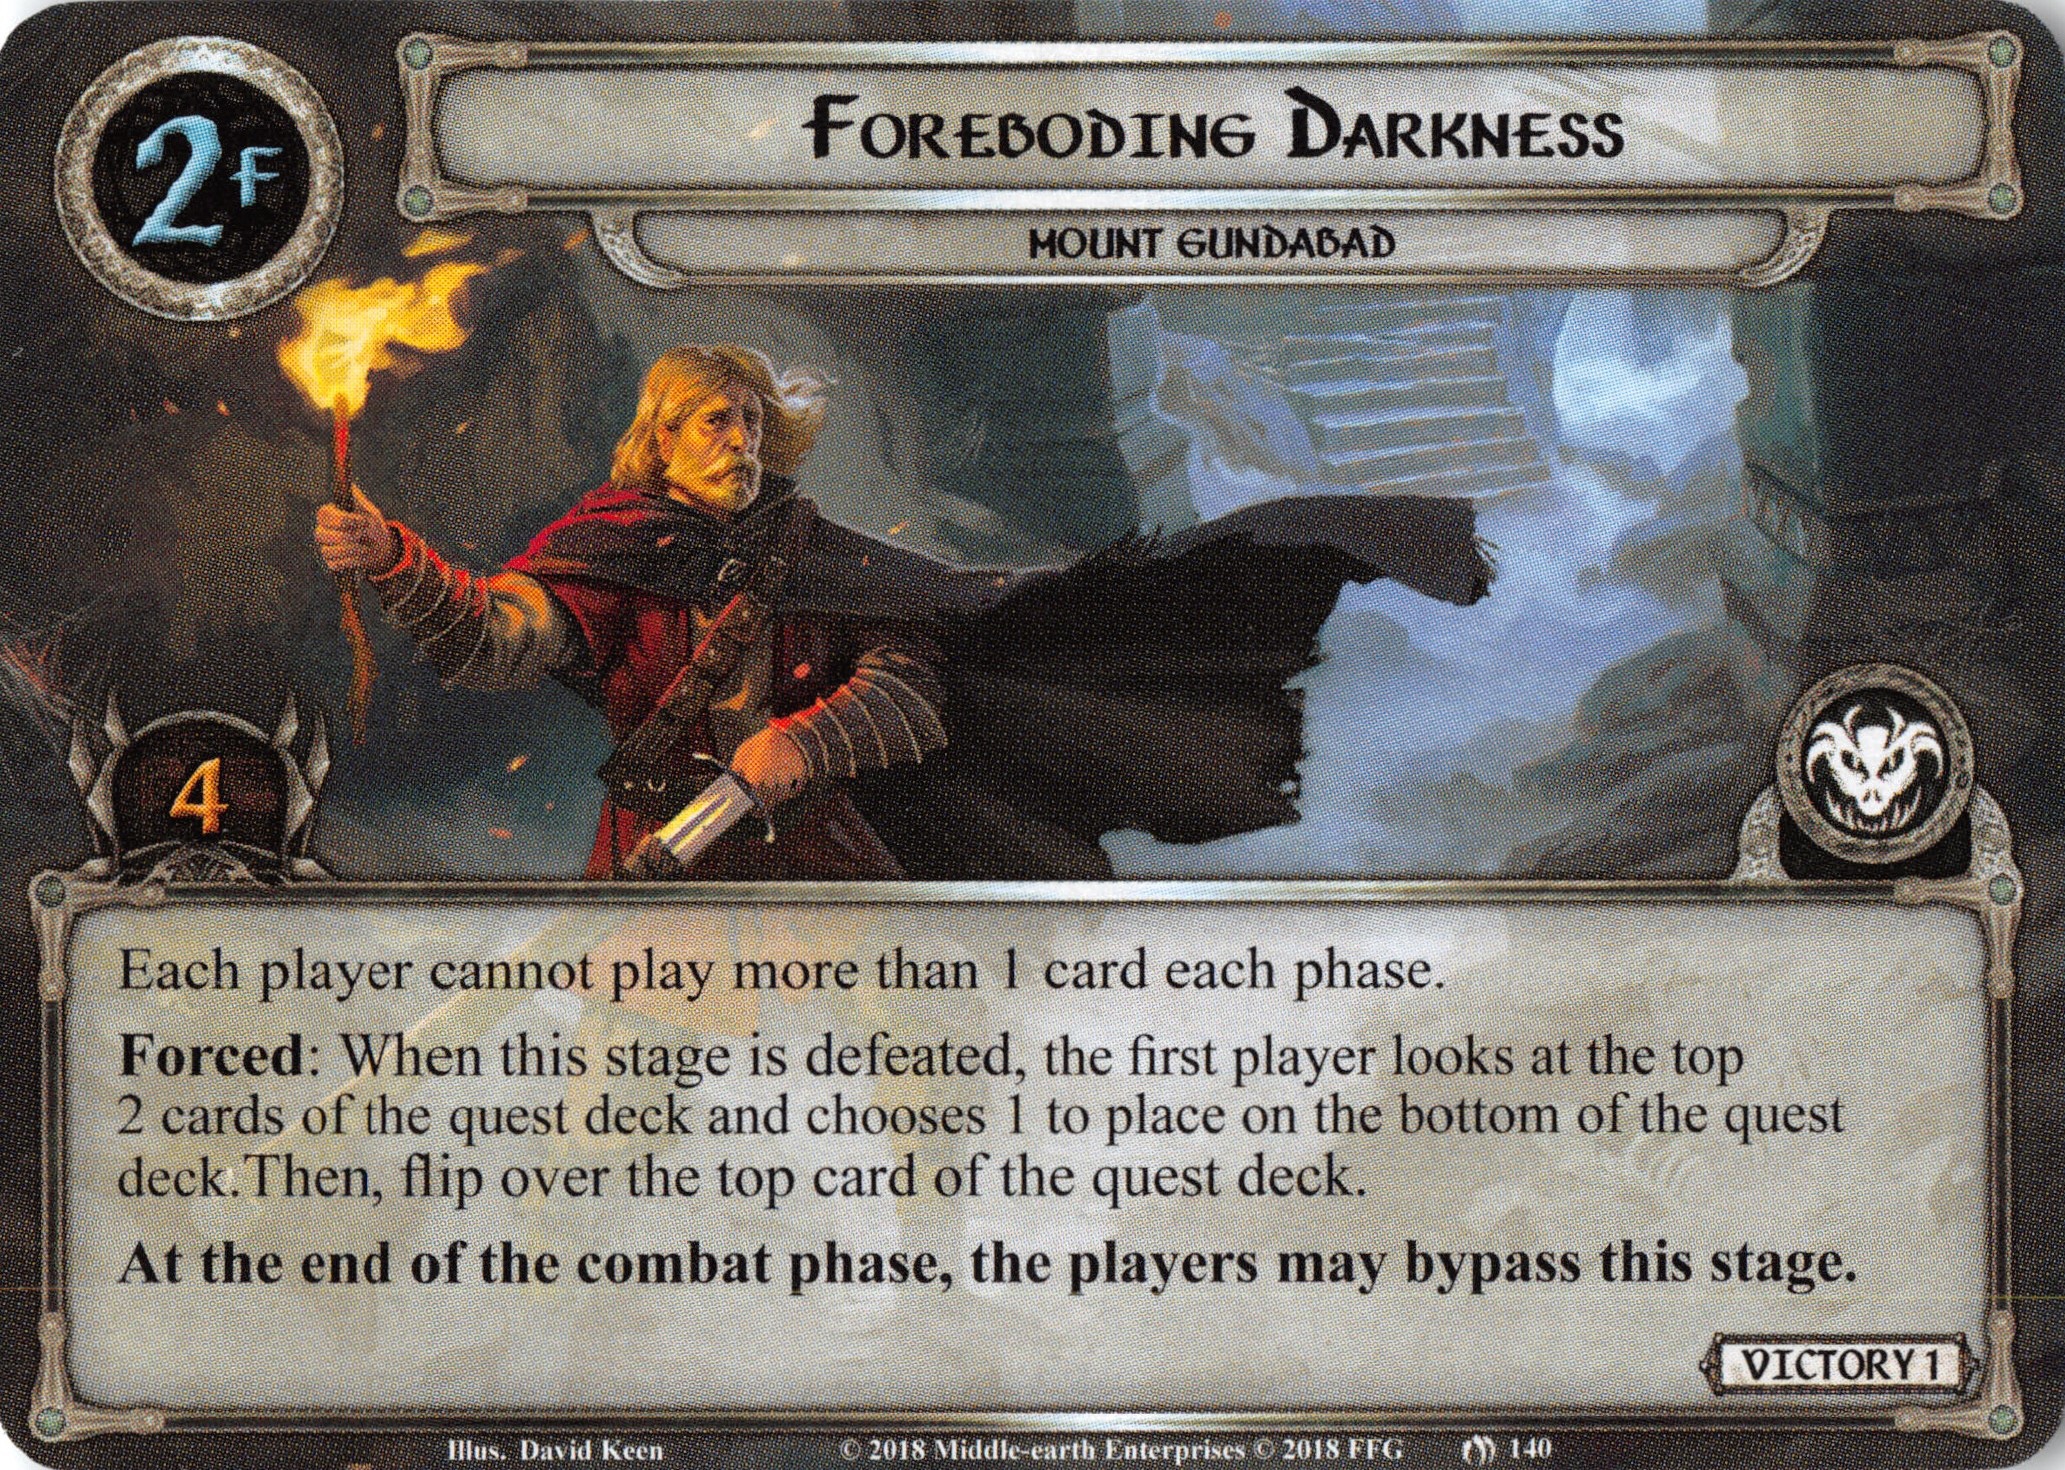
This stage is interesting. It offers you a good reason to complete it, but while doing so, you’ll have to suffer a little. Each player only being able to play one card per phase is bad, but not overly nasty. The other effect though is very useful, as it allows you to avoid a nastier stage and get to a beneficial stage instead, giving you good control over where you go next. As always, players may bypass this stage at the end of combat phase, but I’d recommend to just defeat it to get some use out of the effect.
Stage 2G: Imminent Pursuit – 6 quest points

As you might have already noticed, Dagnir is not the only danger in Mount Gundabad. While venturing deeper into the caves, you are attacked by Deep-Dwellers, Orcs too scared to run away from Dagnir and your old friends, the Stone-Trolls. The feeling of being pursued is shown on this stage by an effect that damages questing characters. It’s not a lot of damage, but it can get dangerous if you can’t heal. In case you are able to get away from your pursuers (aka defeat this stage), though, you may discard a non-unique enemy from play. If you are sure you can defeat this stage quickly, it might be worth staying here for one or two rounds to potentially discard a strong enemy. If you don’t have such or most of your questing characters are already damaged, you might rather want to bypass this stage like the others.
Stage 2H: The Great Worm
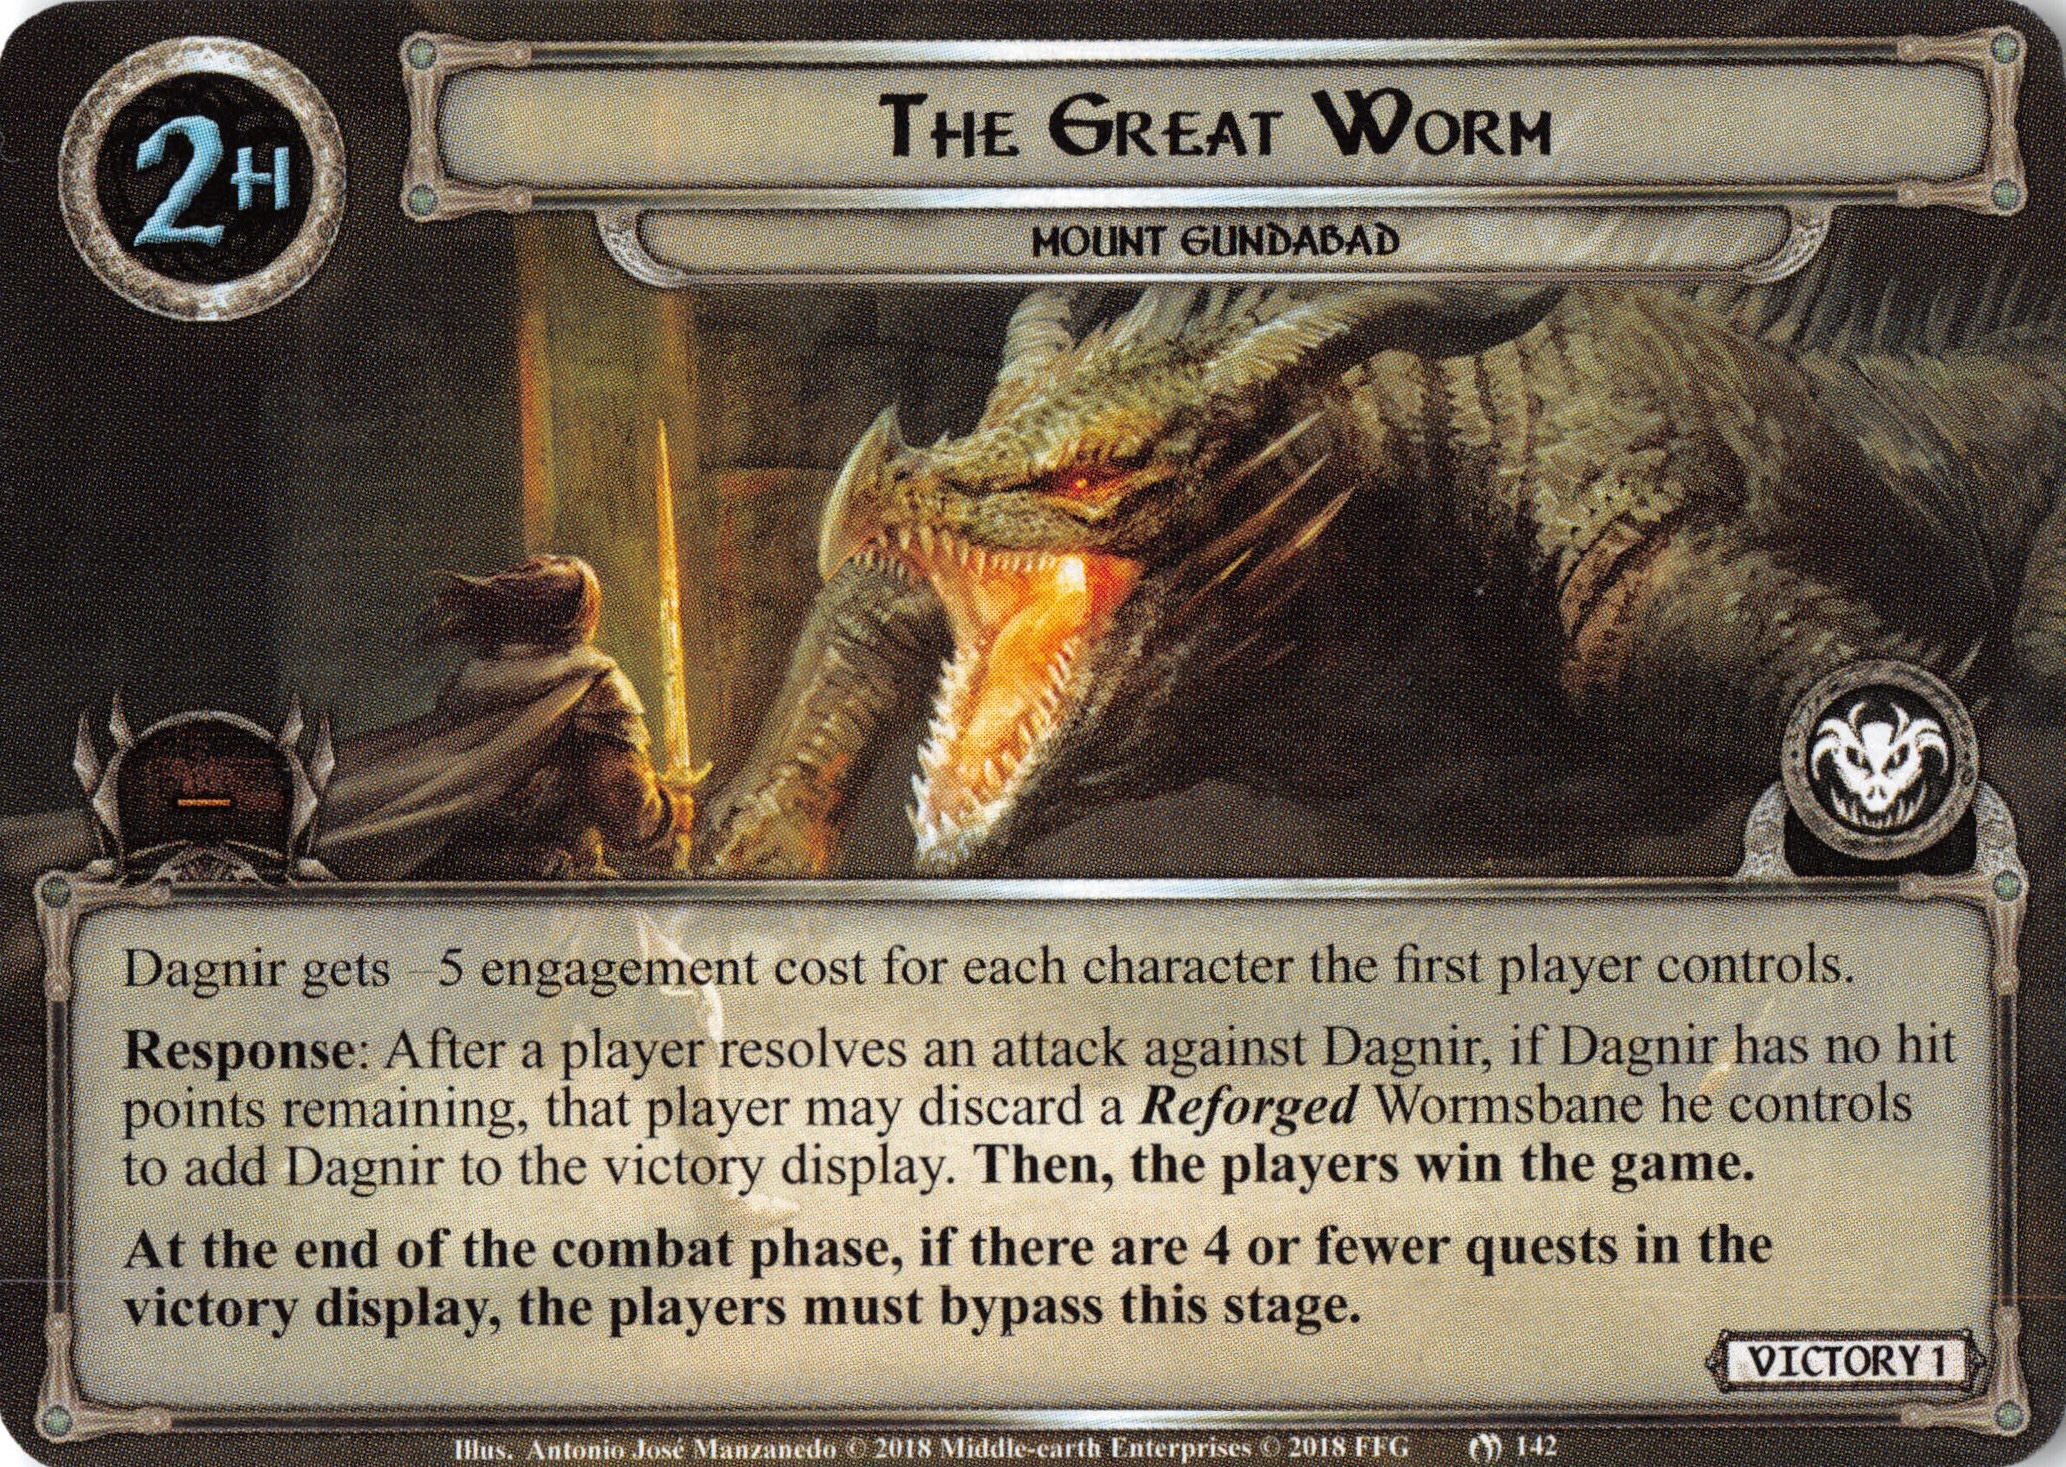
Here you have it: The stage where everything ends. The epic showdown. This stage is the only one which tells you how to win the game, which is, of course, by killing Dagnir. She gets -5 Engagement cost per character controlled by the first player, which makes it unlikely that, if you draw this stage as the first one, you’ll be wrecked, which is nice. After a few turns, though, her engagement cost might sink below 30, making her very dangerous. I will go into the next part a little further down, when I’ll talk about how to navigate through the quest deck. The last part states that if there are four or less quest cards in the victory display, players must bypass this stage (I don’t think you’ll want to refuse doing that anyway, though).
Getting through the quest

This part of the guide is here to help you get through this quite complex quest. In general, you’ll want to get to The Upper Levels as quickly as possible to be able to find The First Forge quickly and reforge Wormsbane. This will help you kill enemies easier the further you get through the quest.
To thin the Caves deck, it is recommended to travel to deep locations from the beginning on, but beware of dangerous caves! Just bypass most stages and build up your boardstate. Once you have a good army ready and reforged Wormsbane, you can start defeating quest stages to later kill Dagnir. Watch out, though, as Dagnir’s textbox automatically makes her engaged to all players once you have defeated five stages. Then, you don’t want to waste any time and get to The Great Worm quickly to be able to defeat Dagnir. You can already begin damaging her before you are at that stage, but to defeat her completely, you need to be there and kill her using Wormsbane. Once you have done that, you win the game!
But you don’t have much time to celebrate, as a horn sounds and you hear the voice of Urdúg ordering you to come out and let yourself be killed so he can move into his home again. Of course, he didn’t come alone, so you’ll have to try your best fighting his army of goblins in a battle that will decide The Fate of Wilderland…
The Encounter deck
Global
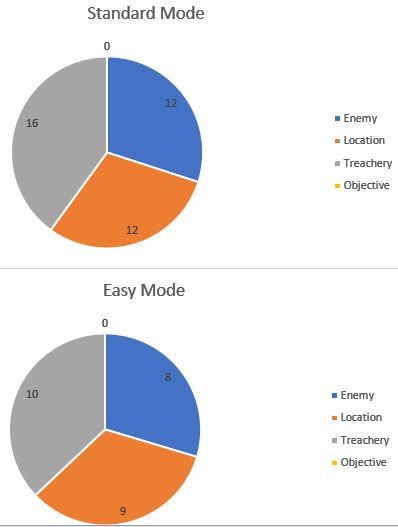
- The encounter deck consists out of 40 cards in Normal mode, and 27 in Easy mode after setup. This does not include the locations in the Caves deck.
- The chances of hitting a shadow effect are 63% in Normal mode, and 67% in Easy mode. Many shadow cards get worse if Dagnir is the attacker with that shadow card.
- The average threat per card is rather low, ranging from 0 to 3 with an average of 1.45 threat per card in Normal mode, and 1.55 threat in Easy mode.
- Surge only appears on the four Dragon’s Might treacheries. This gets halved in Easy mode, as 2 are removed for that format.
- Doomed 1 is the only time you see this keyword, and it is only on 3 treacheries. The quest doesn’t raise your threat a lot, but be careful with your engagement costs.
- Immunity
- Stone-Troll cannot have player card attachments
- While Dark Tunnel is in the staging area, progress cannot be placed on Dark locations in the staging area
- While Dagnir’s Slave is in play, Dagnir herself cannot take non-quest damage
- Dagnir is Indestructable and immune to player card effects
- Dagnir can only receive X damage per round, where X is one more than the number of quest cards in the Victory Display
- While there are 5 quest cards in the victory display, Dagnir cannot leave the staging area
- The First Forge is immune to player card effects
The statistics above do not count the locations in the Caves deck, and do not count Dagnir or Wormsbane either, since none of these cards can ever enter the encounter deck or encounter discard pile. The encounter deck is skewed slightly towards treacheries, so be sure to bring some cancellation to avoid the worst effects.
Objective
Wormsbane
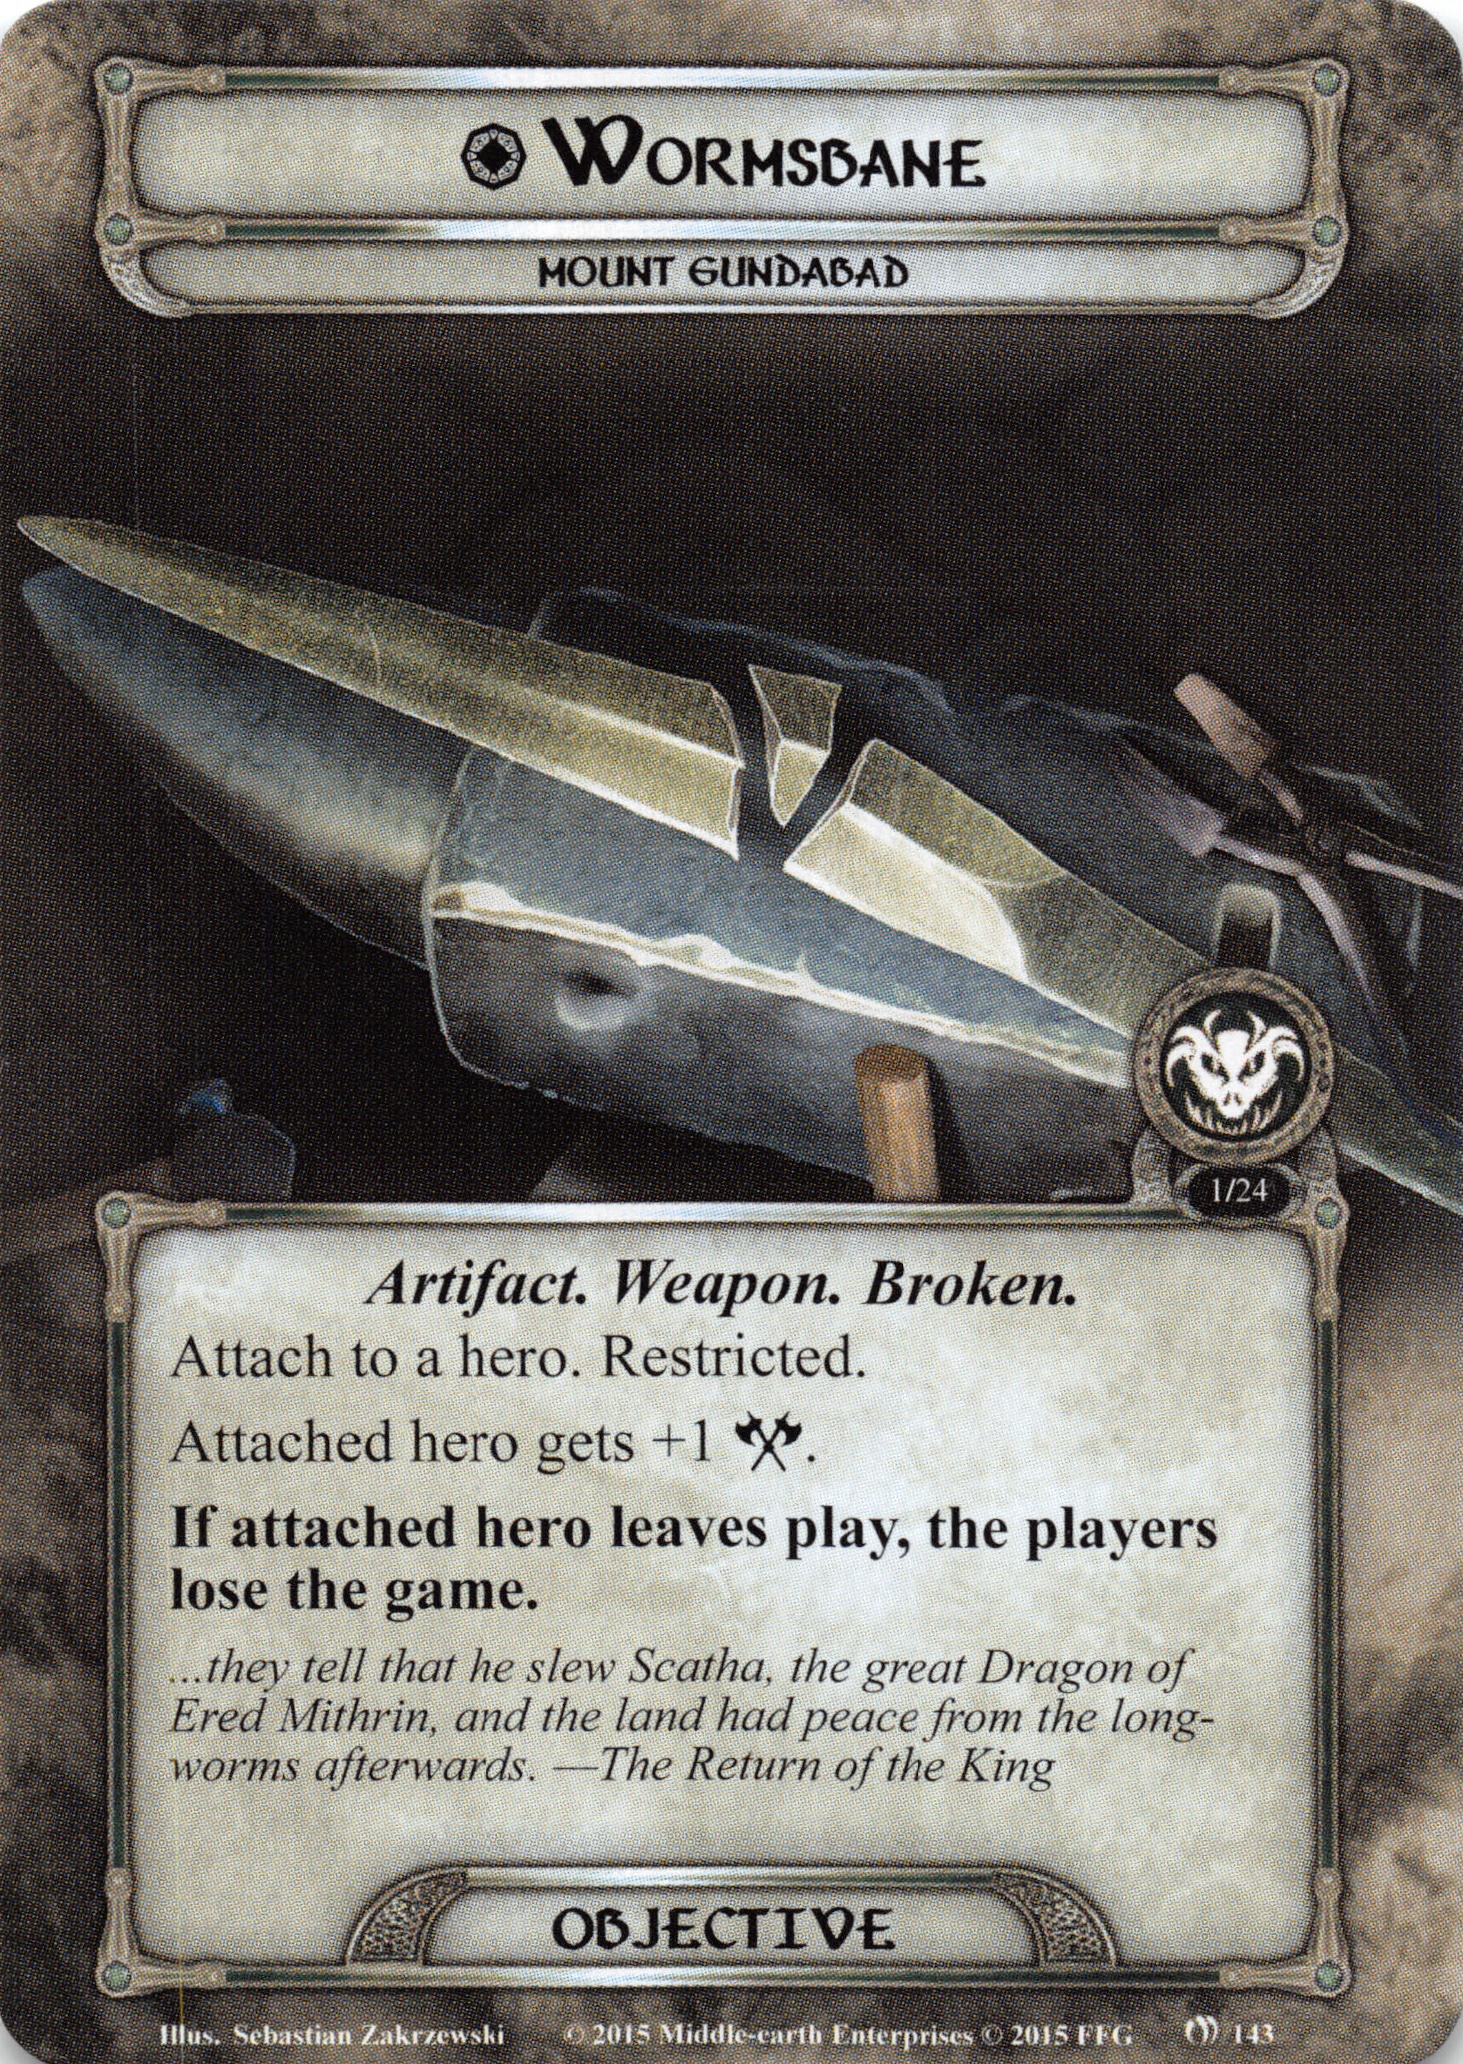
This is the quest’s only objective card, but it is very useful. At the beginning, you only have the broken Wormsbane, which just gives the hero it is attached to +1 attack. Note that this is not a player attachment, but still an attachment, preventing the use of Brand‘s card draw ability. After you have reforged the sword, it gets much more useful, giving attached hero +X attack, where X is the amount of quest cards cleared plus one. This will usually go up to +6 attack, which is very respectable. Also, This is a weapon and an artifact, which makes it able to synergize with some player cards (Ring of Barahir, for example).
Enemies
Enemies in this quest are a wild mix of beefy ones and those that are dangerous mostly because of their textbox. You’ll find goblins, trolls and spiders in the caves of Gundabad, but they are all overshadowed by… well, the gigantic dragon that also lives here.
Guardian of Gundabad
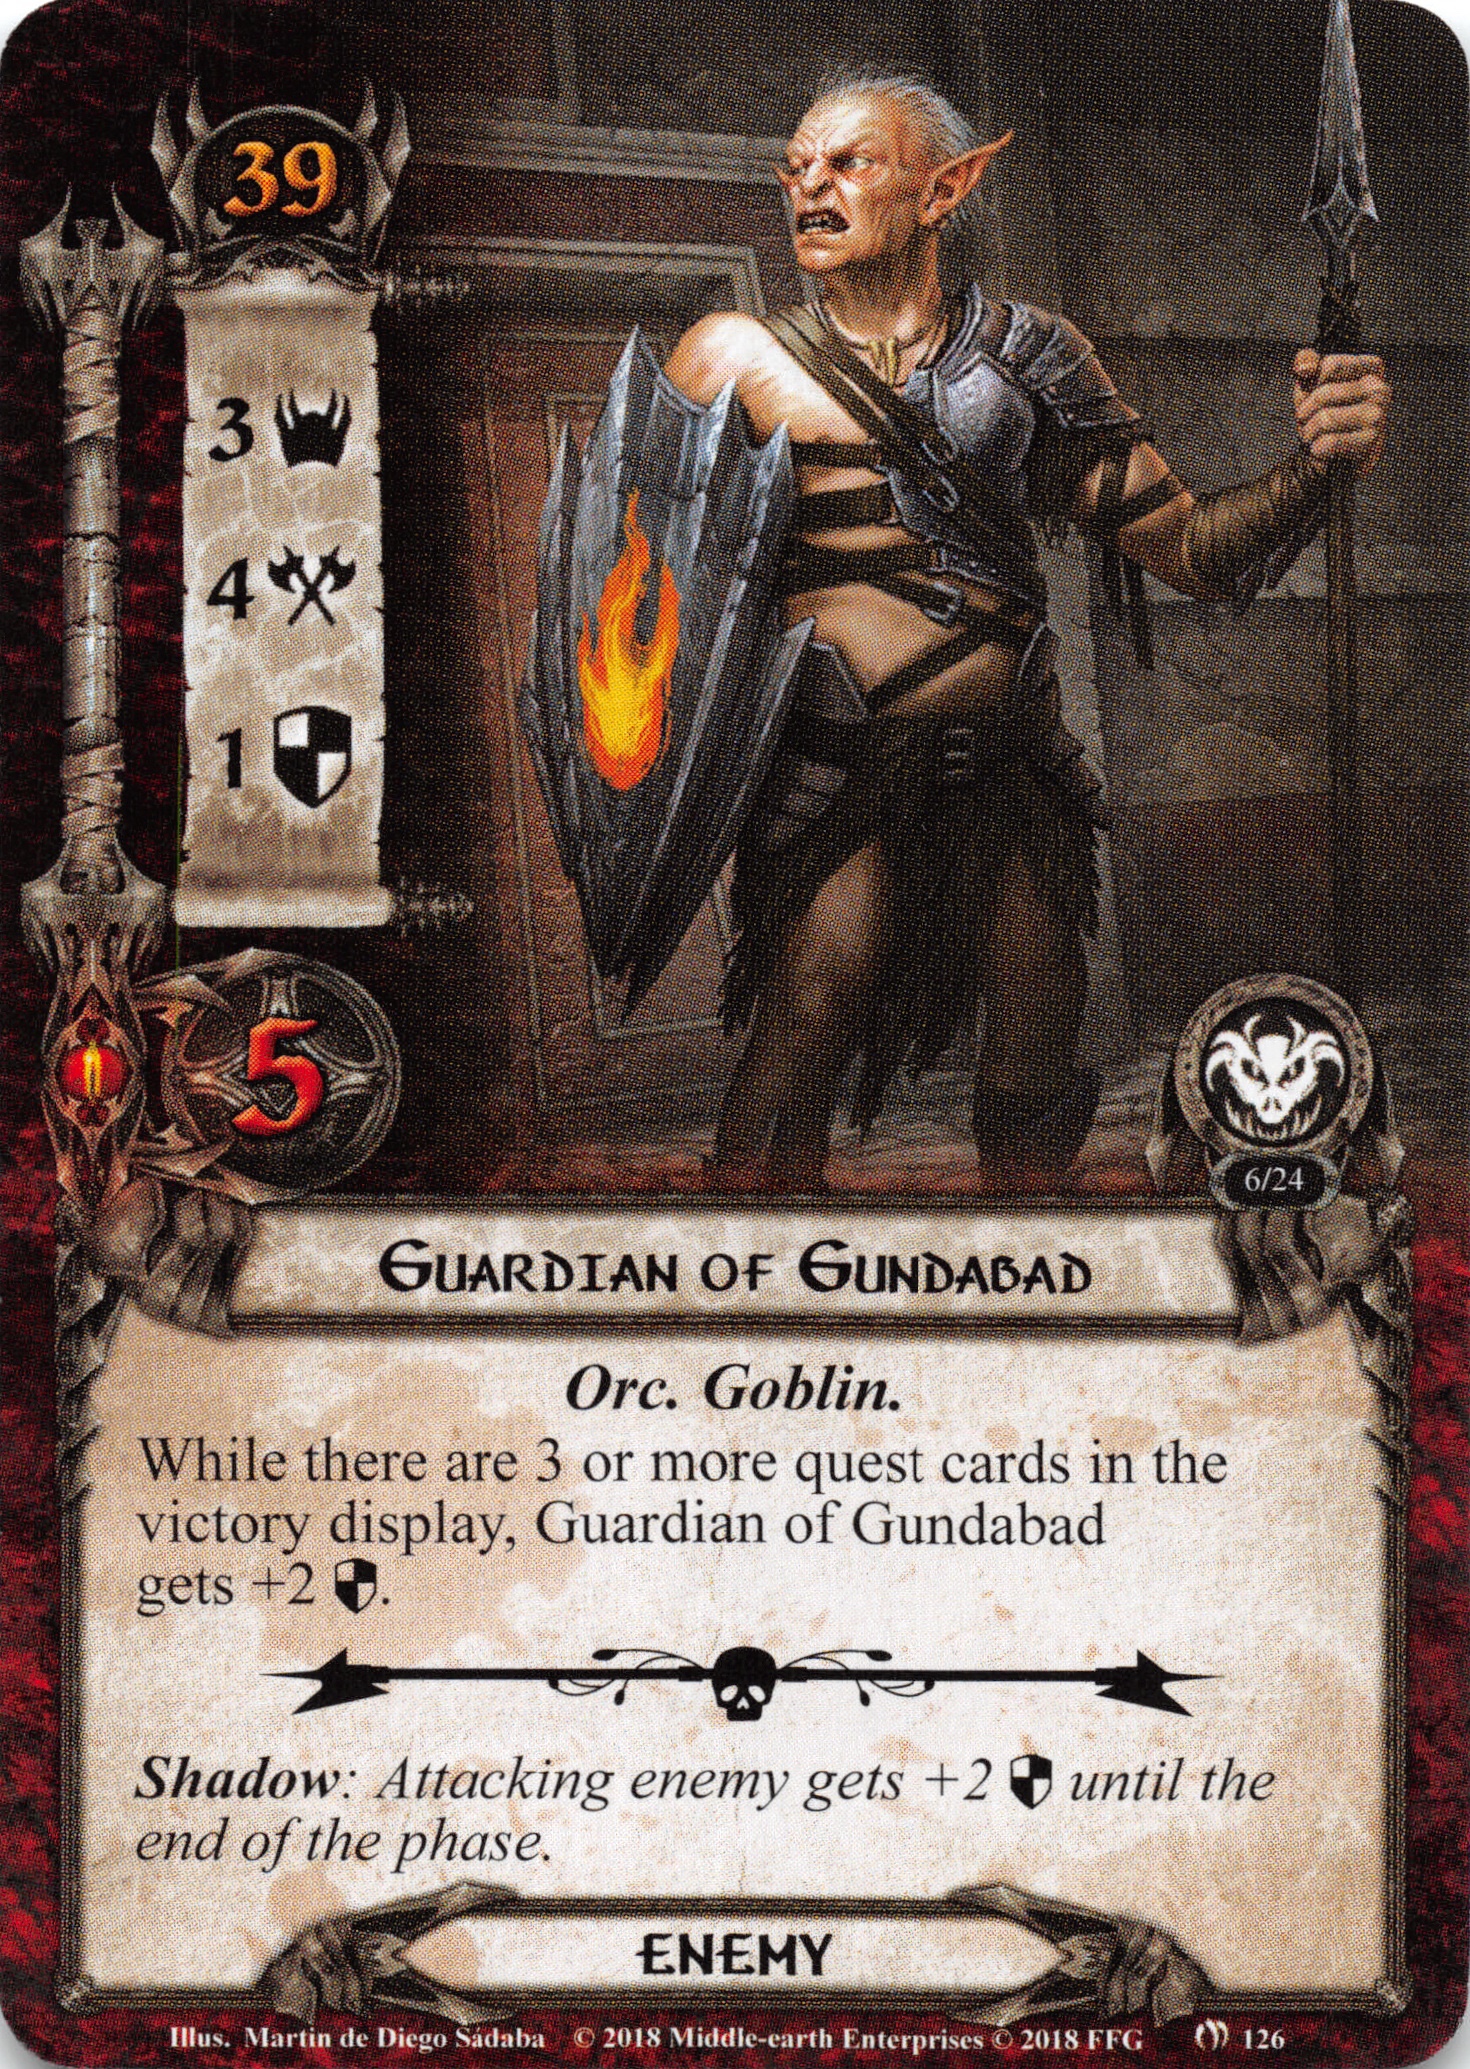
This is a fairly nasty enemy, judging by its stats. Three threat and four attack are no joke, but not too dangerous, either. This one is beefy though, with 1 or 3 defense and 5 health. There are no specific strategies for this enemy, just to watch out. I’ll give bonus points for the artwork, though!
Dagnir’s Slave
One of the more wimpy enemy cards, this has rather weak stats. It’s ability is not too bad, either, preventing Dagnir from taking any combat damage, as this enemy is easily dealt with and you’ll want to be prepared to fend off more than one attack by Dagnir anyway when you engage her. Overall, this enemy is, dare I say, almost a beneficial one to reveal.
Deep-Dweller
This is another enemy that is low on stats, but this one has two abilities that make it rather dangerous. When it engages you, it makes an attack. As it has an attack strength of 3, this can easily deal 1 or 2 damage if you are unprepared to deal with two attacks in one round. Also, when it it is dealt any damage and survives, you have to put it back into the staging area. This means that you will want to defeat it in one blow, as it will otherwise contribute its threat to the staging area and make another bonus attack next round. A reforged Wormsbane can do wonders here.
Other enemies
Stone-Trolls and Hobgoblins can be found here, too. As they were already described in the article about The King‘s Quest, I won’t write more about them here.
Locations (encounter deck)
The encounter deck features five locations, all of which are deep, so you don’t have to care about them themselves too much. They are also all Underground and most are Dark, which might open up some strategies with Dwarves, who get a natural benefit from locations with these traits.
Mines of Gundabad
Your average 3/3 location. As all others it has deep, so you get rid of it when traveling to it. Also, as long as it is in play Dagnir will have -10 Engagement cost, which can get you into some trouble later on.
Narrow Stair
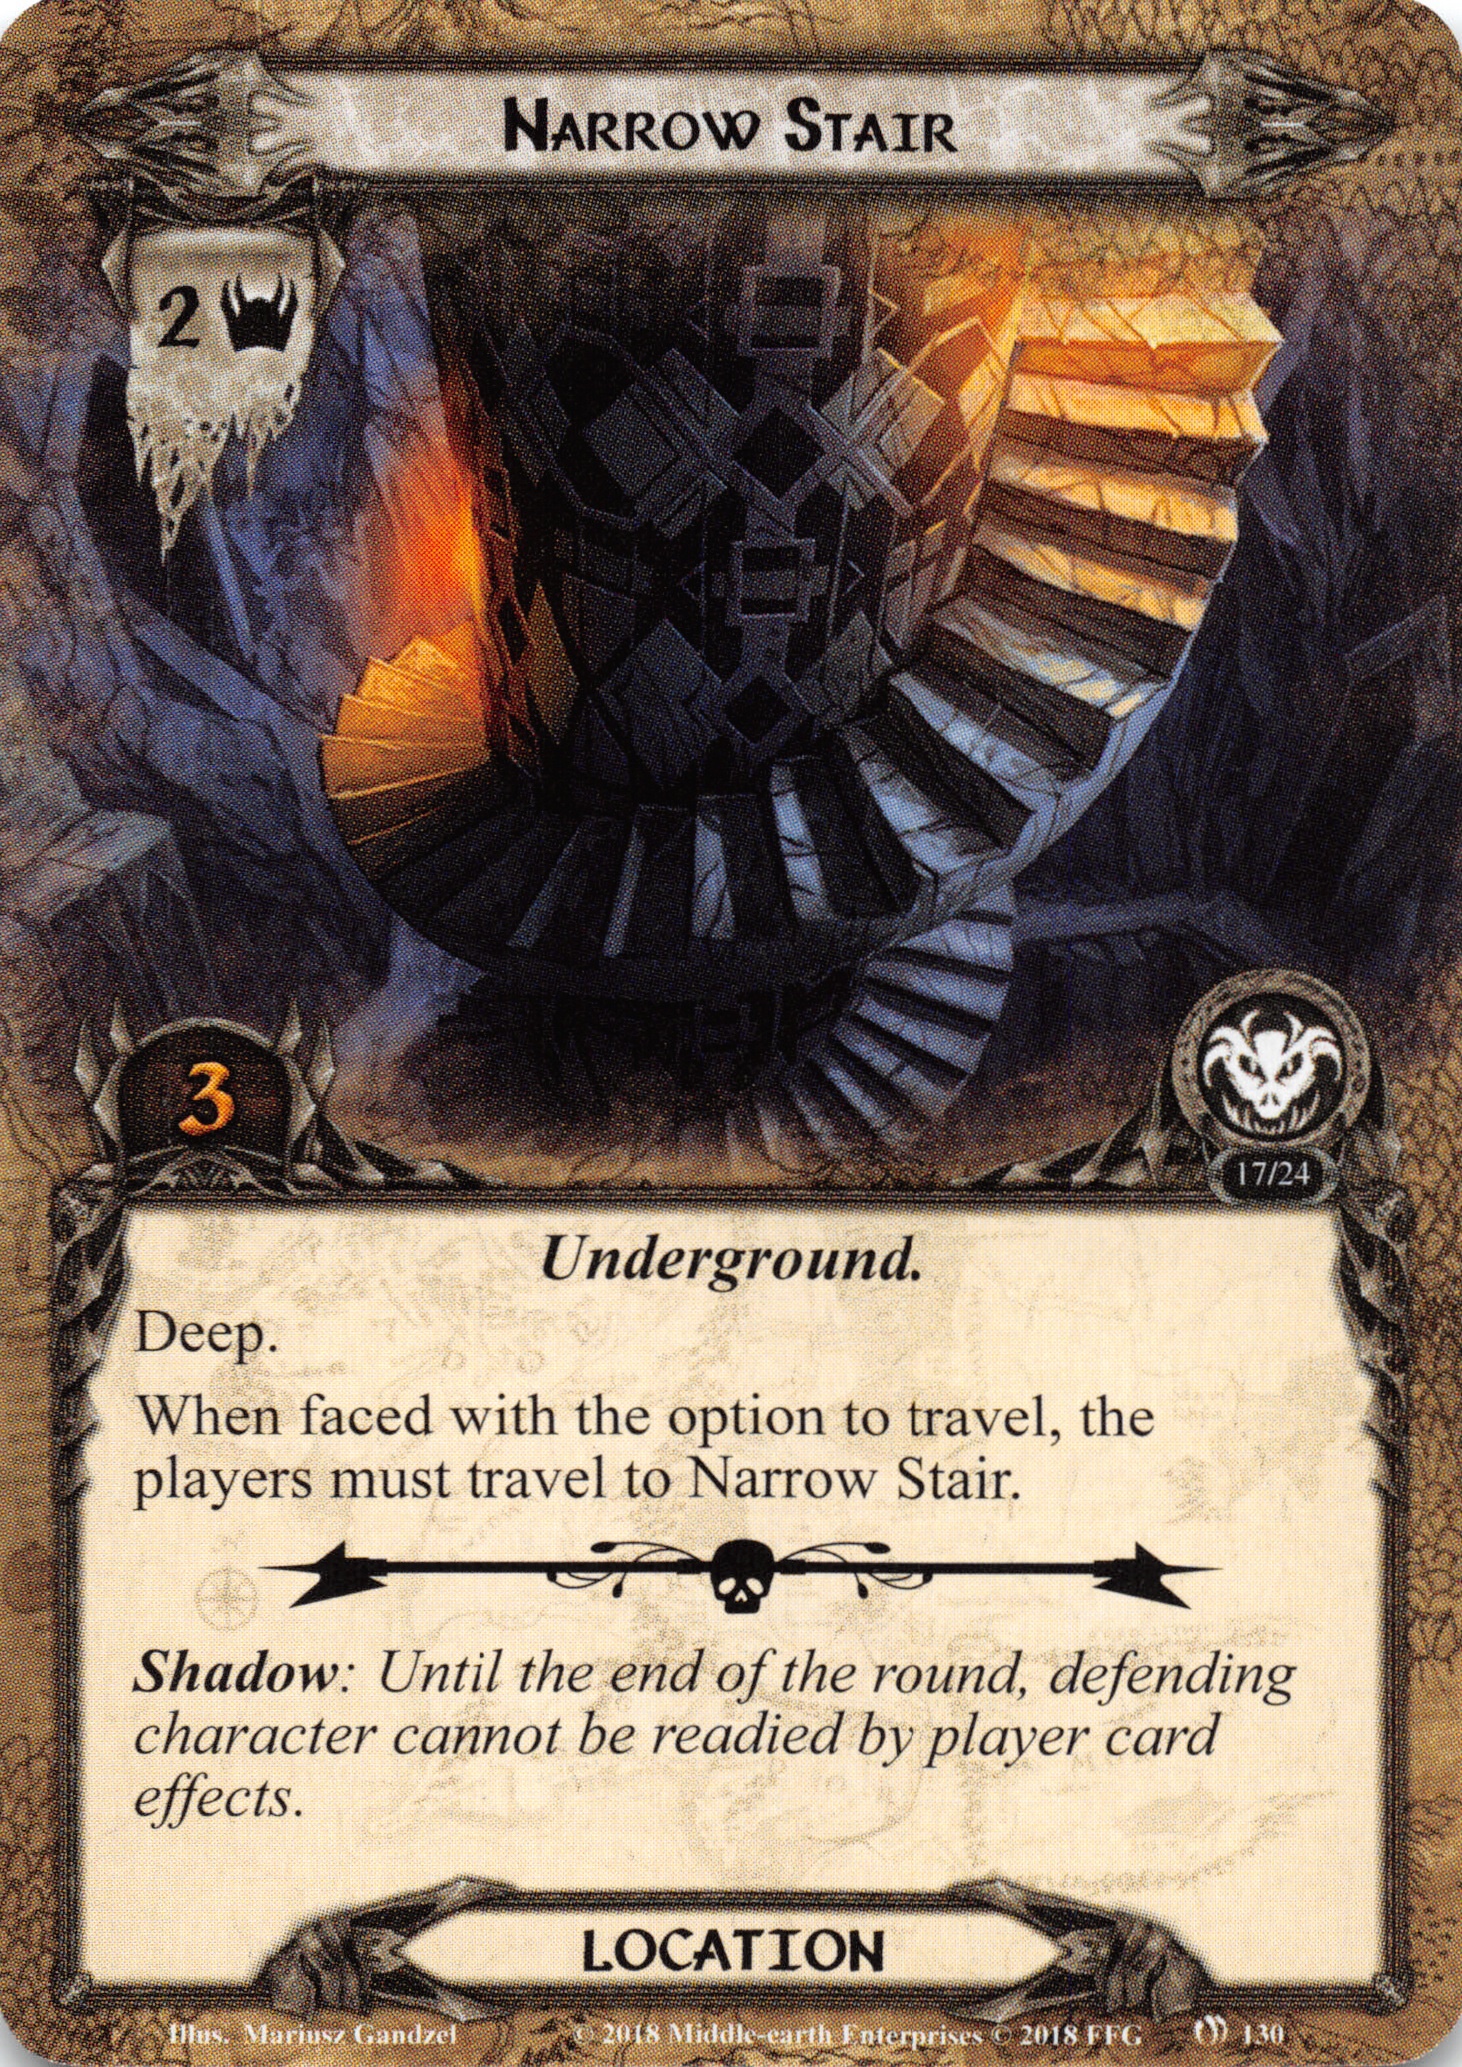
This location looks rather harmless, as it has little threat and quest points, but it can get very dangerous in some cases (if you can’t travel to a Mines of Gundabad, for example). Other than that, there is not too much to say here.
Desecrated Ruins
Again, a pretty harmless location with 2/4 stats. At least you think so until you see the textbox, which states that as long as there are three or more quest cards in the victory display, it gets +2 threat, bringing it up to 4. 4/4 are no joke, so you’ll want to travel here rather quickly.
Other locations in the encounter deck
Dark Tunnels and Forked Passages from the Deep Underground encounter set have already been analyzed in the article about The King‘s Quest, so I won’t do that again here.
Locations in the Caves deck
The cave deck in this quest is made of the Lost Caves encounter deck as previously, with the addition of two cards from Mount Gundabad and, ideally, a third one. As usual, you should try to be ready for some tough questing, harsh combat and nasty direct damage. Also, all of the Locations here have the underground trait and most also have the dark trait, enabling strategies using cards like Untroubled by Darkness.
The First Forge
Here you go, this is the place where you can reforge a sword for… nothing! This gets shuffled into the cave deck when you defeat The Upper Levels. When you draw it from the deck, the hero Wormsbane is attached to is exhausted and can’t ready while The First Forge is the active location (which can’t be changed because it is immune to player card effects). Ideally, it shouldn’t need more than one round of questing to explore it, this finishing reforming the sword.
Dagnir’s Hoard
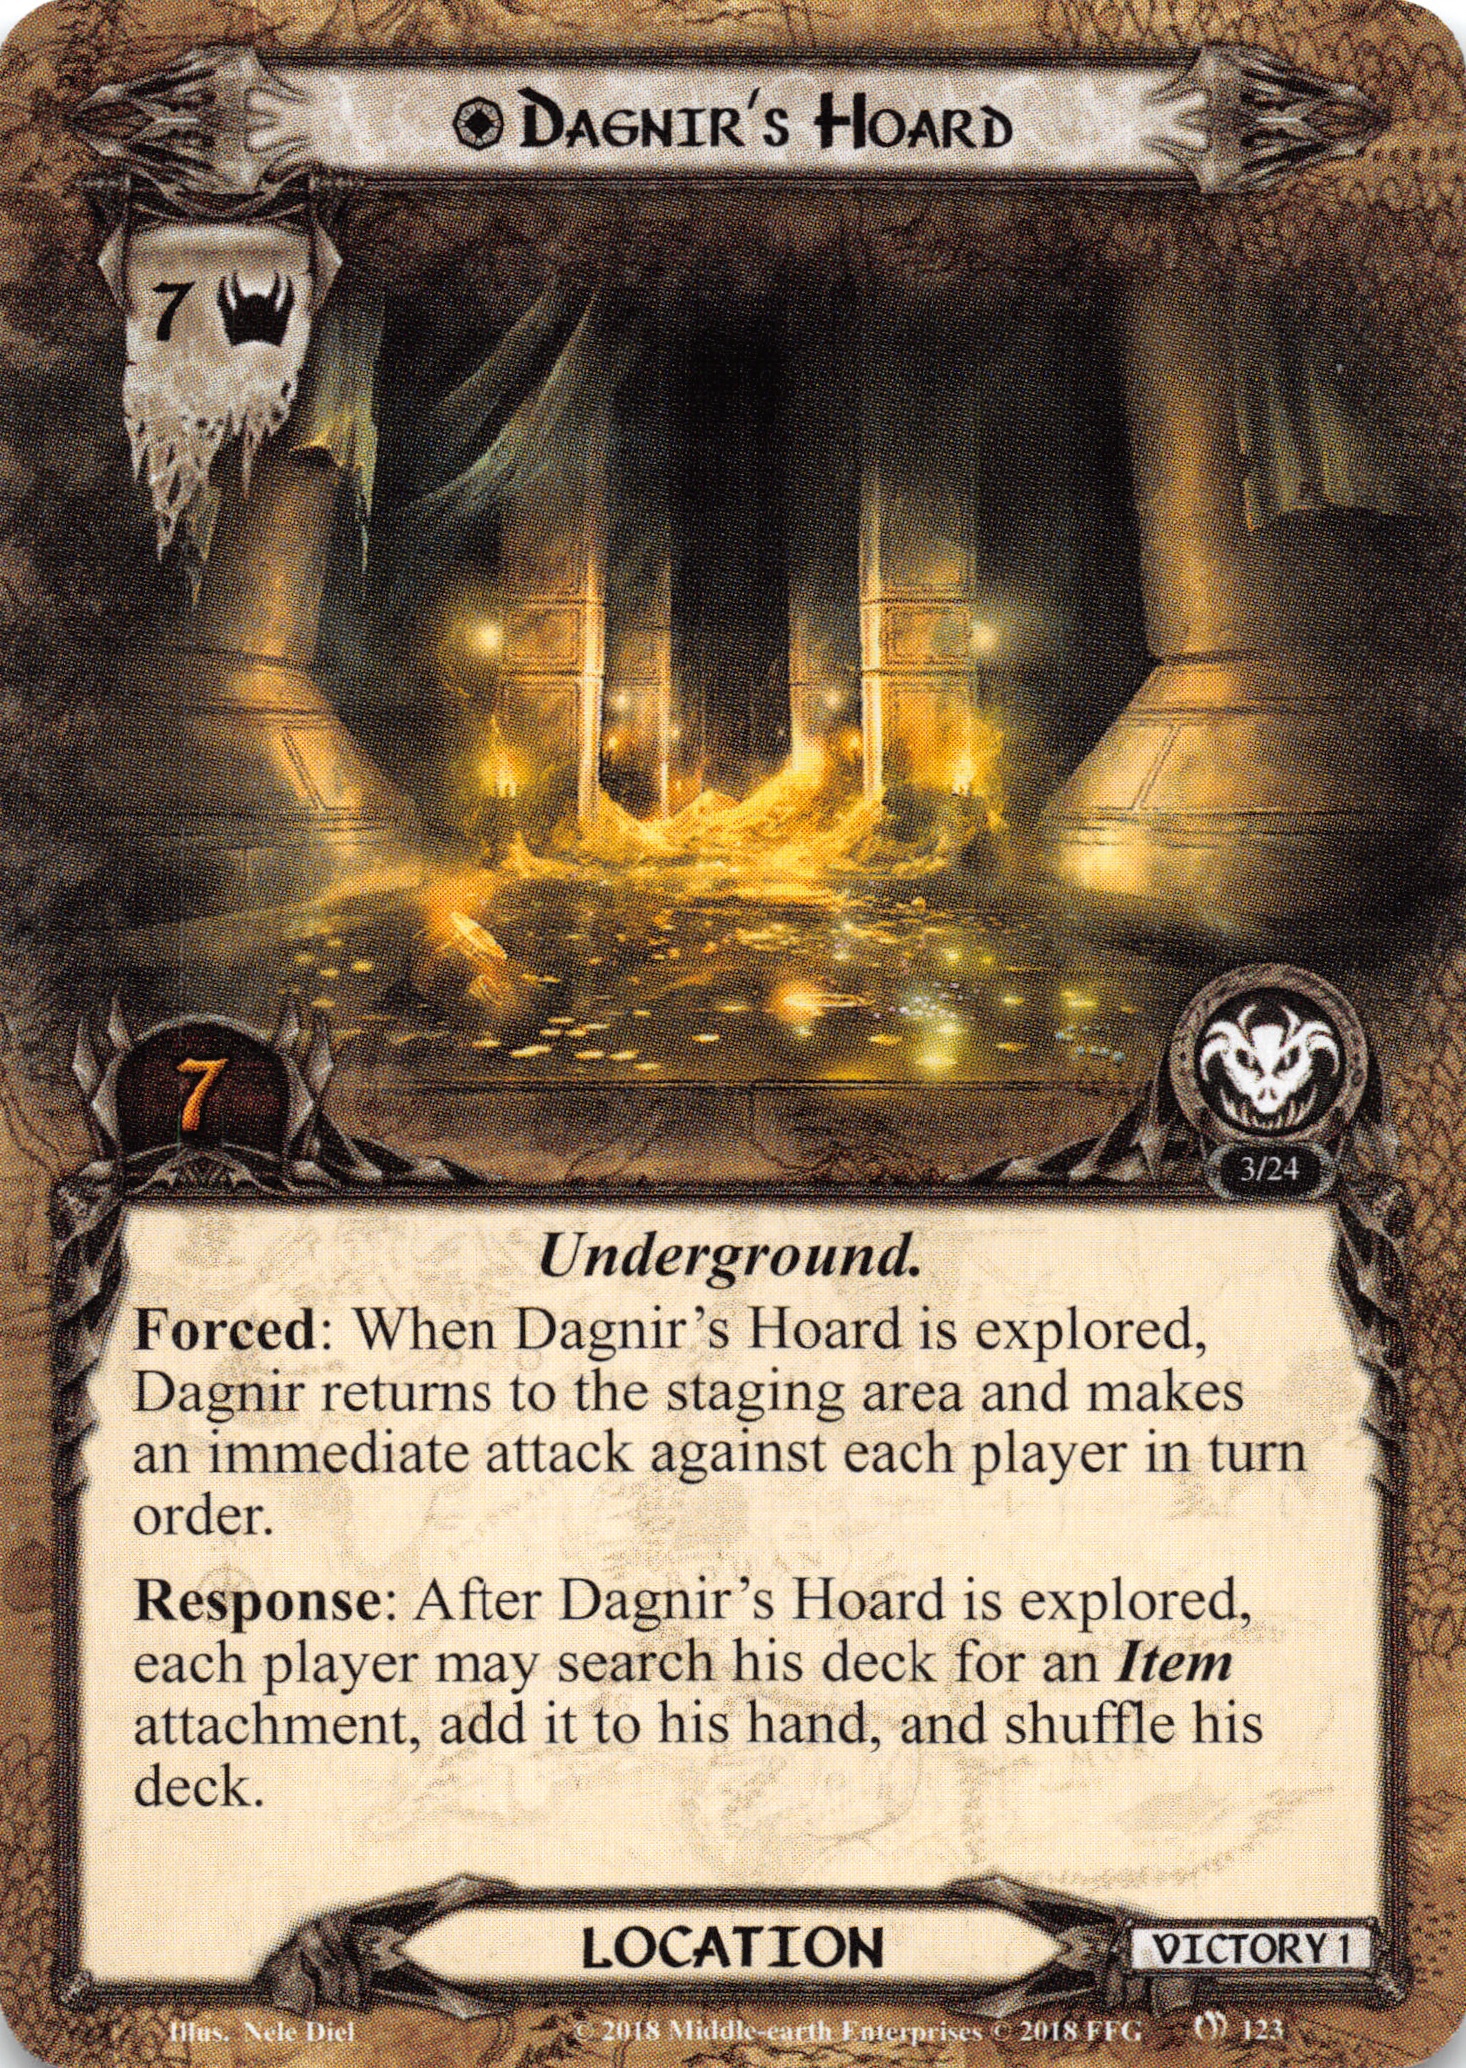
This location feels kind of strange, as this is presumably not going to be the active location when you have your stand-off with Dagnir. Also, Dagnir only reacts to your departure from this location, not when it becomes active. But as this is a dragon’s hoard, you can find some treasures here, which is represented by each player being allowed to search their deck for an item attachment when it is explored. Just watch out here and try to keep back a defender or chump when you explore this location.
Throat of the Mountain
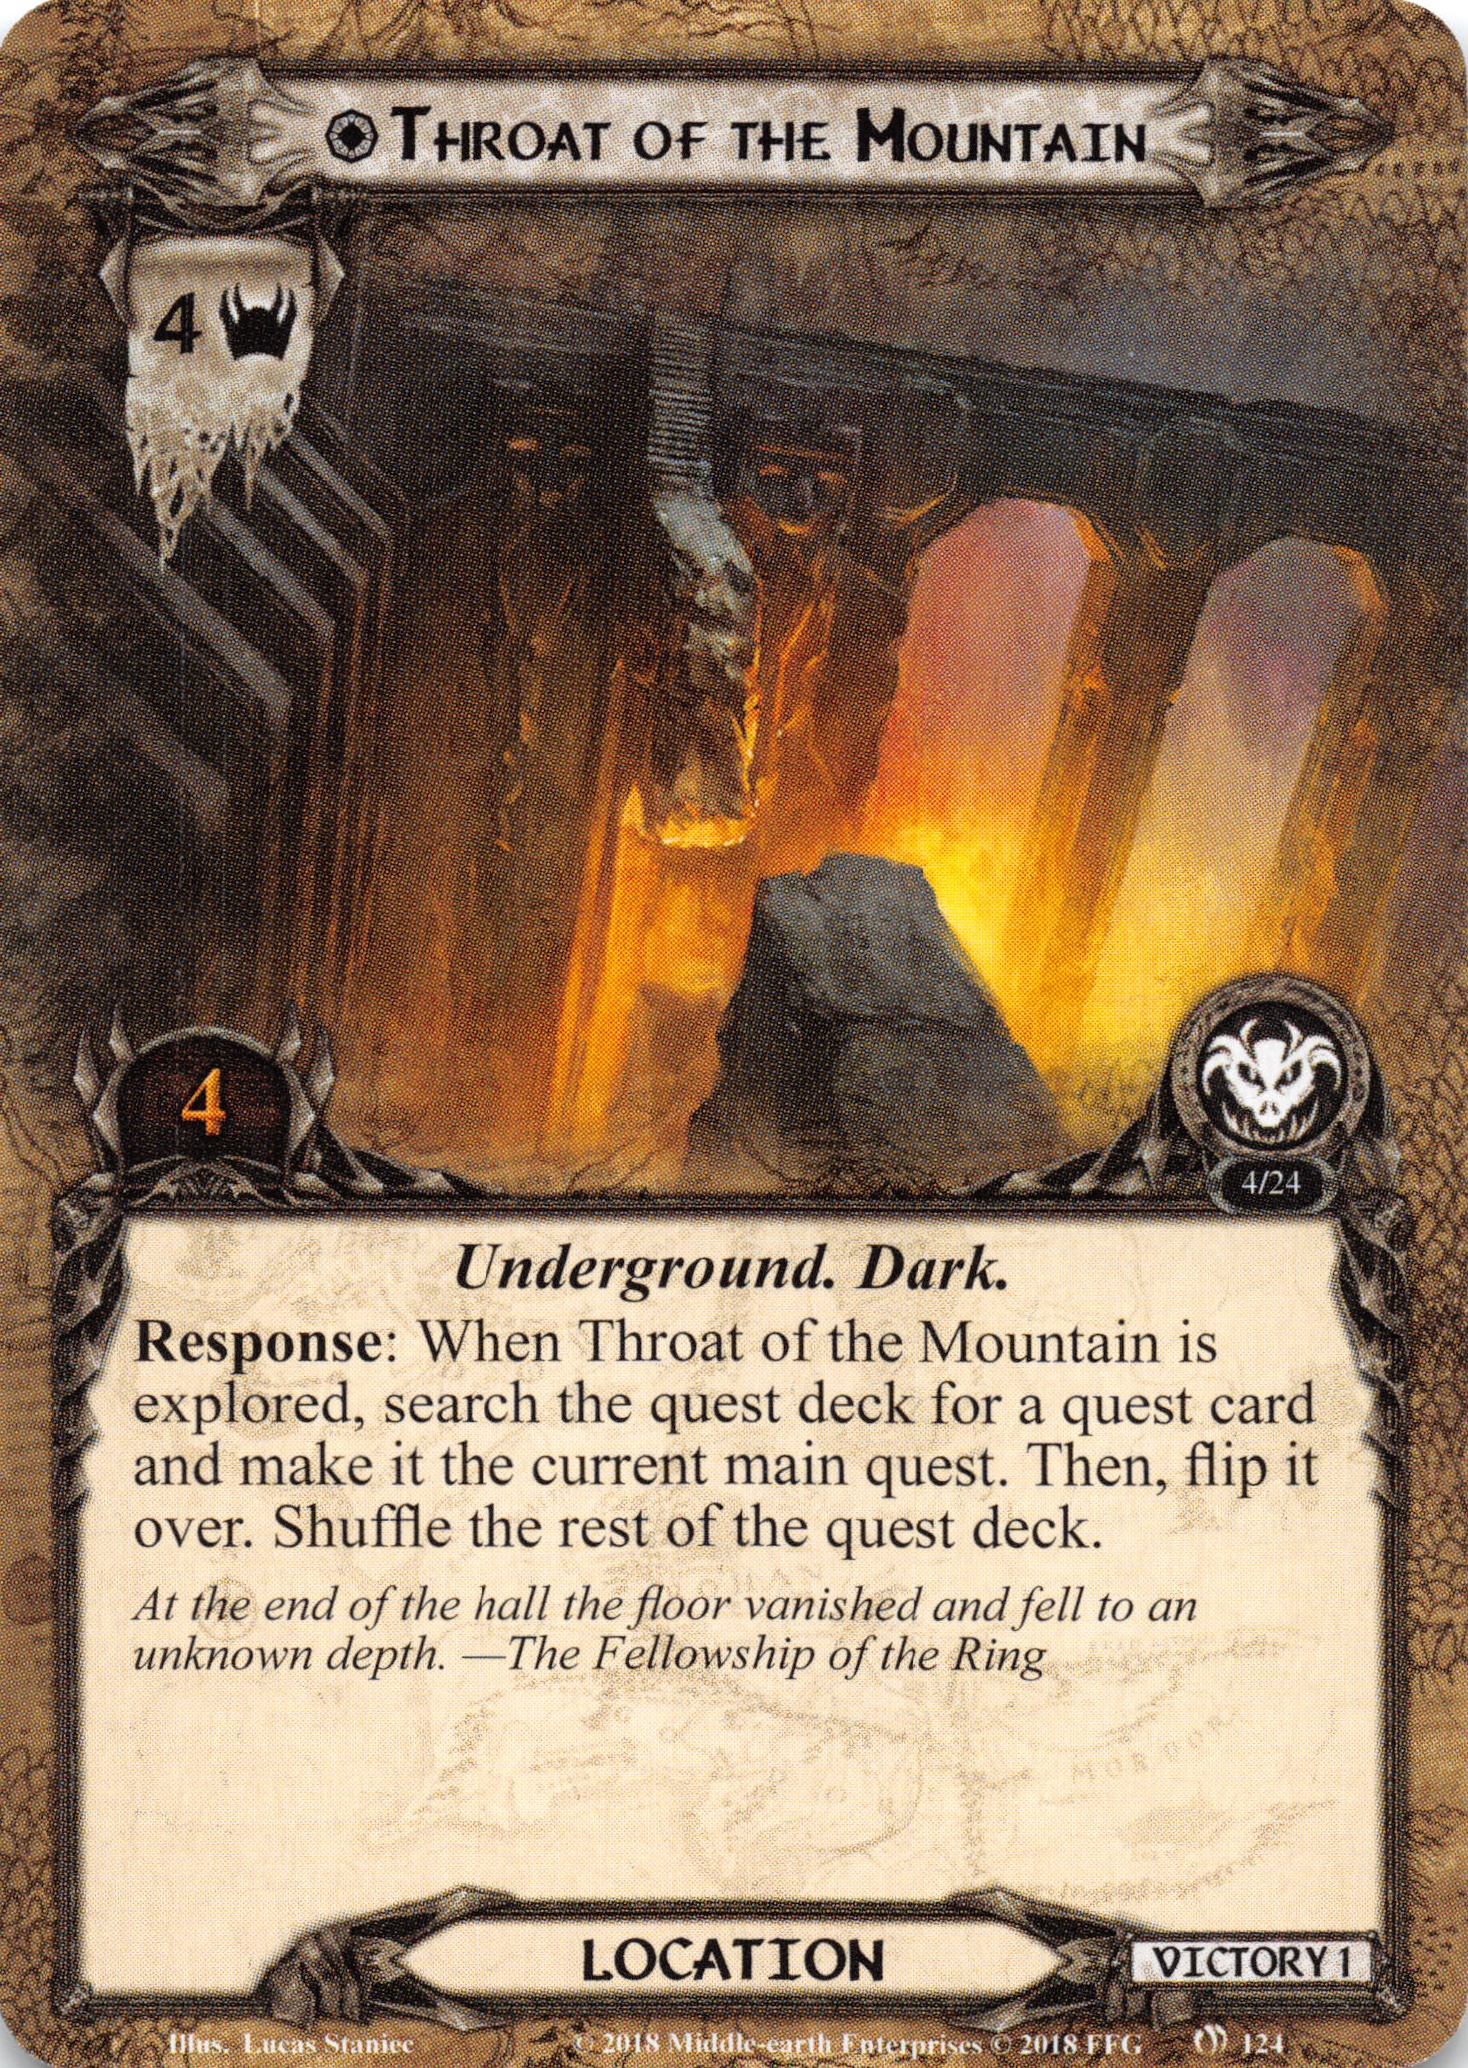
This location’s artwork reminds me of Erebor in the Hobbit movies, where the whole mountain is has been mined away in the middle, leaving a gigantic shaft. The location itself is also nice to reveal, as its exploration gives the players the opportunity to search the quest deck, make it the current main quest and shuffle the quest deck. In early game, this effect should be used to find The Upper Levels quickly. Later, it can save you some time getting to The Great Worm.
Other locations in the cave deck
The rest of the cave deck is made of the cards from the Lost Caves encounter deck. There are some beneficial ones and some pretty harmful ones, but they have, again already been analyzed in the The King‘s Quest guide.
Treacheries
The treacheries in this quest are mostly dangerous. There are immediate attacks, direct damage and threat increase, both in the staging area and against the players’ threat meter. Keep cancellation ready.
Wilderland‘s Bane
This is basically “the” Dagnir treachery. It makes Dagnir make an immediate attack against every engaged player, which can mean she’ll make up to four attacks through her own engagement effect. If there are no engaged players, she gains -30 engagement cost until the end of the round, definitely engaging a player during the next engagement phase. You can only get rid of her by advancing to a new quest stage, either by defeating or bypassing the current one. Note that this treachery is only a problem in Normal mode, as both copies are removed for Easy mode.
Suffocating Shadows
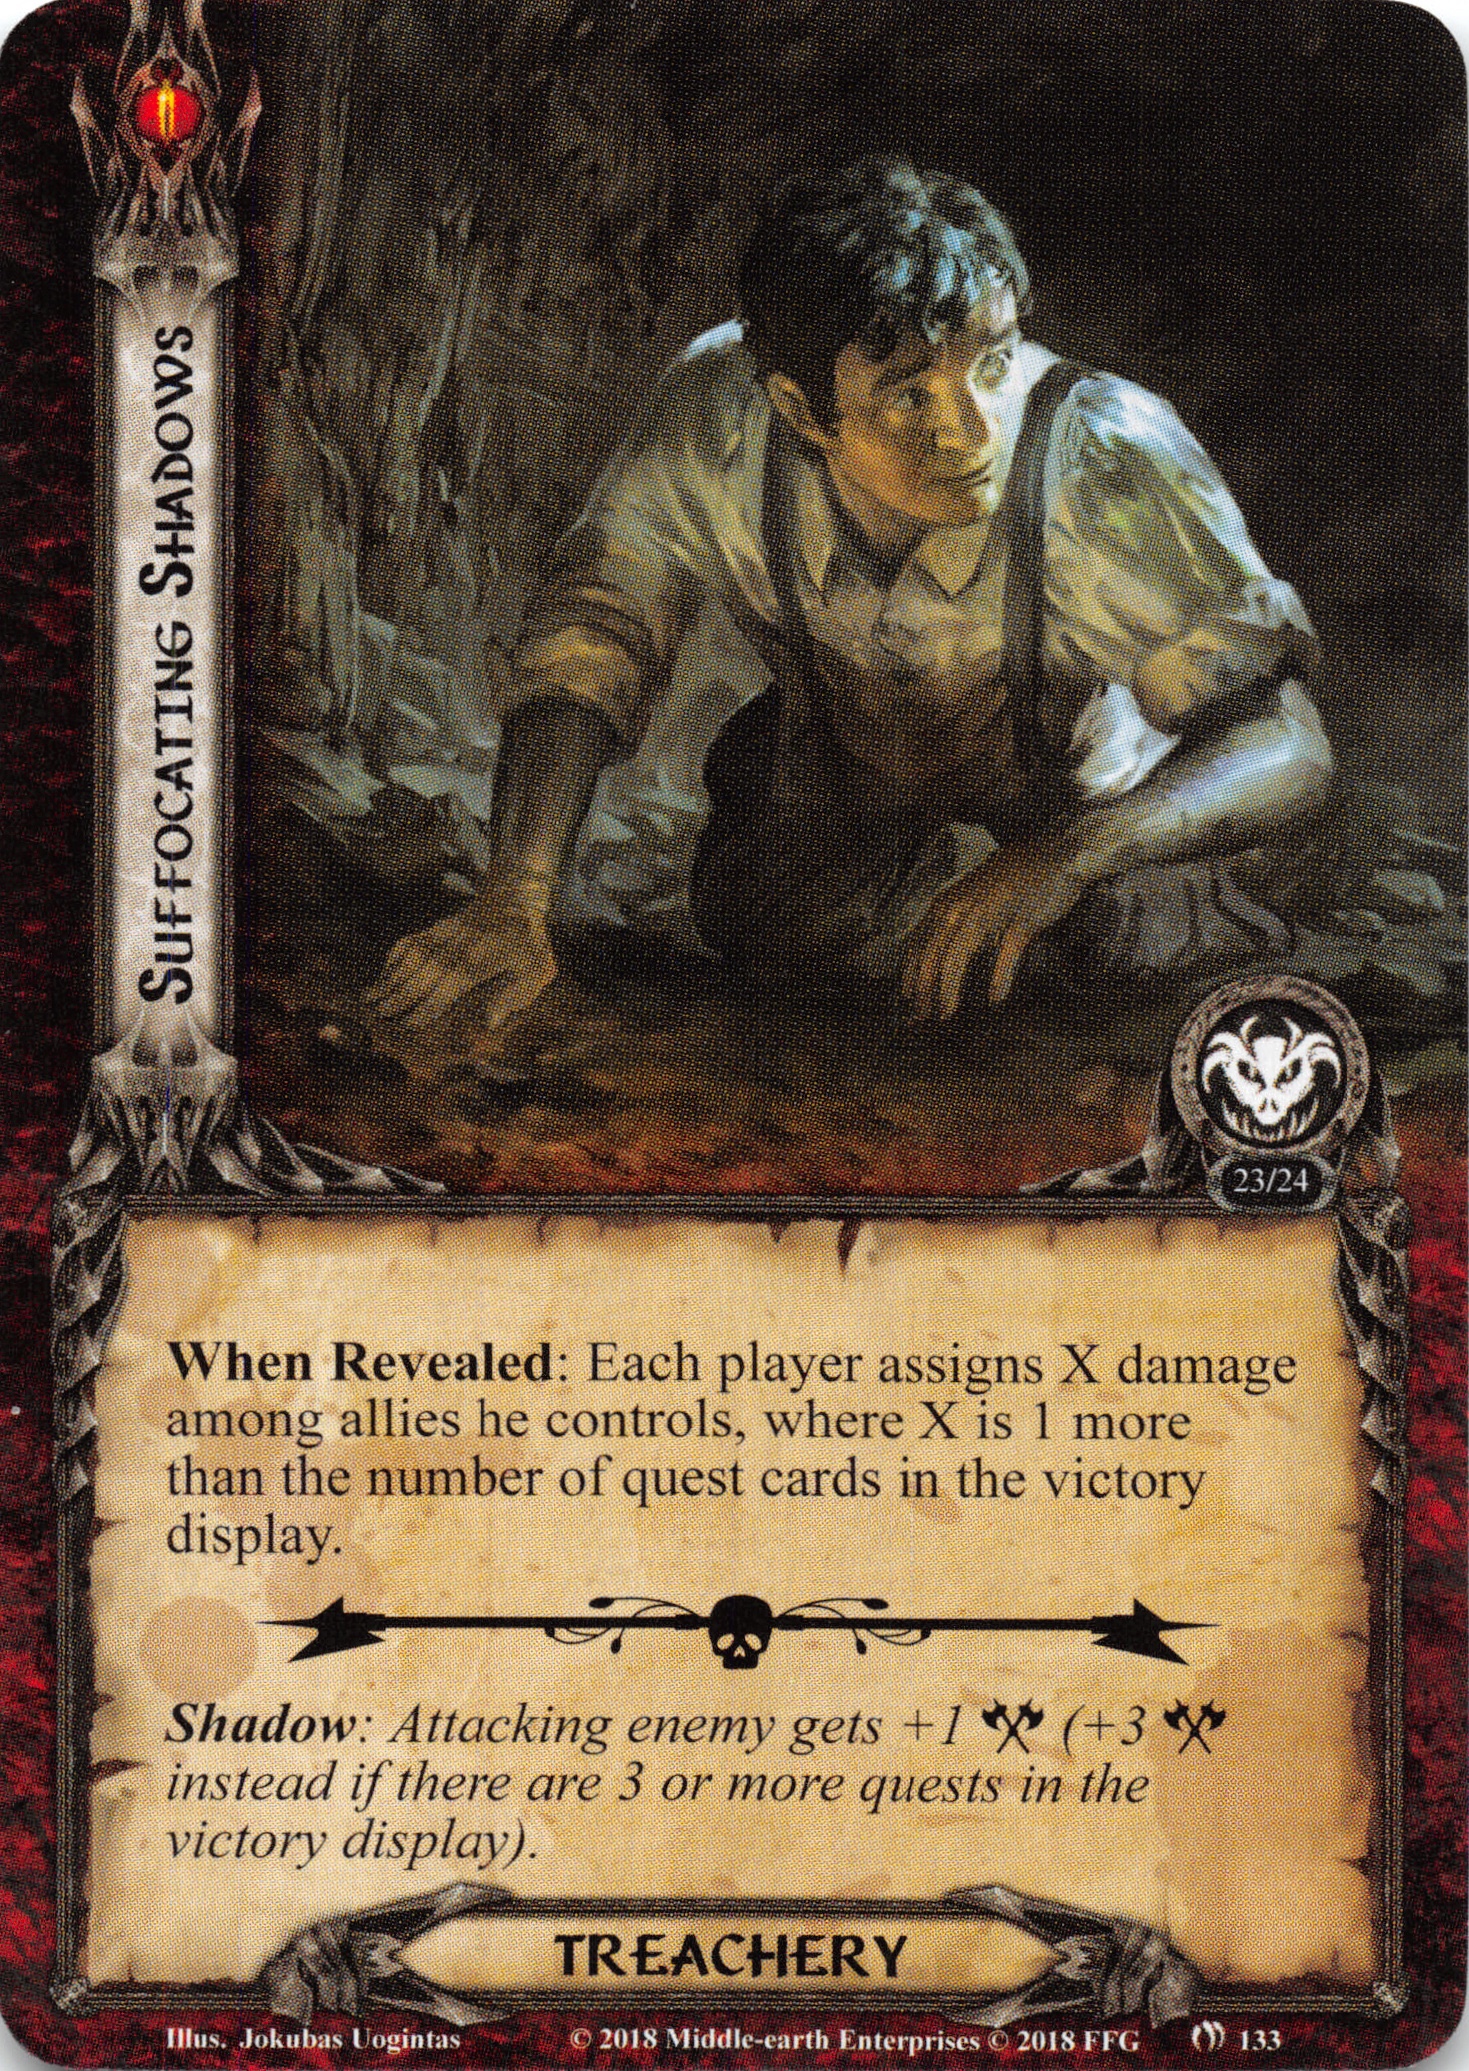
Aside from Dragon Breath, this is the only source of direct damage in the quest. That is not a reason to be happy, though, as both can deal LOTS of damage and kill characters. This card’s shadow effect is very strong, too, as it can easily increase an enemy’s attack value by three.
Other treacheries
Other treacheries in this quest come from the Dragon Might, Afraid of the Dark and Deep Underground sets, which have all been reviewed in the The King‘s Quest article.
Tips and Tricks
- Location control is not too important here. Rather try to build up good combat capability.
- Treachery/Shadow cancellation is going to be very useful to avoid nasty effects. Also avoid one-hp-allies and try to get a little healing in case your cancellation fails.
- Try to have some characters with manually variable willpower to avoid over-questing.
- There are only few effects that are punishing to specific deck-types, so you can run almost all types here. Hobbit decks are especially useful here, though, as Dagnir has an engagement cost of 50.
- Try to always have your strong defender ready to defend against strong attacks from Dagnir and the Trolls.
Playthroughs
This is a rather new and pretty wrinkled quest, so I was only able to find one playthrough:
- 2 players (Harad and Dale decks): https://youtu.be/DVMq-rk5Pwk
This concludes the Mount Gundabad scenario analysis. The blog will now circle back to the fourth AP in the cycle, The Ghost of Framsburg, which will release this month. From there, the conclusion of the cycle is next, and the blog can start its work on the 9th cycle of the game!

One thought on “Mount Gundabad”