
This is the concluding scenario of the Shadows of Mirkwood cycle. It is also one that I personally come back to every once in a while. It features a lot of strong enemies, brutal treacheries, and enough quest cards to make you stay in Mirkwood for a very long time. The quest is also very memorable if you have ever attempted it solo. I believe many of us did not make it very far. With all of these lovely effects and a whiny Gollum who keeps throwing Tantrums, it is time to close this chapter of the story with:
Return to Mirkwood
- Found in Return to Mirkwood Adventure pack, Shadows of Mirkwood cycle, pack 6
- Official difficulty: 7
- Community difficulty level: 7
- Encounter sets: Return to Mirkwood, Wilderlands, Spiders of Mirkwood
- Quest cards: 4
- Play if: you enjoy a challenge against tough enemies while escorting Gollum, you want to play a 4 player game that is exciting and has varying effects going off, you want to experience the end of this cycle once again.
- What is different about this quest?: Lots of tough enemies, Gollum objective that increases threat, very punishing treacheries, large changes of pace between stages
- Solo or multiplayer?: I dare you, double dare you to try and win this quest solo. This quest was designed to pass Gollum between players at least every round. As you add more players, the game will become easier.
- Can I run Side Quests for this scenario?: Not really, you have quite a few stages to go through before you complete the scenario. If you stall, your threat will become very hard to control and Gollum will throw more Tantrums. This quest will rely on speeding through to the end.
The Quest
Setup
The setup portion of this scenario will have players looking for Gollum in the encounter deck and discussing who is the best candidate to start guarding him. This usually tends to be the player with the lowest amount of threat, who wasn’t planning on running Secrecy (don’t bring Secrecy to this quest). Then, that player gains control of Gollum as an ally. To start the game off, each player must reveal an encounter card from the deck and add it to the staging area. The worst thing to reveal now would be a tough enemy, as you will probably not be outfitted to handle heavy combat during round 1. From here, the quest continues as normal.
Quest card 1: Through the Forest – 12 quest points
Nothing special about this part of the quest. Try and get a questing army off the ground to prepare for the next stage. The 12 progress tokens will require some time to clear so you can take it slow. Do not just sit on your ass though, as your threat will start to rise quickly. Take this time to avoid higher engagement cost enemies and build up your board state.
Quest card 2: Escape Attempt – 3 quest points
I thought we left the escape tests in the Dead Marshes? Oh well, Gollum tries again to escape during this part of the quest. This causes the player guarding Gollum to be unable to commit to the quest unless he is the only player in the game. In 2 player, this is the more difficult part, as you lose half of your questing power, but still, need to reveal at least 2 cards. Coordination between players is key here, as the person with the least questing capability should be guarding Gollum at this point. During the stage, if ever the players quest unsuccessfully (threat is higher than committed willpower) Gollum escapes and you have failed the game. This is an early defeat and will allow players to face a different scenario with the spare time they have left. If the players are successful in questing against this stage, they are quite likely to make all 3 progress required for this stage and pass on to the next.
Quest card 3: To the Elven King’s Halls – 7 quest points
This is where solo games tend to hit a brick wall. The only text on the quest card is that the player guarding Gollum cannot play cards from his hand. This does not include playing stuff off the top of your deck with Gandalf or Vilya, nor does it limit you playing cards from the discard pile like Glorfindel and Elven-Light. Every other player in the game can play cards like normal. Make sure to switch control of Gollum between players to have everybody play what they have in hand. The 7 quest points required for this stage are quite easy to gather if you are playing multiplayer. This allows players to pass to the final hurdle.
Quest card 4: Ambush – 2 quest points
Not really an ambush if you managed to kill every enemy in the game, but otherwise the player who is guarding Gollum better get his defenders ready. At the beginning of the combat phase, all enemies engage the player who is guarding Gollum. You will be able to choose who to have all of these enemies engage if you have a Wood Elf Path in the staging area where you can travel to in the Travel Phase. Dunedain decks will be good options as they benefit a lot from having enemies engaged with them. Having a lot of Mirkwood Bats in play at this point can cause the player guarding Gollum to lose at this point, try to kill these bats with direct damage before they engage. The rest of the quest is simple, kill everything in play and make 2 progress to win. However, you will have the chance of revealing more enemies if you need another round of staging. Having Tactics Legolas in play to put 2 progress on the quest is important to prevent this. It is also thematically a home-run (literally, as you are near his home). Having sufficient ranged and Sentinel characters on the board will allow the player guarding Gollum to survive the onslaught of enemies engaged with him.
Once every enemy is dead, you have won the game and have delivered Gollum to Thranduil. This brings an end to your adventures in Wilderland for the next 6 cycles.
The Encounter deck
Global
- The Encounter deck contains 53 cards in Normal mode, 35 in Easy. This does not include Gollum
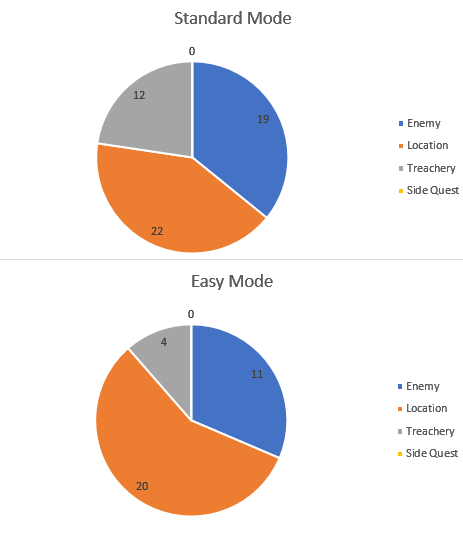
- Shadow effects are on 38% and 34% of the cards between the two modes
- Average threat ranges between 1.3 and 1.5 between Normal and Easy mode
- Surge is present on 5 cards, this is a chance of around 1 in 10 cards that adds additional cards to the staging area
- Doomed is again not present on any cards. Be careful that there are enough other effects that raise threat though
- No cards are immune to player card effects
The deck contains a high number of locations, be sure to bring some location control for these. They usually don’t have many quest points on them, so you should be able to clear it instead of travelling. Shadow effects are on about 1 in 3 cards, this can make the Wargs a bit of a problem where they return to the staging area after they attack. When playing Easy mode, a lot of the treachery cards are removed, but at least 1 of each Tantrum remains in the deck. Attercop, Attercop is only a threat if you are playing Normal mode, the 3 copies get removed in Easy mode.
Objectives
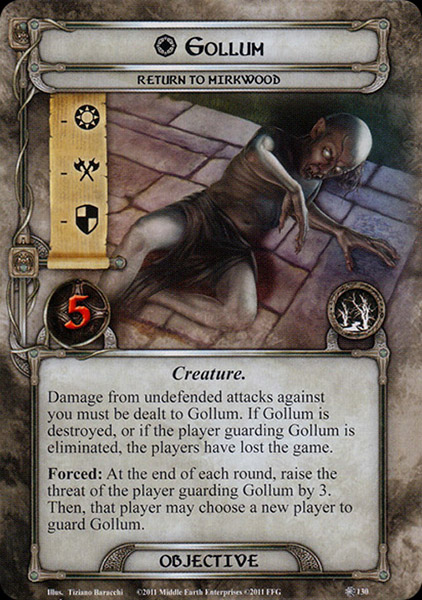
Gollum returns as an objective in this scenario. This time, however, he is a fully fletched objective ally that is incapable of questing, attacking, and defending. Besides that, he is able to be targeted with effects and is under the control of the player guarding him. This means you are able to exhaust him for effects like King Spider. He has no willpower, attack strength or defence strength, which will not allow you to increase those numbers. He does have hitpoints though, which are able to be healed.
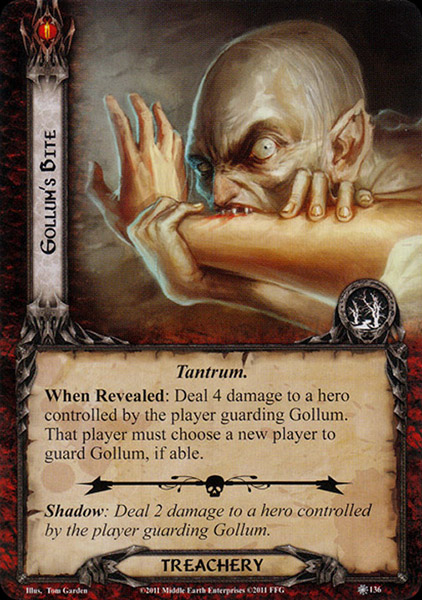
Damage from undefended attacks must be dealt to Gollum. This means that if you find yourself swarmed with little enemies, you will have to defend them all or risk Gollum taking damage. If he ever has 0 hit points, he is dead and the players lose the game. Alternatively, if all the heroes of the player guarding Gollum die, that player is defeated and the game is also lost. All in all, the player guarding Gollum has to be careful not to die, which is a real possibility with effects like Gollum’s Bite and Attercop, Attercop
The final Forced effect on Gollum is one of the reasons why you should run this scenario in multiplayer and change the player guarding Gollum on a regular basis. At the end of the round, when you would normally add 1 threat to your threat meter, you must raise your threat by an additional 3 points. This is a total of 4 threat each round. That is one Elrond’s Counsel and a Galadriel ability per round worth of threat. To lower your threat consistently, you will have to play the Galadhrim’s Greeting time and time again. The increase in threat will make Combat more difficult and presents the players with the real threat (haha) of getting to 50 threat quickly. Getting higher threat cost will have enemies like the Hill Troll and Hummerhorns engage you early, making things very difficult for the players. I would advice starting below 25 to buy yourself some time and run some threat reduction effects. Lore Aragorn can really shine if he is timed right.
Locations
Mirkwood is a big forest, and easy to get lost in. The scenario adds 4 different types of locations to the mix to make the quest more difficult. However, there are a couple of silver linings for the players if they manage to find certain locations. The locations do not require much progress and they are not a big threat in the staging area as well. However, The East Bight and The Brown Lands are also included, providing big buffers in terms of threat and quest points.
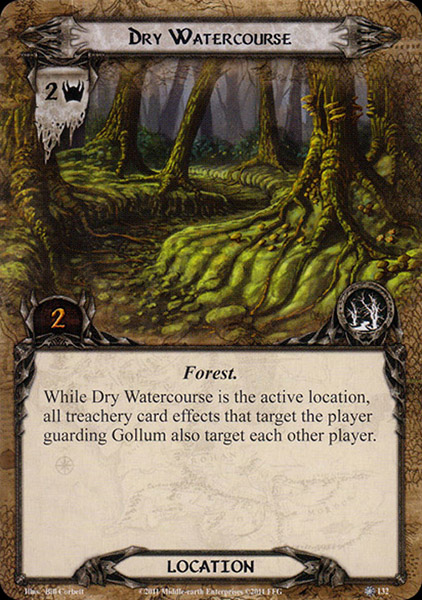
- Dry Watercourse: Definitely the worst location out there. The Dry Watercourse has the static effect when it is active where all treachery cards that target the player who guards Gollum, target every other player as well. These tantrums are game-changing, so having these go off on as few people as possible is definitely a good idea. Ergo, don’t travel to this location and clear it with location control. 2 quest points should be easy to overcome. If you are playing solo, you are free to travel to this location, as the effects will target you regardless.
- Woodman’s Glade: Another 2/2 location that we have come to know during this cycle. Woodman’s Glade is a beneficial location if you are playing with multiple people. Once it is explored, every player who is not guarding Gollum gets to lower their threat by 2. While this isn’t very much, it might just save you from threating out for a turn. In solo, this location does nothing besides requiring you to exhaust a hero to travel there. However, the location doesn’t have to be active and then explored to lower the threat, you can perfectly clear it with Asfaloth in the staging area and lower your threat by 2 (as long as you aren’t guarding Gollum).
- Wood Elf Path: Have a lot of enemies or treacheries crippled your board state while you are guarding Gollum and is someone else better equipped to handle him this turn? Travel to Wood Elf Path. Though the 1 threat doesn’t mean that you absolutely have to travel there, it is nice to have the option during the travel phase. This will make sure that Attercop, Attercop doesn’t engage you, but another player. Again, in solo, the response is useless as there are no other players who can guard Gollum.
- The Spiders’ Ring: This is the exact opposite of Wood Elf Path. As long as this location is active, the player guarding Gollum cannot change. This means that that player has to raise their threat for at least another turn and will be subject to all the terrible effects that focus on that player. However, the keen-eyed among you have already noticed that this location has 2 quest points, which means that it is very easy to get rid of. You will probably not have to travel to it unless you are playing solo.
Enemies
There are plenty of horrible enemies in this encounter deck. Most of them you will have seen before like Ungoliant’s Spawn and the two Hill Trolls. But this encounter deck has also got a couple of smaller enemies that tend to provide the players with a lot of trouble since they can’t be left undefended by the player guarding Gollum. To illustrate the difference between these two types of enemies, the expansion features 1 for each type:
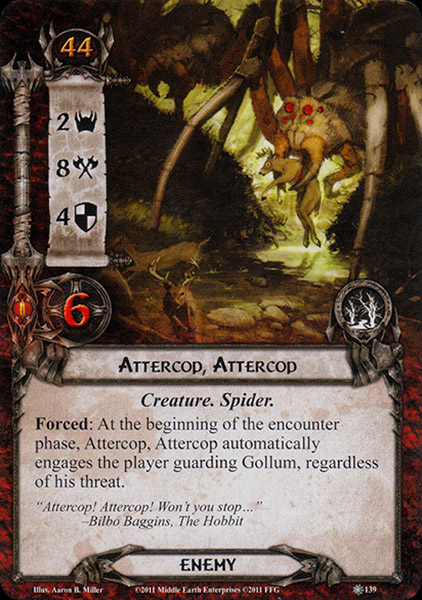
- Attercop, Attercop: Yes it has a base 8 attack strength, yes it has a 4 defence and 6 hitpoints, no it is not the final boss of this scenario. Even worse, this spider has 3 copies in the encounter deck which can make the final stage of the quest very difficult. The best bet to defend this massive spider is to use chump blockers or an incredible defender with perhaps Blood Of Numenor. Be careful that you have Shadow Cancellation in your hand if you decide to block the attack, as Despair will absolutly wreck the defending character if it comes up as a Shadow card. Try to pile all the damage onto this spider at once so that its high defence has only to be conquered once. The 6 hitpoints make it strong enough to withstand a lot of direct damage, so unless you play a dedicated direct damage deck, you will have to suffer at least 1 attack from these spiders. Remember that you will be able to use a Forest Snare to prevent them from attacking you. Its forced effect will make it engage the player guarding Gollum at the beginning of the encounter phase. Drawing this enemy during setup or the early rounds of the game might be enough reason to scoop and reset the game. if you can’t handle these spiders, try the scenario in Easy mode. All the Attercops are removed and you may enjoy the game a bit more.
- Mirkwood Bats: Though the spider is annoying, the Mirkwood Bats are fearsome in their own way. Their stat line of 1/1/1/1 is nothing special, but they surge into more cards and have a devastating forced effect. If the Mirkwood Bats engage any player, the player guarding Gollum must deal 1 damage to each character he controls, including Gollum. If one of his heroes has barely survived a Gollum’s Bite, that hero is now dead unless you have healed him in the meantime. The low engagement cost of the bats will mean that they will be coming down the turn they are revealed unless you can kill them with direct damage (Thalin comes to mind) or if you use Ranger Spikes. However, they will still surge if you manage to get the trap on them. Thalin is your best bet against these Bats.
Treacheries
Gollum doesn’t like the fact that he is captured (who’d guess?) and will throw a tantrum on occasion to make matters more difficult for the players. These Tantrum treacheries are very much worth cancelling, as they are potentially game-ending. Each of the Tantrum cards also has a Shadow effect that is the same as the treachery, but at half the threat, cards or damage.
- Wasted Provisions: This is probably the best out of the 3 to reveal. Wasted Provisions will cause you to discard the top 10 cards of your deck, losing access to the cards unless you can bring them back somehow. Back in the day of pre-patch Caldara, this effect benefitted the players, as you were sure to discard some handy allies that you can revive. Nowadays, Dwarven mining decks and Noldor will greet this effect and actually benefit from it.
- Gollum’s Bite: Yeah, not a lot of heroes can take this amount of punishment from Gollum. Out of the 106 heroes released at this date (up to Crossings of Poros), only 21 are able to take the 4 damage and live if they have no other damage on them (not counting alt art and Fellowship Aragorn). Only Beorn will comfortably take this damage. You will need to bring damage cancellation or healing in order to survive multiple bites.
- Gollum’s Anguish: Doomed 8 for the guarding player, plain and simple.
It should be noted that players are forced to choose another player to guard Gollum after any Tantrum. This is to prevent somebody from emptying his deck, threating out, or losing a couple of heroes. However, if Dry Watercourse is active during any Tantrum, all players will have to resolve the effect.
Tips and Tricks
- Gollum is a Creature ally and can, therefore, be healed by Radagast. This will prevent Gollum dying from a lot of undefended attacks. Other healing options are also good to include. Make sure you take as few undefended attacks as possible to prevent damage on him.
- Try to change the player guarding Gollum whenever you can so that all players raise their threat evenly. The increase of 4 per round will really hurt if a single player happens to be the player guarding Gollum at the end of every round. However, if that player brings Lore Aragorn, he can drop his threat to the starting level at the refresh phase. This will keep everyone’s threat low enough by having 1 player take all of the threat and then dropping back down. Adding Desperate Alliance to the deck will allow this effect to be repeated between players.
- A lot of locations have 2 or fewer quest points before it is explored. Bringing Asfaloth or Evening Star will clear a lot of these. This will prevent you from getting swarmed with locations in the Staging Area.
- Thalin has got some great targets for his ability with the Mirkwood Bats, they will not surge if you kill them straight away. You will also not have to engage them so no damage will be dealt to your characters.
Playthrough
- Progression style, 2 players: https://www.youtube.com/watch?v=pWJZO1oZ9_k
- Progression style, 4 players: https://www.youtube.com/watch?v=H3bL6yN3dWs
- 2 handed, modern card pool: https://www.youtube.com/watch?v=LCeVpYB0m1Q
So ends this first cycle of the game. Overall these quests are not often played on a regular basis by people who have an extended card pool. However, it feels good to return to the roots of the game every once in a while to discover the birth of ideas in the developer’s heads. These ideas are later expanded upon or improved. The time mechanic from the Ringmaker cycle originates from the Rhosgobel quest where you have limited time before you lose the game.
All in all, the cycle is not perfect, but some difficulty and the fixing of mechanics is done with the Nightmare packs. I do not own any so I will not be able to do reviews on them anytime soon. If you would like to analyse a Nightmare version of a quest, contact me.
Now our paths bring us closer to the looming mountains of mist. What secrets lie beneath the snowy peaks in eternal darkness? Only the Dwarrowdelf cycle will reveal this to us. Next time we travel Into the Pit!

6 thoughts on “Return to Mirkwood”