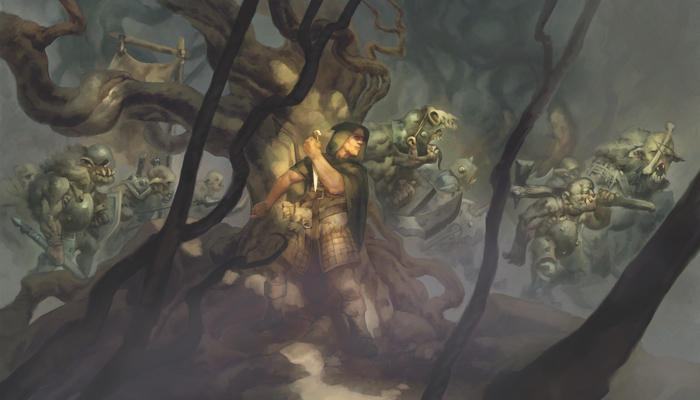
As the first quest of the new Angmar Awakened cycle, this was the first time for many players to come into contact with encounter side-quests. This quest was perfect for those, as there is just 1 main quest stage that has to be defeated, but the enemy is giving you side quests that hurt you if you do not clear them in time. During this quest, players will be hunting a War Party heading to the Breeland. In order to stop them, players will have to engage and kill various enemies in order to reduce the threat they pose to the surrounding lands. With new objective allies and a whole new card type, it is one of the most played quests from this cycle, and not too difficult, yet thematic.
Intruders in Chetwood
- Found in: The Lost Realm Deluxe box, quest 1
- Official Difficulty: 4
- Community Difficulty: 5.7
- Encounter sets: Intruders in Chetwood, Iârion, Angmar Orcs, Eriador Wilds
- Quest cards: 1, but with various encounter side quests
- Play if: you want a decent testing quest for your decks and enjoy a challenge, you want to experiment with a side-quest deck that doesn’t run so many side-quests on its own, you want to feel like a hunter taking down prey as you stalk the enemies through the forest.
- What is different about this quest?: Enemies make no engagement checks, a boss level enemy must be killed in order to win, side-quests will take priority over the main quest at times.
- Solo or multiplayer?: I will say that this quest can be enjoyable in any player count, but gets a bit easier when you add more players to the mix. Solo games tend to last a while as the player has to make all 30 progress while also keeping enemies at bay and getting rid of side-quests. In higher player counts, the players will have to deal with more War Parties that are likely to be revealed. Having a location management deck will also be a boon to the players in 3 or 4 player games.
- Can I run side-quests for this scenario?: Not really, the encounter deck will provide you with side-quests to clear. There is no time to waste on your own side-quests, as there will be enough quest cards out there that will all be a good target to quest against. Putting more quest cards out will actually hurt you with effects that scale to the number of quests in play.
- What to look out for?: Many quest cards in play, massive boosts in threat if enemies aren’t engaged, side-quests that have a big impact on your game, finding the good balance between combat and questing, enemies bouncing back to the staging area, only engaging 1 enemy per round per player.
The Quest
Setup

The game begins by giving the first player control over the Iârion objective. This ally will stay with the first player during the entire quest, switching between players if there are more than 1 player in the game. Then, 1 copy of the Orc War Party gets added to the staging area. This prevents the players from winning the game through progress alone, as the War Party must be out of play before players can win the quest. Besides this 3 threat enemy, the players will also each have to pick a different location and add it to the staging area. In multiplayer, this can start a location lock right out of the gate, so have at least some location control in play at some point to alleviate the pain a little.
The players will have 5 options to choose from when it comes to picking the location. In a 4 player game, the choice will be fairly simple, as the Outlying Homestead is probably the worst pick and should be excluded. This does mean that you cannot avoid its 1 threat, but its static effect will hurt your start way more than the other locations. For true solo players, the Shrouded Hills should definitely be your pick, as it removes a surging card from the deck and is only a 1 threat location. This makes for a good start to the game. For more players, I would advise adding Rugged Country – Chetwood Forest – Borders of Bree-land in that order. This should give you the best start you can get against this scenario. Your opinion may differ, so experiment with other locations if you want. Once the players have added the locations to the staging area, they flip the stage and can begin the first round.
Quest card 1B: Stop the War Party – 30 quest points
Yep, that’s right, this is the only quest stage of this scenario. But don’t be fooled, 30 quest points will take a while to obtain, especially in solo games. The players will also be distracted from the main quest by the various side-quests in this scenario. This quest will always be in play and can only be defeated when the players control Iârion, have 30 progress on the stage, and have no Orc War Parties in play. All of these criteria will have to be met, but players should first focus on getting some progress on this stage. There are 3 copies of the War Party in the deck, so killing the one in the staging area doesn’t guarantee victory.

Players can also not win this scenario if the Rescue Iârion side-quest is in play. This will take top priority when it is revealed, as the players may very well lose the game if they let the Orcs get away with their objective ally. Rescue Iârion is the only side-quest that must be completed in order to win, but only if it is revealed. More on this side-quest will be handled later. The other side-quests are not mandatory to be completed but will start to hinder you by blocking progress or boosting enemies. While you don’t have to clear these side-quests, you will be thankful if you do defeat them. Whenever a side-quest is explored, it is added to the victory display. This removes it from play so that cards like Shrouded Hills or Weight of Responsibility no longer count it.
The enemies in this scenario will never make engagement checks against the players. This means that generally, the players can only optionally engage enemies from the staging area. There are cards (especially in the Dunedain and Ranger archetypes) that let you bypass this restriction. This passive line of text is easy to miss, but very important. It also means that you do not have to do combat if you do not want to, you can just leave the enemies in the staging area and better prepare yourself for them next turn. This does come at a cost though. Players will have to raise their threat at the end of the refresh phase by 1 for each enemy in the staging area at that time. This can cause threats to rise steadily, especially since there are numerous effects that bounce enemies back into the staging area.
Threat will be your main enemy here, besides the Orc War Parties. Not engaging enemies in combination with some Doomed keywords on encounter cards will make sure that you will be in Valour without much trouble, and soon threating out at 50 as well. Pack some threat reduction to buy you a couple of extra turns. The Outlying Homestead can prevent players from lowering their threat, so once you get the option to lower your threat, do so. When players have cleared these locations, they can start lowering their threats again. Note that engagement checks won’t be made, so your threat doesn’t matter in that regard. Only Hobbit/Ranger players will want to keep a low threat to benefit from their bonuses against enemies with a higher engagement cost.
In order to place the progress on the main stage as quickly as possible, I would argue power questing in the early game before you get distracted by side-quests. Since there are no encounter card effects that remove progress tokens from the main stage, it will benefit you a lot to get to that 30 progress as soon as possible. After a few rounds, you will have a couple of side-quests in play that will likely seem more appealing to quest against. Remember that questing against side-quests will raise the threat of the Rugged Countries, though players can negate this by playing East Road Rangers, who will receive a willpower boost for as much as the Rugged Country gains threat.

The big enemy in this scenario is the Orc War Party, of which there are 3 copies. One starts off in the staging area and prevents the players from winning the quest by placing progress alone. The Orc War Party also prevent players from directly damaging enemies in the staging area while it itself is in the staging area. This not only prevents damage from Thalin but also cancels attacks against enemies with Hands Upon the Bow or Haldir. Since you cannot damage the enemy, you cannot defeat it that way. You are able to discard enemies with Hunting Party for example, since these effects don’t deal damage to the enemy.
You can, of course, engage the War Party and then use your attacks to enemies in the staging area, though you will have to take care of a big enemy as well. With multiple copies of this enemy in the encounter deck, I would argue that it is best that you engage the War Party later when you are set up for it. Maybe get the progress on the main quest first, and then draw down this enemy (and other copies that may have appeared). All Orc War Parties must be out of play in order to win the scenario (besides having the 30 progress on the main quest). This means that players can not only kill the enemy but also use Saruman to have that enemy be considered out of play. I would argue that a Sneak Attack + Saruman is a pretty good alternative to win this scenario if you have the progress required. This strategy only really works if there is only 1 copy of the Orc War Party in play unless players are continuously bouncing Saruman in and out of play during the same round.
Once all War Parties are out of play and the players have placed at least 30 progress on the main stage, they immediately win the game (if Iârion is controlled by the first player). The next stage in this deluxe expansion will have you chase down the fleeing Orcs who went to the Weather Hills. But the weather might prove to be more deadly than the Orcs.
The Encounter deck
Global
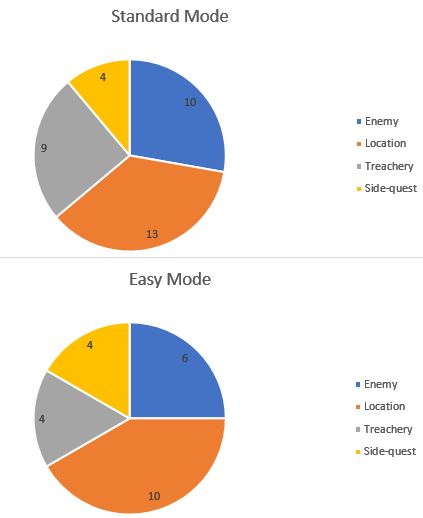
- This encounter deck consists of 36 encounter card in Normal mode and is cut down to 24 in Easy mode.
- Shadow effects on cards in the encounter deck appear at a percentage of 53% in Normal mode and is boosted to 62.5% in Easy mode with most shadow effects scaling to the number of quest cards in play or returning enemies to the staging area.
- Average threat on cards revealed is just 1.4 per card, though a lot of cards have printed 3 threat, so the actual staging math can be higher in some cases.
- 5 cards have the actual surge keyword on them, though a lot of cards like Weight of Responsibility and Angmar Orc will also reveal more encounter cards.
- Doomed is back and can be found on 8 cards. Combine this with raising your threat for the main stage effect each round, and you will be looking at 50 threat very soon unless you have ways to lower it.
- The time keyword can also be found in this quest, with only the Rescue Iârion quest having Time 4 on it. There are no other cards in the encounter deck that synergise with this keyword.
- Immunity
- Orc War Party cannot have attachments and while it is in the staging area, no enemies in the staging area can be damaged.
- Sudden Assault cannot be cancelled
The statistics above do not count the copy of Orc War Party that is in play during setup, but they do include all locations. Since the players have to add locations to the staging area during setup, the real values might shift a little bit. Important to note is that Normal mode will remove 2 copies of Orc War Party, making it likely that you only encounter the one in the staging area for the rest of the scenario. Easy mode does, however, increase your chances on Shadow effects and the chances that you reveal an encounter side-quest during staging.
Objective

Iârion is the objective ally during this quest and you will assist him and his rangers on taking down the Orcs. He has a statline of X/X/X/4 where X is the number of quest cards in play. This is always a minimum of 1, as the main quest cannot leave play. Players can boost Iârions stats by adding player side-quests to the mix, though this also boosts several treacheries and shadow effects. The encounter deck will be raising his stats as more encounter side-quests are revealed, so Iârion tends to average at 2 or 3 points of willpower/attack/defence during most games. Clearing side-quests will remove them from play, lowering his stats, but allowing players to make more progress on the main stage, reduces the threat that Orcs pose or returns all cards underneath a side-quest to their owner’s hand.
On top of having variable stats, Iârion has a Response that allows him to ready whenever a side-quest is revealed from the encounter deck. This sets him up as a questing character in most cases unless his combat abilities are required in the combat phase and players don’t want to run the risk of having him quest but not reveal a side-quest. This readying give Iârion a bit more use and will help the players making more progress since the new side-quest will also result in a +1 to Iârions stats.
Like I said, Iârion tends to be a questing character in my games, though he can make for a solid attacker if players have a lot of quest cards in play. If players specifically build towards this archetype though, Legacy Blades and Thurindir will most likely handle questing and attacking, so defending might be a good option with Iârion, presuming you can cancel shadow effects and heal him up.
The side-quest Rescue Iârion will force players to lose control over him and having to rescue Iârion within 4 turns. Even if all other requirements for victory have been met, the players will have to finish that side-quest, as they must control Iârion in order to win the game. Not completing this side-quest in time will discard Iârion. Losing him will result in an instant loss for the players. This is also the side-quest that doesn’t benefit Iârion’s ability or his stats, as he isn’t under the control of the players to benefit from this.
Enemies
The enemies in this scenario are all Orcs, giving some cards like Skinbark or allies Elladan/Elrohir a boost against them. The enemies do not make engagement checks against you from the staging area, allowing you to only take down 1 enemy per round unless you include cards that work around this restriction.
- Orc War Party: Ain’t no party like an Orc party! These enemies are the boss level enemy in this scenario and will all have to be defeated in order to win the scenario in the end. There are 3 copies in Normal mode and just 1 in Easy mode which starts off in the staging area during setup. These enemies are not messing around when it comes to stats, as their 3/6/3/6 stats make for formidable enemies that are a nightmare to defend against. On top of that, they are immune to attachments, forcing players to find another strategy outside of Forest Snares and Poisoned Stakes. While these enemies are in the staging area, they prevent the players from damaging enemies in the staging area. The best course of action can be to engage this enemy early, allowing other players to snipe and directly damage other enemies in the staging area. The War party may be protected from attachments, but not from other card effects. This means that players can easily cancel its attacks and kill him without defending his impressive 6 attack. Piercing through the 3 defence won’t be easy, but having just Skinbark attack can place 4 damage tokens on the enemy (7 with Boomed and Trumpeted, setting the War Party up for direct damage effects). When players do defeat the Orc War Party, it gets discarded, meaning that it could rear its head again later in the scenario. To prevent this, try using None Return. This adds the enemy to the victory display, allowing players to feel relieved that they have 1 War party less to worry about. This strategy works best in Easy mode and also protects the players from the effect of Sudden Assault.
- Angmar Captain: Besides the War party, there are other threats in the encounter deck that can really screw your combat phase. One such threat is the Angmar Captain, who has a powerful attack stat of 5 and is protected from direct damage by a healthy pool of 5 hitpoints. This enemy is one you will likely want to draw down engaged with you, as he is contributing at least 3 threat to the staging area. Once engaged, the Angmar Captain will require players to defend with a hero or a strong defensive ally. Chump blocking this enemy is out of the question because of his Forced effect. Whenever the Angmar Captain attacks and destroys an ally, the defending player must discard the top card of his deck. Should that card be an ally, the Captain makes another attack against the defending player. If you want to chump his attacks, consider running some scrying effects whereby you can know what the top card of your deck will be. Galadriel, Imladris Stargazer, and especially Gandalf will be important in that case. The Captain is the best target for your Forest Snares that cannot go onto the War Party, and shouldn’t be too difficult to kill. Defending this enemy will be the biggest threat, but if you can cancel his attack, he is no big deal.
- Angmar Marauder: While the Captain boasted some impressive stats, the next two enemies are considerably less powerful. This does not take away that they can be annoying though. The Angmar Marauder will be a decent enemy with only 2 defence and 4 hitpoints, making defence reduction a good strategy combined with Straight Shot. The printed 3 threat will be a pain to have sitting in the staging area, so drawing this guy down to you will benefit your questing capabilities next round. While the Angmar Marauder only has an attack stat of 3, he shouldn’t be defended lightly by any ally. If the attack would destroy an ally (not completely unrealistic with some of the shadow effects, including his own) then the Marauder returns to the staging area. This not only prevents you from attacking him but will also raise the threat of each player by 1 additional point at the end of the round unless players can re-engage him with characters like Tactics Aragorn. When attacking the Angmar Marauder, it shouldn’t take a lot of attention, as it will only need 6 attack to kill. It would be best to prioritise this guy if you can so that he won’t be bothering you next round.
- Angmar Orc: The smallest of the enemies, but also the one with the nastiest When Revealed effect. The Angmar Orc will either have you discard one ally from play or reveal an additional encounter card. The ally can belong to any player, so that gives this enemy a bit more flexibility, but discarding allies is never a good idea (save for some corner-case Eagles). There are ways around his When Revealed effect, namely the Dunedain Lookout, which is also a thematic win. There isn’t much else to say about this guy, other than his ability. He can get annoying if Orc Assault is in play, but he should always be your choice when the encounter deck forces you to find an enemy.

Locations
The lands of Arnor are home to a wide variety of biomes, ranging from hills to forests and homesteads. The locations in this quest can pile up at times, so proper location management can definitely help you in higher player counts.
- Outlying Homestead: Quite possibly the worst location in the encounter deck. While its threat may not be the issue, it takes 8 progress to clear and raises the threat of every player by 1 when it enters play. To make matters worse, the players cannot reduce their threats while this location is in the staging area. This makes threating out even more of a possibility if these Homesteads are not allowing you to lower your threat for a while. Travelling to the location is also a poor decision, as players must reveal a card from the encounter deck to travel here and the location will prevent a lot of progress from going onto the quests as it will absorb 8 progress by itself. The best tech against this location is Woodmen’s Path which works around those 8 quest points and lowers it to 1. Use things like Ghan-Buri-Ghan or even The Hidden Way to get around paying the travel cost for this location. In the staging area, it will take a long time before players can use their location control cards to clear this location, though spending a lot of attention on this specific location can accelerate the rate at which this location gets explored.
- Borders of Breeland: This location usually gets the most votes when deciding where to travel to and for obvious reasons. While this location sits in the staging area, players will each have to return 1 enemy engaged with them to the staging area at the beginning of the quest phase. While this does not raise the threat of each player during the end of the round, it will add a lot of threat from the enemies to the staging area before the staging step. This effect also stacks with other copies of Borders of Bree-land, potentially returning all engaged enemies to the staging area. This is why players should look to kill as many engaged enemies as possible during the combat phase and should travel to this location as quickly as possible in order to prevent the enemies from swarming in the staging area. Clearing it in the staging area is also a decent option and shouldn’t be too hard for a dedicated location control deck.
- Rugged Country: We will be seeing this location a lot during this cycle and it will be a pretty big location for the majority of those games. This location plays off of the side-quest mechanic where it gains +2 threat should the current quest be a side-quest. This basically negates the boost in willpower that the East Road Ranger gets. Remember this location should the players suddenly have to switch quests because of Pressing Needs, it might get its boost or the boost is neglected depending on the quest you have switched to. Having just 3 quest points makes it easy to clear in the staging area with a Northern Tracker and Asfaloth, though there are other combinations that can be used. I also like to use Eryn Galen Settler to discard an additional copy of this location from play should I clear one with location control. This can reduce the threat in the staging area by an additional 4 at the cost of an ally.
- Chetwood Forest: A basic 3/3 location with very little going on. This Forest is an easy pick for the setup requirement and is likely the location you travel to in the first round. Travelling gets rid of 3 threat in the staging area, but one player must pick an enemy in the staging area and engage that enemy. It doesn’t have to be the first player, so pick the player who is best set up to engage an enemy at that point. This location also helps in engaging more than 1 enemy per player per round, making its travel cost not really a terribly high cost at all. Only if there are no enemies in the staging area does this location become nasty, as you cannot travel to it at that point. However, with a good distribution of locations and enemies in the encounter deck, you should have other locations to travel to and keep this one back to travel to next round. Location control on the Chetwood Forest can help by clearing 3 threat, though I wouldn’t be prioritising this location over things like Rugged Country or Borders of Bree-land.
- Shrouded Hills: This location starts off light, but can get scary in the blink of an eye. The Shrouded Hills get +1 threat for each quest card in the game, including player side-quests. This makes player side-quests a poor strategy if there are multiple copies of this card in play. If there is only 1 quest card (the main quest) in play when this card is revealed, then it also surges into another card. This location is the optimal choice during setup, as you only add 1 threat to the staging area and bypass its surge effect since you aren’t revealing it. The 5 quest points on this card prevent many players from travelling to this location if there are other options available. Having this location in the staging area doesn’t hurt too much, though gradual location control like Northern Tracker can clear this location over a few rounds, removing it from the staging area. This location only gets troublesome when players keep revealing side-quests and aren’t clearing them quickly enough. At that point, this location deserves some more attention.

Treacheries
The treacheries in this scenario tend to focus on the number of side-quests you have in play. This can draw out more side-quests for you to complete, and hurts you for not completing them. Cancellation is advised, though not always allowed.
- Pressing Needs: This card has stopped a lot of questing phases and delayed many games up to now. Besides raising your threat by 2, this treachery will be forcing you to either go against a different quest card in play or, if there is no other quest card in play, find another side-quest in the encounter deck if able. This new side-quest does not become the active quest card, but it will have to resolve its When Revealed effects. Try having 2 quest cards in play at all times, in order to avoid revealing another side-quest. You can always swap quest stages that way and will likely clear a side-quest or make a bunch of progress on the main stage. Should you ever have all side-quests in play or in the victory display, then the first option of finding a side-quest from the encounter deck is no longer an option. Should you have explored all the side-quests in play, this card will then only raise your threat by 2.
- Weight of Responsibility: This card is really simple and won’t get a lot of attention. It will reveal additional cards during staging for each quest card in play. This is the reason why player side-quests are a poor decision in this quest, as you will be revealing more encounter cards. In the early game, this treachery just surges into something else and is not really worth cancelling. In later rounds, this treachery can add multiple rounds of staging on top of the other cards you still have to reveal so a Test of Will will be a lifesaver in that case. Any time you would be revealing more than 1 card, try to cancel this to avoid revealing more cards this round. Revealing a side-quest due to this effect will not increase the number of cards you have to reveal for this copy of Weight of Responsibility.
- Surprising Speed: I just love the art on this one, as it looks like the Orcs are running a relay race and the ranger just passed the stick to the Orc. In all fairness, the treachery does have some annoying effects as it pushes enemies back to the staging area. In doing so, it raises the threat in the staging area by up to 4 enemies worth of threat and it prevents players from engaging more enemies if there are any in the staging area. Each player only has to return 1 enemy, so being engaged with multiple enemies can still keep you engaged with one, which is important to Dunedain decks. If the players are not (yet) engaged with enemies, they are unable to return any enemies to the staging area and the card then gets Doomed 1 and Surge. In a true solo game, revealing this card as your only card during staging isn’t a big problem, though in multiplayer with Orc Ambush in play, this treachery should be cancelled to prevent a large influx of threat in the staging area because of 1 card.
- Sudden Assault: When a treachery cannot be cancelled, you know that it will probably be bad news. While the treachery has a big wall of text on it, it basically boils down to this: Should the players have committed more willpower to the quest than there is currently threat in the staging area, then all enemies in the staging area make attacks against the first player. This can cause a lot of problems if a Surprising Speed went off just before this treachery was revealed. The first player should be having some solid defenders online just to survive this effect. Good options for this are Vigilant Dunedan with some buffs to his defence stats. Hour of Wrath on a defender can also protect that player from taking a bunch of attacks undefended. Sentinel characters are allowed to defend these attacks so other players could draw some of the attacks their way, though players must be careful to leave characters ready to defend during the combat phase if there are enemies engaged. Should there ever be no enemies in the staging area before this effect triggers, then the players must find a copy of Orc War Party out of the encounter deck or discard pile and add it to the staging area. If the War Parties are already in play or in the victory display with None Return, then this treachery can whiff, though it is rare.

Side-quests
This is the first quest where we are encountering side-quests. It delays the players from the main objective by hurting their board state or boosting the enemy. Clearing these side quests will add them to the victory display, potentially boosting various effects and characters. Remember that revealing a side-quest will ready Iârion and boost his stats.
- Orc Rearguard: Just when you needed the final 4 progress tokens on the main quest in order to win, this card pops up and stalls you for another turn. This side-quest might have the fewest quest points of any side-quest in the game (both encounter and player side-quests) but tends to stall your games quite severely at any point during the scenario, especially the early stage or during your final push. This side-quest prevents placing more than 3 progress tokens on any current quest card per round. This means that players could take up to 10 turns questing against the main quest before having enough progress to clear it. In order to be able to remove this limit, players must pick Orc Rearguard to be their active quest stage next turn and defeat it in one round. If players reveal Pressing Needs immediately after Orc Rearguard, the players could immediately explore it to have it out of the way immediately. However, any time that Orc Rearguard is the current quest, it will reveal an additional card at the end of the staging step. Since the players finish the staging step before resolving the quest, this effect even happens when they will clear the side-quest, as it is still in play at that point in time. Revealing the extra card can hurt in solo games, but gets more bearable in multiplayer games, since it is just the one card. This side-quest will hinder the players a lot, not only by limiting progress on the main stage but also on other side-quests. It is therefore advisable that players quest against this stage when they can, as clearing it will open up the other quests again.
- Orc Assault: Out of all the encounter side-quests I find that this one is the most devastating to the players. This side-quest puts out one enemy per player and puts it engaged with the player. On top of that, all enemies in play now get +1 to their threat, attack and their defence (all Orc enemies = all enemies in this scenario). This not only makes the newly engaged enemies tougher to defeat but also raises the threat of any enemy in the staging area as well. This leads to a couple of rounds of intense combat where enemies like the Orc War Party and the Angmar Captain are very difficult to take care off. For selecting the enemies for the side-quests effect, I tend to go with the regular Angmar Orc. This bypasses his nasty When Revealed effect and makes for a relative easy enemy. This side-quest will have to be explored as soon as players can, in order to reduce the stats on the enemies and making combat a lot easier to deal with. Players could use effects like Keep Watch, Tactics Aragorn, and Horn’s Cry to make things a little easier on the players, but those are relatively situational cards to bring.
- Lost in the Wilderness: This is the side-quest that hurts the players the most in the early game, especially during round 1 when they haven’t gotten their decks up and running yet. This side-quest will place all cards in the player’s hands underneath the quest stage. These cards are now unplayable and the players will have to draw into new ones in order to refill their hand. The cards underneath the stage can be reclaimed when players beat this stage and place all 4 progress tokens on it. In the late game, this side-quest can often be neglected as players won’t desperately need the cards in their hands, and have gotten card draw engines up and running to restock their hand within a few turns. But if you are finding yourself facing this side-quest early, then it might be worth it to quest against if you just placed some good cards underneath that stage. Good counters to this side-quest include some Noldor characters like Galdor of the Havens and Erestor, who refill your hand incredibly fast. The Noldor synergy is well protected against this side-quest, as they use their discard pile as an extension of their hand. Having other heroes that draw cards like Beravor and Bilbo will also help you to overcome this side-quest, making it not really a distraction from the main quest in most cases. Leave this side-quest in play just to have something to fall back on should Pressing Needs be revealed.
- Rescue Iârion: Finally, we have this side-quest that prevents the players from winning unless they beat this side-quest. It is pretty straightforward but can spell a quick defeat if the players cannot place enough progress each round. When this side-quest is revealed, the players lose control of Iârion and place him underneath this stage facedown. They now have to rescue Iârion by defeating this quest in order to fulfil the requirement on the main stage that says that players cannot win unless they control the objective ally. However, this quest has a sense of urgency to it since the players are only given 4 turns to clear this quest. This is done by the familiar Time keyword from the last cycle. Luckily, there are no cards in the encounter deck that remove time counters from cards in play so you can know reliably that you only have 4 turns to rescue Iârion. If the players run out of time on this stage, they must discard Iârion and immediately lose the game. If players manage to place 4 progress tokens within the allowed time, they can discard the side-quest and the first player regains control of Iârion who gets exhausted by this. The good thing about this side-quest is that it removes any damage tokens on Iârion, essentially healing him if he has taken any damage before he got captured. In terms of urgency, the players should watch out for not letting that time counter tick down too much, though they can explore other side-quests first if those are hurting them more at that point. At about 2 time counters, I would prioritise this stage above all others.

Tips and Tricks
- With so many encounter side-quests in play, it will be wise to add some player cards that synergise with it to your deck. This can be any card from this list, as it does not specify that the side-quest has to be a player card as well. This allows you to benefit from the mechanic a bit more, without having to add side-quests of your own.
- Thalion is actually not a bad card to run in this quest. Chances are that you will be completing at least 1 side-quest, allowing you to get 2 uses out of him. On top of that, he becomes a hero once you have completed 3 side quests. While he will be just a Neutral hero, you could complete 1 player side-quest to grant him that sphere. If you have control over the scenario, this strategy can easily grant you an additional hero.
- In order to engage more than 1 enemy per round, you should look into the Dunedain archetype. These heroes and allies will allow you to engage more enemies per round. Since the enemies don’t make engagement checks, you will be forced to leave some in the staging area. Halbarad, Tactics Aragorn, Mablung, and Dunedain Hunter can all prevent this and make sure that you engage more enemies out of the staging area or the encounter deck.
- If your decks can’t handle the Orc War Party, there are other alternatives to get it out of play. Players can run Saruman, The Wizard’s Voice, Revealed in Wrath, and Hunting Party in order to get rid of the War Party easily. There are 3 copies of that enemy in the deck though so you might reveal another one soon after. Being a non-unique enemy gives the players plenty of tools to work around his text.
- Location control will be important for this quest, especially when questing against side quests which boost the threat of the Rugged Countries. Most locations in this quest will take some attention to take down, so having one player focus on the locations in the staging area will benefit the group greatly. Not only does this remove threat from the staging area, but it also removes some passive effects that are active while the locations are in the staging area.
- Traps can be valuable in this quest, but only if you know which ones to bring. Ranger Spikes are a poor choice since players will actually want to engage the enemies, not let them stay in the staging area. Followed is a great trap to get into play, as it will attach to enemies engaged with you, lowering the threat in the staging area. This will give you another reason to engage enemies and actually benefit off of it. Poisoned Stakes is also great, as it can take out an enemy in the staging area without it making any attacks.
- Threat reduction is another thing to pack into your deck. Even if you are engaging all enemies in the staging area, there are still a number of encounter cards with Doomed on them in this deck. Lowering your threat will buy you a few rounds extra to take care of this scenario. You can also rely on getting to Valour rather quickly. Bringing cards for that keyword can also be a good deal in the late game.
- Revealed in Wrath will NOT work against the bold text on the Orc War Party. This part of the enemy is not considered to be active text that can be cancelled. Multiple questions about this have been sent to the developers and it has been stated as such.
- Shadow cancellation will be pretty important to prevent enemies from going back to the staging area or to cancel boosts to enemies in attack. This can save you from losing characters and from having to raise your threat because an enemy got into the staging area at the end of the round.
- An easy way to get rid of the Orc War Party is to use the new event The Great Hunt. While this will require a mono-Lore setup, you can more easily discard the War Party, as it is not unique. You can also use the event to discard other enemies, clearing out the staging area.
Playthroughs
The quest is quite popular among playtesters, so there are a lot of videos to be found for this quest. You can check out some clips here, but be sure to check the internet for other playthroughs if you need more tips.
- 2 players, progression style: https://www.youtube.com/watch?v=oy1NR59jF9g
- 1 player, updated decks: https://www.youtube.com/watch?v=yrfkgDO5FAA
- 1 player, restricted progression style: https://www.youtube.com/watch?v=JNWbaUUOL2A
- Two-handed, cheezy way to win the quest: https://www.youtube.com/watch?v=W5Eb4eo_LBc (completed in 1 turn, check this one out!)
- 1 player, updated decks: https://www.youtube.com/watch?v=gAhC7cBmXno
- 2 players, updated decks: https://www.youtube.com/watch?v=bBkVXZcVu7M
And that rounds up the very first quest of this new cycle. I will be looking to do these in regular order again but might jump between scenarios if I find myself at a couple of difficult quests here and there. This cycle is a lot of fun, but some of these quests will take a lot of tips in order to fully cover them. I hope you guys enjoyed and will join me next time as we pursue the orcs into the Weather-Hills.

2 thoughts on “Intruders in Chetwood”